


2025/03/20Number of reading(13124)Number of comments(0)
一、Target Audience
Operators
二、Feature Introduction
Almost everyone selling on Amazon uses Amazon Advertising to gain more visibility and traffic. However, currently, we can only check if our ads are displayed on the front end, but we cannot know which specific ads are showing. If we are running multiple campaigns, optimization becomes even more challenging.
Therefore, being able to see which ads are appearing in the top 3 pages of search results can help us better understand ad performance and provide strong data support for our advertising decisions.
SellerSpace Plugin's [Ad GPS] feature (also known as: Ad ID Sync), combined with the [Keyword Rank] feature, fetches corresponding Ad IDs to match front-end ad placements with your backend campaigns. This helps us intuitively see which of our ads are appearing within the top 3 pages of search results.
With this data, we can optimize our ads with a clear target, avoid self-competition, and achieve search result page domination. At the same time, we can also analyze the historical performance of keywords that have impressions but no clicks, yet have appeared within the top 3 pages. This allows us to identify overlooked high-potential keywords, re-launch ad campaigns, and gain more traffic opportunities.
三、Usage Scenarios
- Clearly understand which ad placement you occupy corresponds to which ad in your Seller Central backend.
- View which Sponsored Products (SP) ads are appearing in the top three pages of current search results.
- When running multiple campaigns for the same product and keyword, support checking which ads have entered the top three pages.
- For the same product and keyword, query the search term performance under different zip code search results.
- Based on the ad distribution data in the top three pages, adjust ad campaign strategies to avoid self-competition.
- Based on the ad distribution data in the top three pages, achieve search result page domination and gain more visibility.
- Analyze the performance of keywords with impressions but no clicks that have entered the top three pages to find more traffic opportunities.
四、Operation Guide
1. Principle Introduction
In Amazon Advertising, each ad campaign and ad group has its own unique ADID, similar to an ID card.
We can query the ADID of the product ad placement on the Amazon front end, and then match it with the ADID of the ad group in the Amazon backend. If they match, it means that the front-end ad placement originates from that ad group. Knowing which ad group the ad placement comes from can assist your operational decisions.
SellerSpace's Ad GPS, simply put, helps you record the ad group details corresponding to a series of ad placements.
2. How to Synchronize Ad IDs
To use the Ad GPS feature, you need to use the extension to synchronize the Seller Central backend ADID and then match it with the Ad IDs of the ad keywords monitored on the front end.
The specific operation steps are as follows:
① Synchronize Seller Central backend Ad IDs
② Monitor ad keywords, fetch front-end ADIDs, and match them
③ View ad source data
Special Notes:
- Since it needs to be used in two network environments, the SellerSpace extension needs to be installed separately in the browsers of both environments, and choose the corresponding purpose. The installation method is the same. Click to see how to install the extension.
- When synchronizing data, the seller account and the extension need to be running at the same time. If you log out of the account or shut down the computer, synchronization will stop immediately.
① Synchronize Seller Central Backend Ad IDs
The ad IDs in Seller Central backend are synchronized for the entire marketplace and cannot be directly accurate to a single ad.
Taking automatically synchronizing ad IDs for the US marketplace of SellerSpace K at 12 PM every day as an example.
First, you need to install the SellerSpace extension in the browser where Seller Central backend is located.
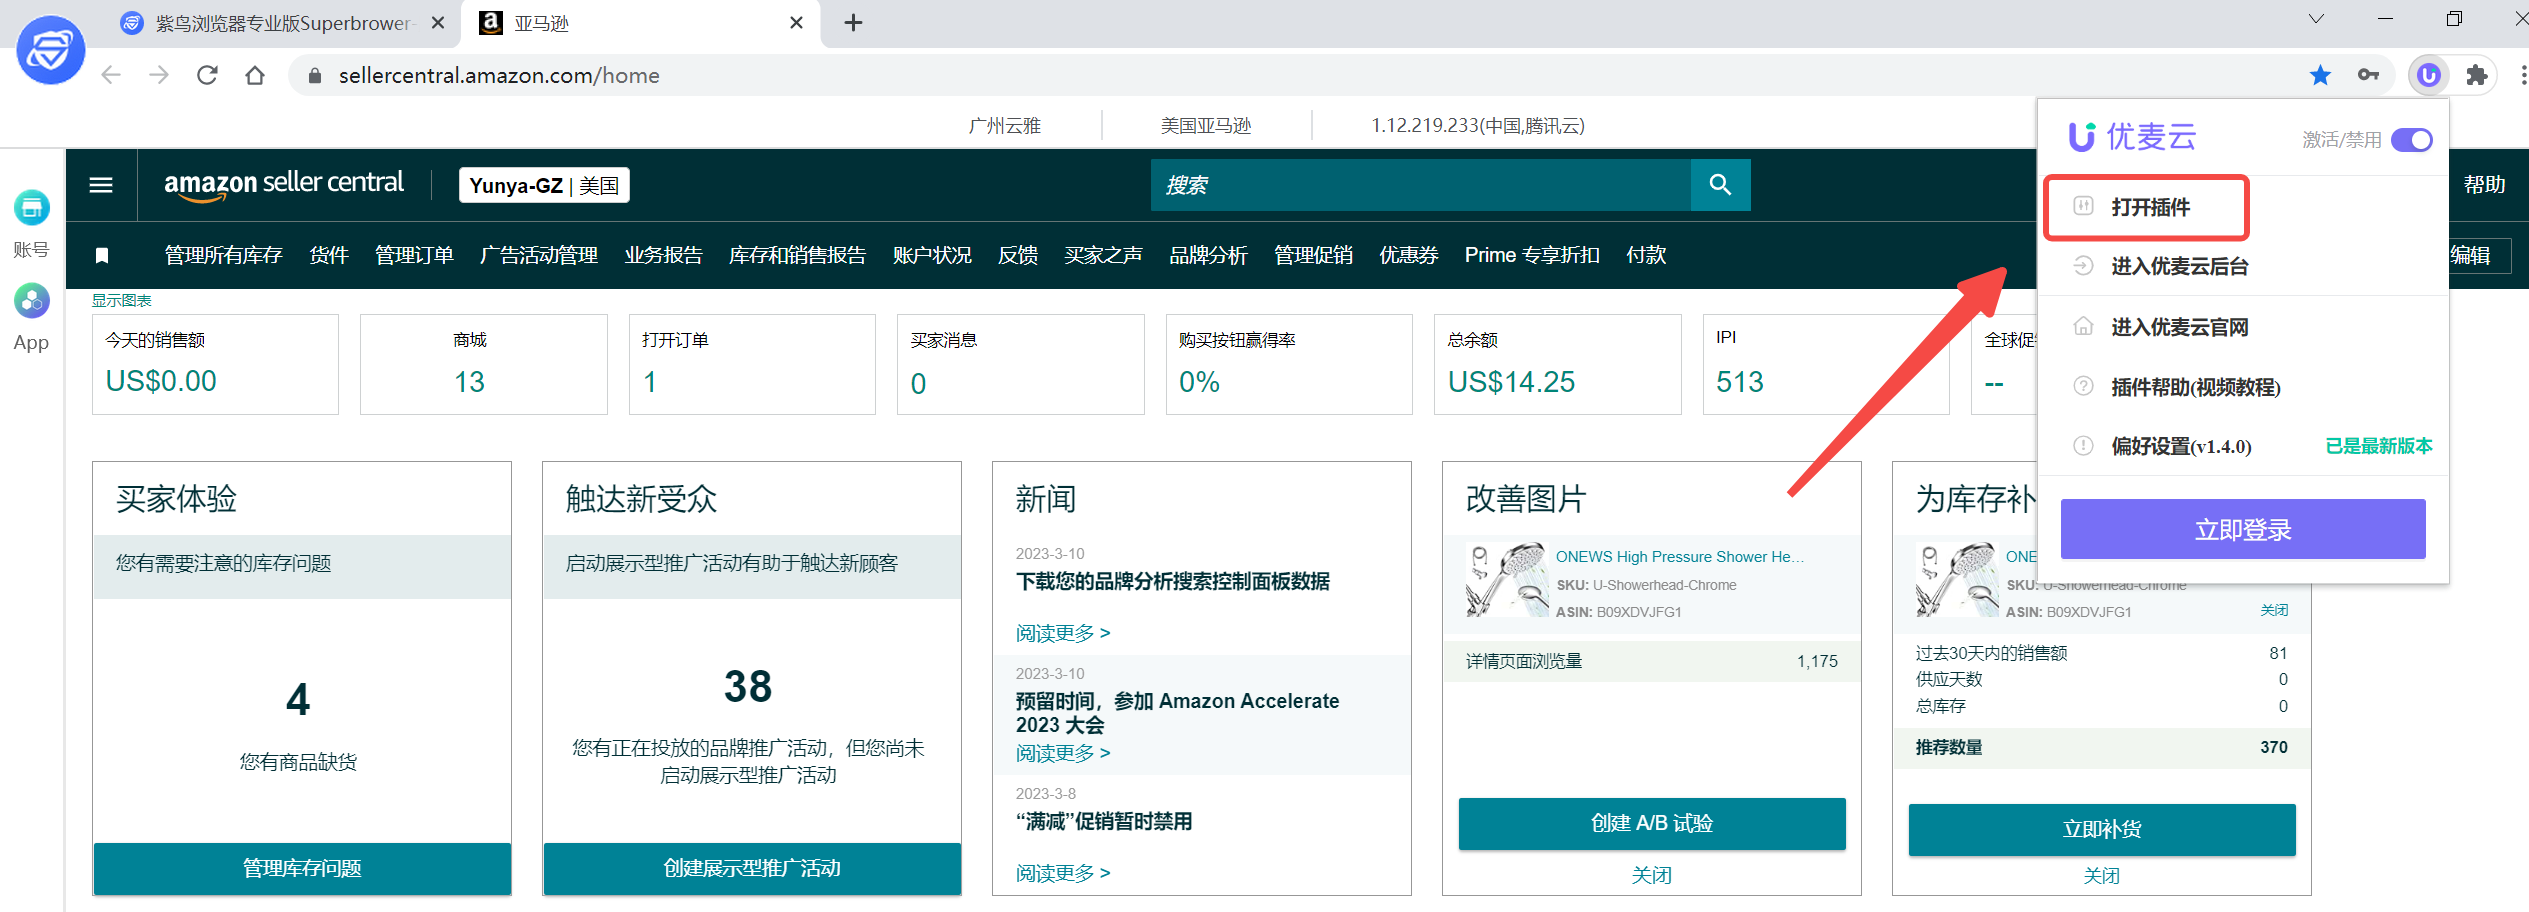
After successful installation, log in to Seller Central backend, open the extension, and log in to your SellerSpace account.
 +
+
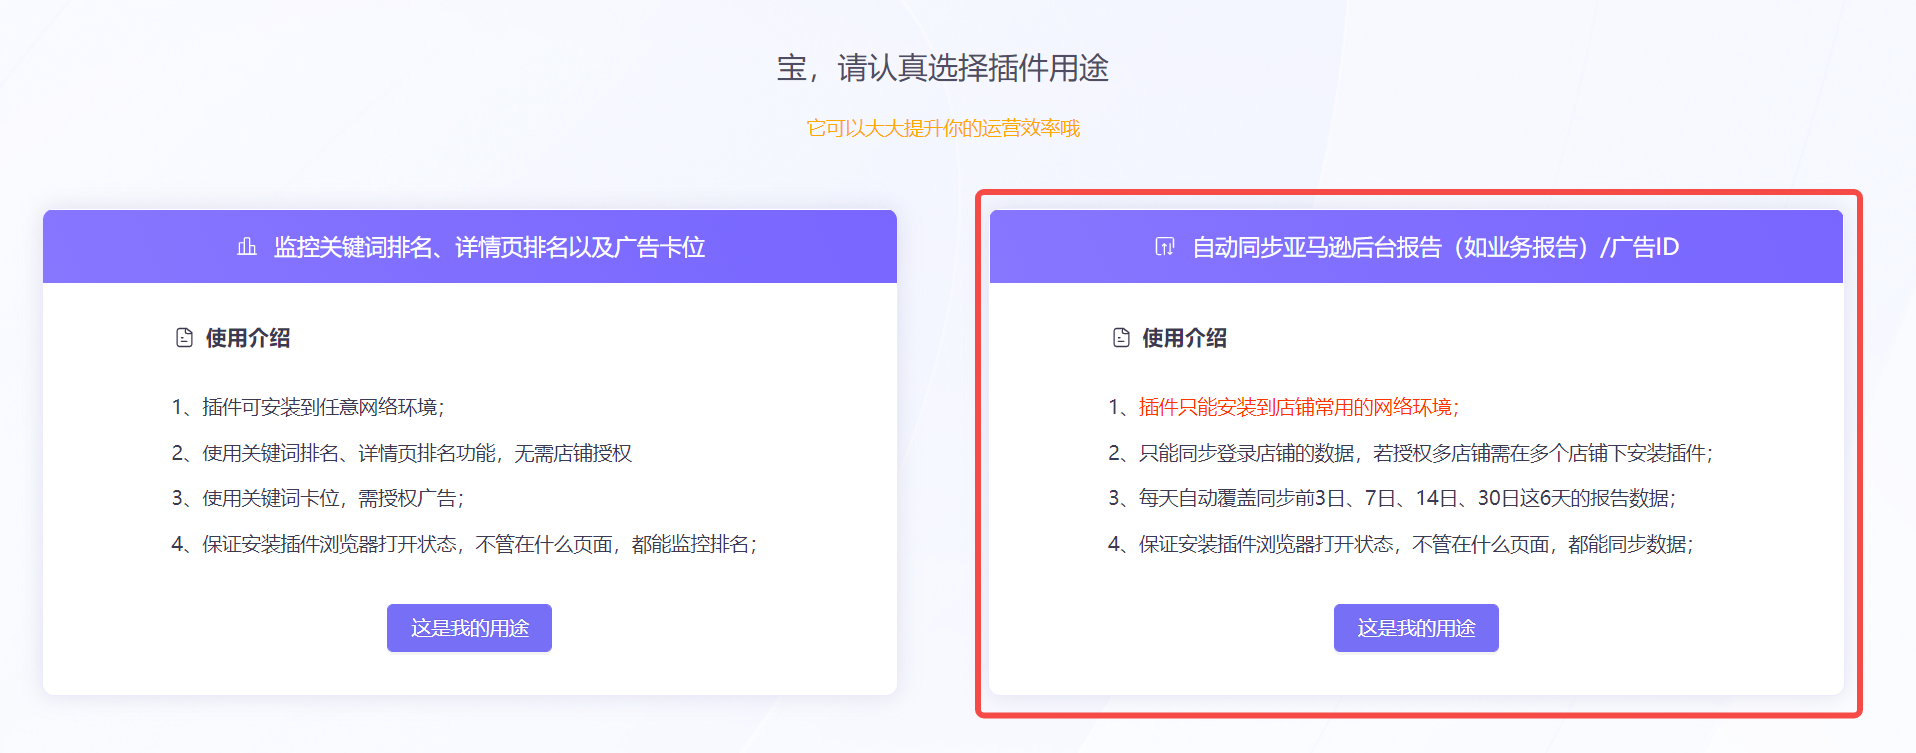
Next, select the extension purpose as [Automatically Synchronize Ad IDs];
 +
+
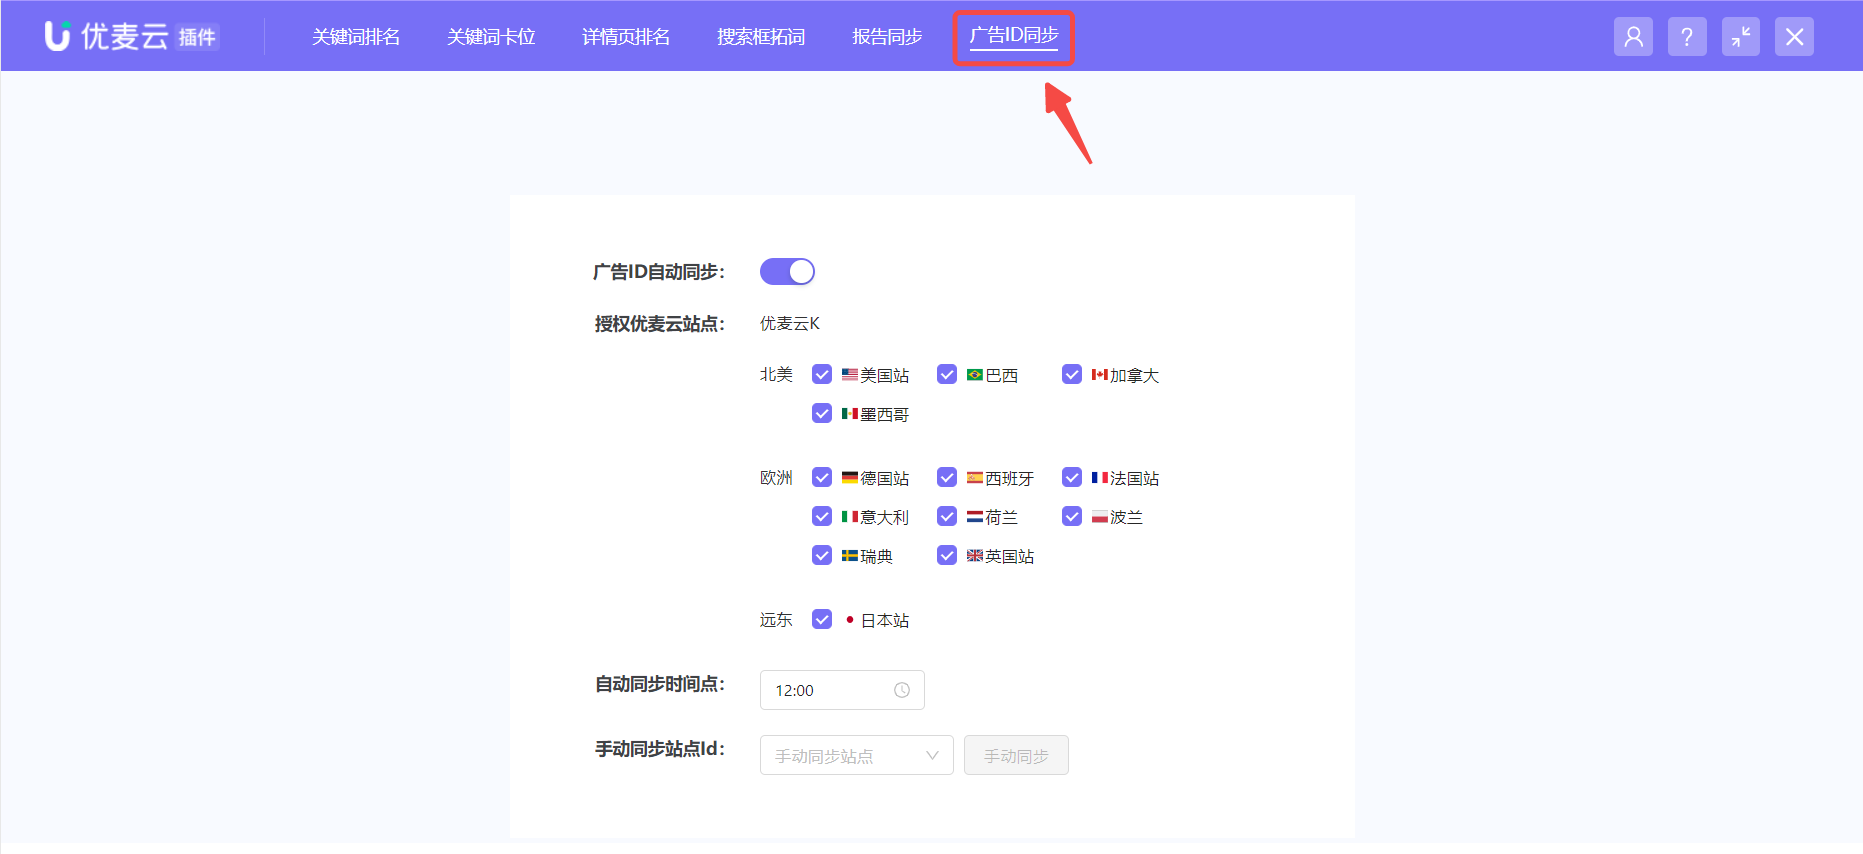
After selection, enter the extension page,
Click to enter the [Ad ID Sync] feature to perform ADID synchronization.
 +
+
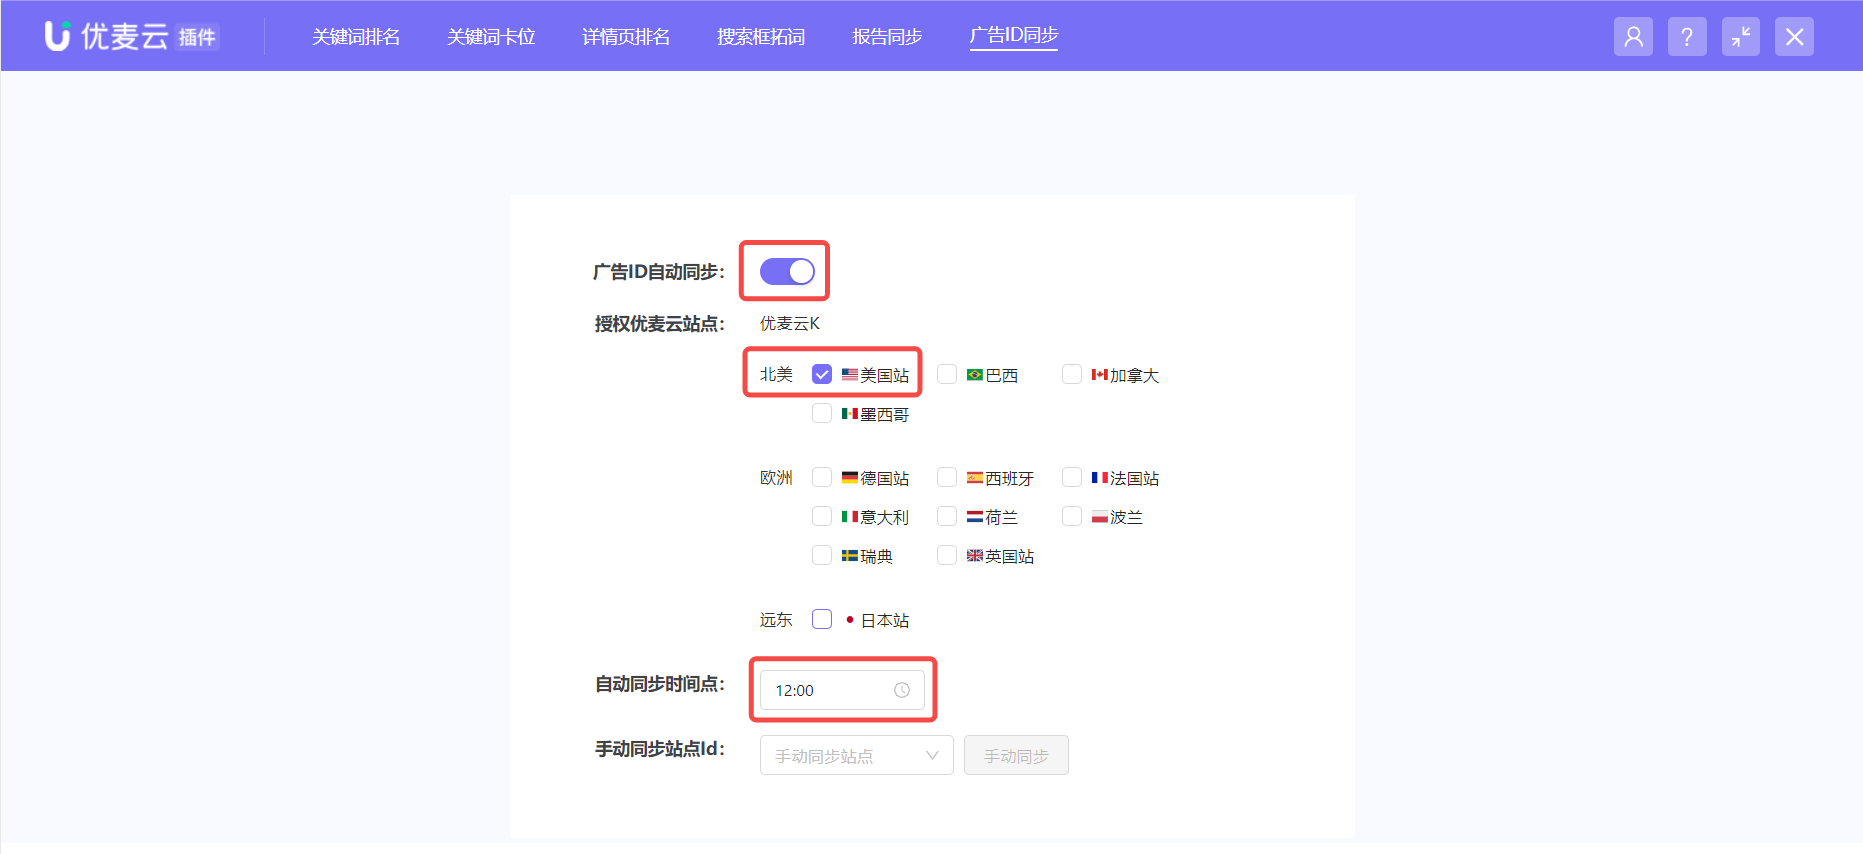
There are two ways to synchronize Ad IDs: Automatic Synchronization + Manual Synchronization.
Automatic Synchronization: The system automatically synchronizes ad IDs for all authorized marketplaces by default. We can customize and select the marketplaces and time to synchronize.
Manual Synchronization: If we need to synchronize immediately, such as after adding a new ad campaign, we can also choose to manually synchronize immediately.
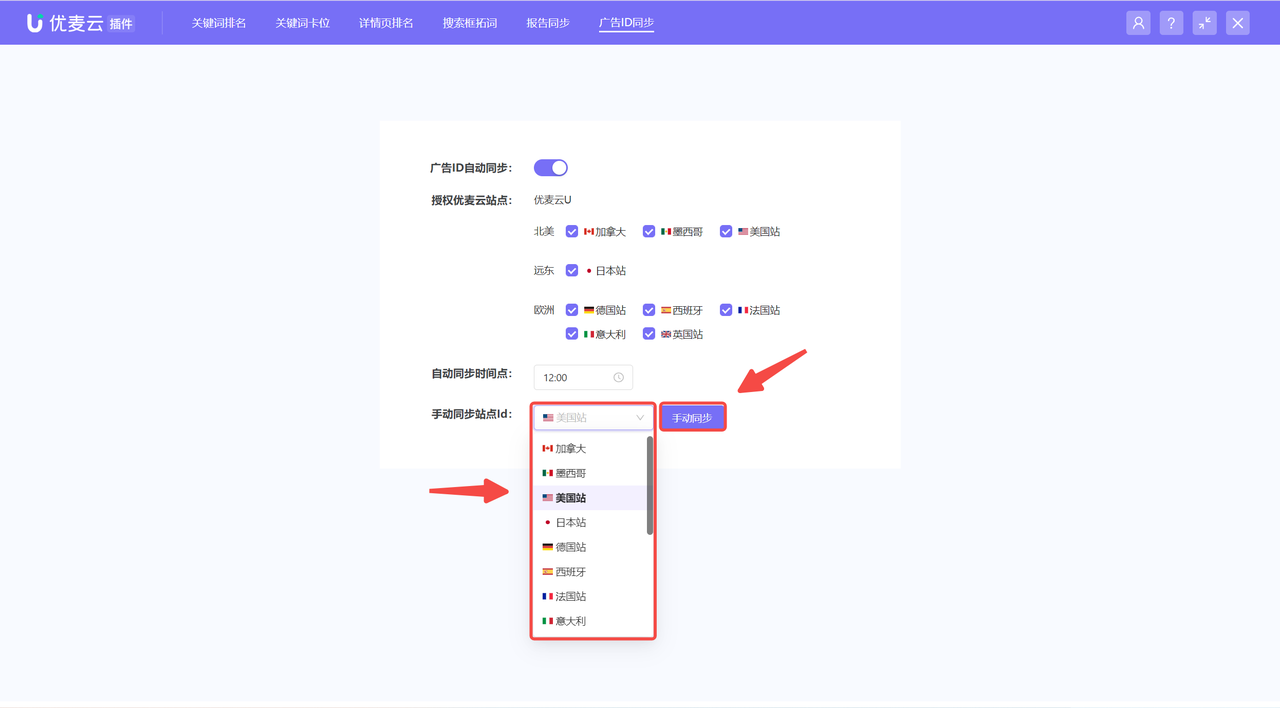
This time, we want to automatically synchronize ad IDs for the US marketplace at 12 PM, so only check the US marketplace, and select 12:00 for the automatic synchronization time. The automatic synchronization time is in marketplace time.
 +
+
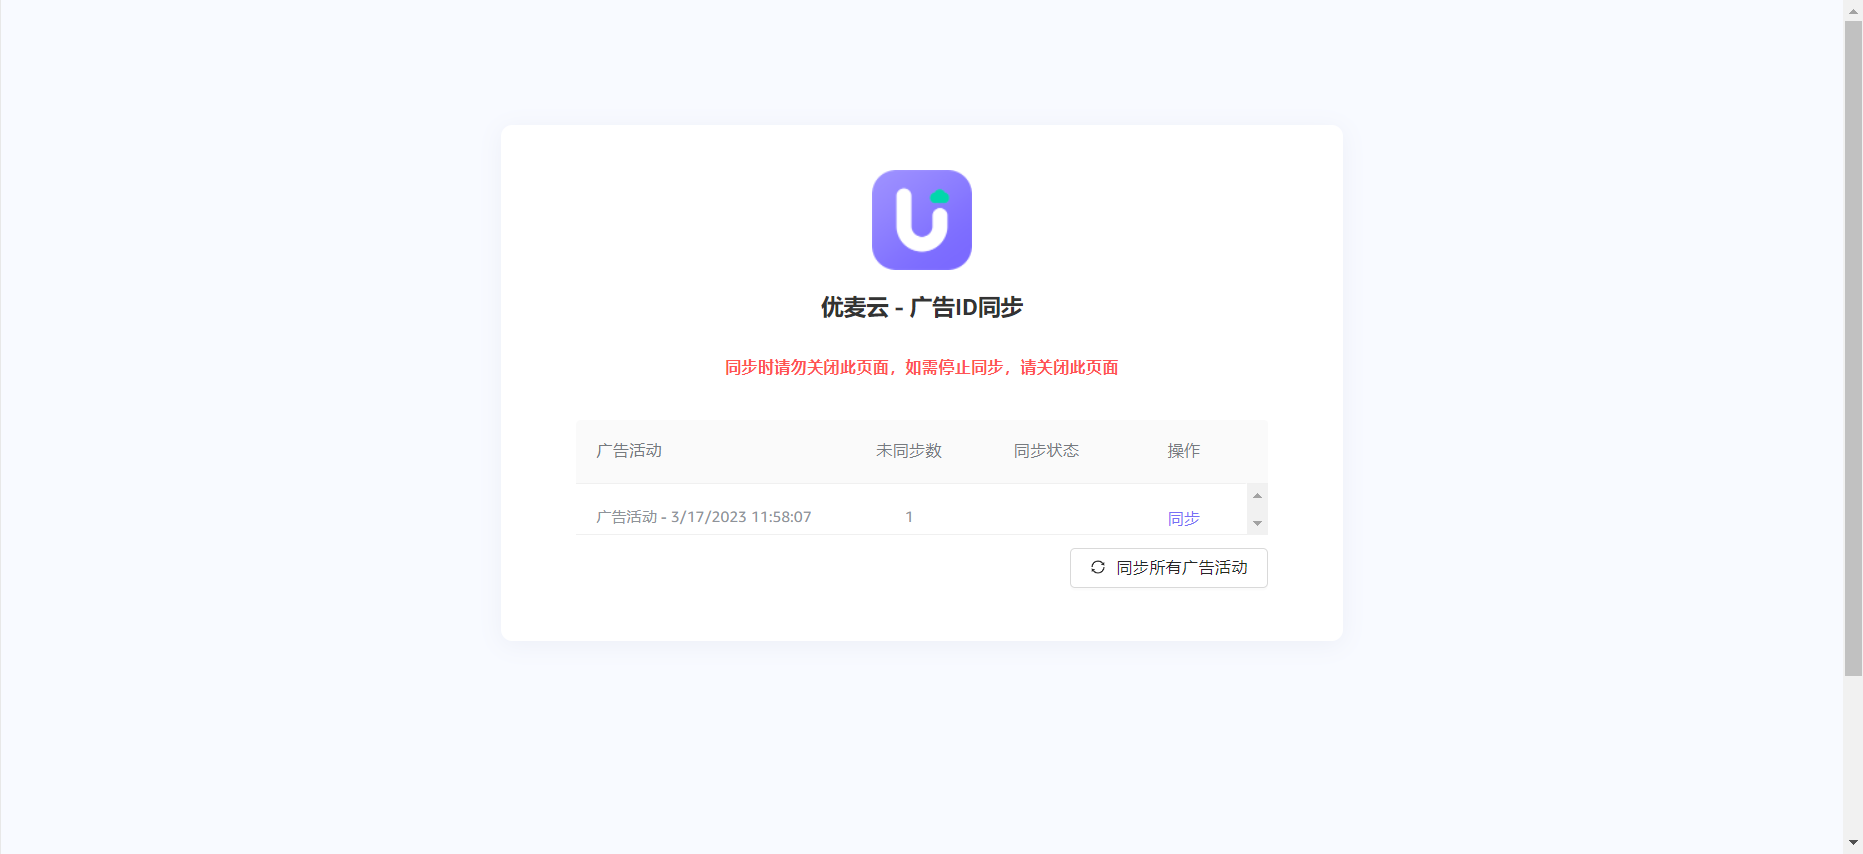
After successful setup, the system will automatically execute synchronization at the set time. At this time, a new fetching page will automatically open, showing the synchronization progress. Do not close this page, otherwise, fetching will end and it will close automatically.
 +
+
If we have new ad campaigns or do not want to automatically synchronize, we can also choose to manually synchronize the ad ADIDs for the marketplace.
Select the marketplace to synchronize and click [Manual Sync].
 +
+
Note during synchronization that if the ads in Seller Central backend are not synchronized to the SellerSpace system, their ad ADIDs cannot be fetched.
Why are ads not synchronized to SellerSpace?
If you adjust ads in Seller Central backend, such as bids, budgets, enable/pause, etc., the data will be synchronized to our backend in about 12 hours. You can also manually synchronize in time. Operation path: Corresponding ad module -> Batch Operations -> Synchronize Budget/Bid or Status.
If you add new ad campaigns, ad groups, promoted products, keyword targeting, or non-keyword targeting in Seller Central backend, the system will not immediately synchronize and update. It will only be synchronized and updated when the ad object has impressions. You can also manually synchronize directly.
Operation tutorial: Click to view
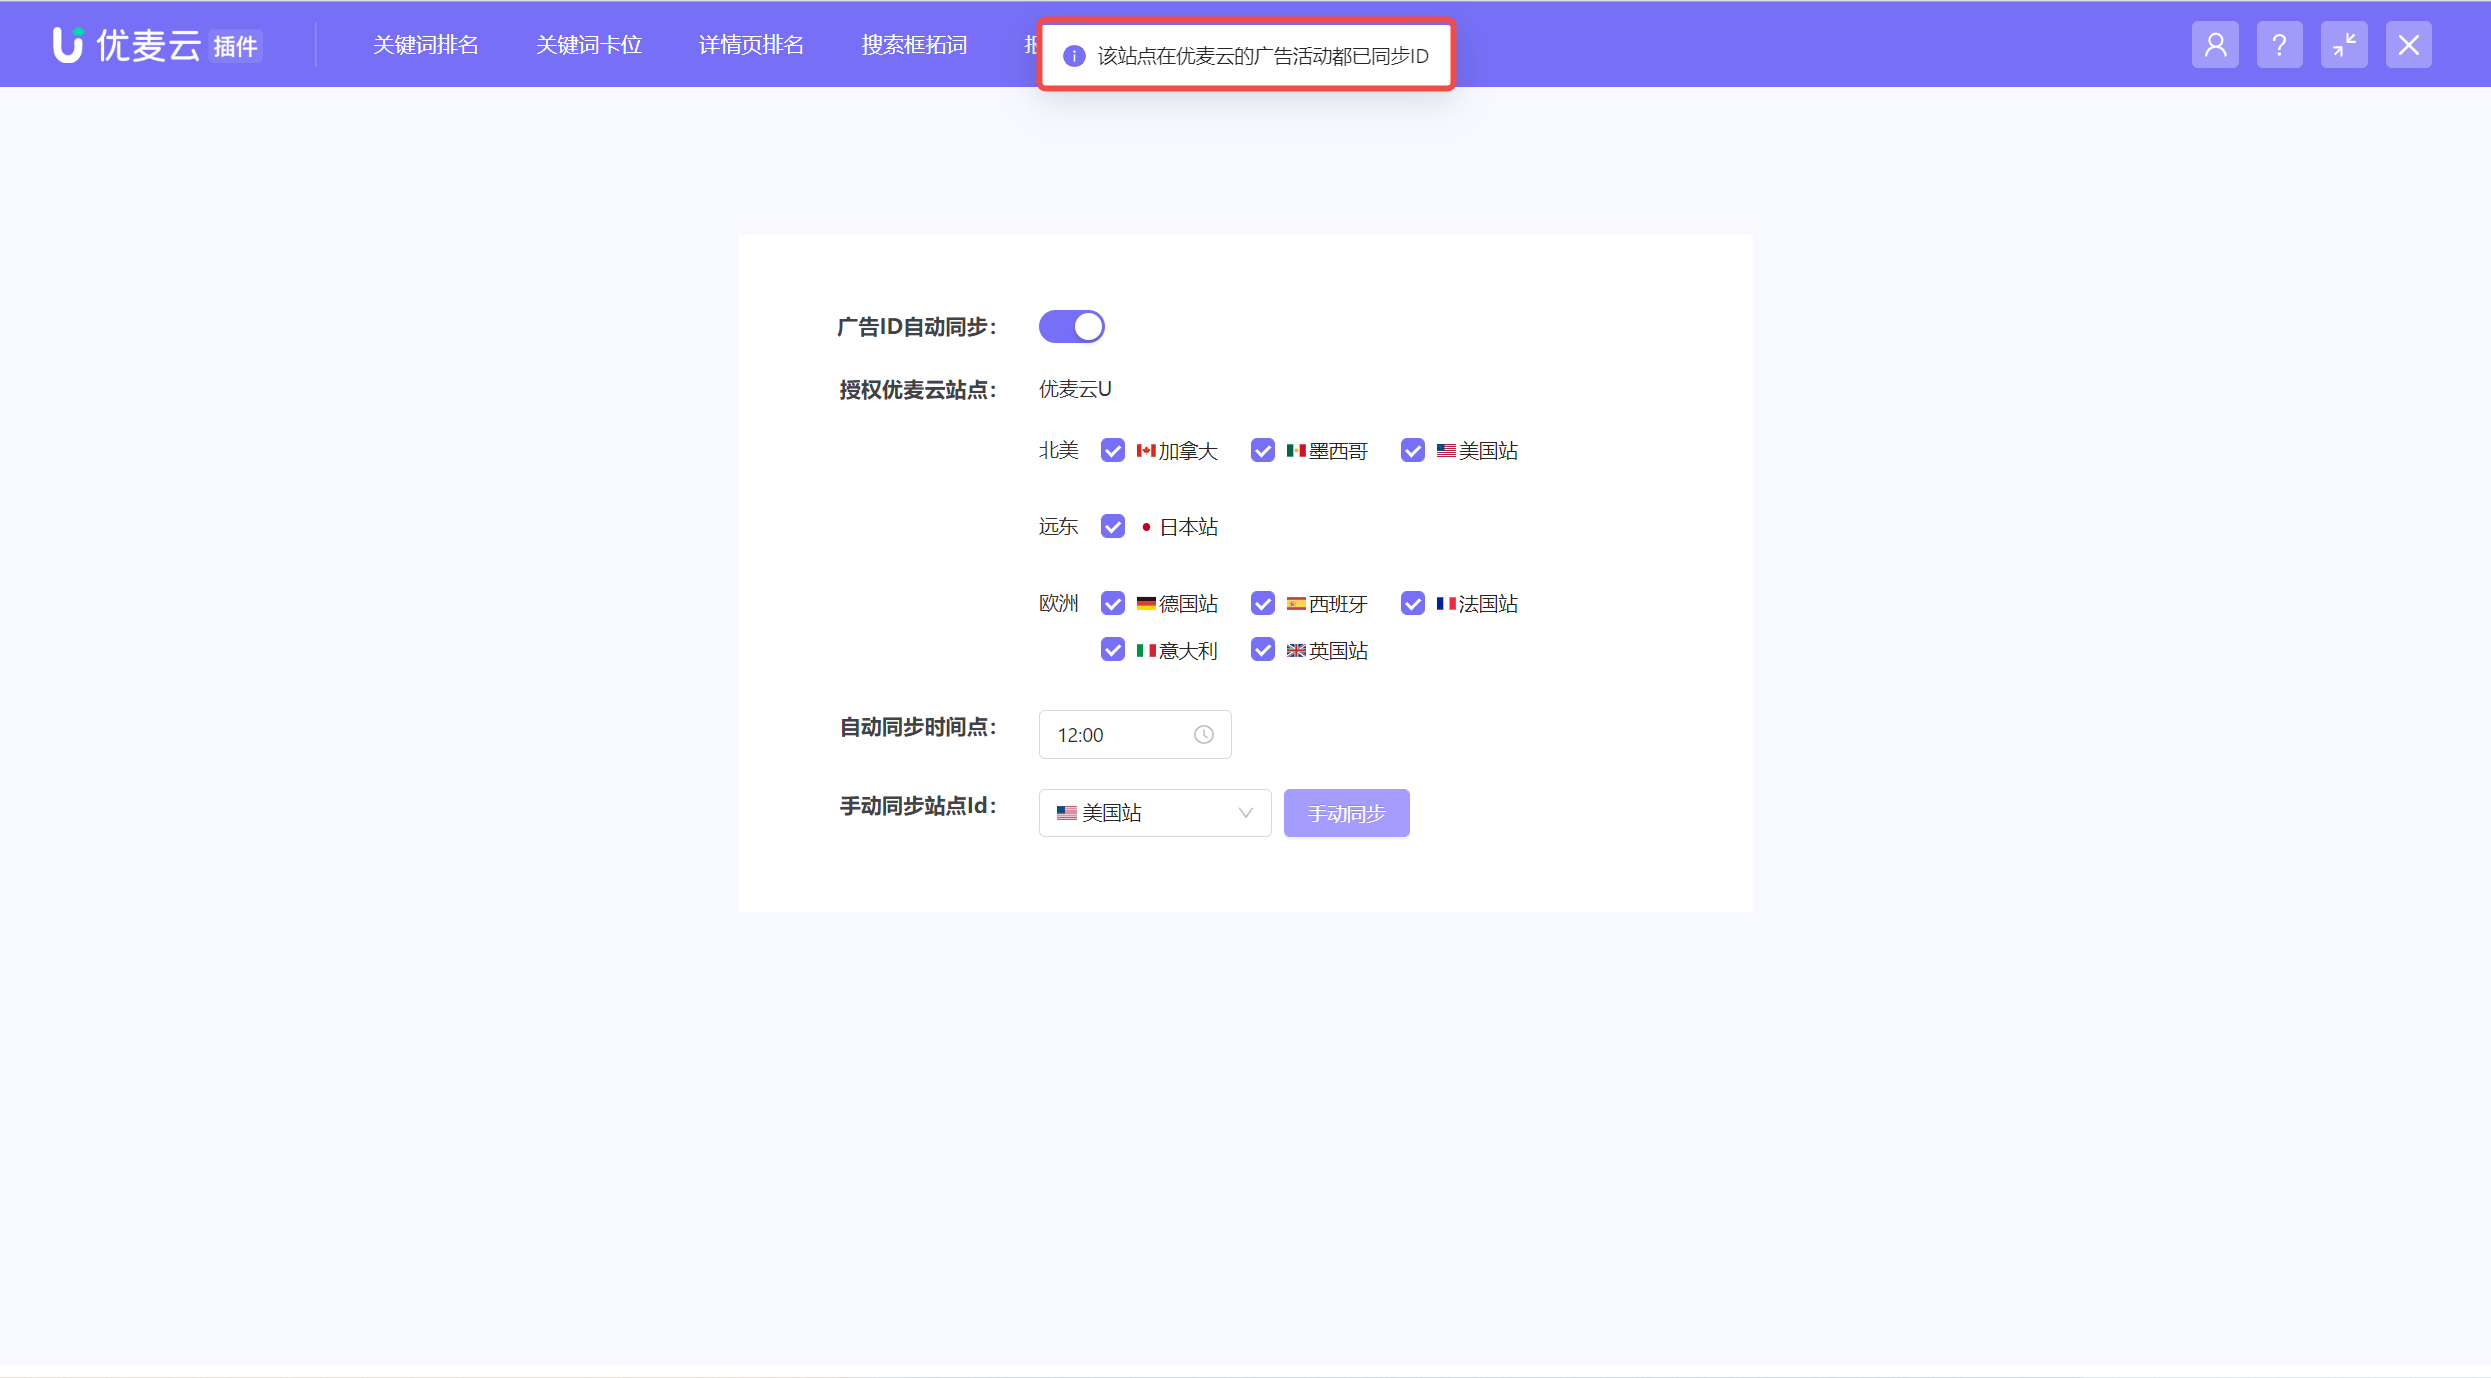
When the page displays "Ad campaigns in SellerSpace for this marketplace have all synchronized IDs", it means that the ad ADID synchronization from Seller Central backend is complete.
 +
+
② Monitor Keywords, Fetch Ranking Data
When the synchronization of Seller Central backend ad ADIDs is complete, the next step is to synchronize the front-end ADIDs of ad keywords.
Front-end ADID synchronization is based on the [Keyword Rank] feature, so just add ad keywords for monitoring.
Click to see how to use the [Keyword Rank] feature
Taking synchronizing the ad placement ADID for the ad keyword: origami paper, for store: SellerSpace K, US marketplace, promoted ASIN: B0B1MK8X7C as an example.
First, you still need to install the extension, and install the extension in a browser that does not usually access Amazon.
Why install the extension in a browser that has not accessed the Amazon front end?
Due to Amazon's mechanism of recommending again after clicking to view the detail page (similar to many social software in life), if it is installed in a browser that usually accesses the Amazon front-end page, the fetched data will have a large gap from the actual buyer search results.
For example, a browser that frequently visits Amazon may show results in the top 3 pages, but when viewed on another computer, it may not even be in the top 3 pages. Therefore, it is recommended to install it in a browser that does not frequently visit Amazon to simulate a real buyer search environment.
The extension installation method is the same as for Seller Central backend.
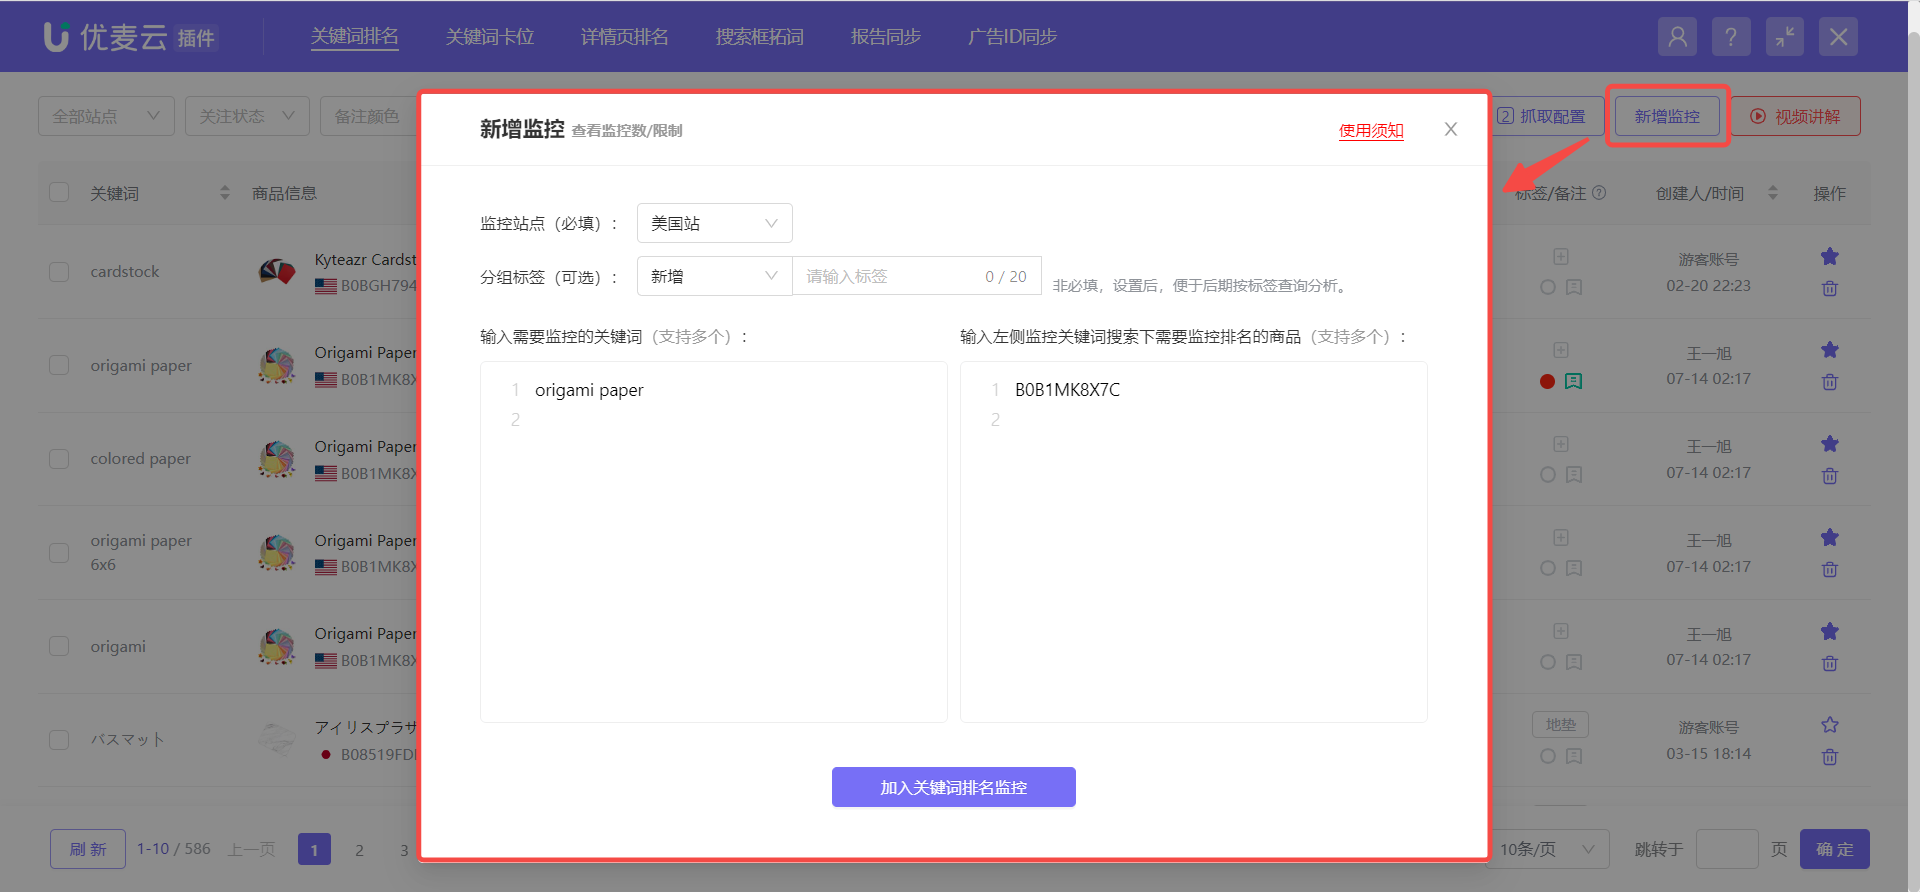
After successful installation, enter the [Keyword Rank] feature, click [Add Monitoring], and add the marketplace, keywords, and products to be monitored.
This time we are monitoring store: SellerSpace K, US marketplace, promoted ASIN: B0B1MK8X7C, ad keyword: origami paper. Enter them in order and save.
 +
+
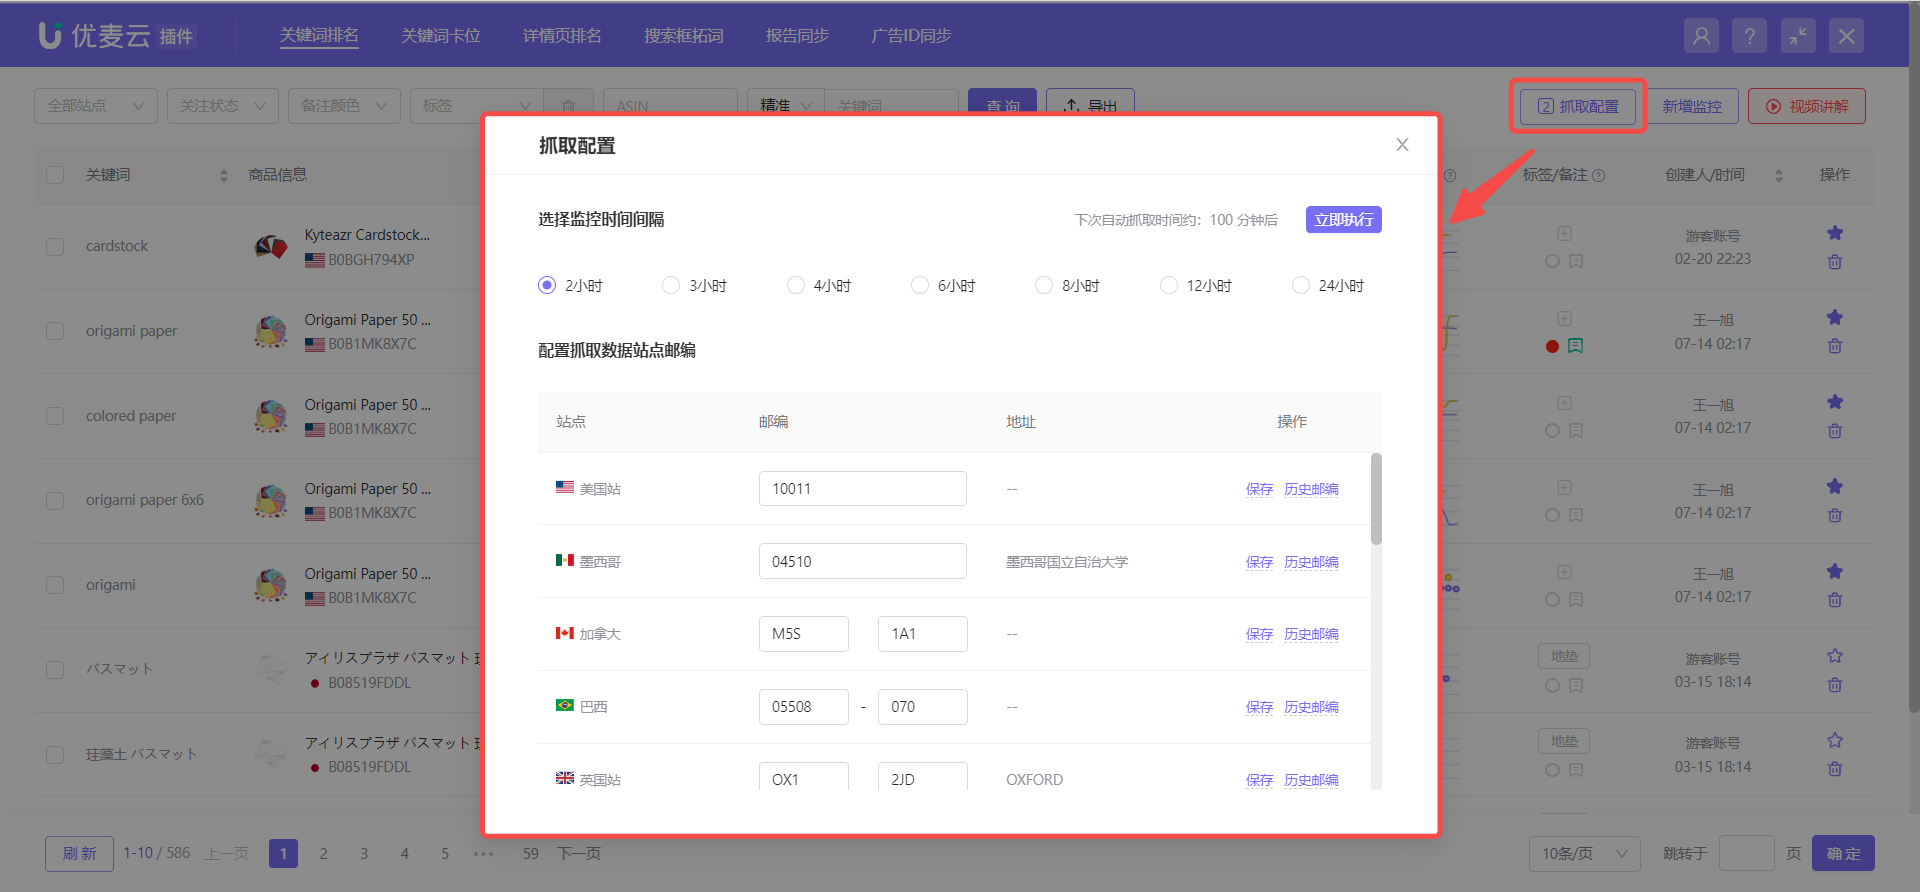
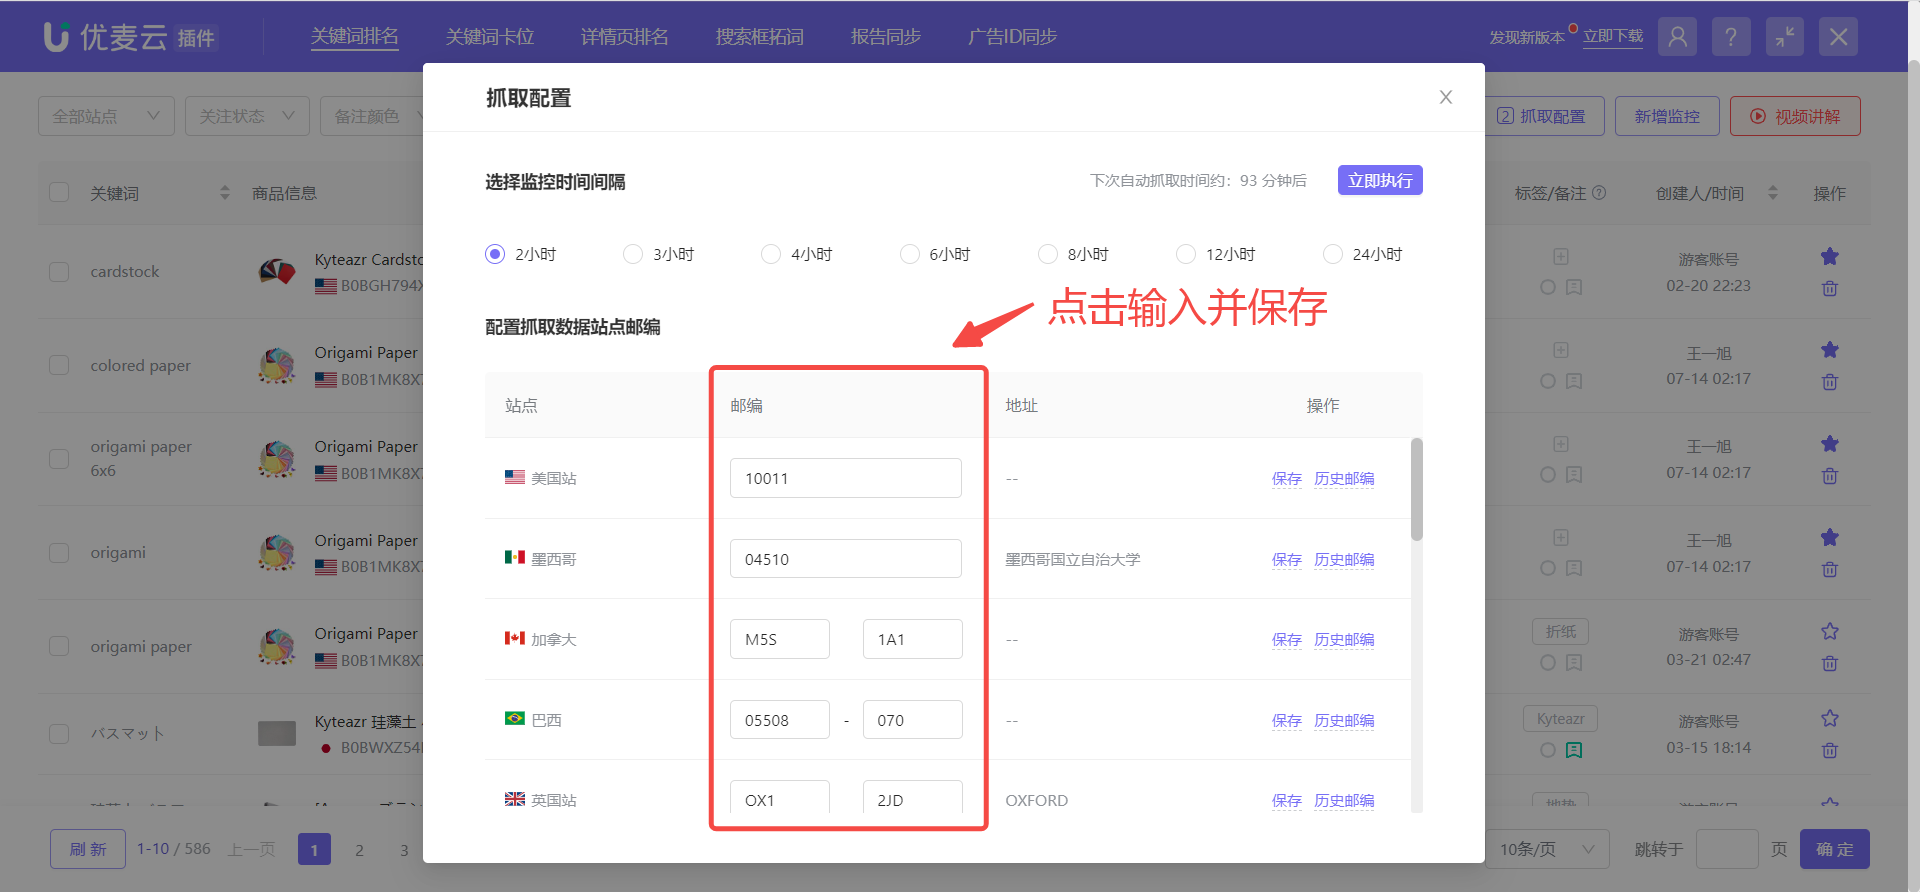
After adding monitored ad keywords, you need to set the fetching time interval and the marketplace zip code for fetching, so that the system can fetch front-end ad ADID data.
Note here that after setting, all monitored keywords will fetch ranking data according to this setting.
Why set a zip code?
The marketplace zip code is equivalent to the buyer's address. Since the search results for the same keyword will be different in different regions, we need to fix the marketplace zip code to match specific results. It is recommended to set the corresponding zip code address by viewing your backend's peak order area.
Click [Fetching Settings] to set the monitoring time interval and zip code.
 +
+
3. How to View Ad Source
After completing the settings of ① and ② above, the system will automatically match the front-end ad placement ADID with the Seller Central backend ad ADID.
After matching, we can start viewing which ad group our front-end ad placement originates from.
① Which Ad Group Does the Ad Entering the Top 3 Pages Come From
We can use the [Keyword Rank] feature (extension version or web version) to directly view which ad group the ad entering the top 3 pages of search results comes from at a certain monitoring time point.
Why only view data from the top 3 pages of search results?
SellerSpace's data fetching only records ad placements when they enter the top 3 pages of search results. Because the main goal of advertising is to get keywords into the top 3 pages of search results, or even the first page, ad placements after the 3rd page have a lower probability of conversion, so our system does not fetch results after the 3rd page.
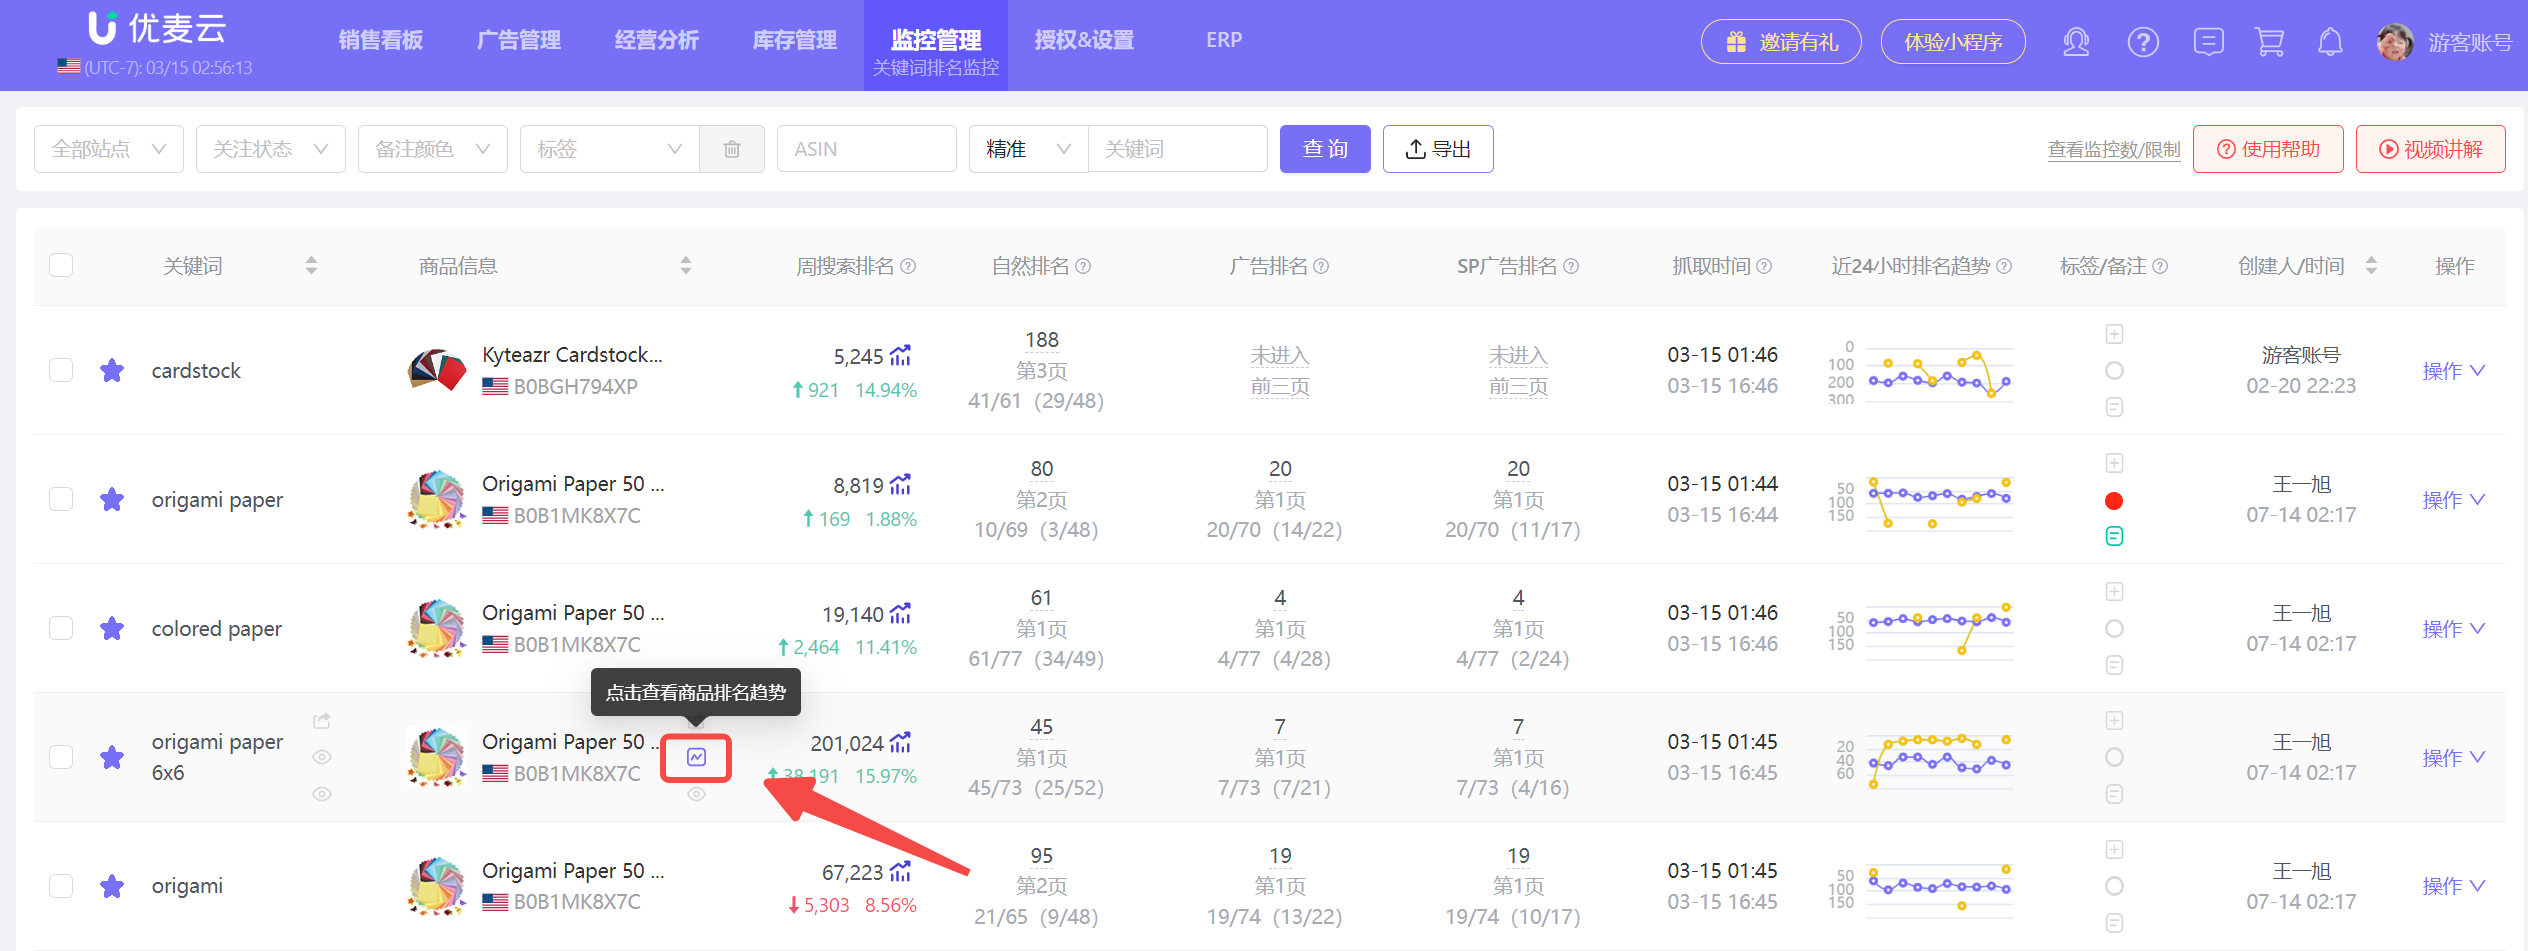
Enter the [Keyword Rank] page,
Click the ranking trend node to view the "Products in Top 3 Pages" snapshot page;
 +
+
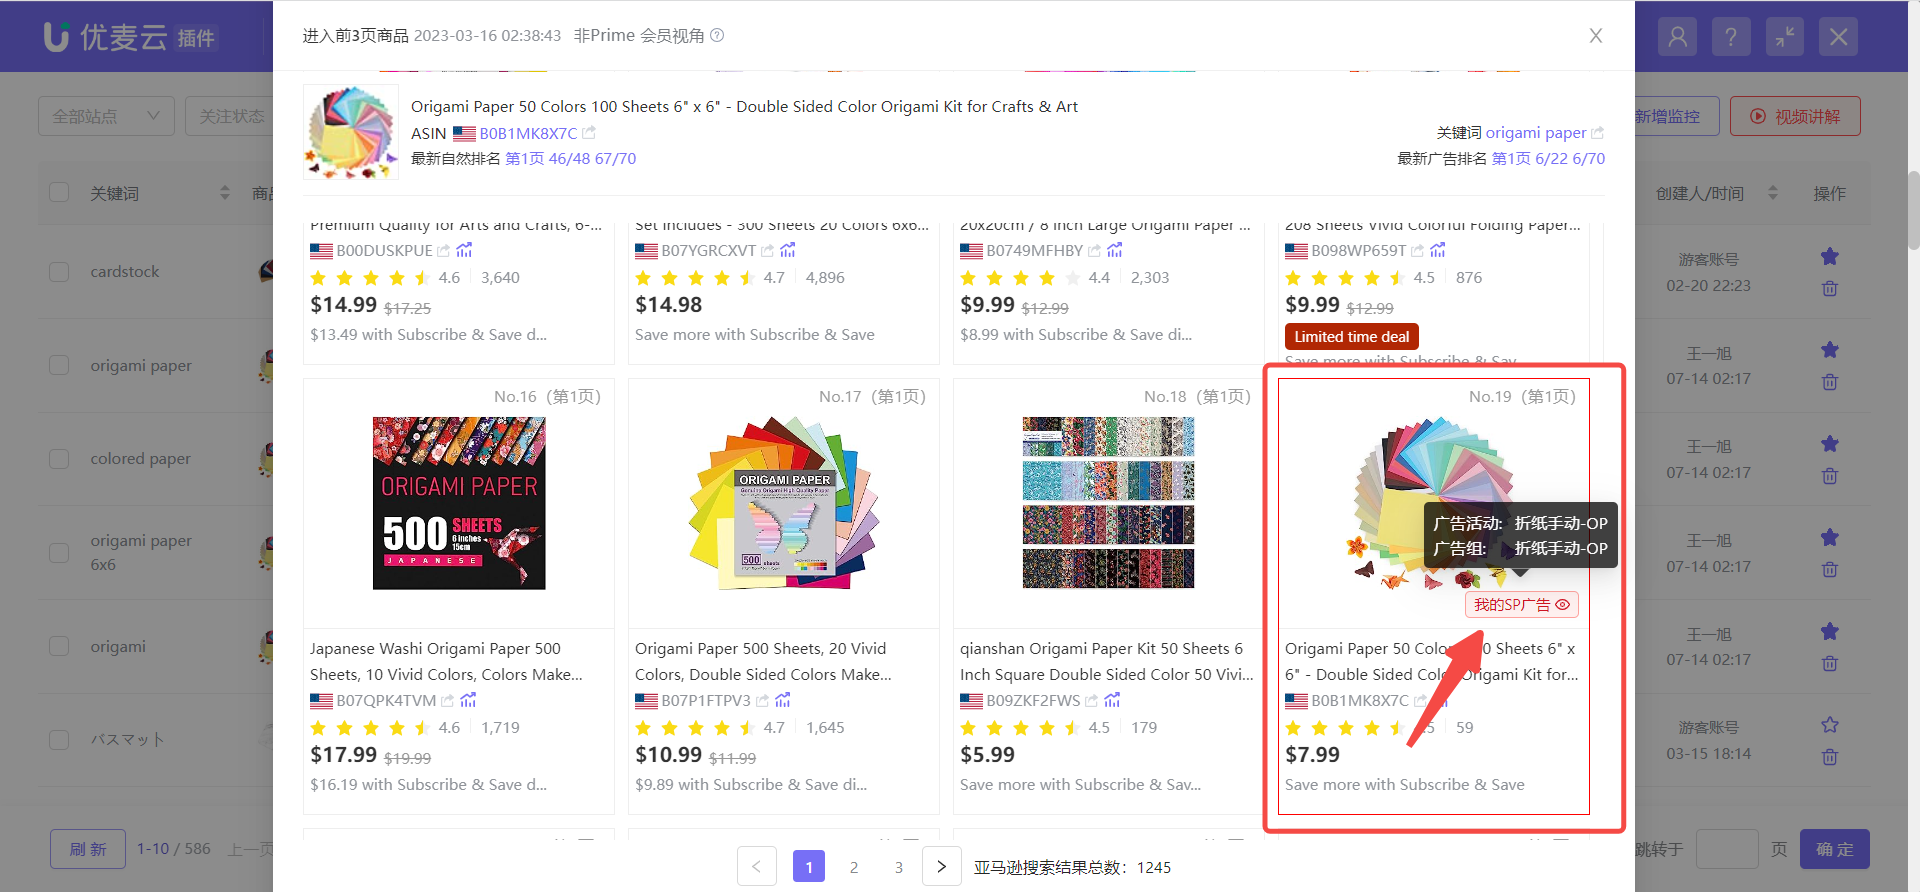
Enter the "Products in Top 3 Pages" page,
The system will automatically locate our SP ad placement. Hover the mouse over the "My SP Ad" icon to view the corresponding ad group source.
 +
+
If our ad placement does not enter the top 3 pages, or has entered the top 3 pages but has not synchronized Seller Central backend ad ADIDs, the "My SP Ad" icon will not be displayed.
 +
+
② Which Ad Groups Have Entered the Current Search Result Page
In addition to seeing the ad group source of ad placements, we can also see which ad groups have entered the top 3 pages of the current search results, helping us understand our ad distribution.
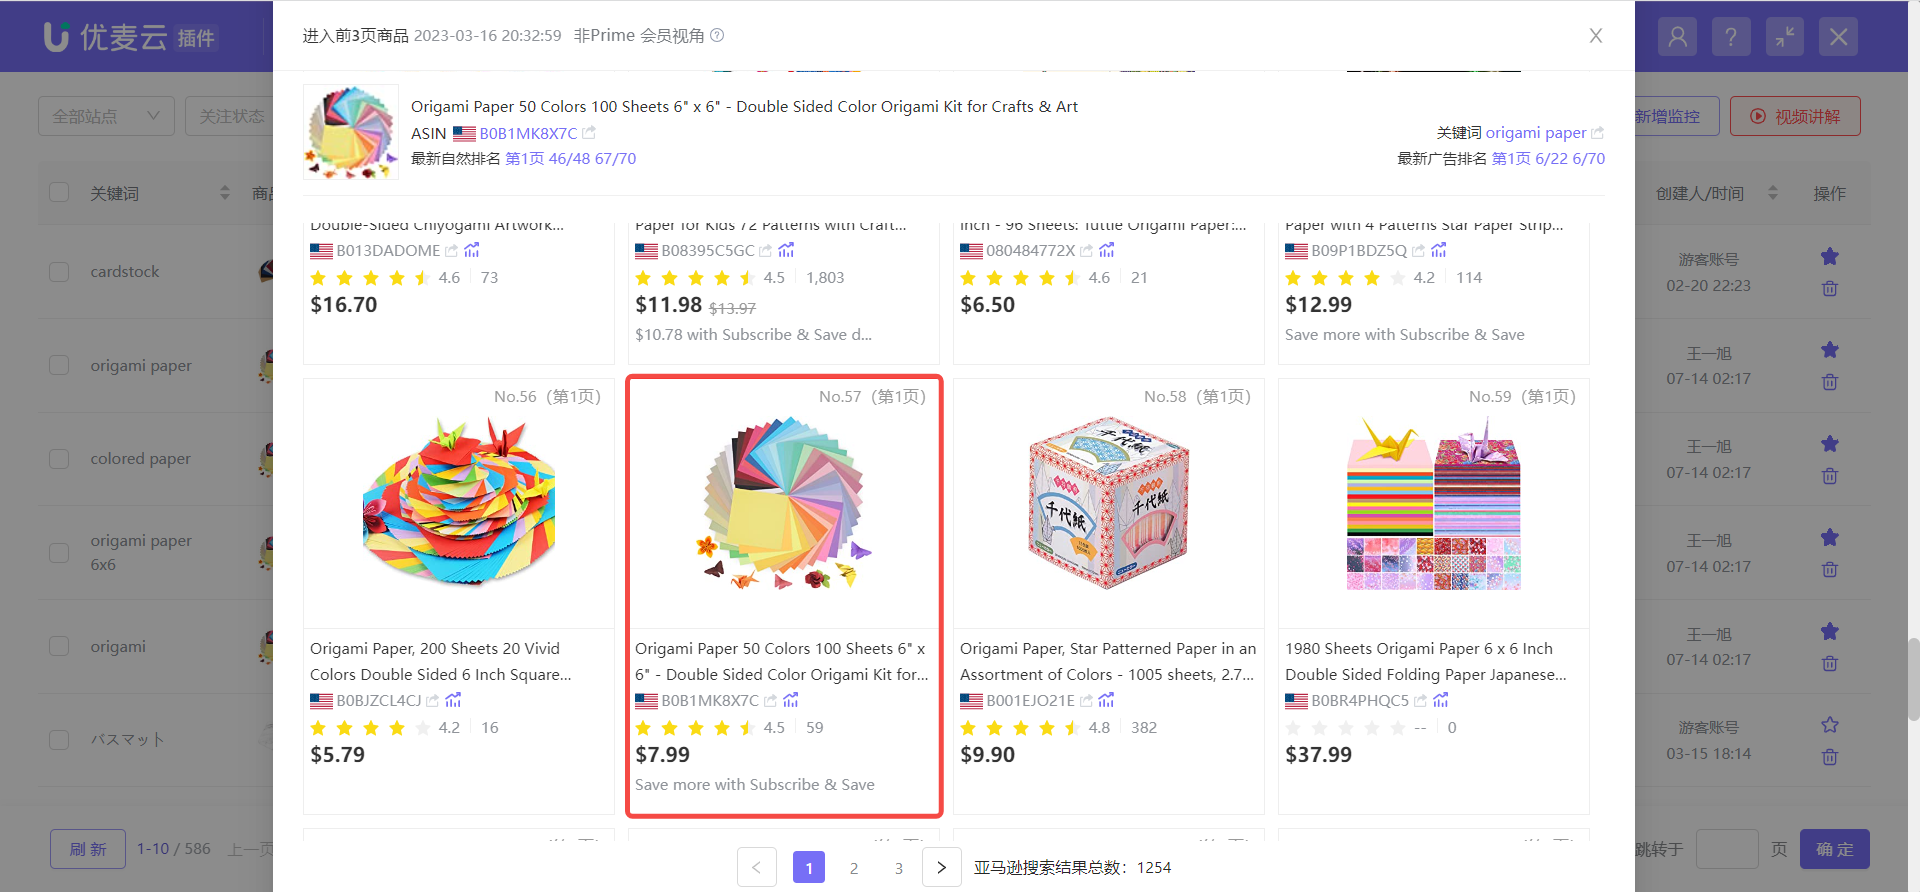
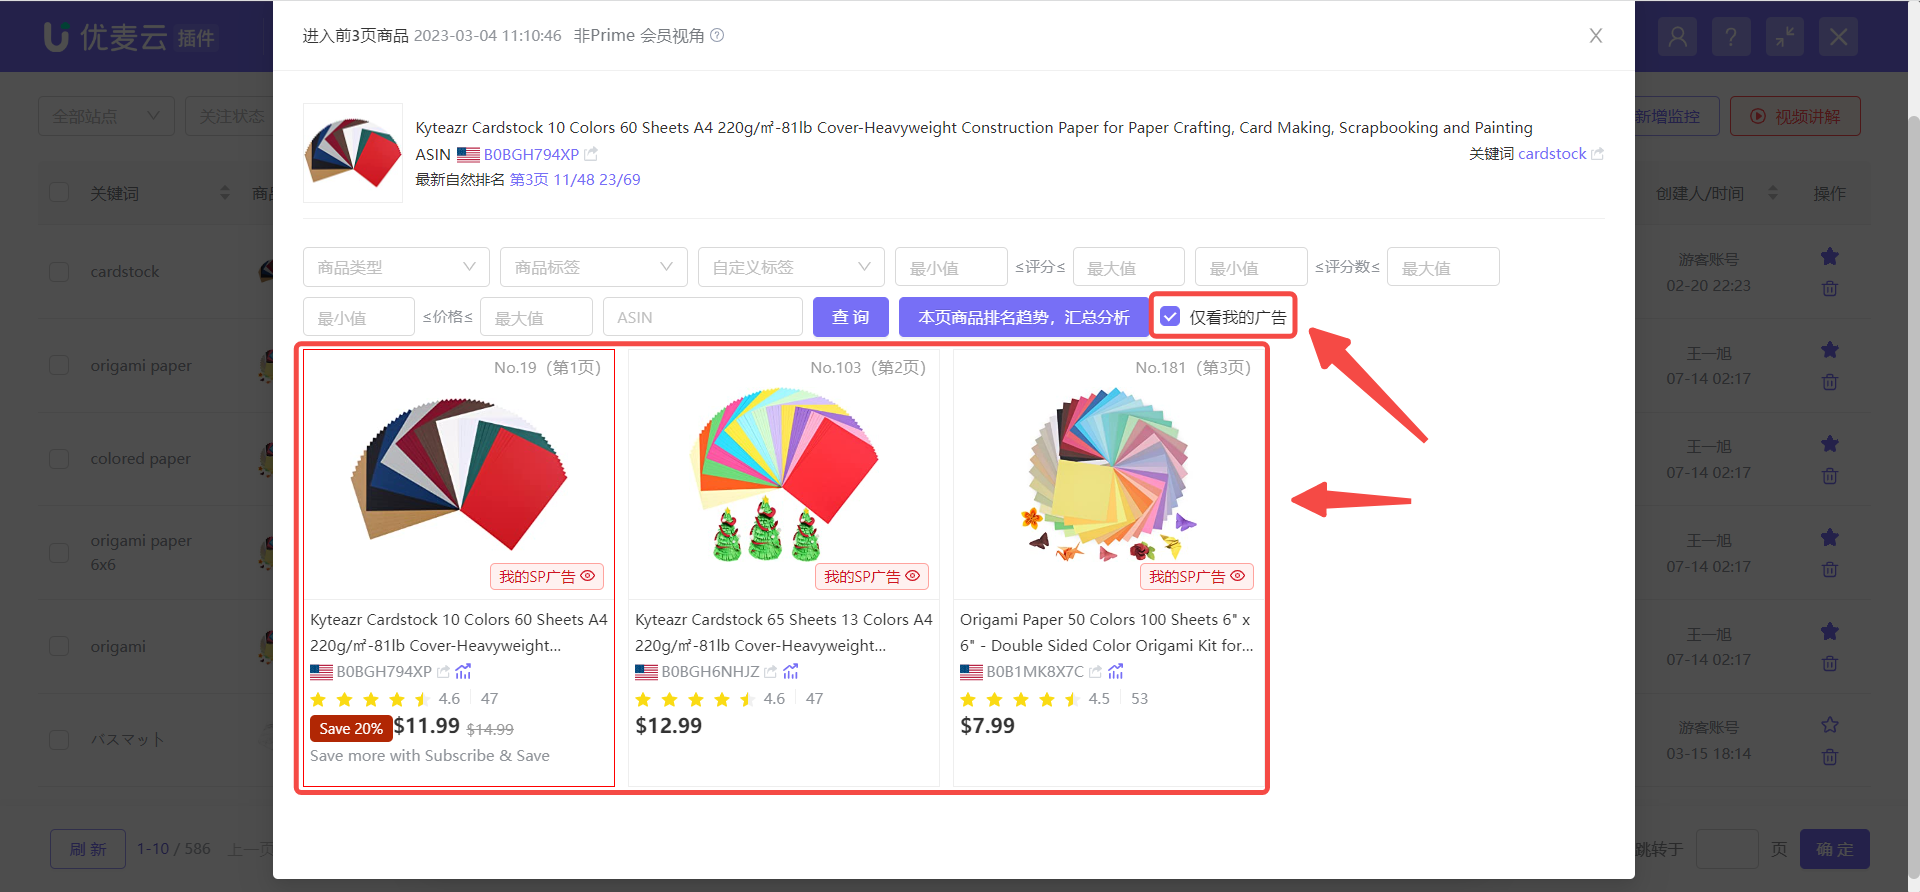
Also enter the "Products in Top 3 Pages" page,
Check [Only Show My Ads] to view all ads that have entered the top 3 pages.
 +
+
If our ad placement does not enter the top 3 pages, or has entered the top 3 pages but has not synchronized Seller Central backend ad ADIDs, it will be displayed as follows:
 +
+
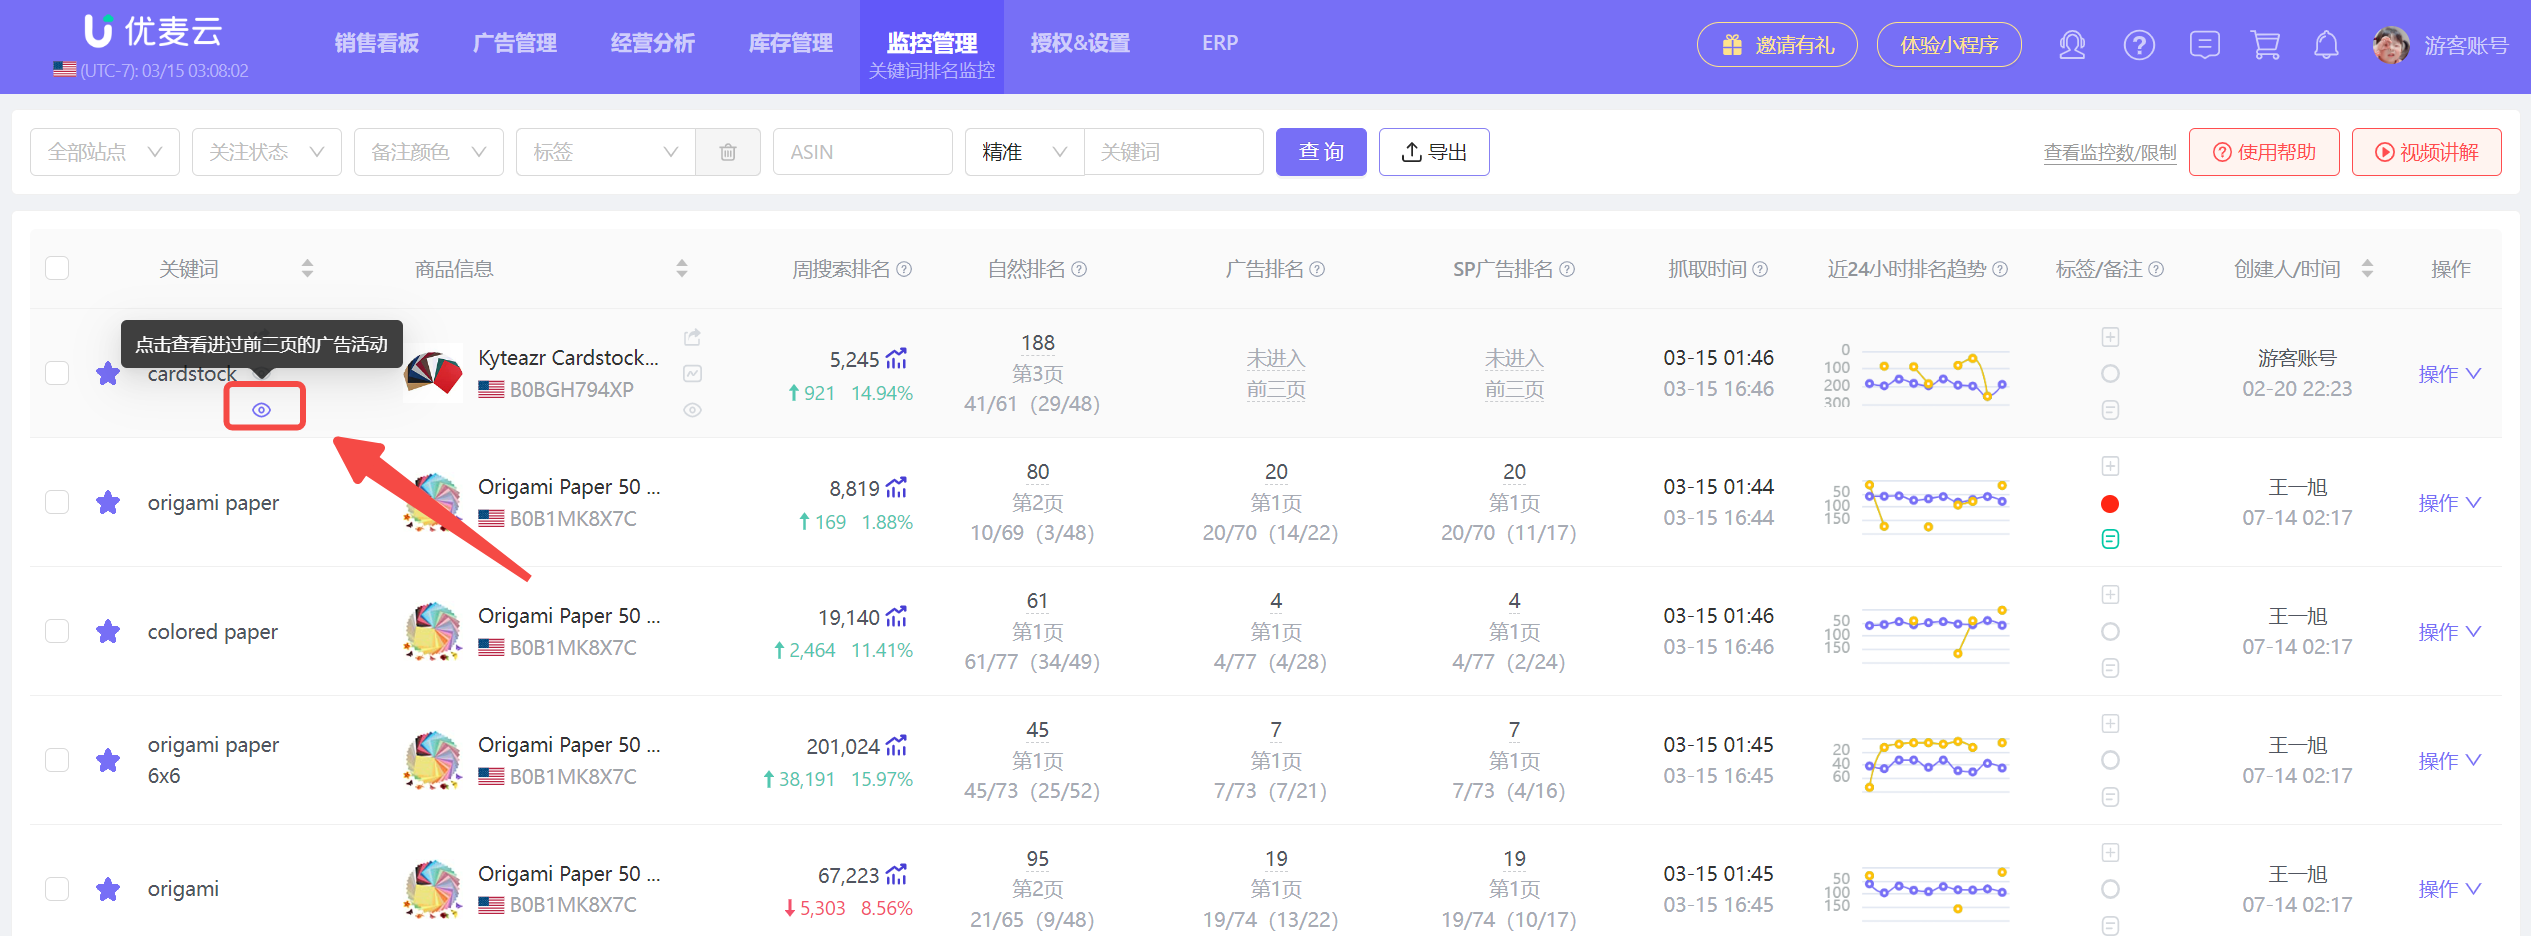
In addition to the extension, the web version can also separately view and analyze which ad campaigns have entered the top 3 pages of search results for this keyword.
Enter the web version [Keyword Rank Monitoring] page, click the [Ad Campaigns in Top 3 Pages] button to view the ad campaign details that have entered the top 3 pages under this keyword search.
 +
+
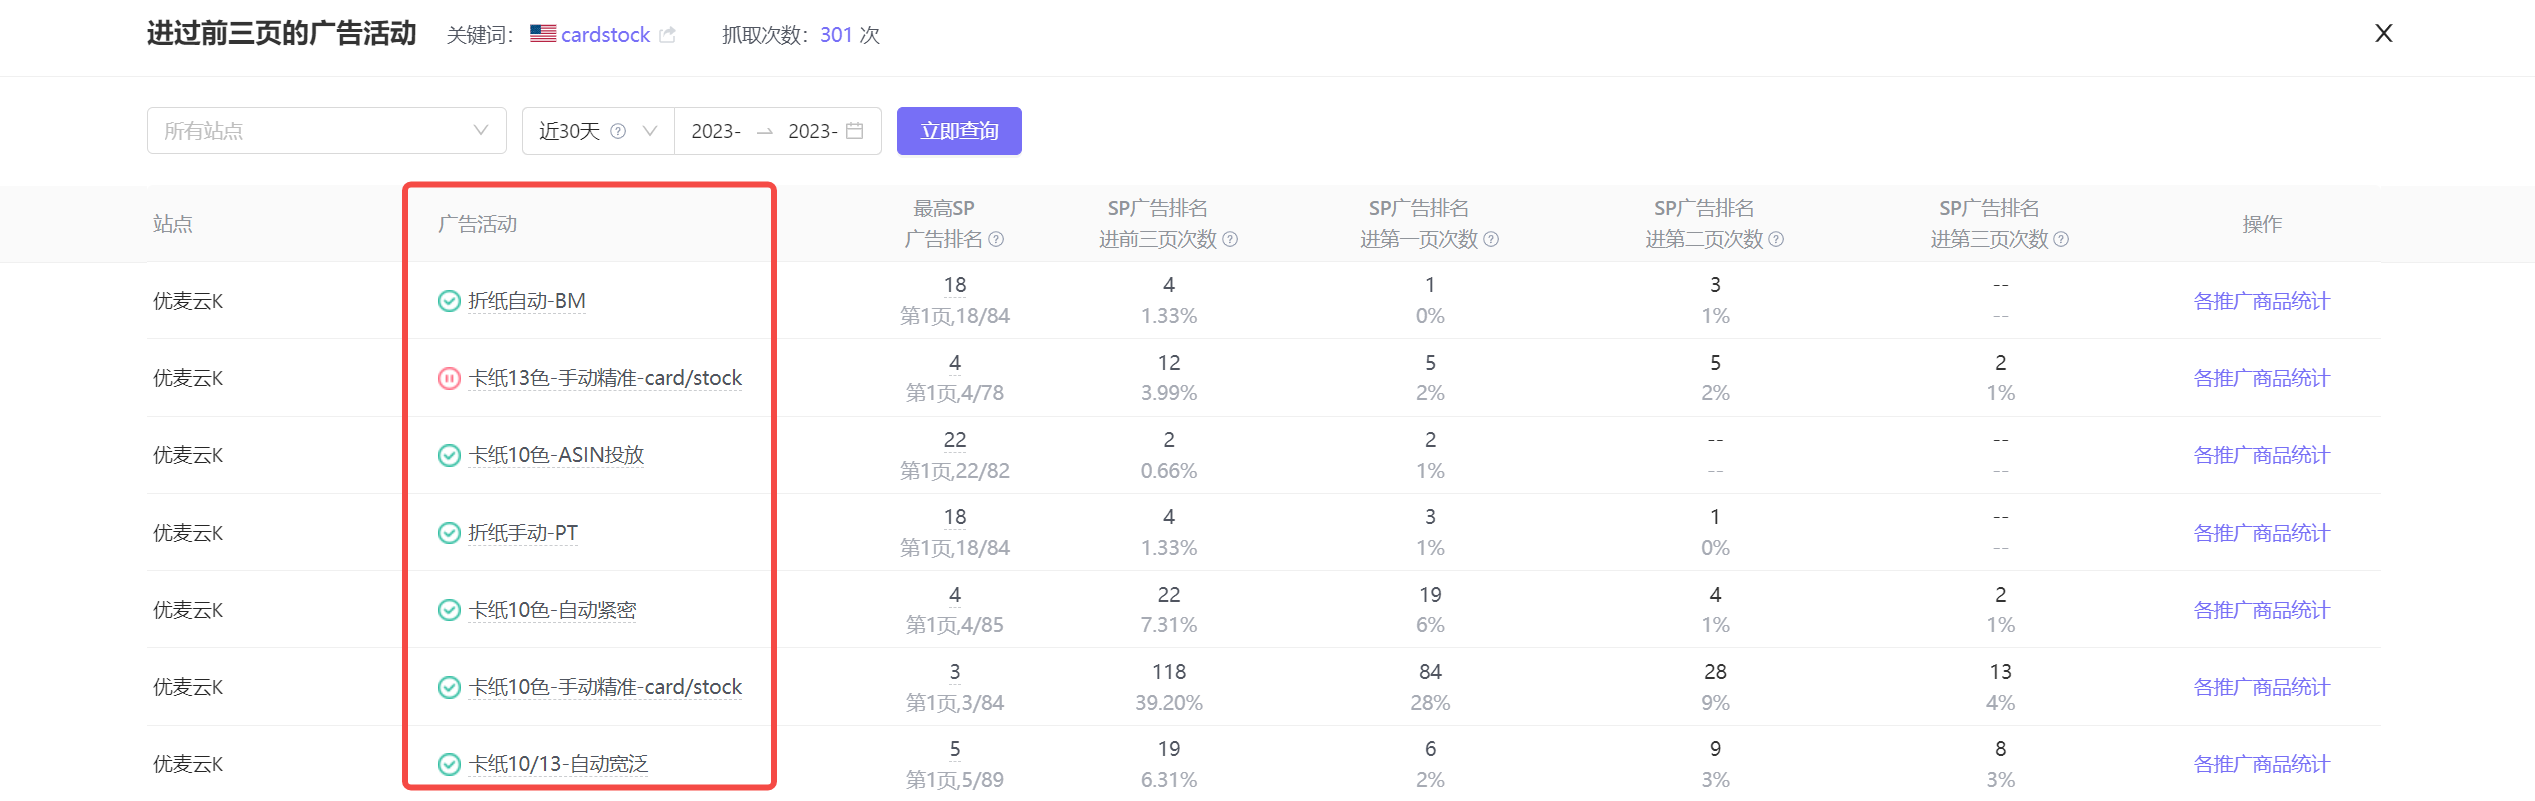
Enter the "Ad Campaigns in Top 3 Pages" page,
We can see which ad campaigns have entered the top 3 pages, the number of times they have entered the top 3 pages, and the highest SP ranking.
 +
+
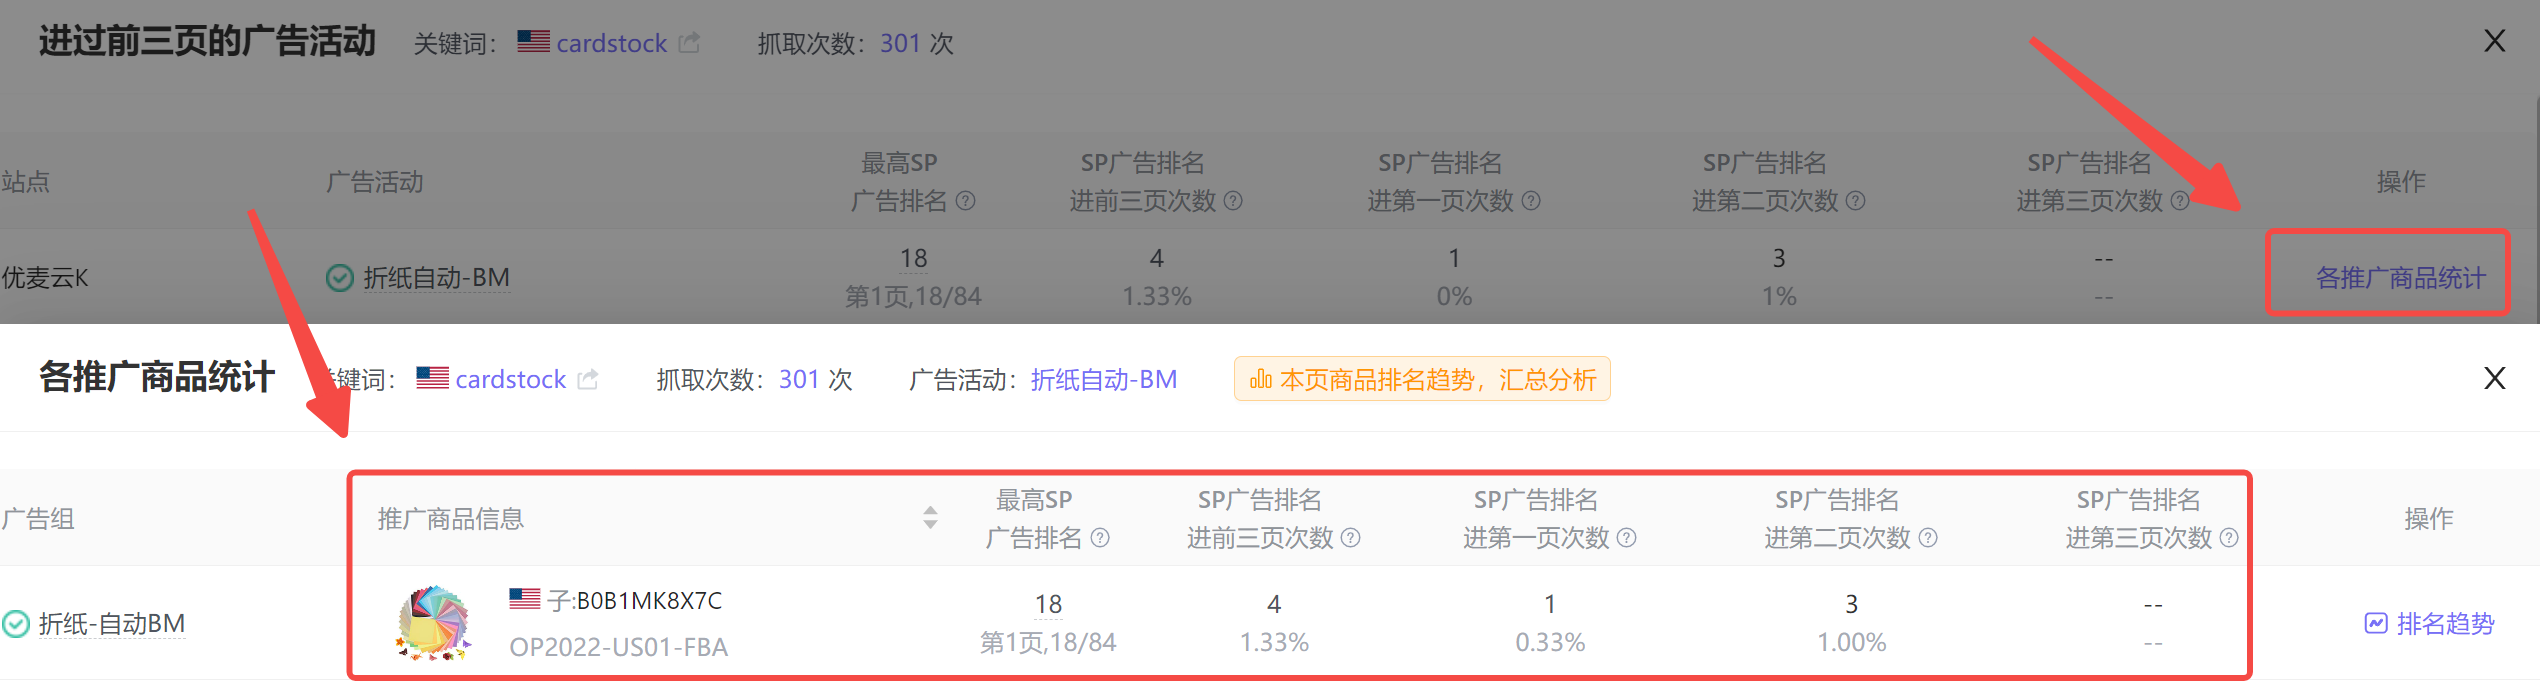
Click [Statistics of Each Promoted Product] on the right to view the performance of promoted products corresponding to different ad groups under this ad campaign.
 +
+
③ Multiple Campaigns for the Same Product and Keyword, Which Ad Groups Entered the Top 3 Pages
When we run multiple campaigns for the same product and keyword, such as opening multiple ad groups, applying different match types: broad, phrase, exact, etc., we can use [Keyword Rank] monitoring to view which ad groups have entered the top 3 pages of search results for this keyword, helping us understand the campaign performance.
Viewing Path: Ranking Trend
Enter the keyword rank page (extension version or web version), click the [Ranking Trend] button to enter the ranking trend page;
 +
+
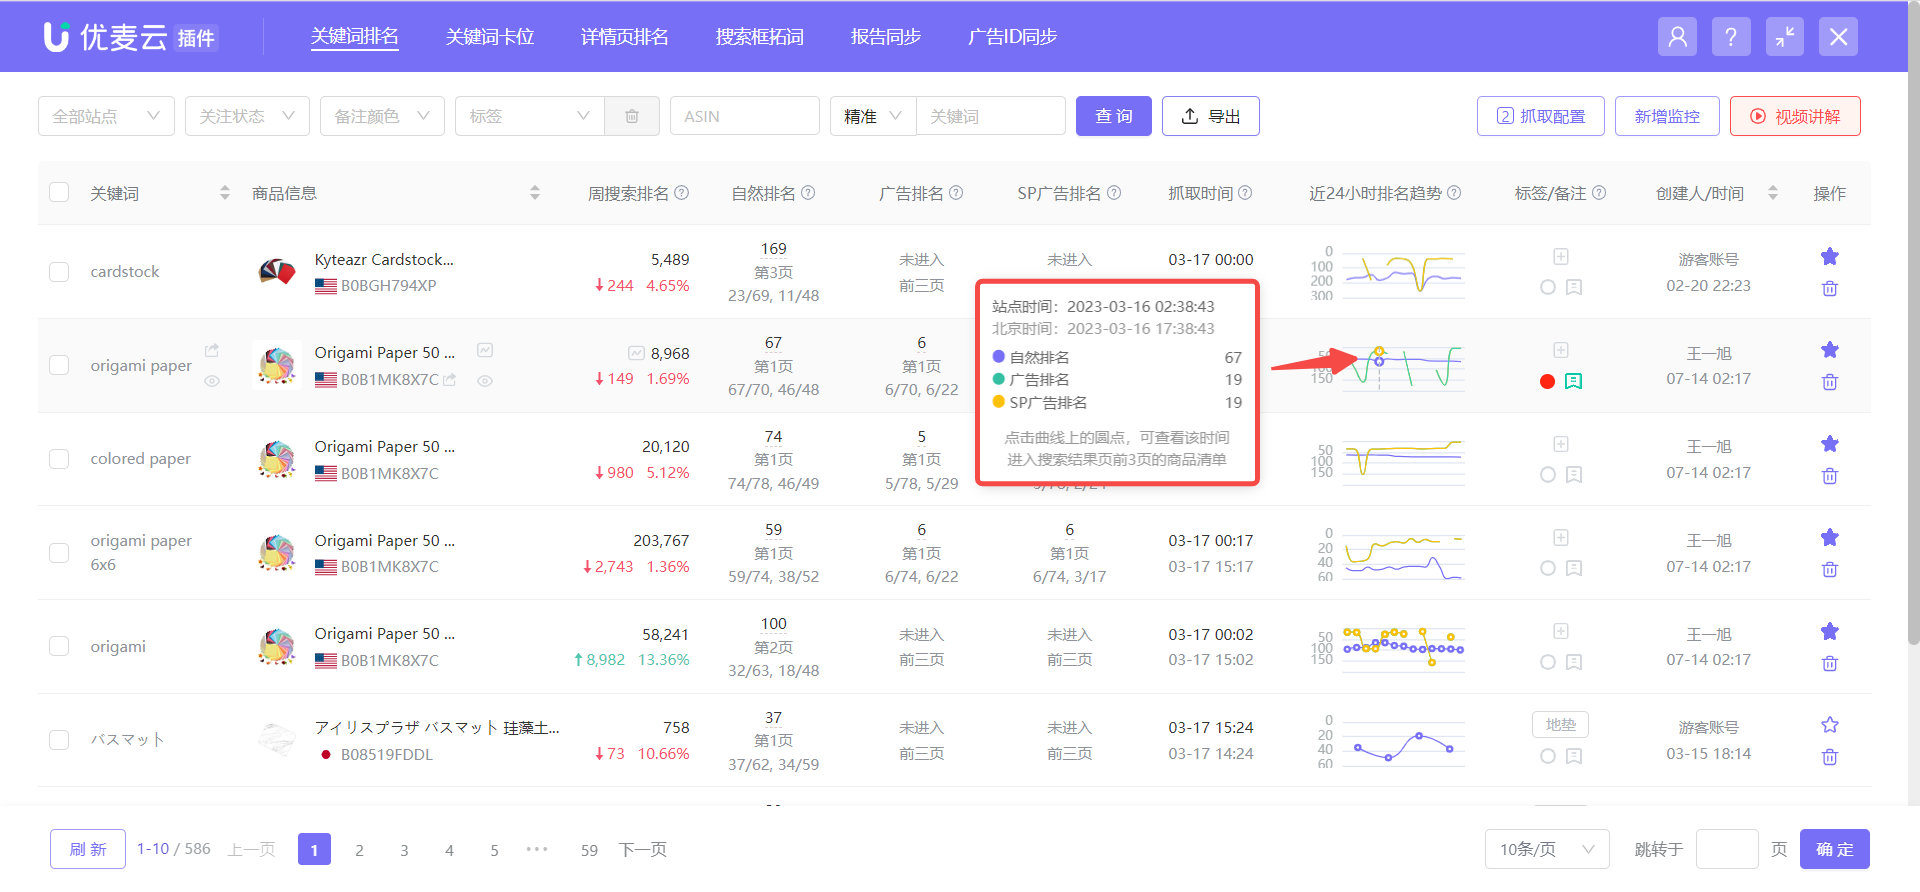
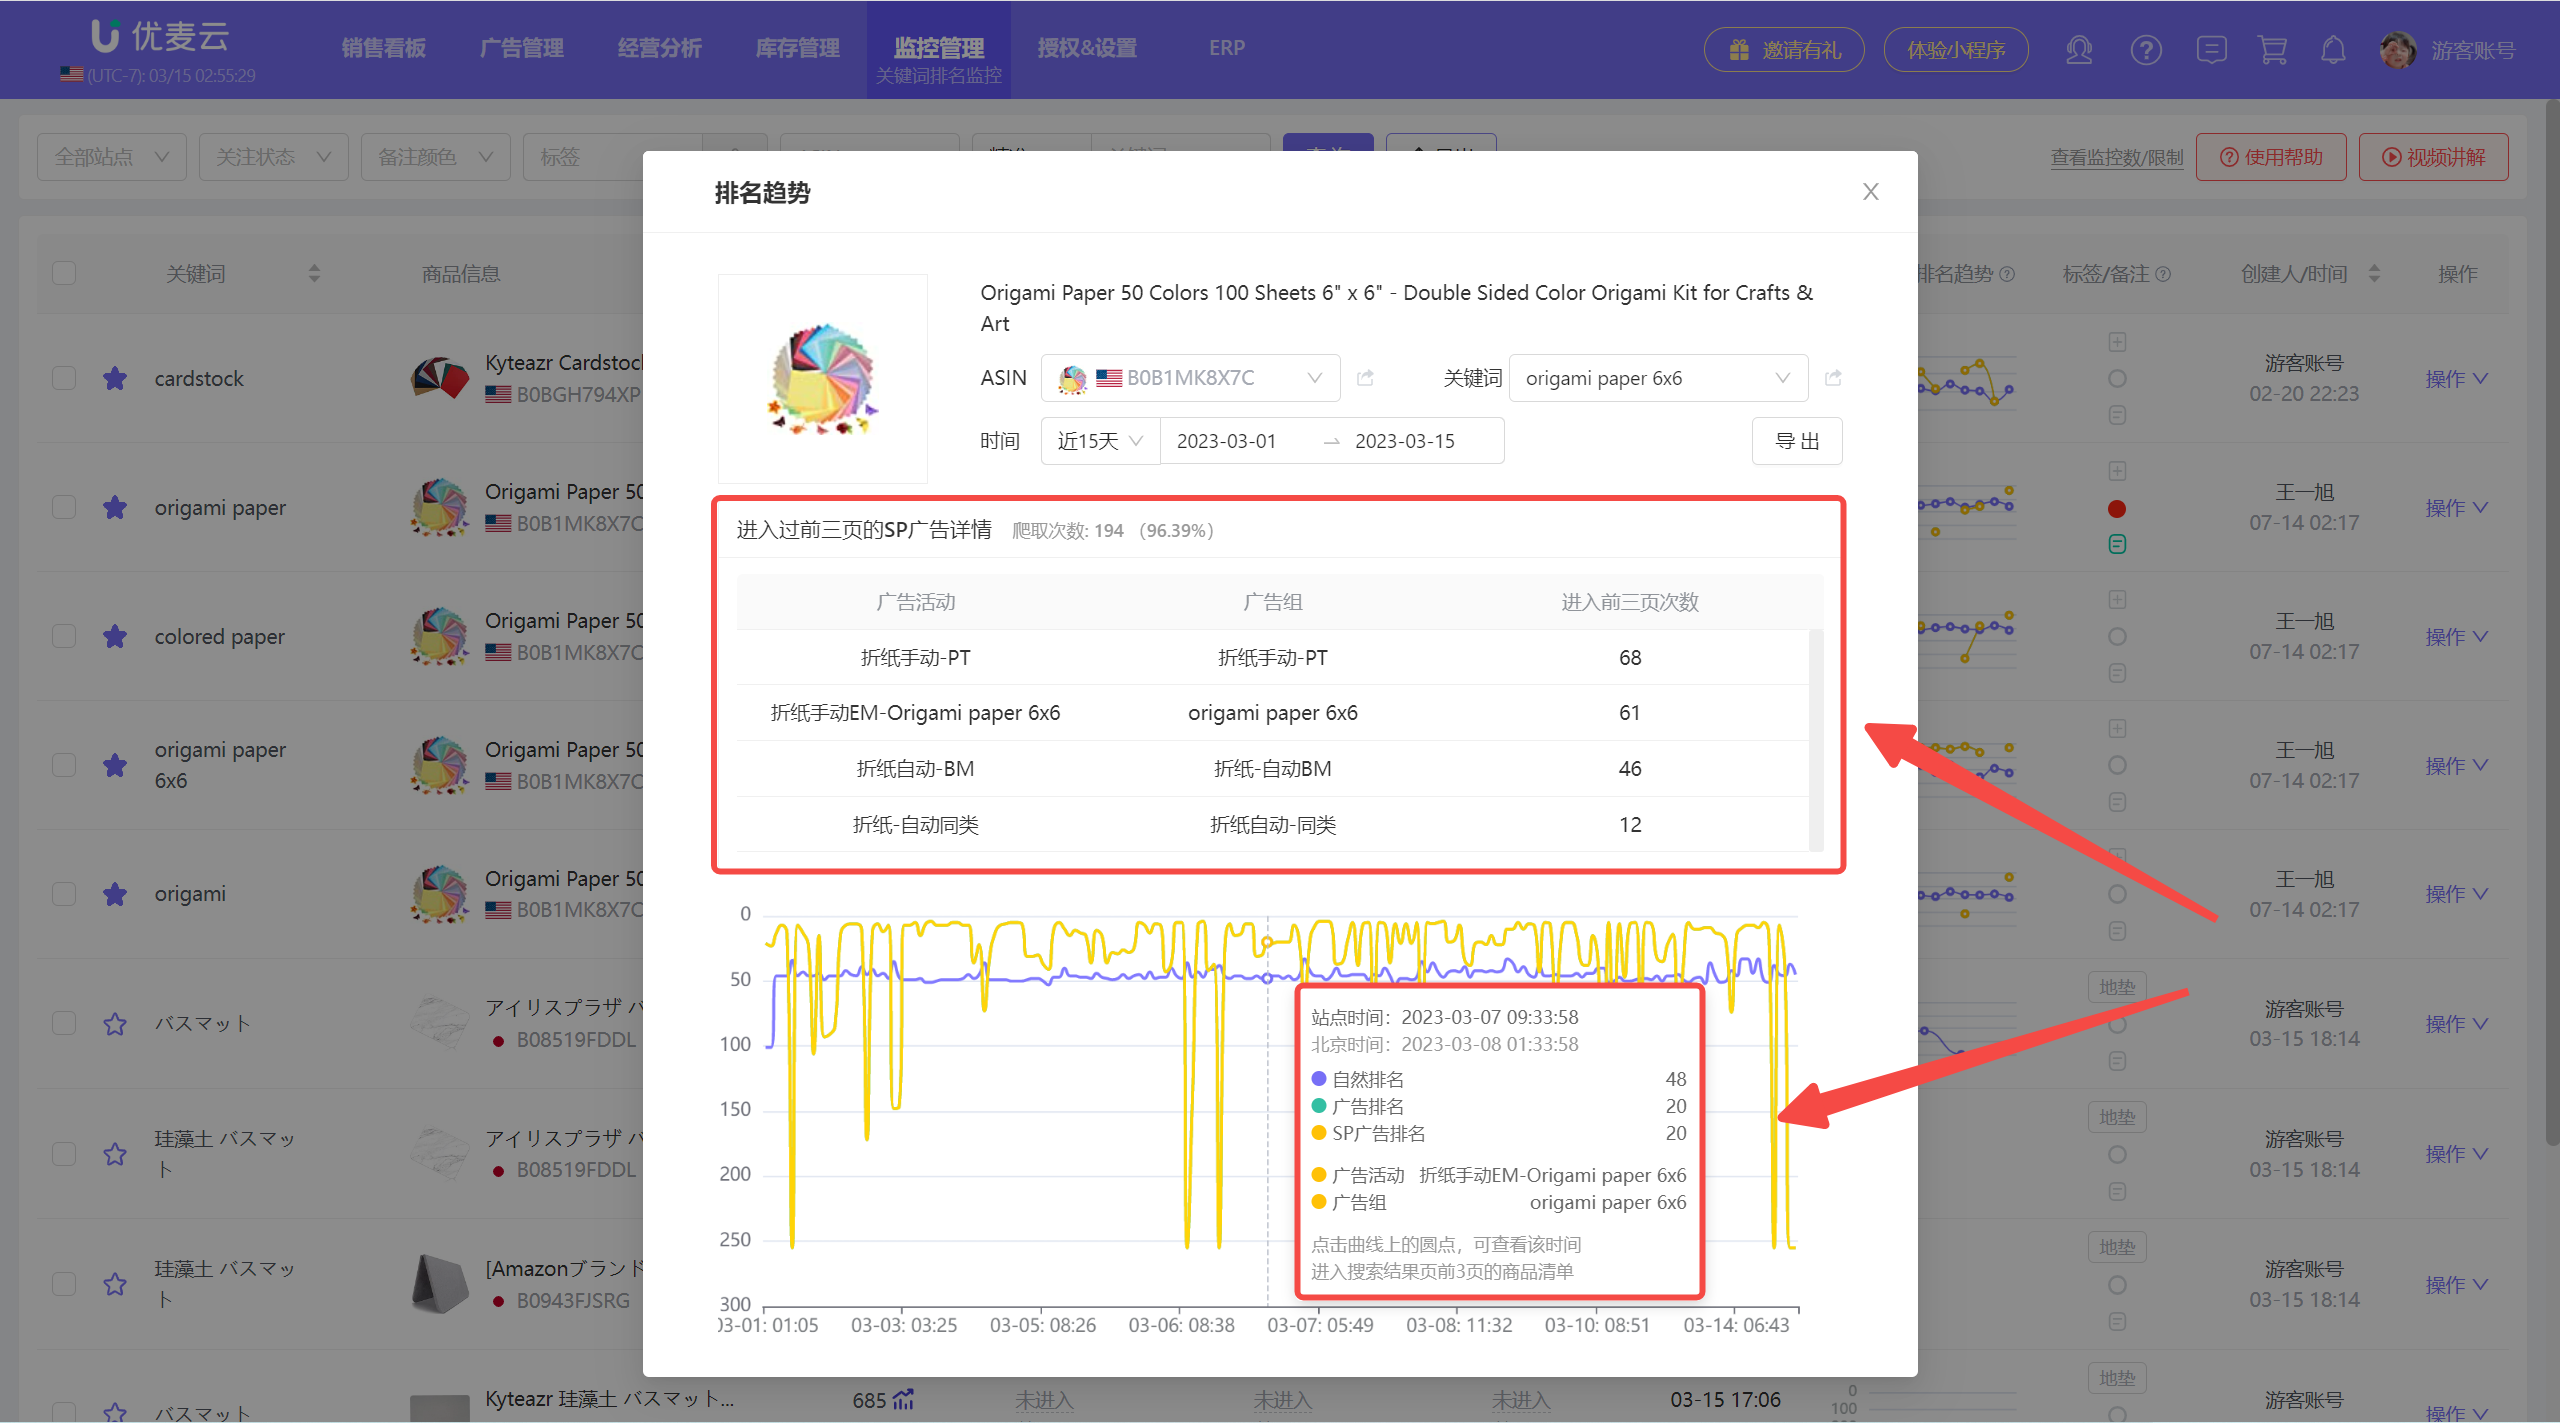
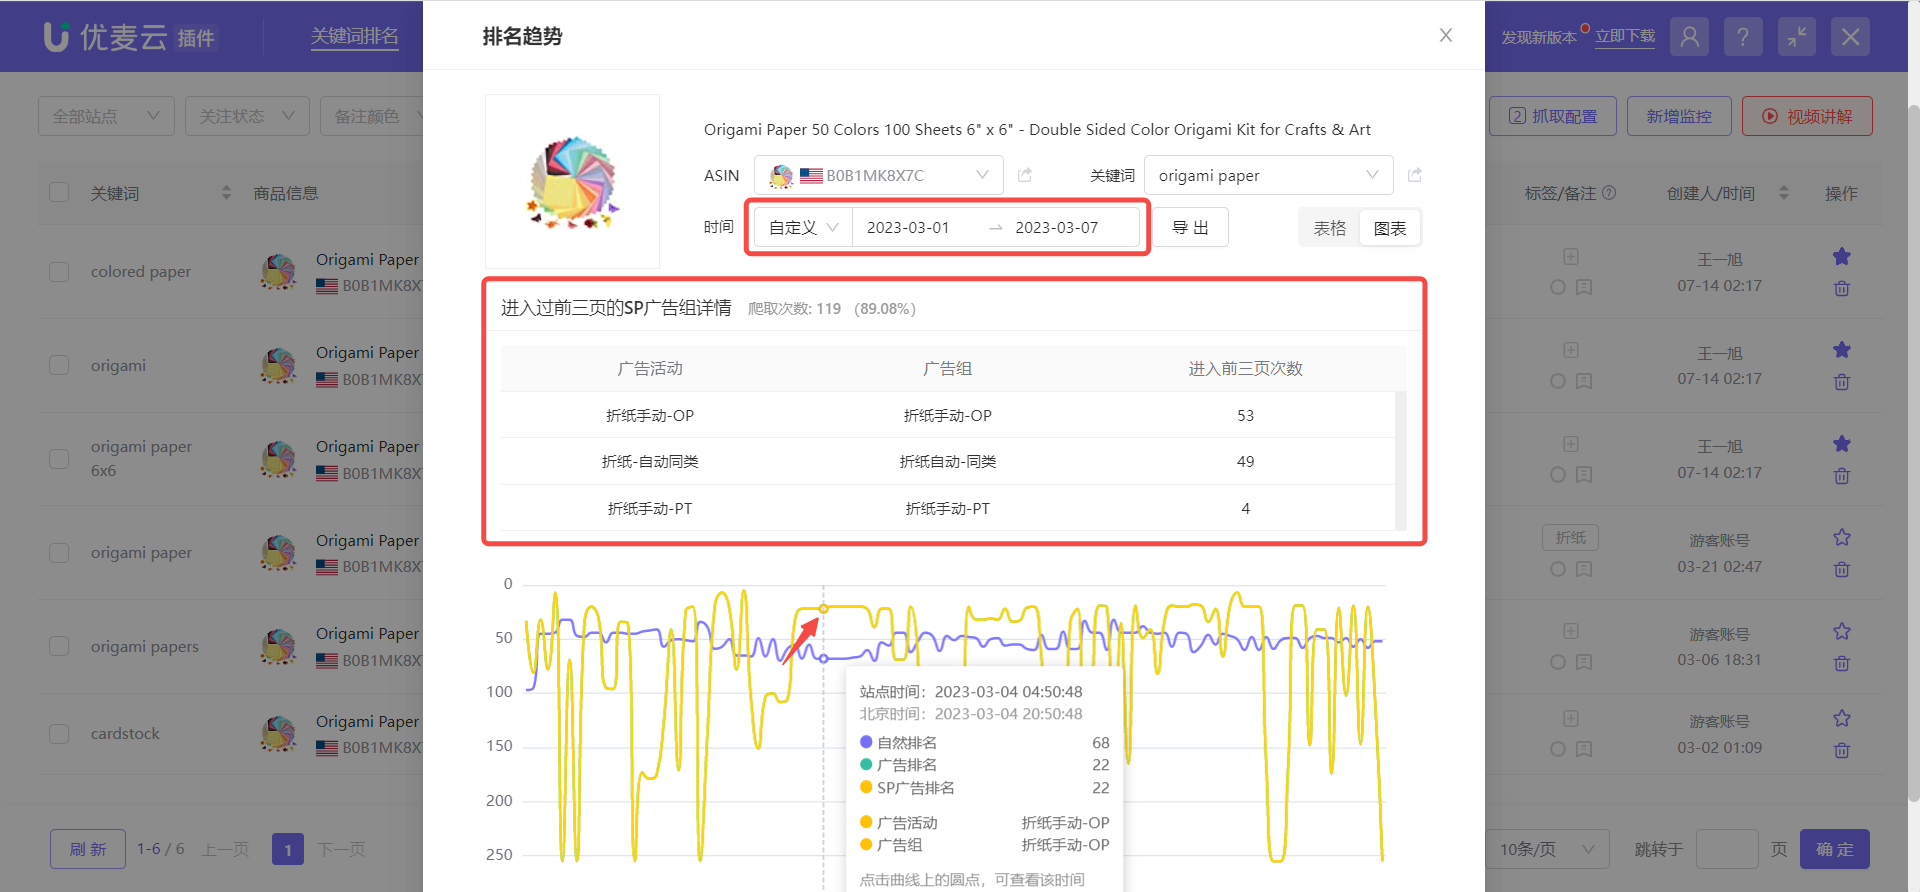
Enter the "Ranking Trend" page,
The system automatically displays the SP ad details that have entered the top 3 pages within the selected time range, as well as the corresponding number of entries.
Hover the mouse over the trend node to view the natural and ad ranking at that time point, and the names of the corresponding ad campaign and ad group.
 +
+
4. How to Effectively Use Ad Source Data
Knowing how to view your ad placement source, some sellers may have new doubts: What is the use of knowing this data?
Next, we will introduce several practical uses as examples to help us understand and effectively use ad source data.
① Assist in Analyzing New Product Ad Performance and Optimizing Ad Strategies
When we advertise, we may consider: Should we use broad, phrase, and exact match types for one of our keywords? Or, if we have several keywords under one ad group, how do we judge which keyword performs better?
At this time, you can use Ad GPS data to assist in judgment.
Taking analyzing the ad performance of ad campaign: Cardstock 13 Colors - Manual Category Targeting, ad keywords: cardstock and colored paper as an example.
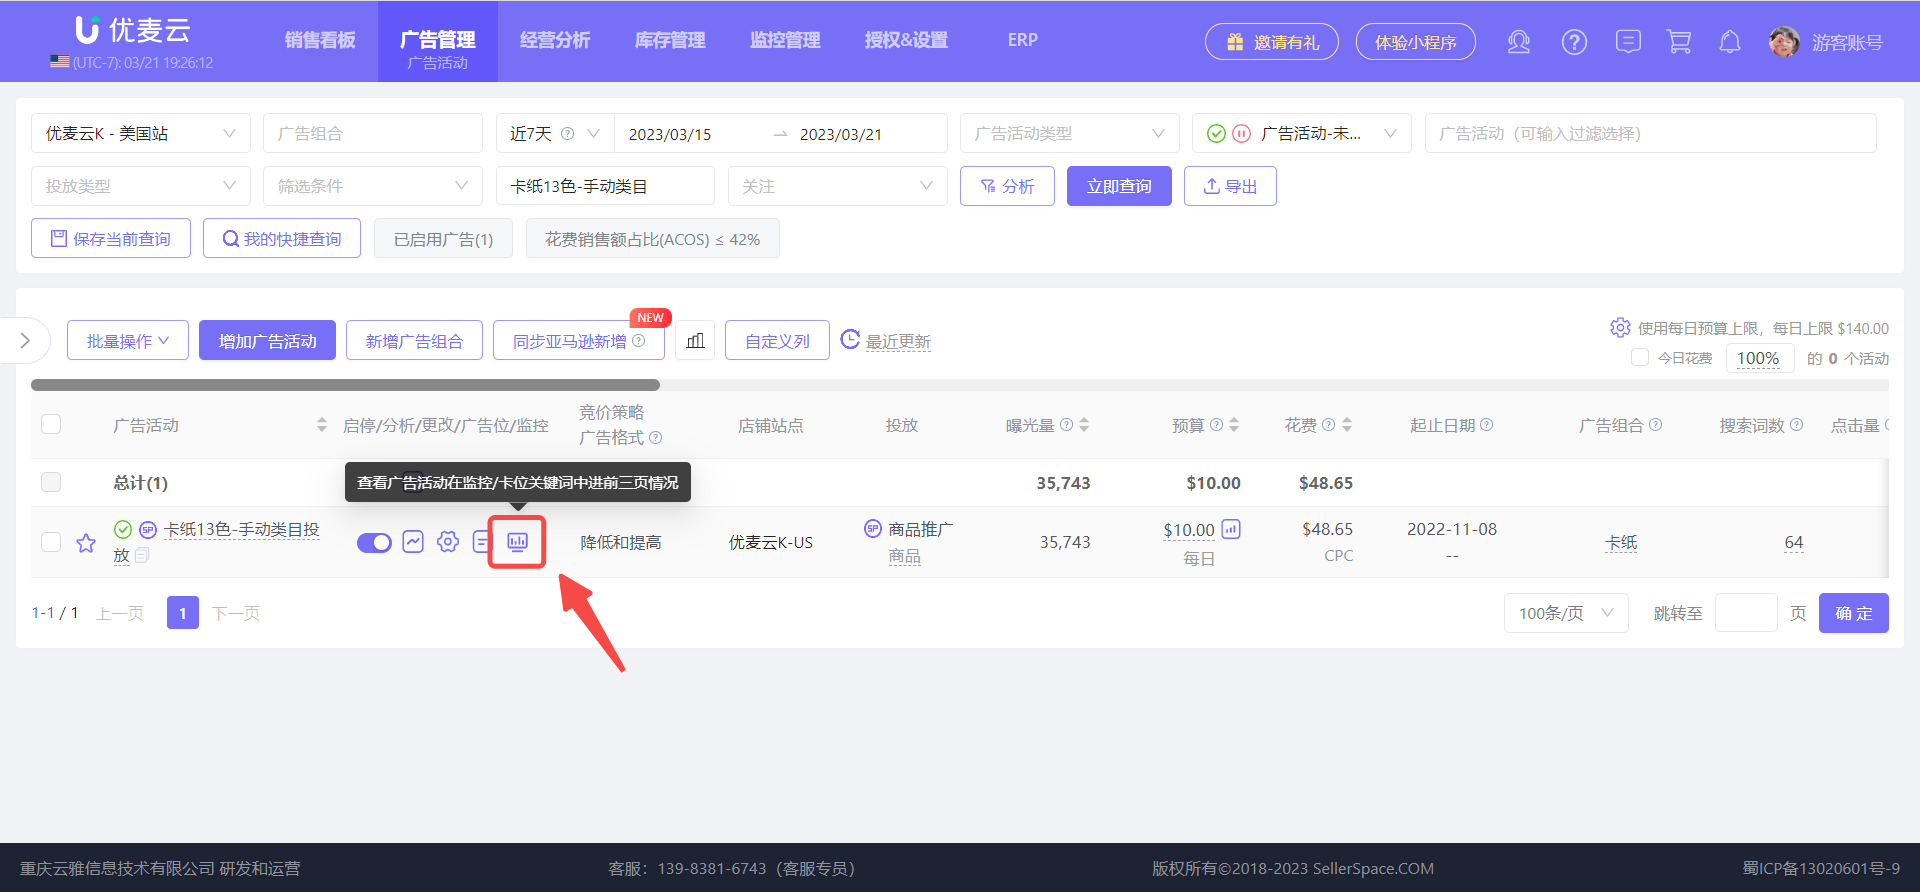
Enter the [Ad Campaigns] feature, find the ad campaign: Cardstock 13 Colors - Manual Category Targeting, and click the [View Ad Campaign's Top 3 Page Performance in Monitored/Positioning Keywords] button to enter the data analysis page.
 +
+
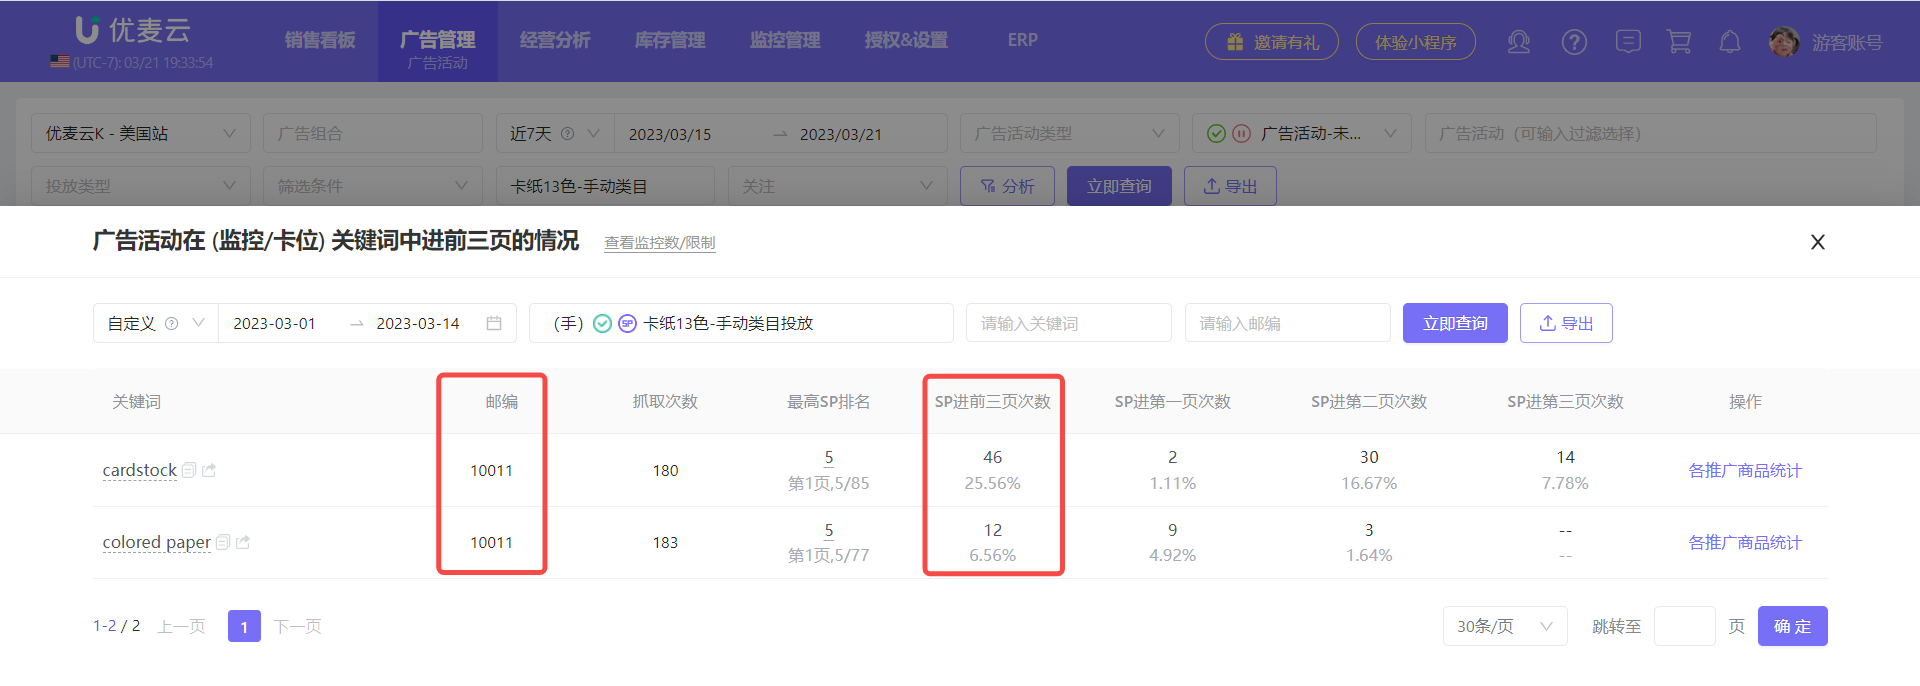
Enter the "View Ad Campaign's Top 3 Page Performance in Monitored/Positioning Keywords" page,
We can see that this ad campaign targets two keywords: cardstock and colored paper.
Under the 10011 zip code, out of 183 fetches in nearly 14 days from 03/01 to 03/14, the number of times cardstock SP ads entered the top 3 pages is significantly higher than the number of entries for colored paper.
This indicates that under the 10011 zip code, the progress of pushing keyword rankings for cardstock is better than colored paper.
In the early stage of pushing keyword rankings, when the advertising budget is limited, we can decide the priority of optimization based on this ad placement performance, that is, first ensure that the budget for cardstock is relatively sufficient, and then meet the budget for colored paper.
 +
+
Special Note: The above method is applicable to new products pushing keyword rankings, with the core purpose of increasing visibility and clicks. If it is a growing product that needs to drive conversions, you also need to combine the click-through rate and conversion rate of ads for comprehensive analysis.
And the keyword ranking results may be different under different zip codes. We can switch different zip codes in the [Keyword Rank] feature on the extension for monitoring, and then analyze the results.
 +
+
② Adjust Ad Strategies to Avoid Self-Competition
Many seller partners often find when searching for keywords: there are multiple ad placements for their own products in the same keyword search results? In this case, it is possible that buyers click on ads multiple times, but only convert into one order in the end, greatly reducing the cost-effectiveness of advertising.
At this time, we can use the Ad GPS feature to find out which ad groups these ad placements come from, and then adjust the ad strategy to avoid self-competition and improve the return on ad spend.
Taking analyzing and adjusting the ad distribution of ASIN: B0B1MK8X7C, keyword: origami paper as an example.
Through the [Keyword Rank] and [Ad GPS] features, we can directly view the top three pages ad distribution for monitored ASIN: B0B1MK8X7C, keyword: origami paper.
Enter the [Keyword Rank] feature, find the monitored ASIN: B0B1MK8X7C, keyword: origami paper, and click the [Ranking Trend] button to enter the ranking trend page.
 +
+
Enter the ranking trend page,
Select the time range to view, click the corresponding time node, and view and analyze the ad distribution at that time node.
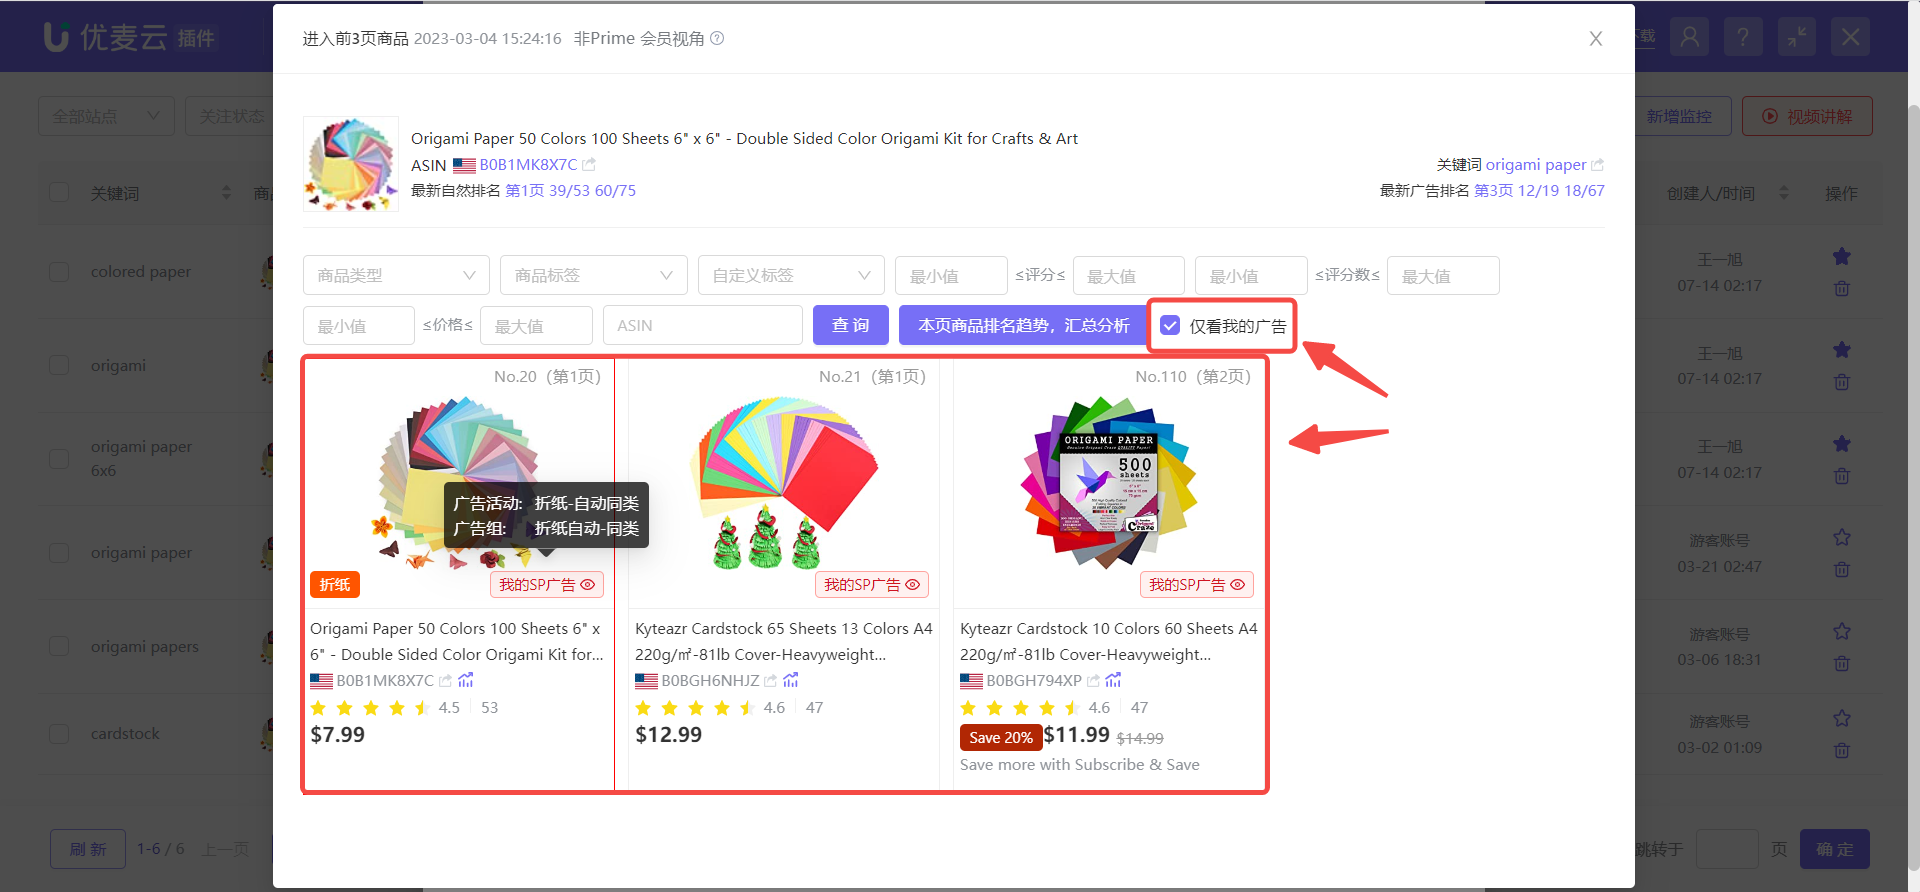
 +
+
For example: At the time node of March 4th 15:24:16, by filtering with [Only Show My Ads], you can see that there are three ad placements for your own products, which come from three different ads: one is the Automatic - Similar Products ad group, one is the origami paper search term ad group, and one is the competitor ASIN targeting ad group.
Moreover, we can clearly see that these three ad placements are very close together. In this case, we can adjust our ad campaigns to separate their positions, avoiding self-competition.
The adjustment method can be to adjust bids to separate them on different pages, or to selectively keep the better-performing ones and stop the poorly-performing ad groups as appropriate.
 +
+
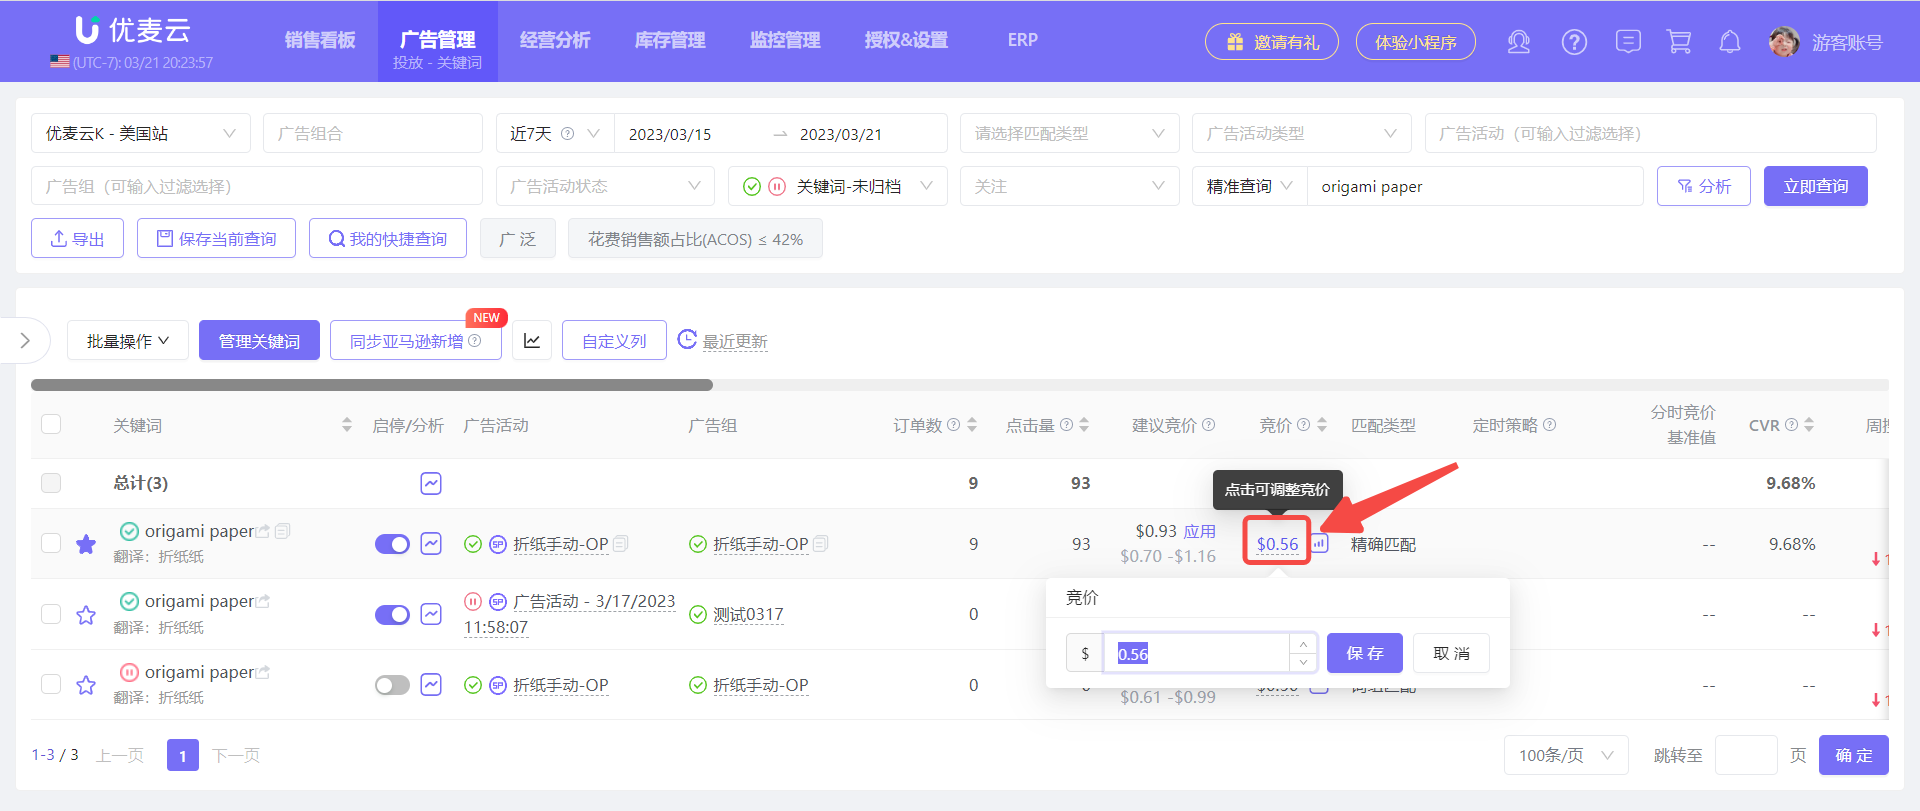
Bid adjustment methods are as follows:
Enter the [Targeting/Keywords] feature, search for the keyword [origami paper], find the corresponding ad group, and directly adjust our base bid. Then track the adjusted ad placement to see if further adjustments are needed.
 +
+
You can also enter the [Ad Campaigns] feature, find the corresponding ad campaign, and adjust the bid strategy of the corresponding ad campaign to: Dynamic bids - down only, Dynamic bids - up and down, or Fixed bids, etc.
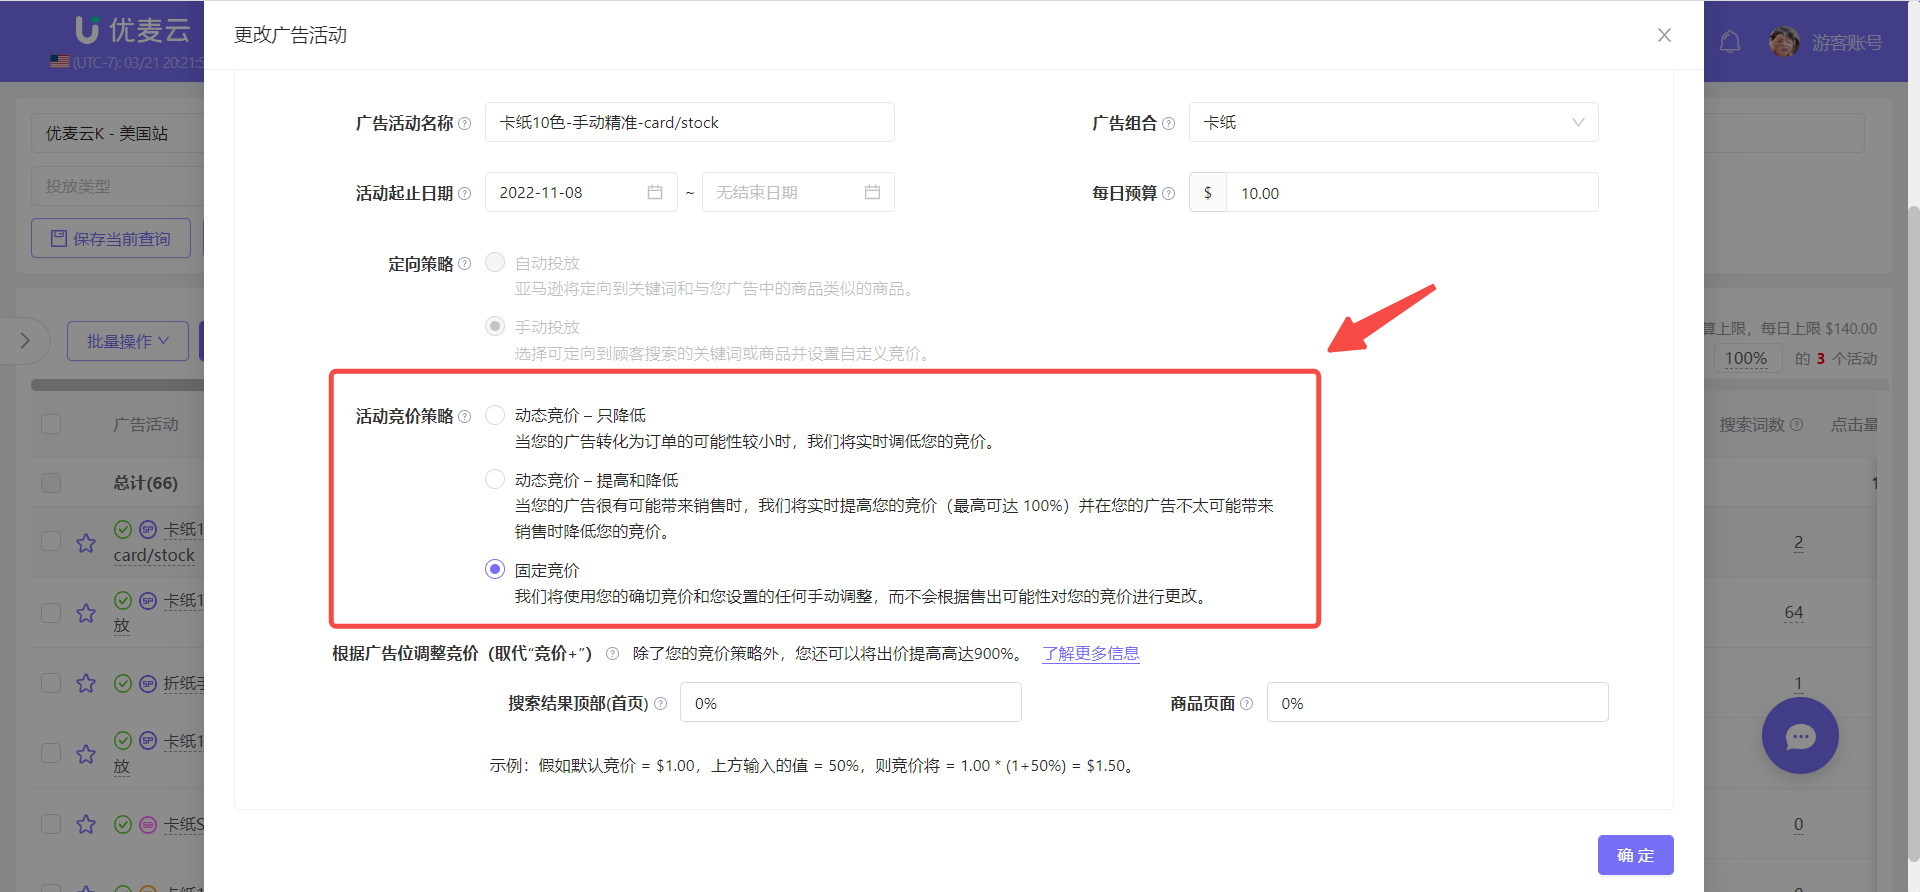 +
+
In addition to the above two uses, we can also combine the [Keyword Positioning] feature to accurately distribute our ads on different pages of search results, or combine the [Scheduled Strategies] feature to precisely target ads, etc. In addition to these, there may certainly be other more powerful uses. Sellers are welcome to share and discuss in the community~
SellerSpace Community: https://www.sellerspace.com/bbs/