2025/03/21Number of reading(17294)Number of comments(0)
一、Target Audience
Operators
二、Feature Introduction
SellerSpace App - Advertising Features: Mobile Ad Management at Your Fingertips. Consistent with the web-based [Advertising Management] feature, the mobile ad management backend of the SellerSpace App allows you to efficiently analyze advertising data for all campaign types (Sponsored Products, Sponsored Brands, and Sponsored Display) on your phone. Advertising data includes all performance metrics for all campaign types. Furthermore, it supports direct adjustments to ad campaigns (excluding campaign creation), such as: adjusting bids, budgets, enabling/pausing, adding ad keywords, product targeting and negative targeting, viewing Scheduled Strategy rules, and more. This helps sellers track and optimize ad campaigns anytime, anywhere, to gain more advertising revenue.
Advertising data synchronization for the mobile app is consistent with the web version interface, meaning data synchronization is the same as the web version. Operation data on the mobile phone is synchronized to Amazon Seller Central in real-time. Operation logs synchronously record history and differentiate operation trails between the PC and mobile app, helping you better analyze ad optimization effectiveness.
三、Use Cases
- Check and analyze ad campaign performance anytime, anywhere while out of the office, to determine if optimization is needed;
- Adjust ad budgets, bids, enable/pause status, and add ad targeting and negative targeting, etc., all from your mobile phone.
四、Operation Guide
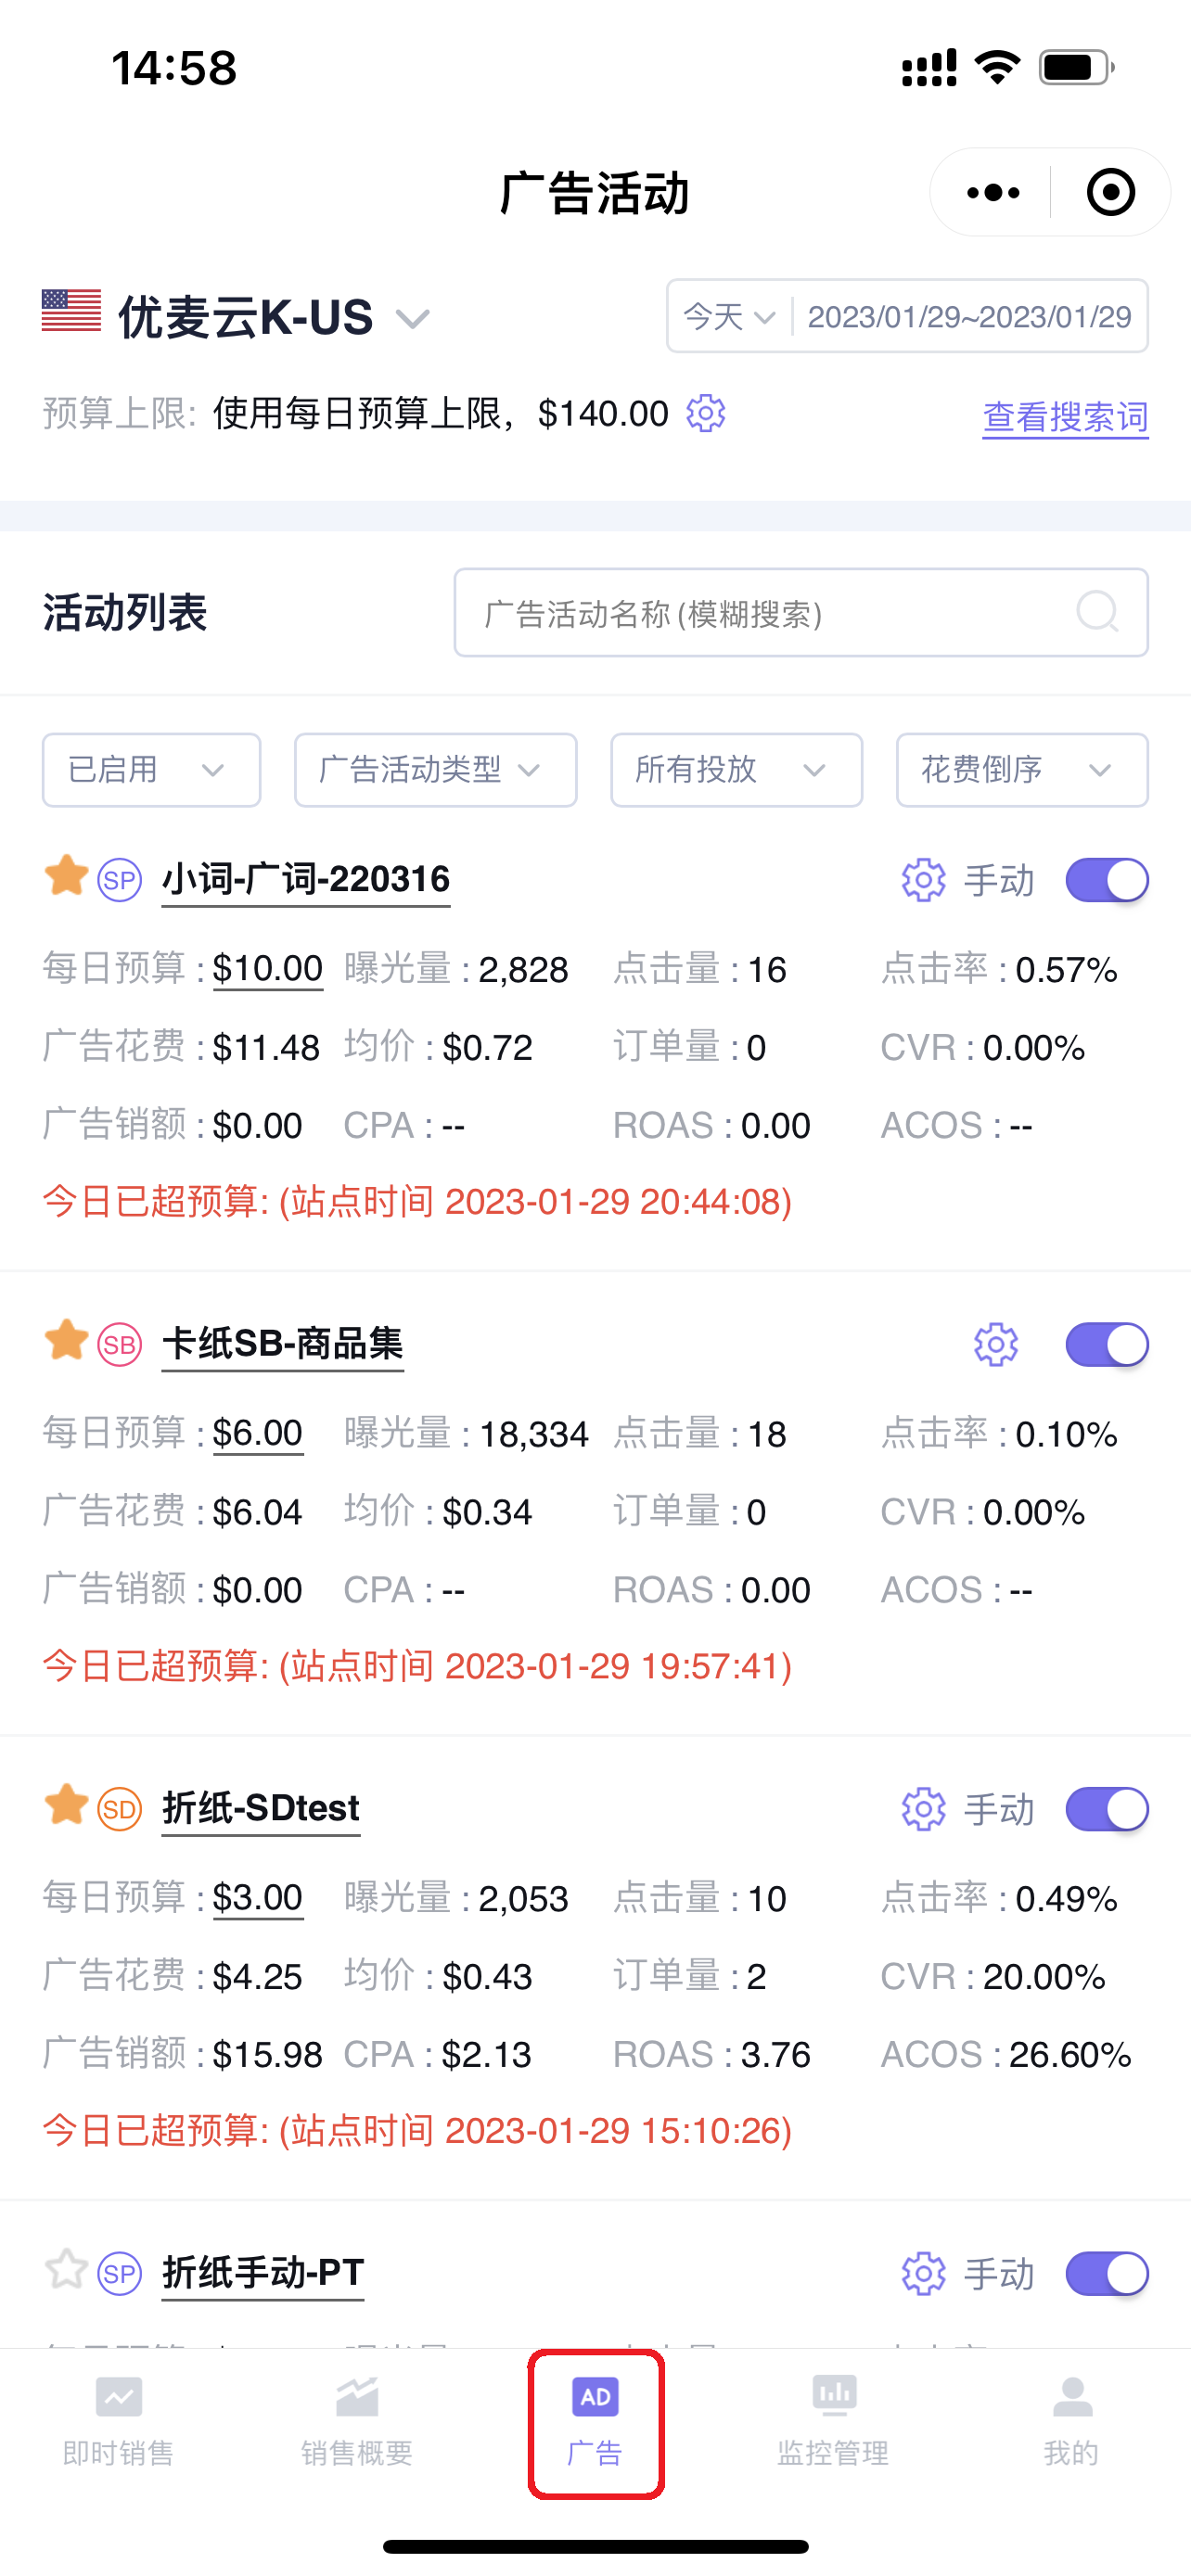
Enter the WeChat App - “SellerSpace ERP”, and click 【Advertising】 at the bottom to enter the mobile ad backend;
 +
+
The mobile app's 【Advertising Management】 is consistent with the web version, allowing you to analyze and adjust campaign performance data for all ad types. Next, similar to the web-based advertising management feature, we will introduce how to use the mobile app's ad backend in 6 dimensions.
Section Introduction:
1. Campaigns
2. Ad groups
3. Products
6. Search Terms
Campaigns
1. Viewing and Analyzing Campaign Data
1.1 Finding Campaigns
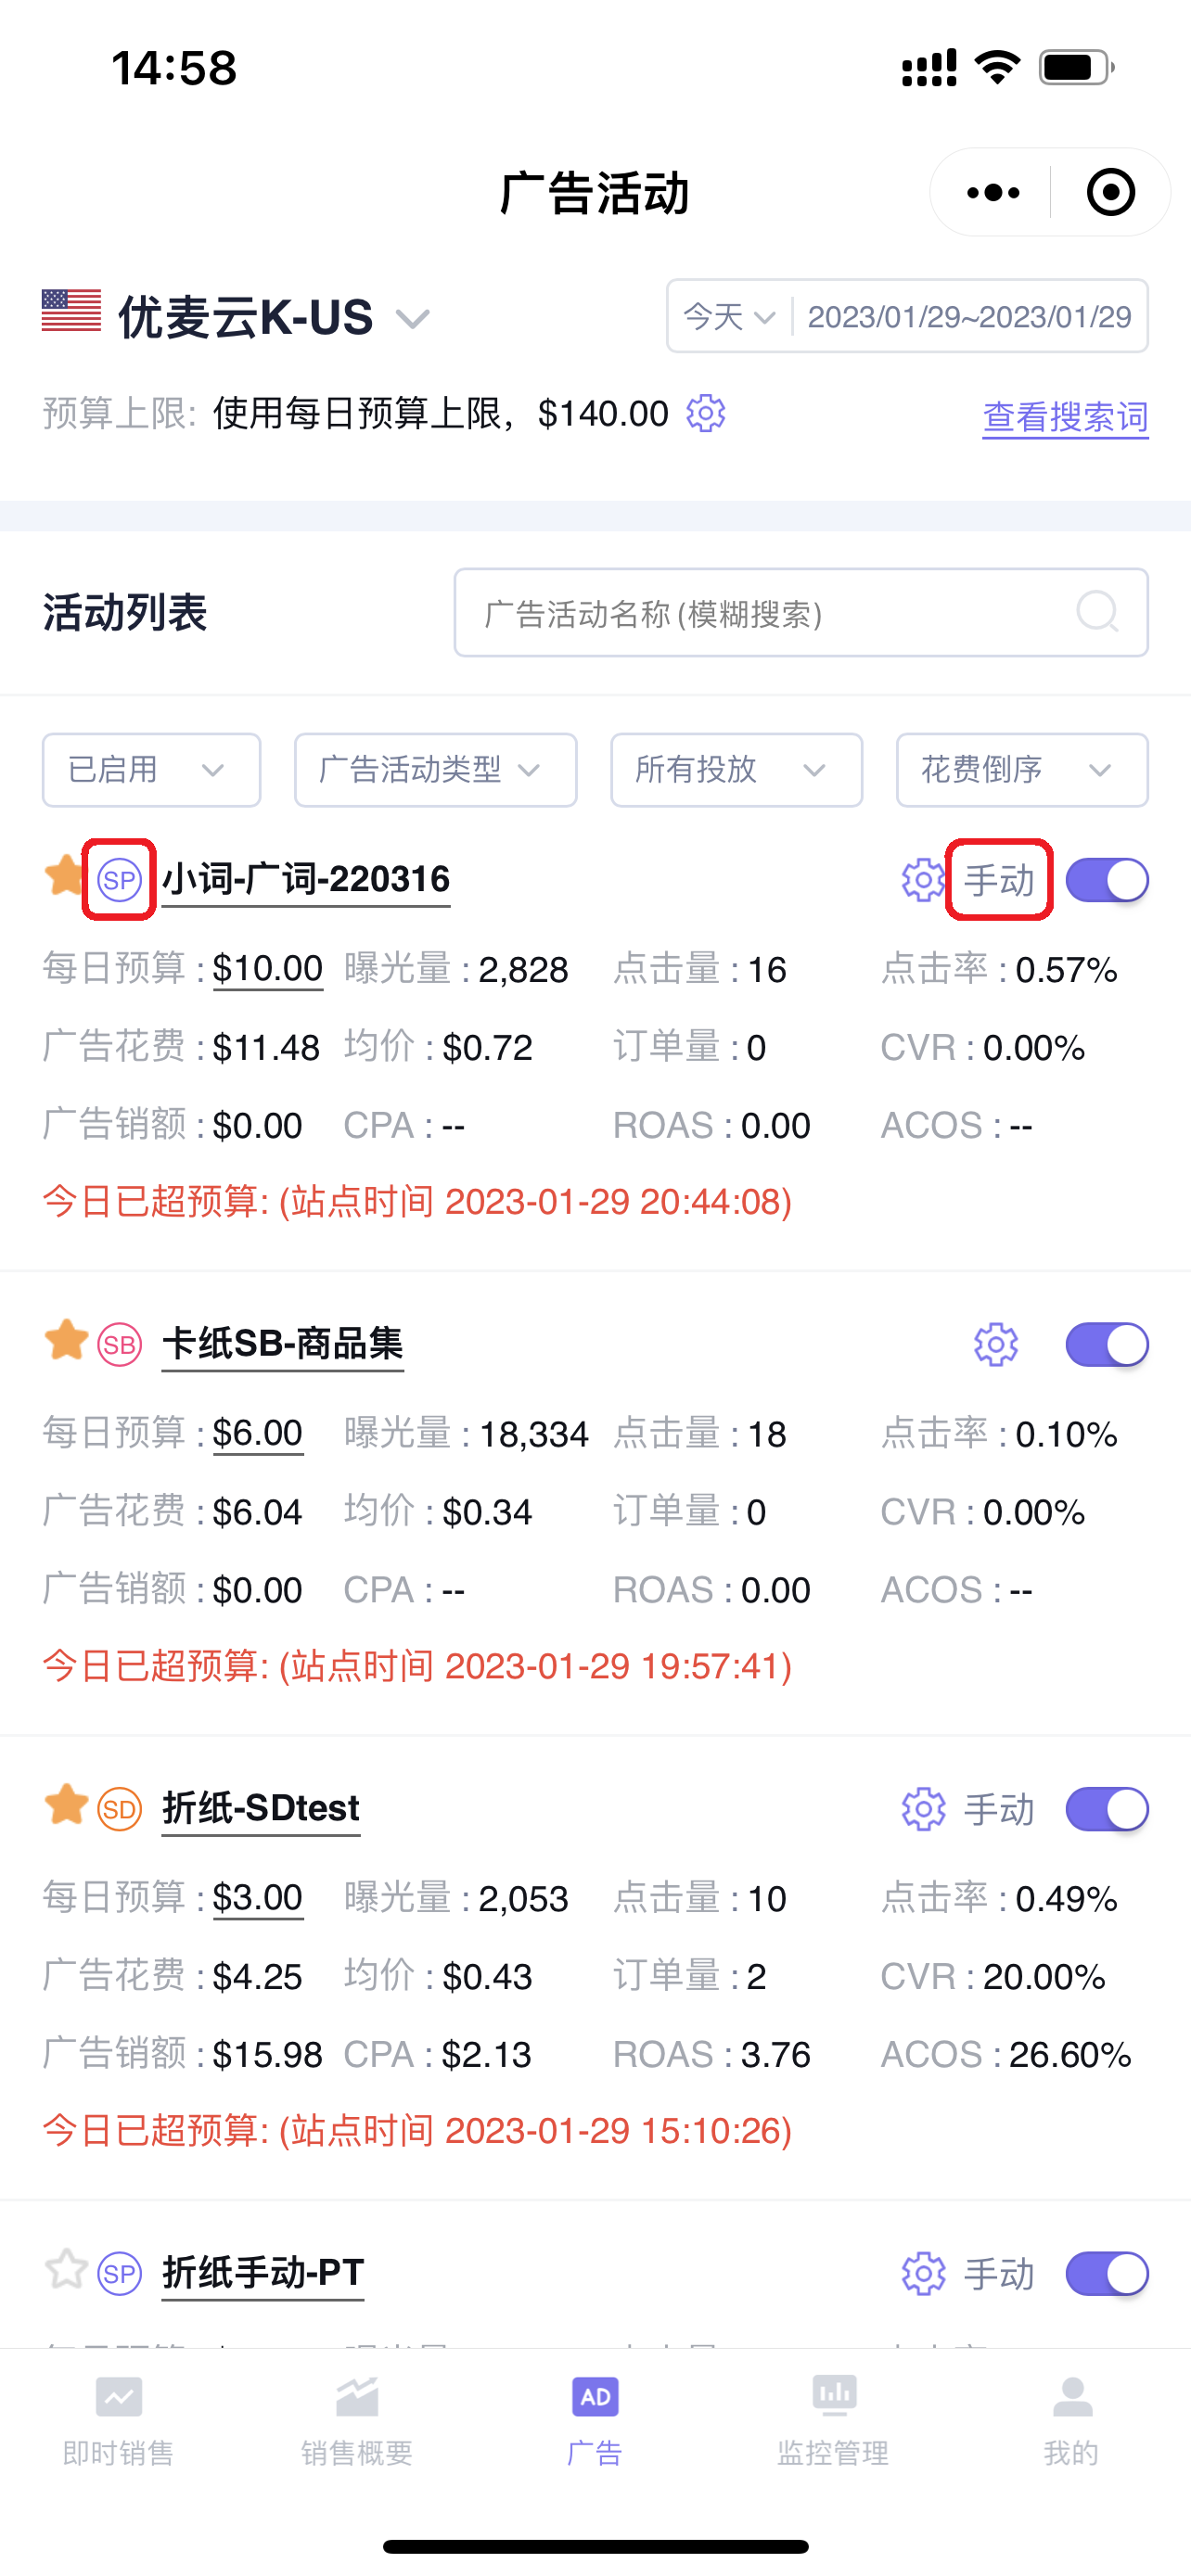
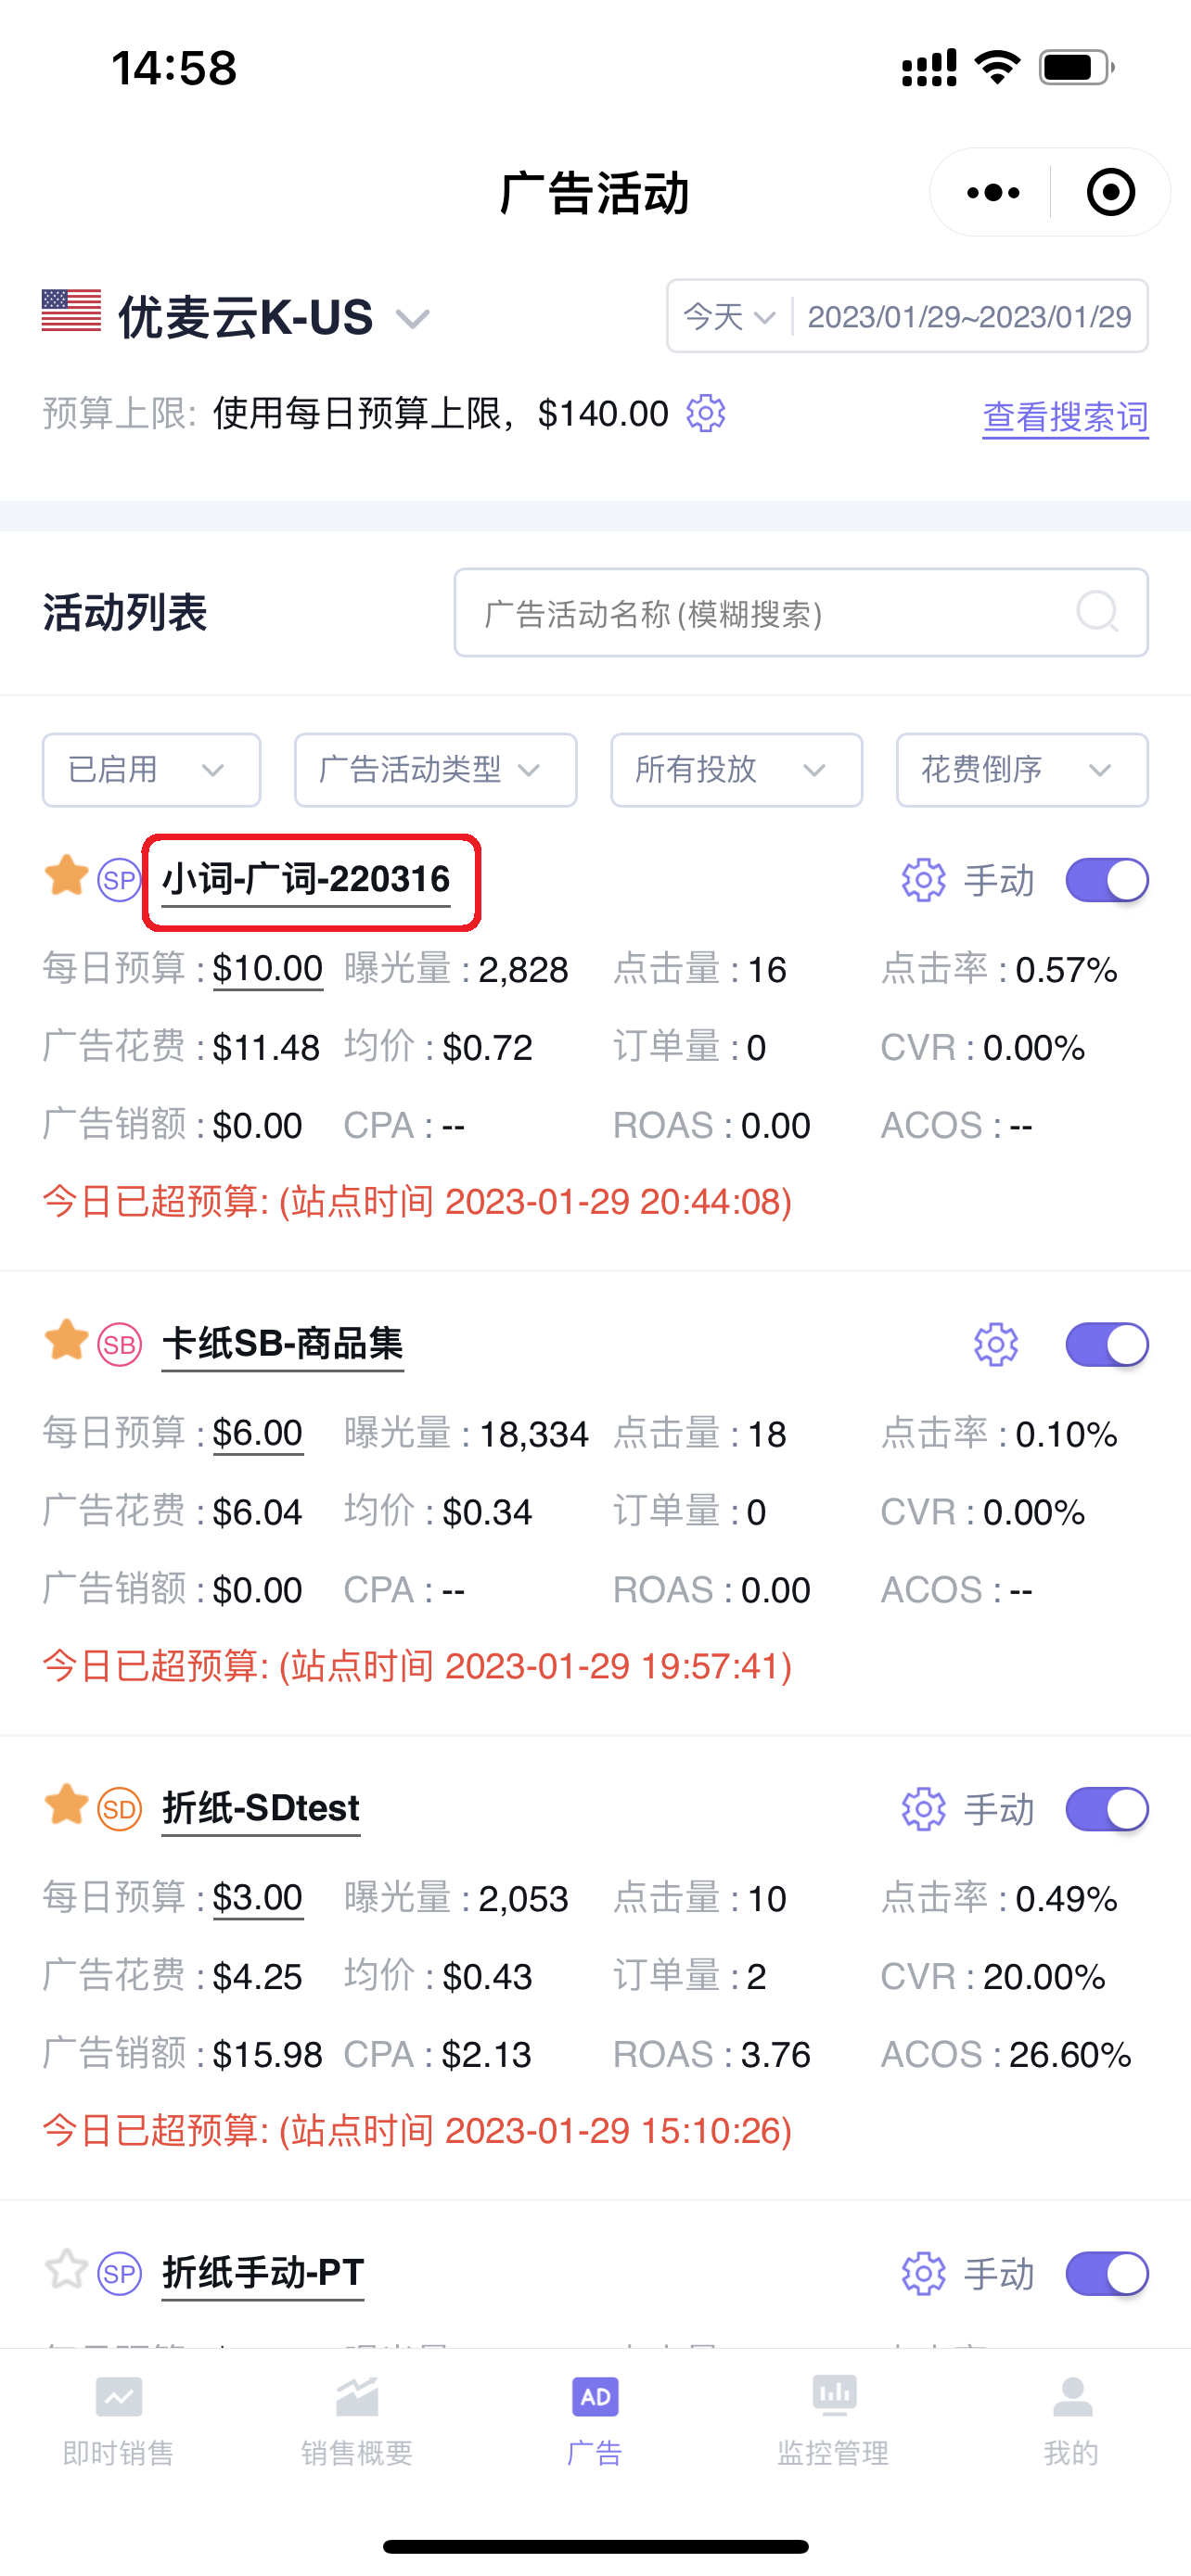
Upon entering the mobile app's ad backend, the default display is campaign data. You can identify the campaign type by the icon on the left side of the campaign name, and view the targeting type on the right side of the campaign;
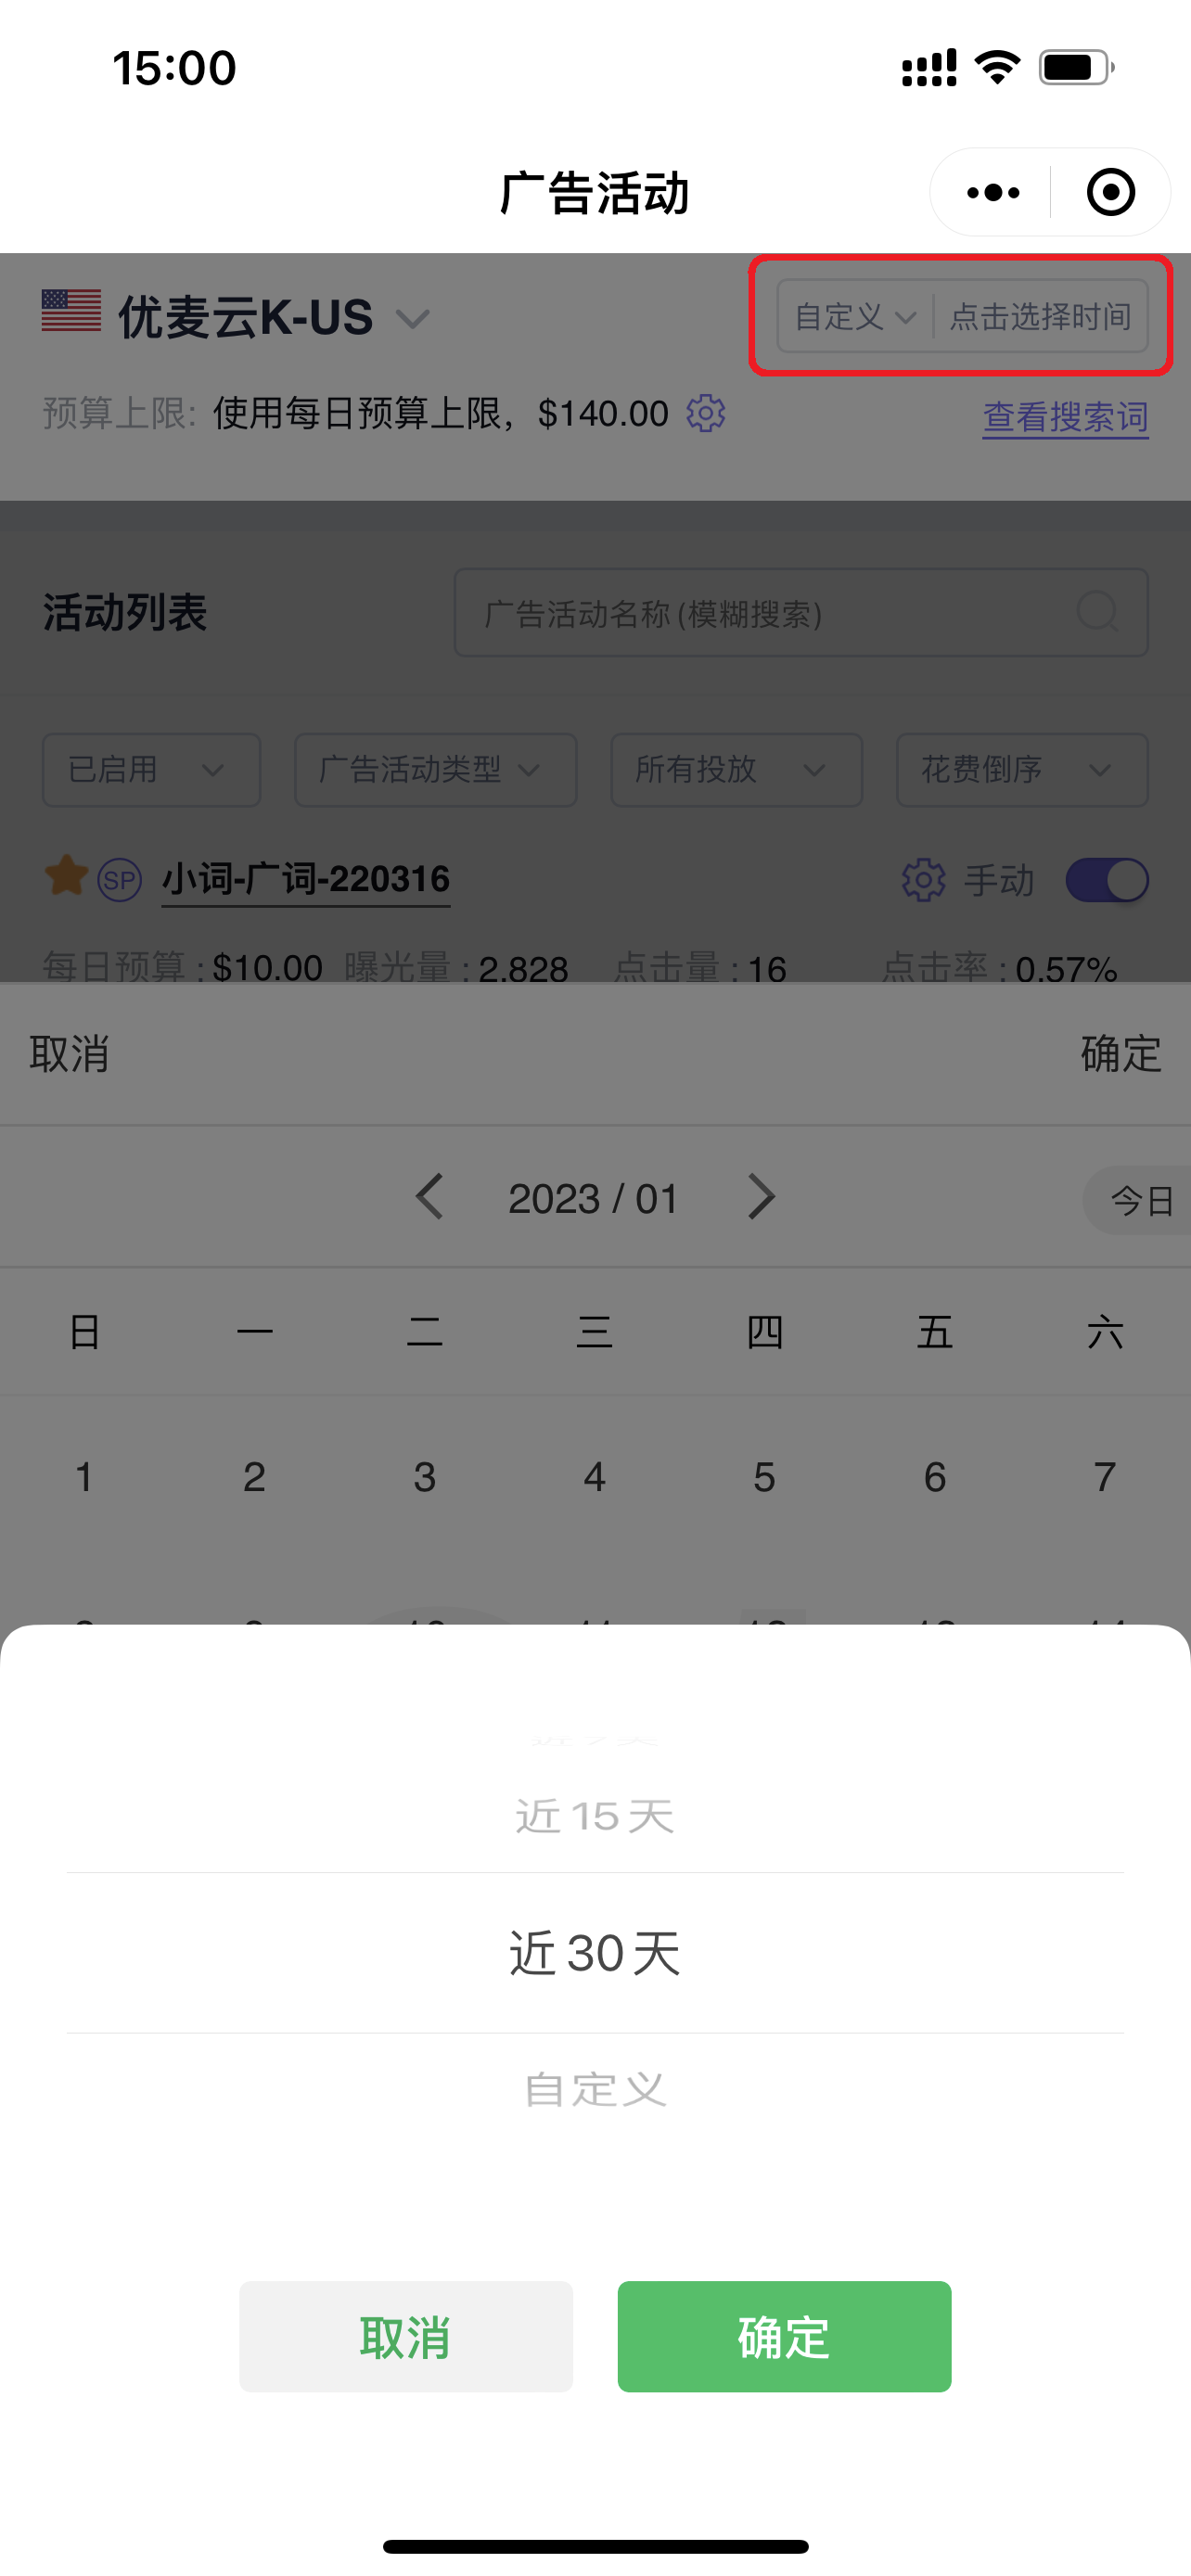
The system defaults to displaying today's advertising data. Click the time in the upper right corner to select other time ranges to view campaign performance data for that period;
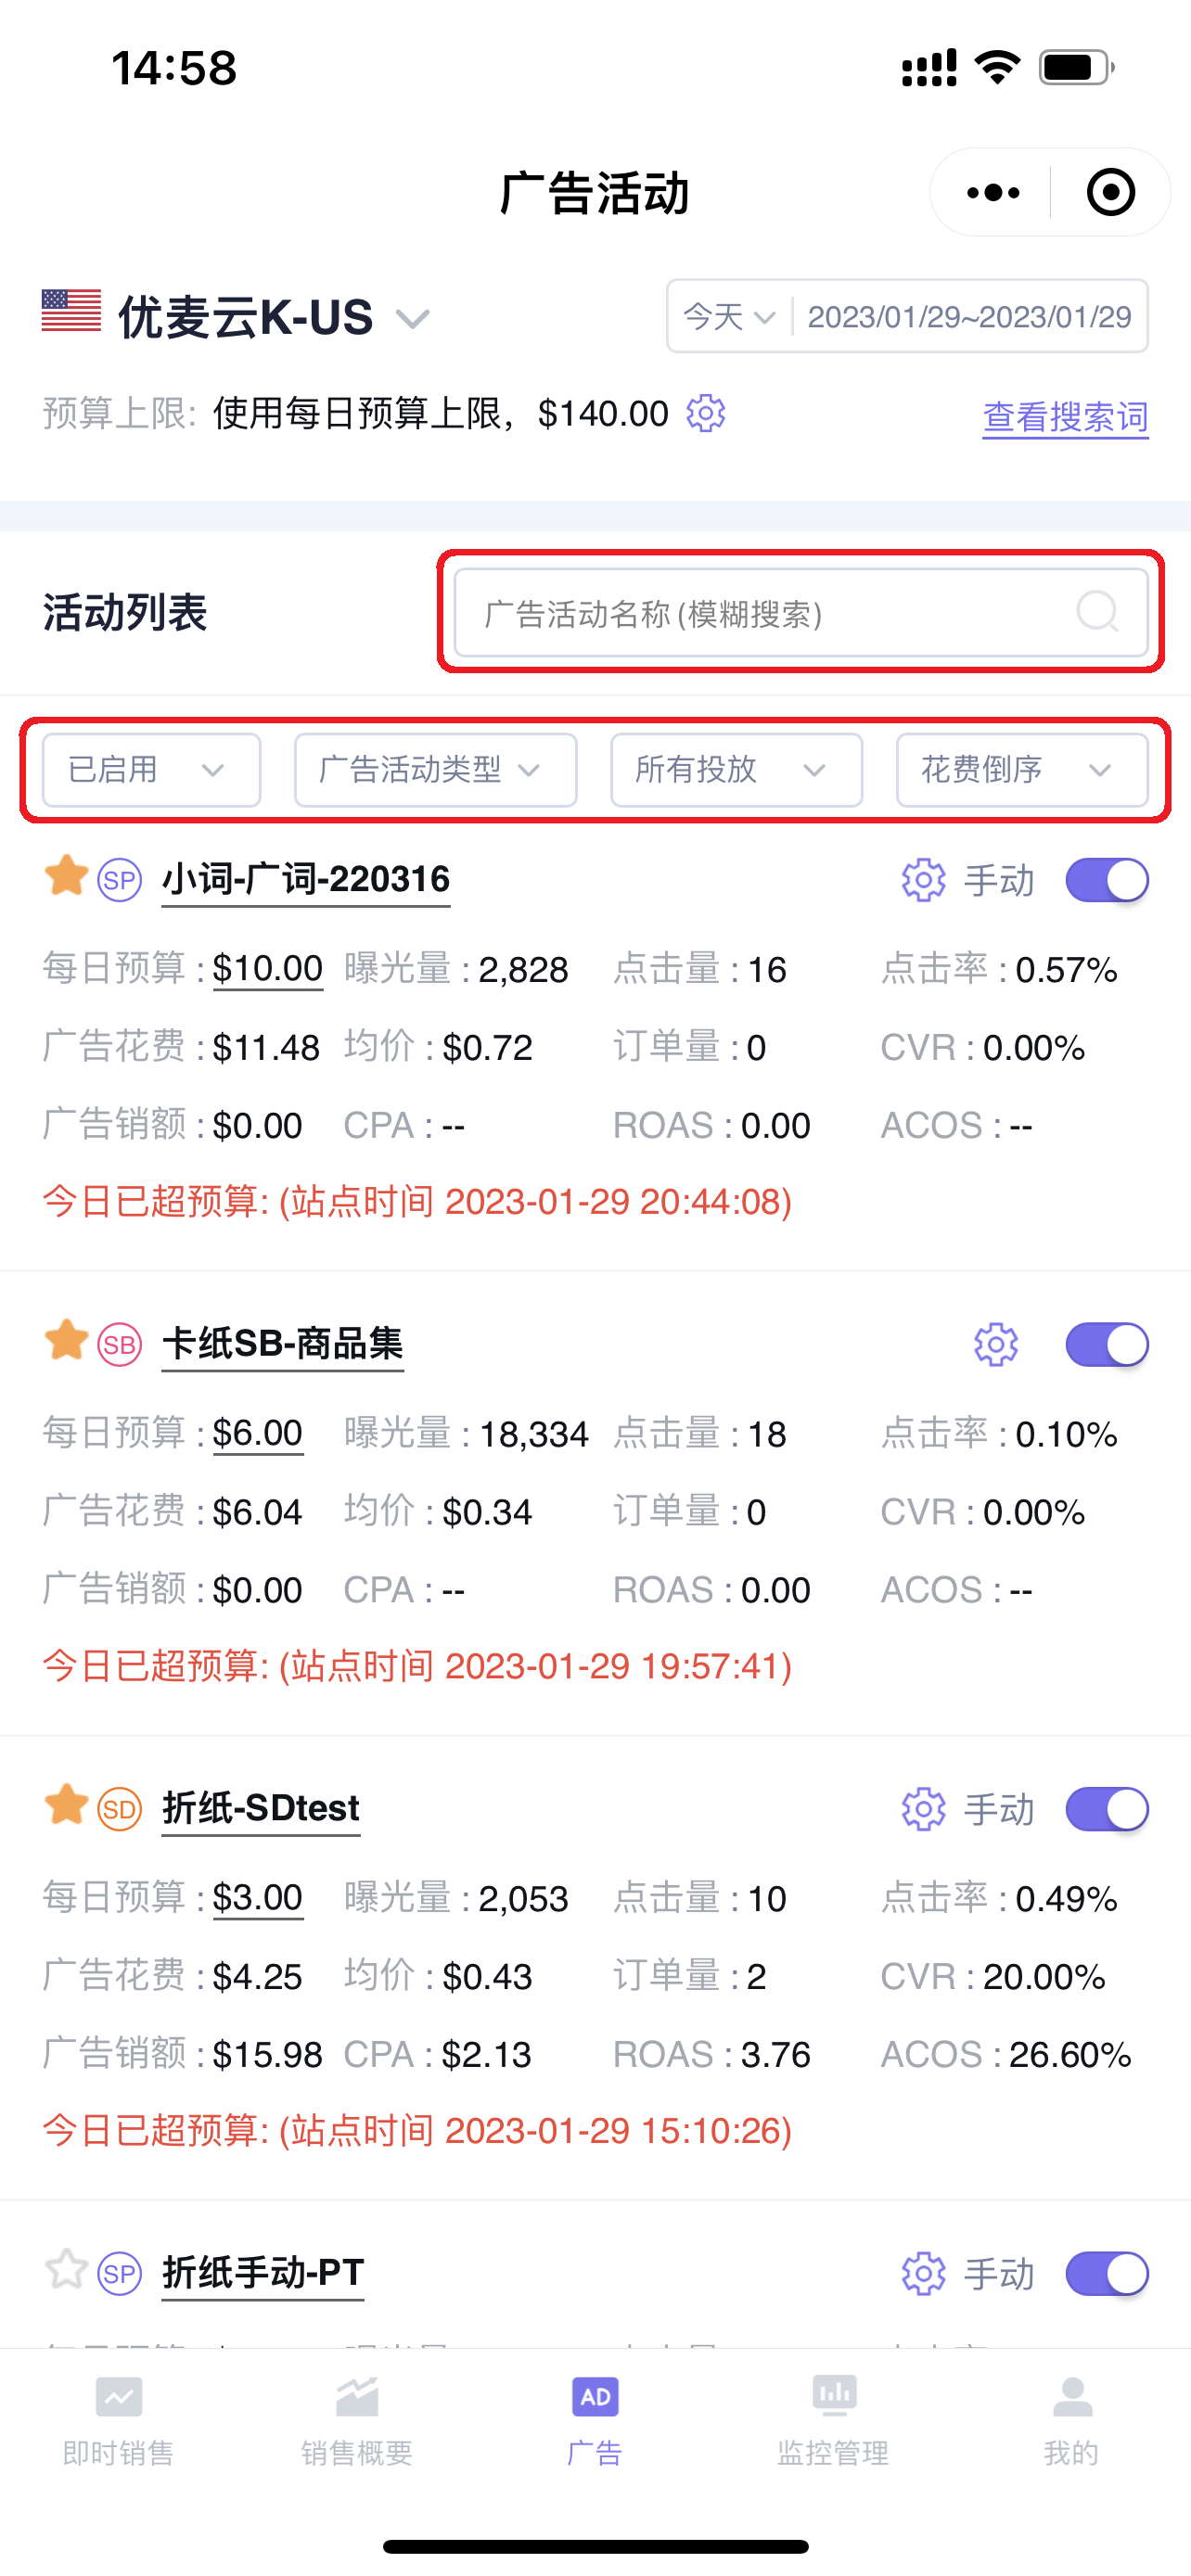
If you have many campaigns, you can use filter conditions to filter the campaigns you want to view, such as: Enabled status, campaign type, targeting type, and sorting by performance metrics;
You can also search for a specific campaign's data by searching for the campaign name;
1.2 Analyzing Campaign Historical Performance (The data presentation format for historical performance of advertising data across all dimensions is consistent.)
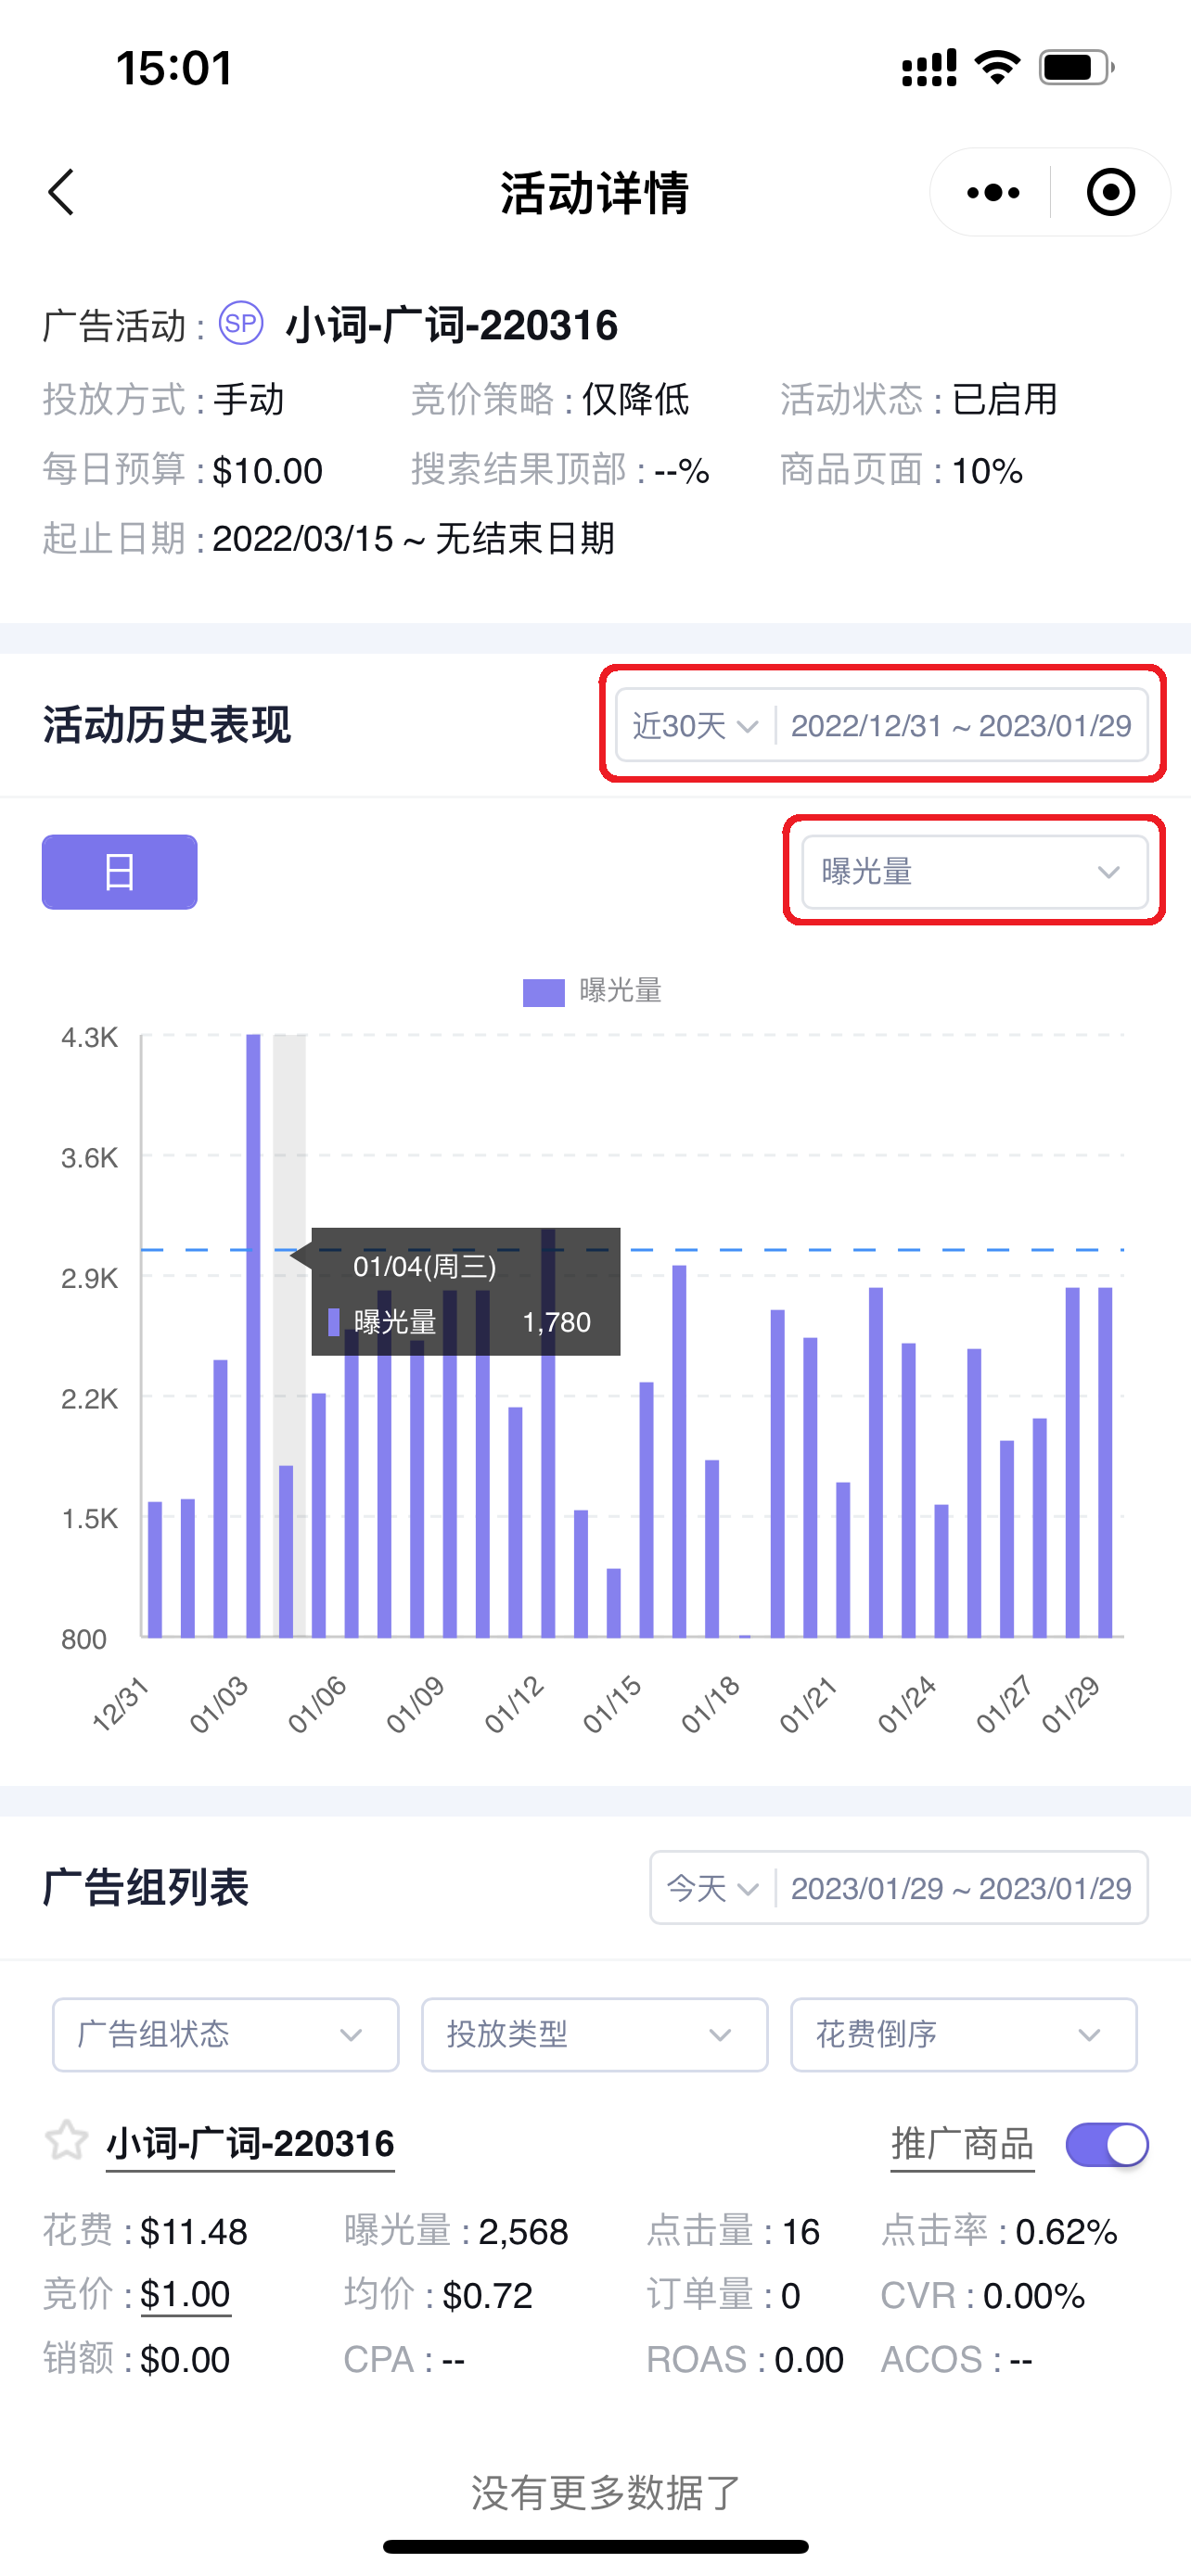
Click the campaign name to enter and view the historical performance data of that campaign;
Enter the “Historical Performance” page,
You can customize the time range (default is the last 30 days), and switch to view data such as: Impressions, Clicks, Click-Through Rate, Spend, Average CPC, (Advertising) Orders, (Advertising) Sales, etc. Click on the bar chart to view detailed data.
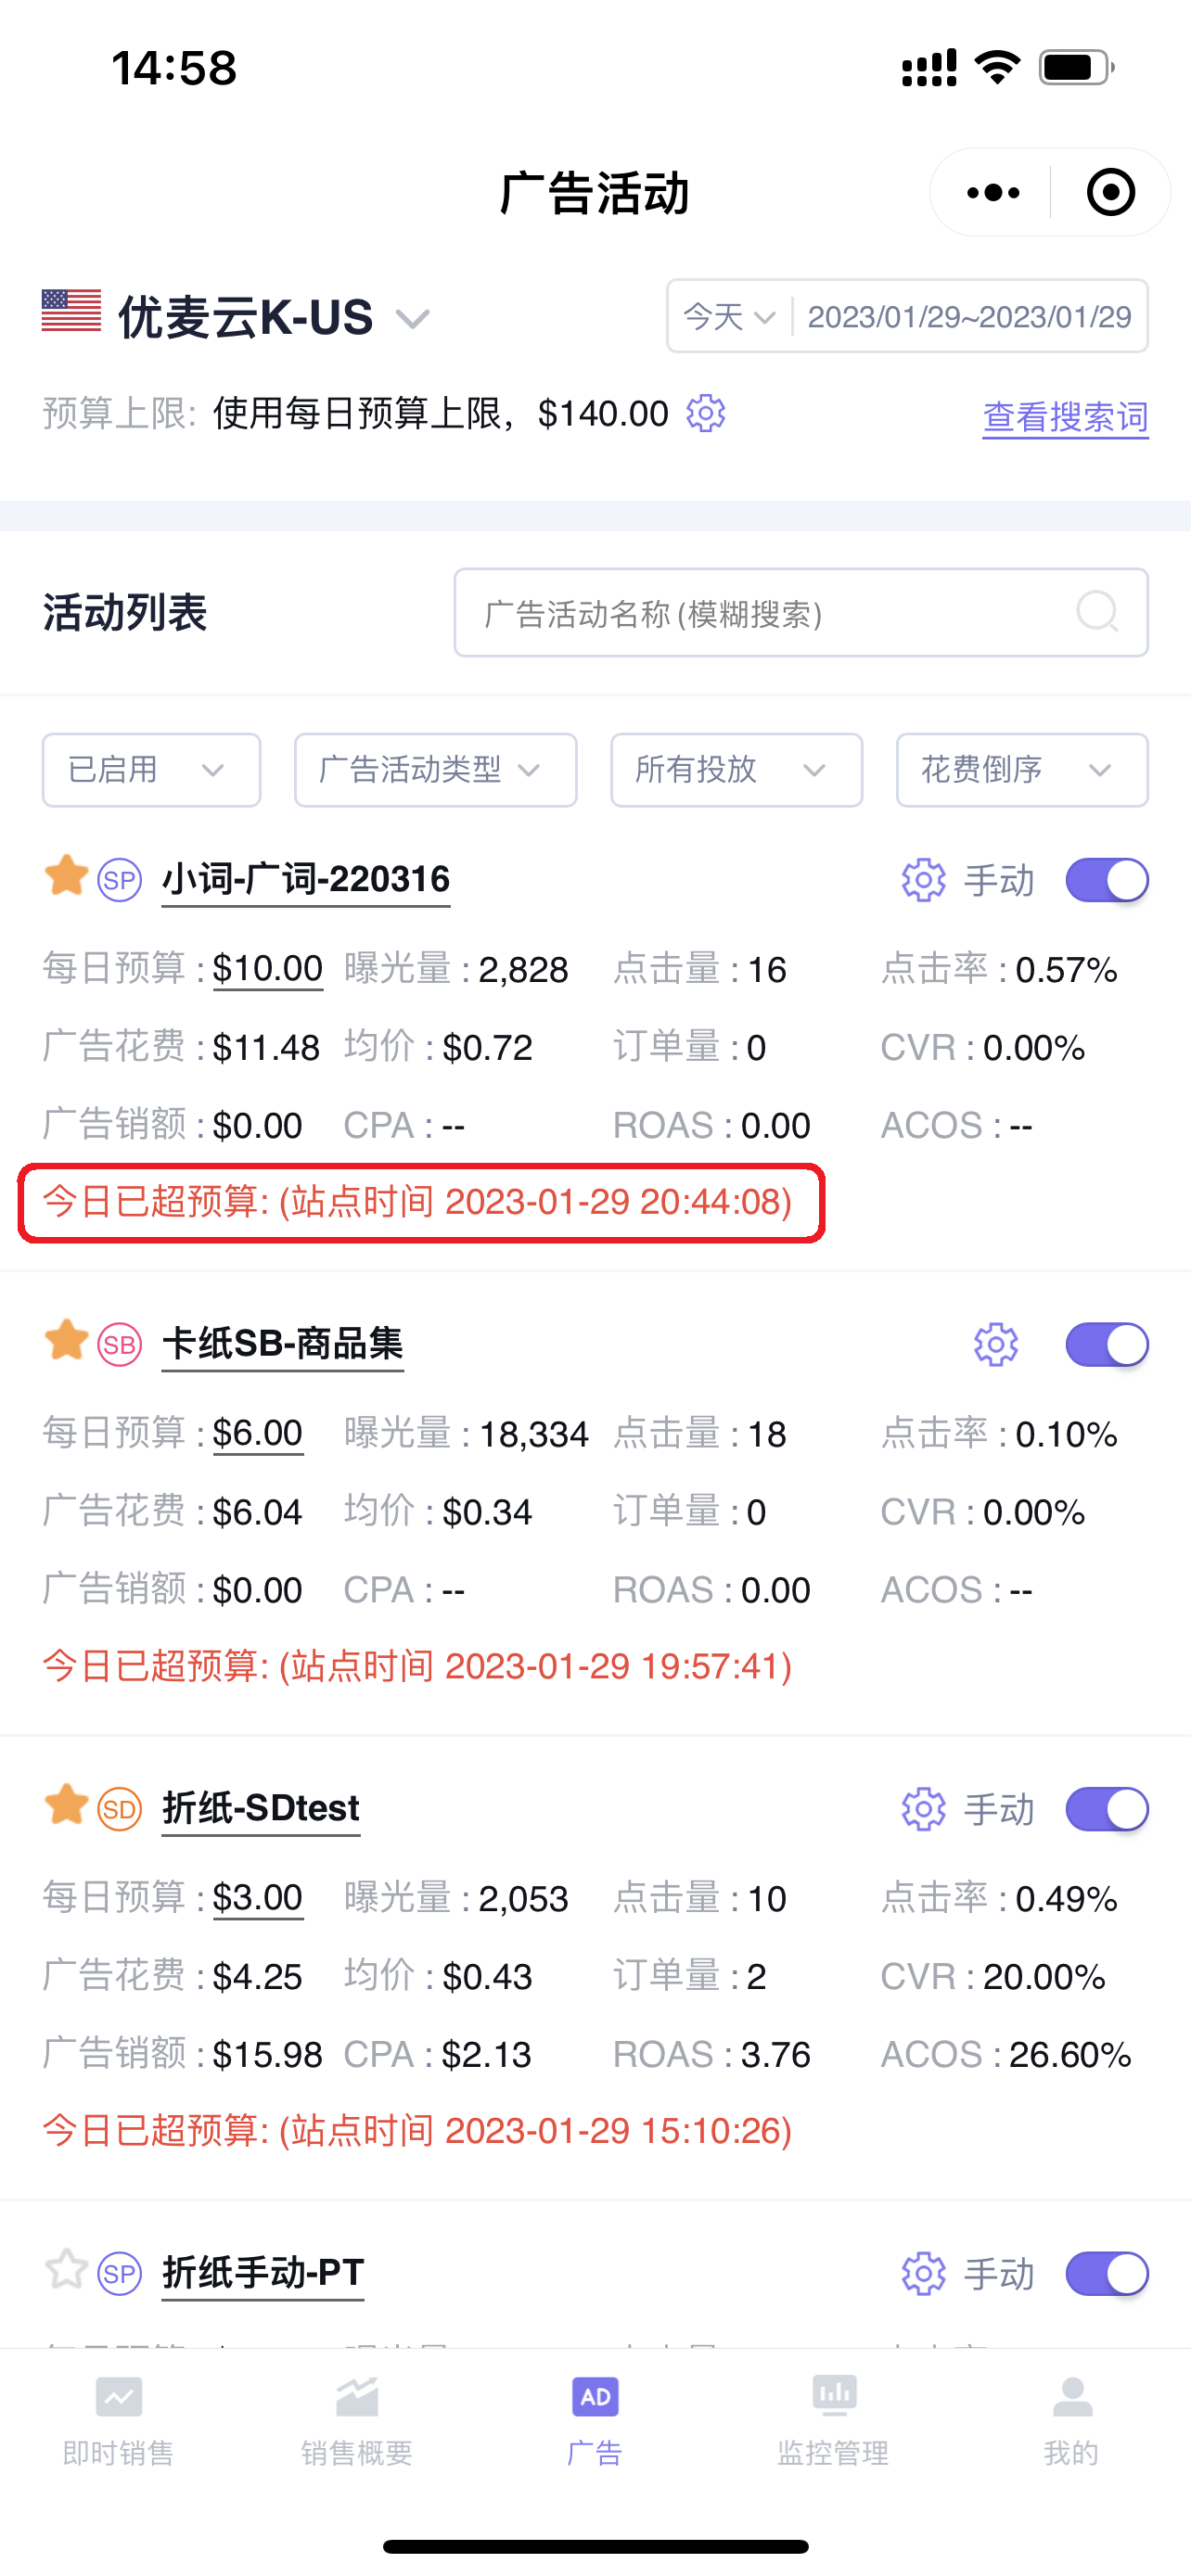
1.3 Out-of-Budget Reminder
The time point when the budget is exceeded for the marketplace will be displayed below the campaign. This helps you analyze the accuracy of budget allocation and whether budget settings need to be optimized, etc.
Note: In SellerSpace, "out-of-budget" refers to the situation where 100% of the budget is spent, which is slightly different from Amazon's out-of-budget calculation.
1.4 Analyzing Placements
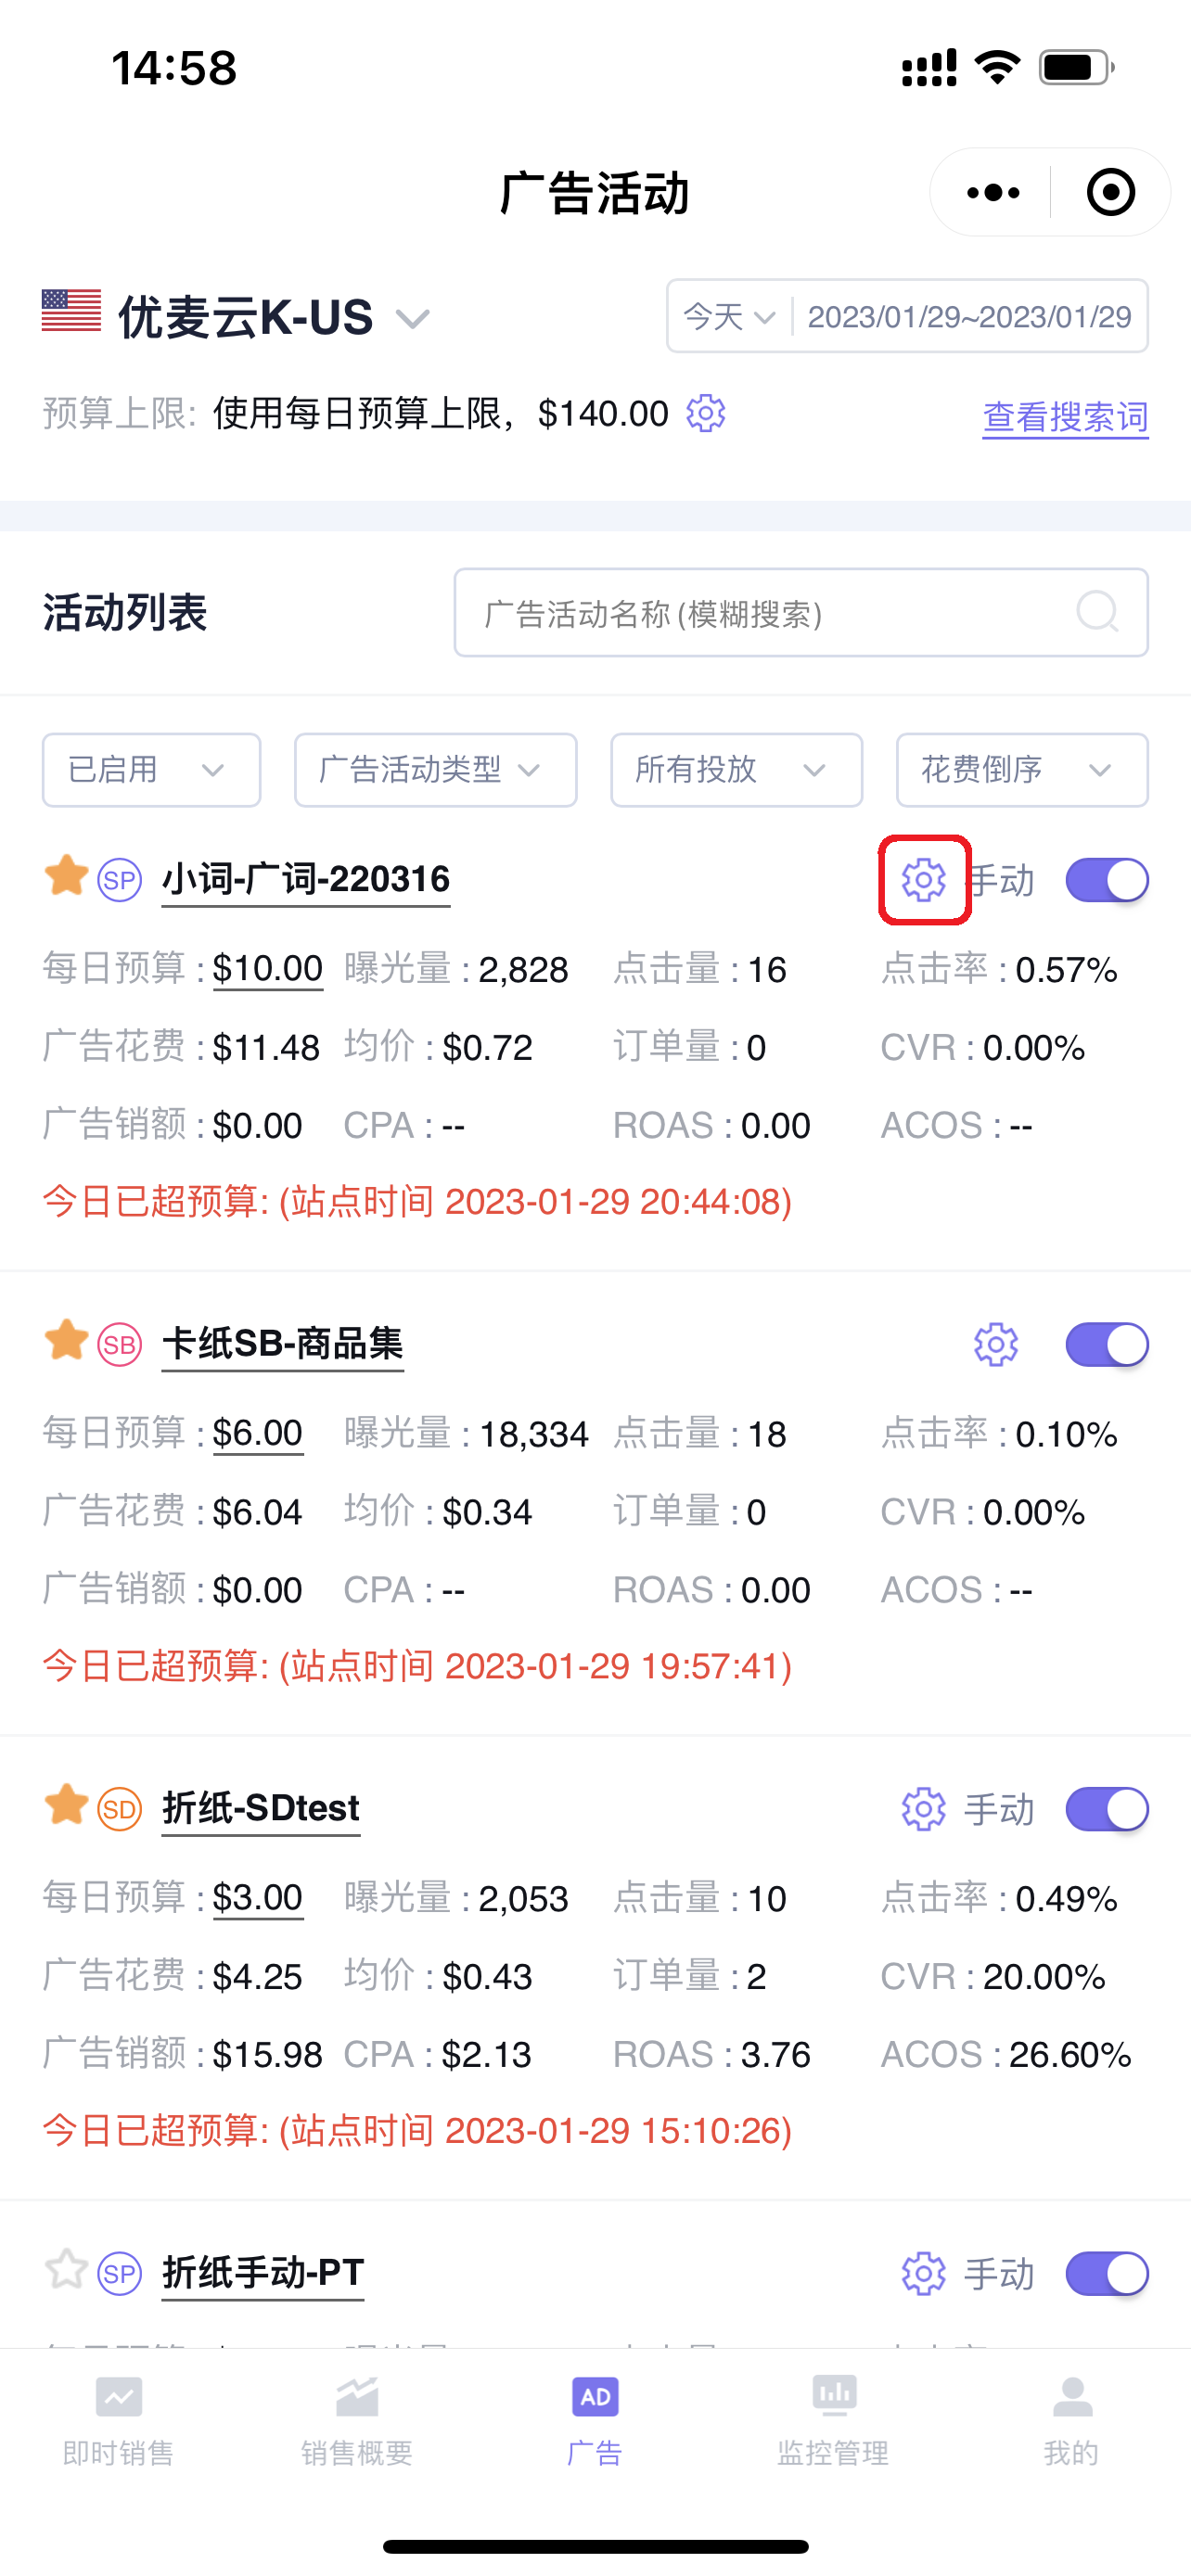
Each campaign has corresponding placement performance data: Top of search results page (Page top), product pages, and other placements in search results.
Click the settings button on the right side of the campaign to enter and view placement performance data analysis.
Placement data:
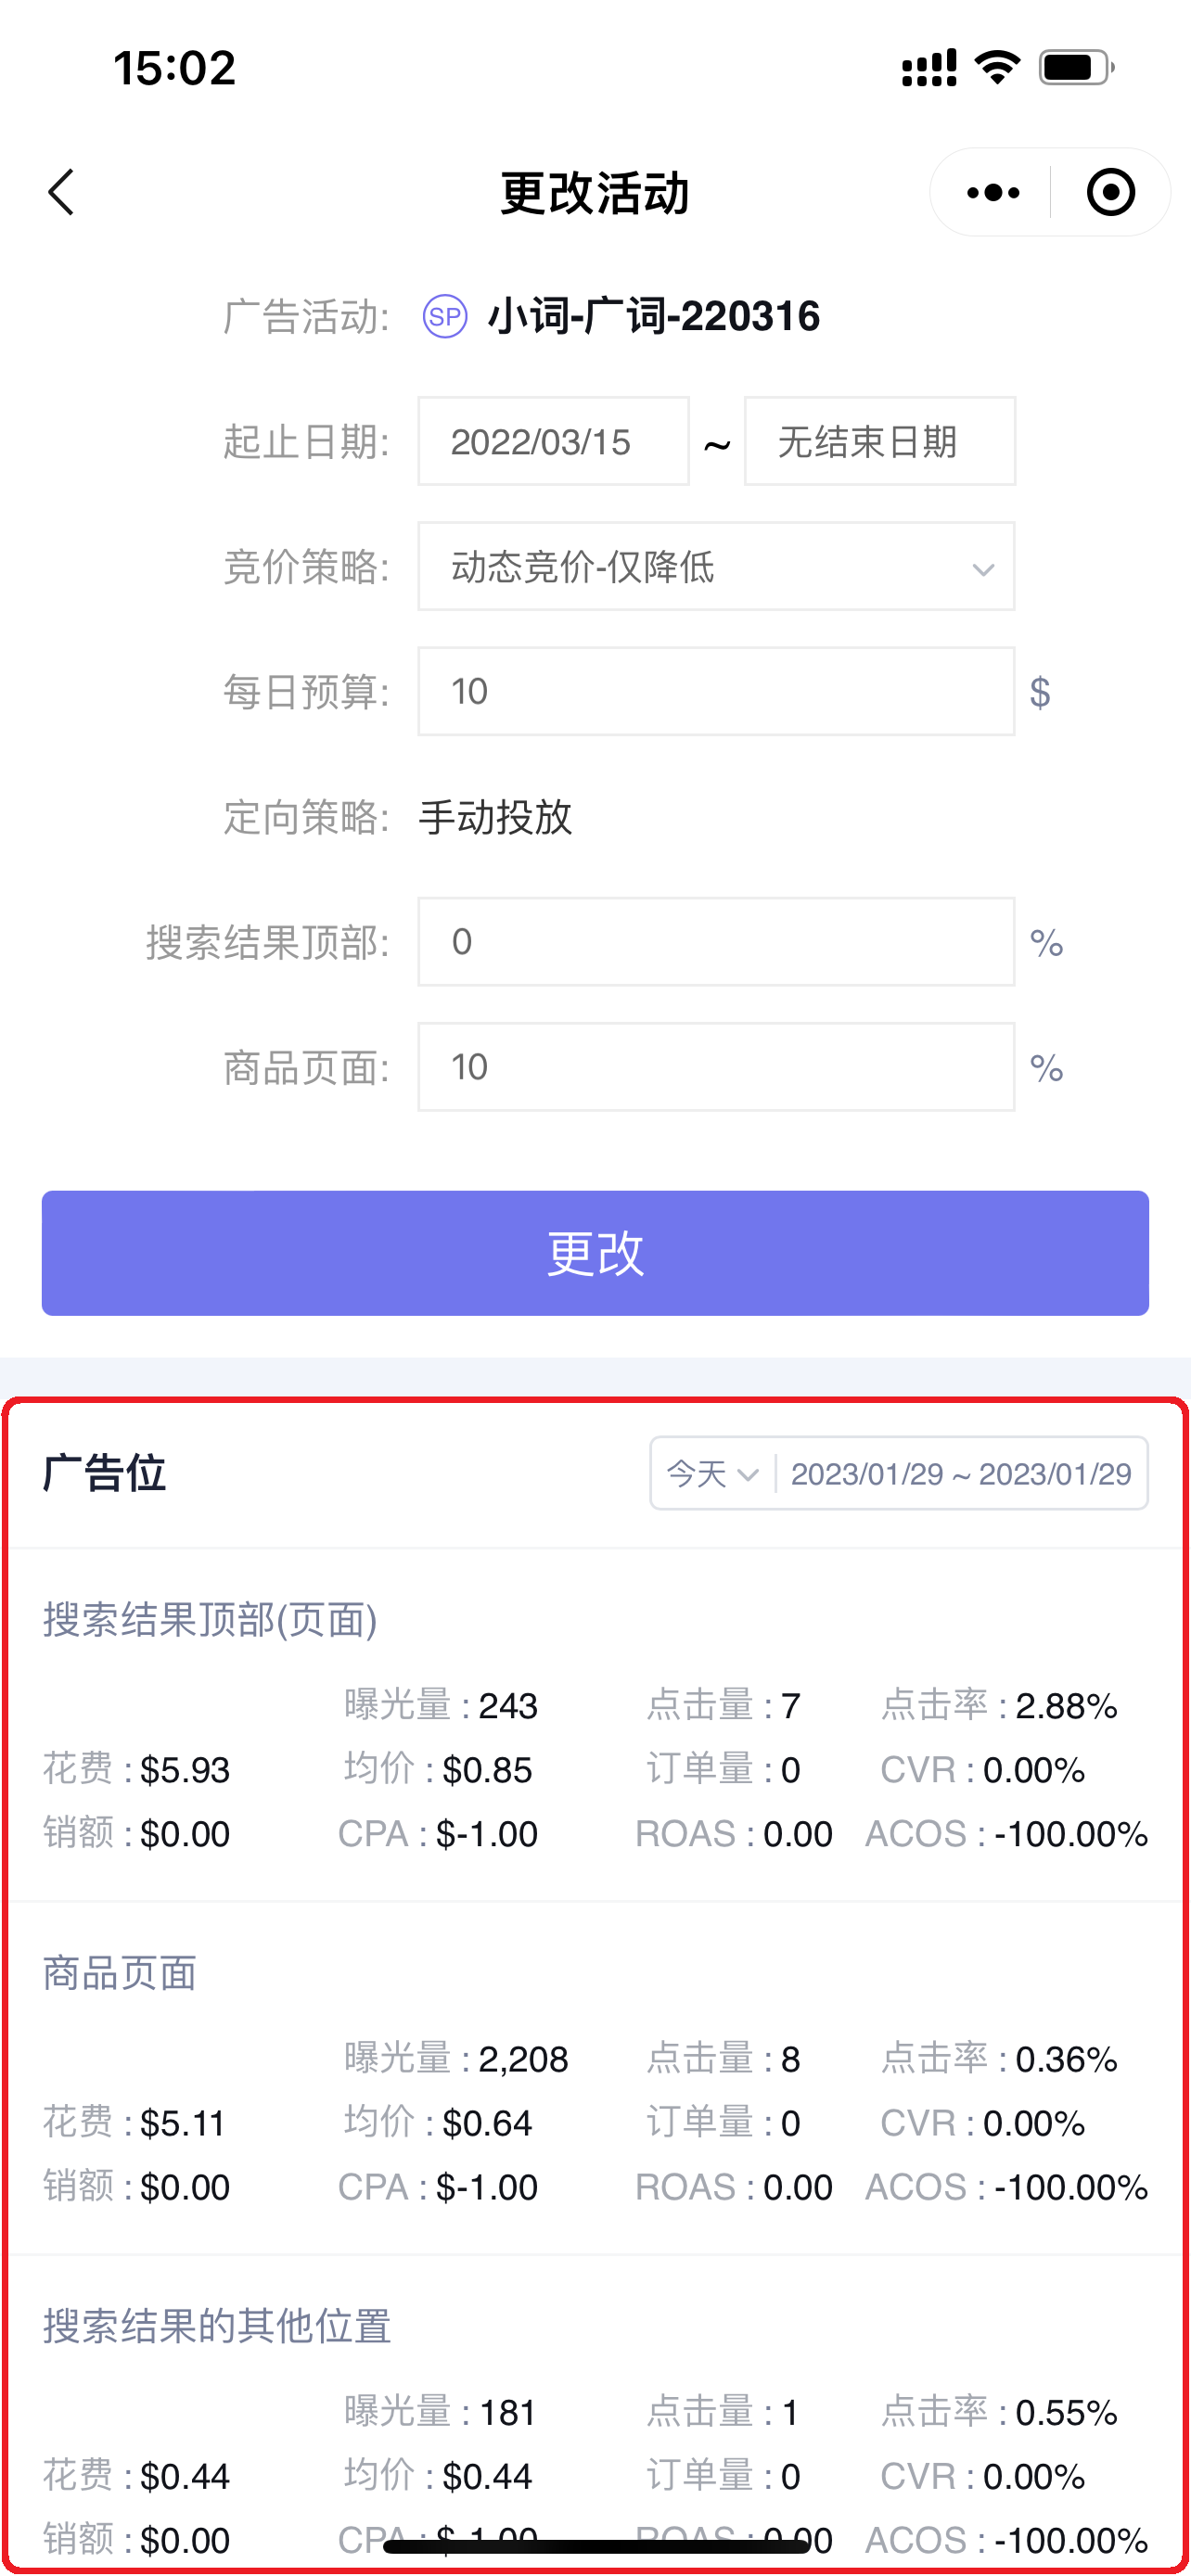
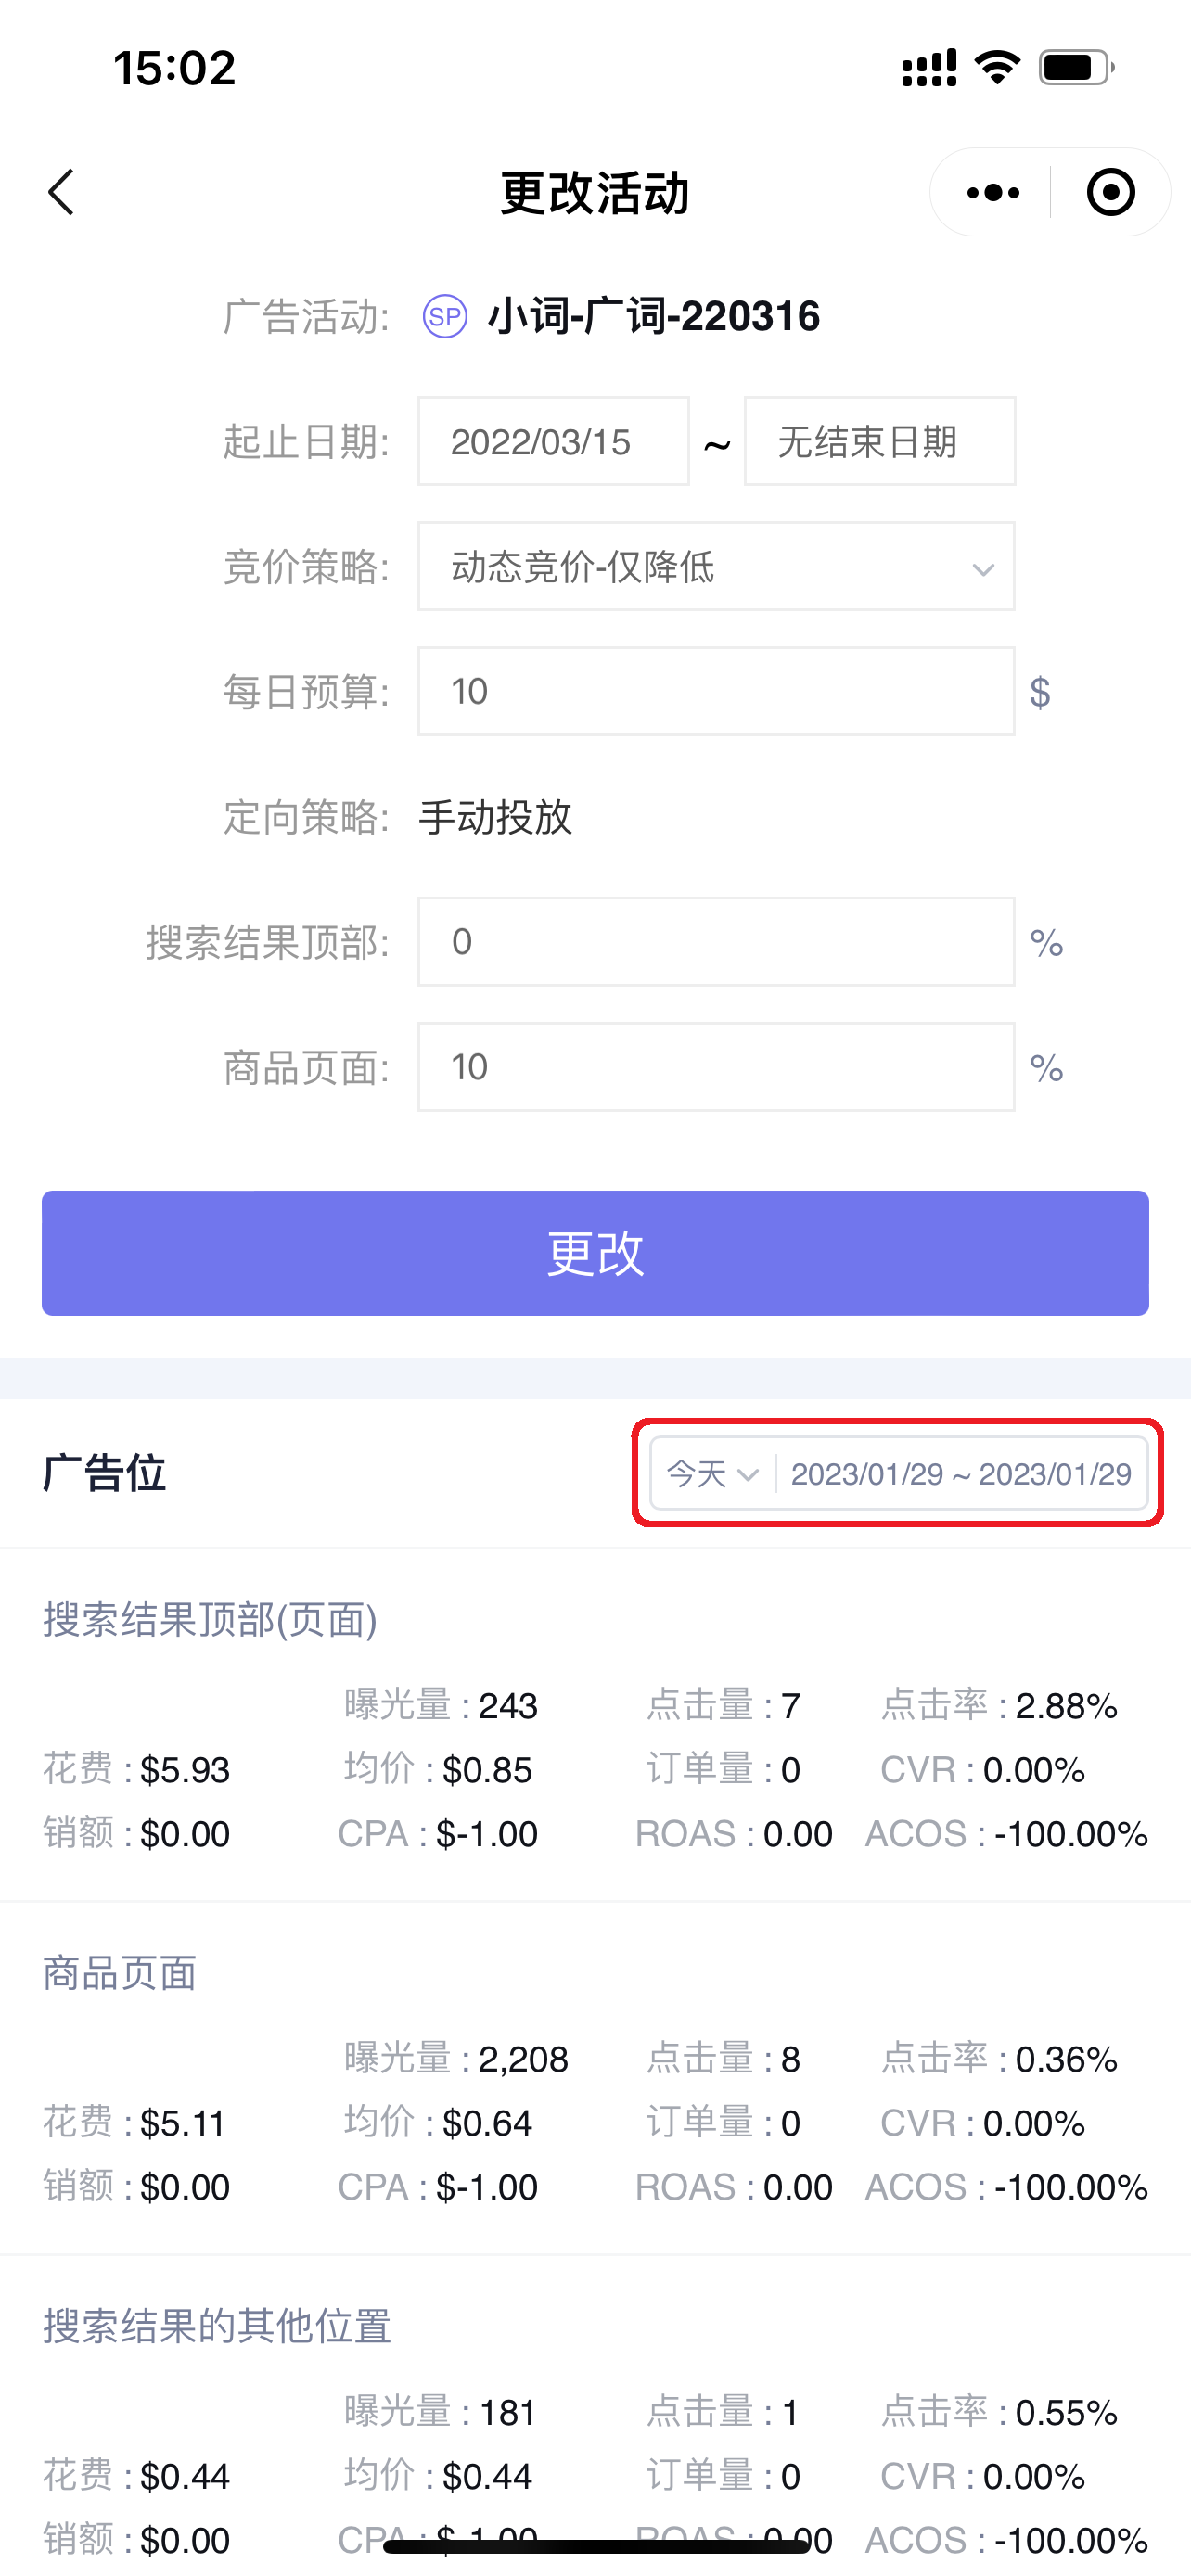
The system defaults to displaying the placement data for the time range selected for the current campaign. You can also choose to analyze placement data for other time ranges.
1.5 Adding to Watchlist (Advertising data across all dimensions can be added to the watchlist)
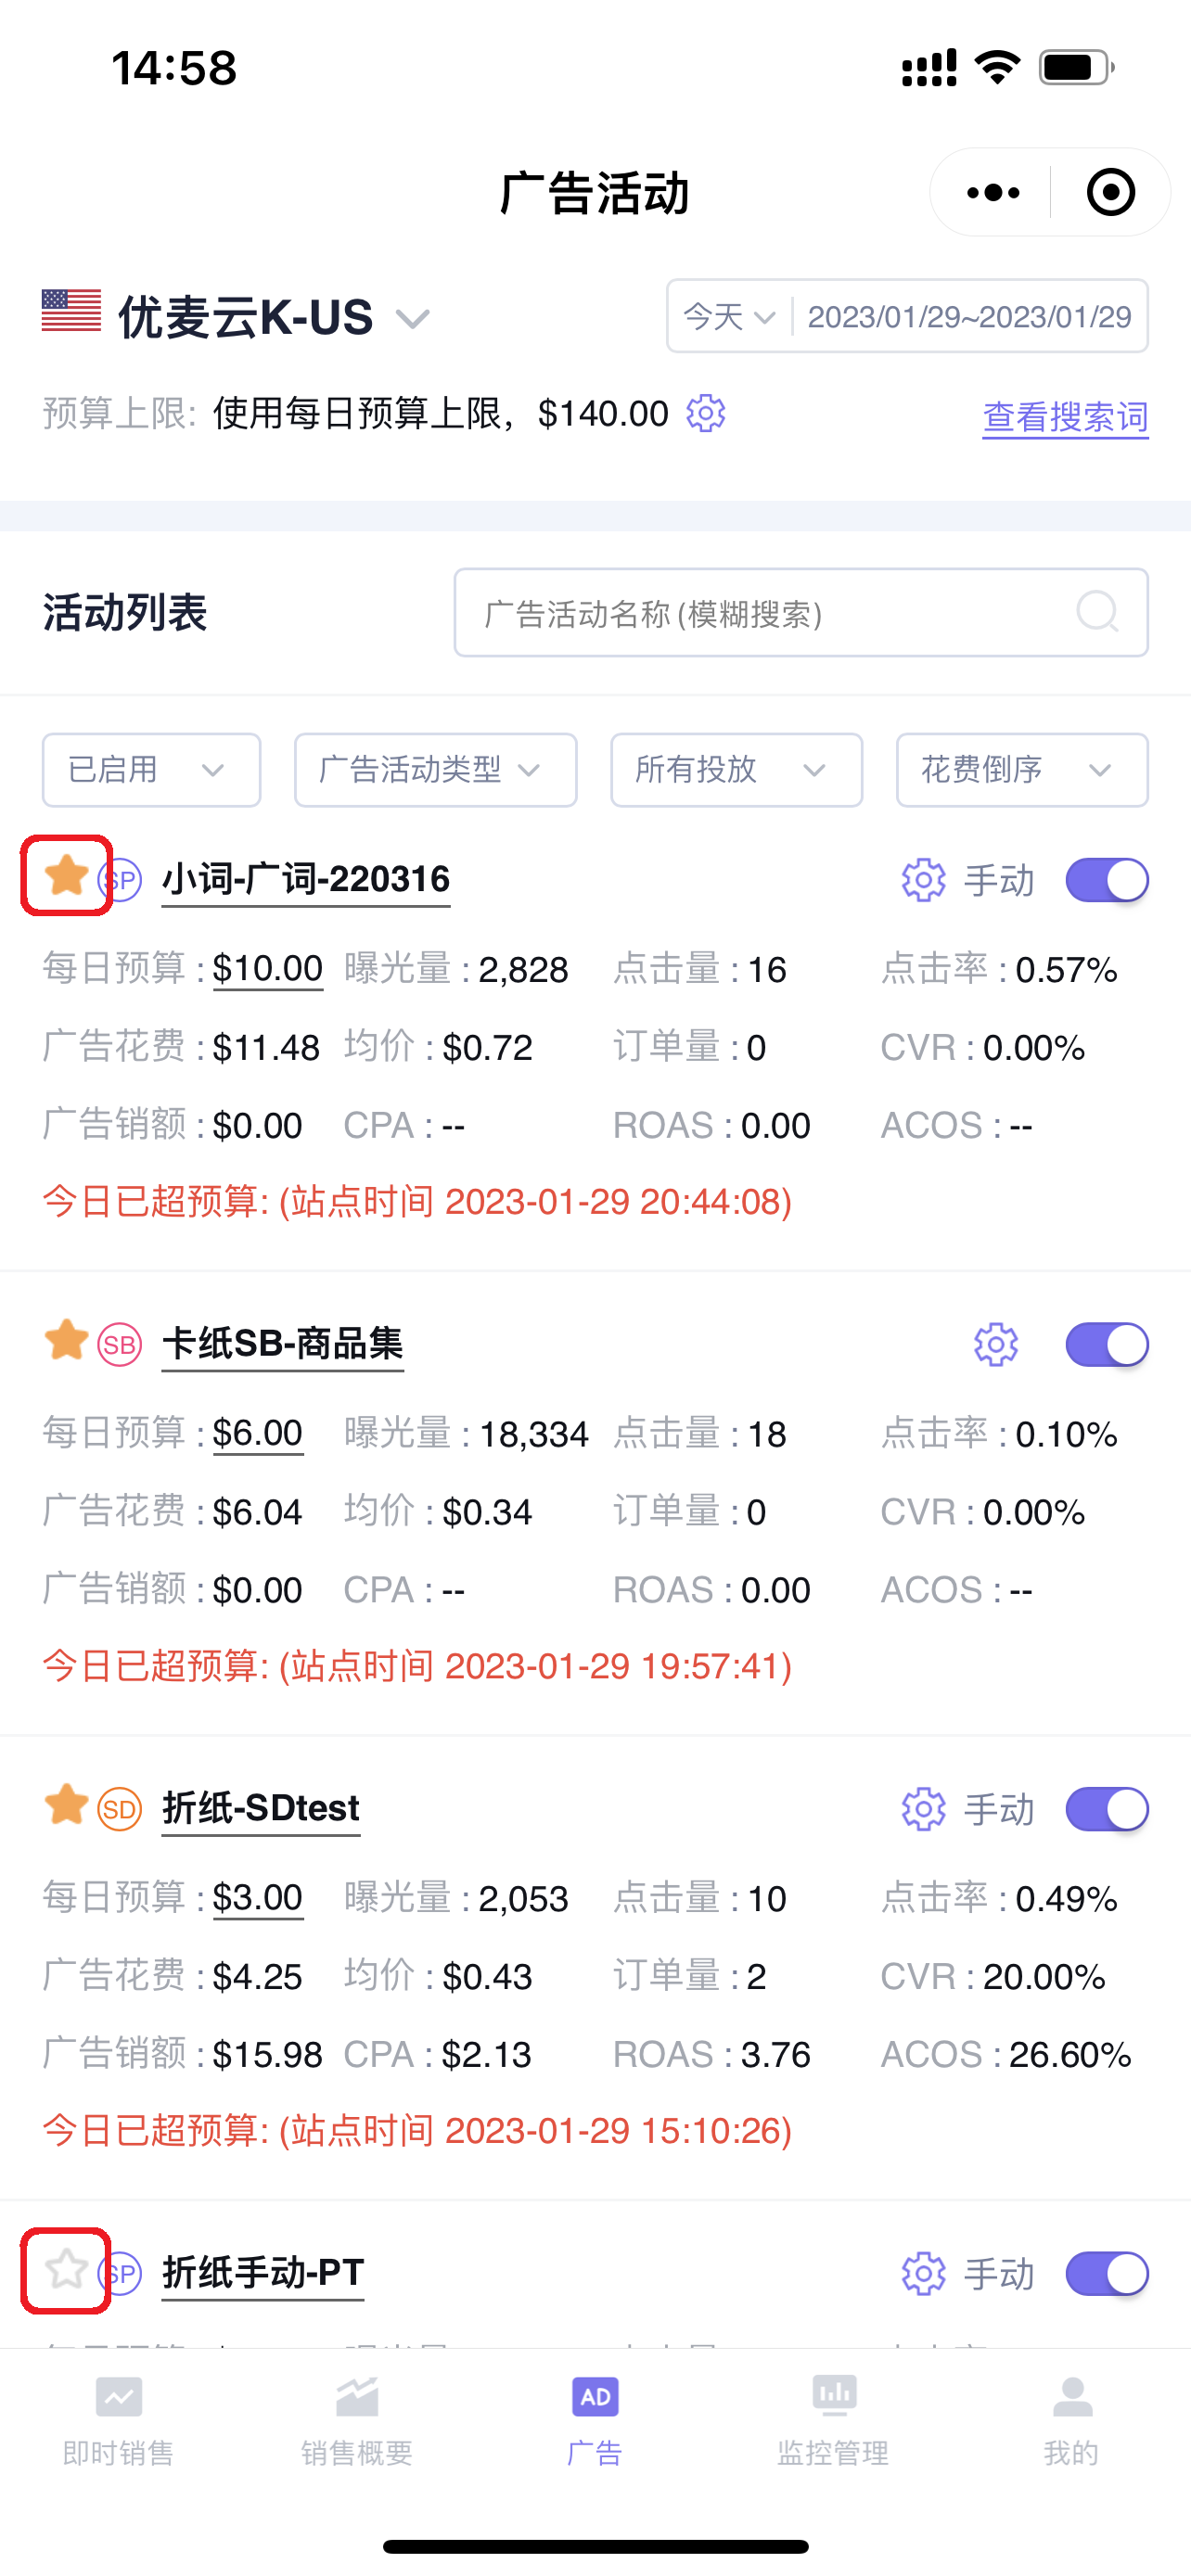
You can set campaigns you want to focus on to your watchlist. After adding to the watchlist, the campaign data will be displayed at the top by default, making it convenient for direct viewing and analysis.
Find the key campaigns and click “☆” on the left to add to the watchlist. Click again to remove from the watchlist.
2. Adjusting Campaigns
You can directly set campaign information in the mobile app, adjust campaign budgets, enable/pause status, and also set the budget cap for the current store.
2.1 Changing Campaign Settings
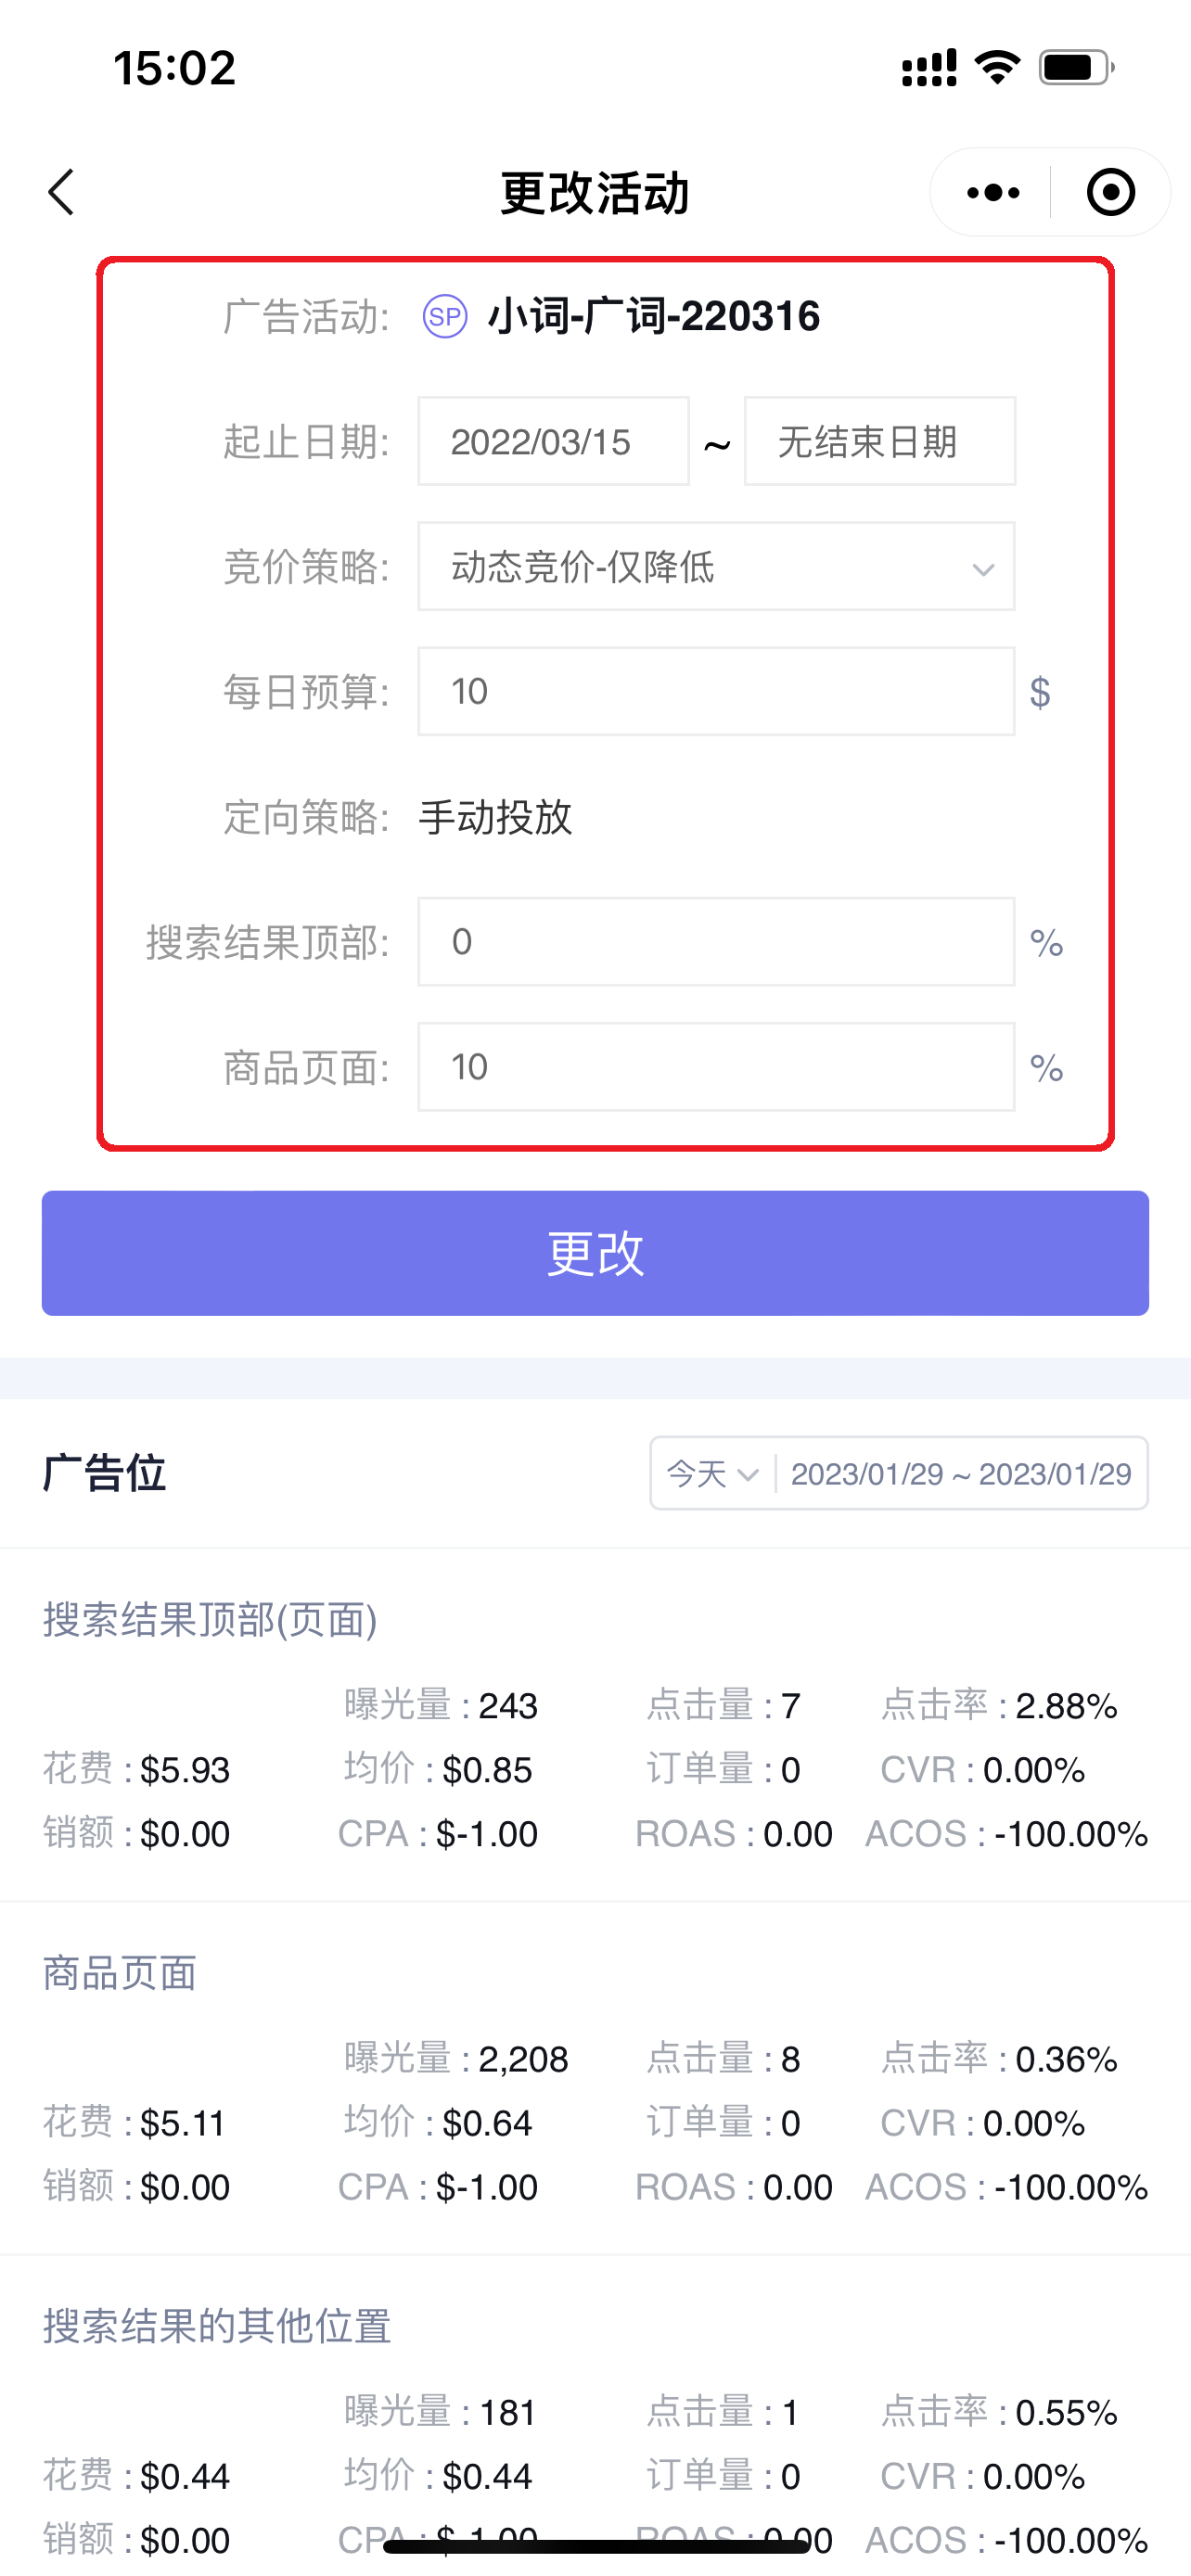
Click the settings button on the right to enter and change campaign settings, such as: start and end time, bidding strategy, budget, and placement bid adjustments.
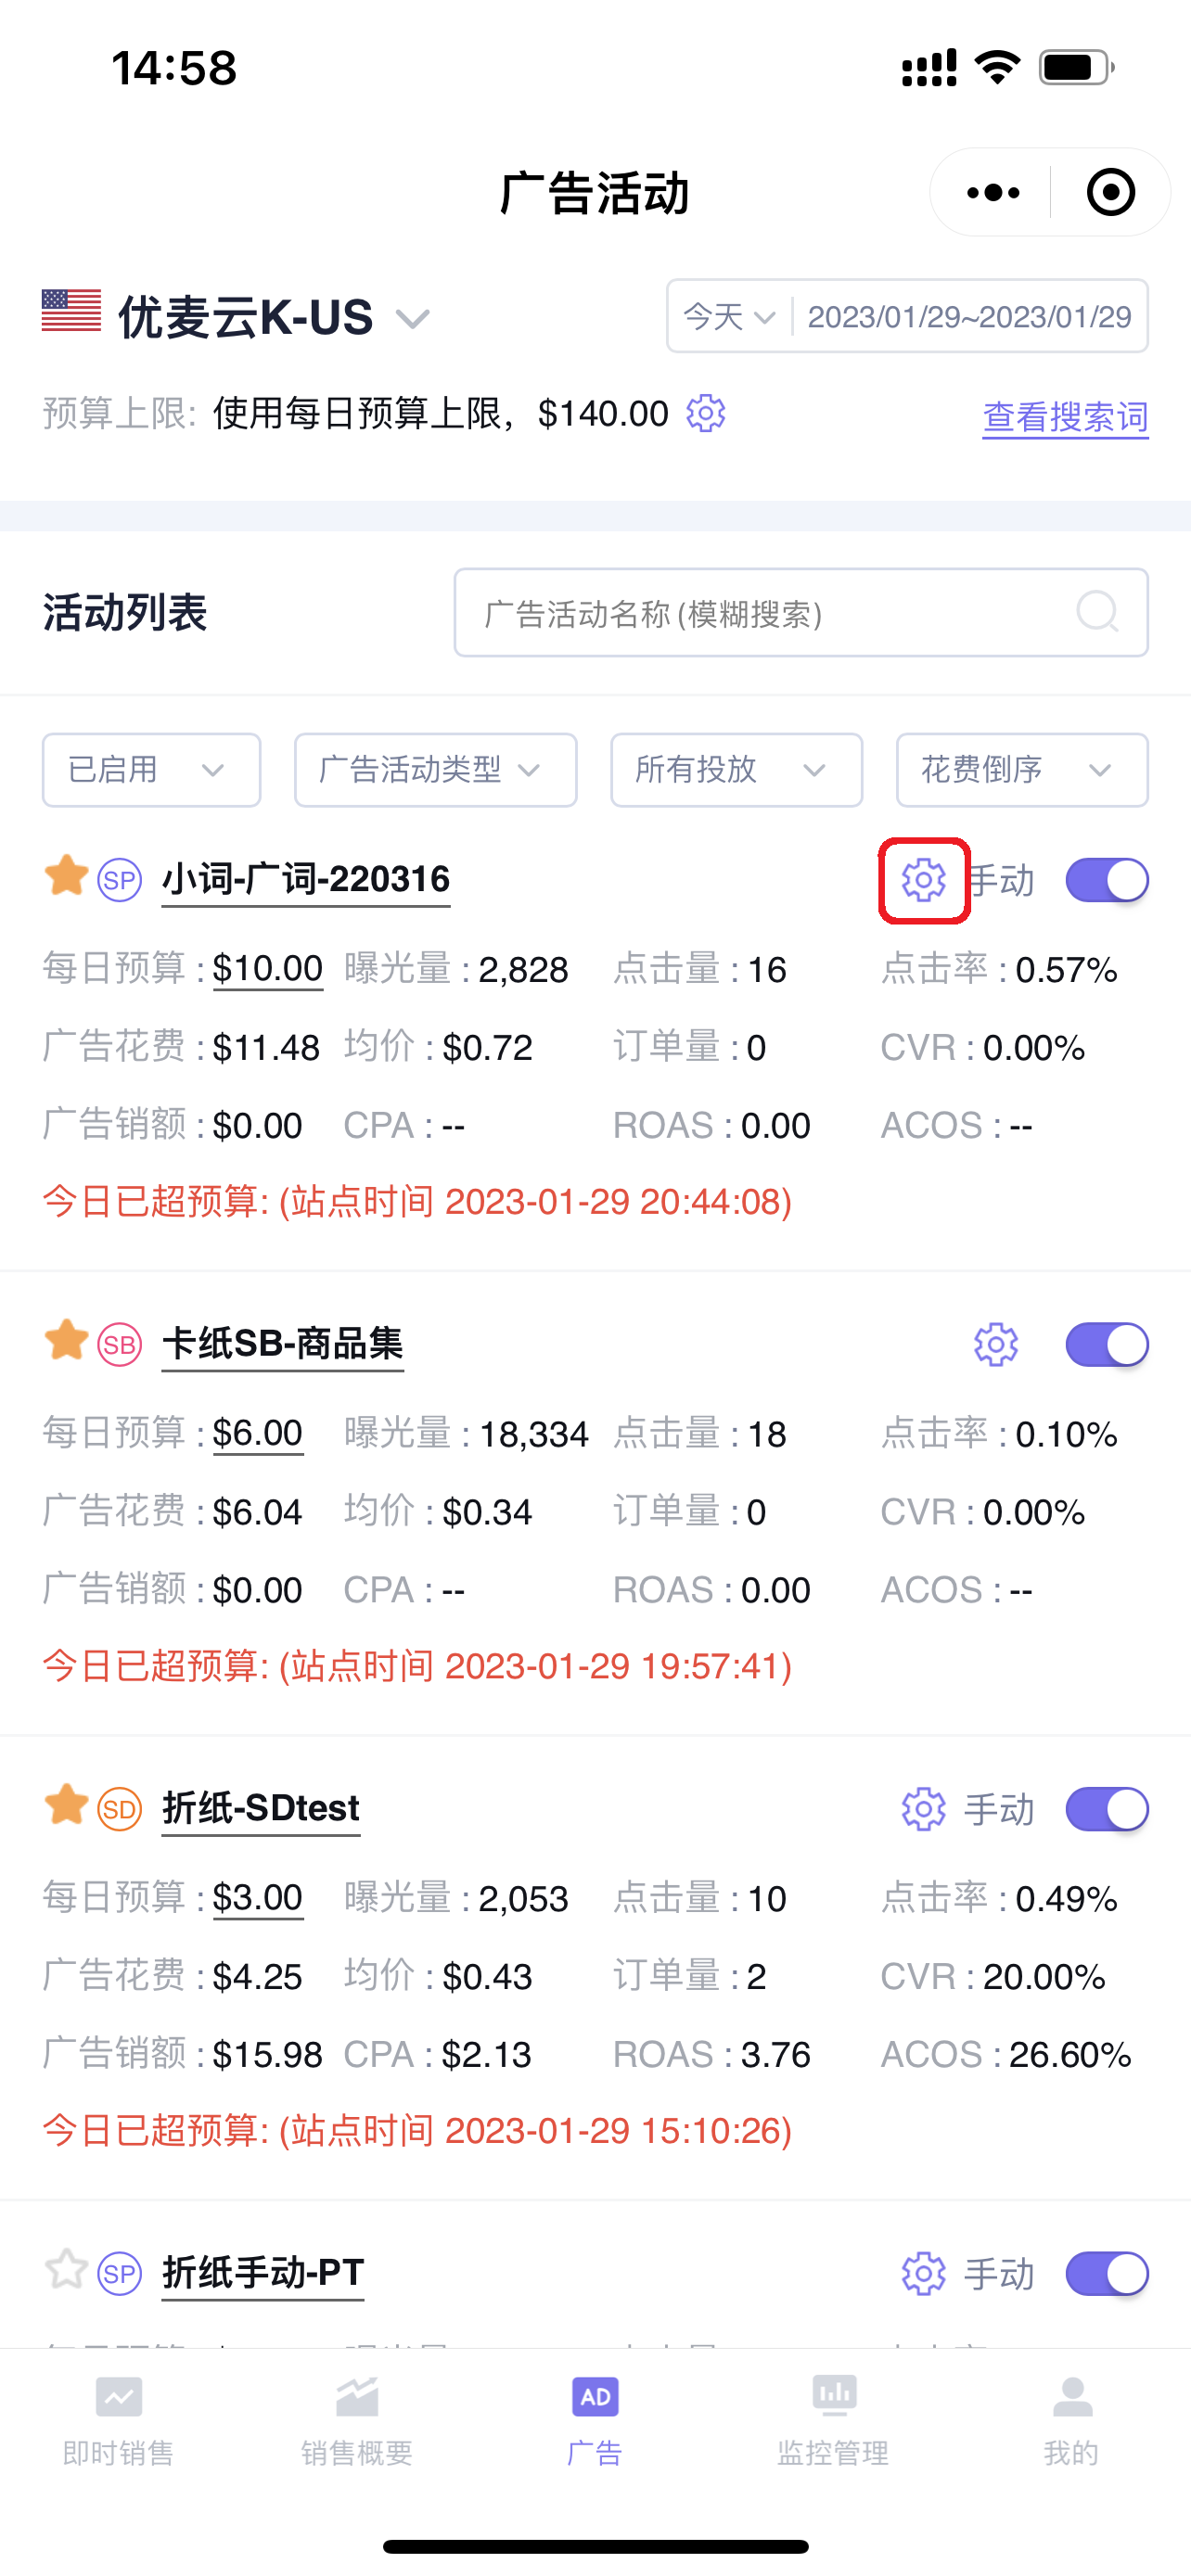
Changing Campaign:
2.2 Adjusting Budget
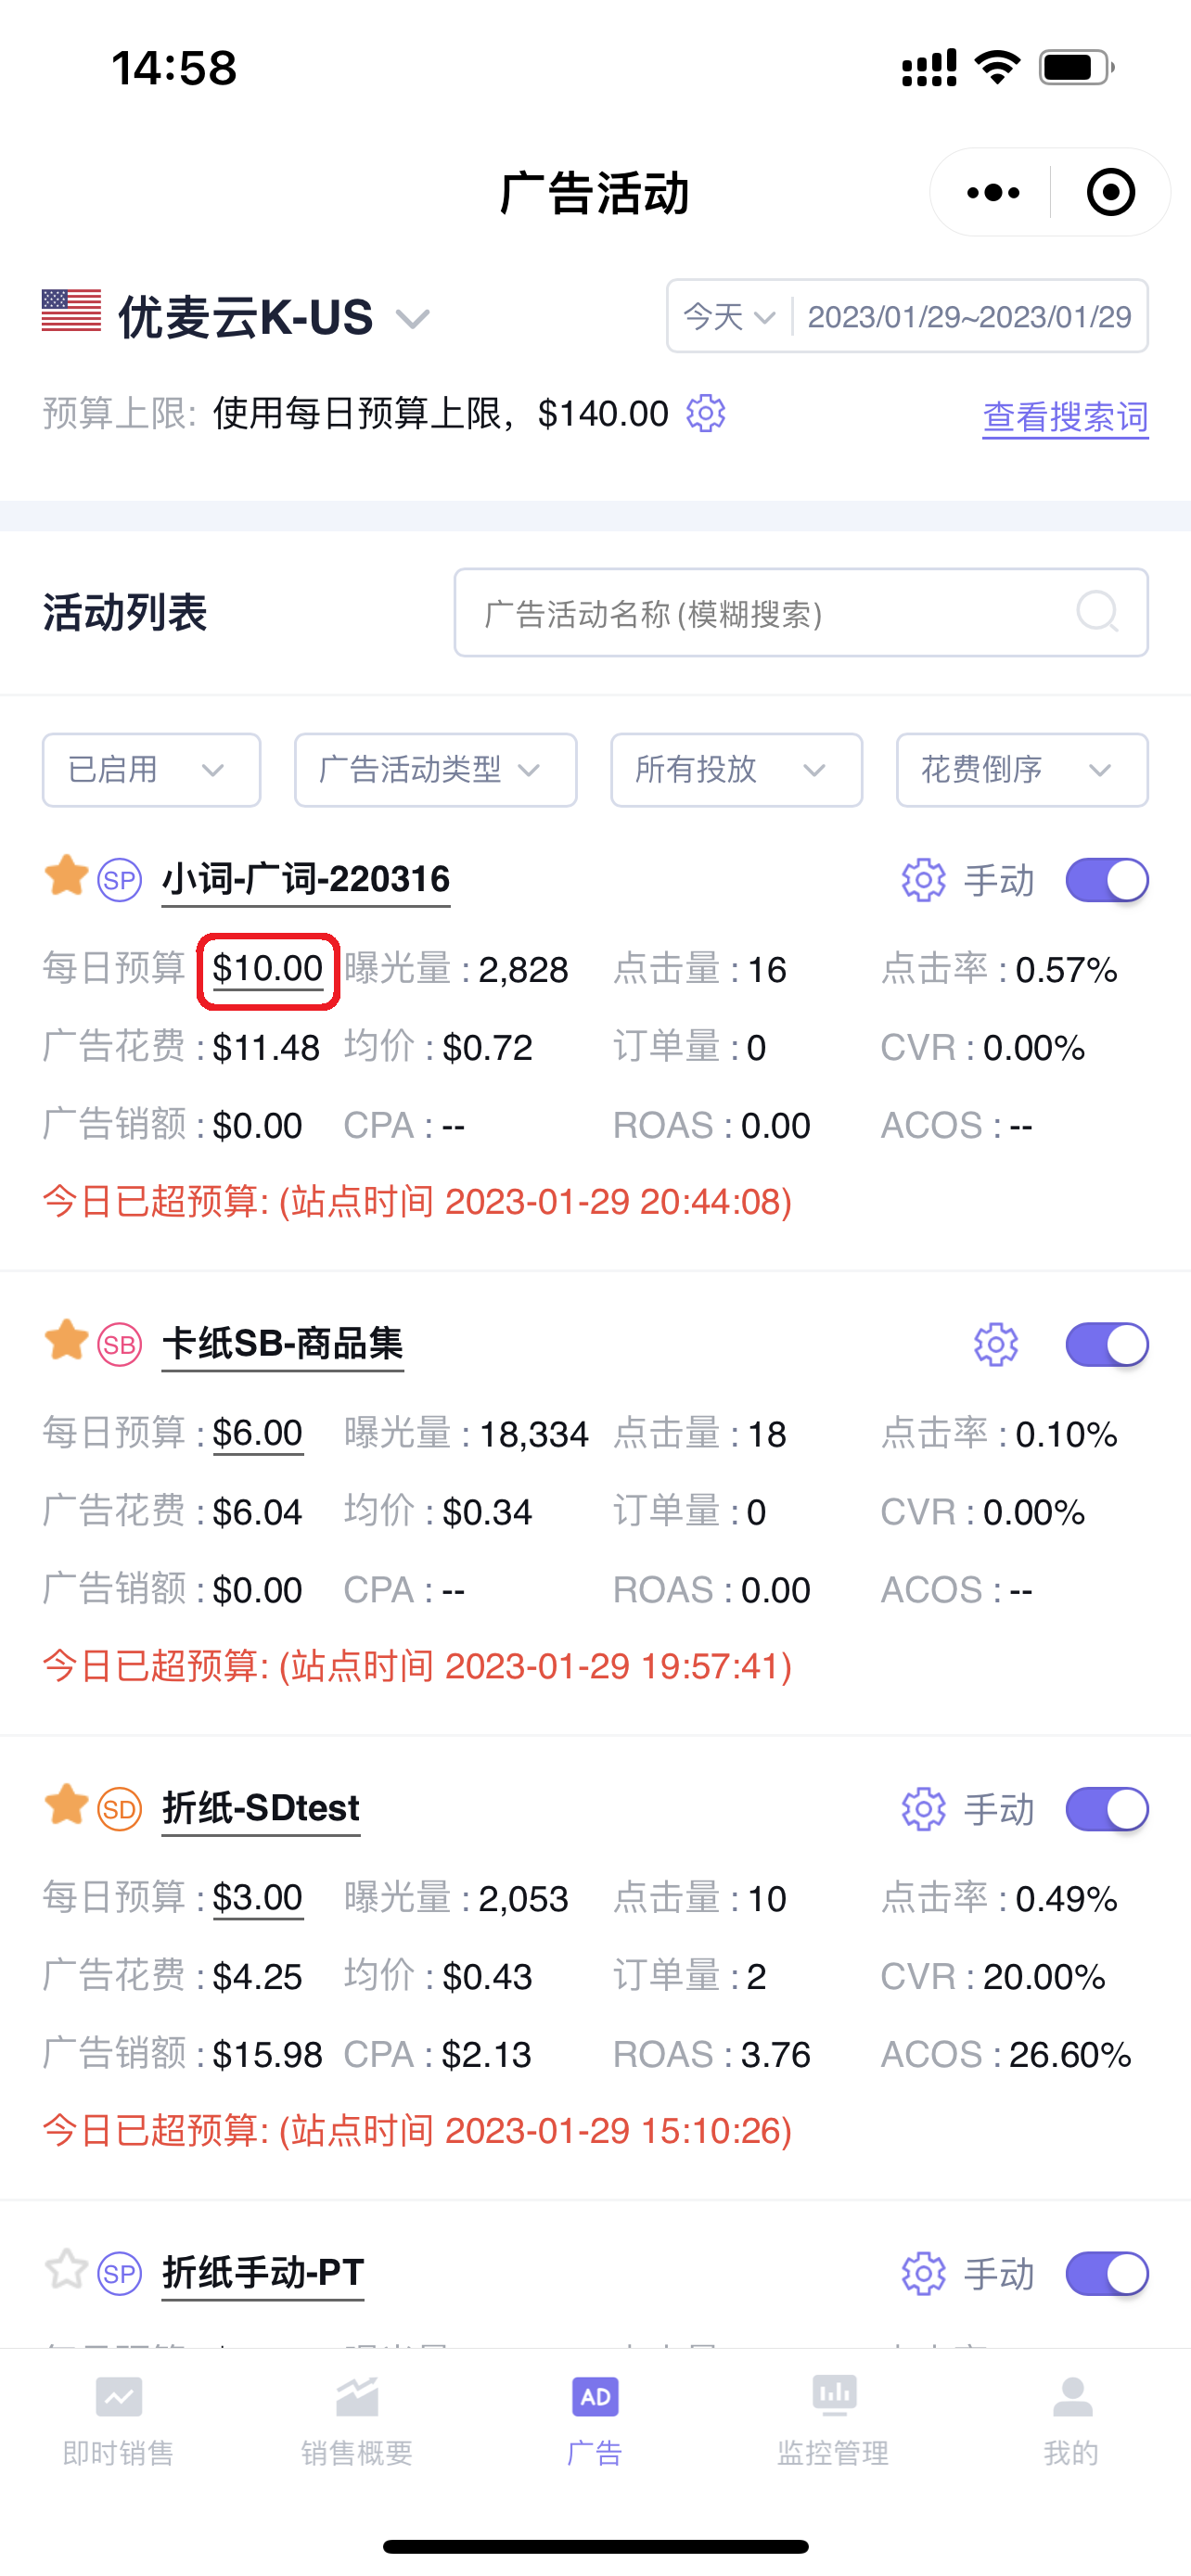
In addition to adjusting the budget on the campaign settings page, you can also directly adjust the campaign budget on the campaign homepage.
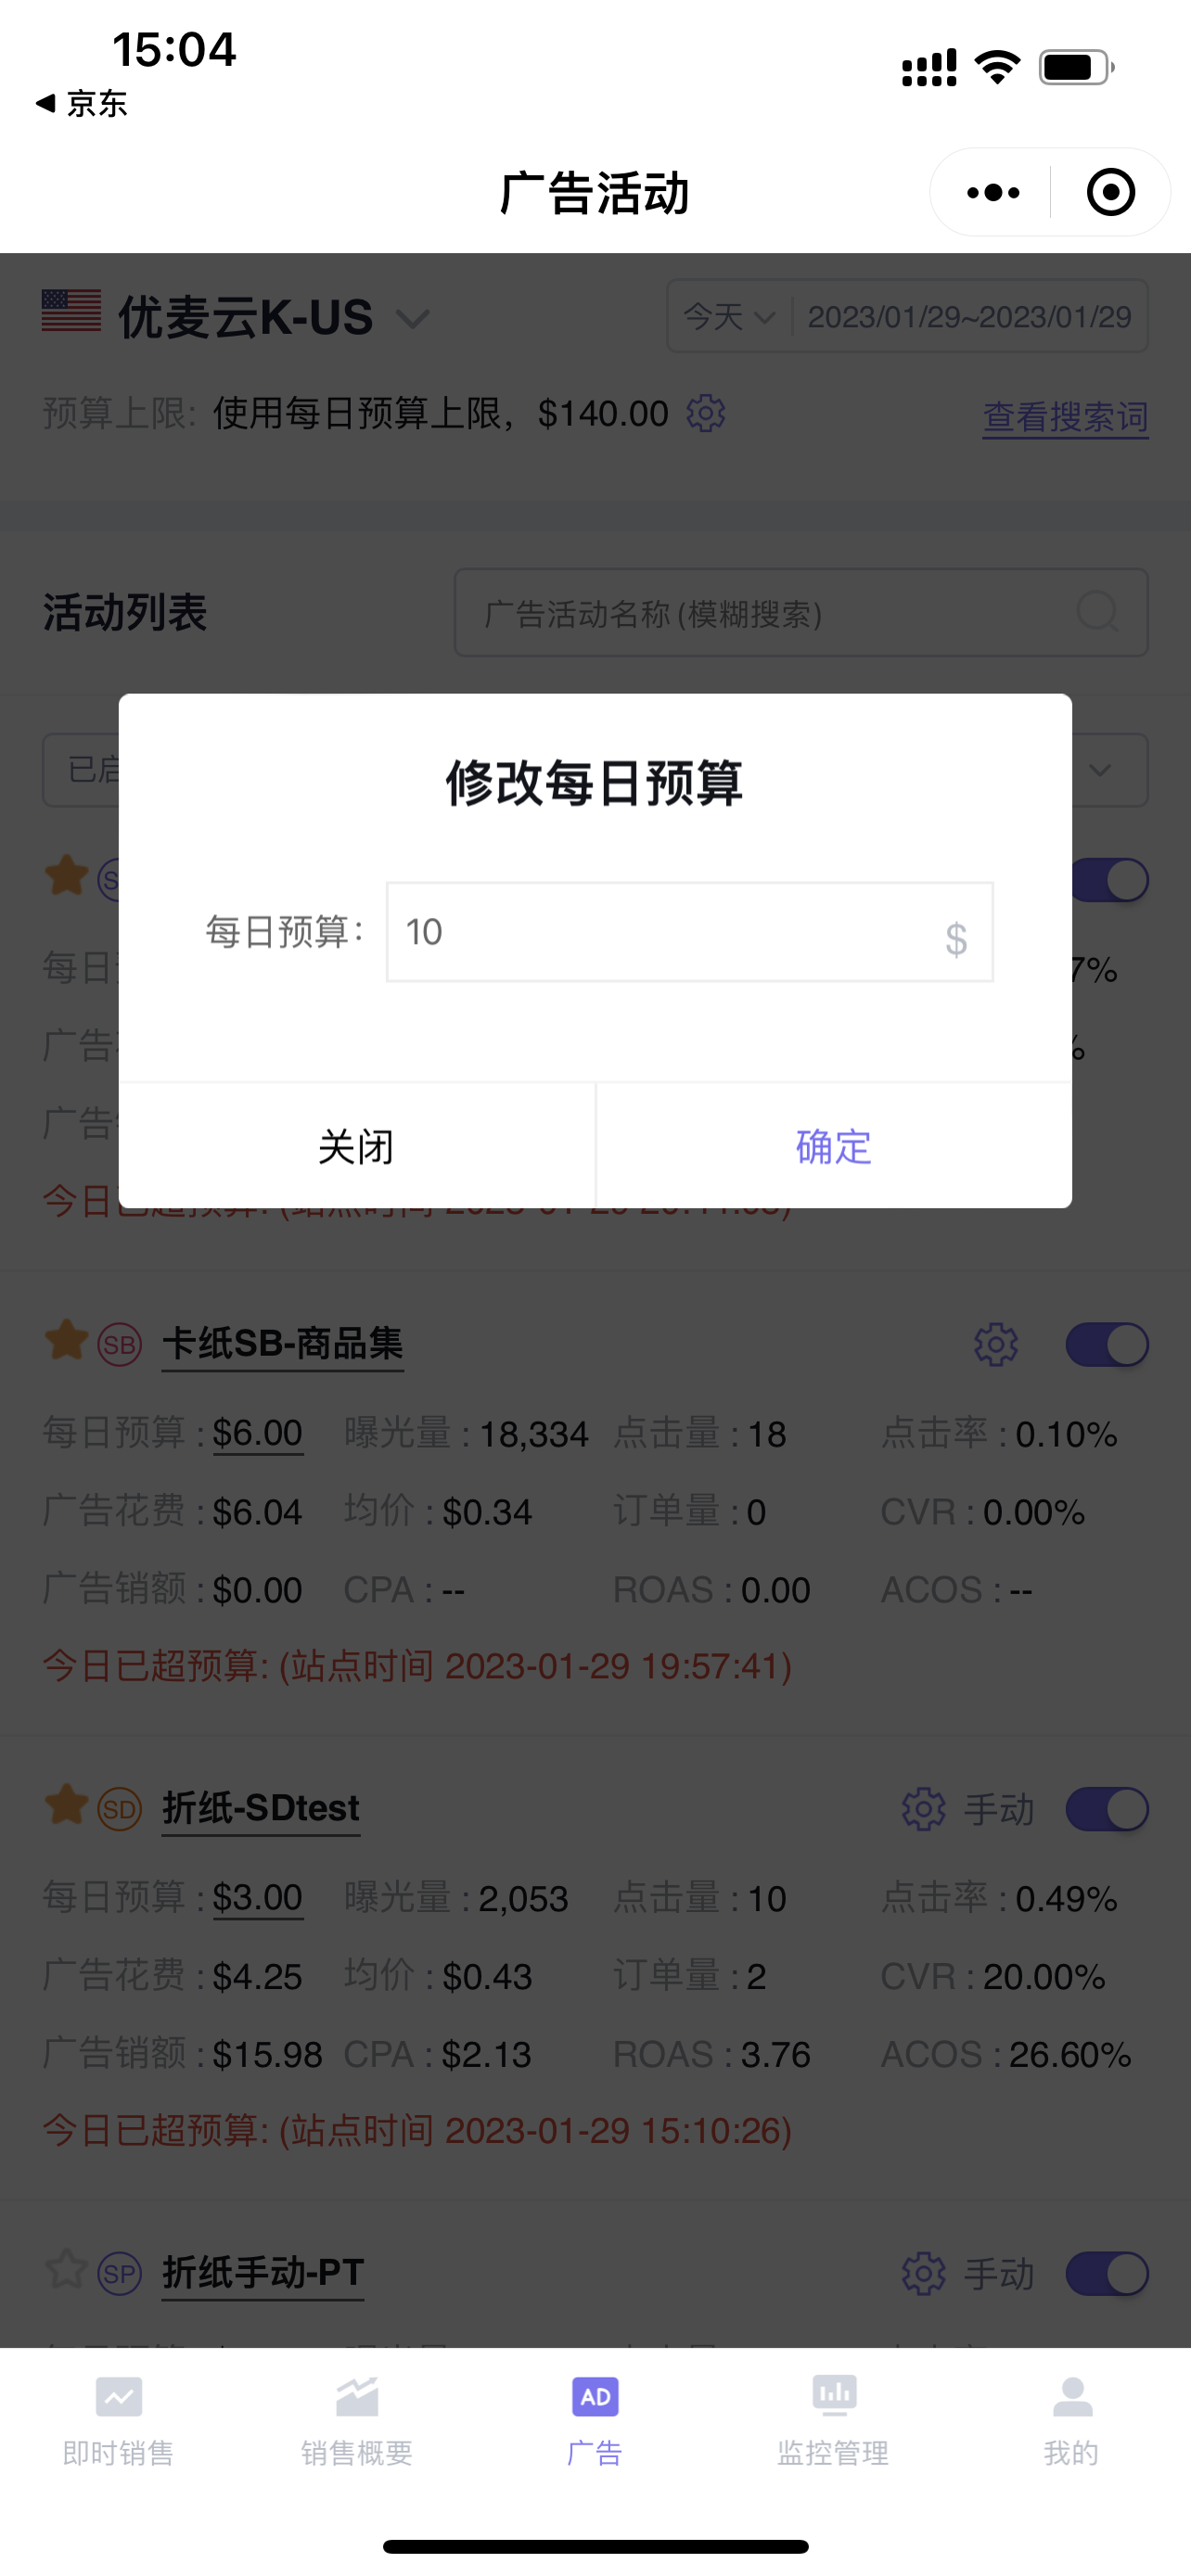
Click the daily budget amount to adjust it.
Modifying Daily Budget:
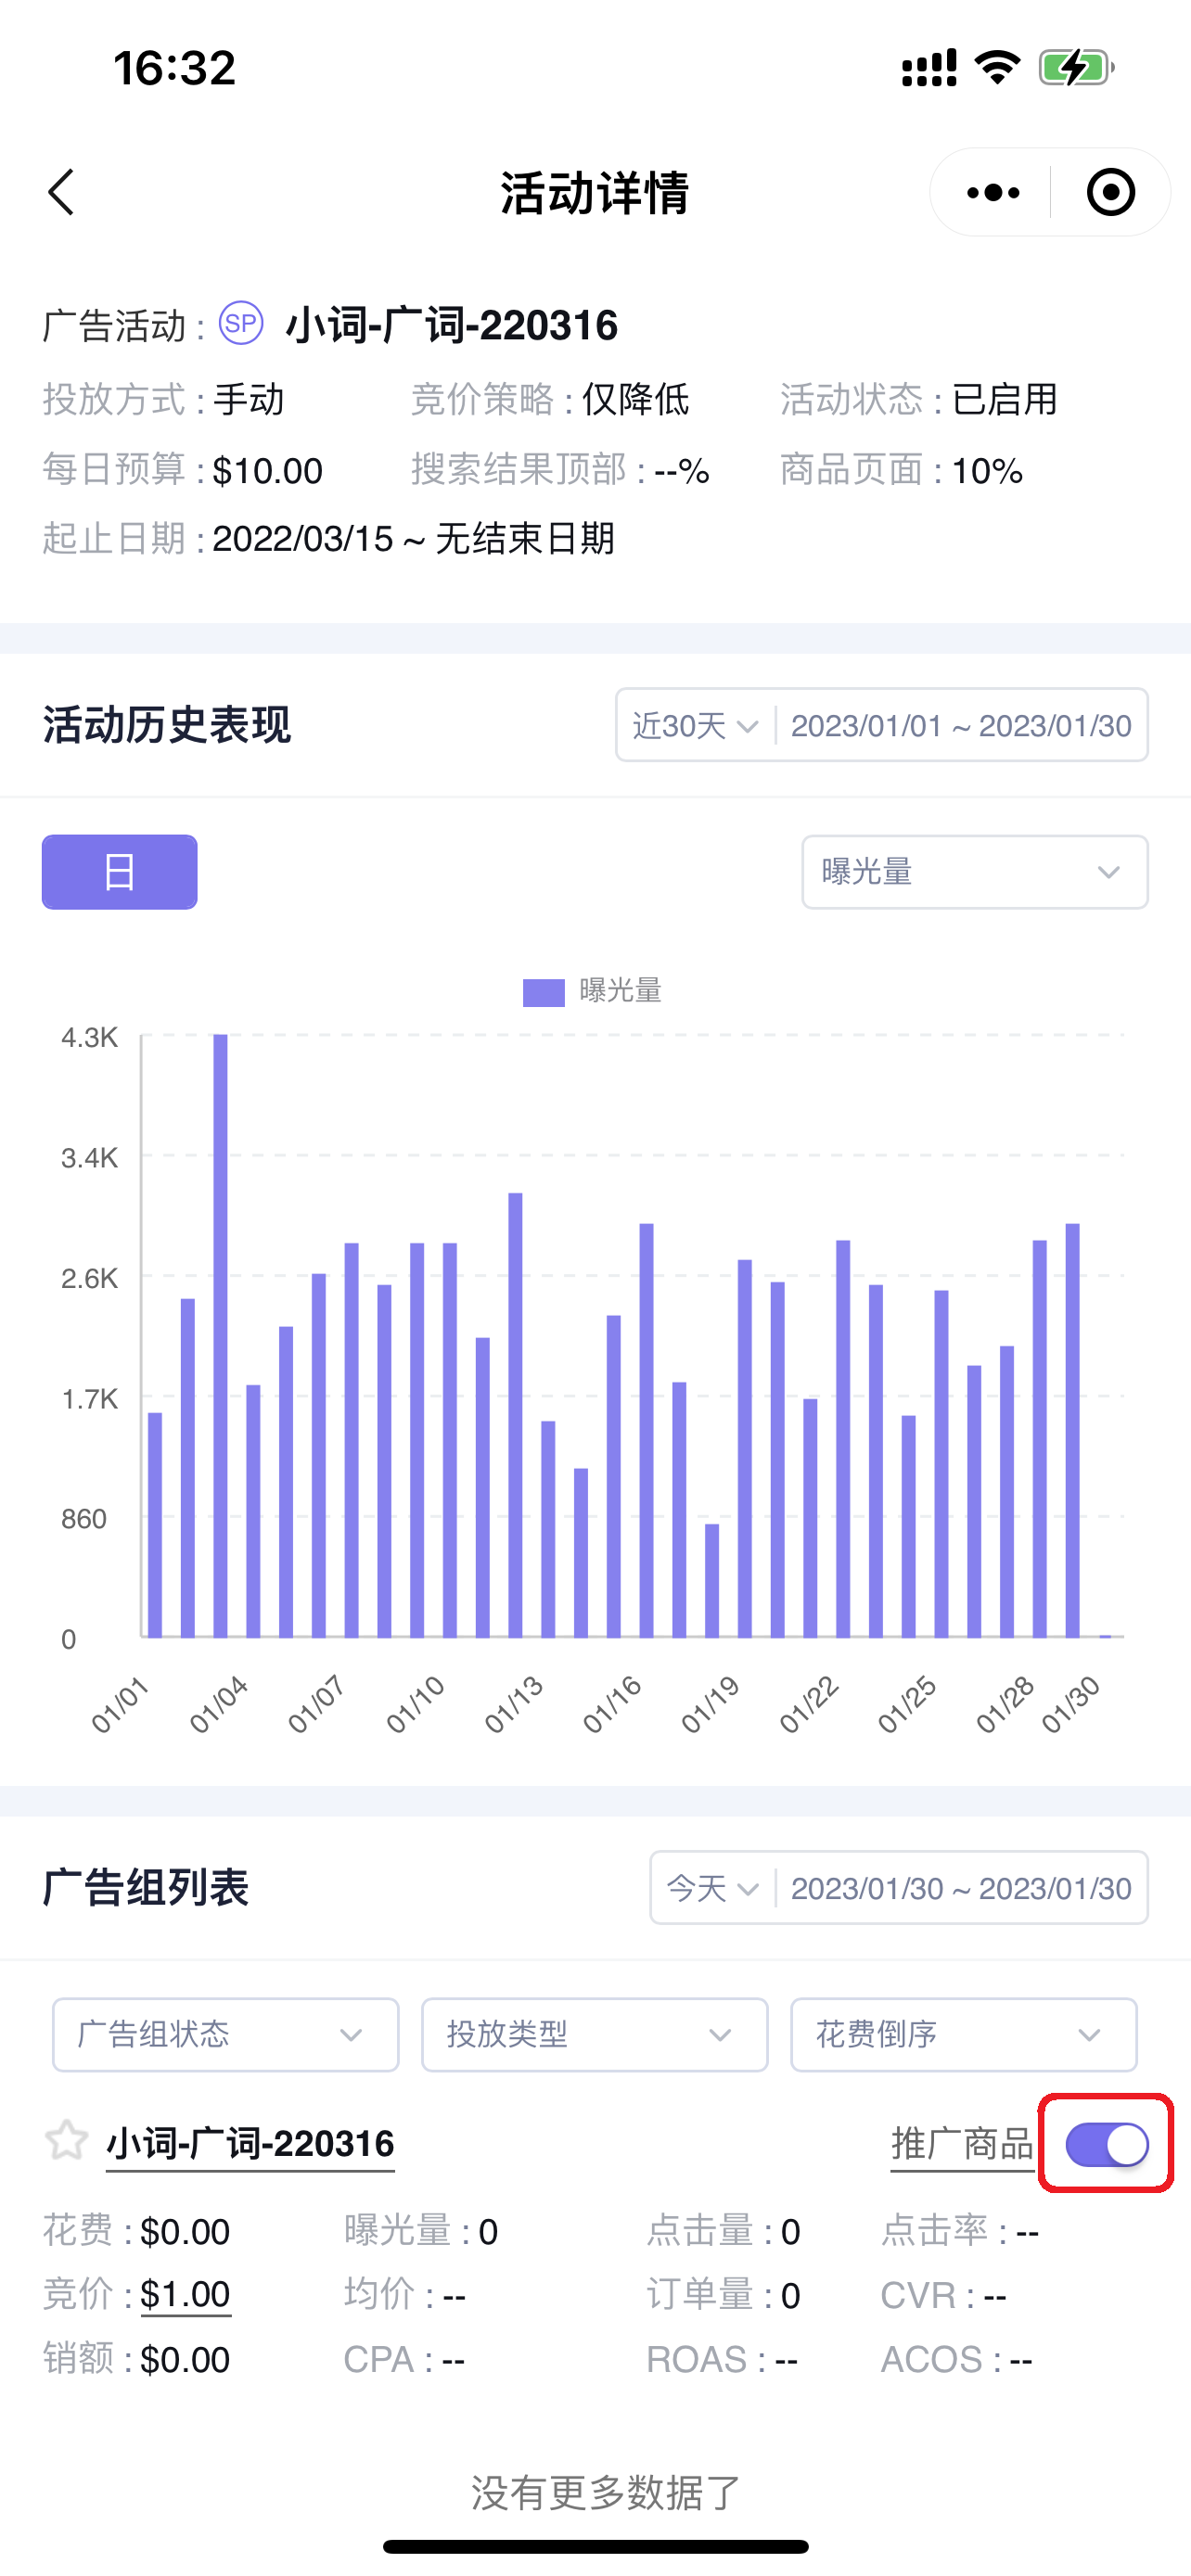
2.3 Adjusting Enable/Pause Status
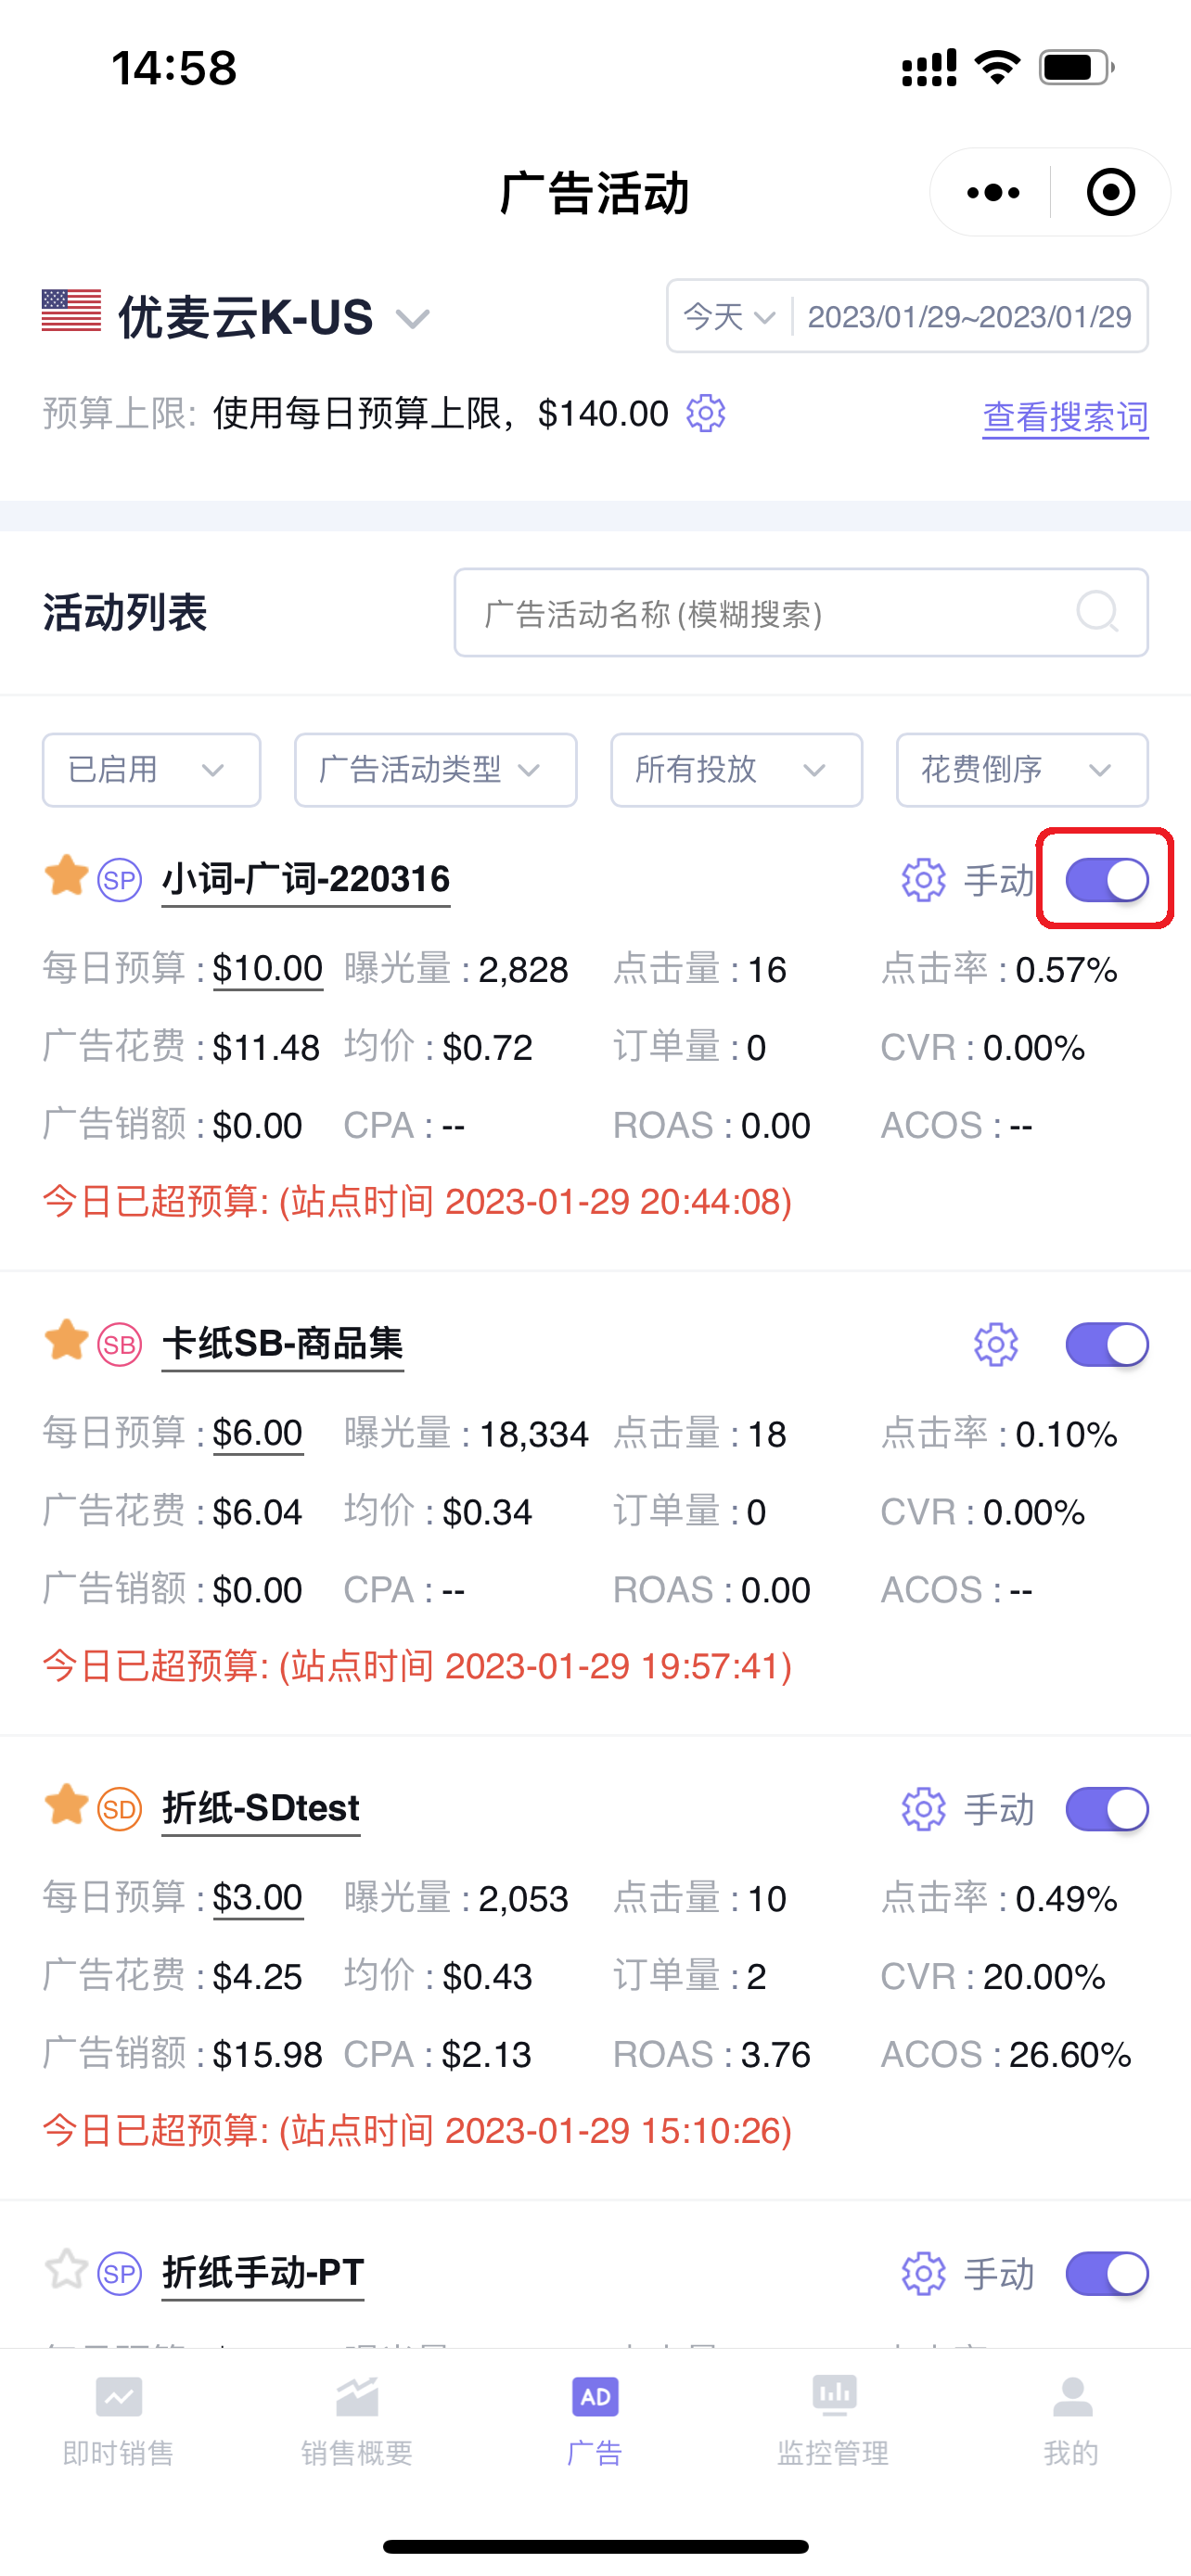
Click the enable/pause button on the right side of the campaign to enable or pause the campaign.
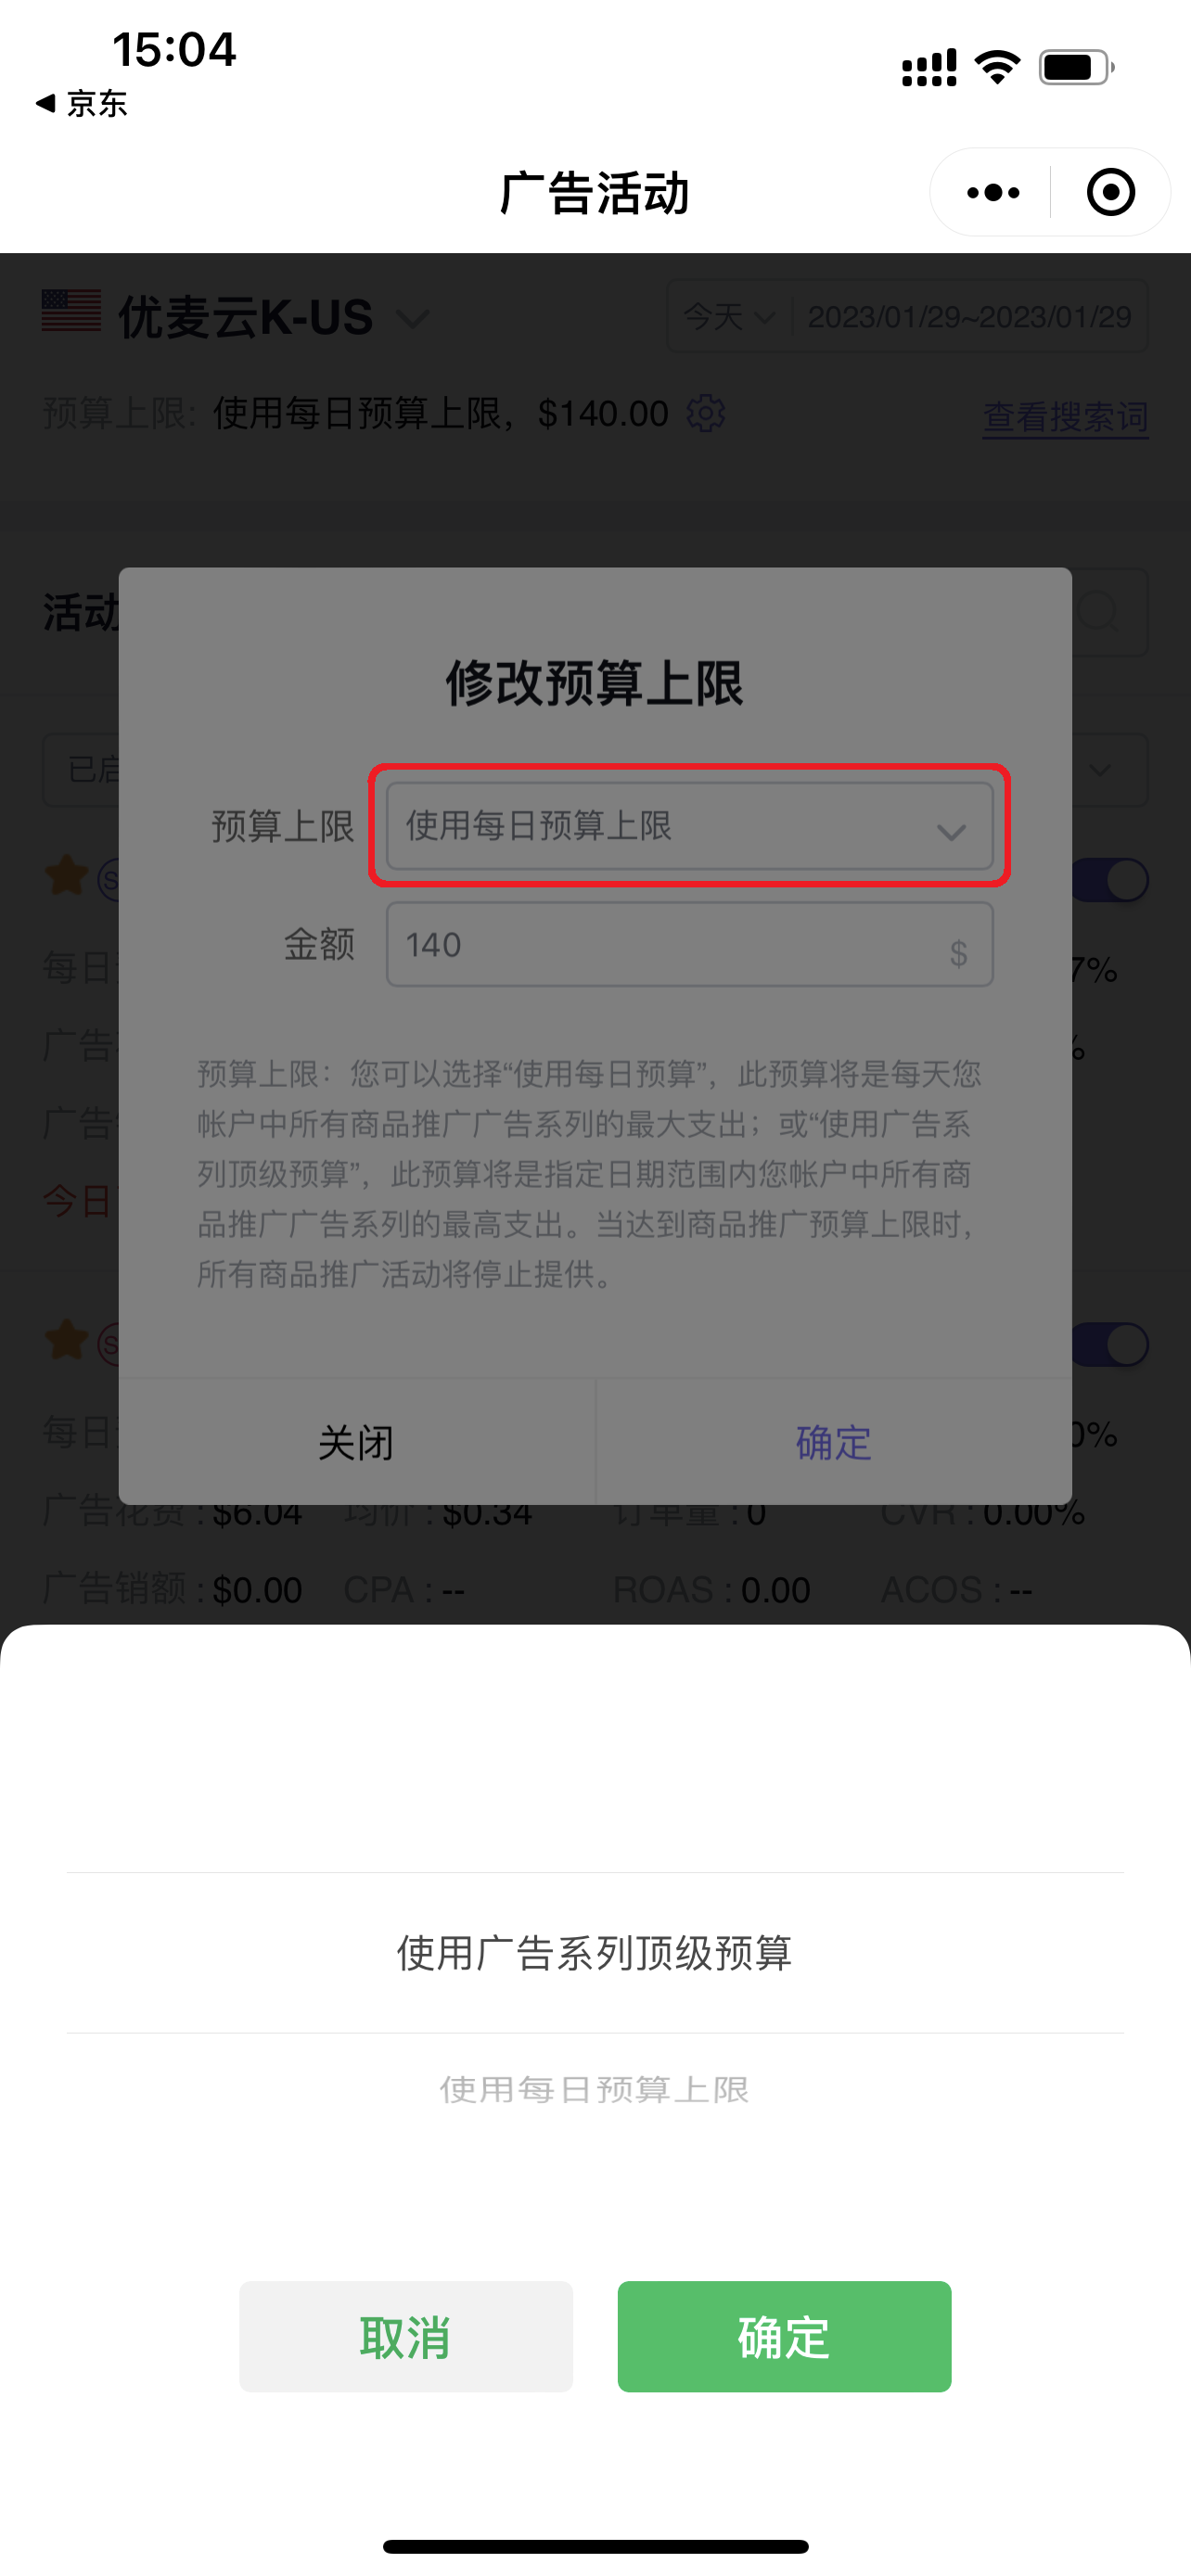
2.4 Setting Budget Cap for Current Store
Click the budget cap setting button to enter the settings;
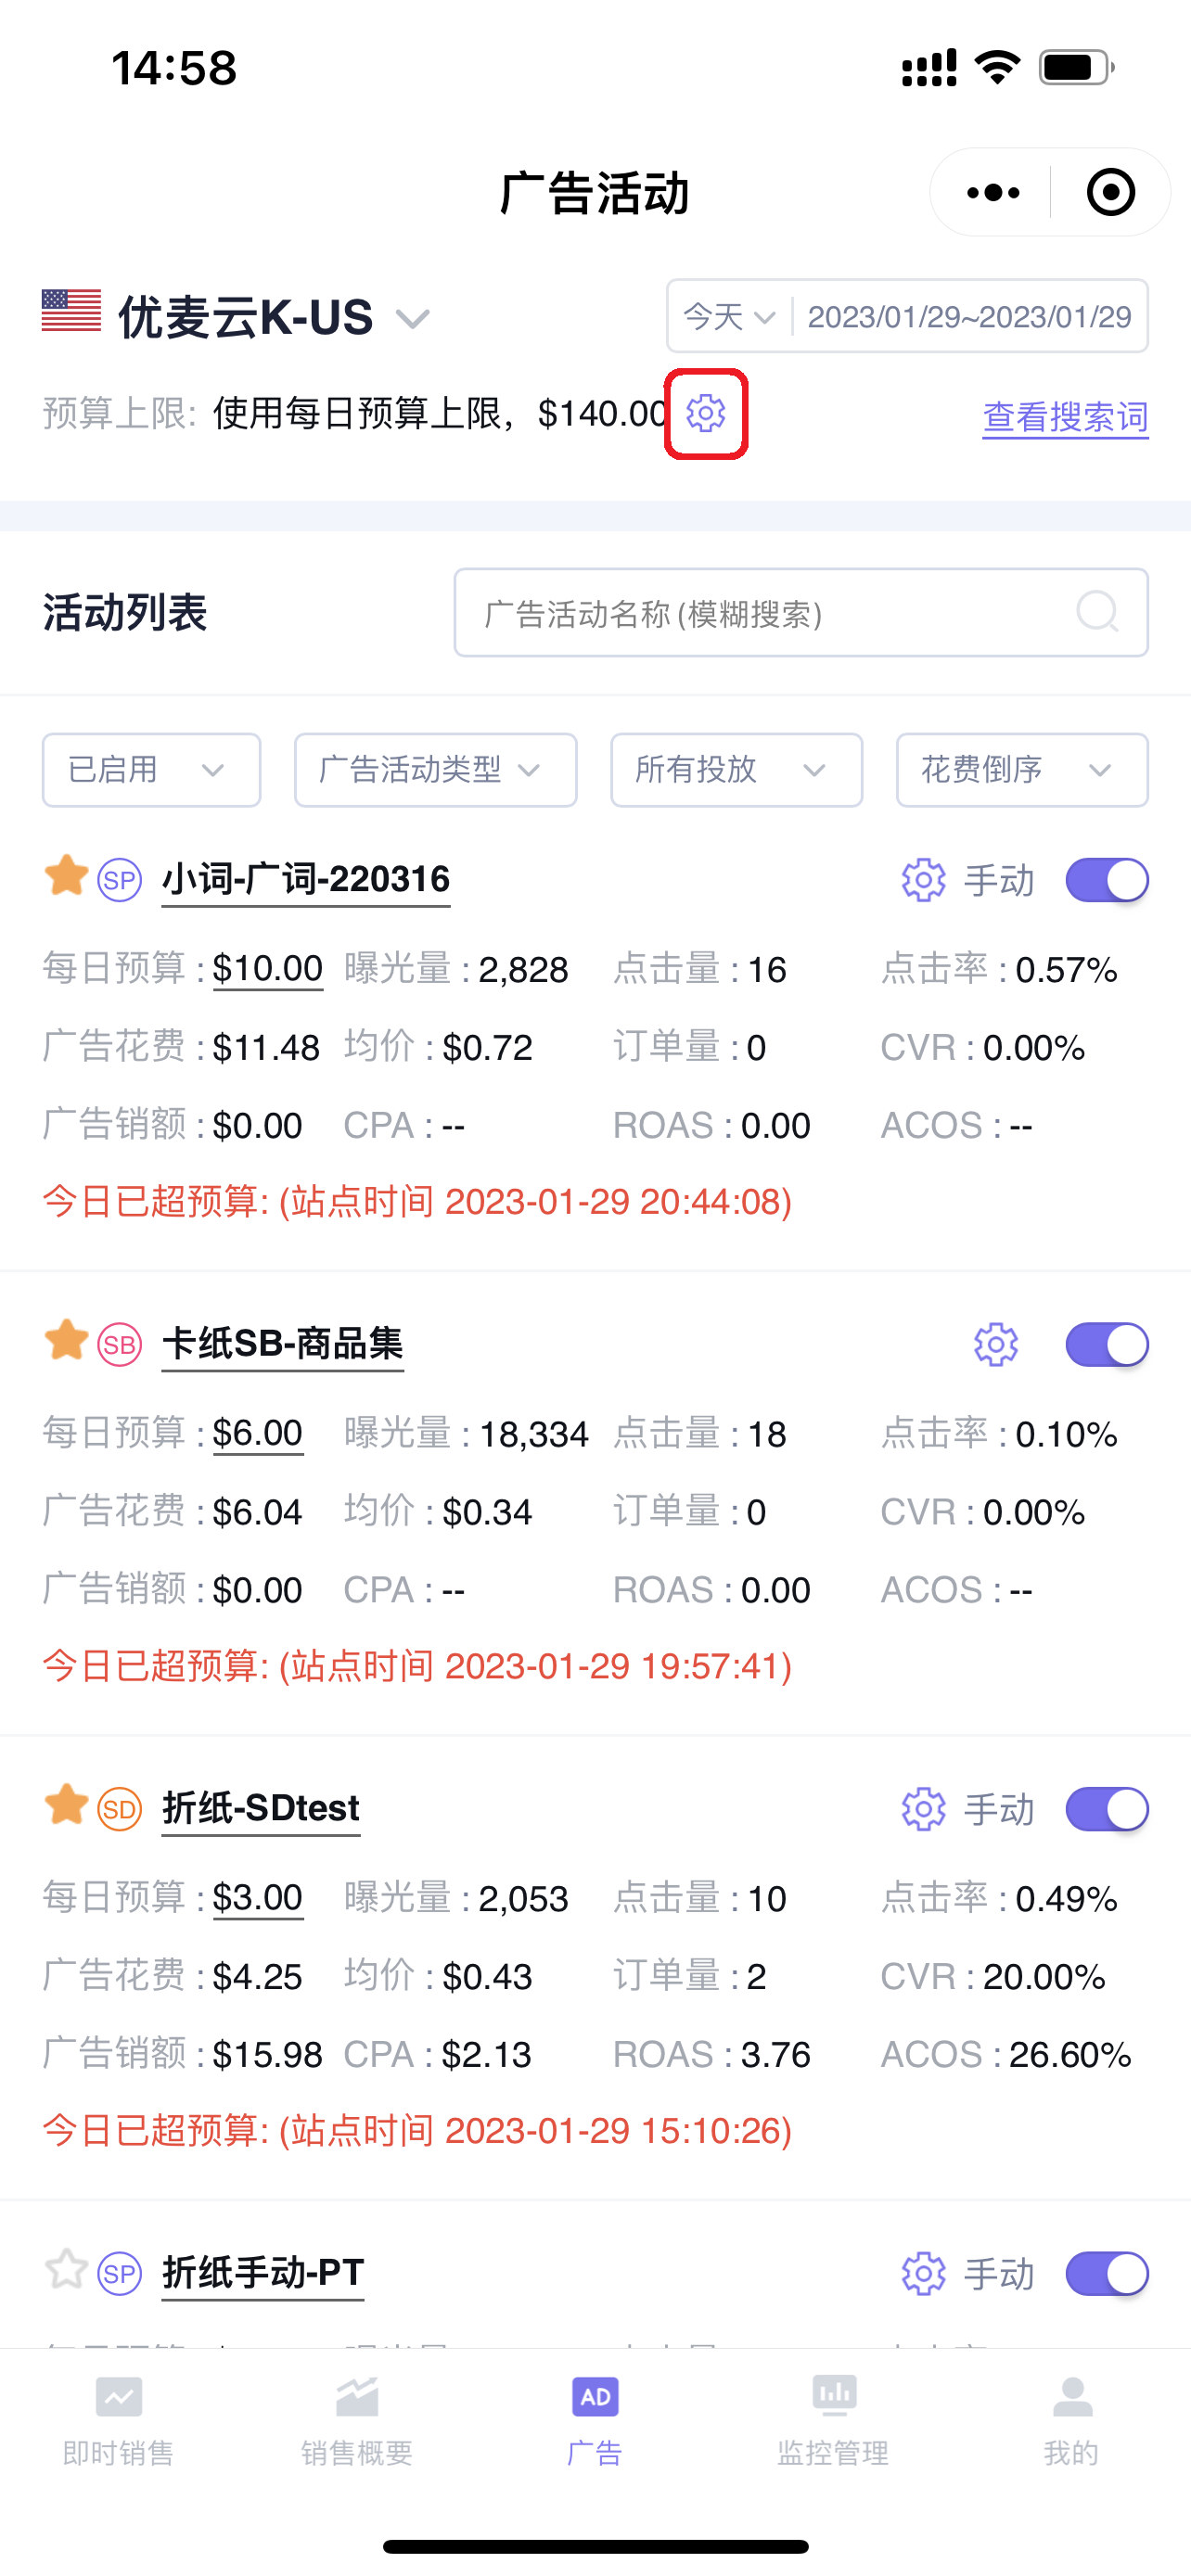
You can choose: Use campaign-level budget or Use daily budget cap.
Ad groups
Multiple Ad groups can be created under one campaign. Depending on the campaign's targeting strategy: automatic targeting/manual targeting (product, keyword, and audience, etc.), the data displayed for the corresponding Ad groups will also be different.
1. Viewing and Analyzing Ad group Data
1.1 Finding Ad groups
Find the corresponding campaign and click the campaign name to enter and view all Ad group data under that campaign;
Navigation path: Campaign name -> Enter Ad group list
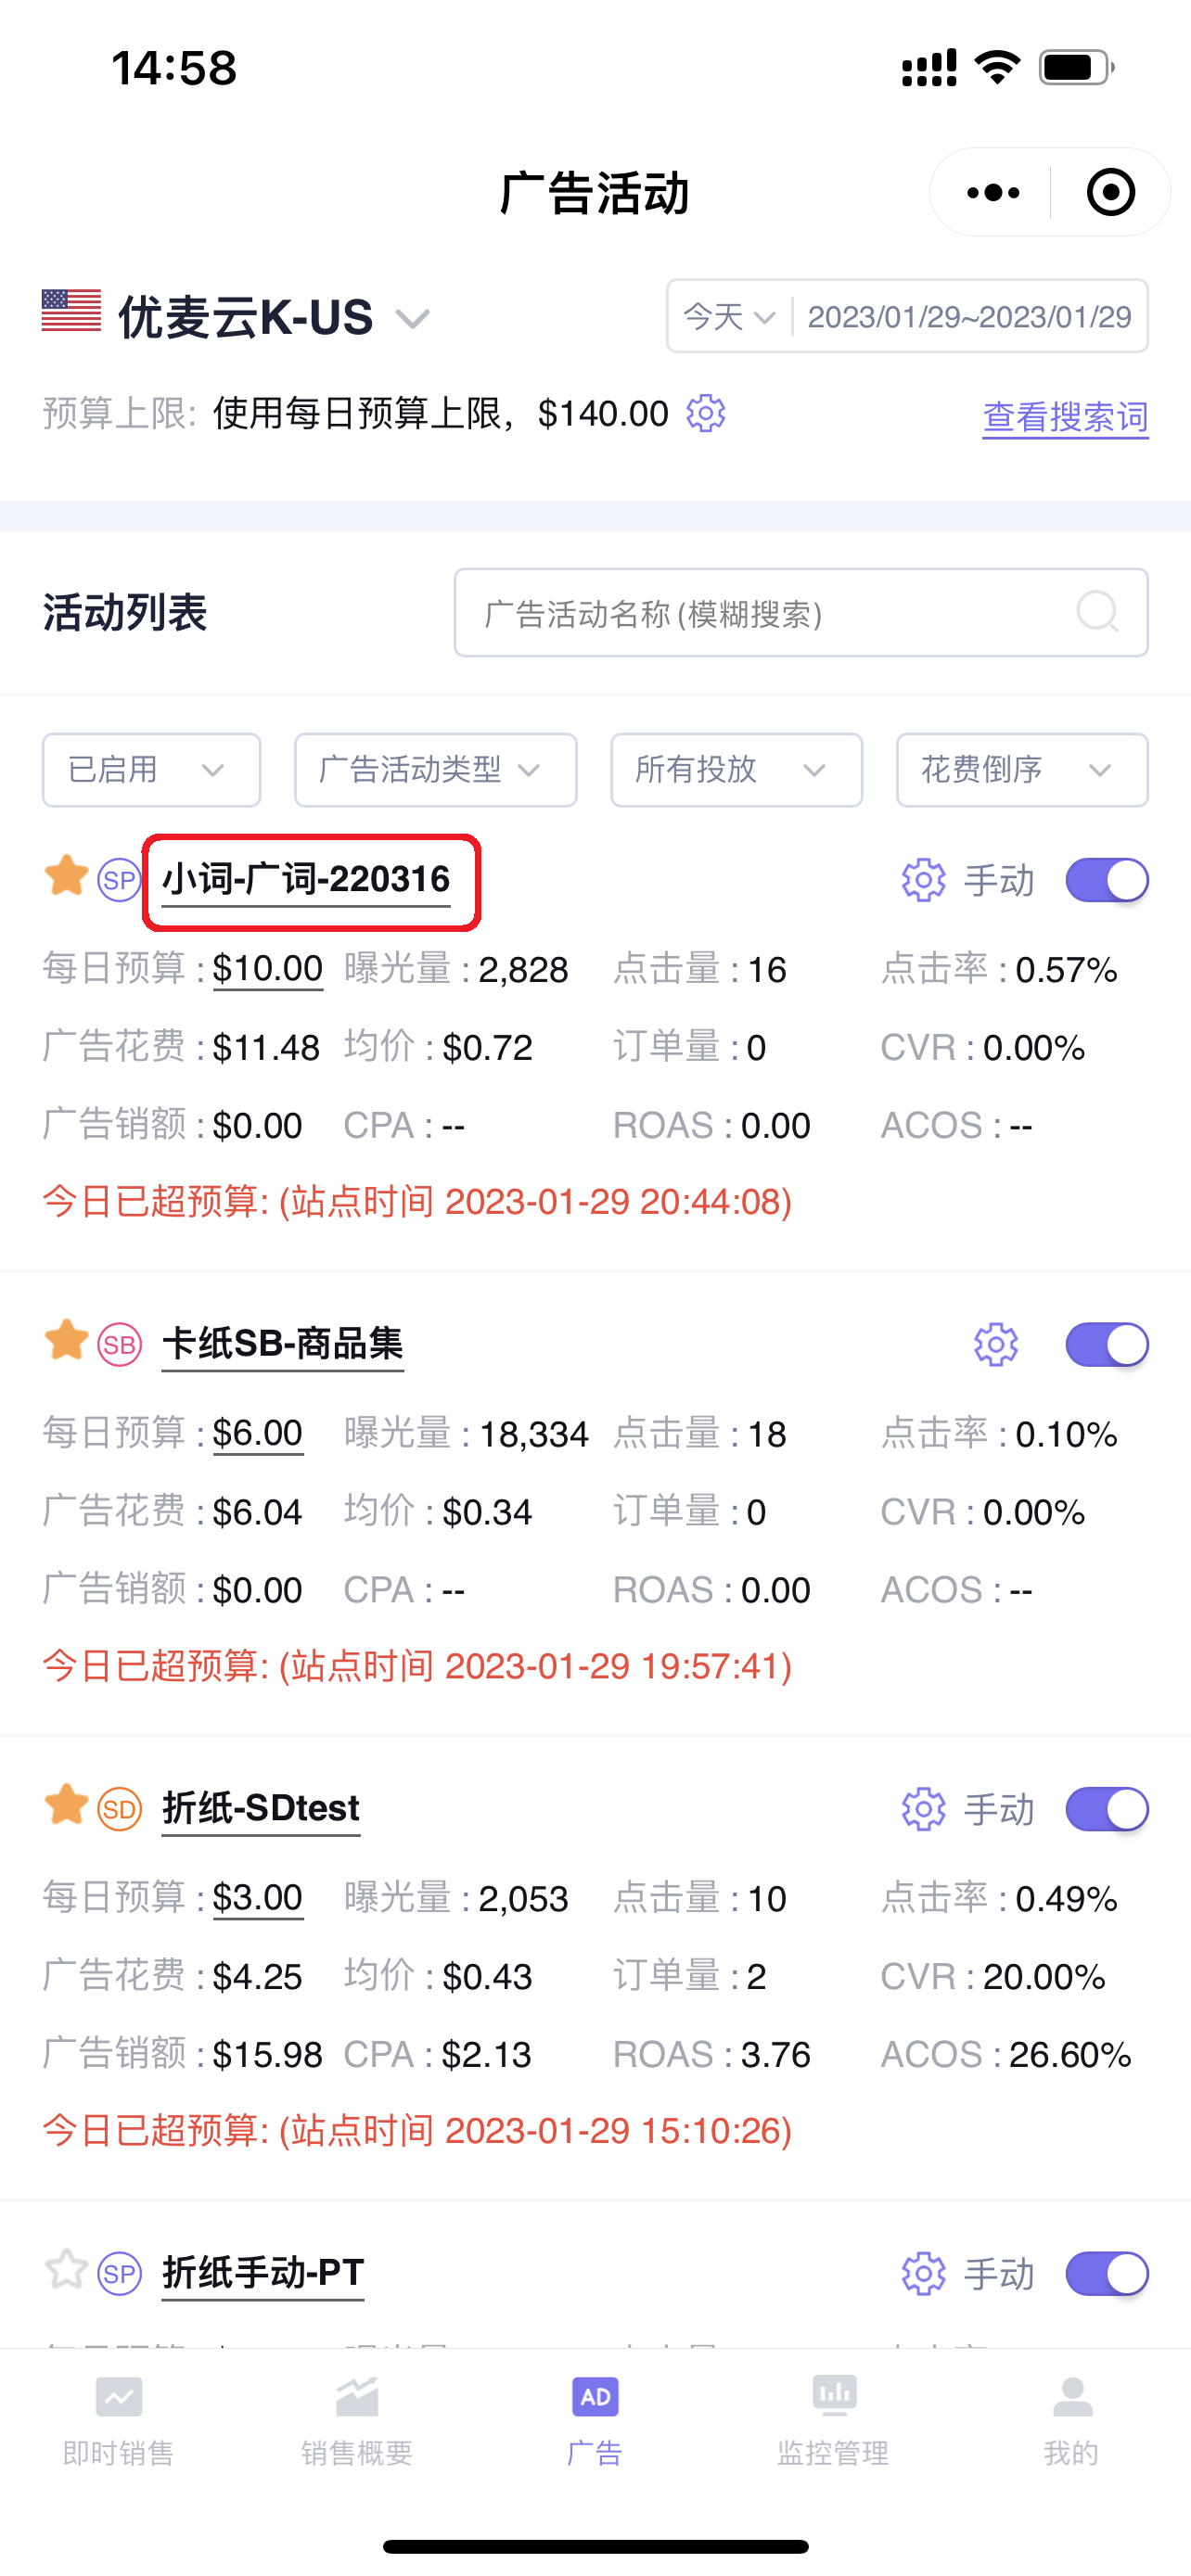
Enter the “Ad group List” page,
The time range for Ad group data defaults to the time range selected for its parent campaign. You can customize the time range for the Ad group to view and analyze corresponding performance data;
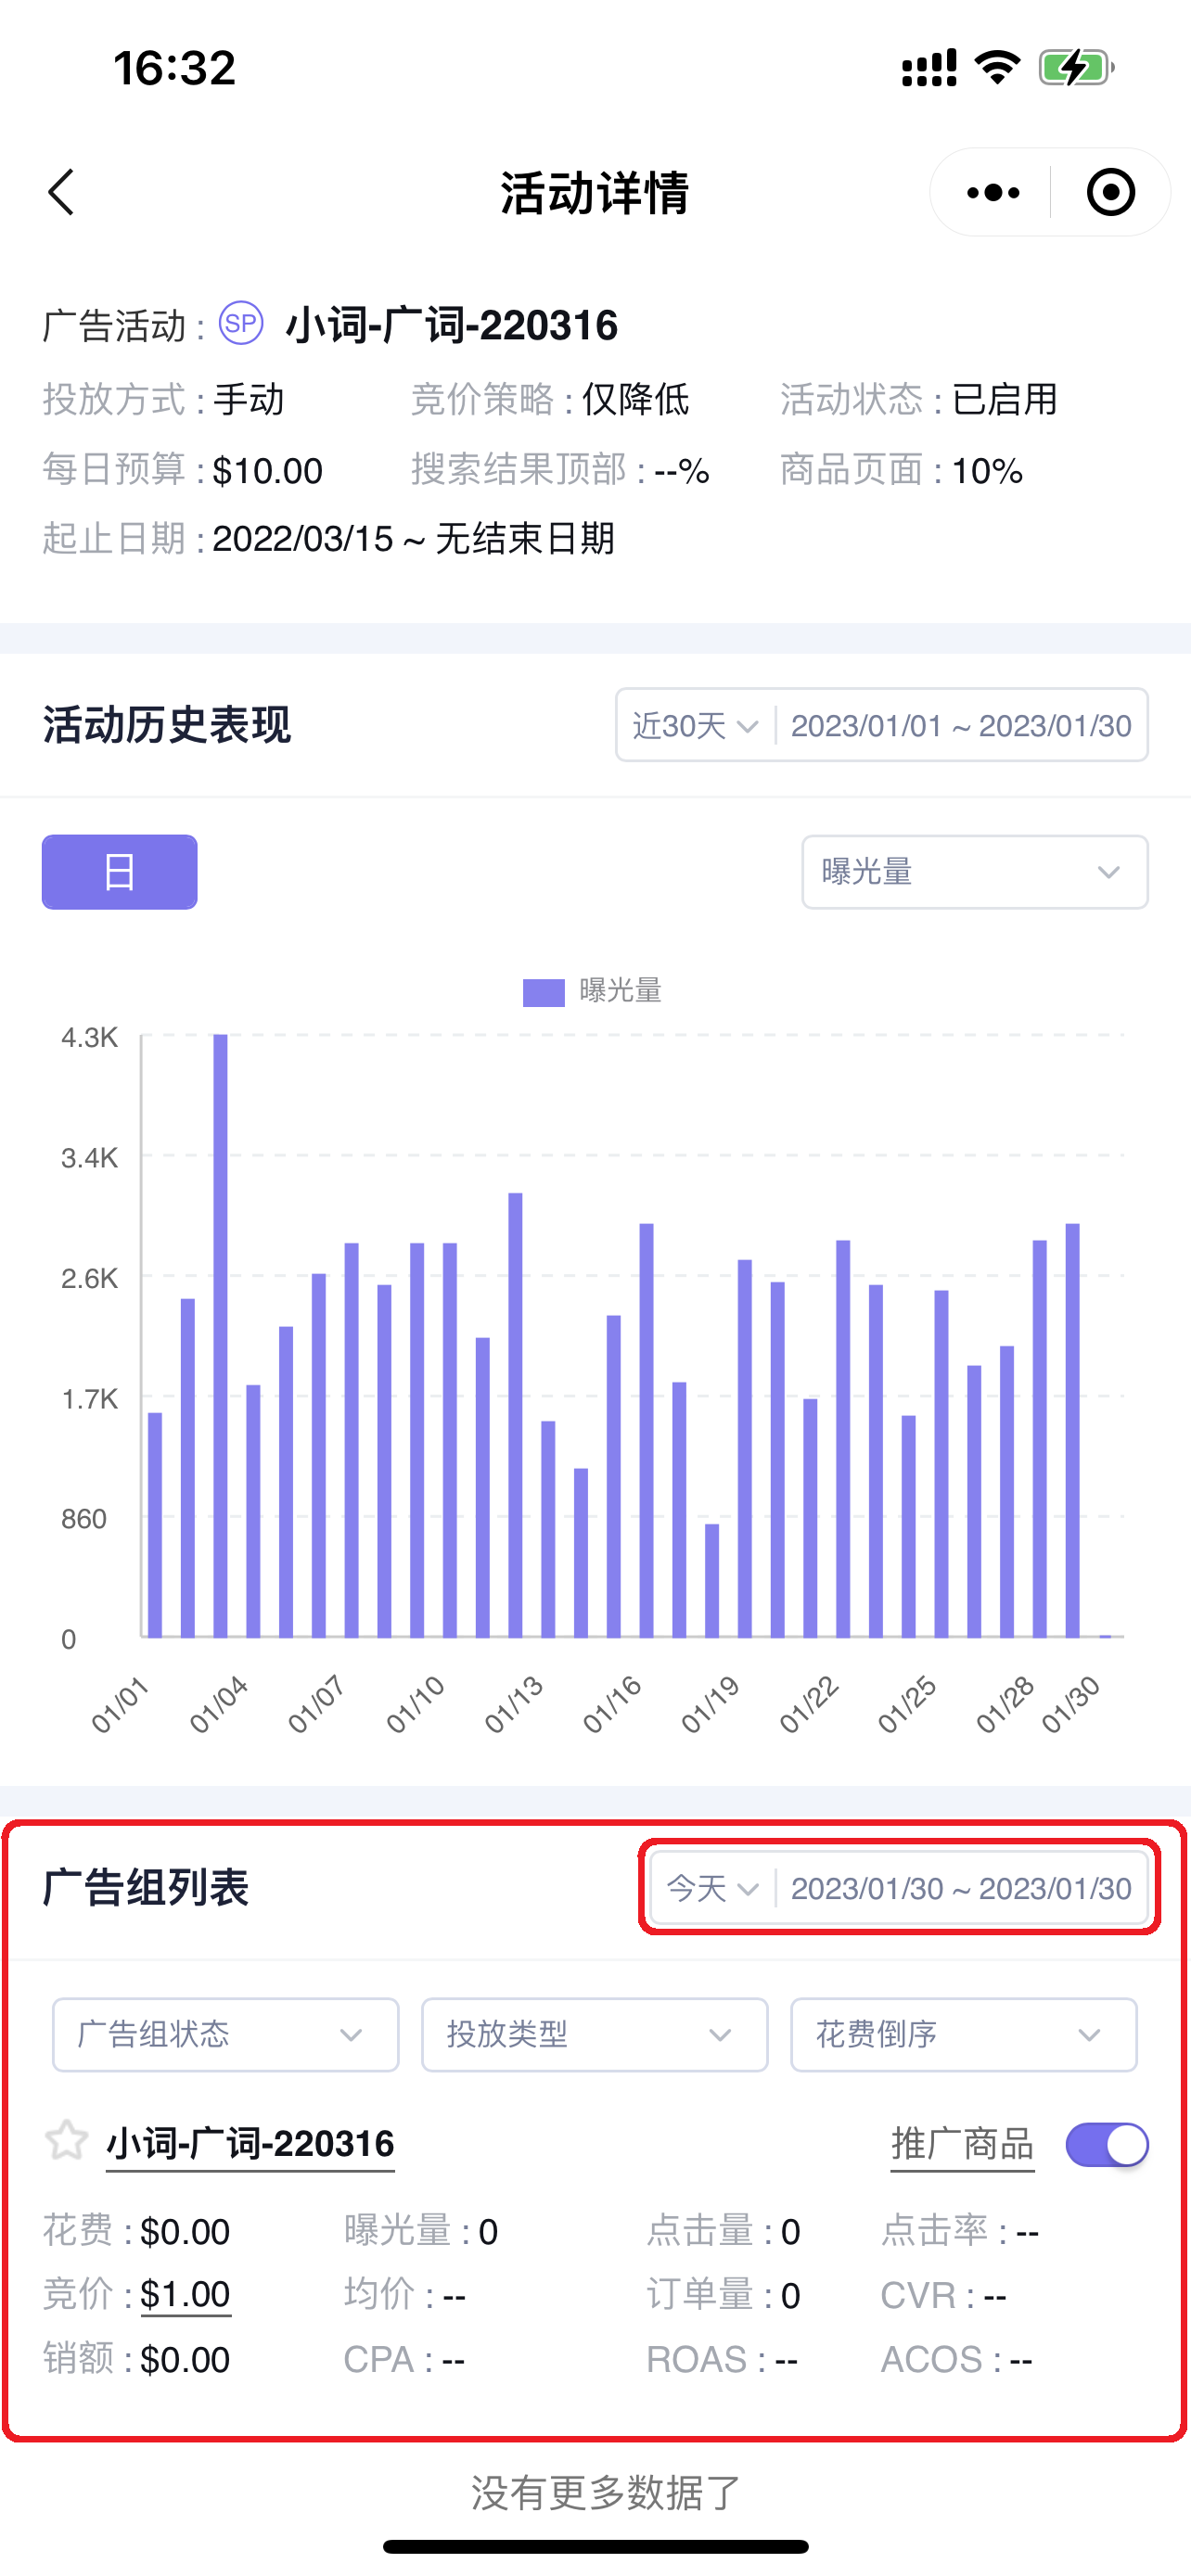
After selecting the time range, you can use filter conditions: Ad group status (default is enabled), targeting type, and sort by corresponding ad data (default is spend descending) to view Ad group data that meets the corresponding conditions.
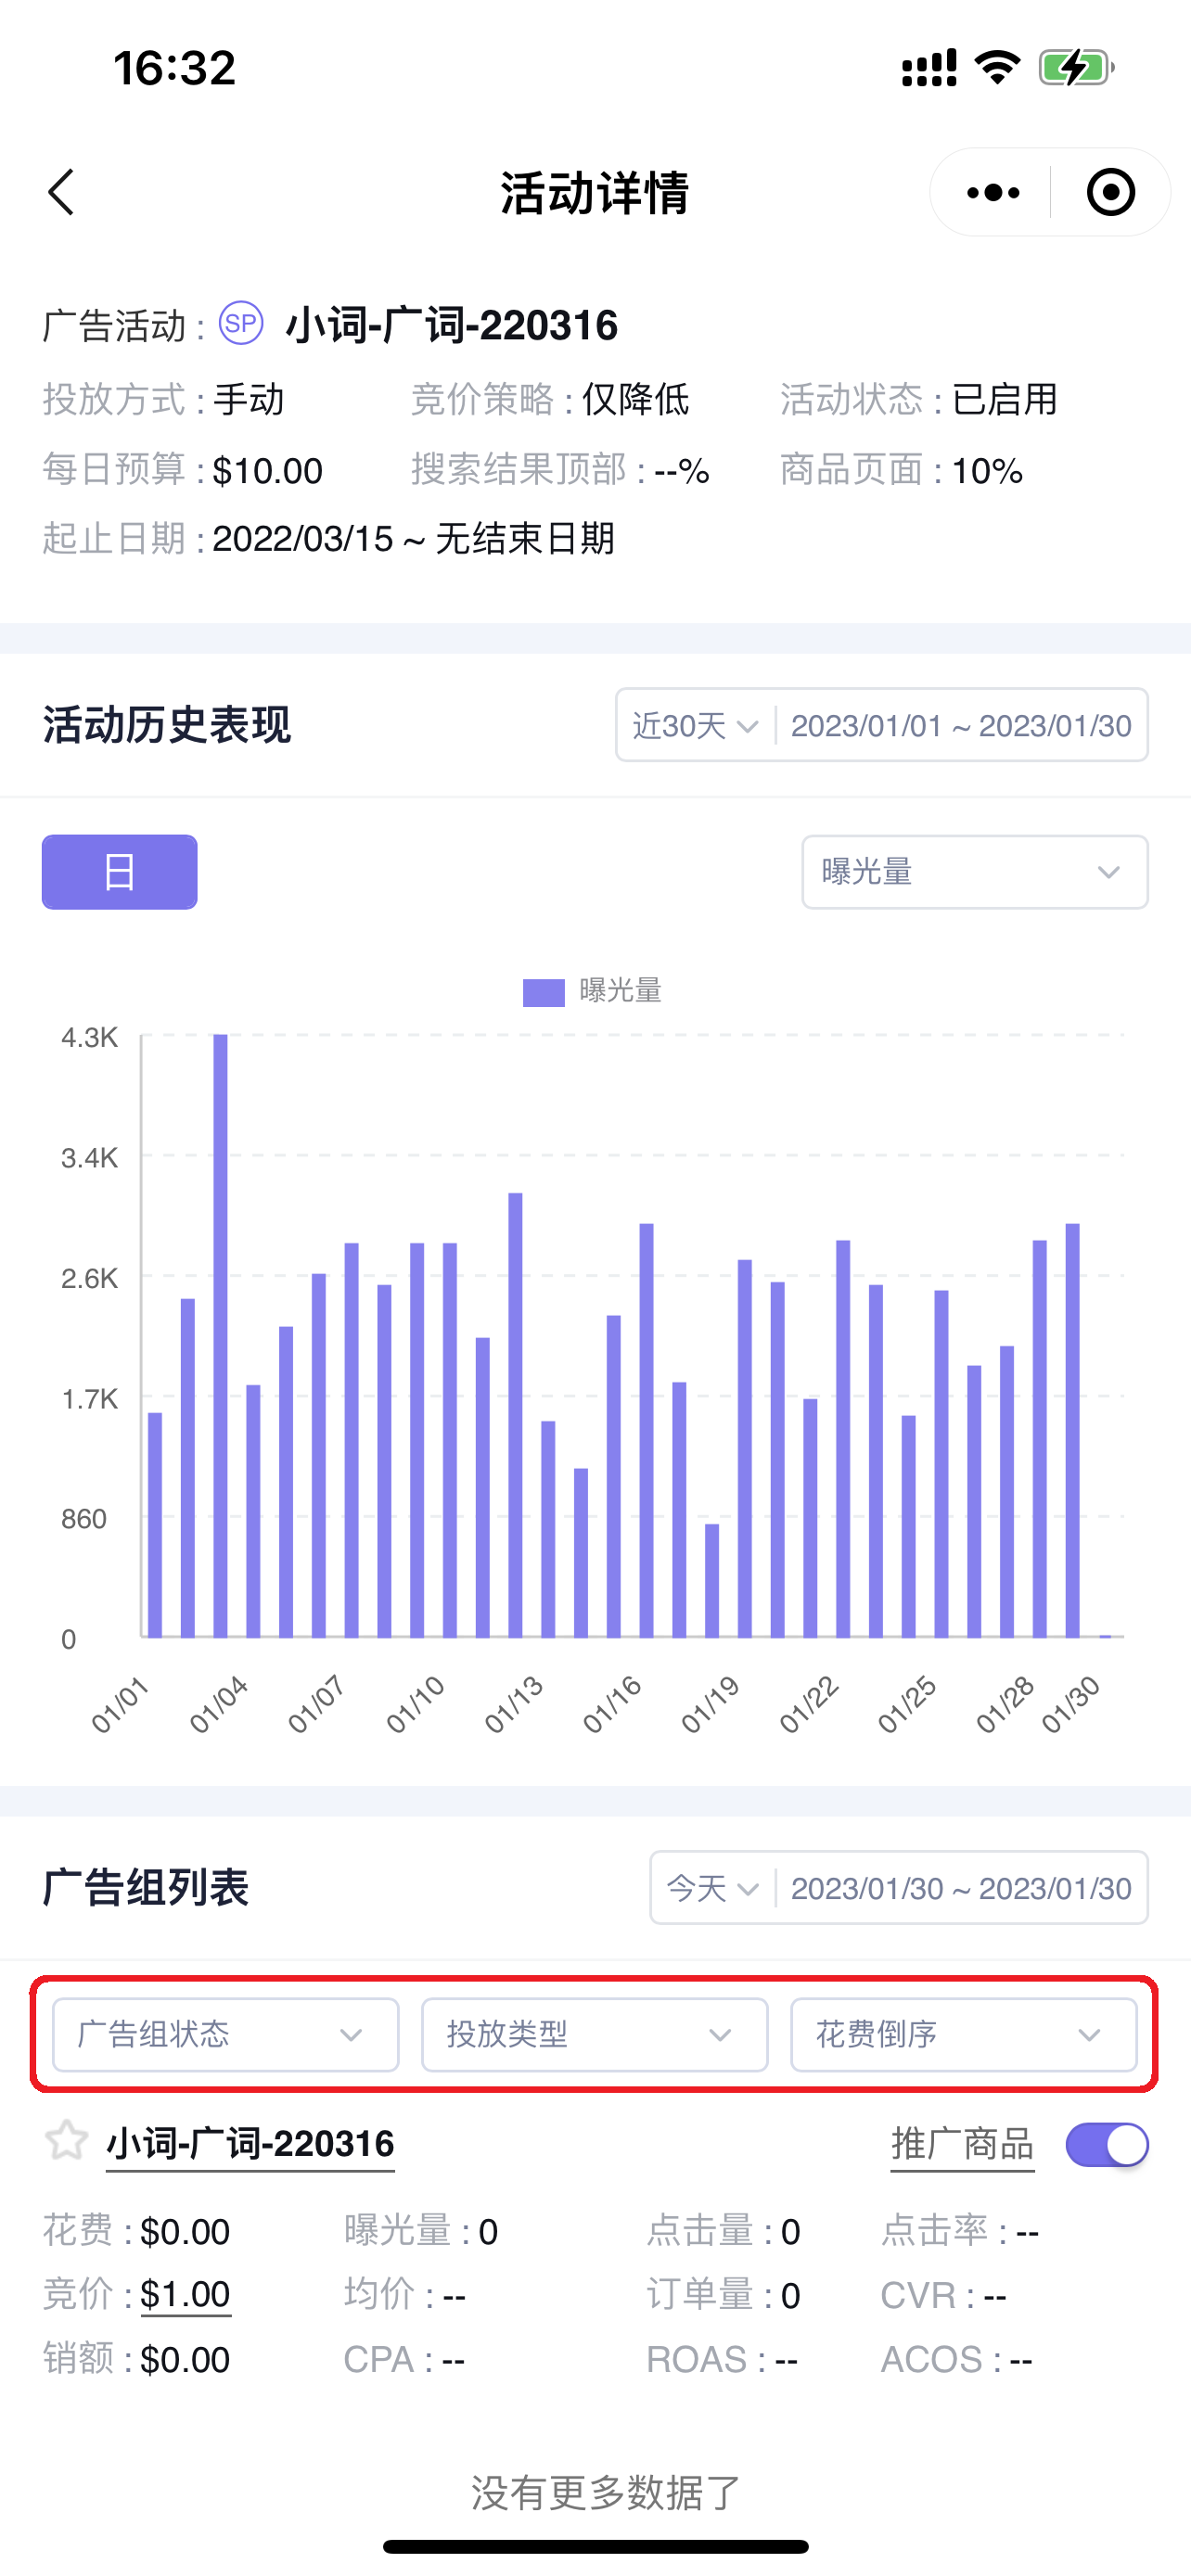
1.2 Analyzing Ad group Historical Performance (The data presentation format for historical performance of advertising data across all dimensions is consistent.)
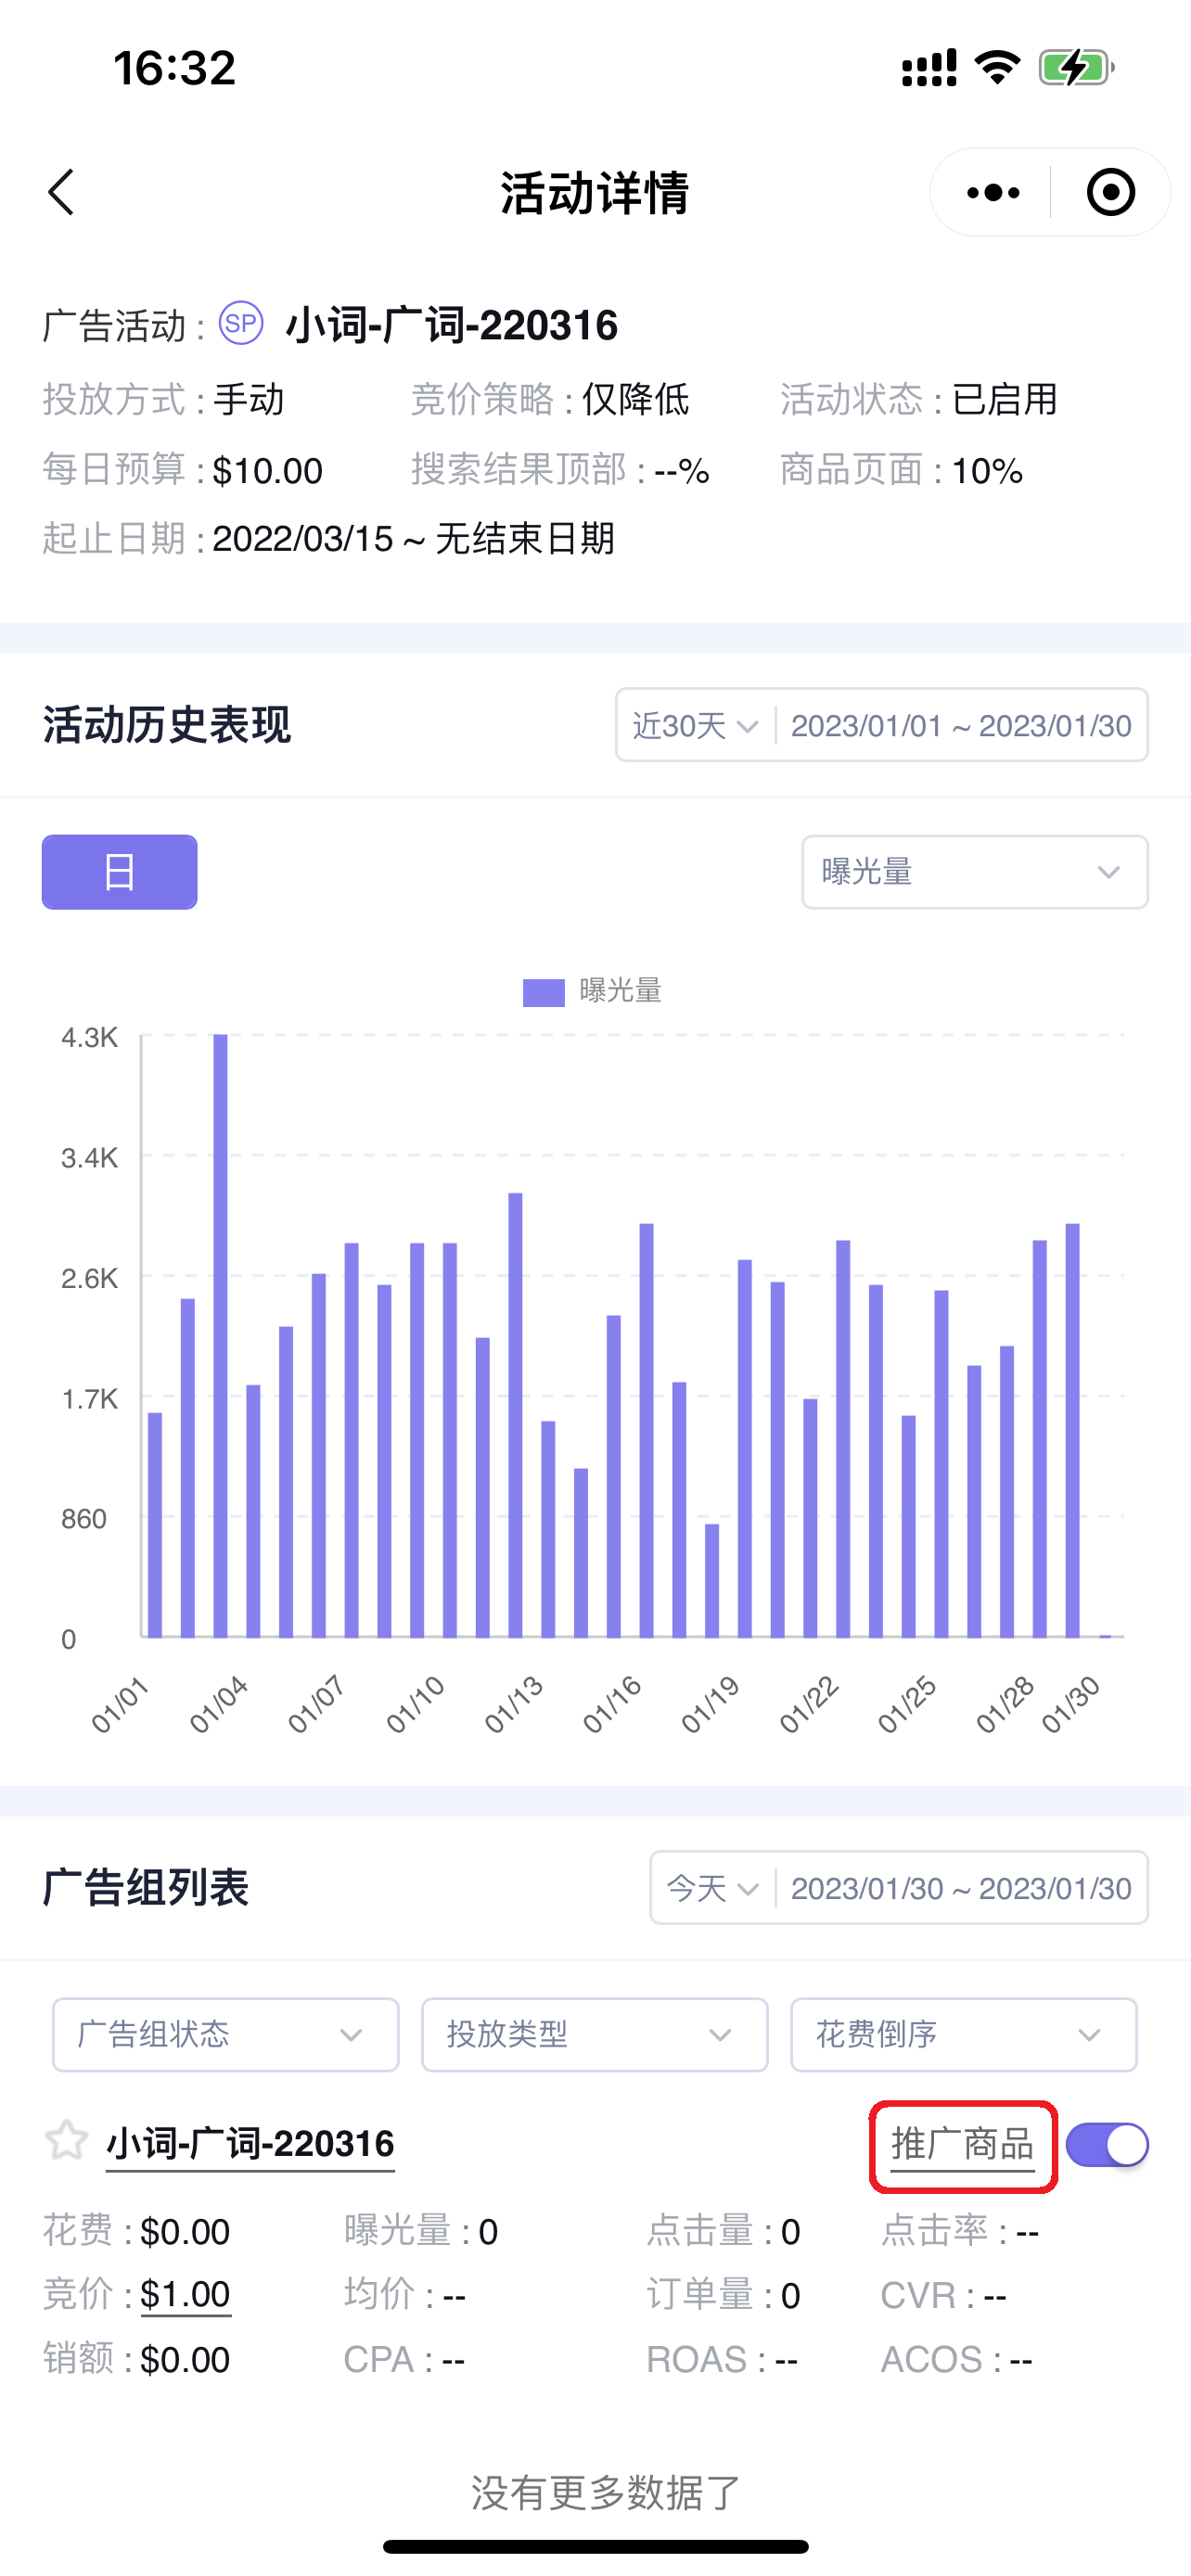
Click 【 Products】 on the right to enter and view the historical performance data of the Ad group;
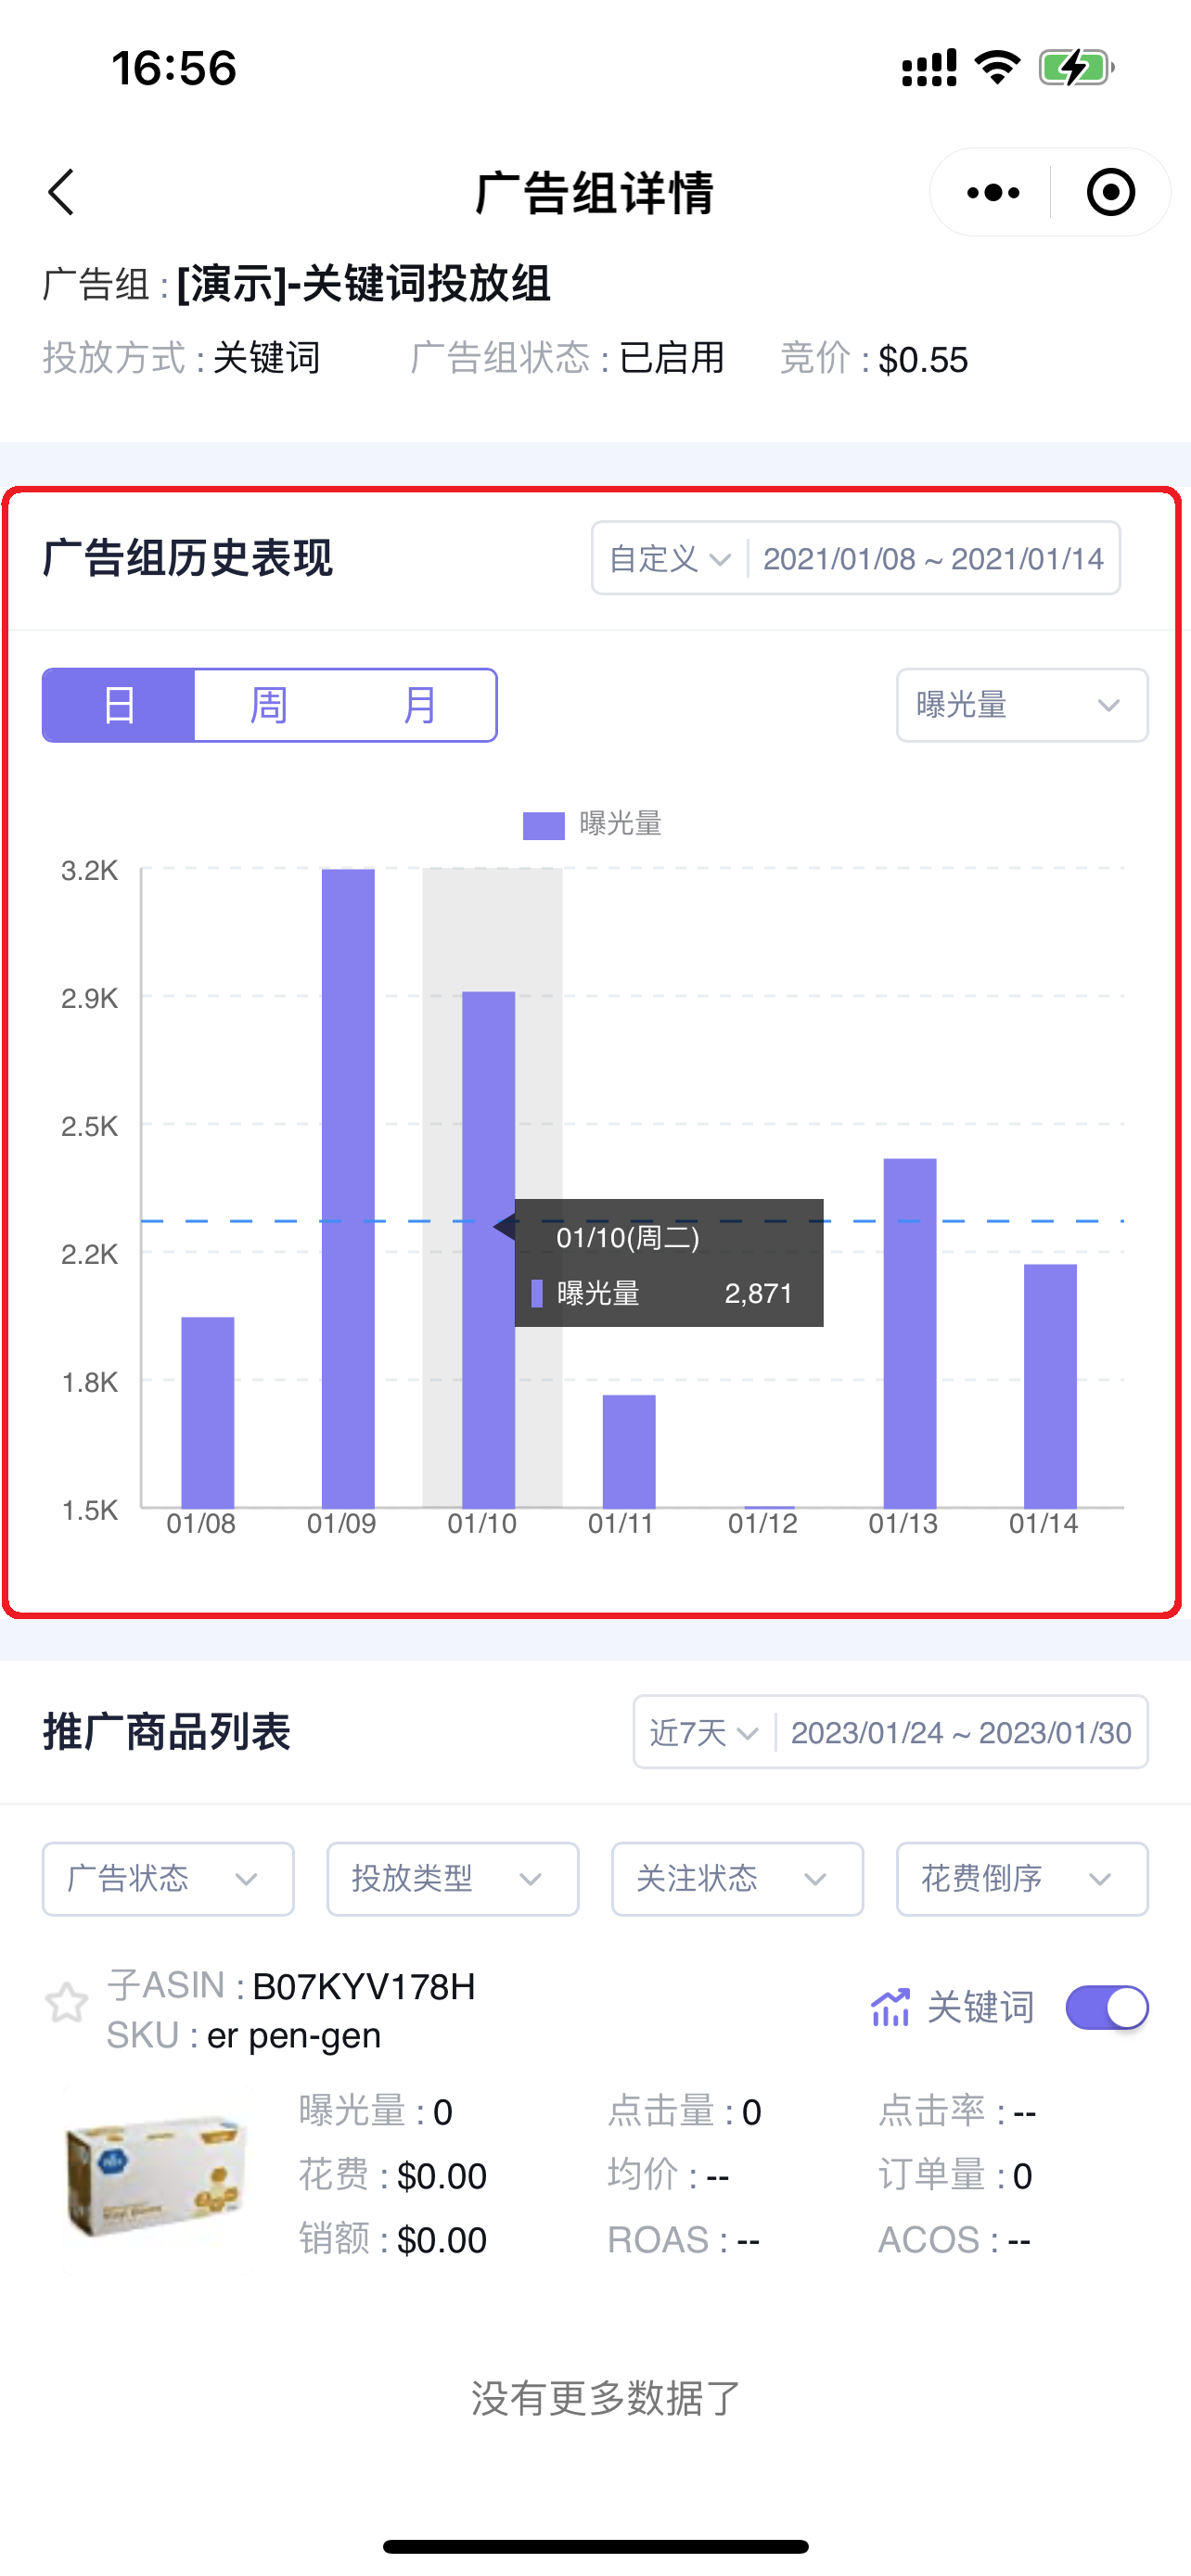
You can customize the time range (default is the last 30 days), and switch to view data such as: Impressions, Clicks, Click-Through Rate, Spend, Average CPC, (Advertising) Orders, (Advertising) Sales, etc. Click on the bar chart to view detailed data.
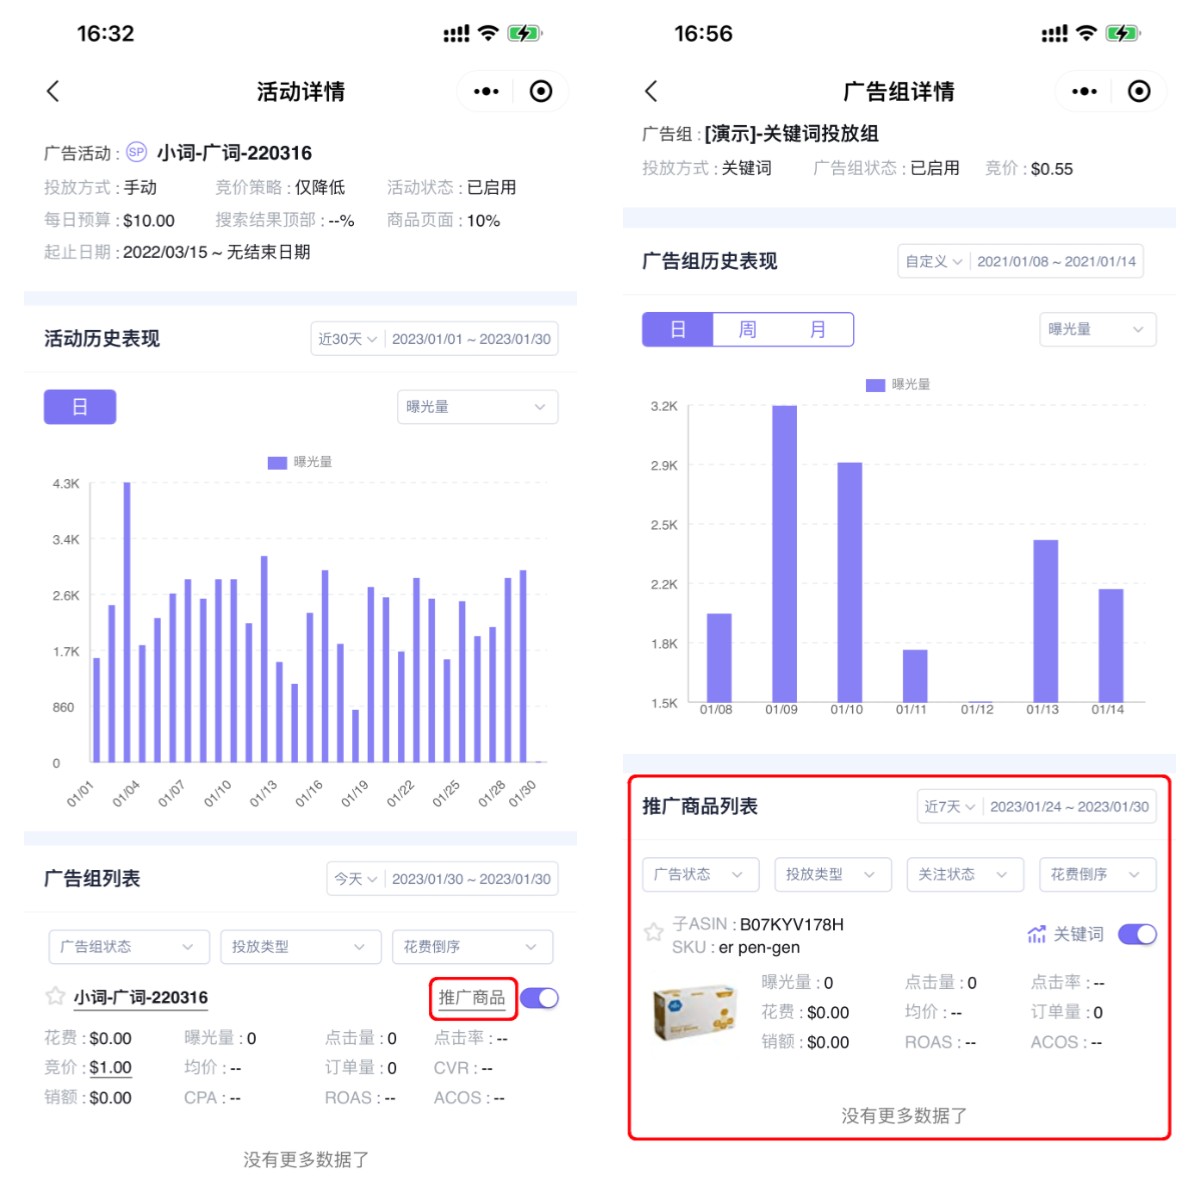
1.3 Ad group - Product List (For detailed operations, please refer to the feature introduction of the “3. Products” module)
Click 【Products】 on the right to enter and view all products under the Ad group.
1.4 Ad group - Keyword Targeting (For detailed operations, please refer to the feature introduction of the “4. Targeting - Keywords” module)
For keyword targeting Ad groups, click the Ad group name to enter and view the keyword targeting list under the Ad group.
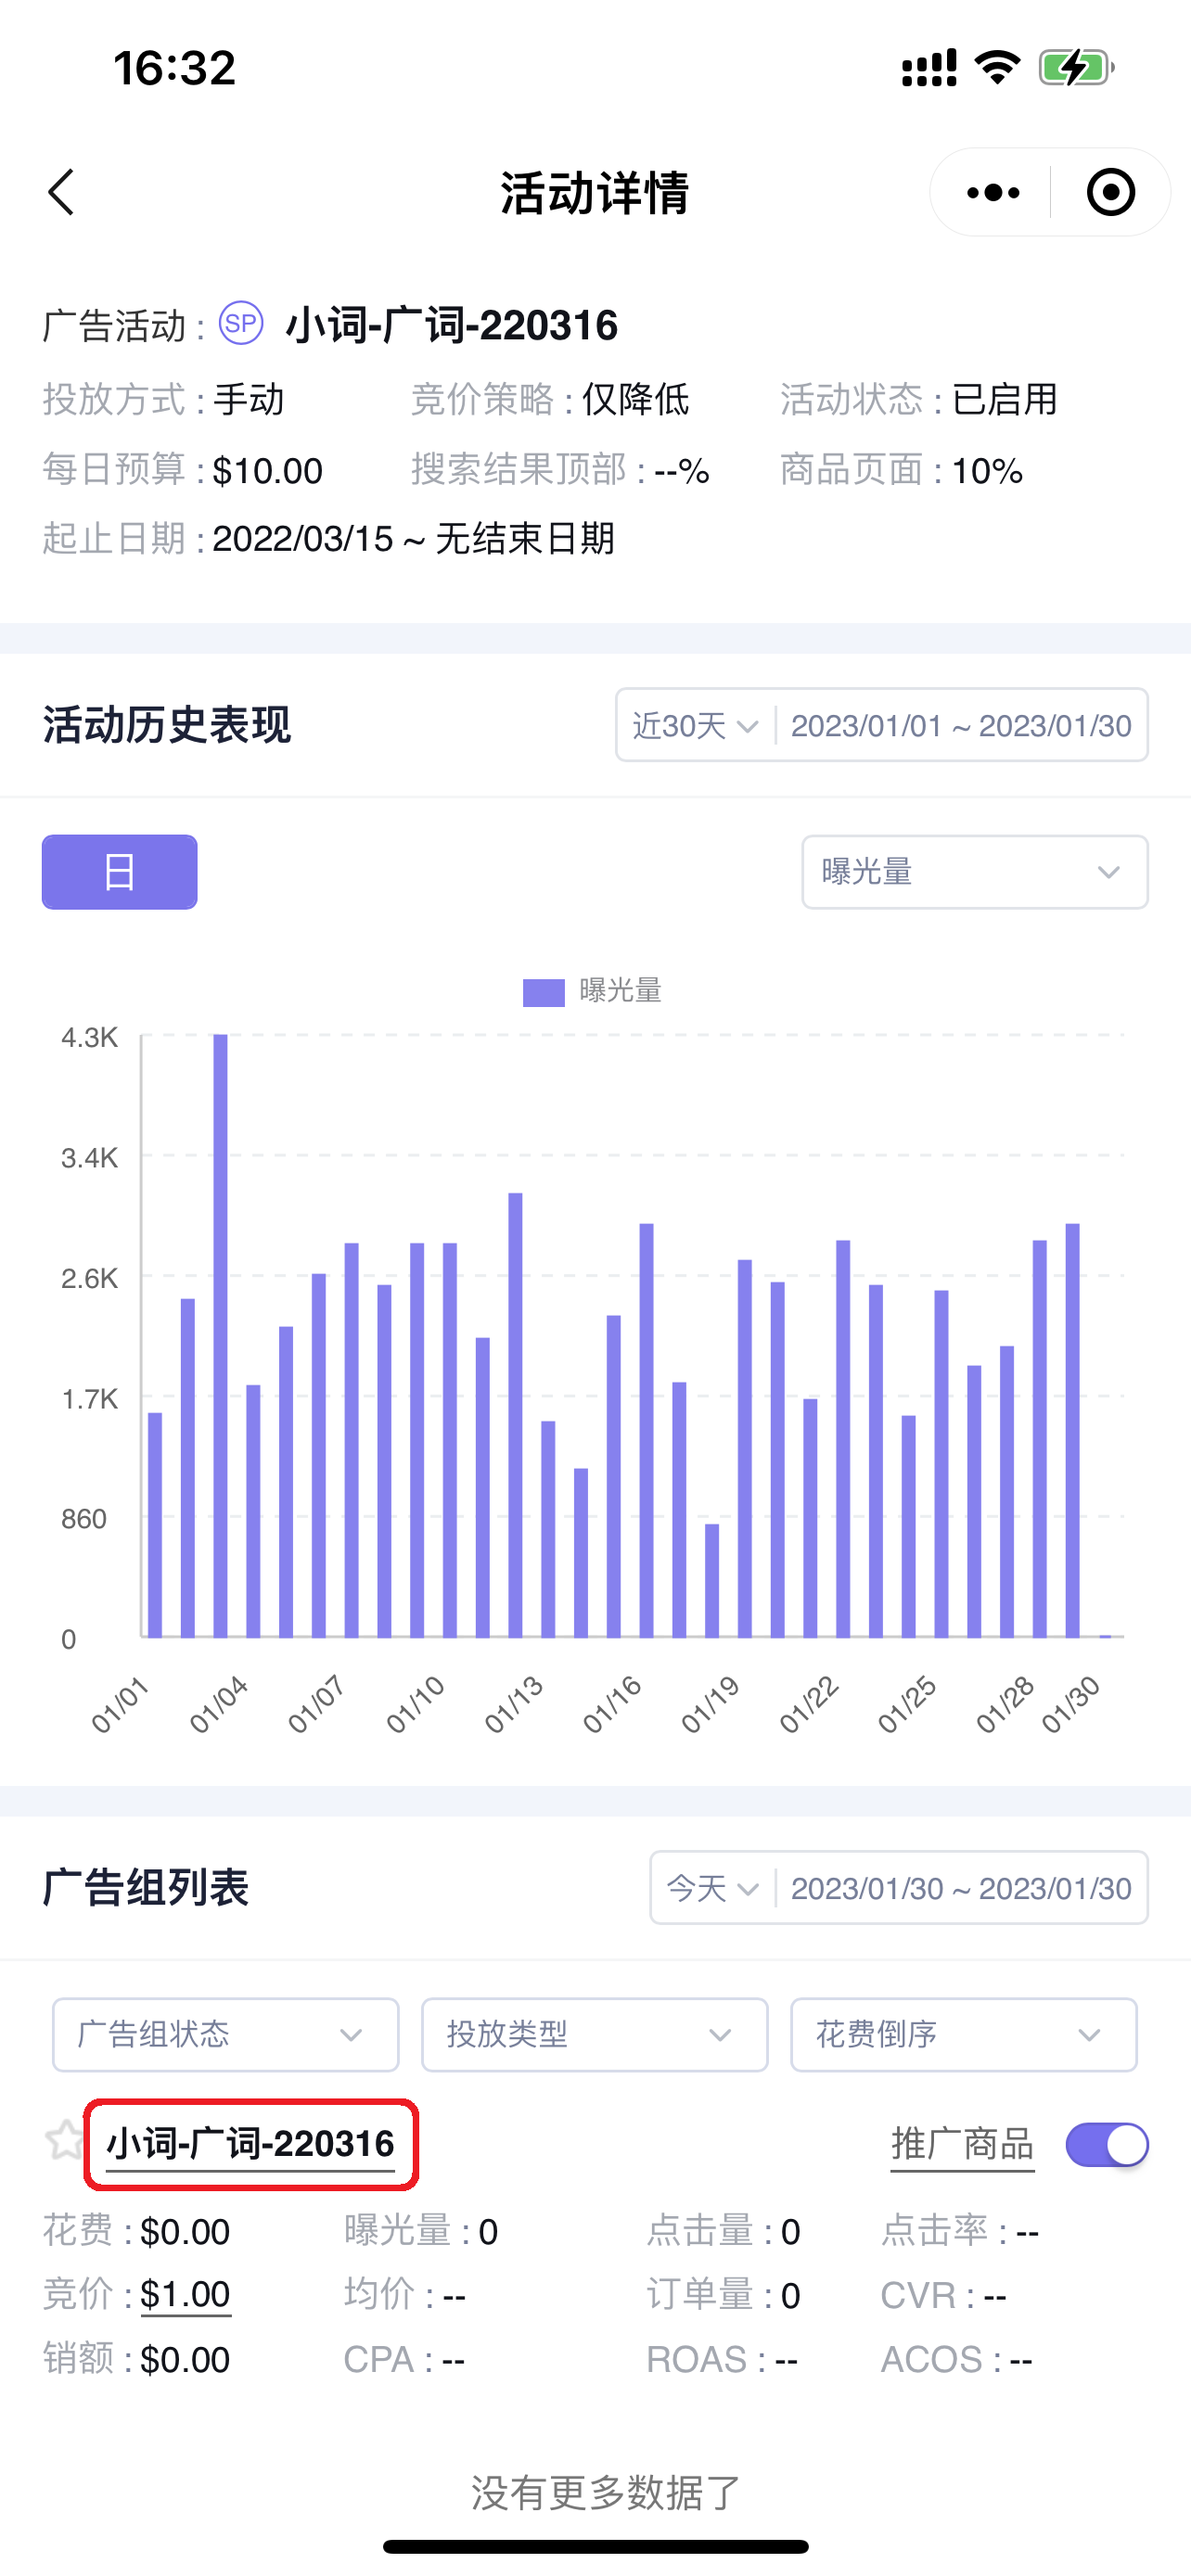
1.5 Ad group - Non-Keyword Targeting (For detailed operations, please refer to the feature introduction of the “5. Targeting - Non-Keywords” module)
For automatic targeting, product targeting, or audience targeting Ad groups, click the Ad group name to enter and view the detail list of automatic targeting four match types, associated ASINs, category targeting, and SD audience targeting. (Same as keyword targeting)
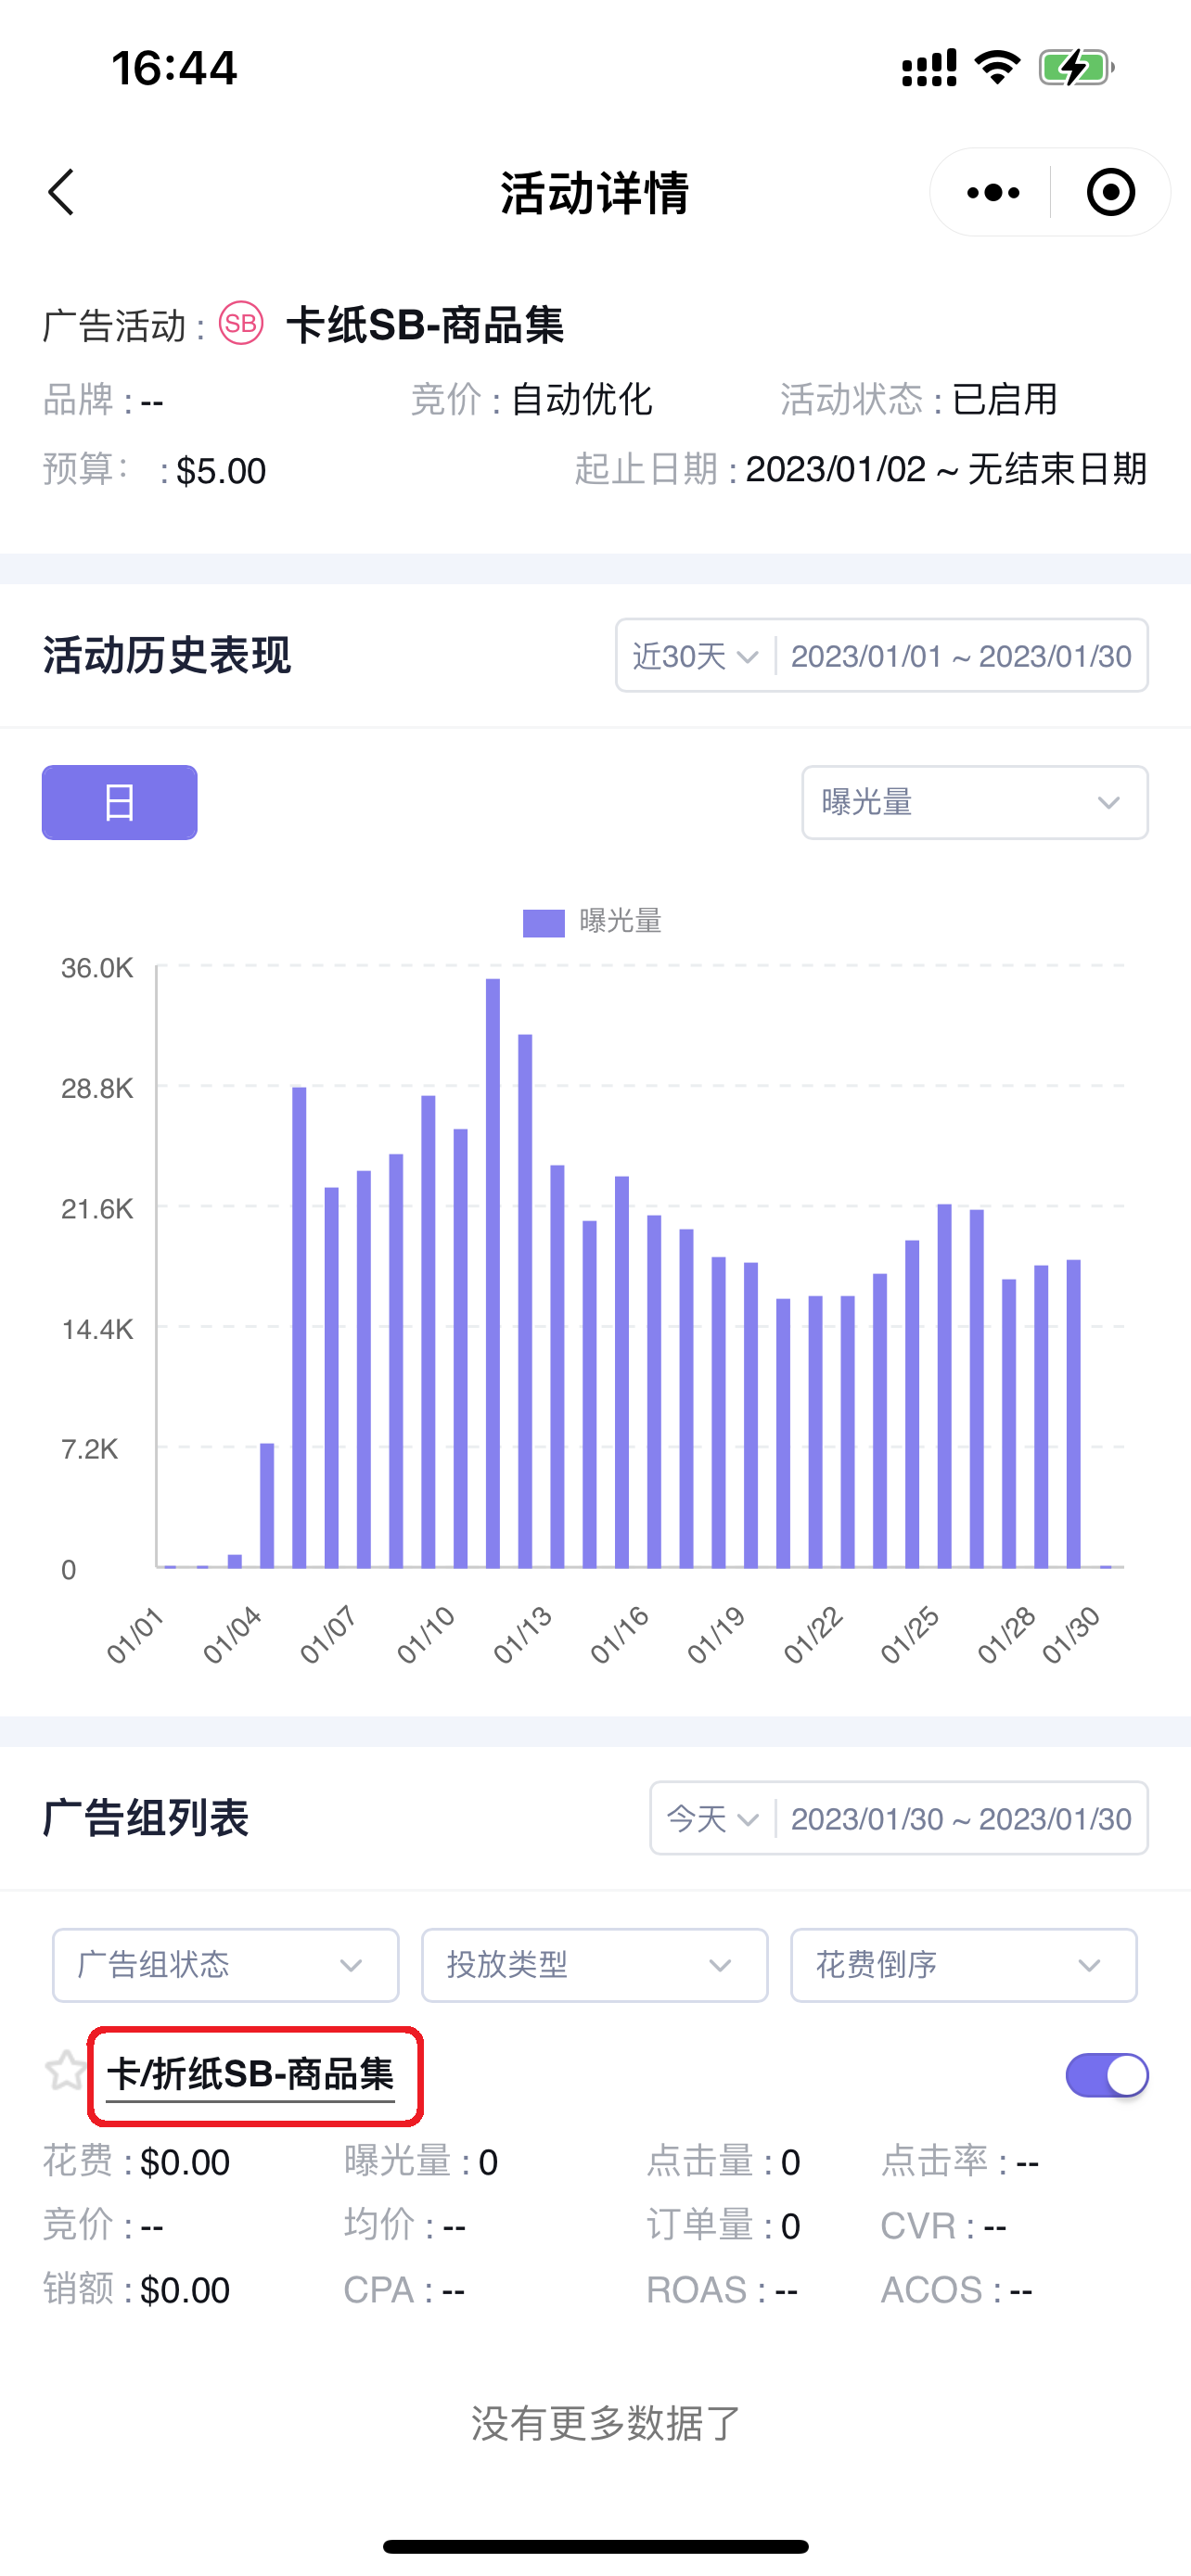
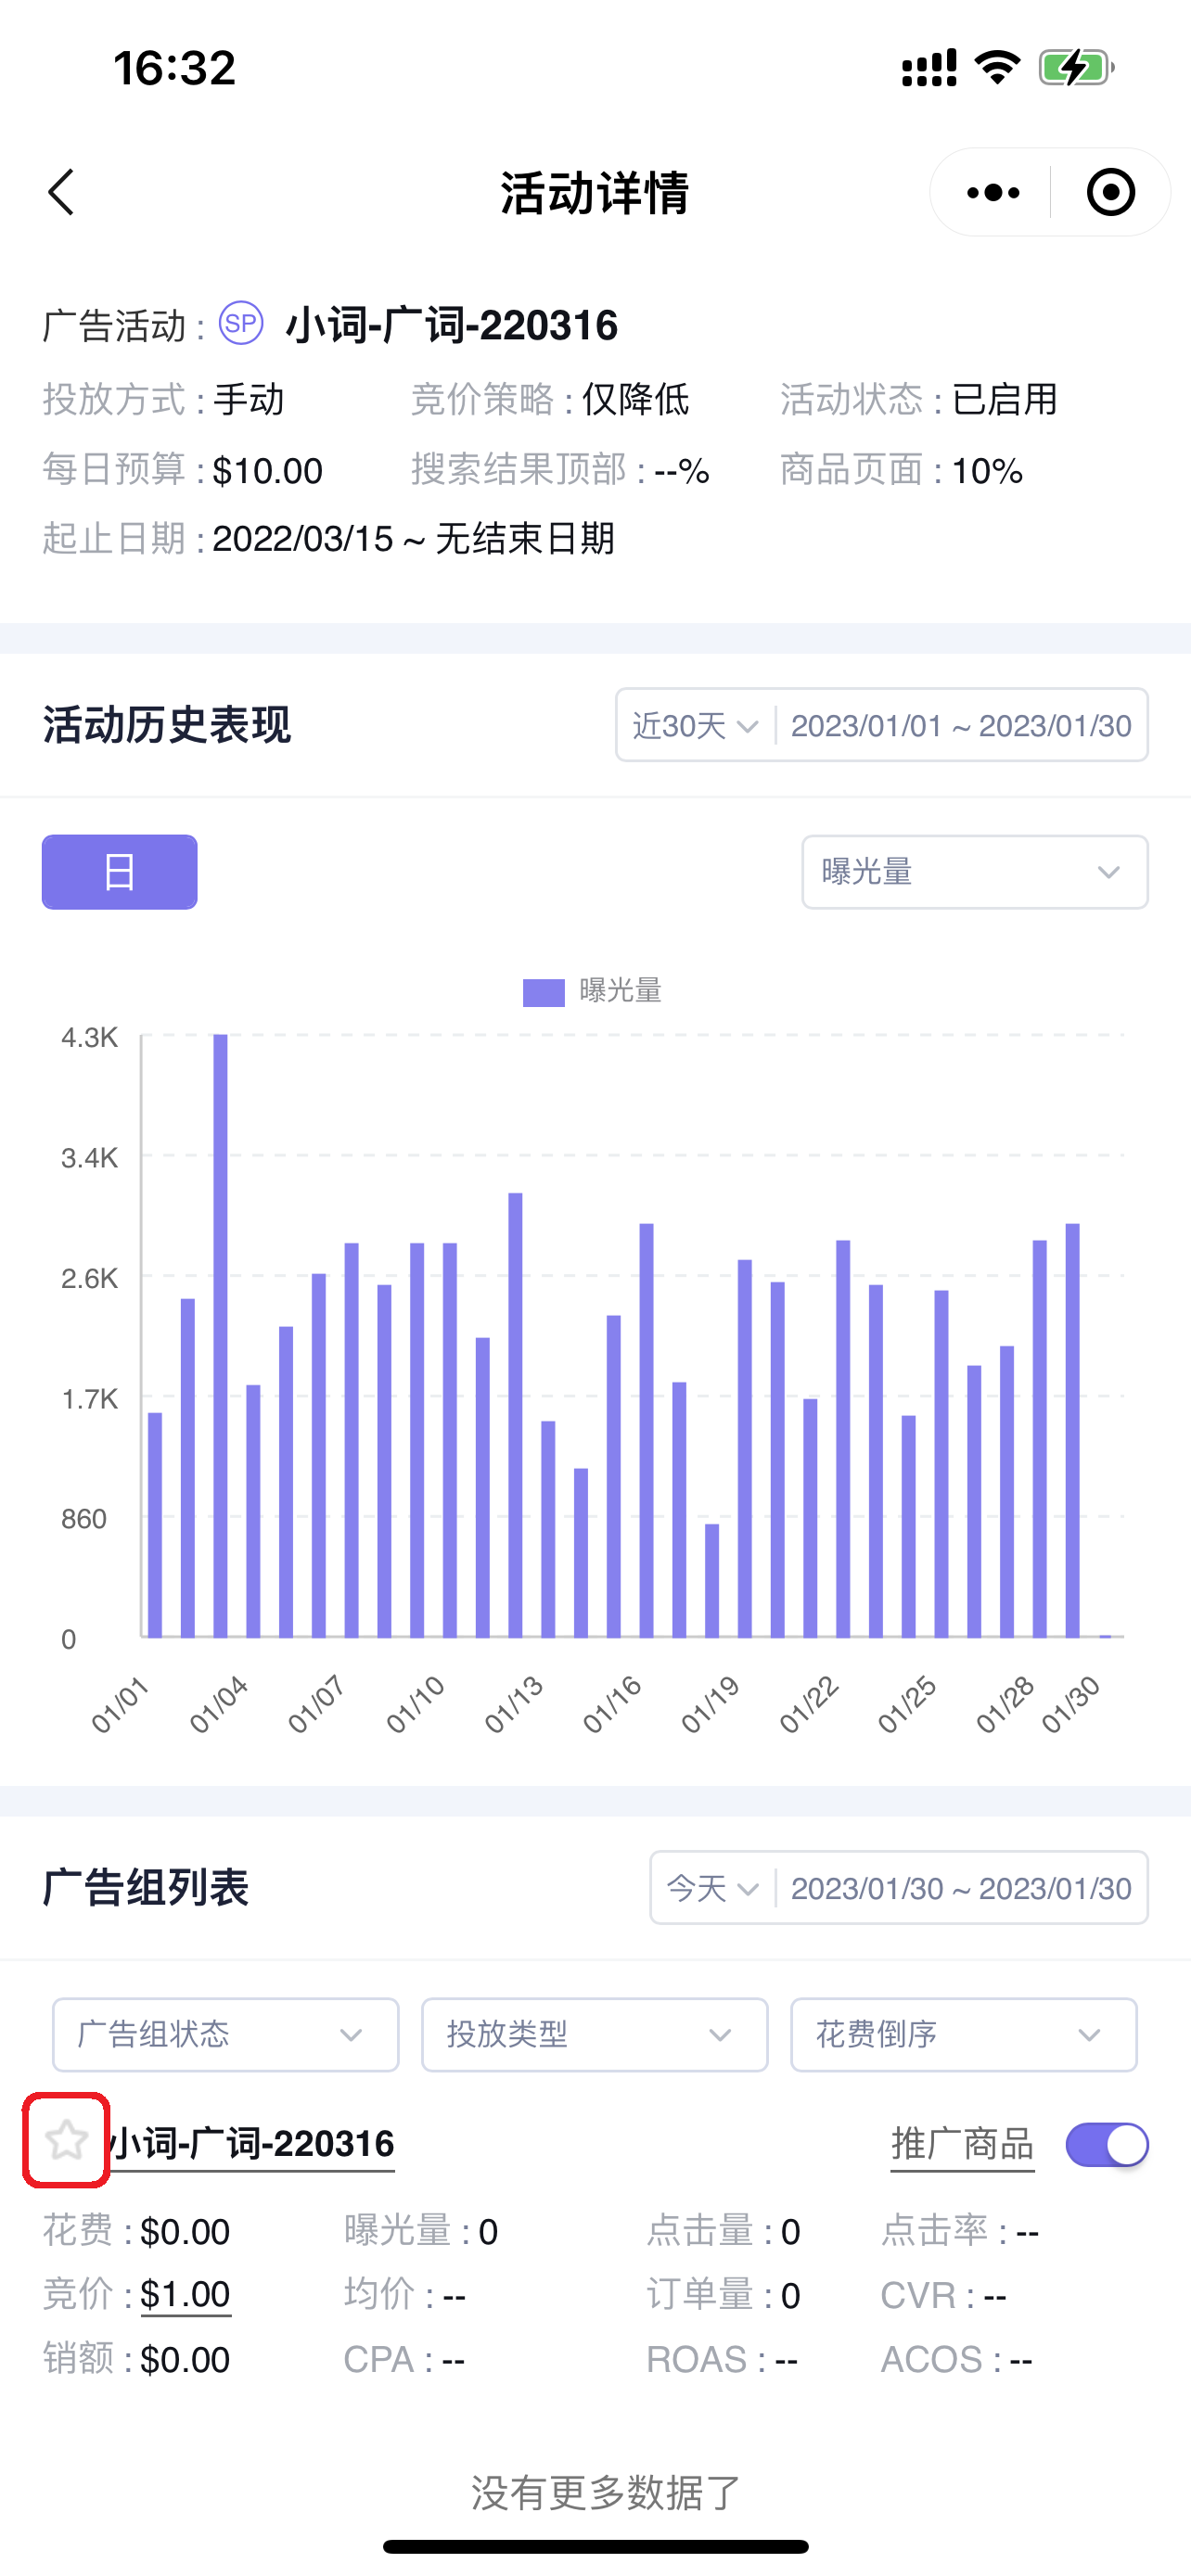
1.6 Adding to Watchlist (Advertising data across all dimensions can be added to the watchlist)
Similar to campaigns, you can also add Ad groups you want to focus on to your watchlist for quick viewing and analysis.
2. Adjusting Ad groups
You can directly adjust the default bid and enable/pause status of Ad groups.
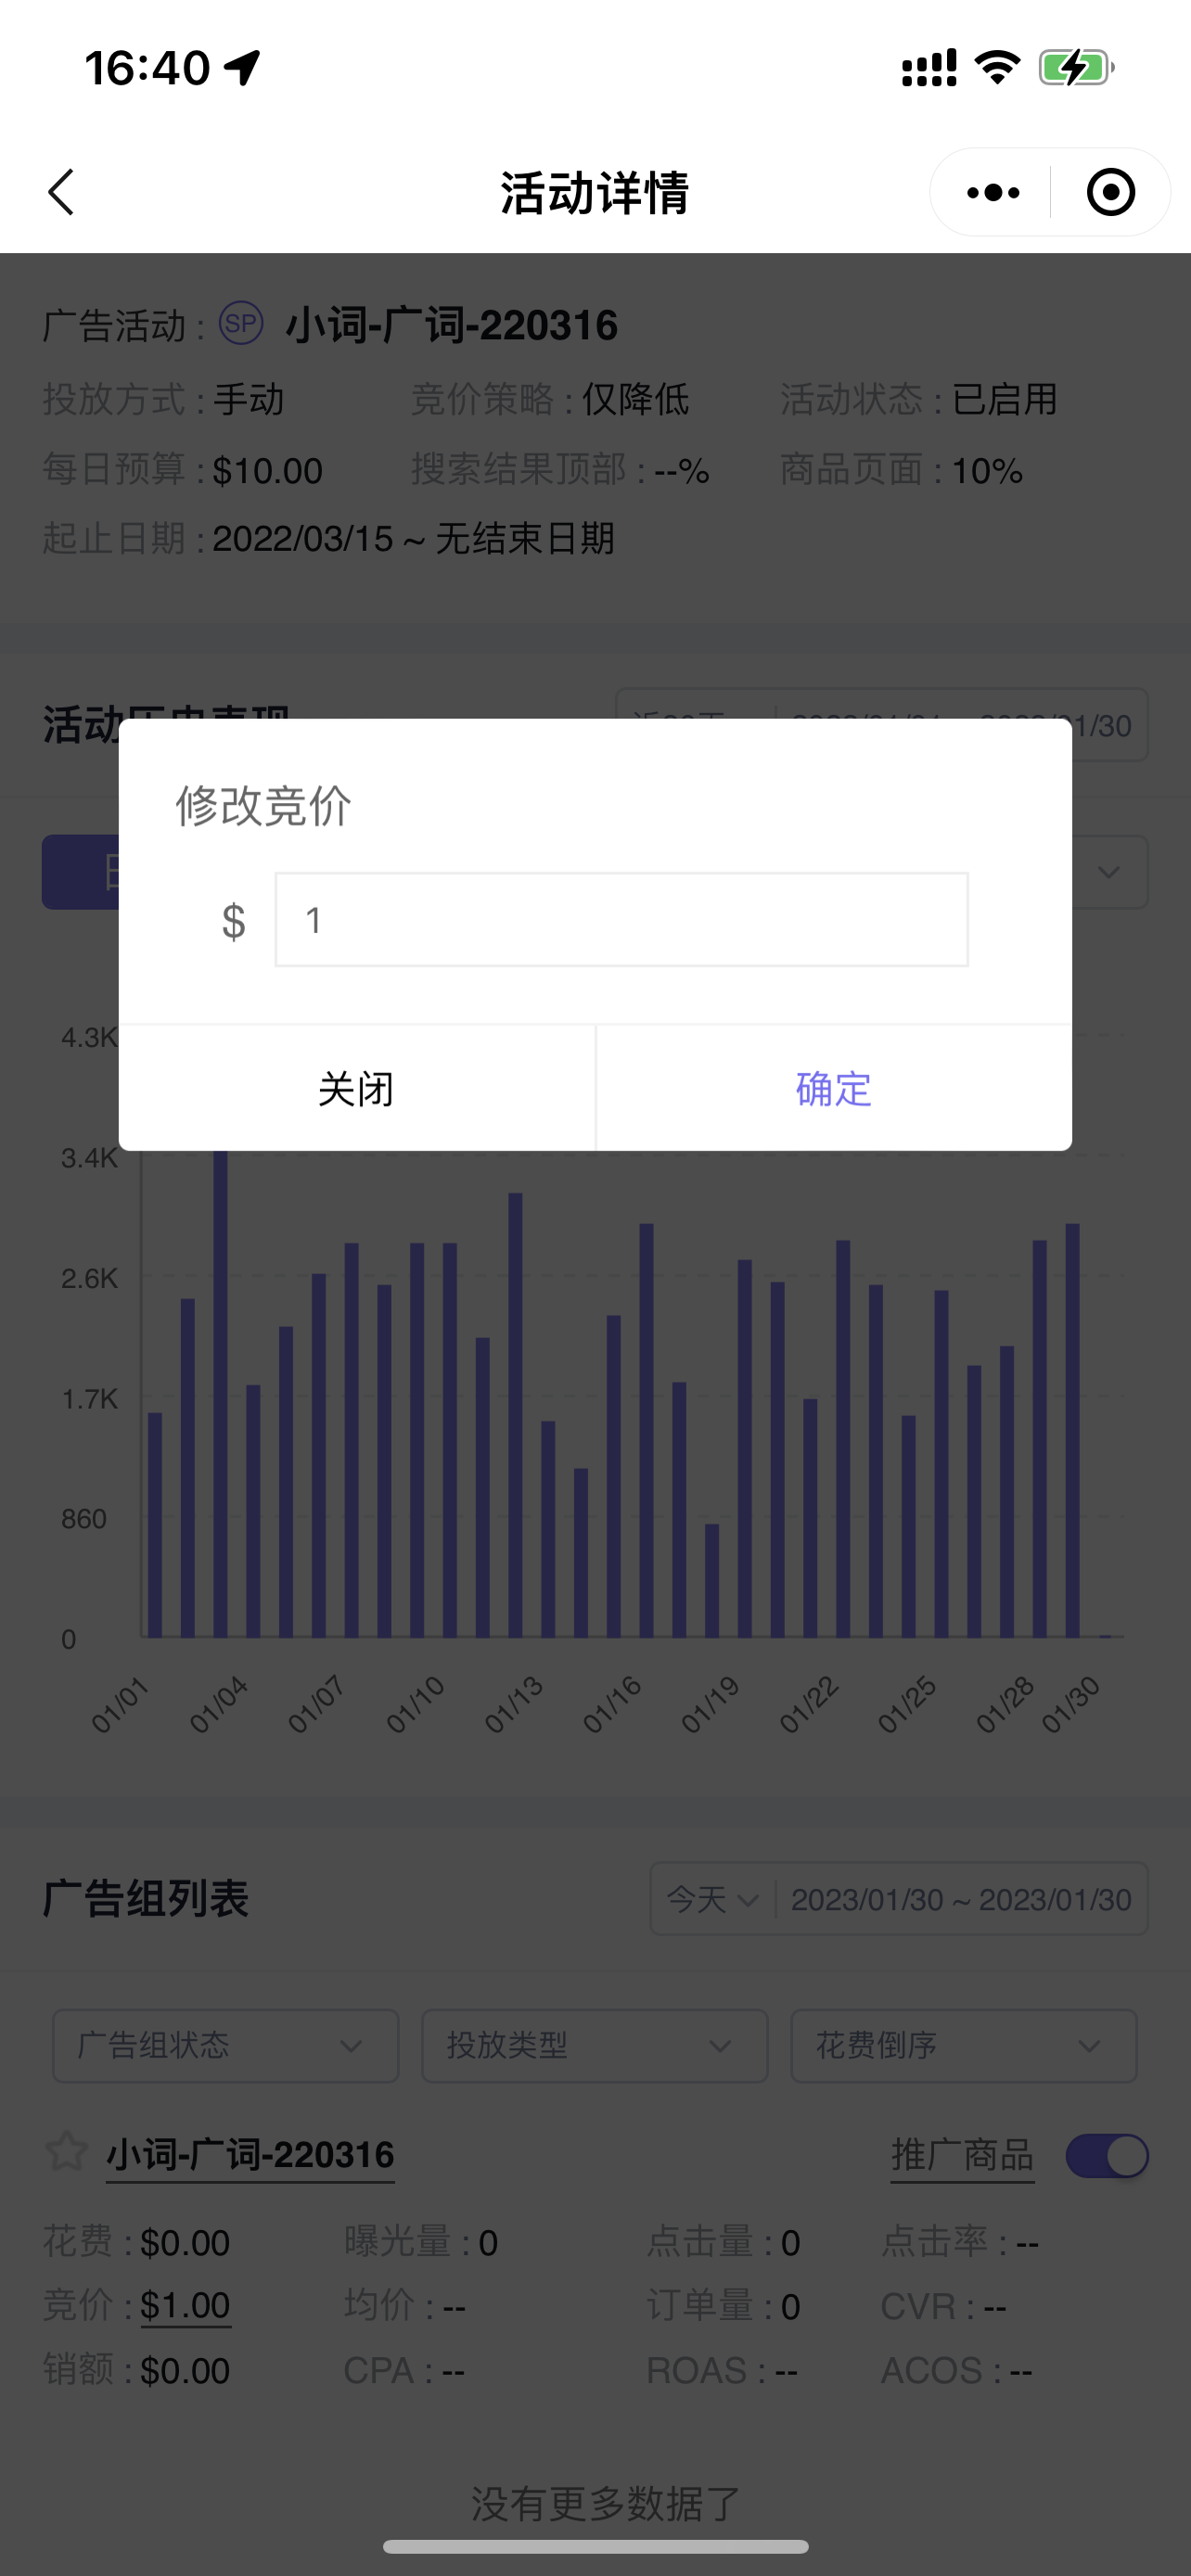
2.1 Modifying Default Bid
Click the bid amount to adjust the default bid for the Ad group.
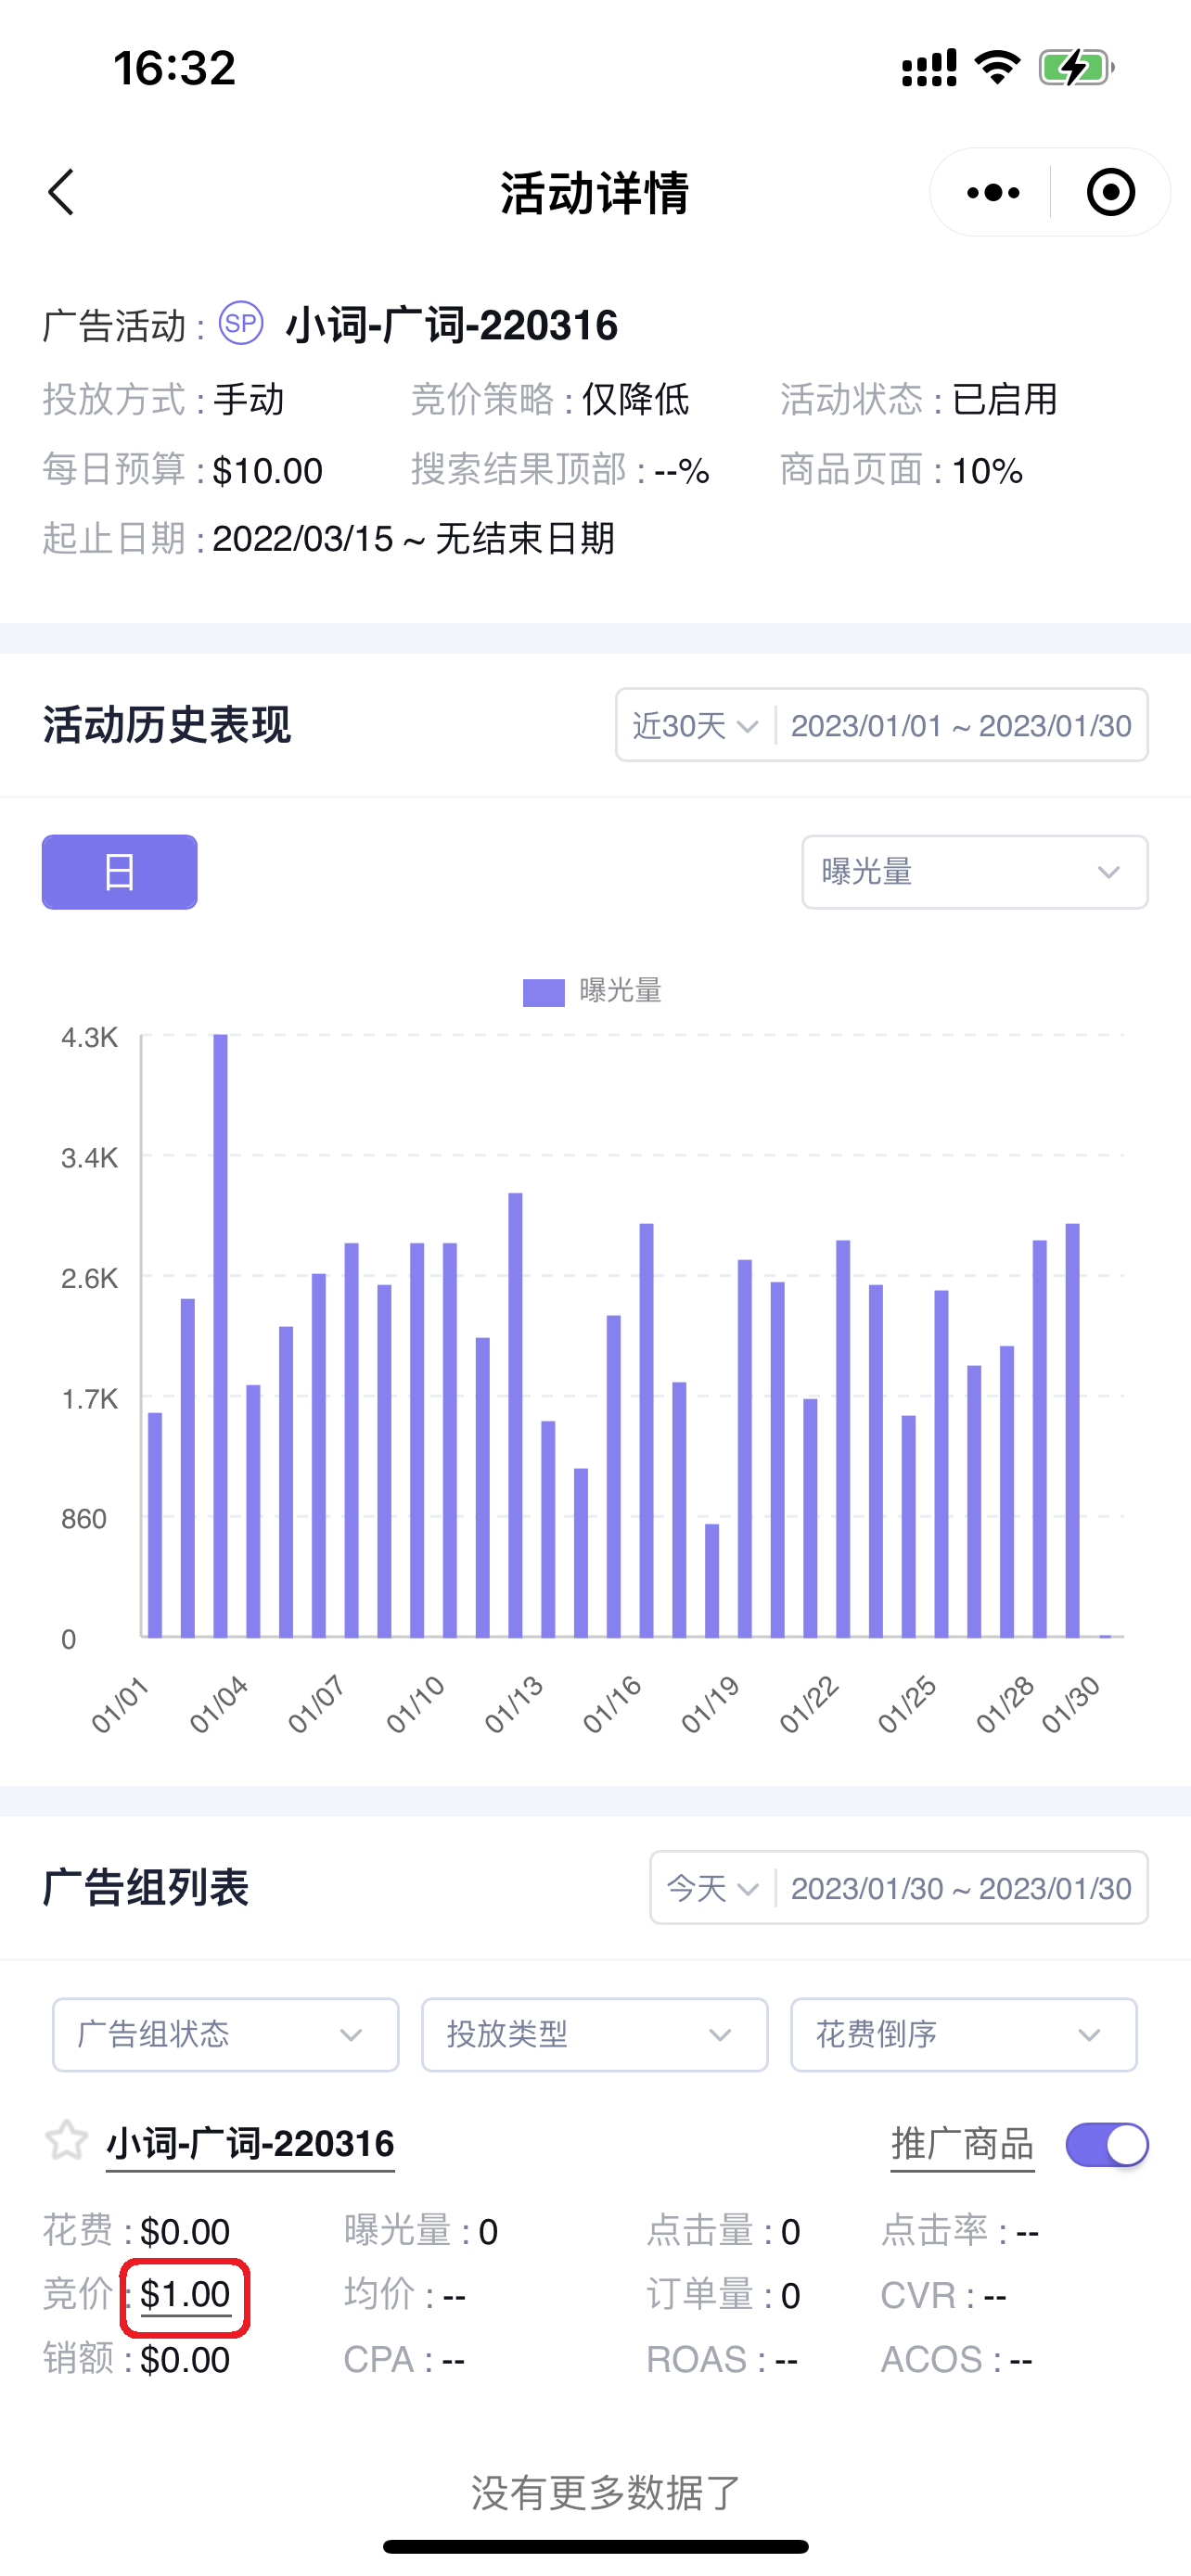
Modifying Default Bid:
2.2 Adjusting Enable/Pause Status
Click the enable/pause button on the right side of the Ad group to enable or pause the Ad group.
Products
Each Ad group has corresponding products. You can analyze and adjust products in different Ad groups to optimize your targeting direction.
1. Finding and Analyzing Products
1.1 Finding Products
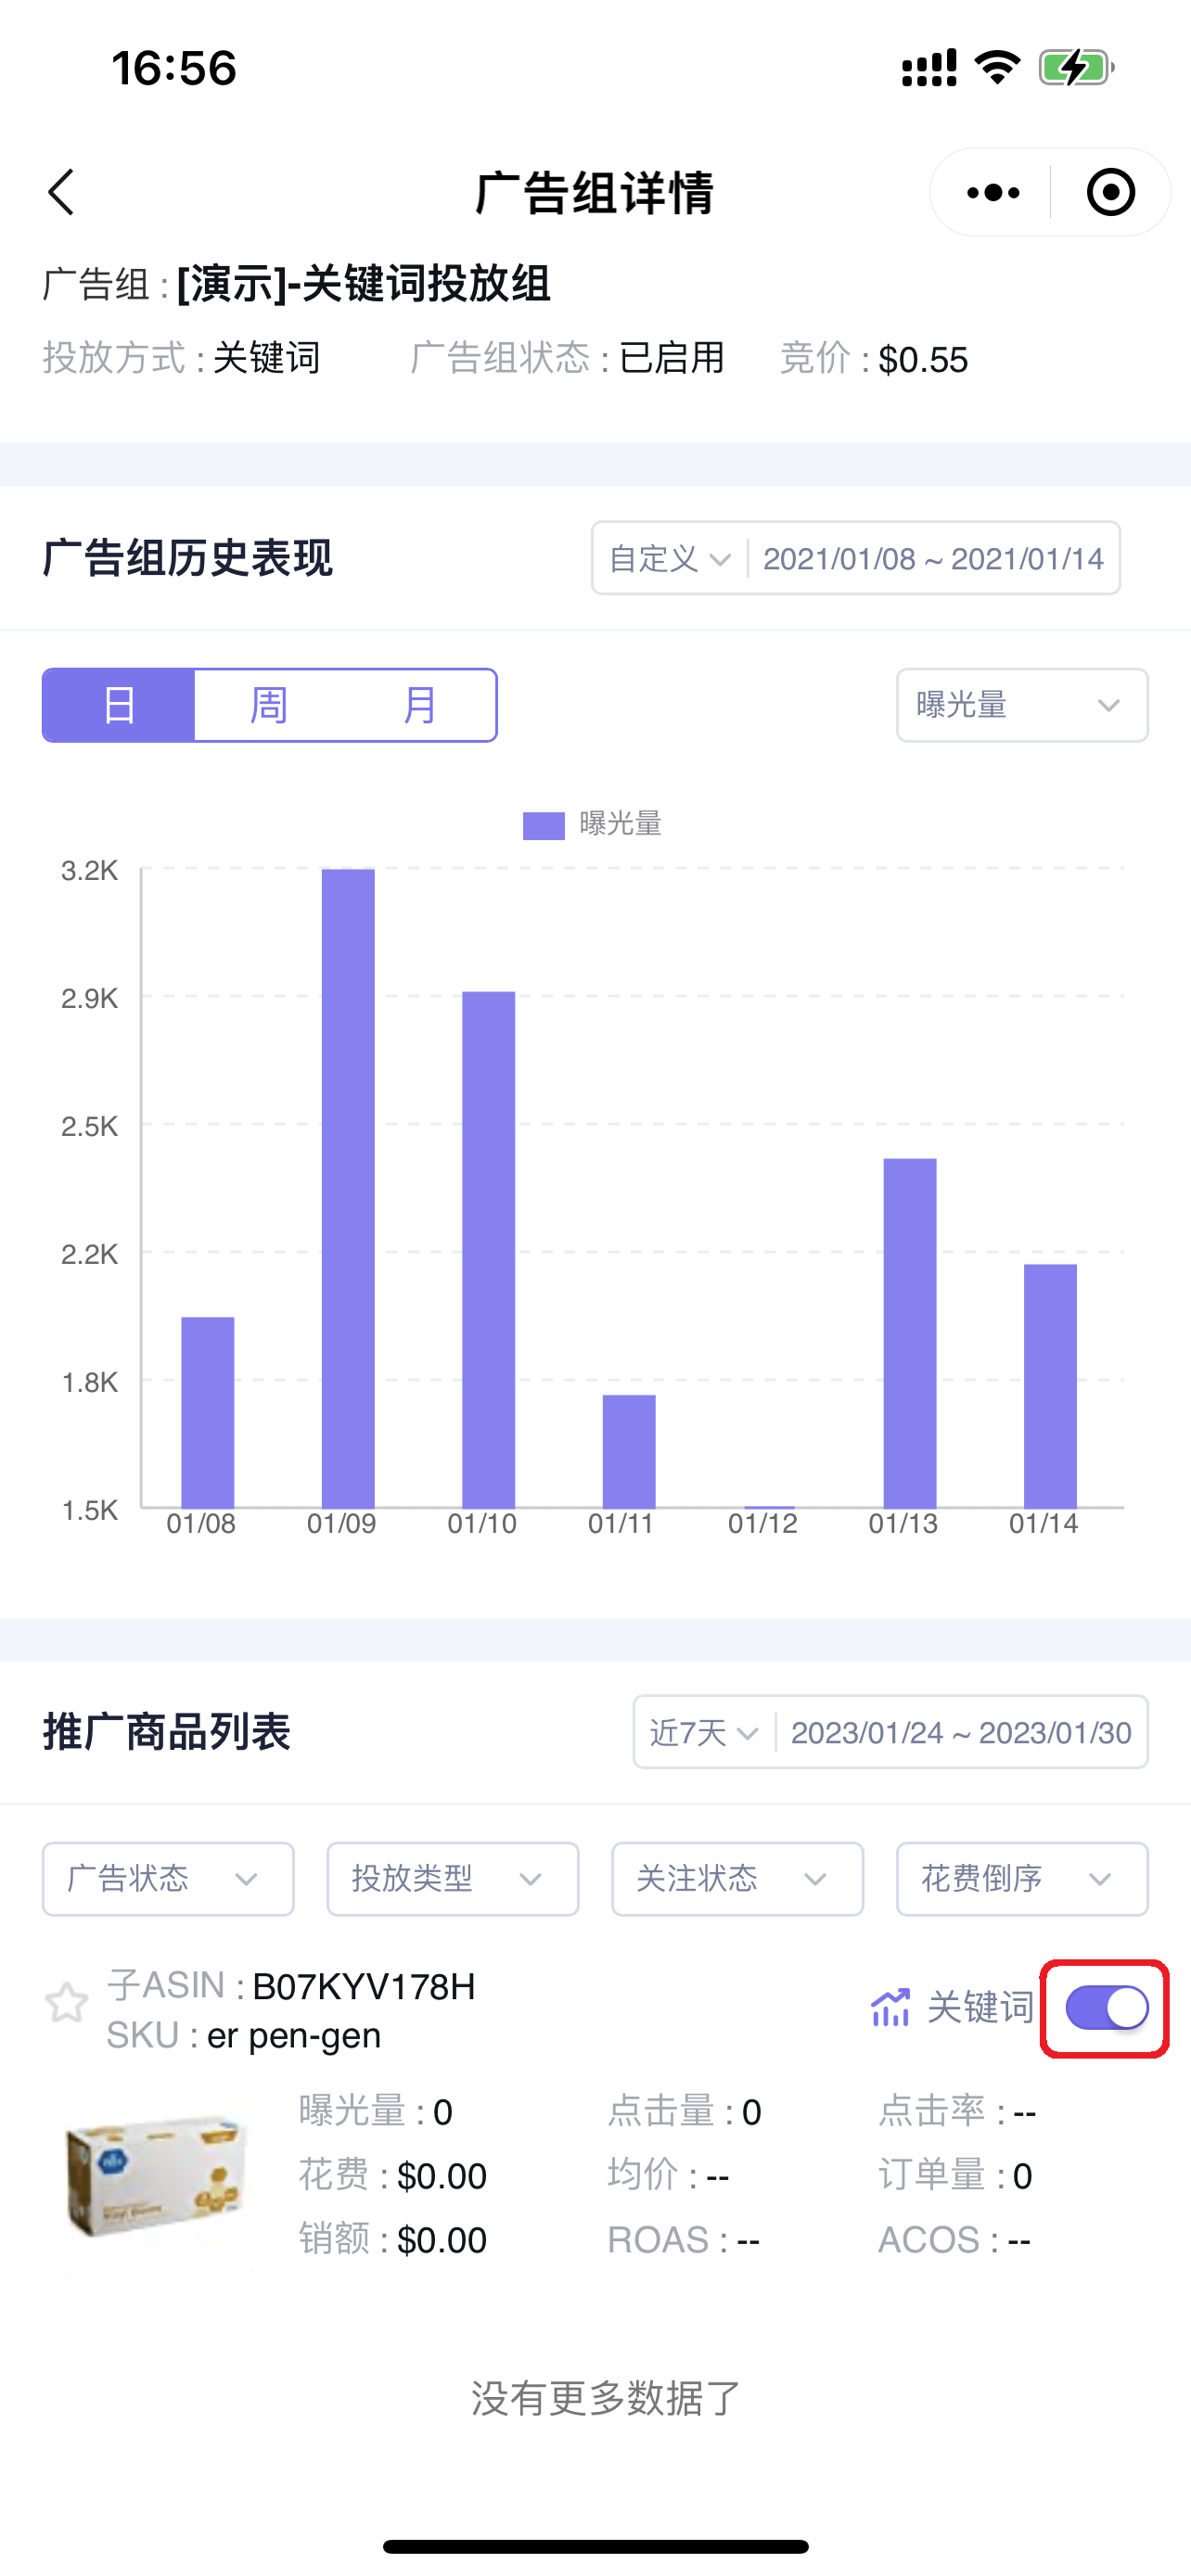
Find the corresponding Ad group and click the Ad group name to enter and view all products under the Ad group.
Navigation path: Campaign name -> Enter Ad group list -> Products -> Enter Product list
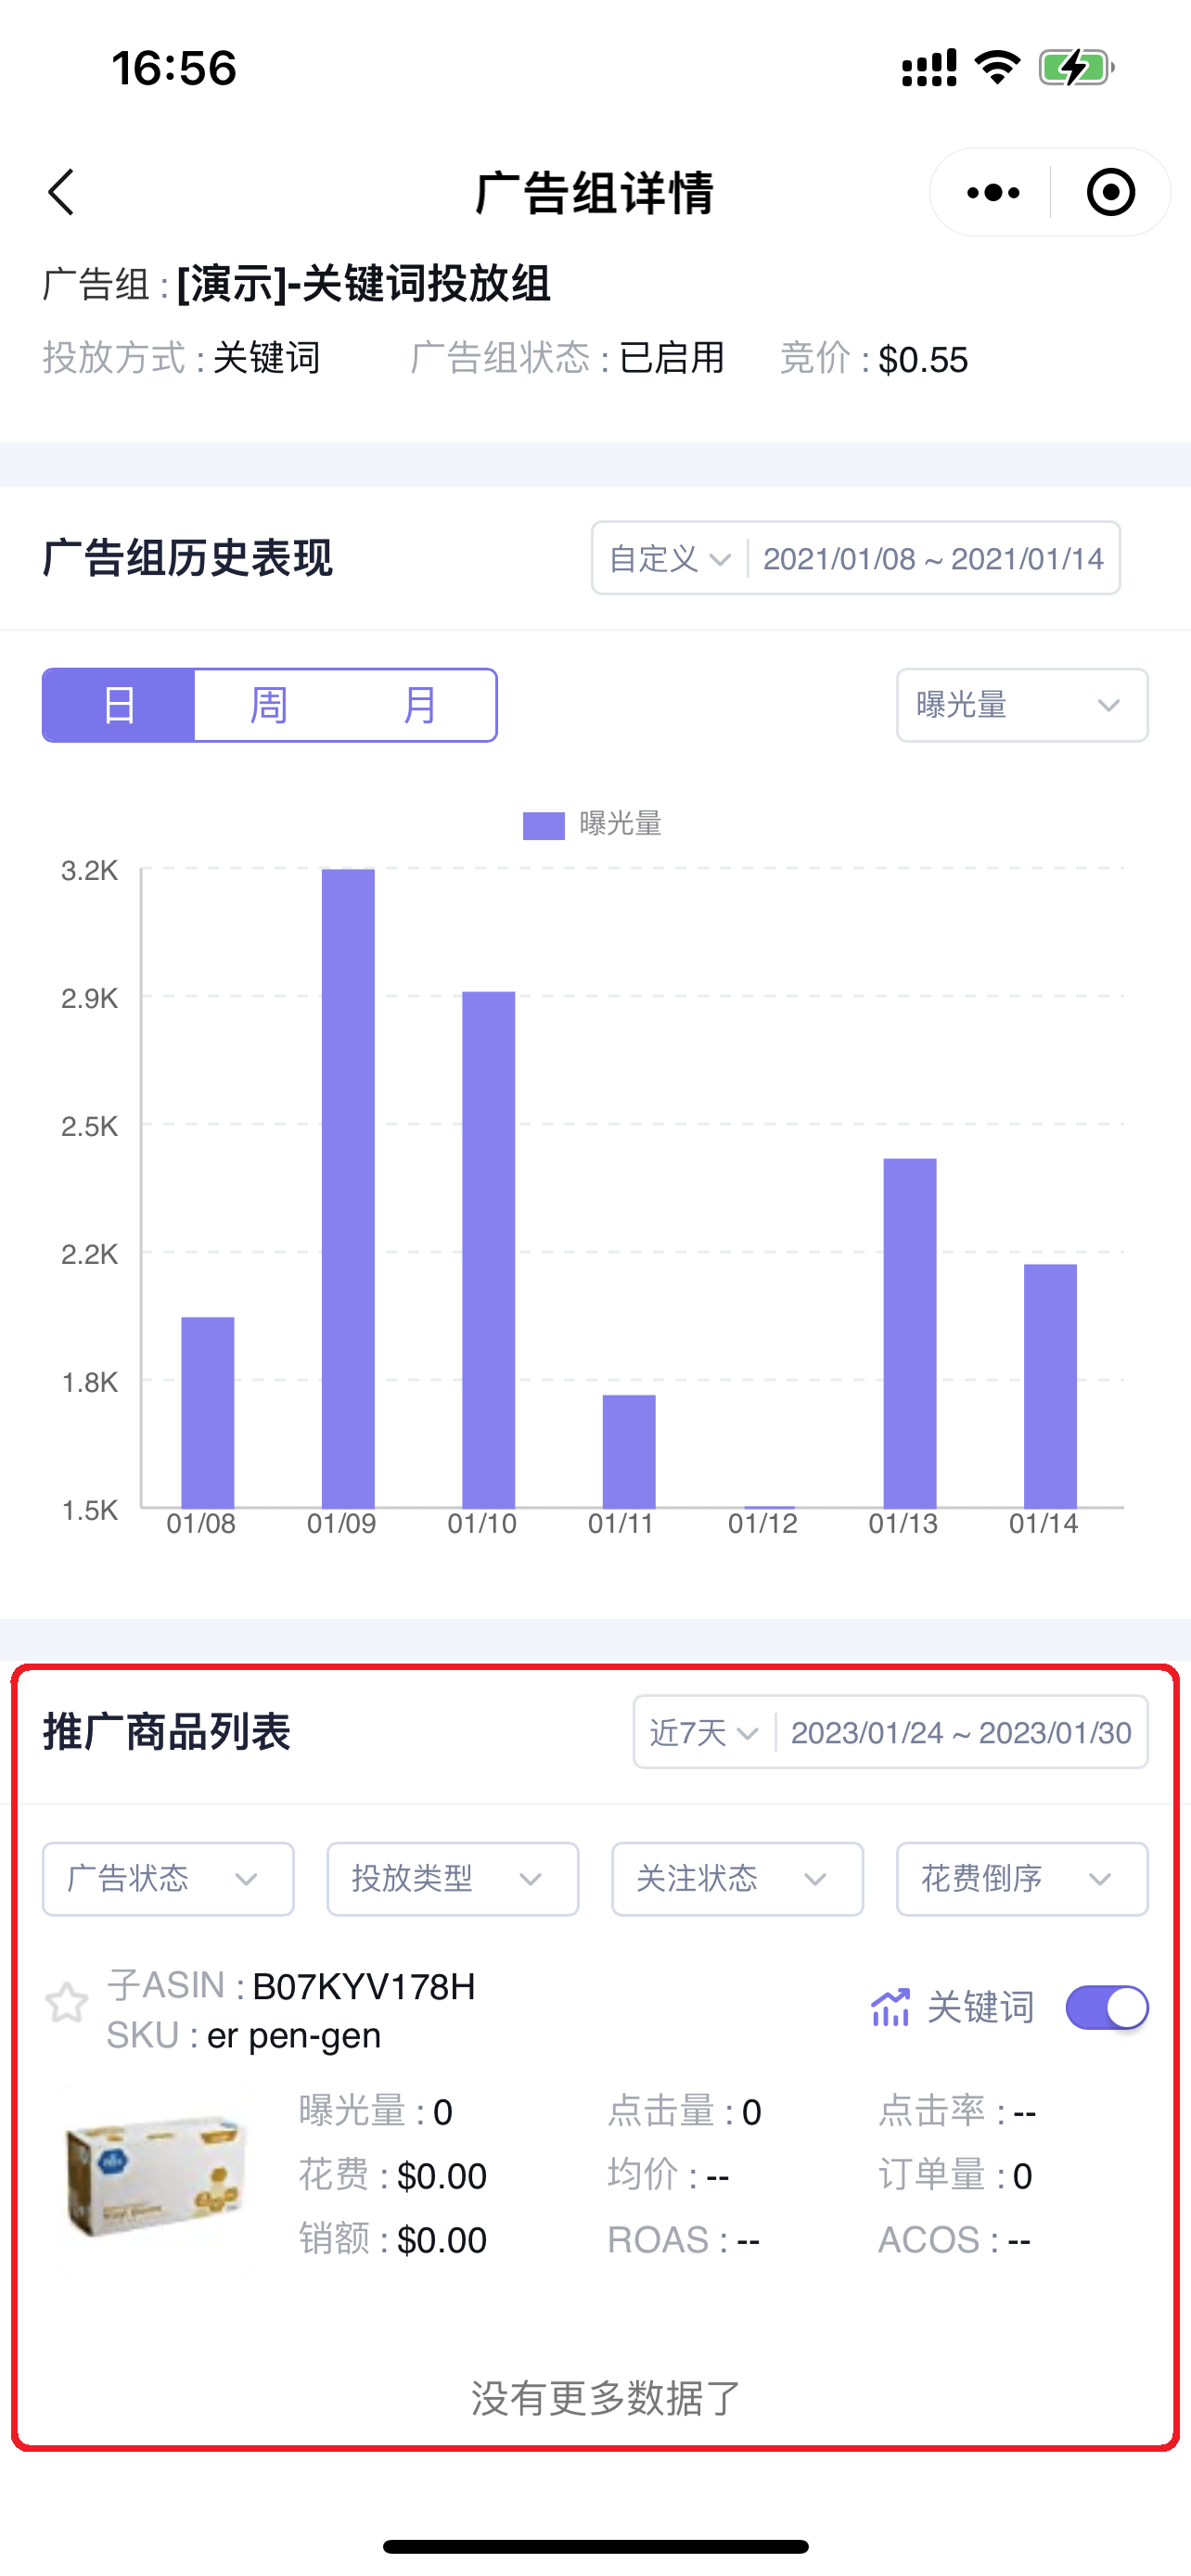
Enter the “ Product List” page,
The data time range for products also defaults to the time range of its parent campaign. You can also customize the time range to view and analyze corresponding performance data.
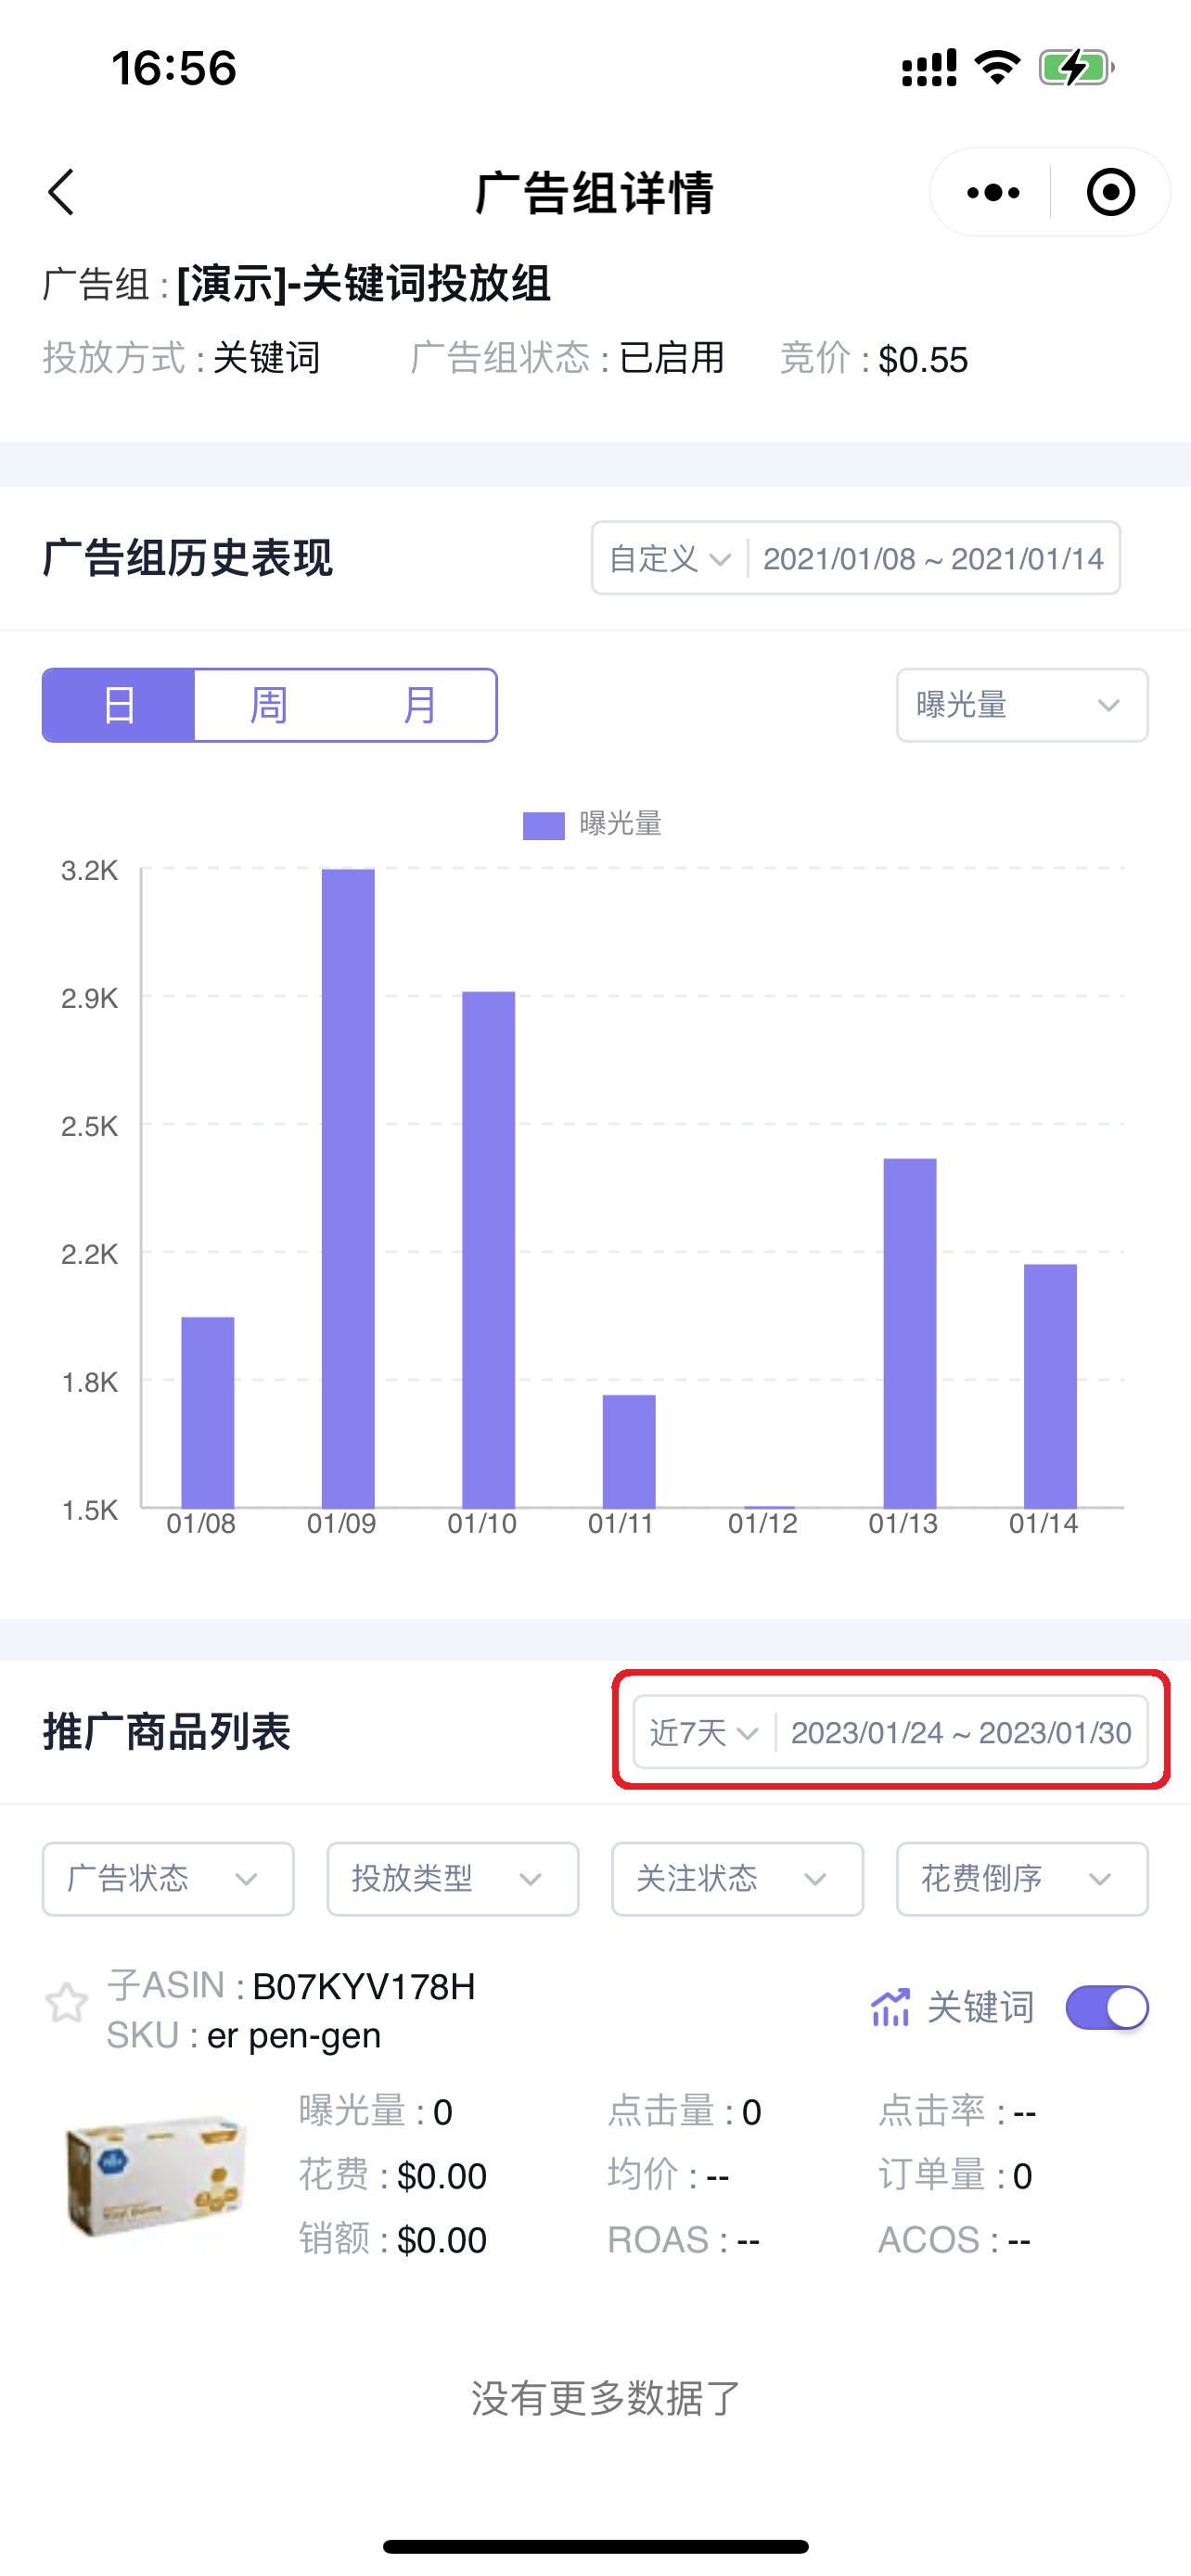
After selecting the time range, you can use filter conditions: ad status, targeting type, watchlist status, and sort by corresponding ad data (default is spend descending) to view product data that meets the corresponding conditions.
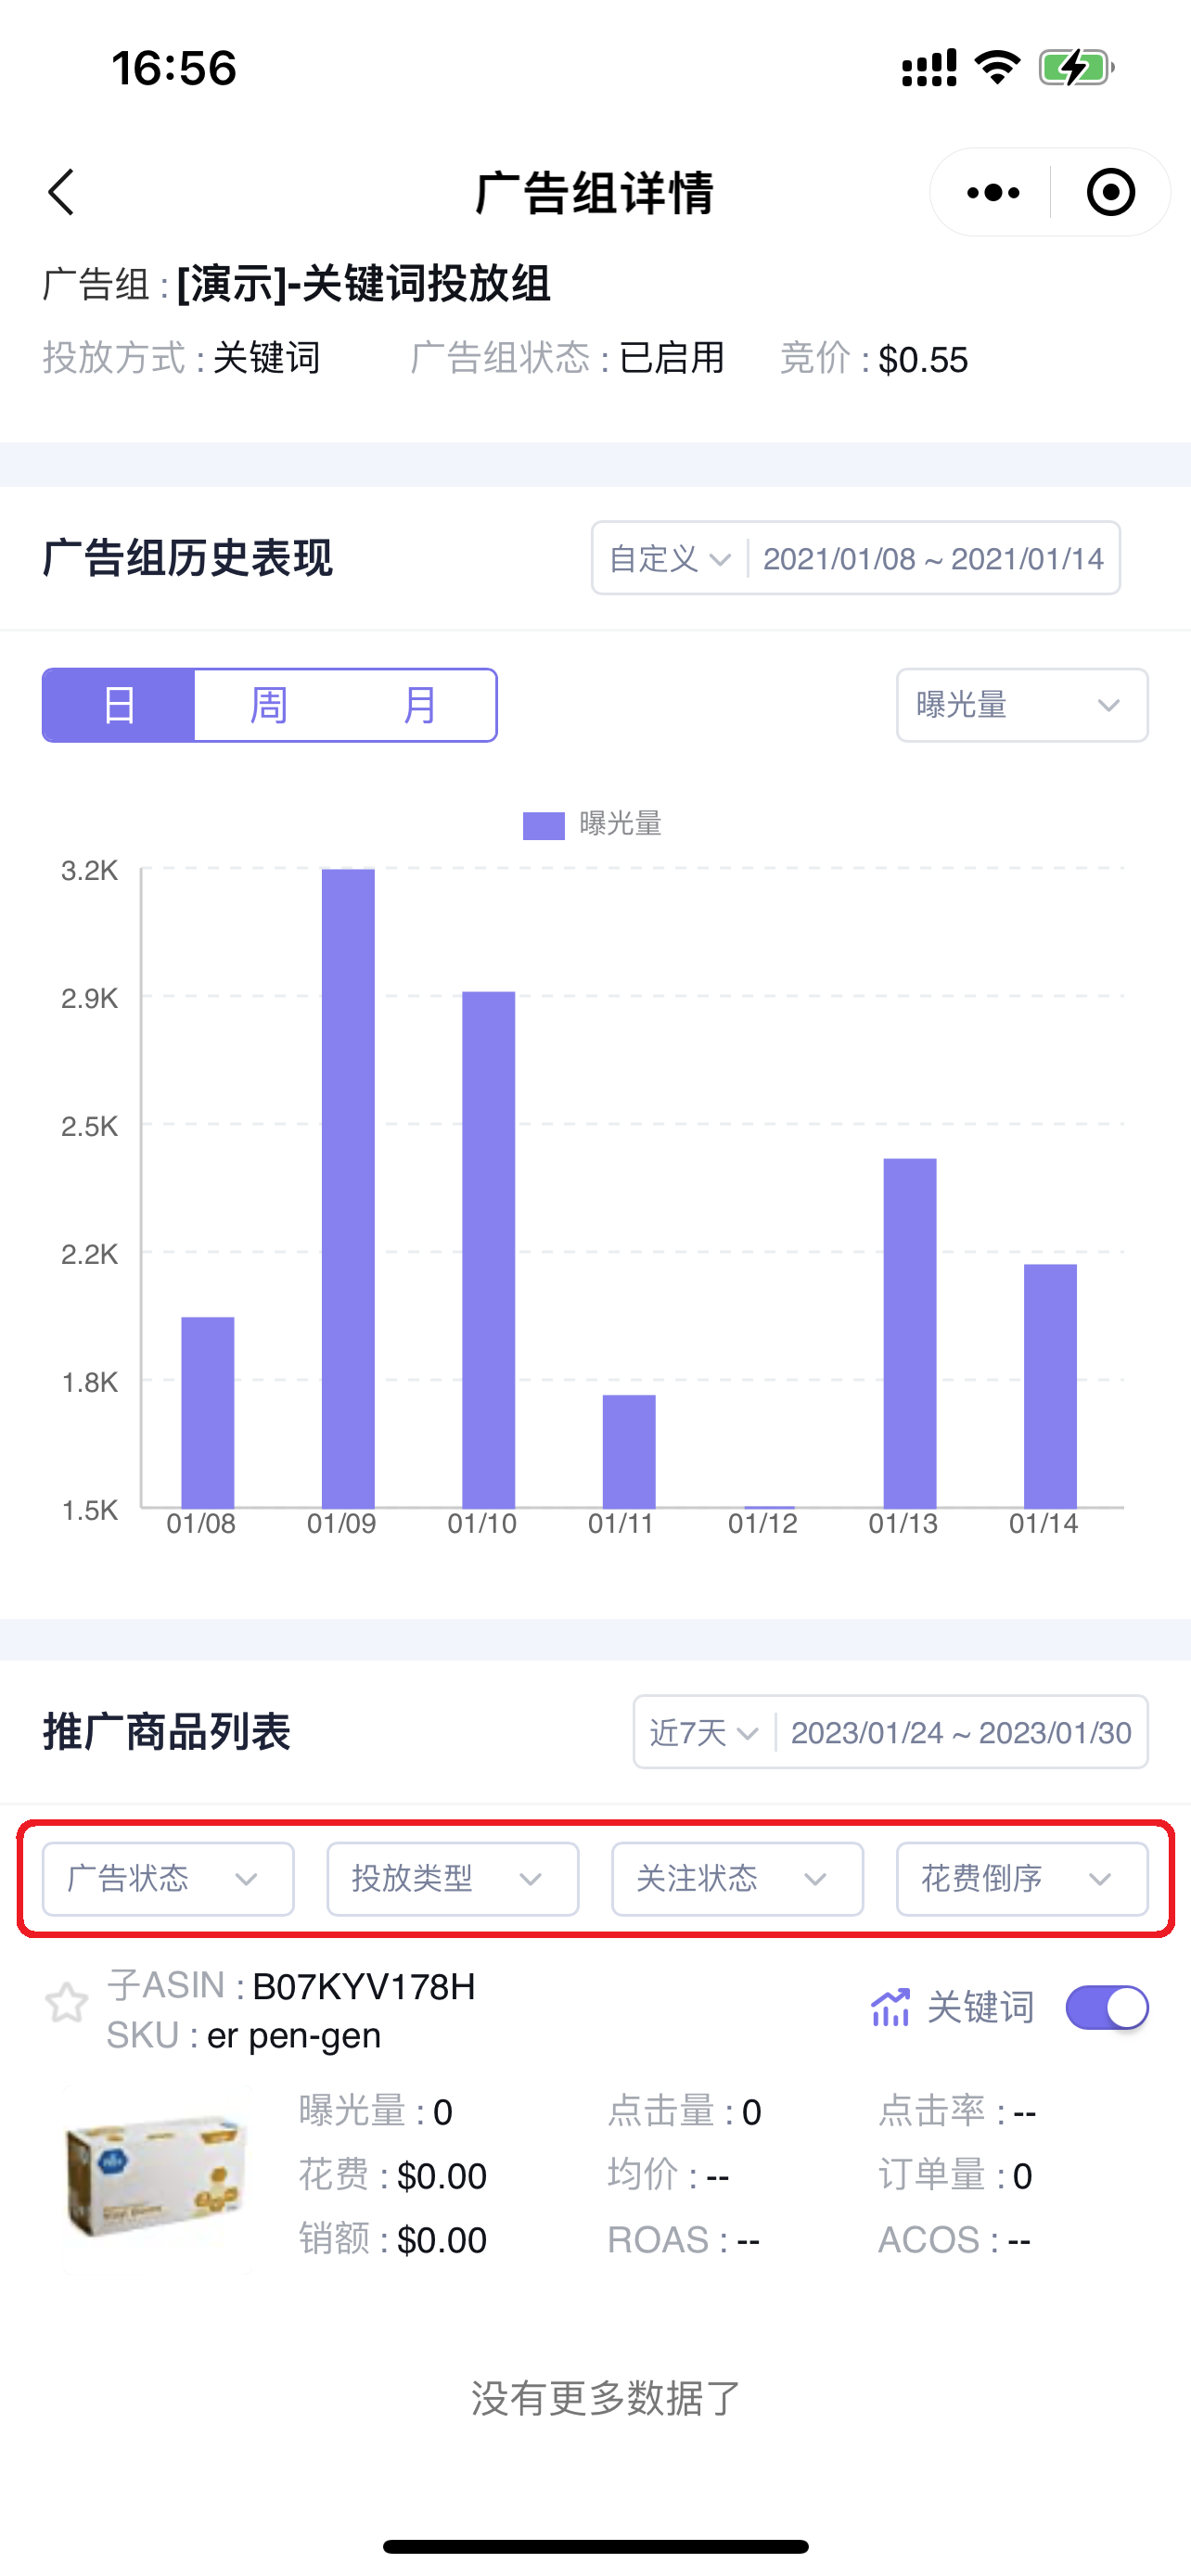
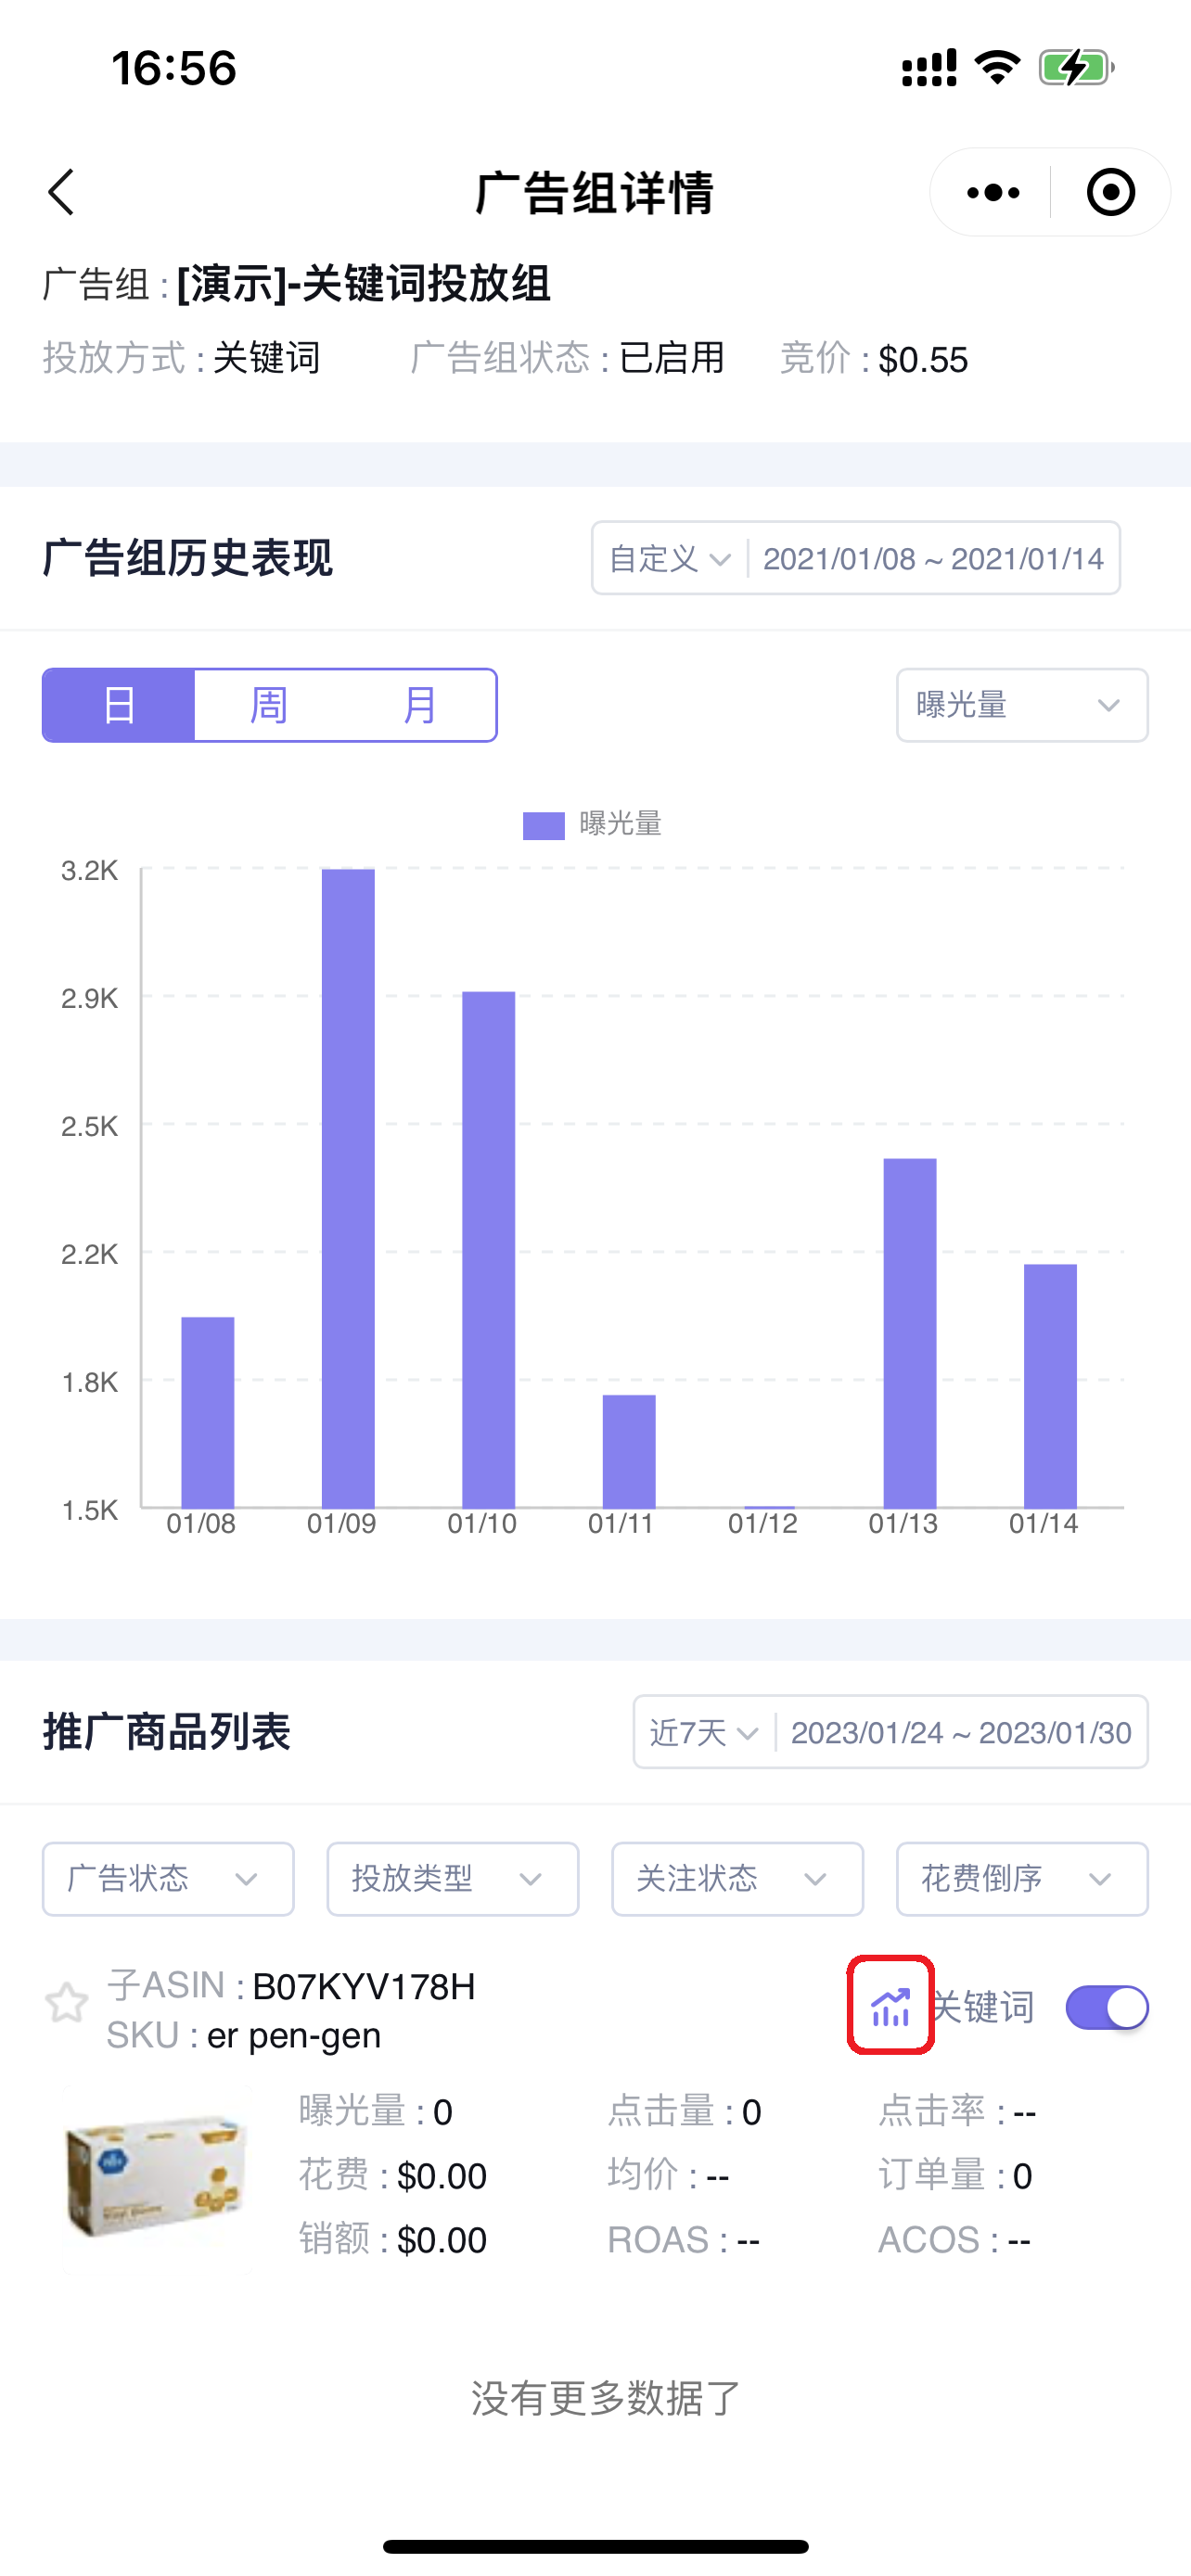
1.2 Analyzing Product Historical Performance (The data presentation format for historical performance of advertising data across all dimensions is consistent.)
Click the historical trend button on the right side of the d product to enter and view the historical performance data of the product;
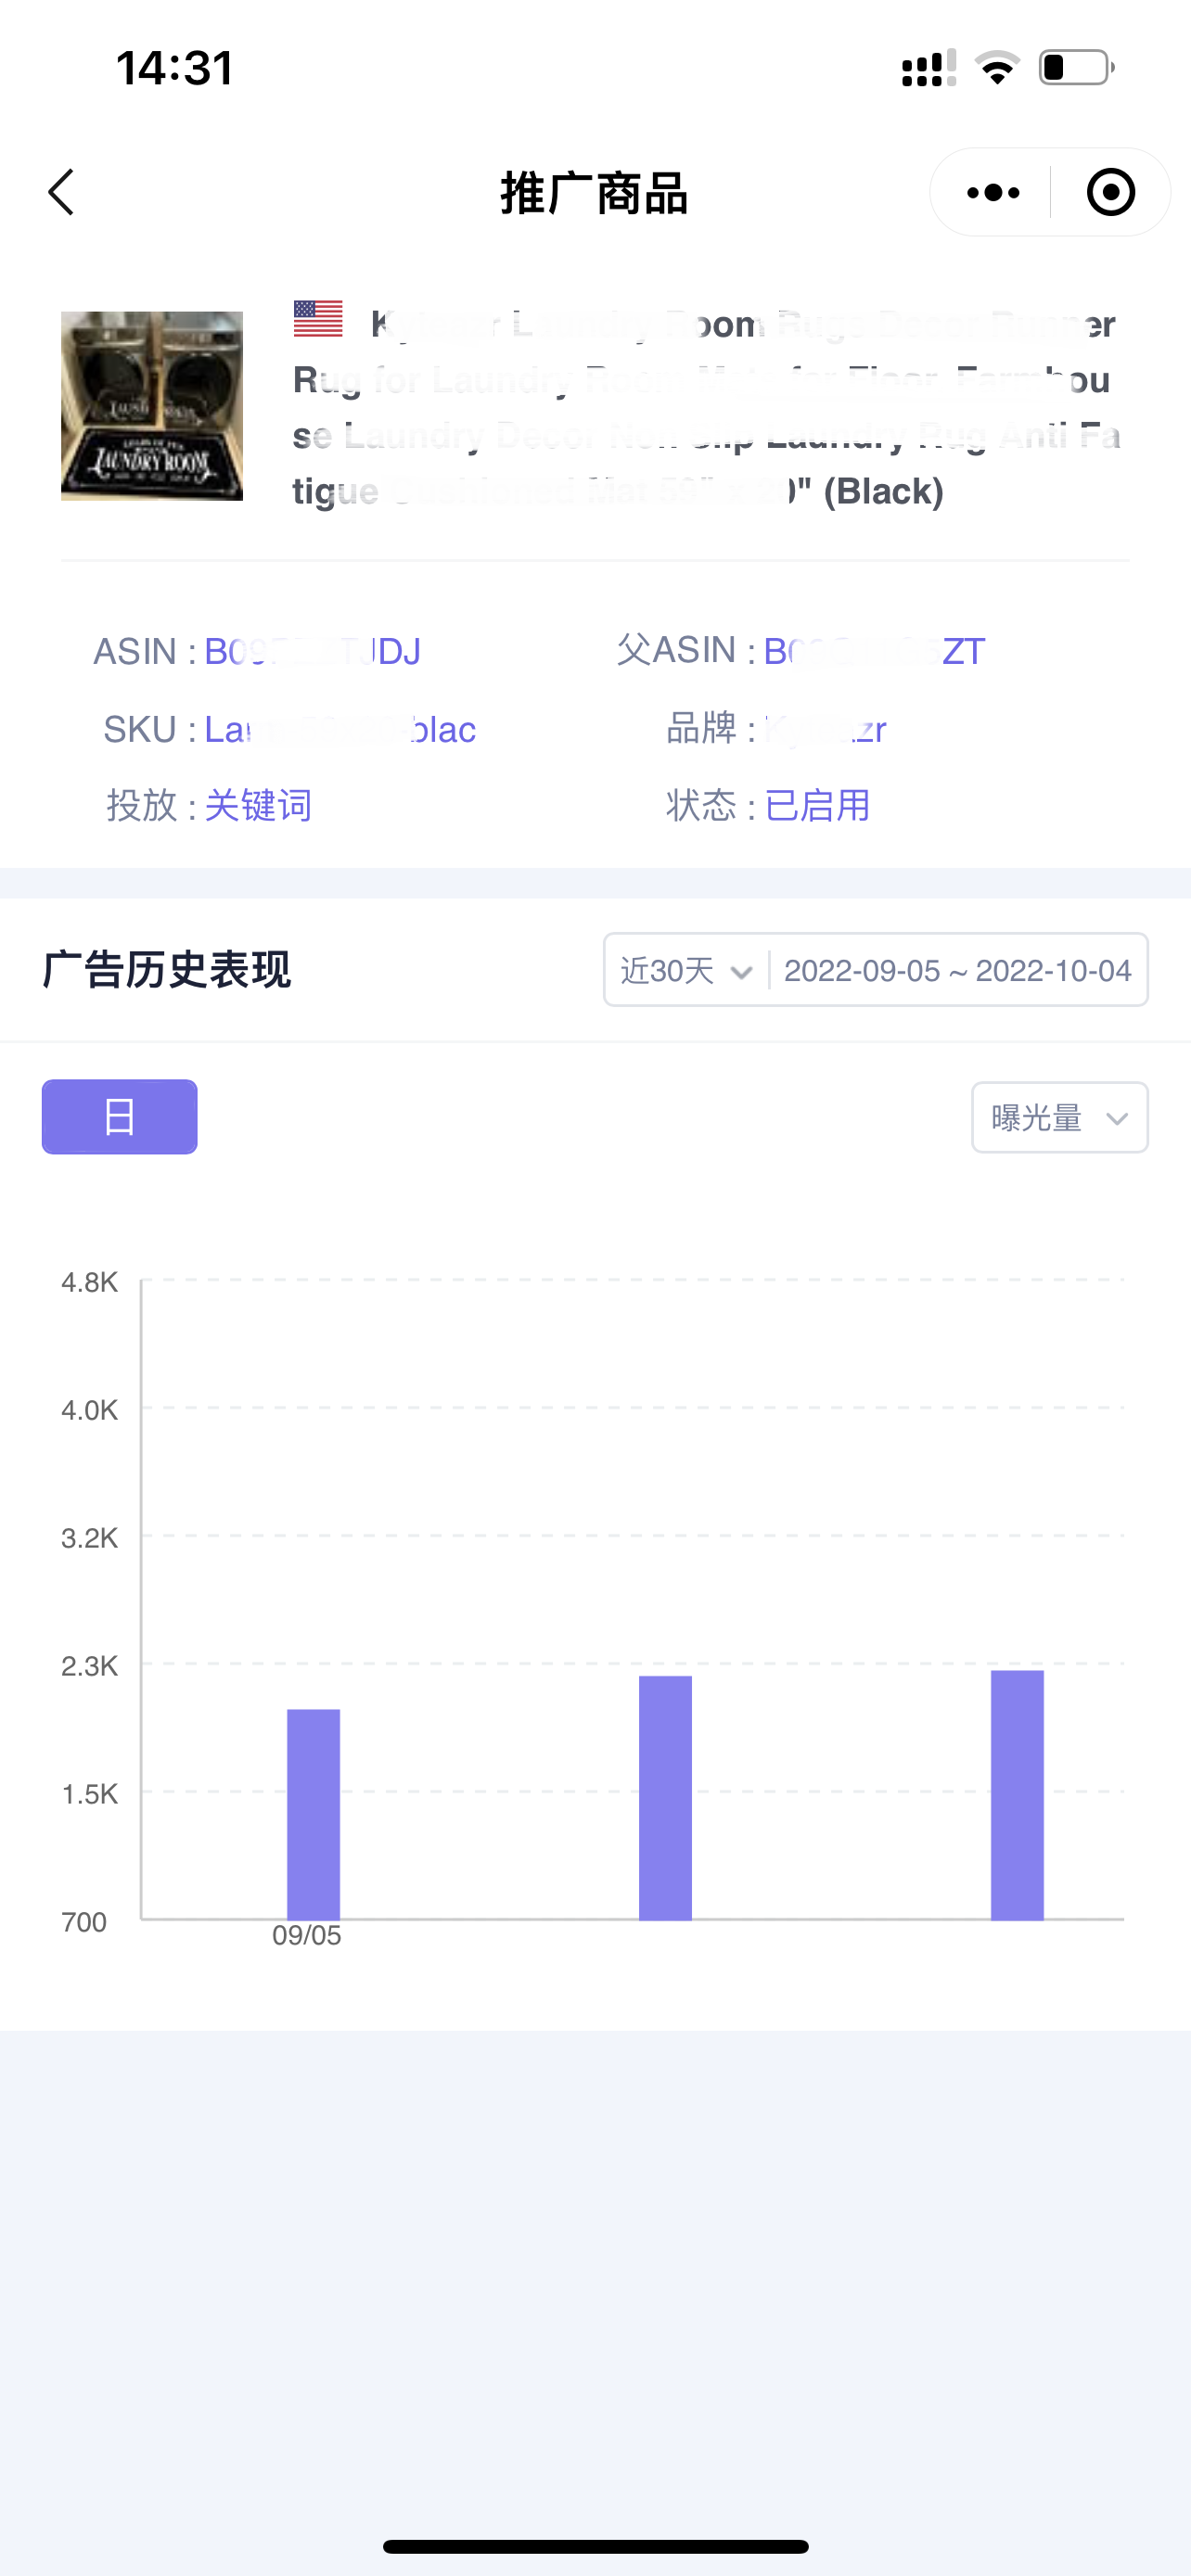
Enter the “Historical Performance” page,
You can customize the time range (default is the last 30 days), and switch to view data such as: Impressions, Clicks, Click-Through Rate, Spend, Average CPC, (Advertising) Orders, (Advertising) Sales, etc. Click on the bar chart to view detailed data.
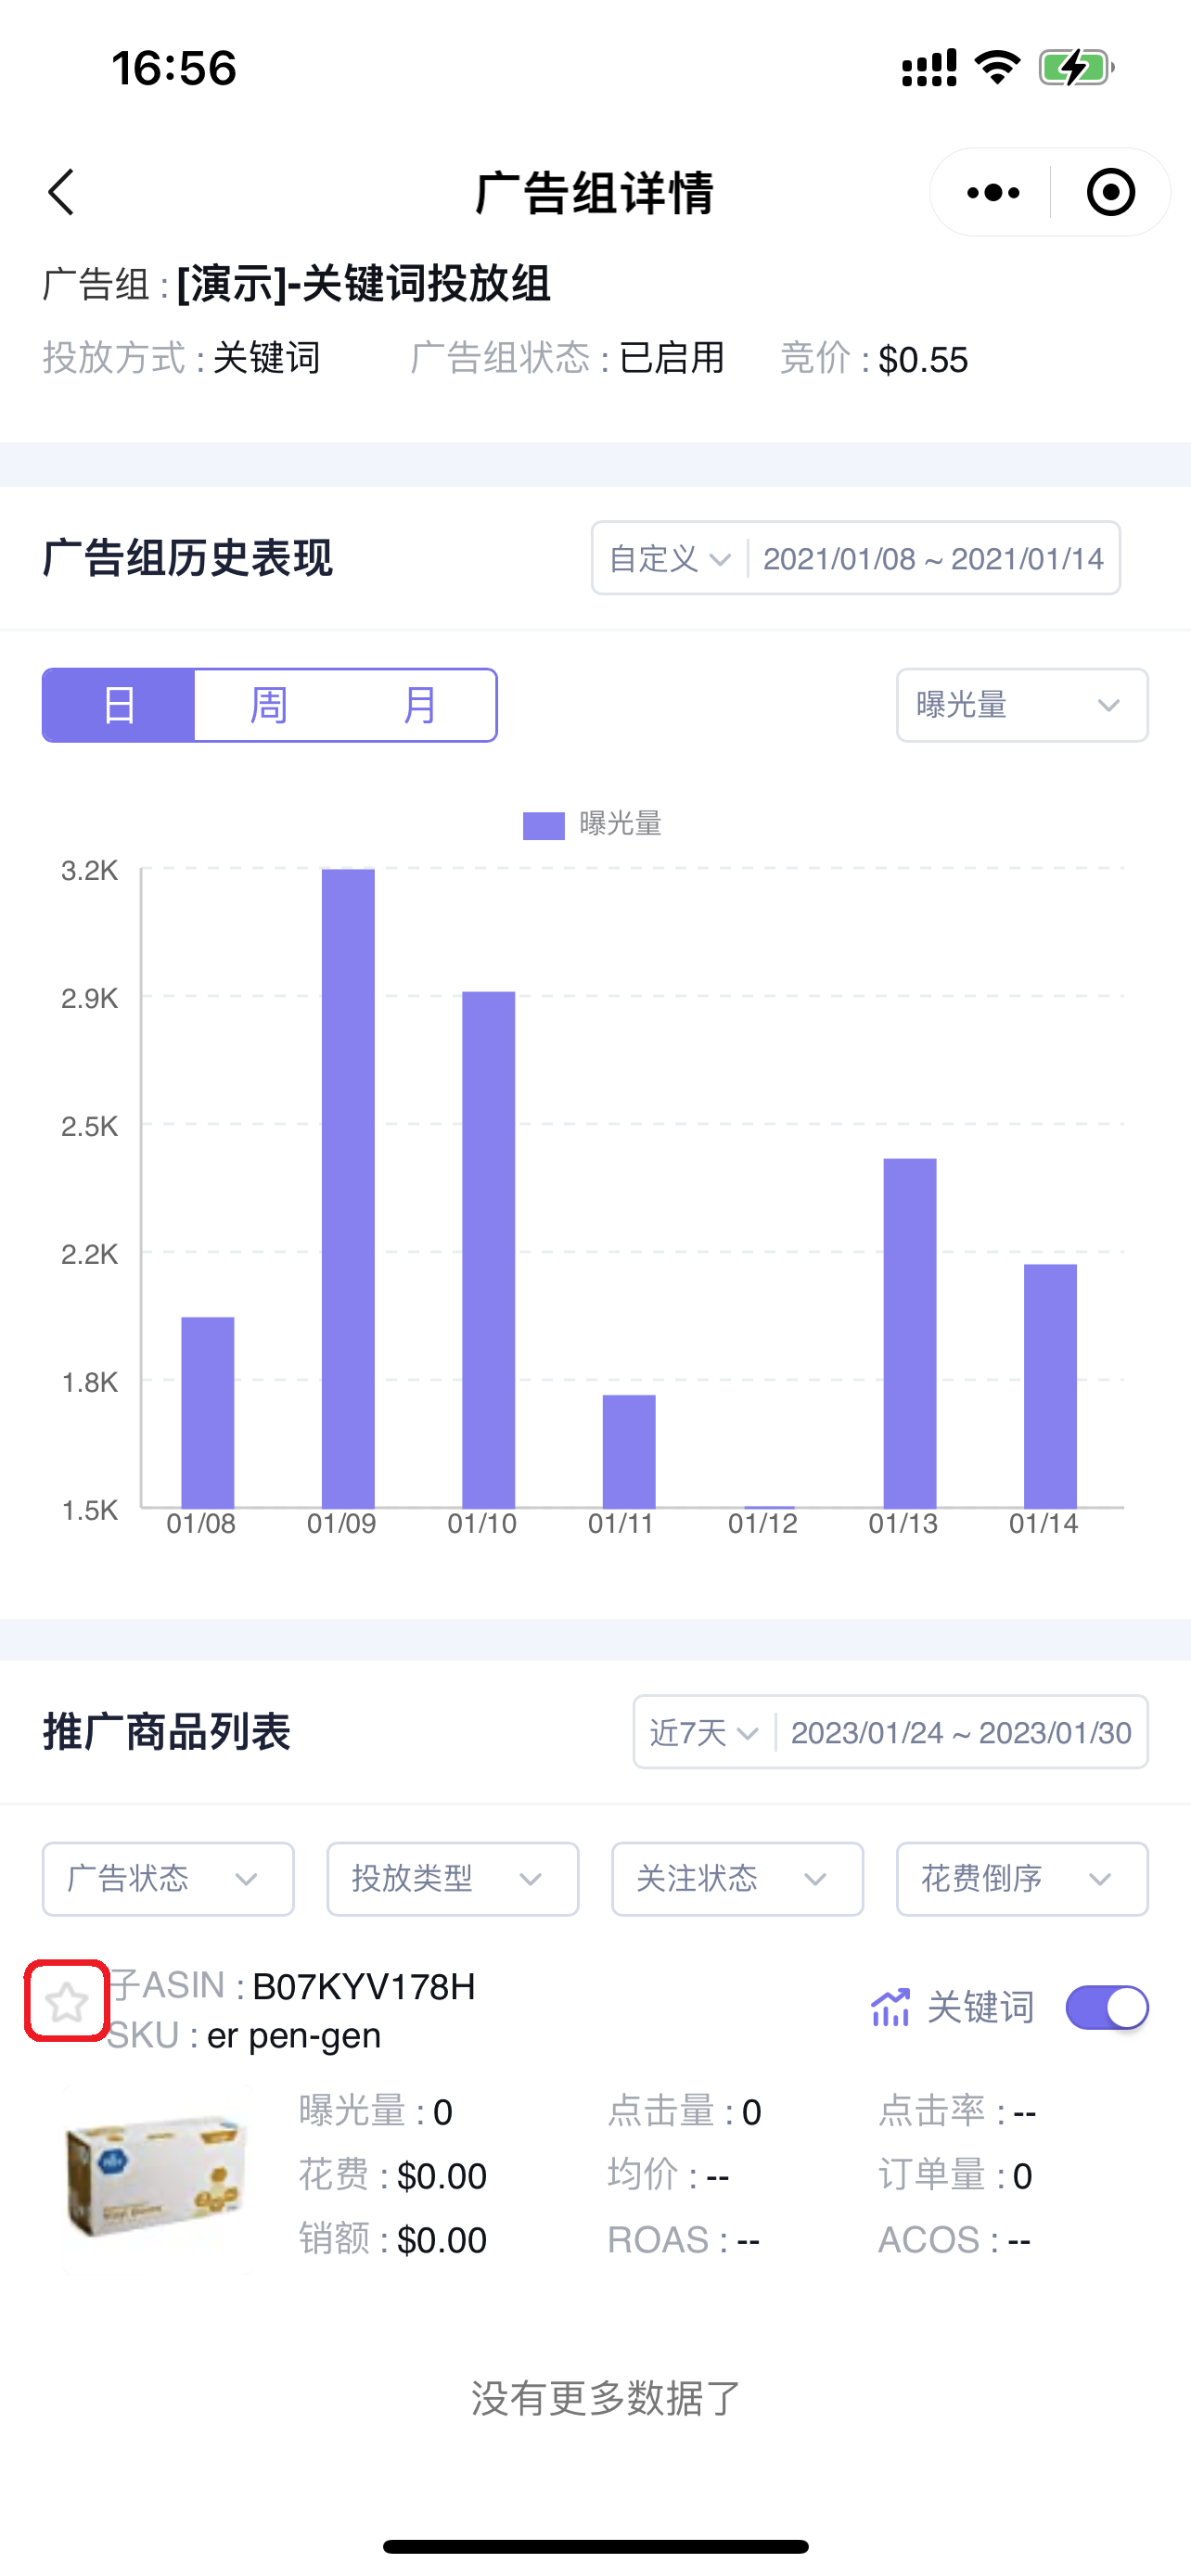
1.3 Adding to Watchlist (Advertising data across all dimensions can be added to the watchlist)
Click the “☆” symbol before the product name to add to the watchlist. After adding to the watchlist, the product will be ranked at the top by default.
2. Adjusting Enable/Pause Status of Products
Click the enable/pause button on the right to individually enable or pause the product.
Targeting - Keywords
Different Ad groups have different targeting strategies: automatic/manual. Among them, manual targeting includes keyword targeting.
1. Finding and Analyzing Ad Keywords
1.1 Finding Keywords
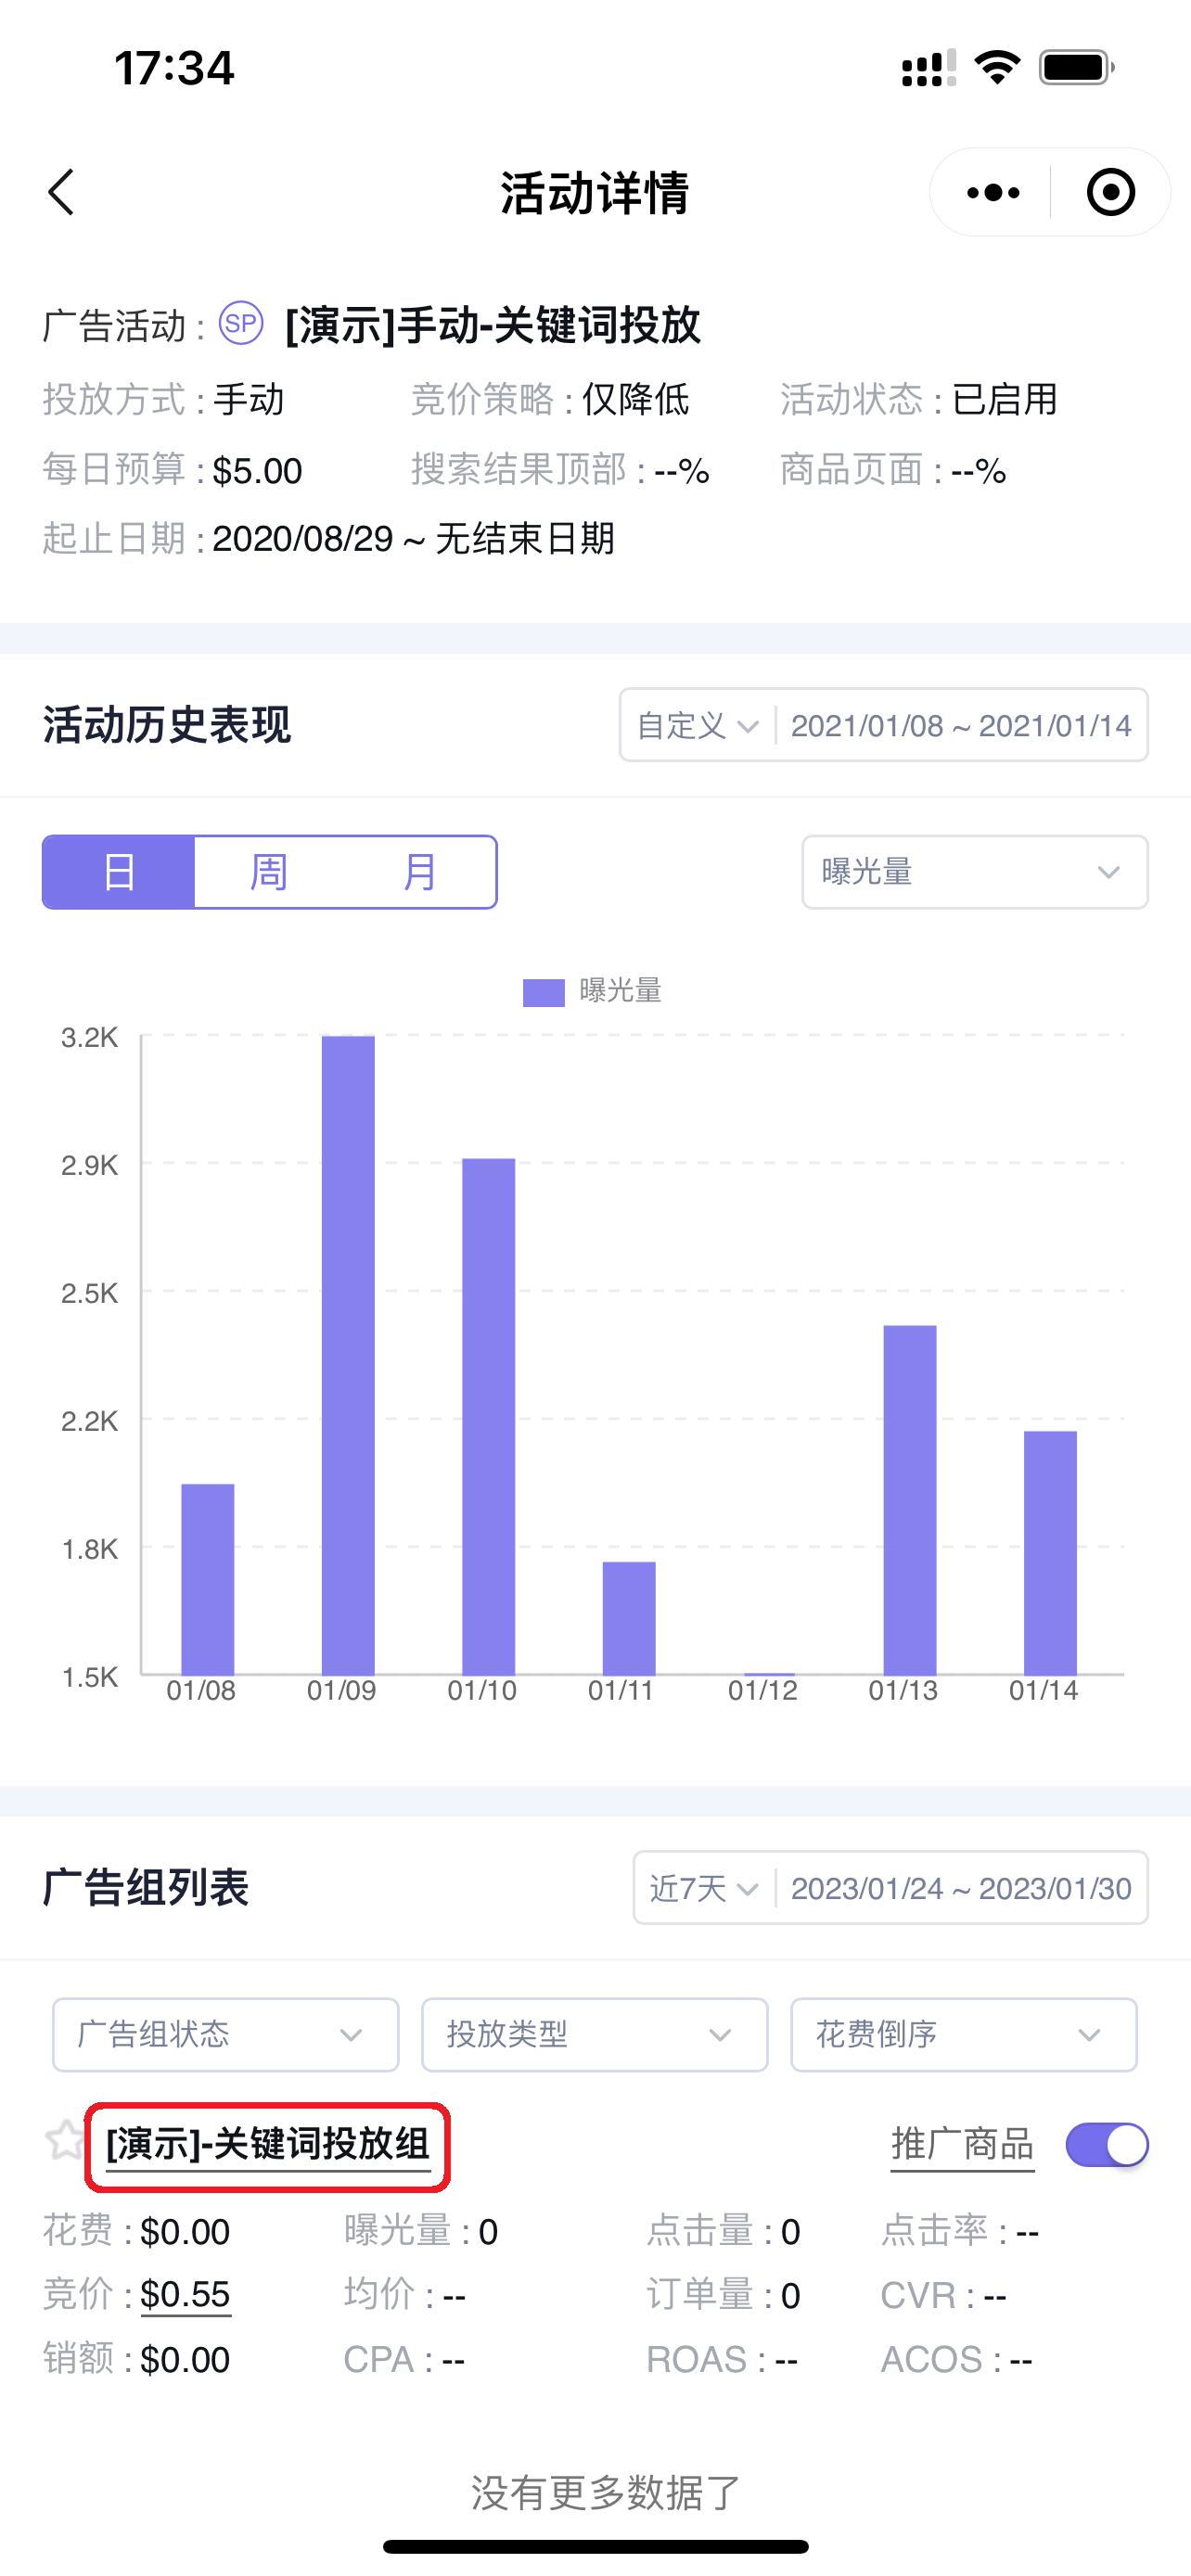
Enter the detail page of the corresponding manual campaign, select a keyword targeting Ad group, and click the 【Keywords】 button on the right to enter and view the keyword targeting list under the Ad group.
Navigation path: Corresponding campaign name -> Enter Ad group list -> Keyword Ad group name -> Enter Keyword list
 +
+
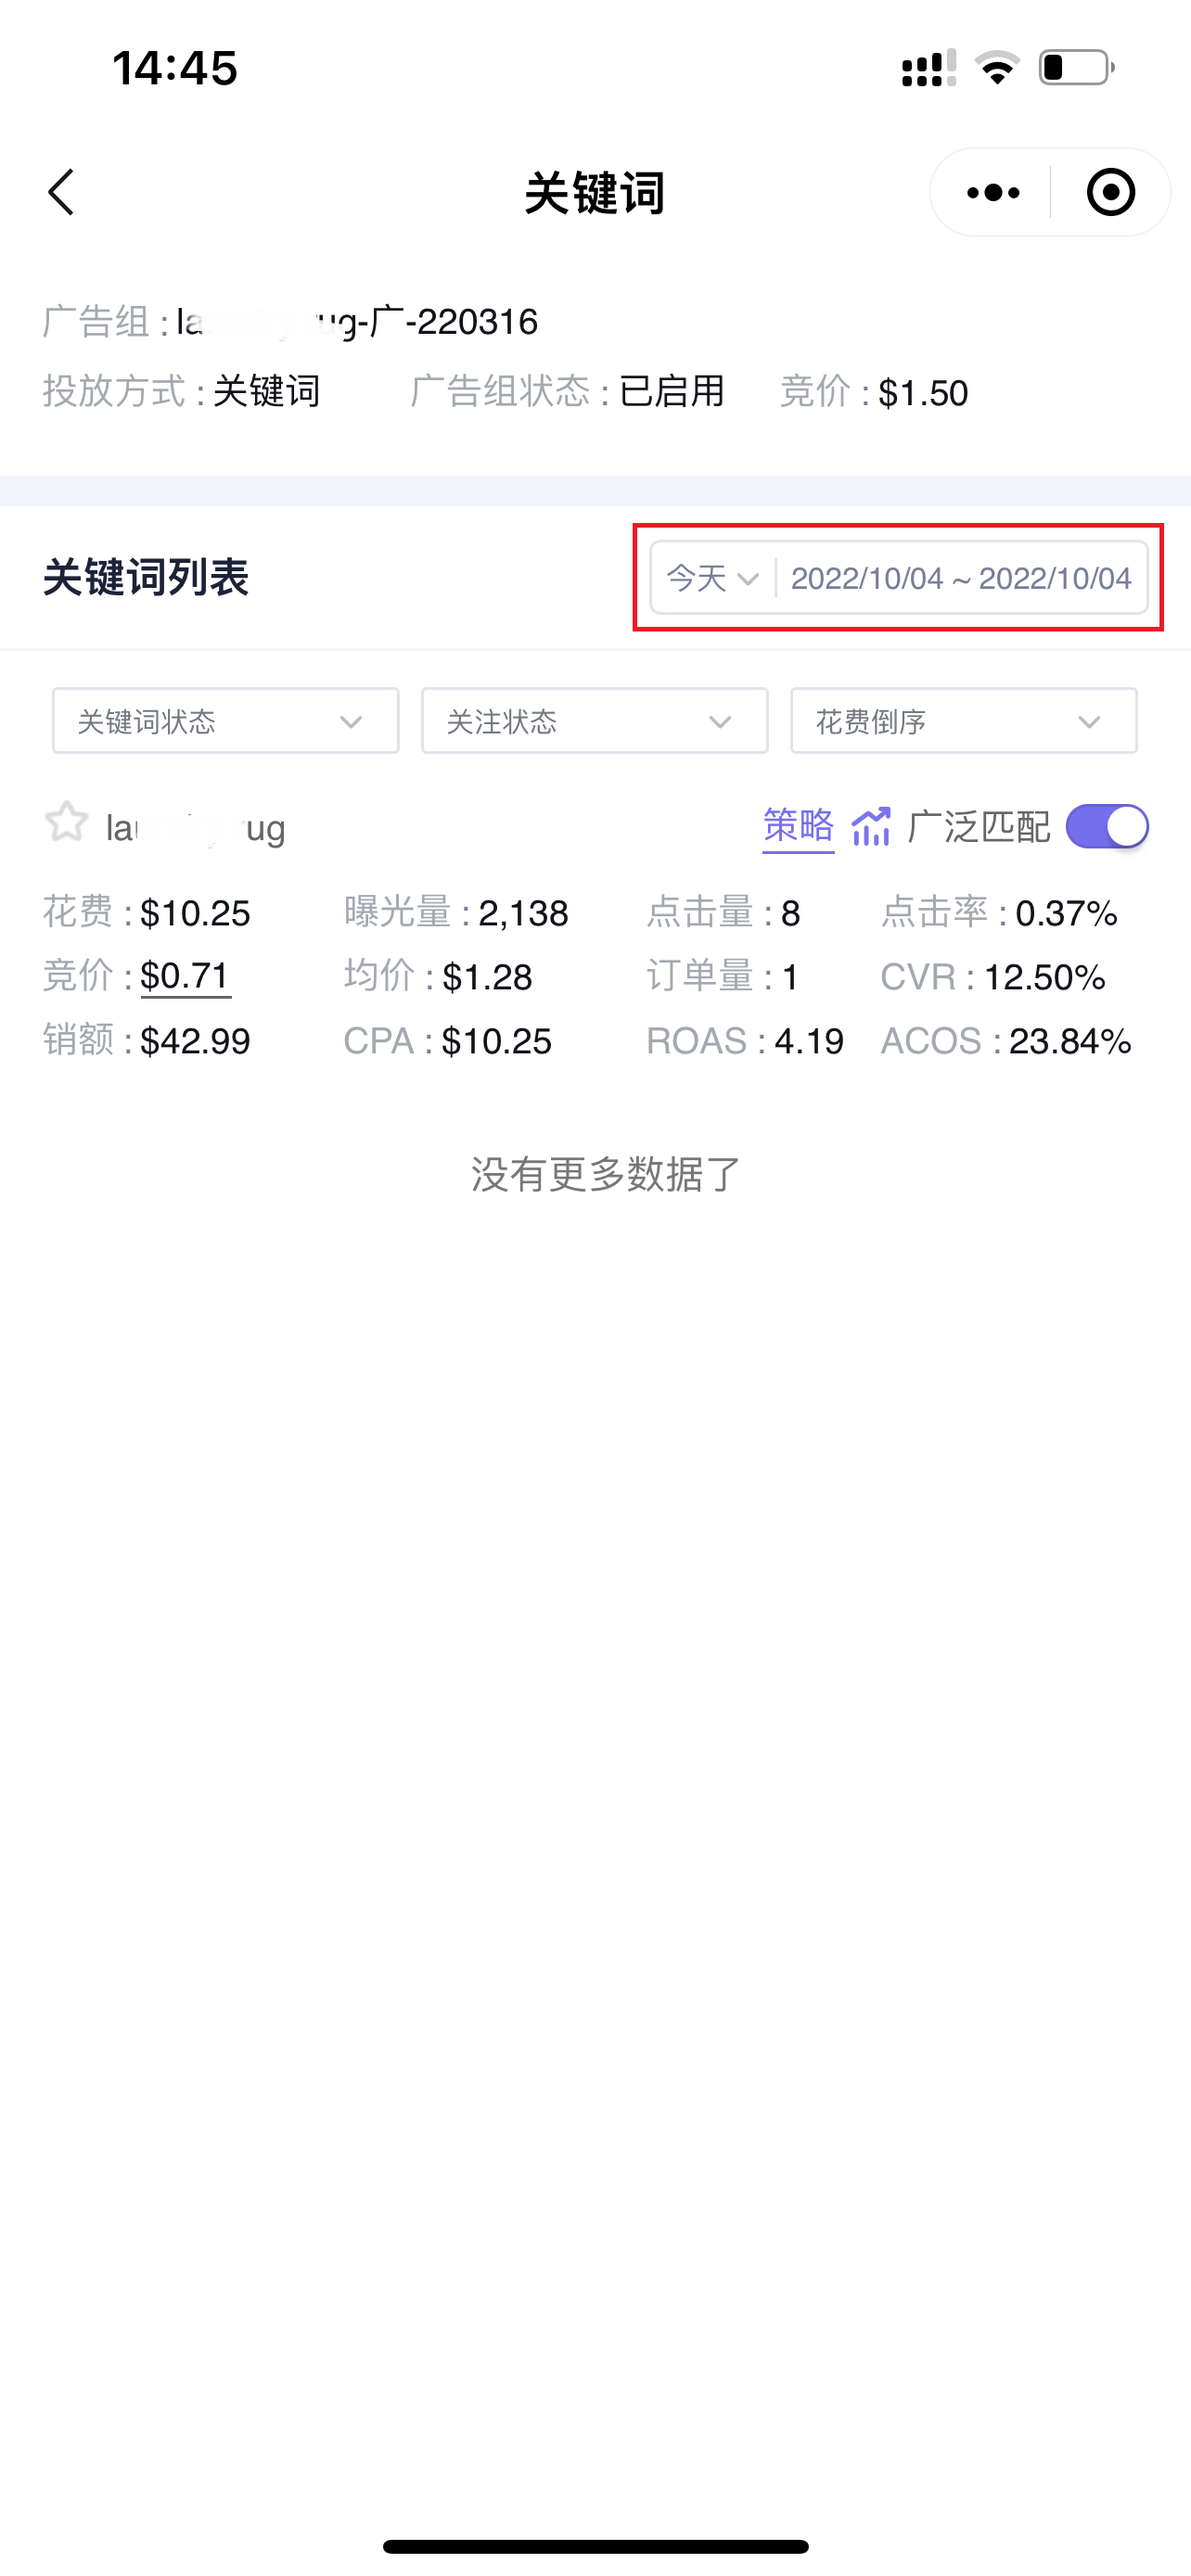
Enter the “Keyword List” page,
The data time range for keywords also defaults to the time range of its parent campaign. You can customize the time range to view and analyze corresponding performance data.
 +
+
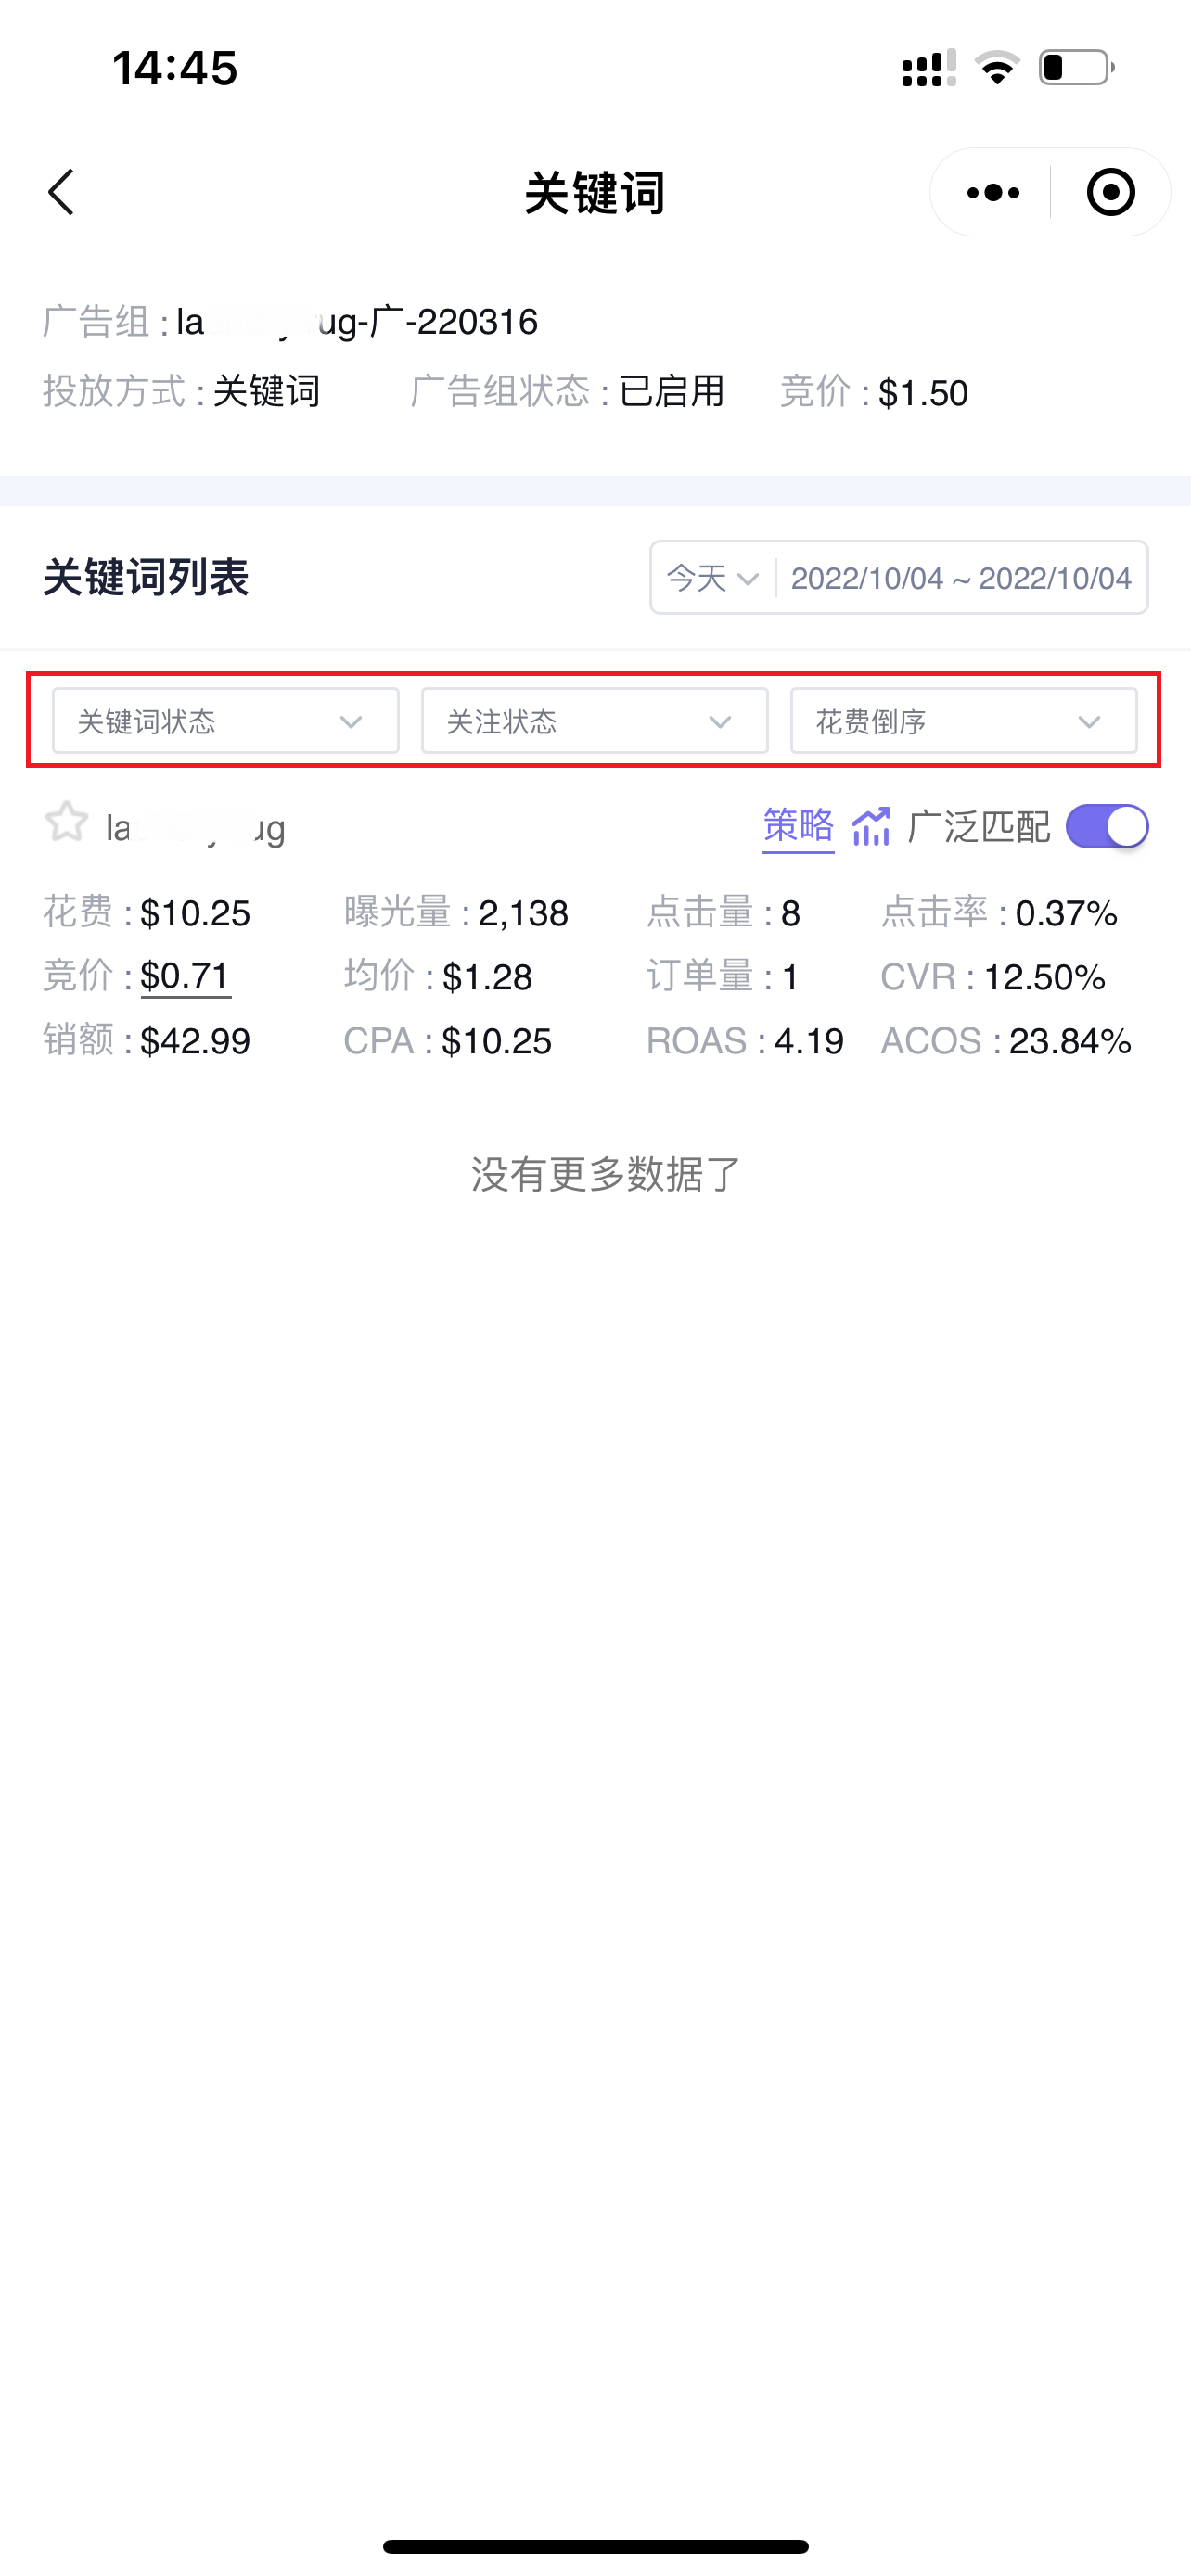
After selecting the time range, you can use filter conditions: keyword status, watchlist status, and sort by corresponding ad metrics to view and analyze keyword targeting data that meets the corresponding conditions.
 +
+
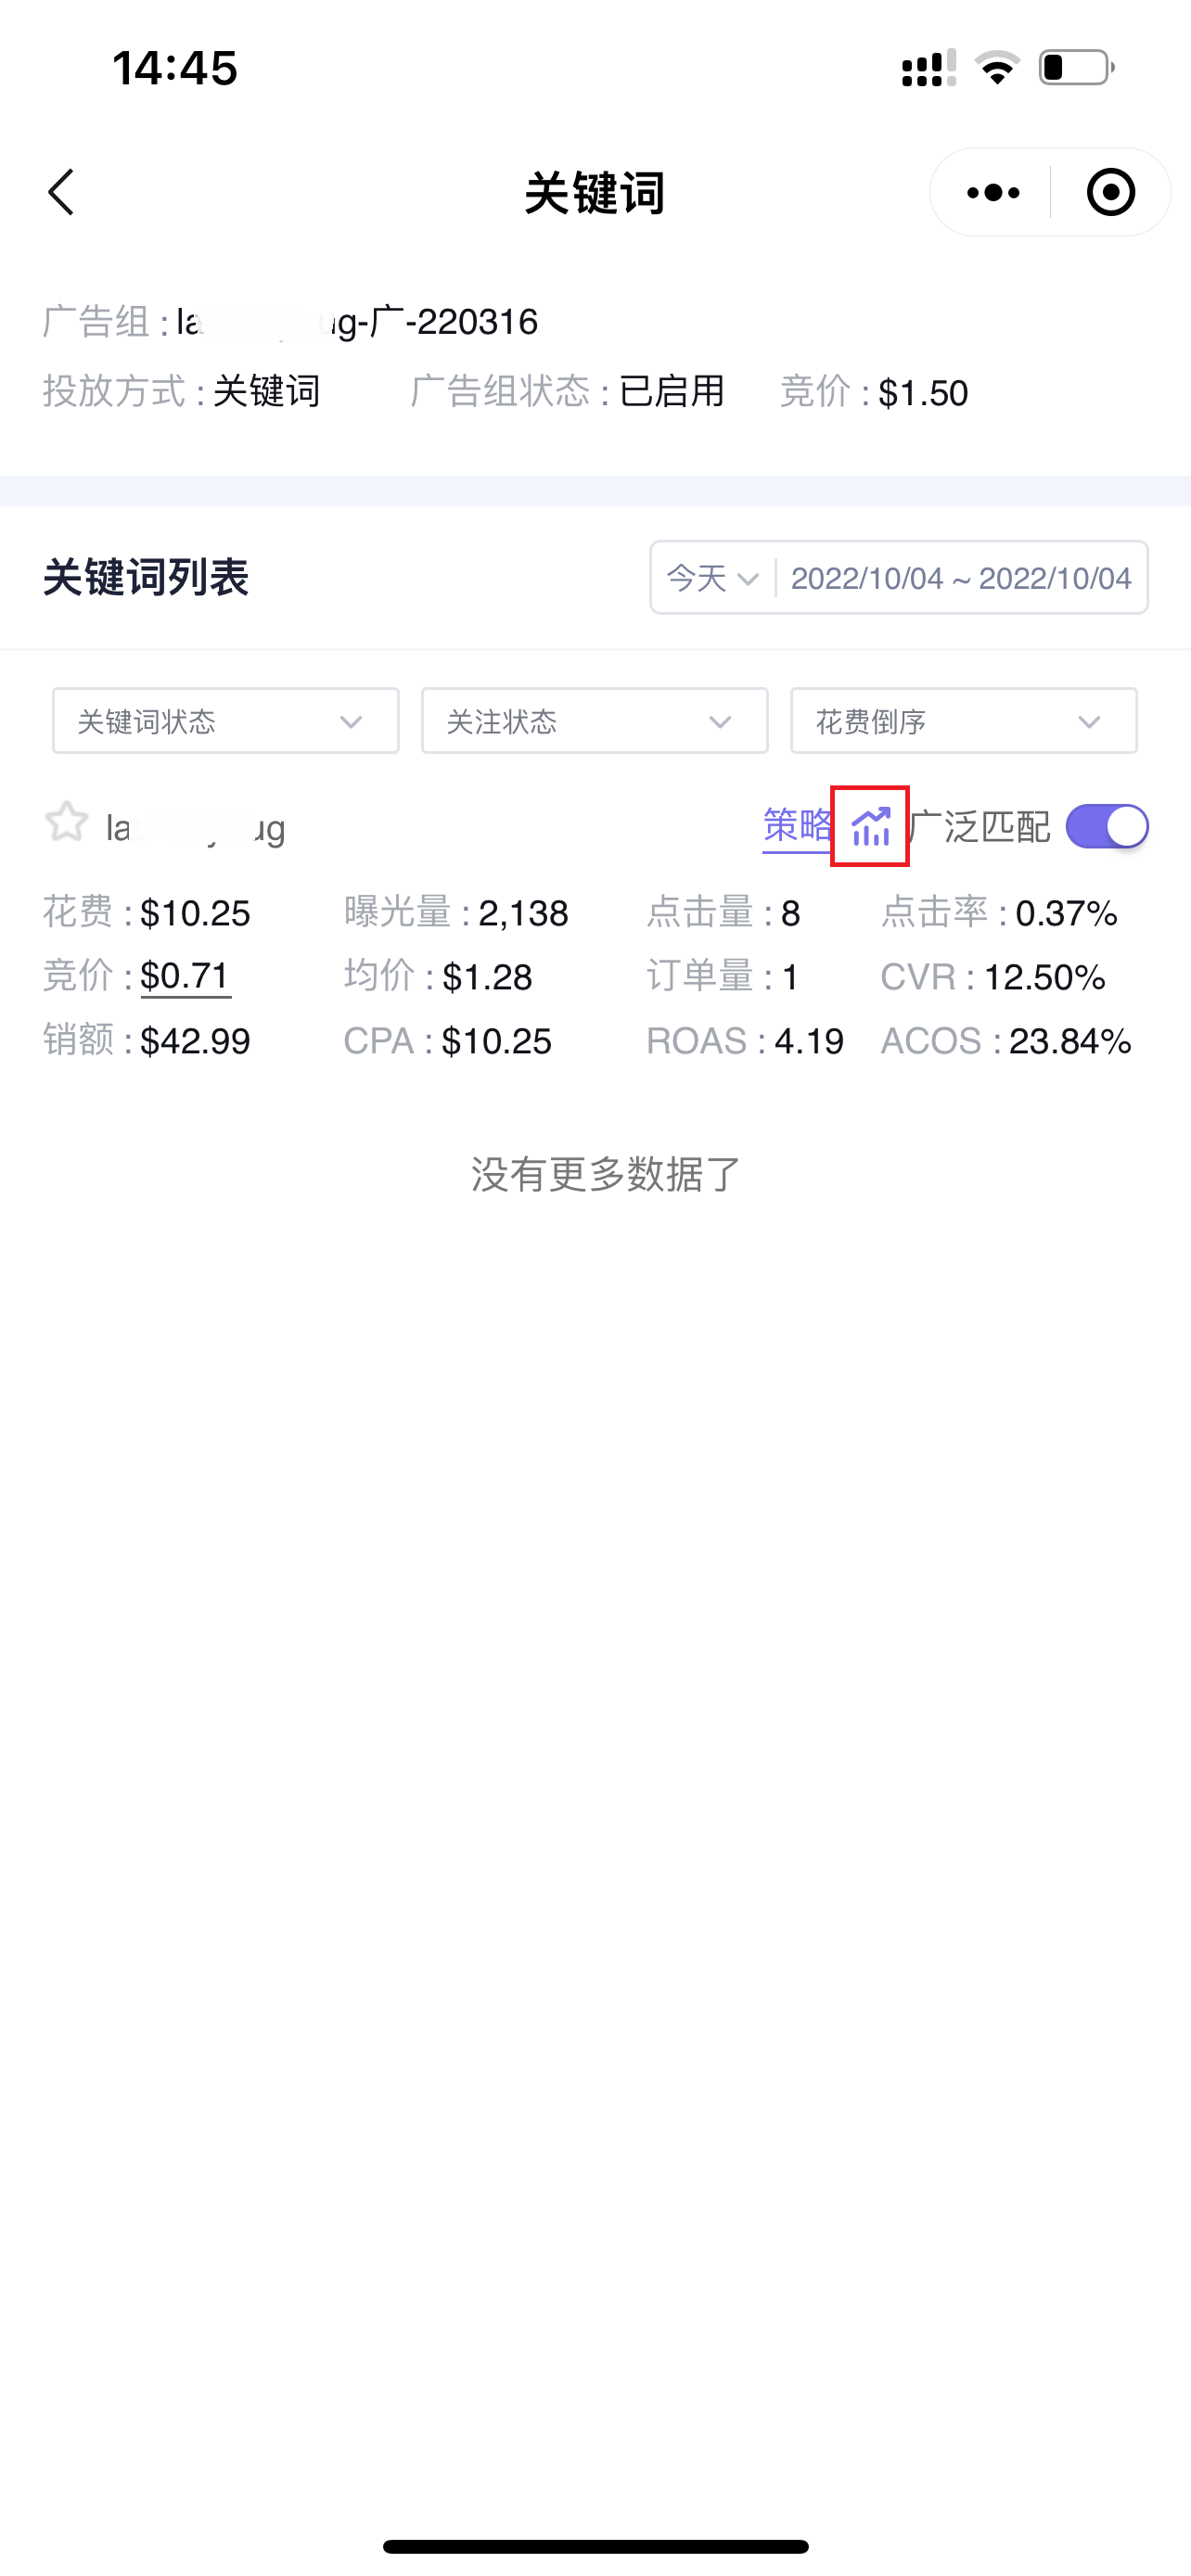
1.2 Analyzing Historical Performance of Keyword Targeting (The data presentation format for historical performance of advertising data across all dimensions is consistent.)
Click the historical trend button on the right side of the keyword to enter and view the historical performance data of the keyword;
 +
+
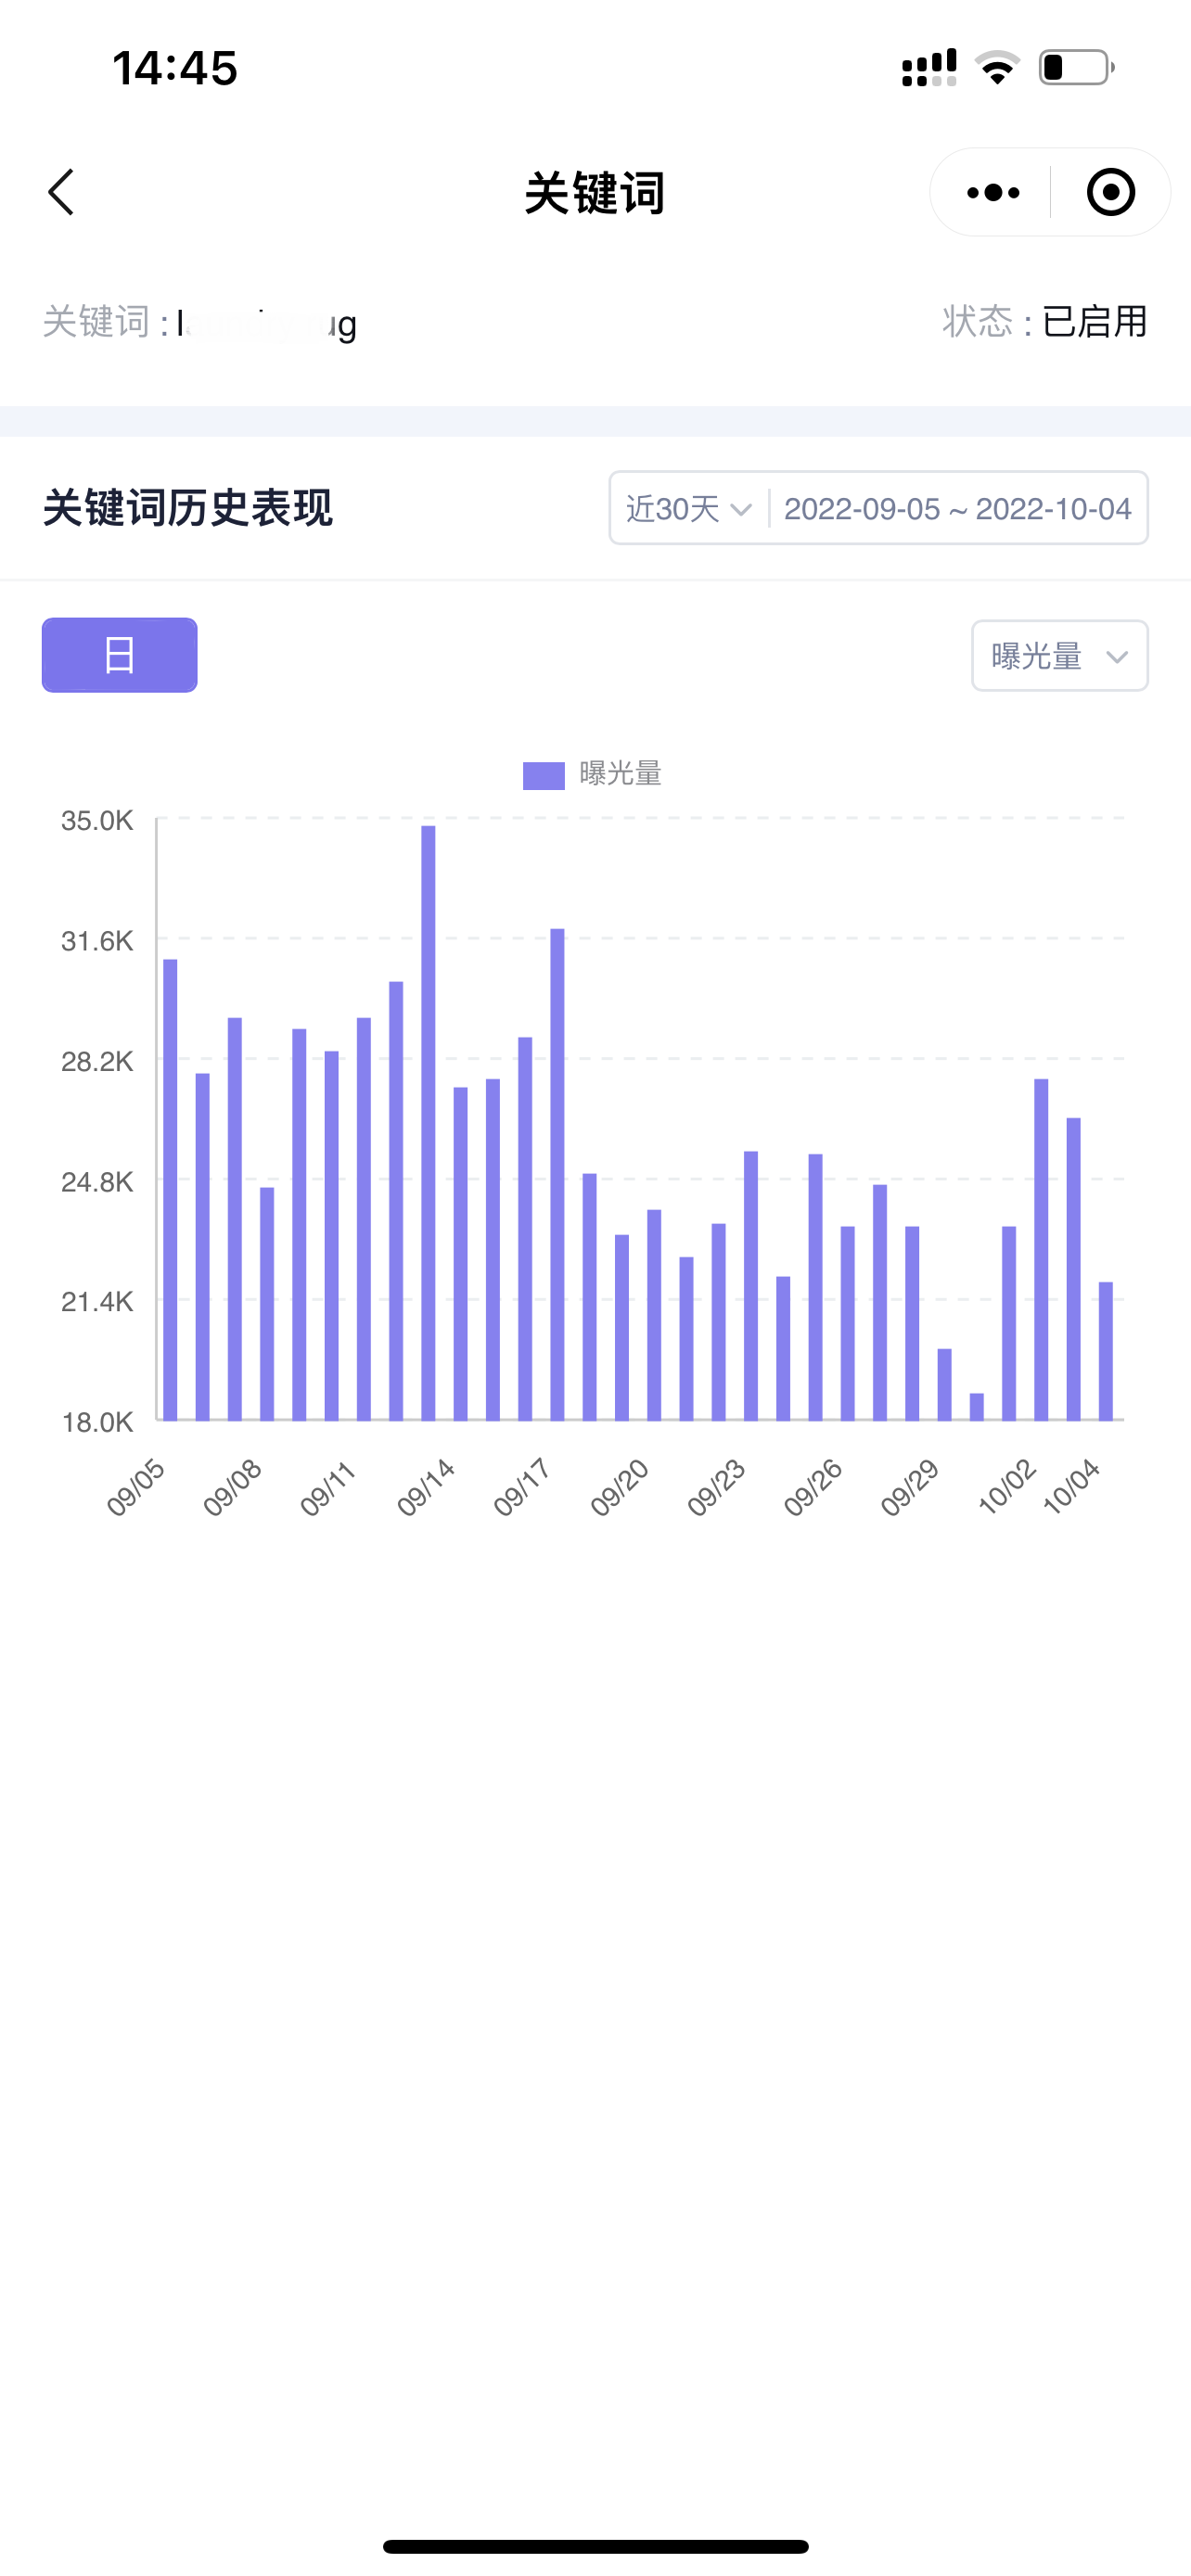
Enter the “Keyword Historical Performance” page,
You can customize the time range (default is the last 30 days), and switch to view data such as: Impressions, Clicks, Click-Through Rate, Spend, Average CPC, (Advertising) Orders, (Advertising) Sales, etc. Click on the bar chart to view detailed data.
 +
+
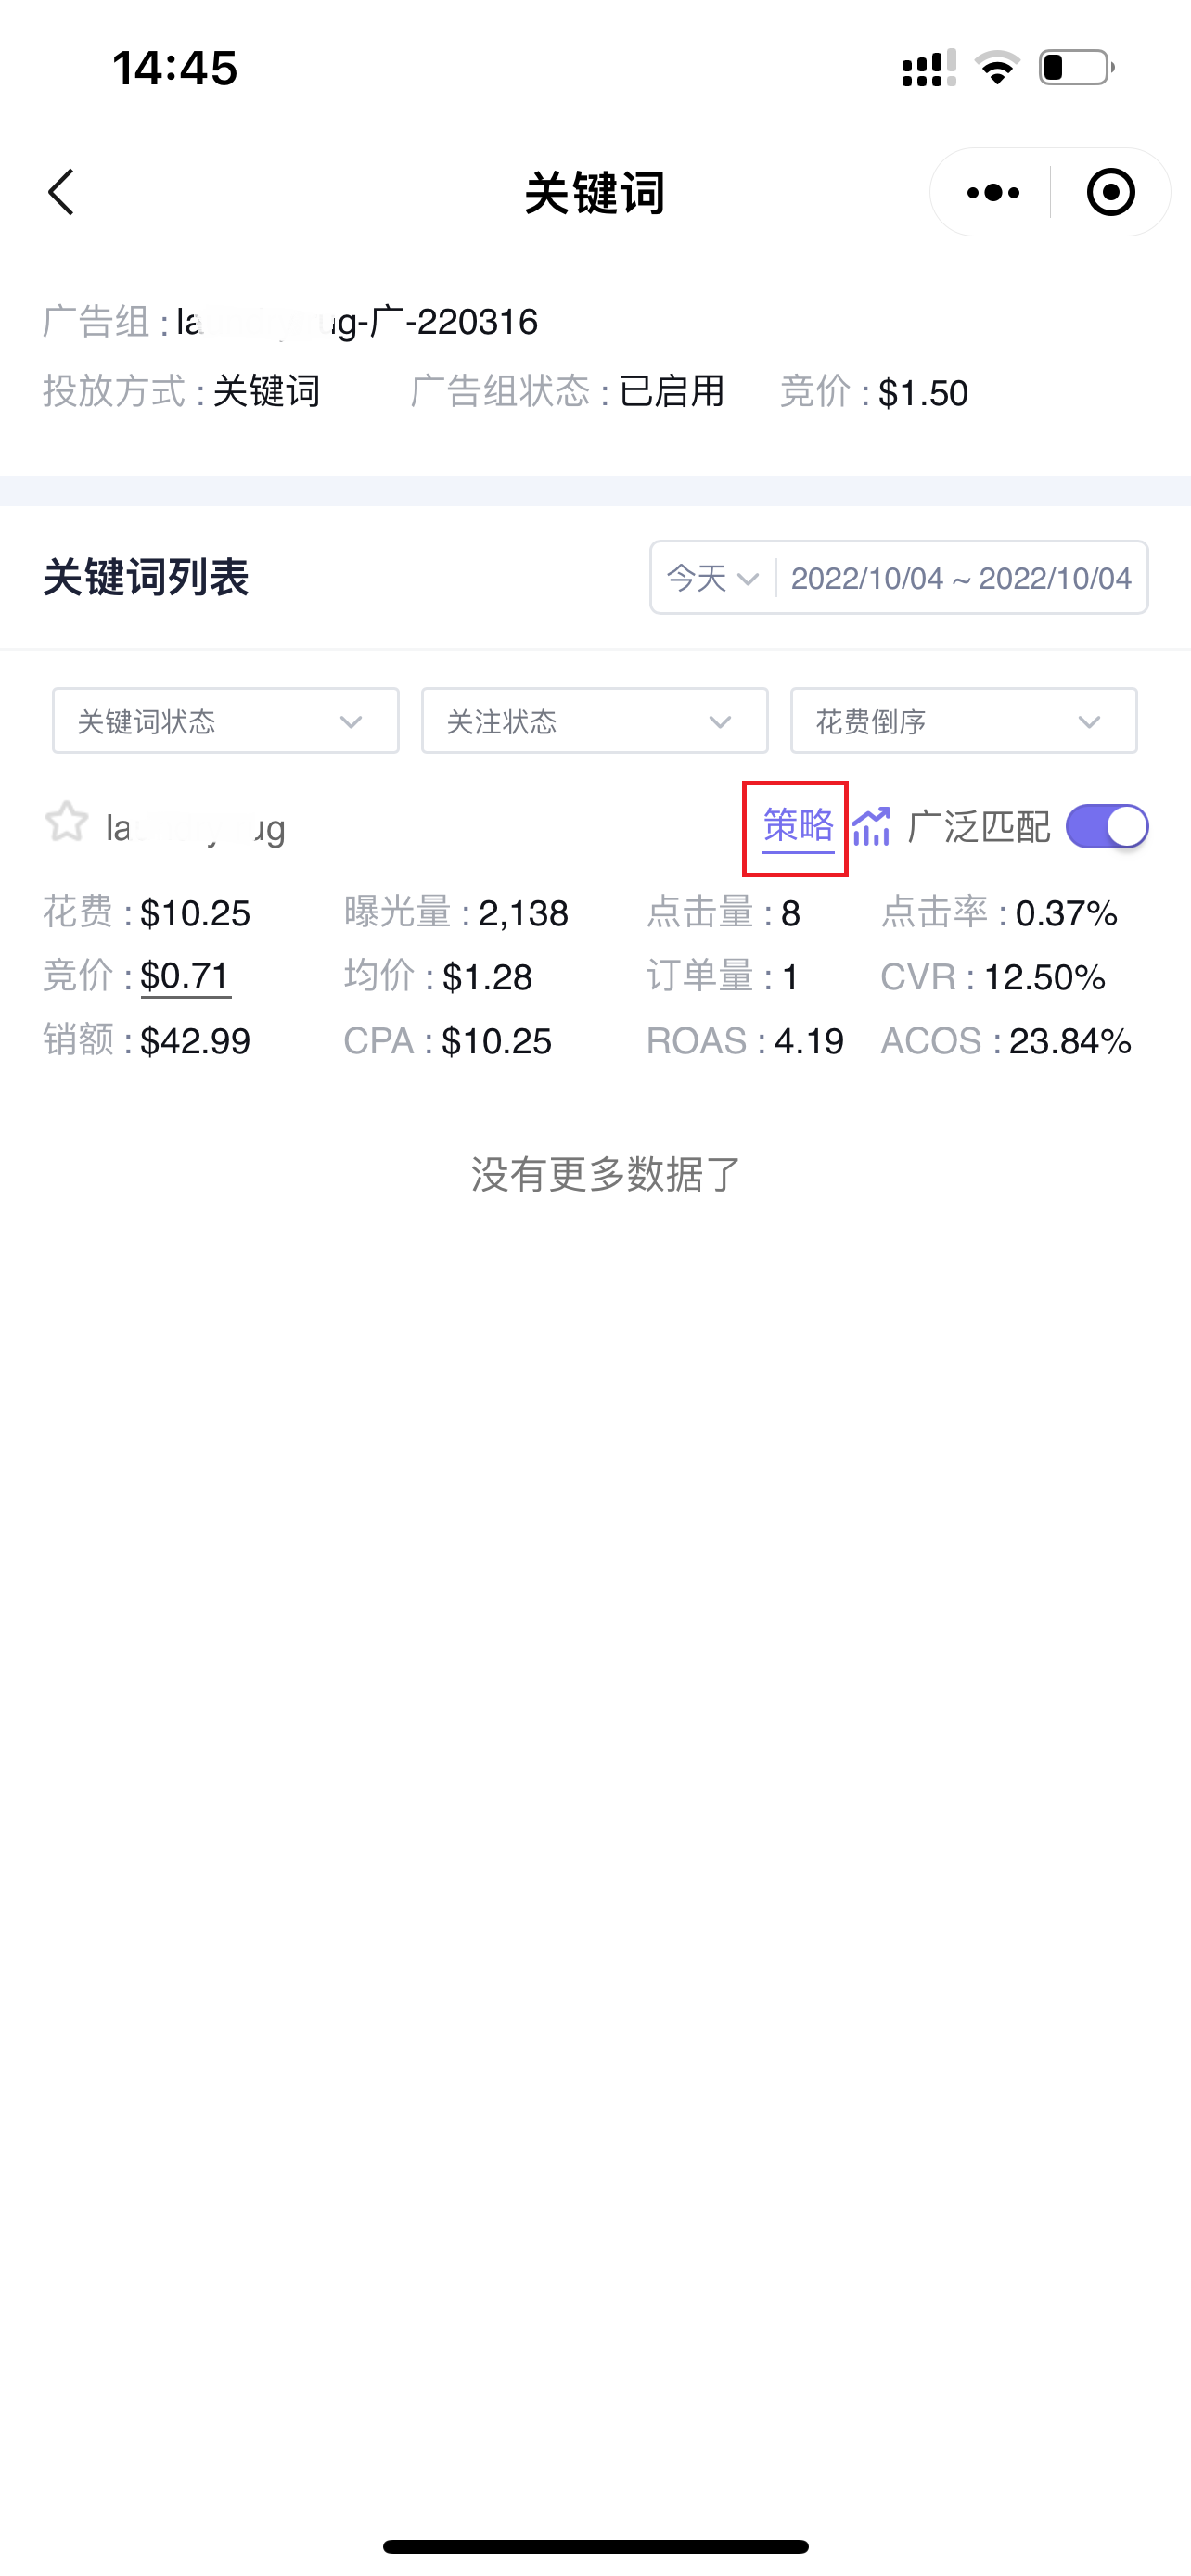
1.3 Scheduled Strategy
If a scheduled strategy is applied to a keyword, click 【Strategy】 to enter and view the details of the scheduled strategy,
 +
+
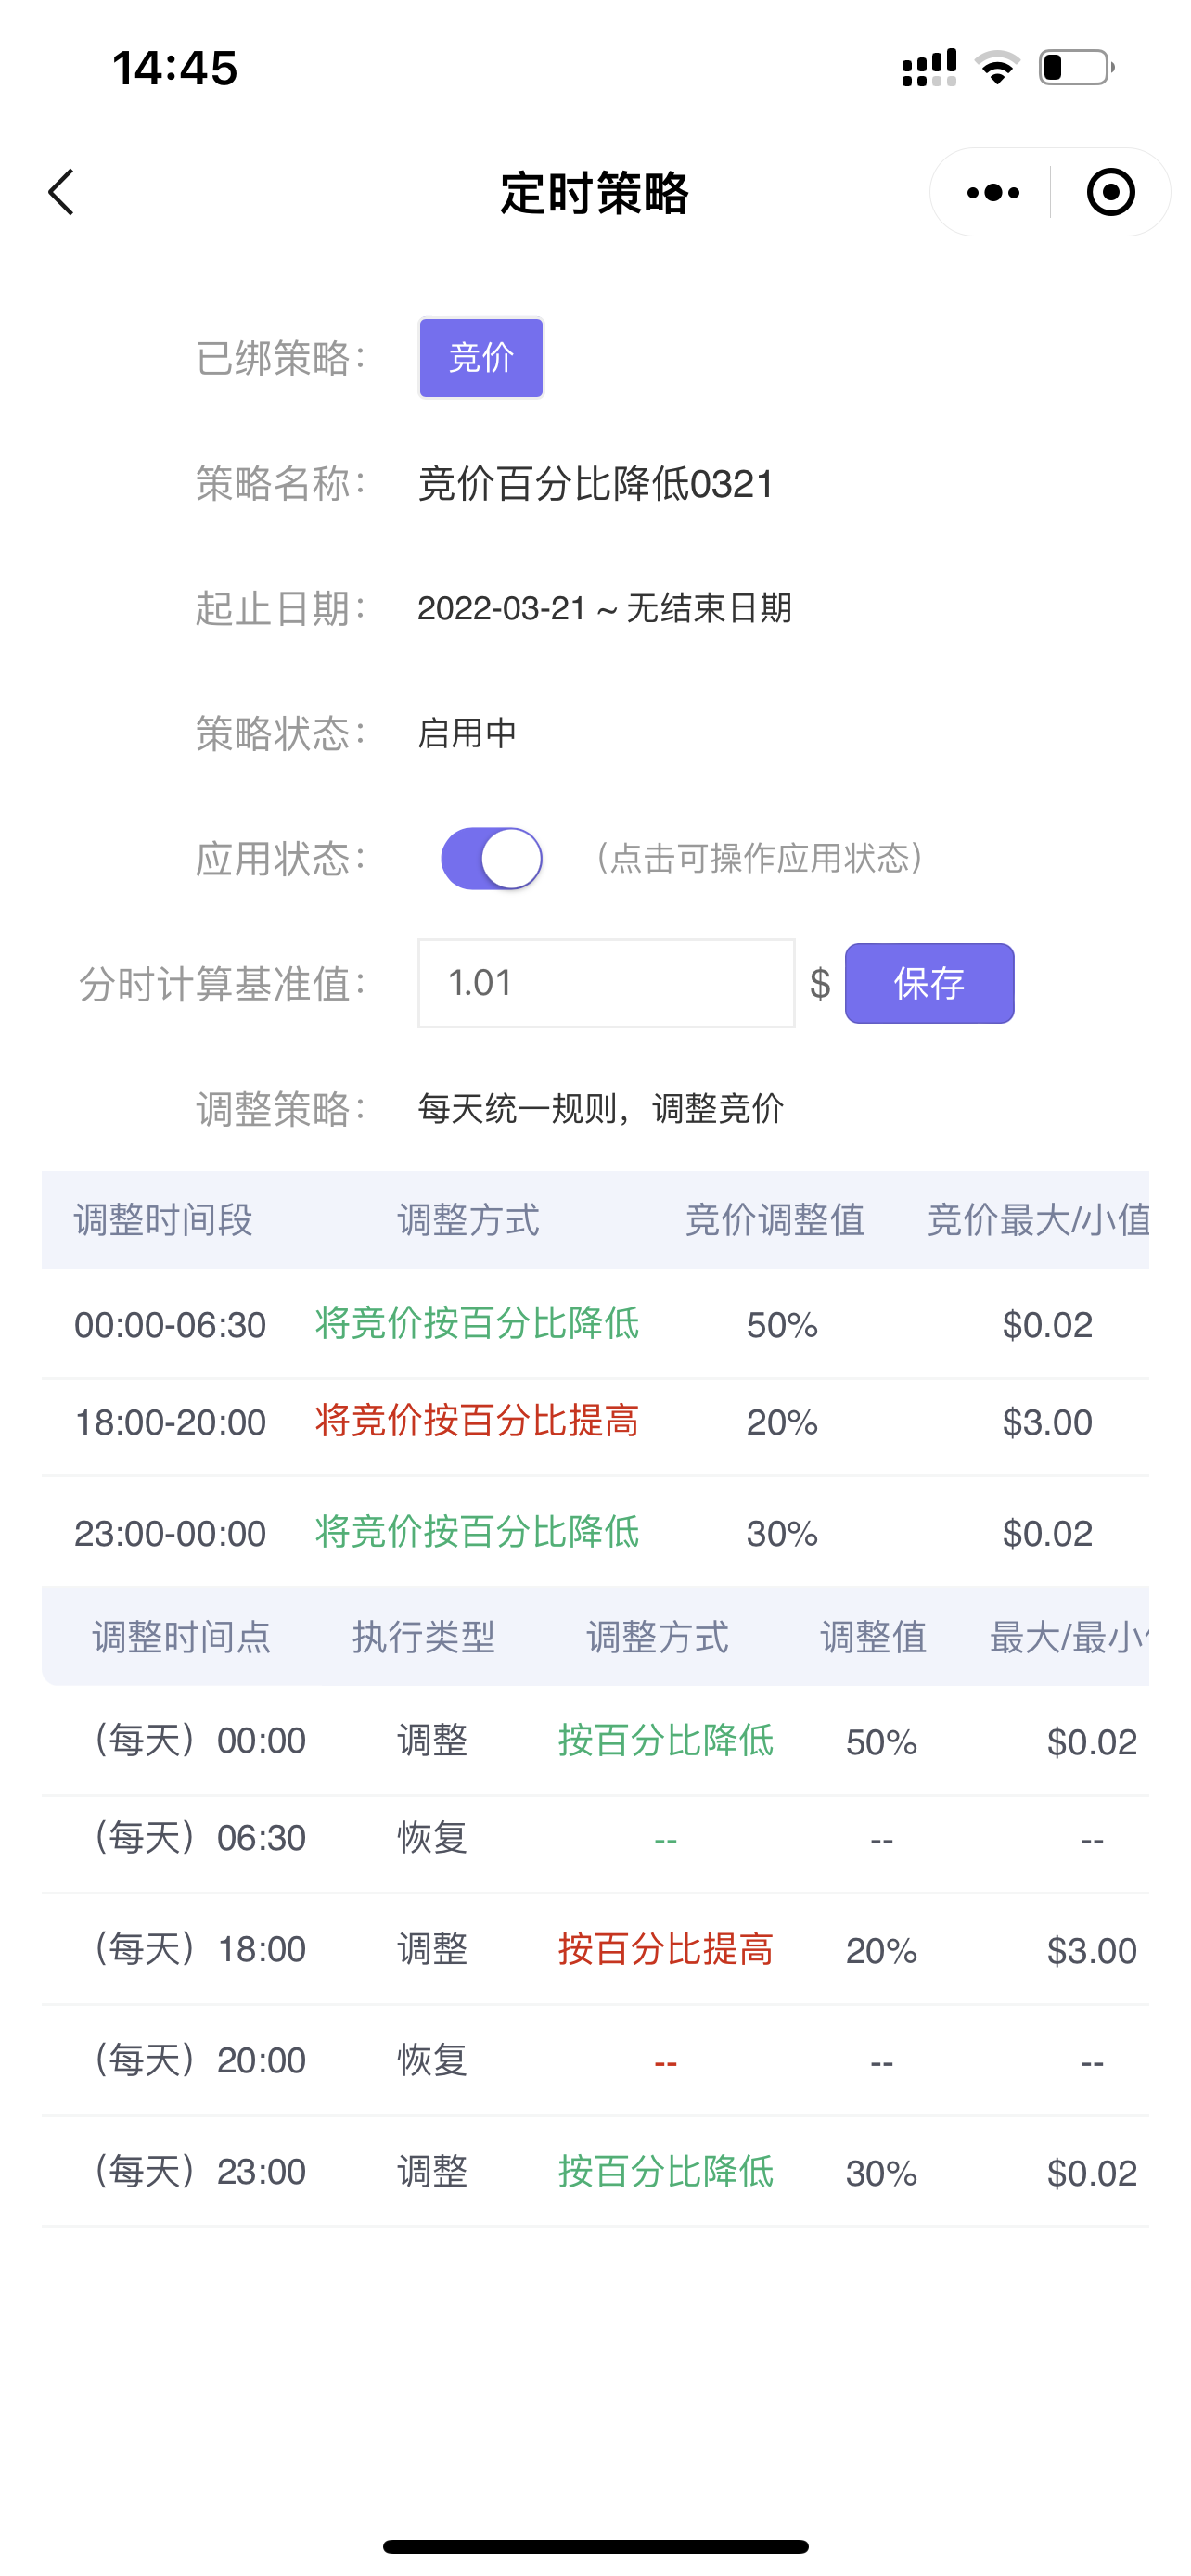
Enter the “Scheduled Strategy” page,
You can view the strategy adjustment rules, execution plan, etc., and support adjusting the application status and modifying the hourly calculation baseline value.
 +
+
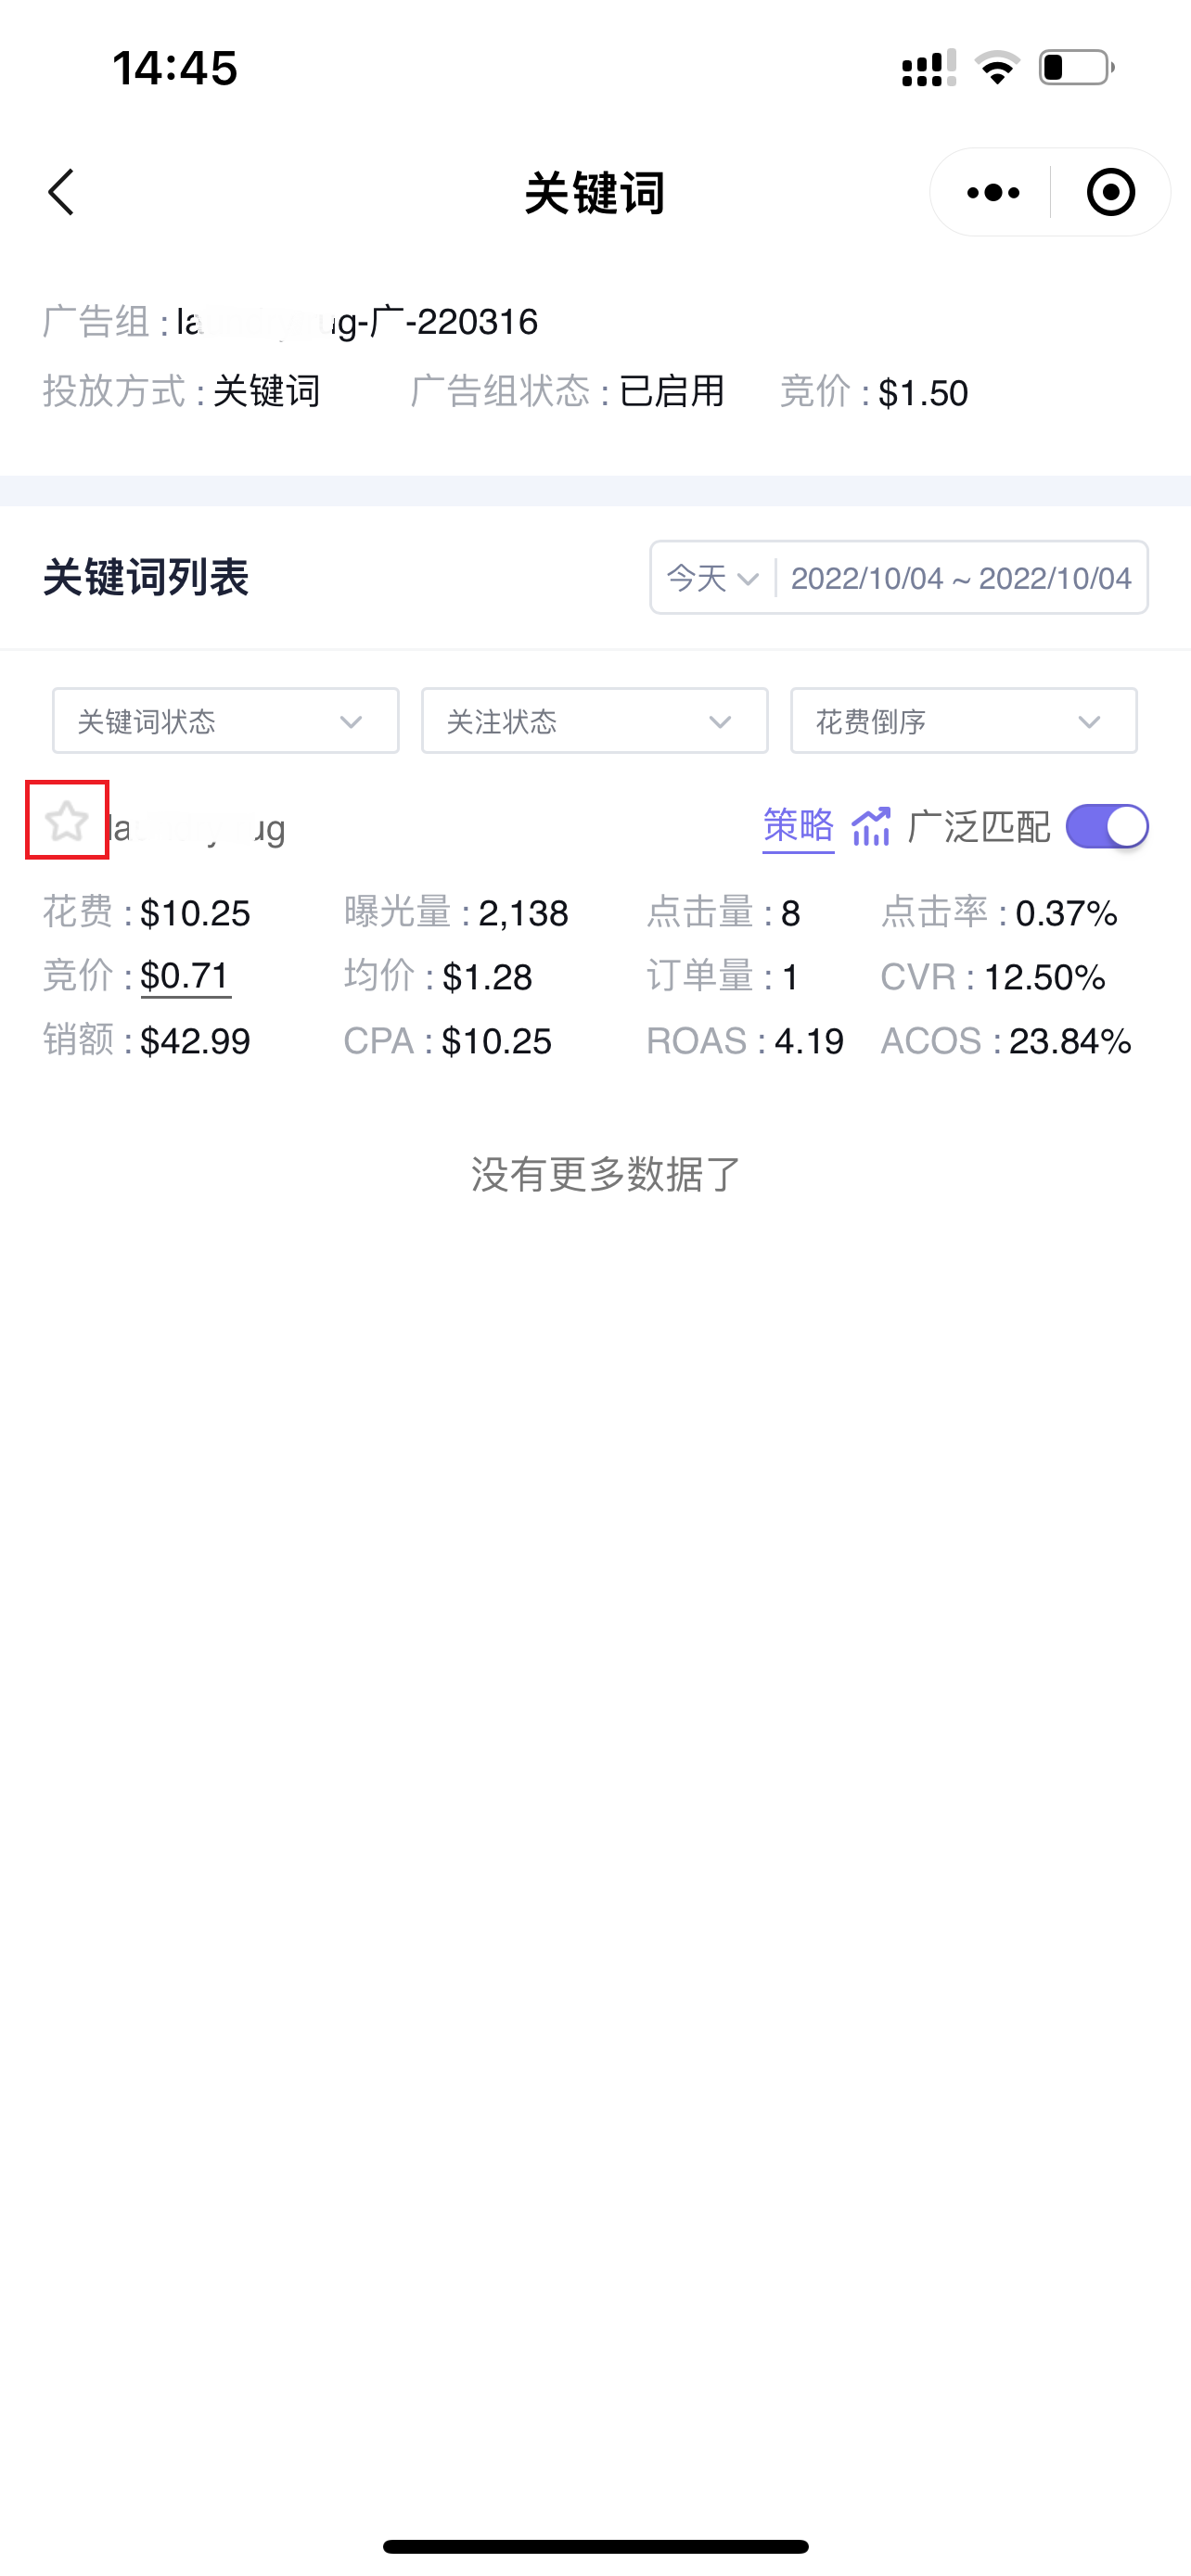
1.4 Adding to Watchlist(Advertising data across all dimensions can be added to the watchlist)
Click the “☆” symbol before the keyword to add to the watchlist. After adding to the watchlist, the keyword will be ranked at the top by default.
 +
+
2. Adjusting Keywords
You can directly adjust the targeting enable/pause status of keywords and modify bids.
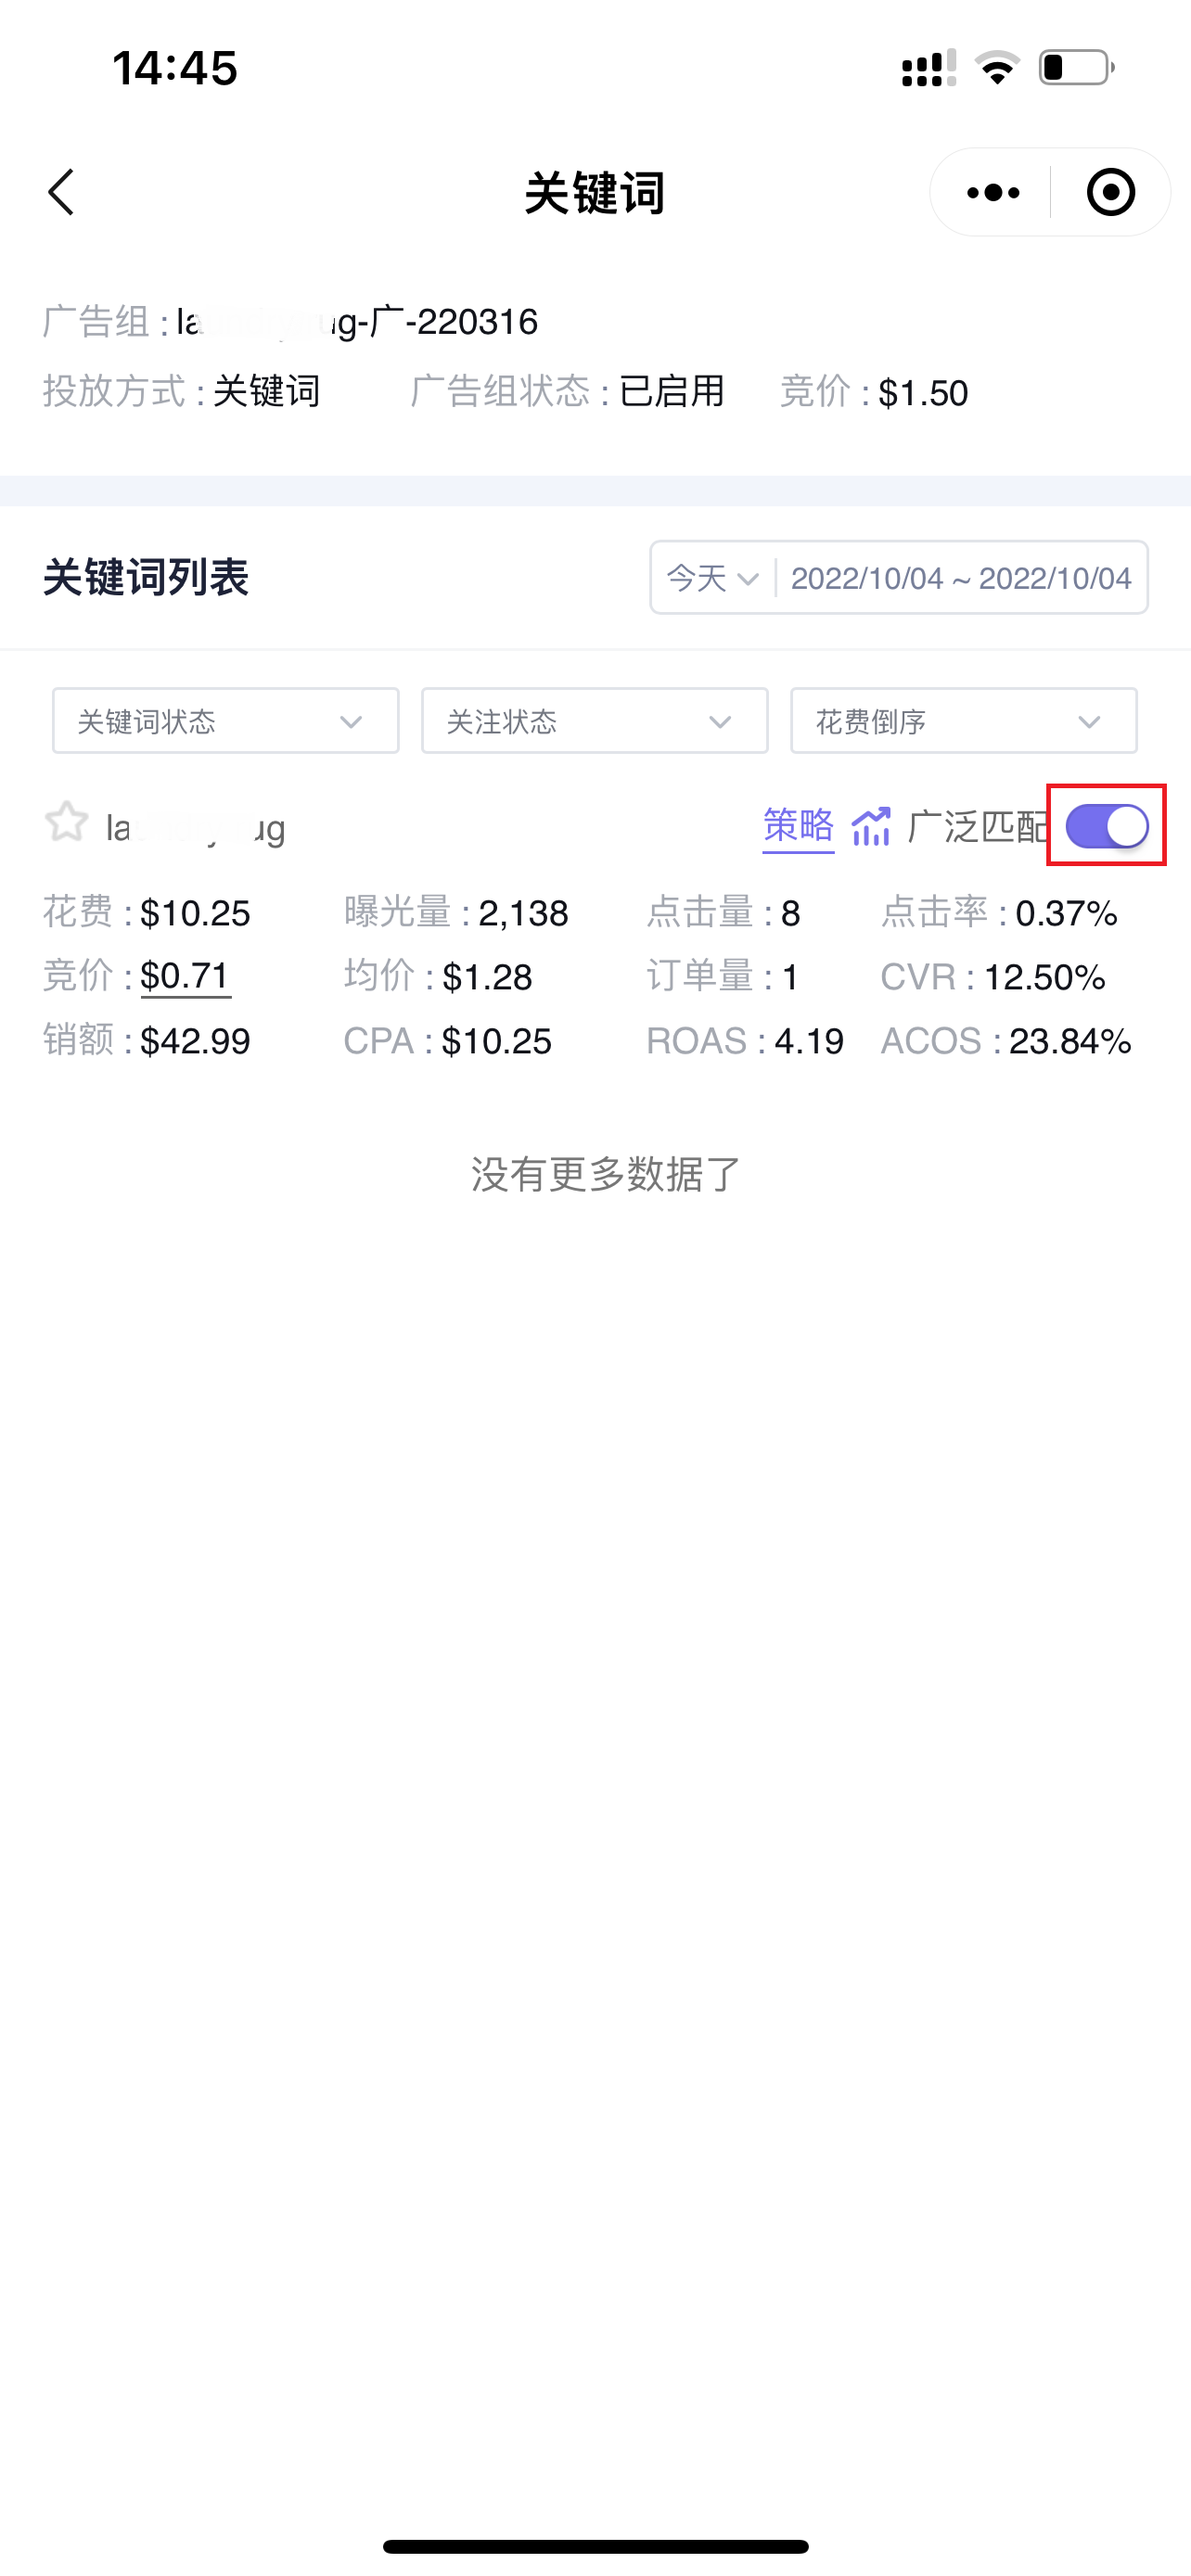
2.1 Adjusting Enable/Pause Status
Click the enable/pause button on the right side of the keyword to individually enable or pause the keyword targeting.
 +
+
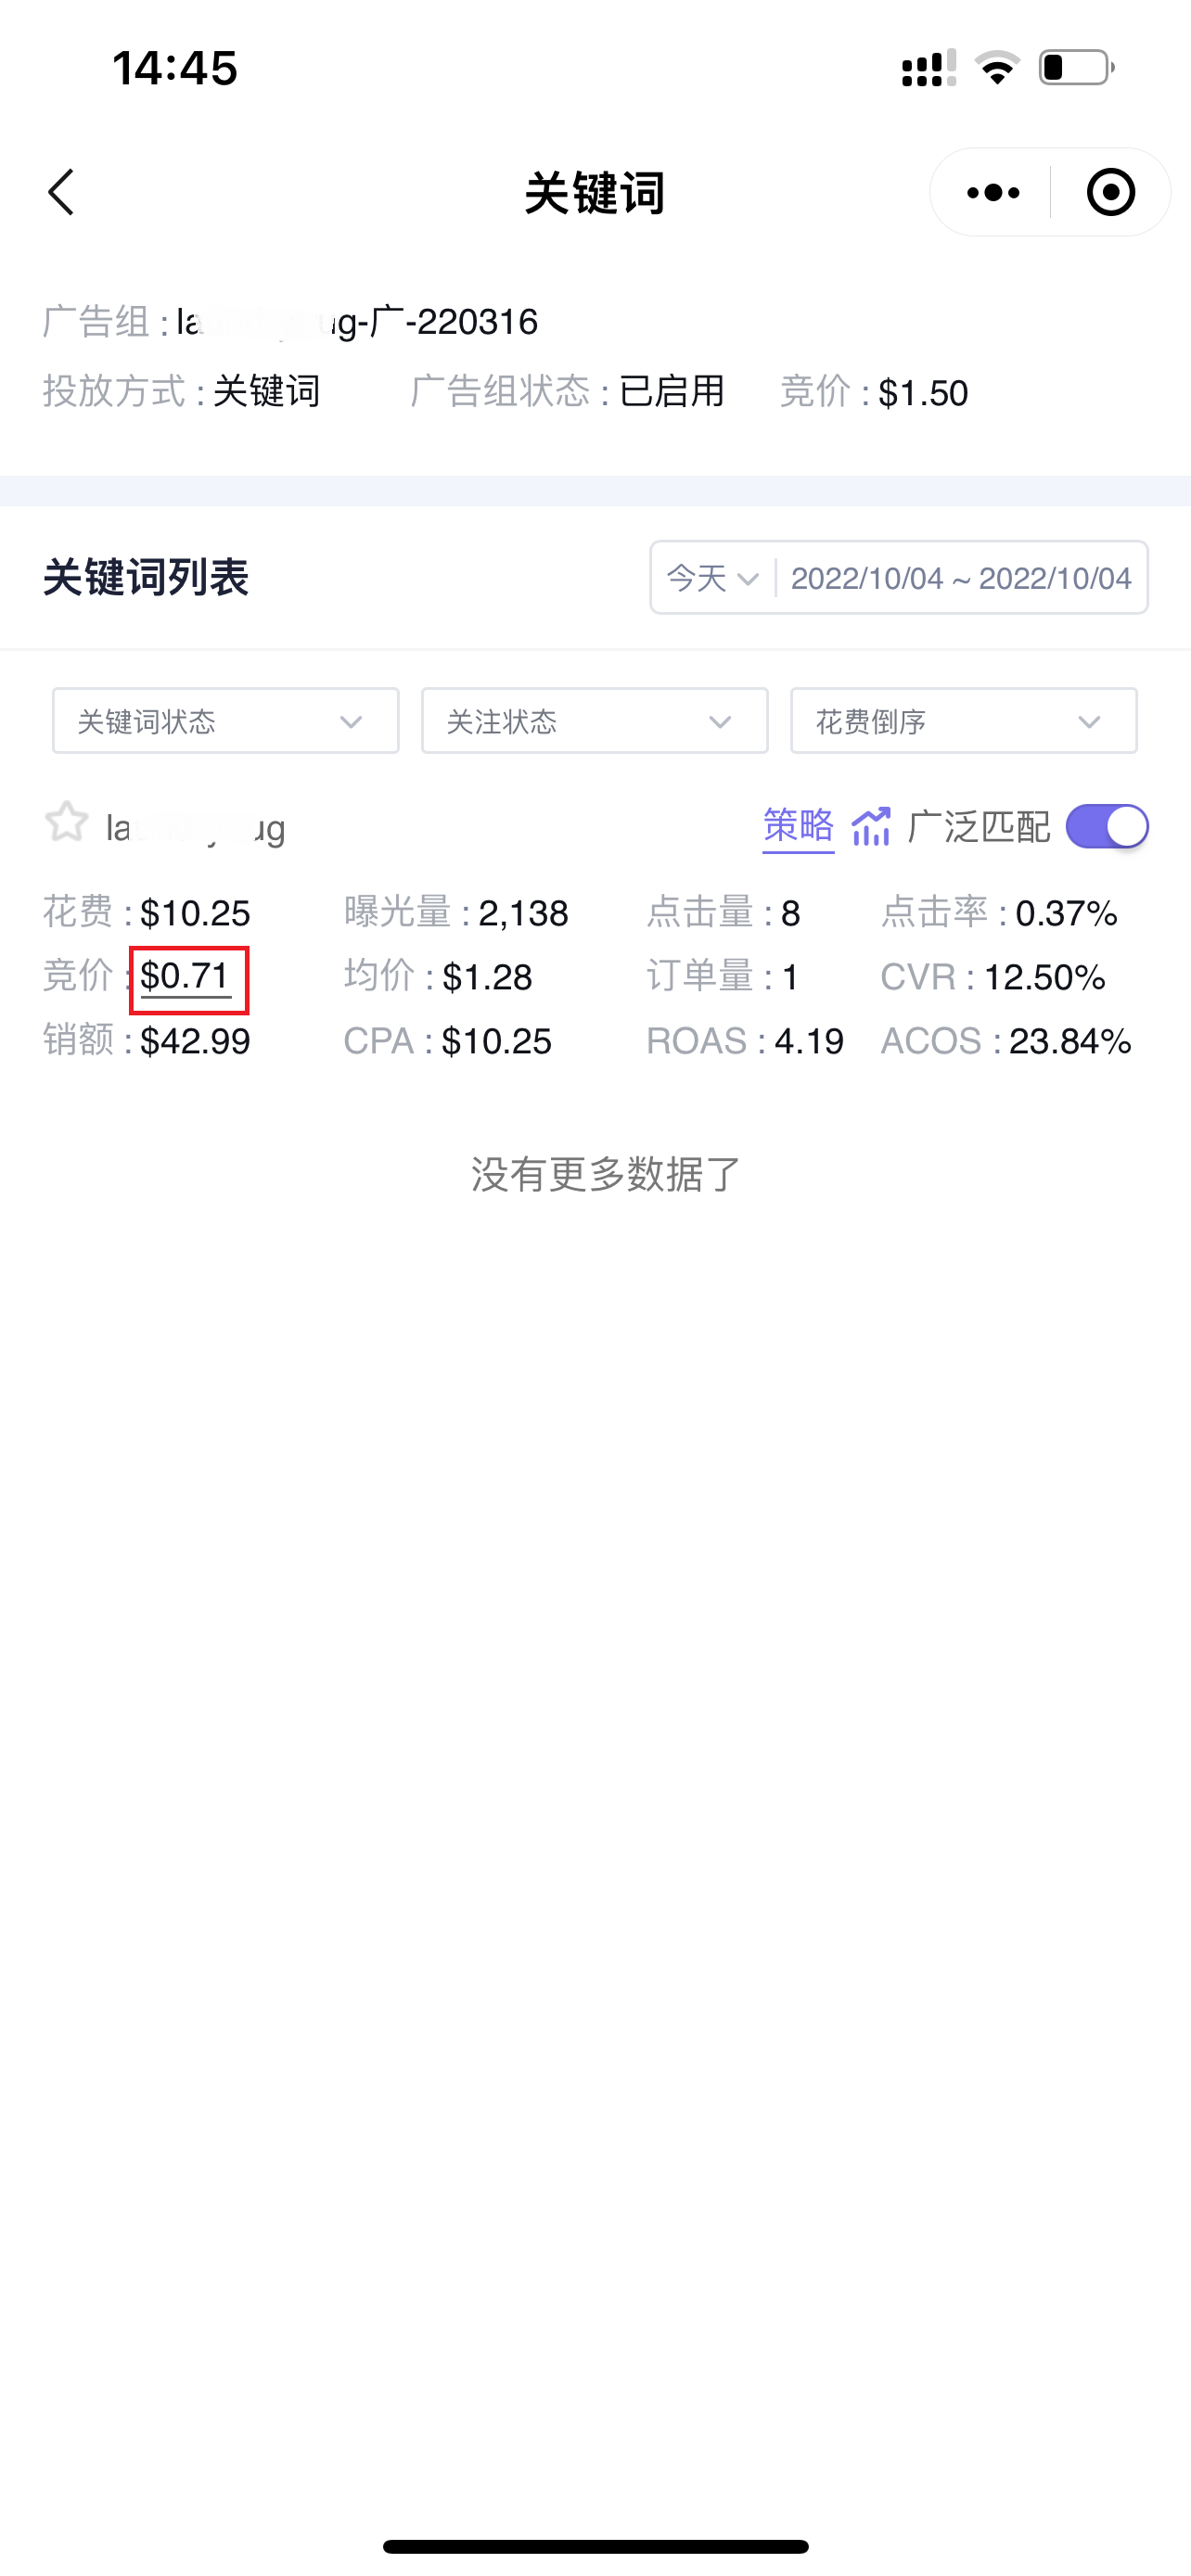
2.2 Modifying Bid
Click the bid amount of the keyword to modify the bid of the keyword;
 +
+
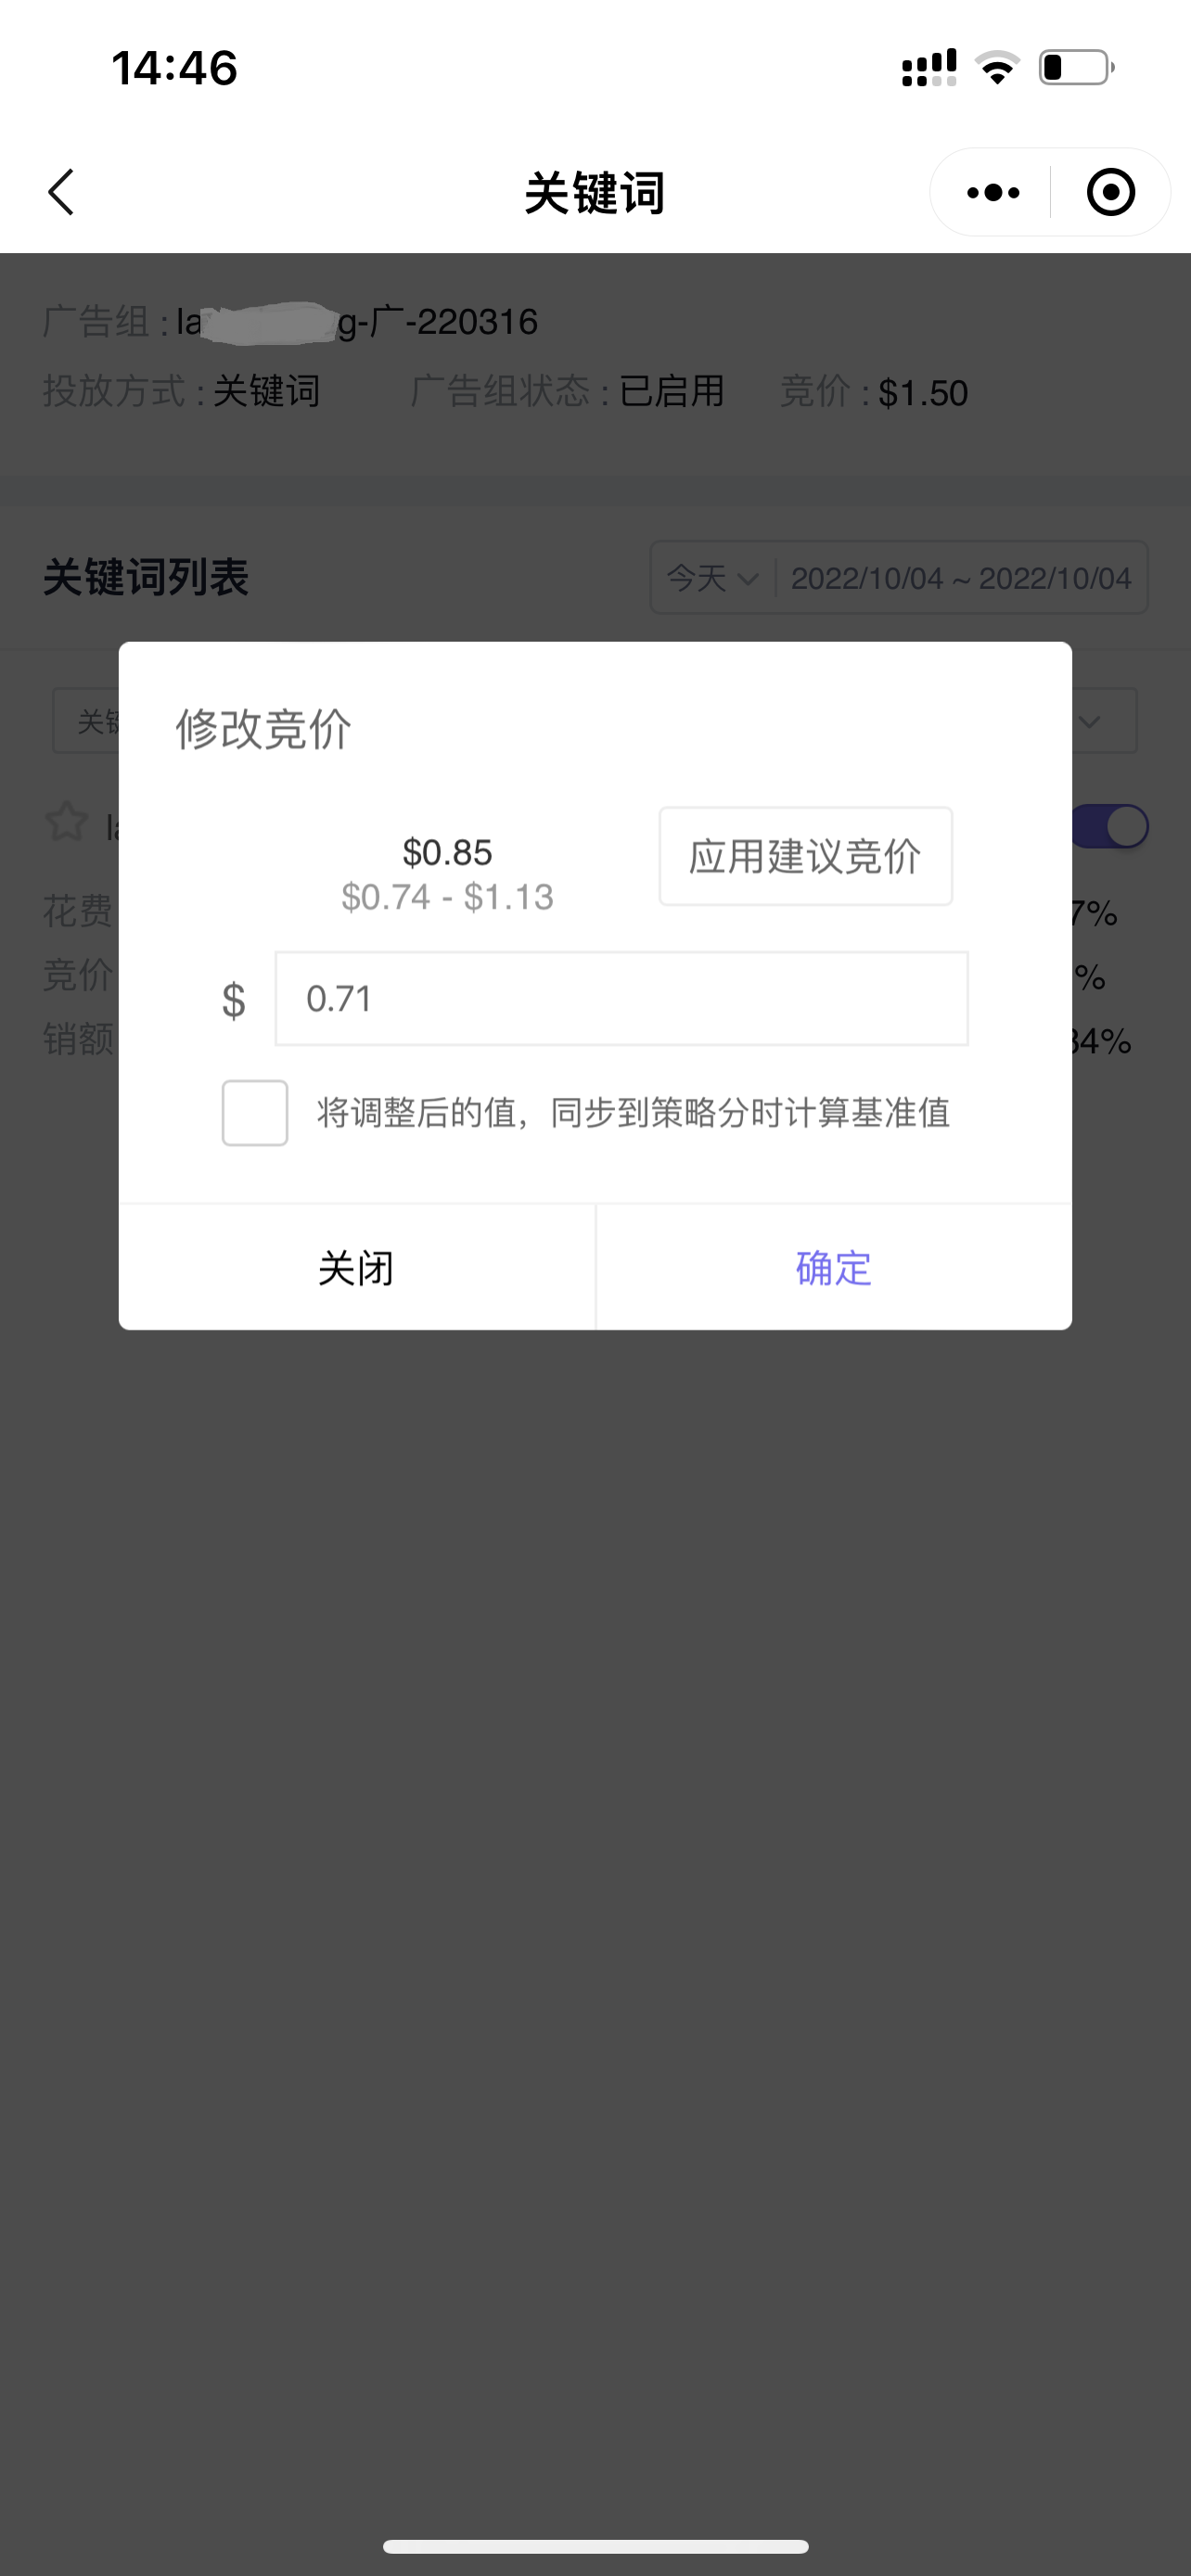
When modifying, you can refer to the suggested bid to help you better adjust and optimize.
If a scheduled strategy is applied to the keyword, you can also choose to synchronize it to the hourly calculation baseline value.
 +
+
Targeting - Non-Keywords
The Targeting - Non-Keywords feature includes other targeting types besides keywords, such as: ASINs, Categories, Audiences, etc.
1. Finding and Analyzing Non-Keyword Targeting
1.1 Finding Non-Keywords
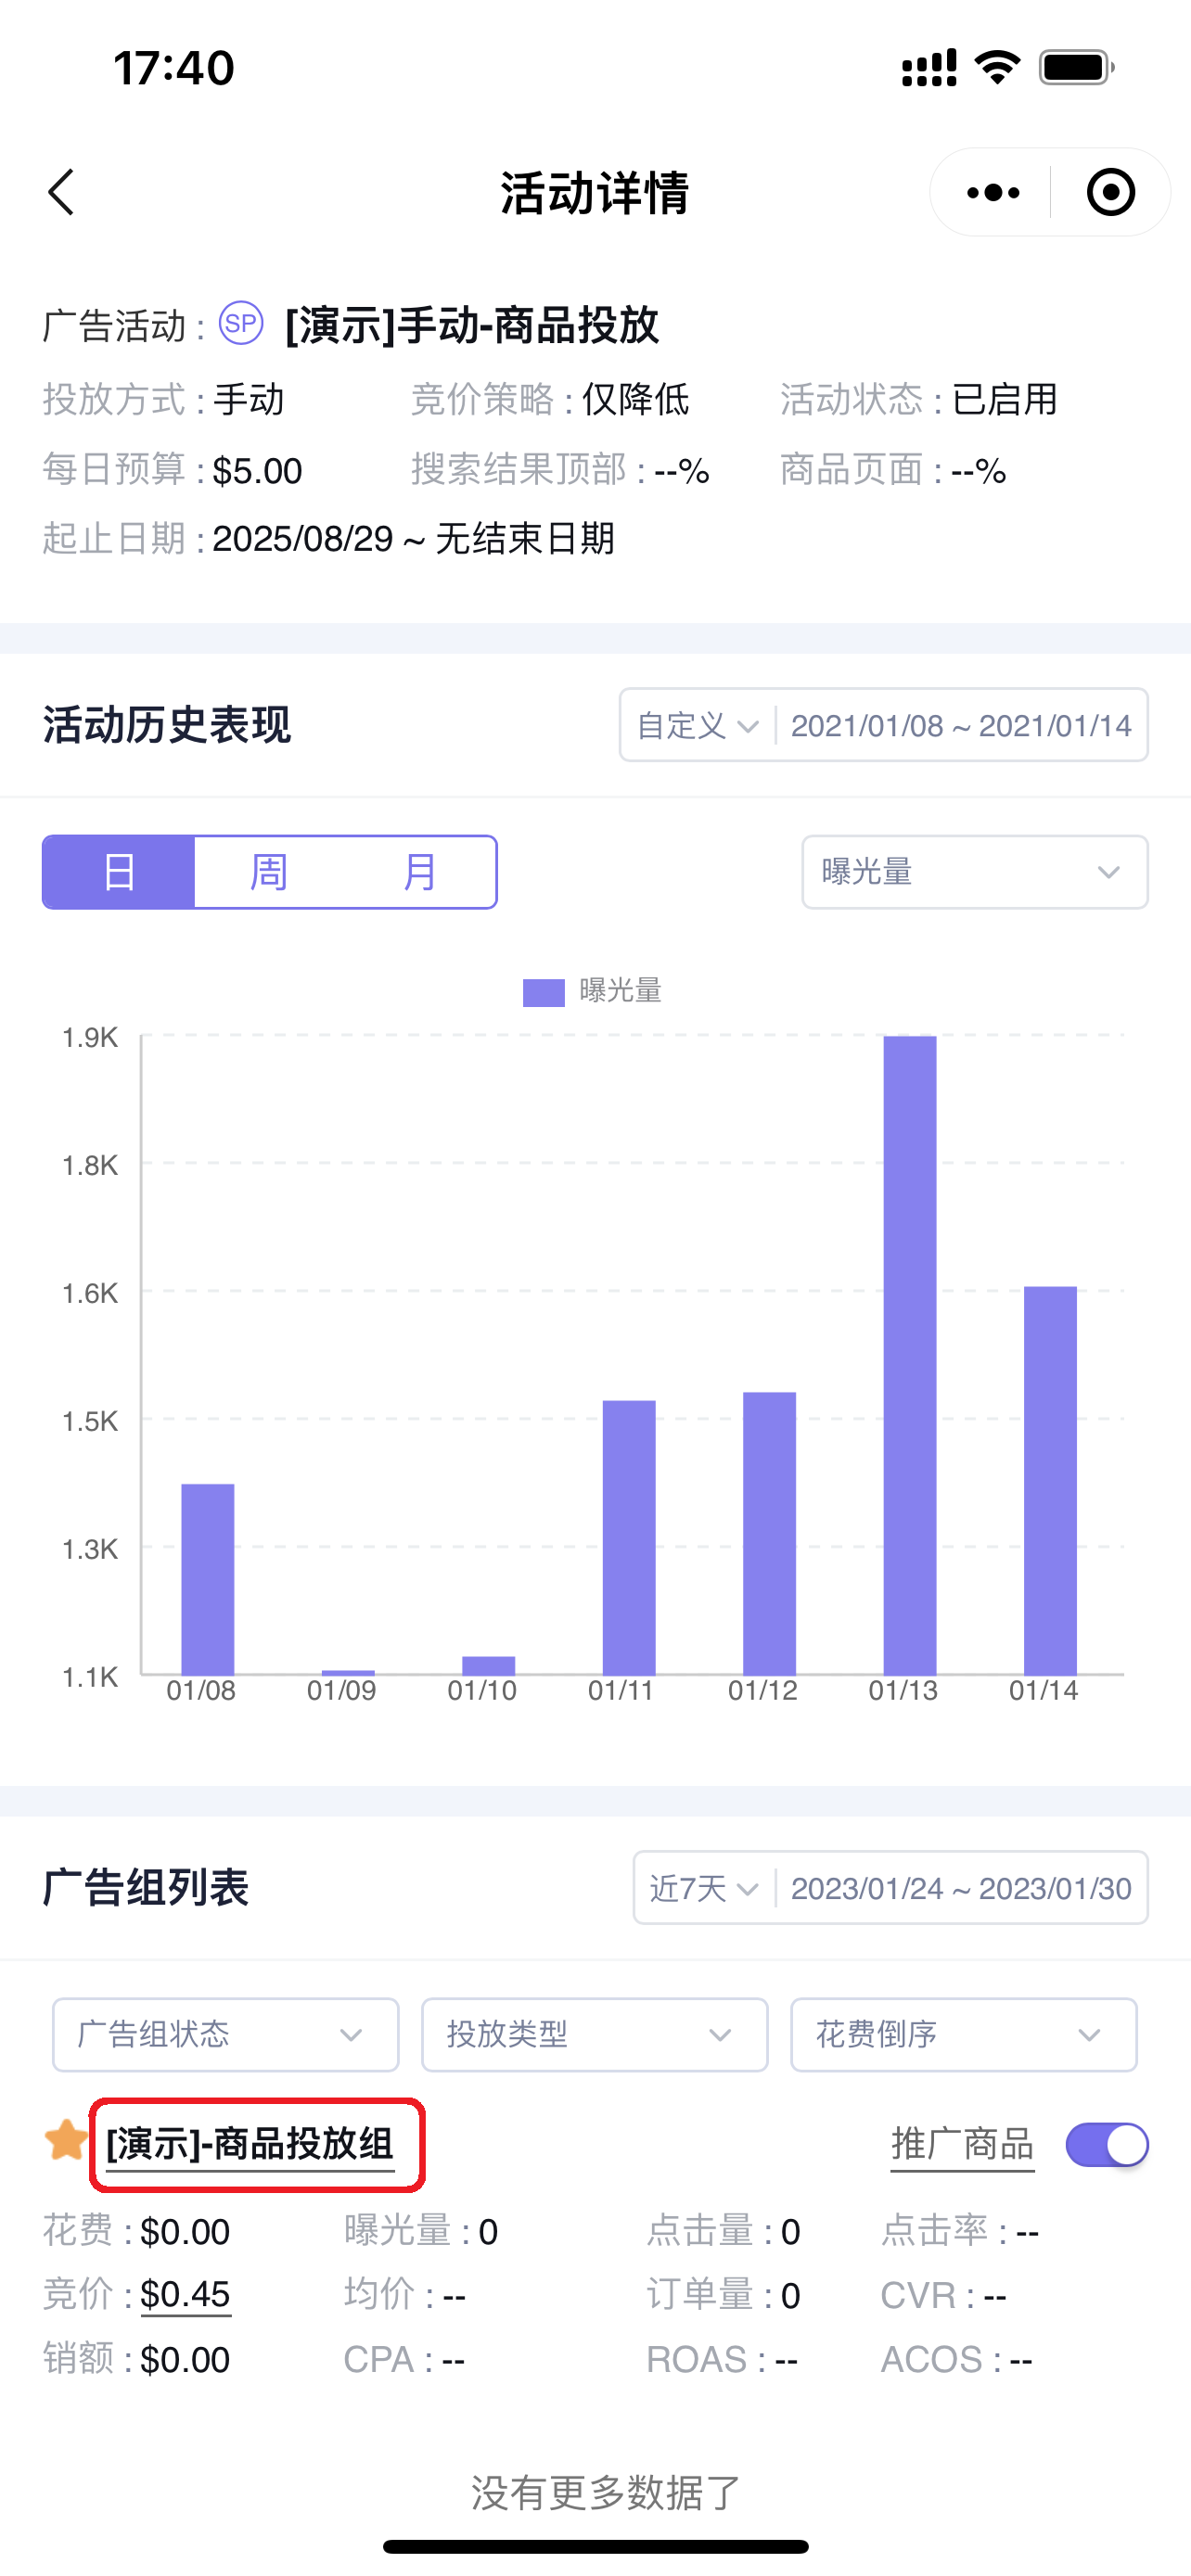
Enter the detail page of the corresponding automatic/manual campaign, select a non-keyword targeting Ad group, and click the “Automatic” / “Product” / “Audience” button on the right to enter and view the targeting list.
Navigation path: Corresponding campaign name -> Enter Ad group list -> 【Automatic】/【Product】/【Audience】Ad group name -> Enter Targeting list
Product Targeting: Associated ASIN and Category Targeting list
Audience Targeting: Display Ads Audience Targeting list
1.2 Analyzing Non-Keyword Targeting Data
Taking 【Product】targeting as an example, enter the 【Targeting List】page;
Similar to keyword targeting, the data time range for non-keyword targeting also defaults to the time range selected for its parent campaign. You can also customize the time range;
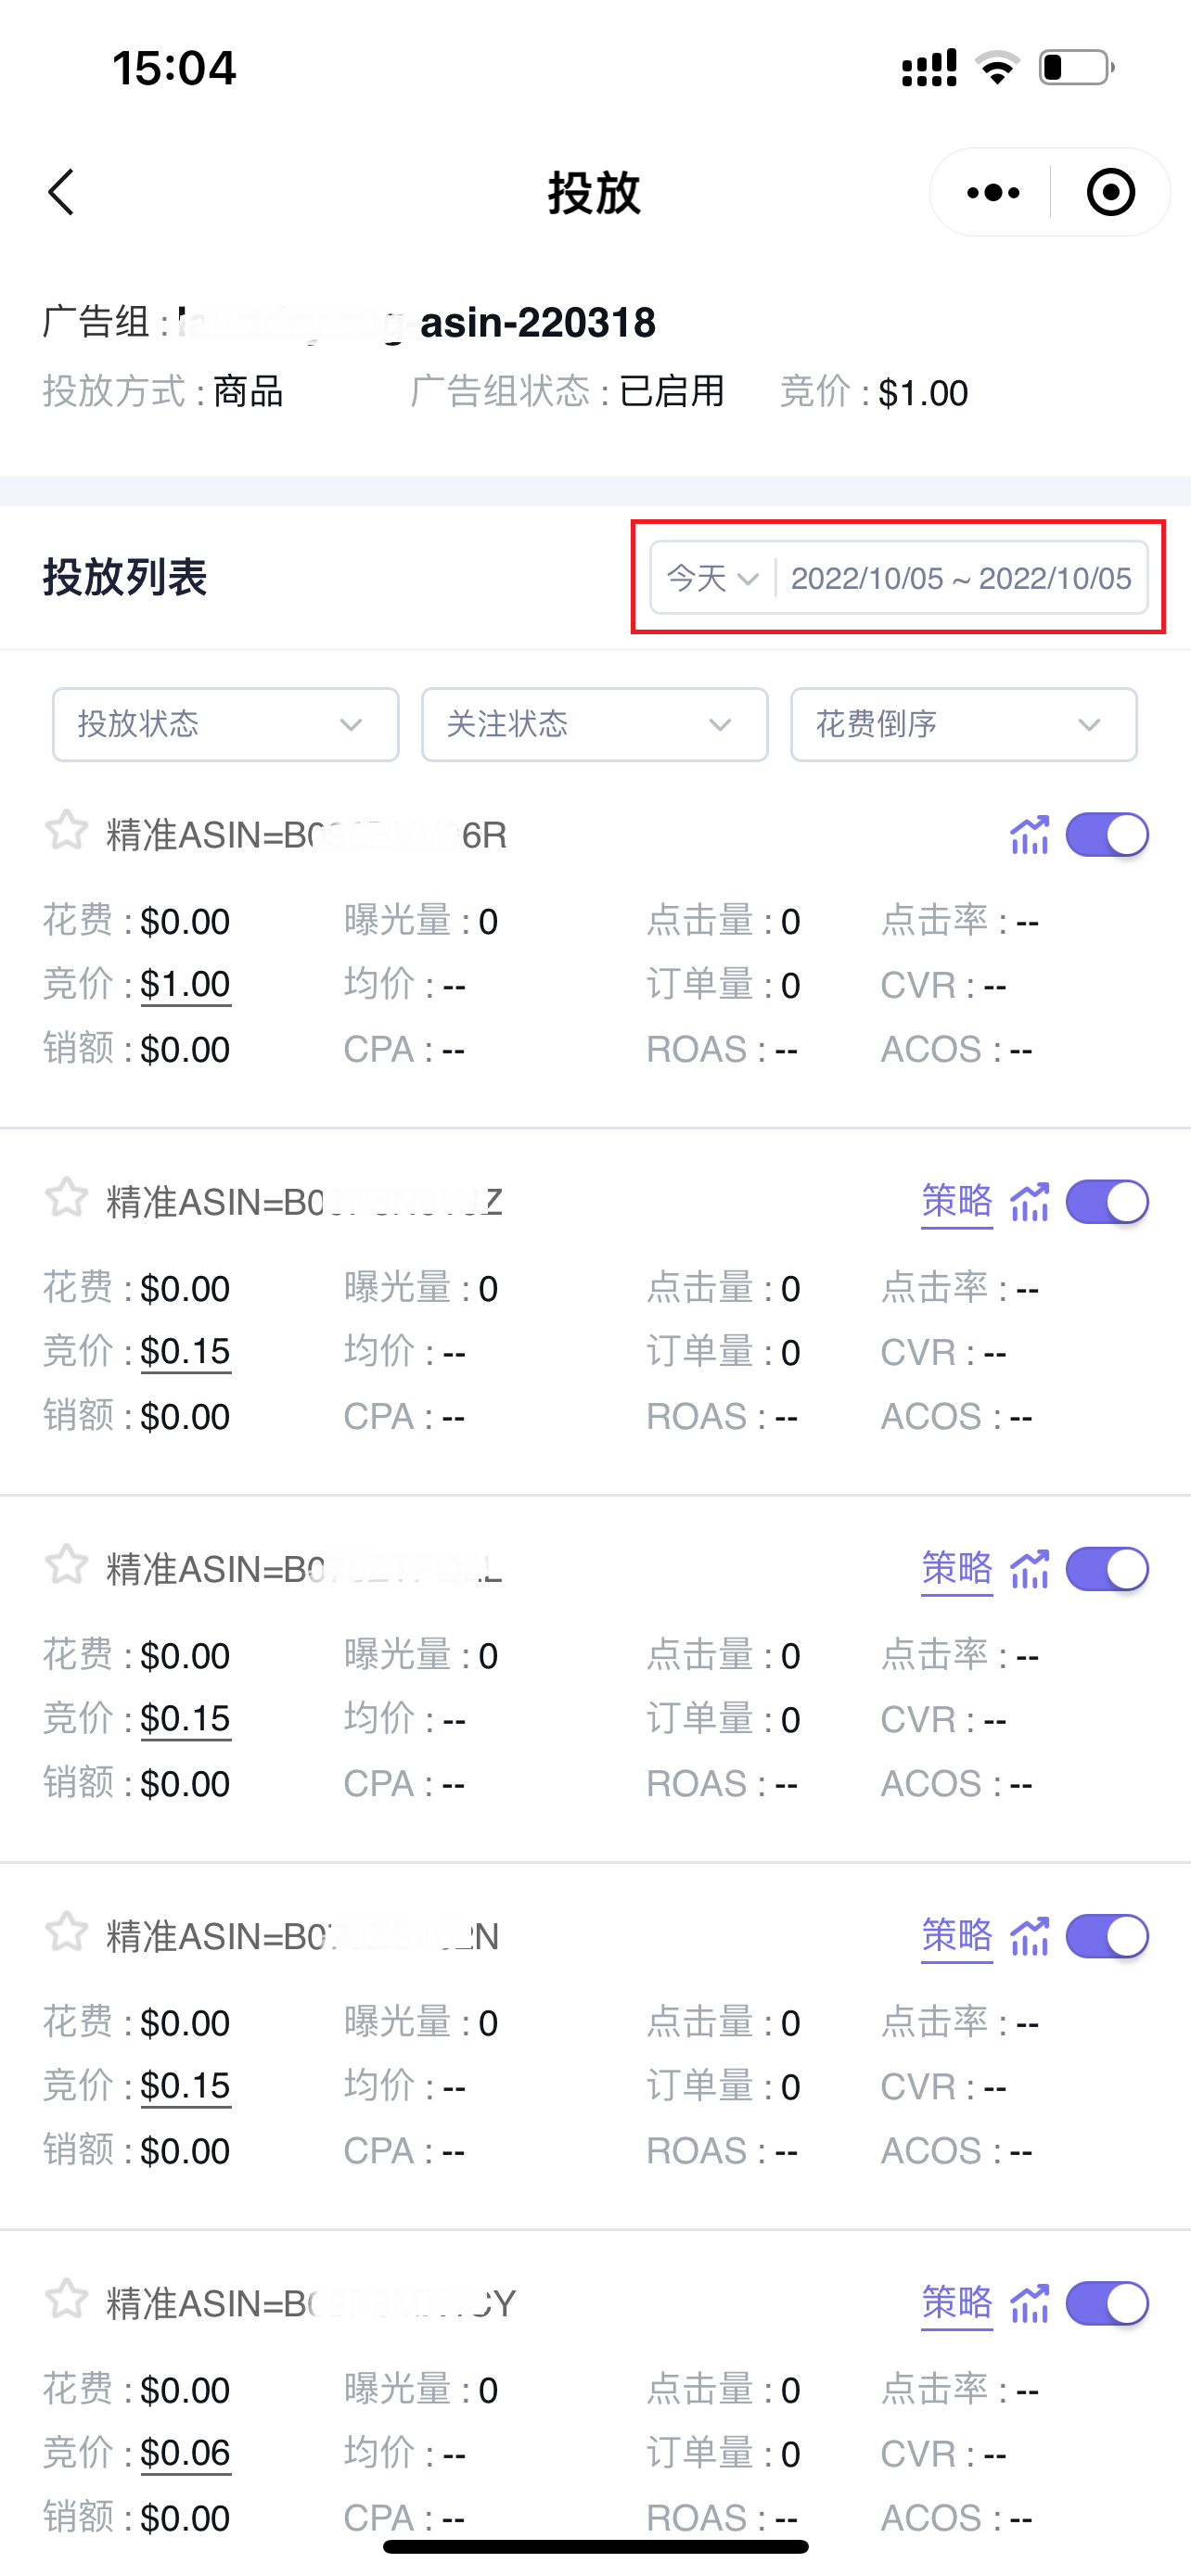
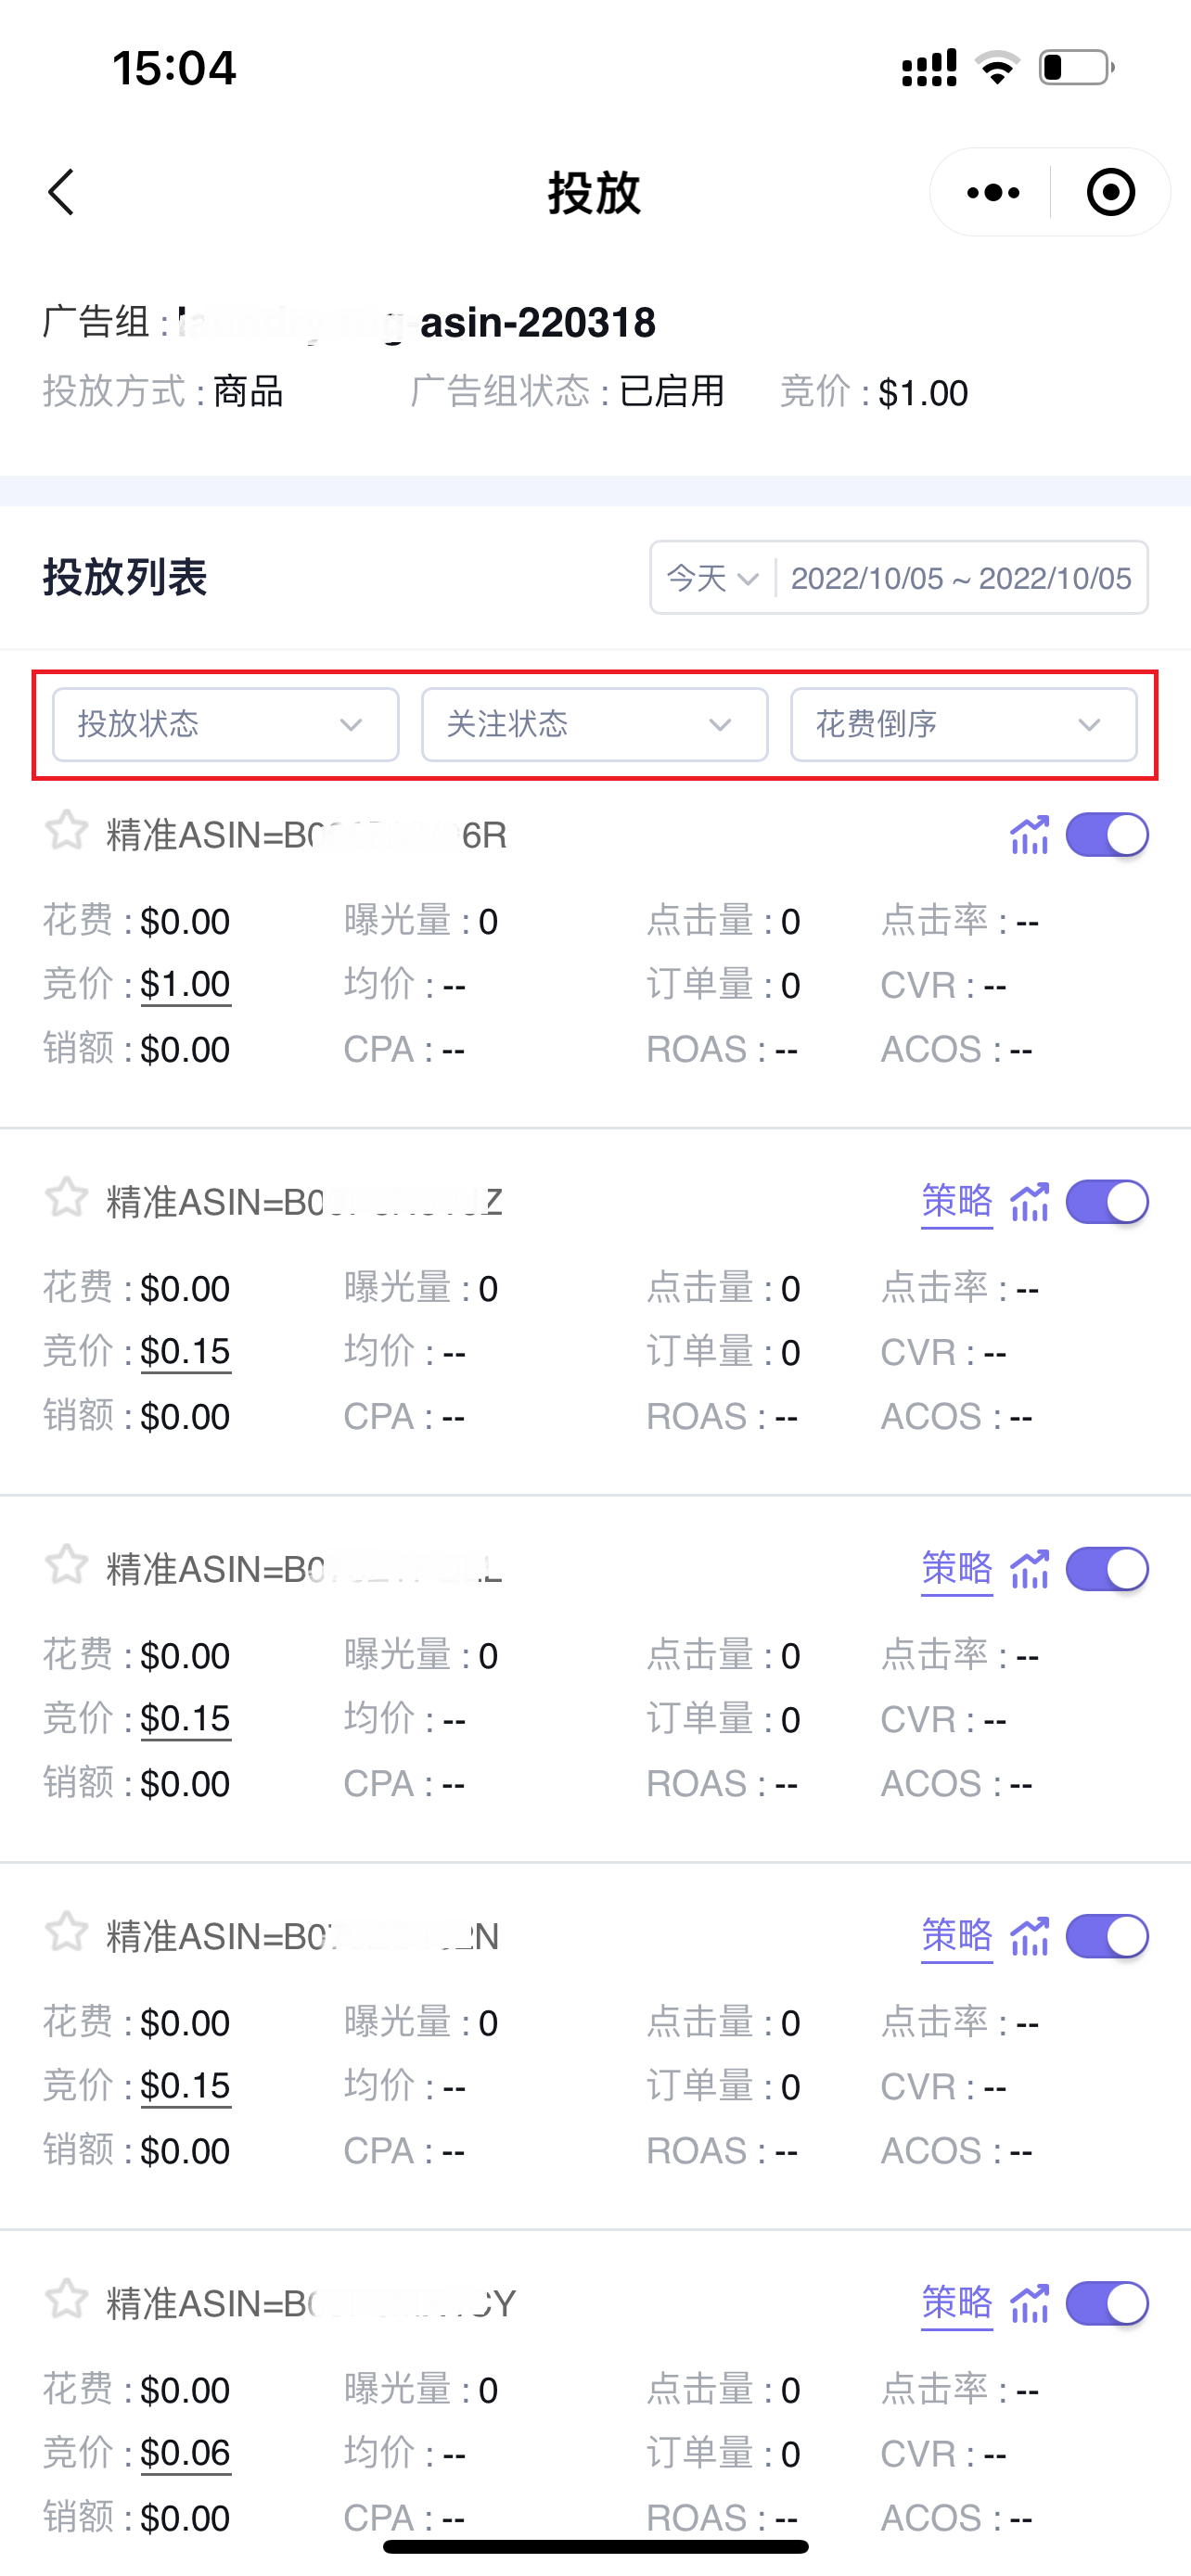
After selecting the time range, you can use filter conditions: targeting status, watchlist status, and sort by corresponding ad targeting metrics to view and analyze targeting data that meets the corresponding conditions.
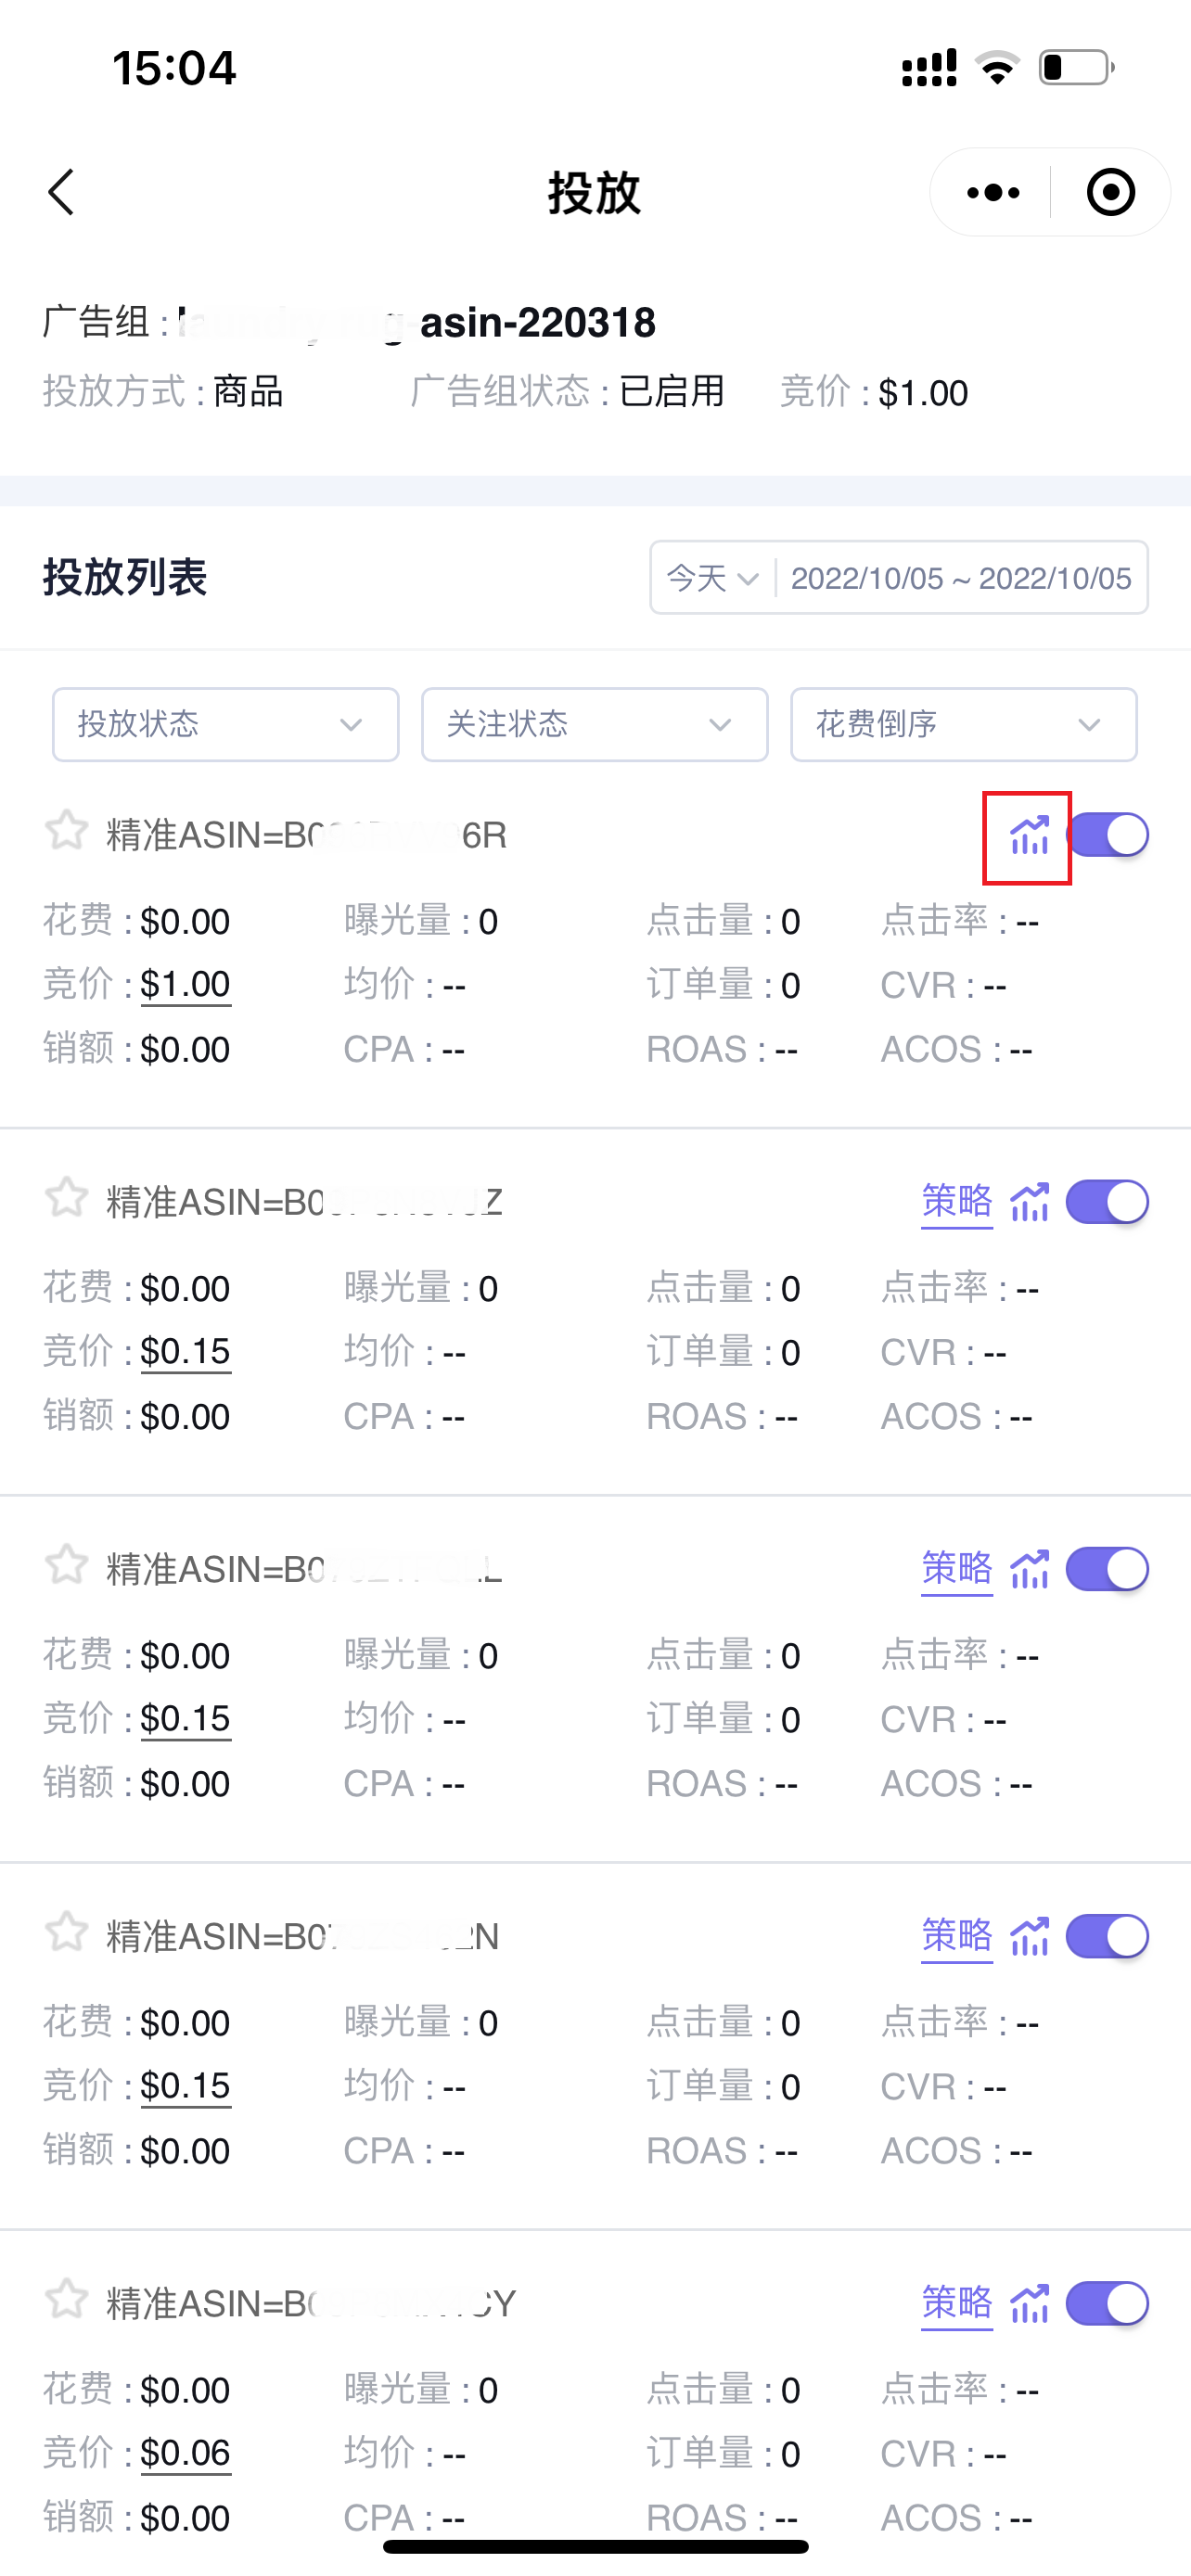
1.3 Analyzing Historical Performance of Non-Keyword Targeting (The data presentation format for historical performance of advertising data across all dimensions is consistent.)
Click the historical trend button on the right side of the non-keyword targeting to enter and view the historical performance of the non-keyword targeting;
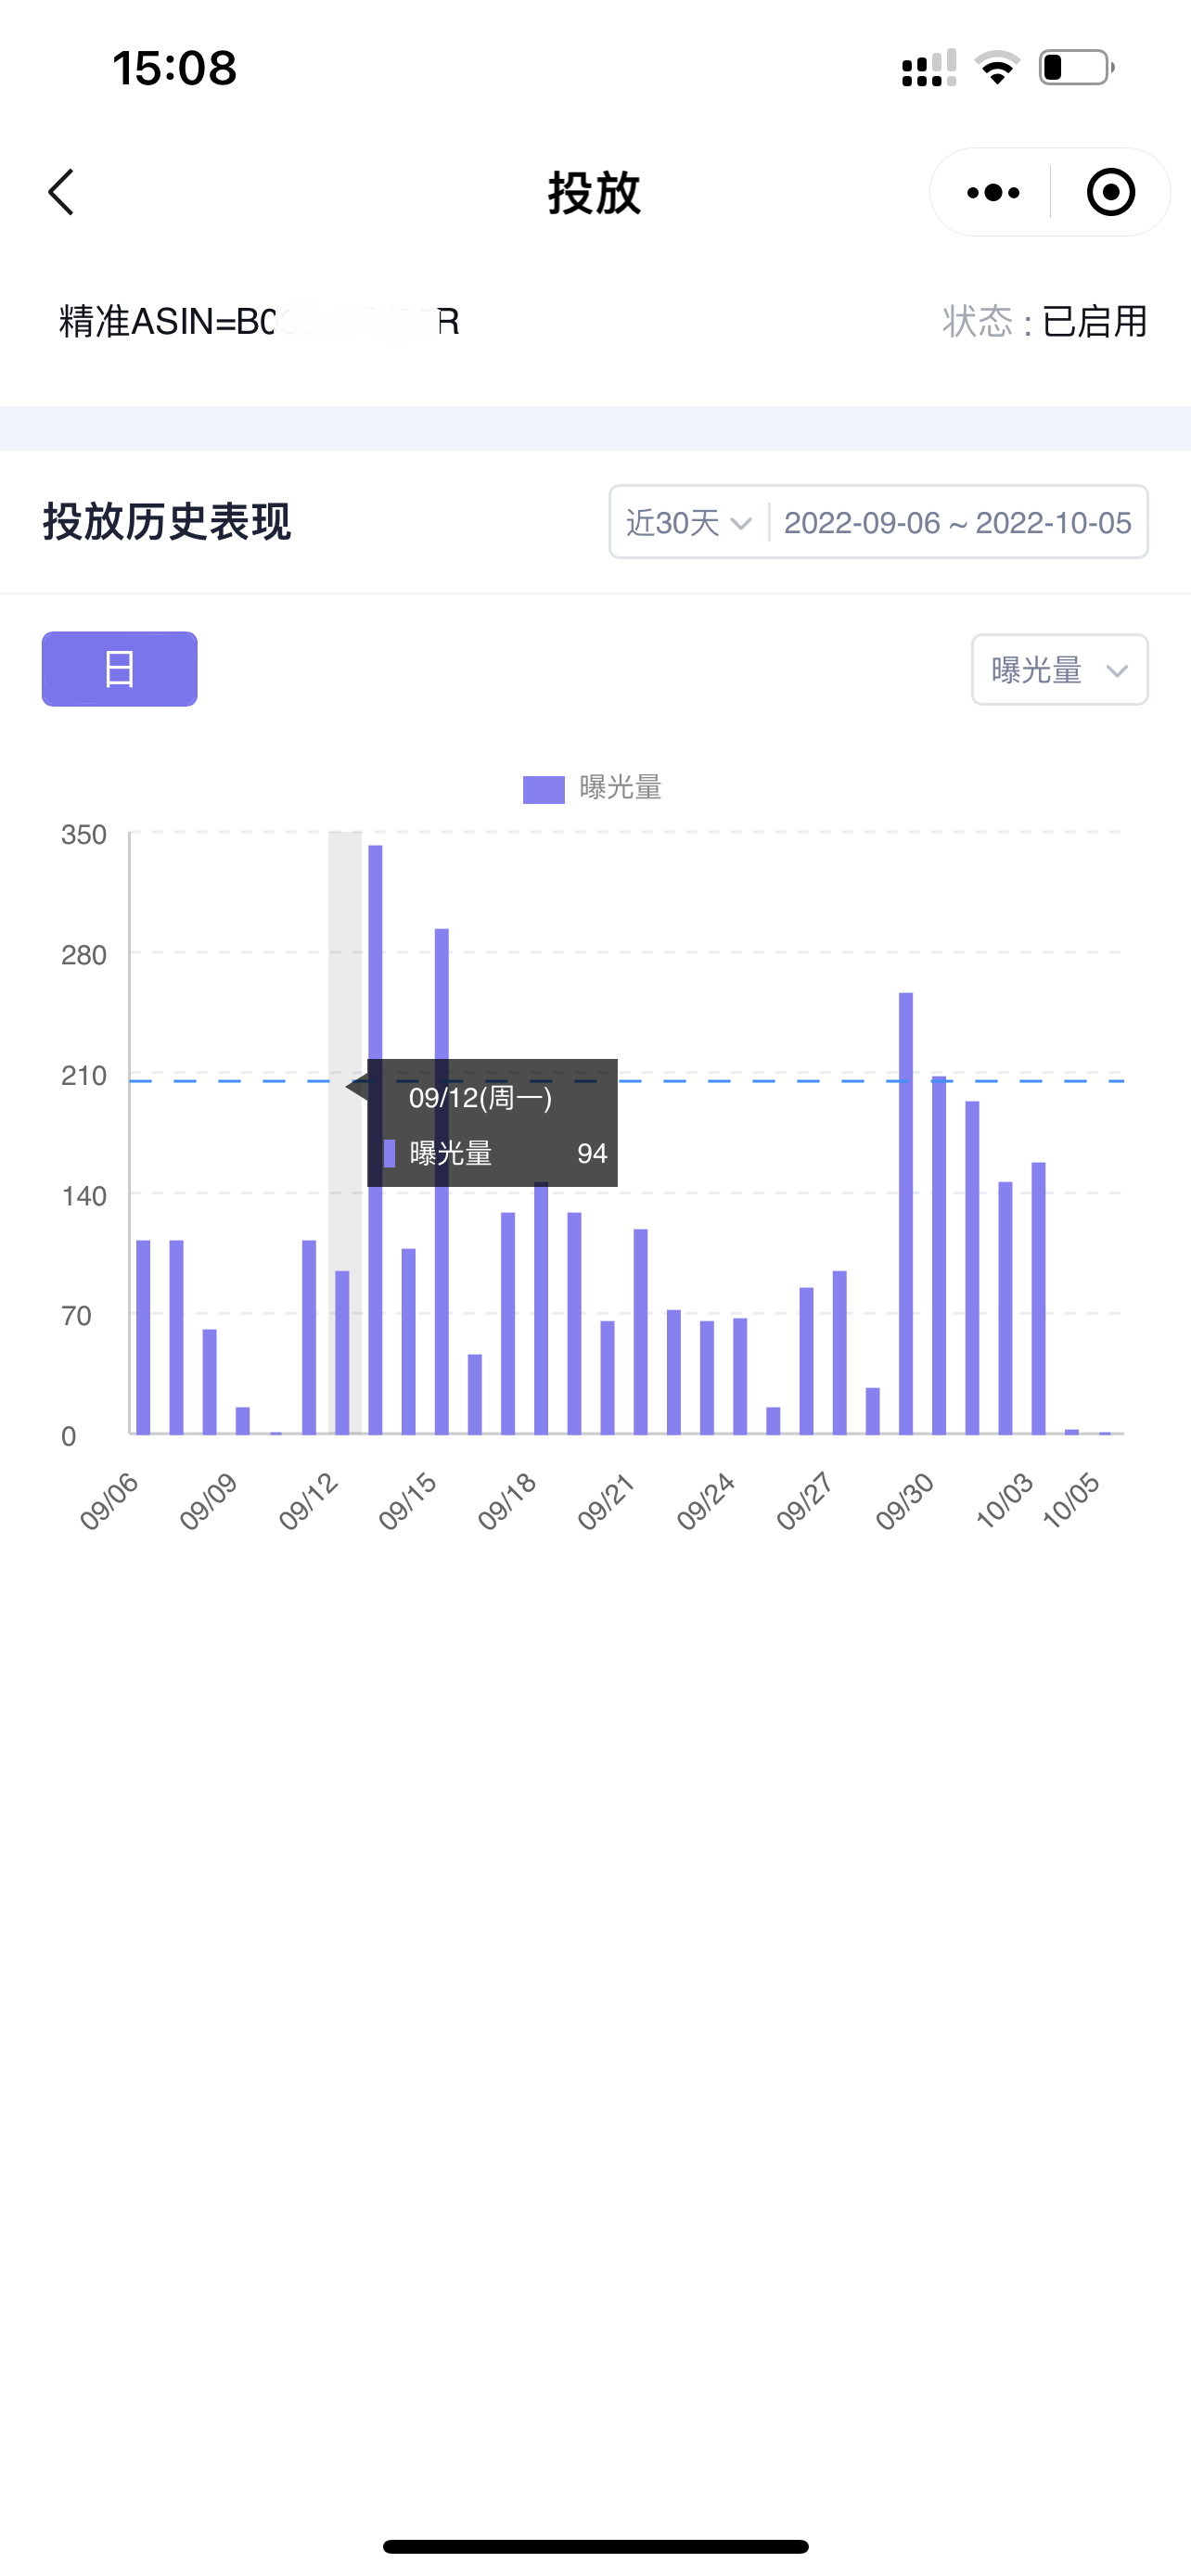
Enter the “Historical Performance” page,
You can customize the time range (default is the last 30 days), and switch to view data such as: Impressions, Clicks, Click-Through Rate, Spend, Average CPC, (Advertising) Orders, (Advertising) Sales, etc. Click on the bar chart to view detailed data.
1.4 Scheduled Strategy
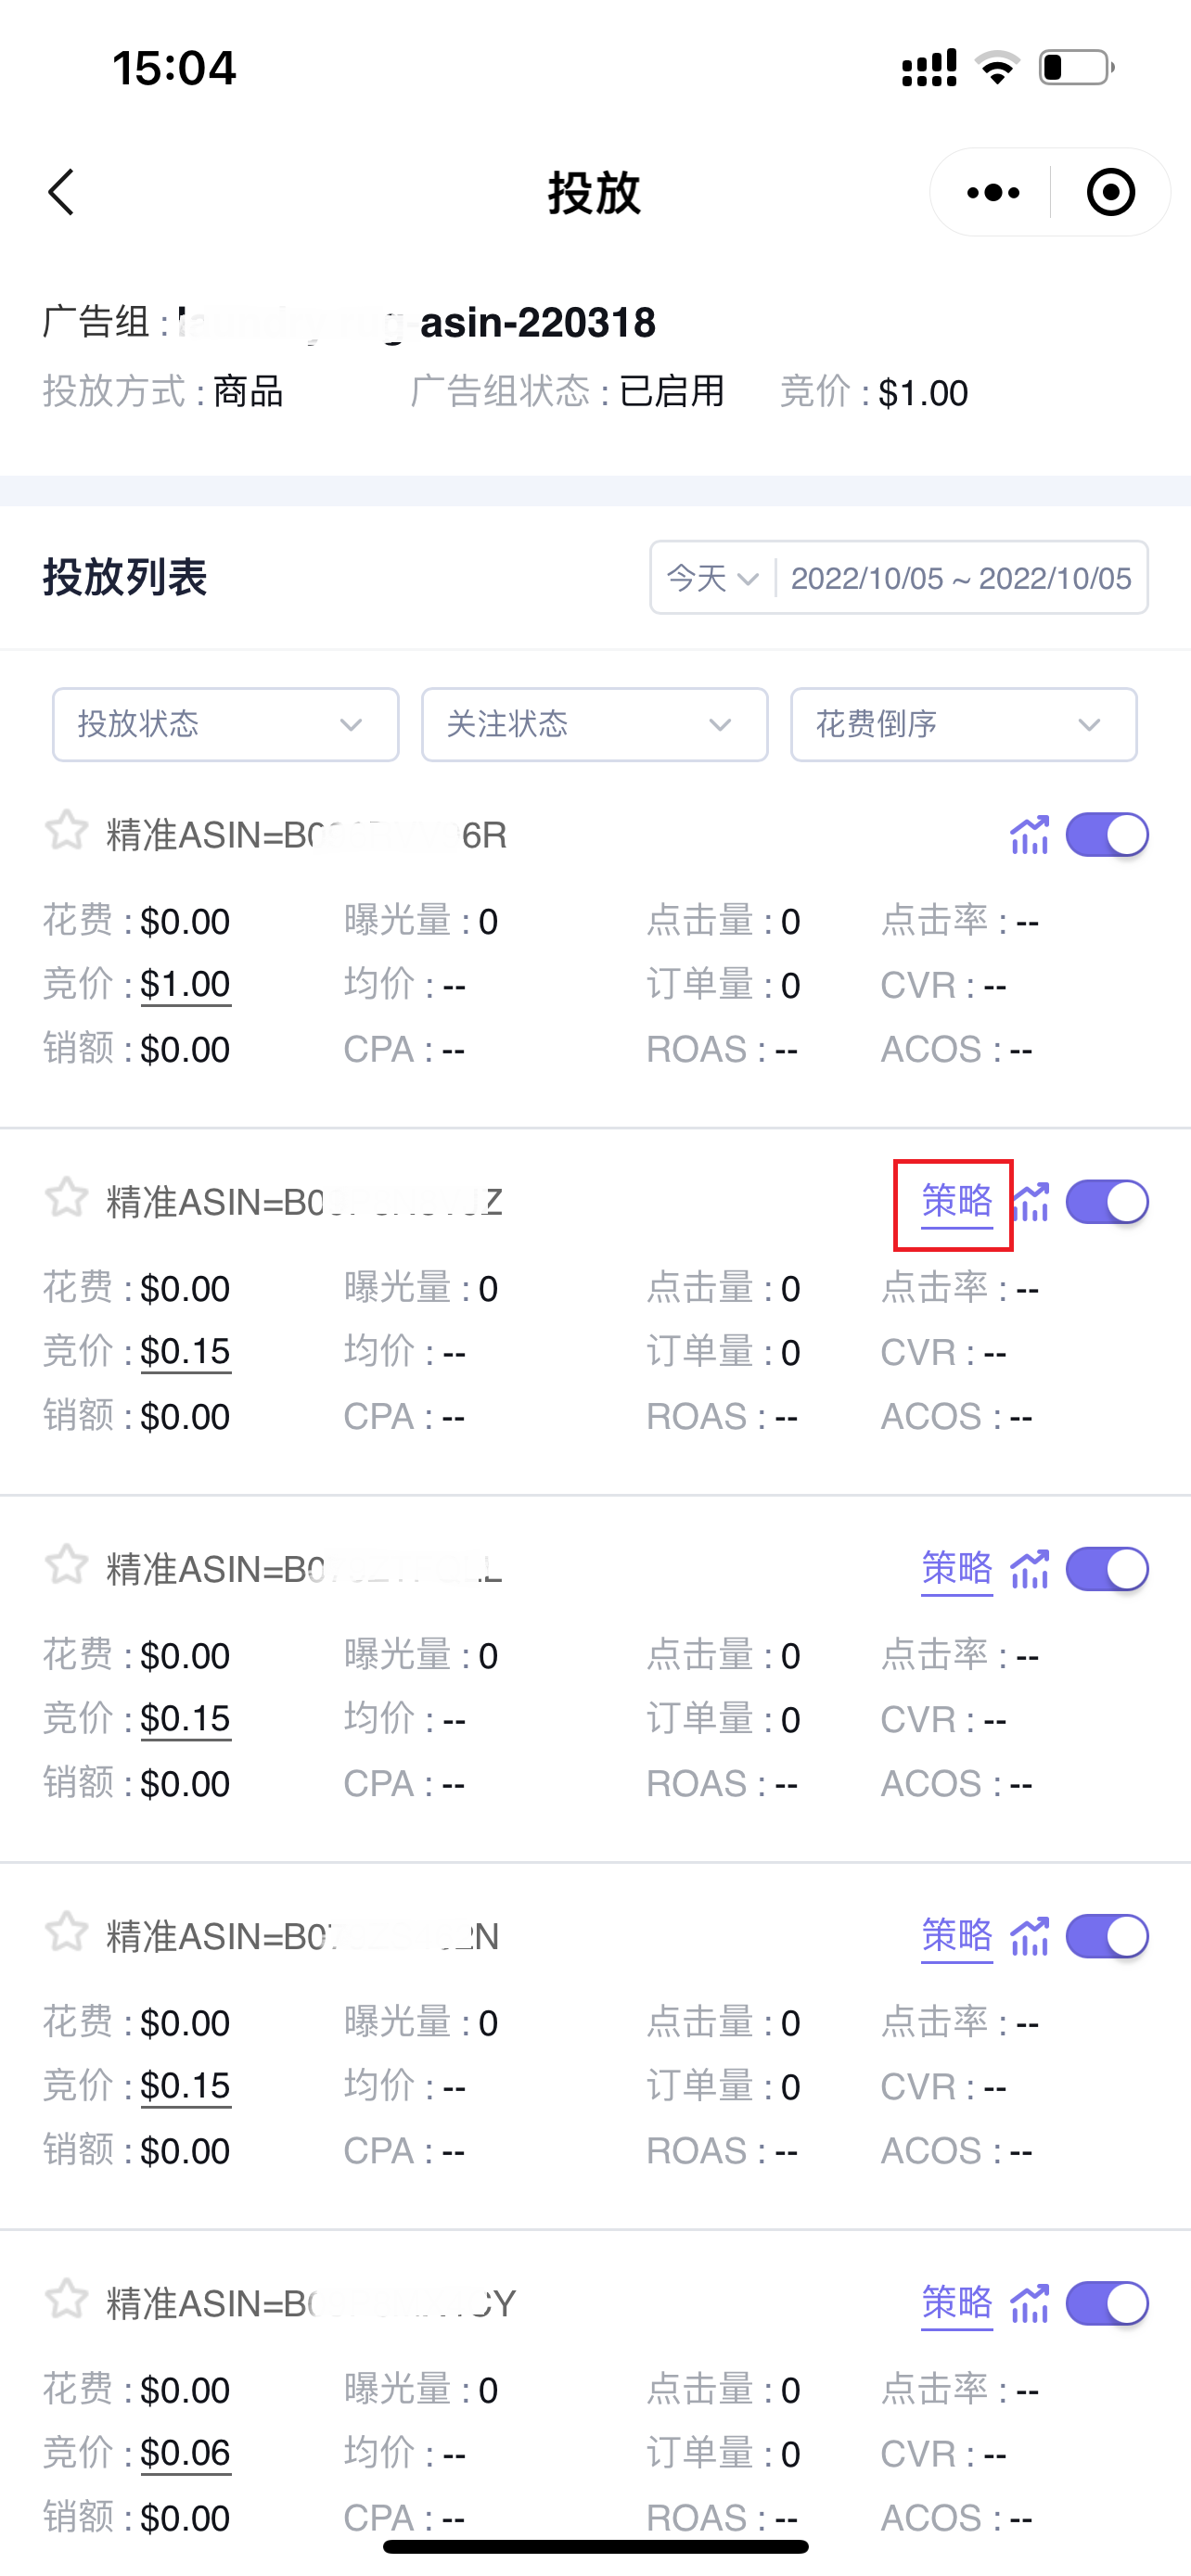
Return to the “Targeting List” page,
If a scheduled strategy is applied to non-keyword targeting, click 【Strategy】 to enter and view the details of the scheduled strategy,
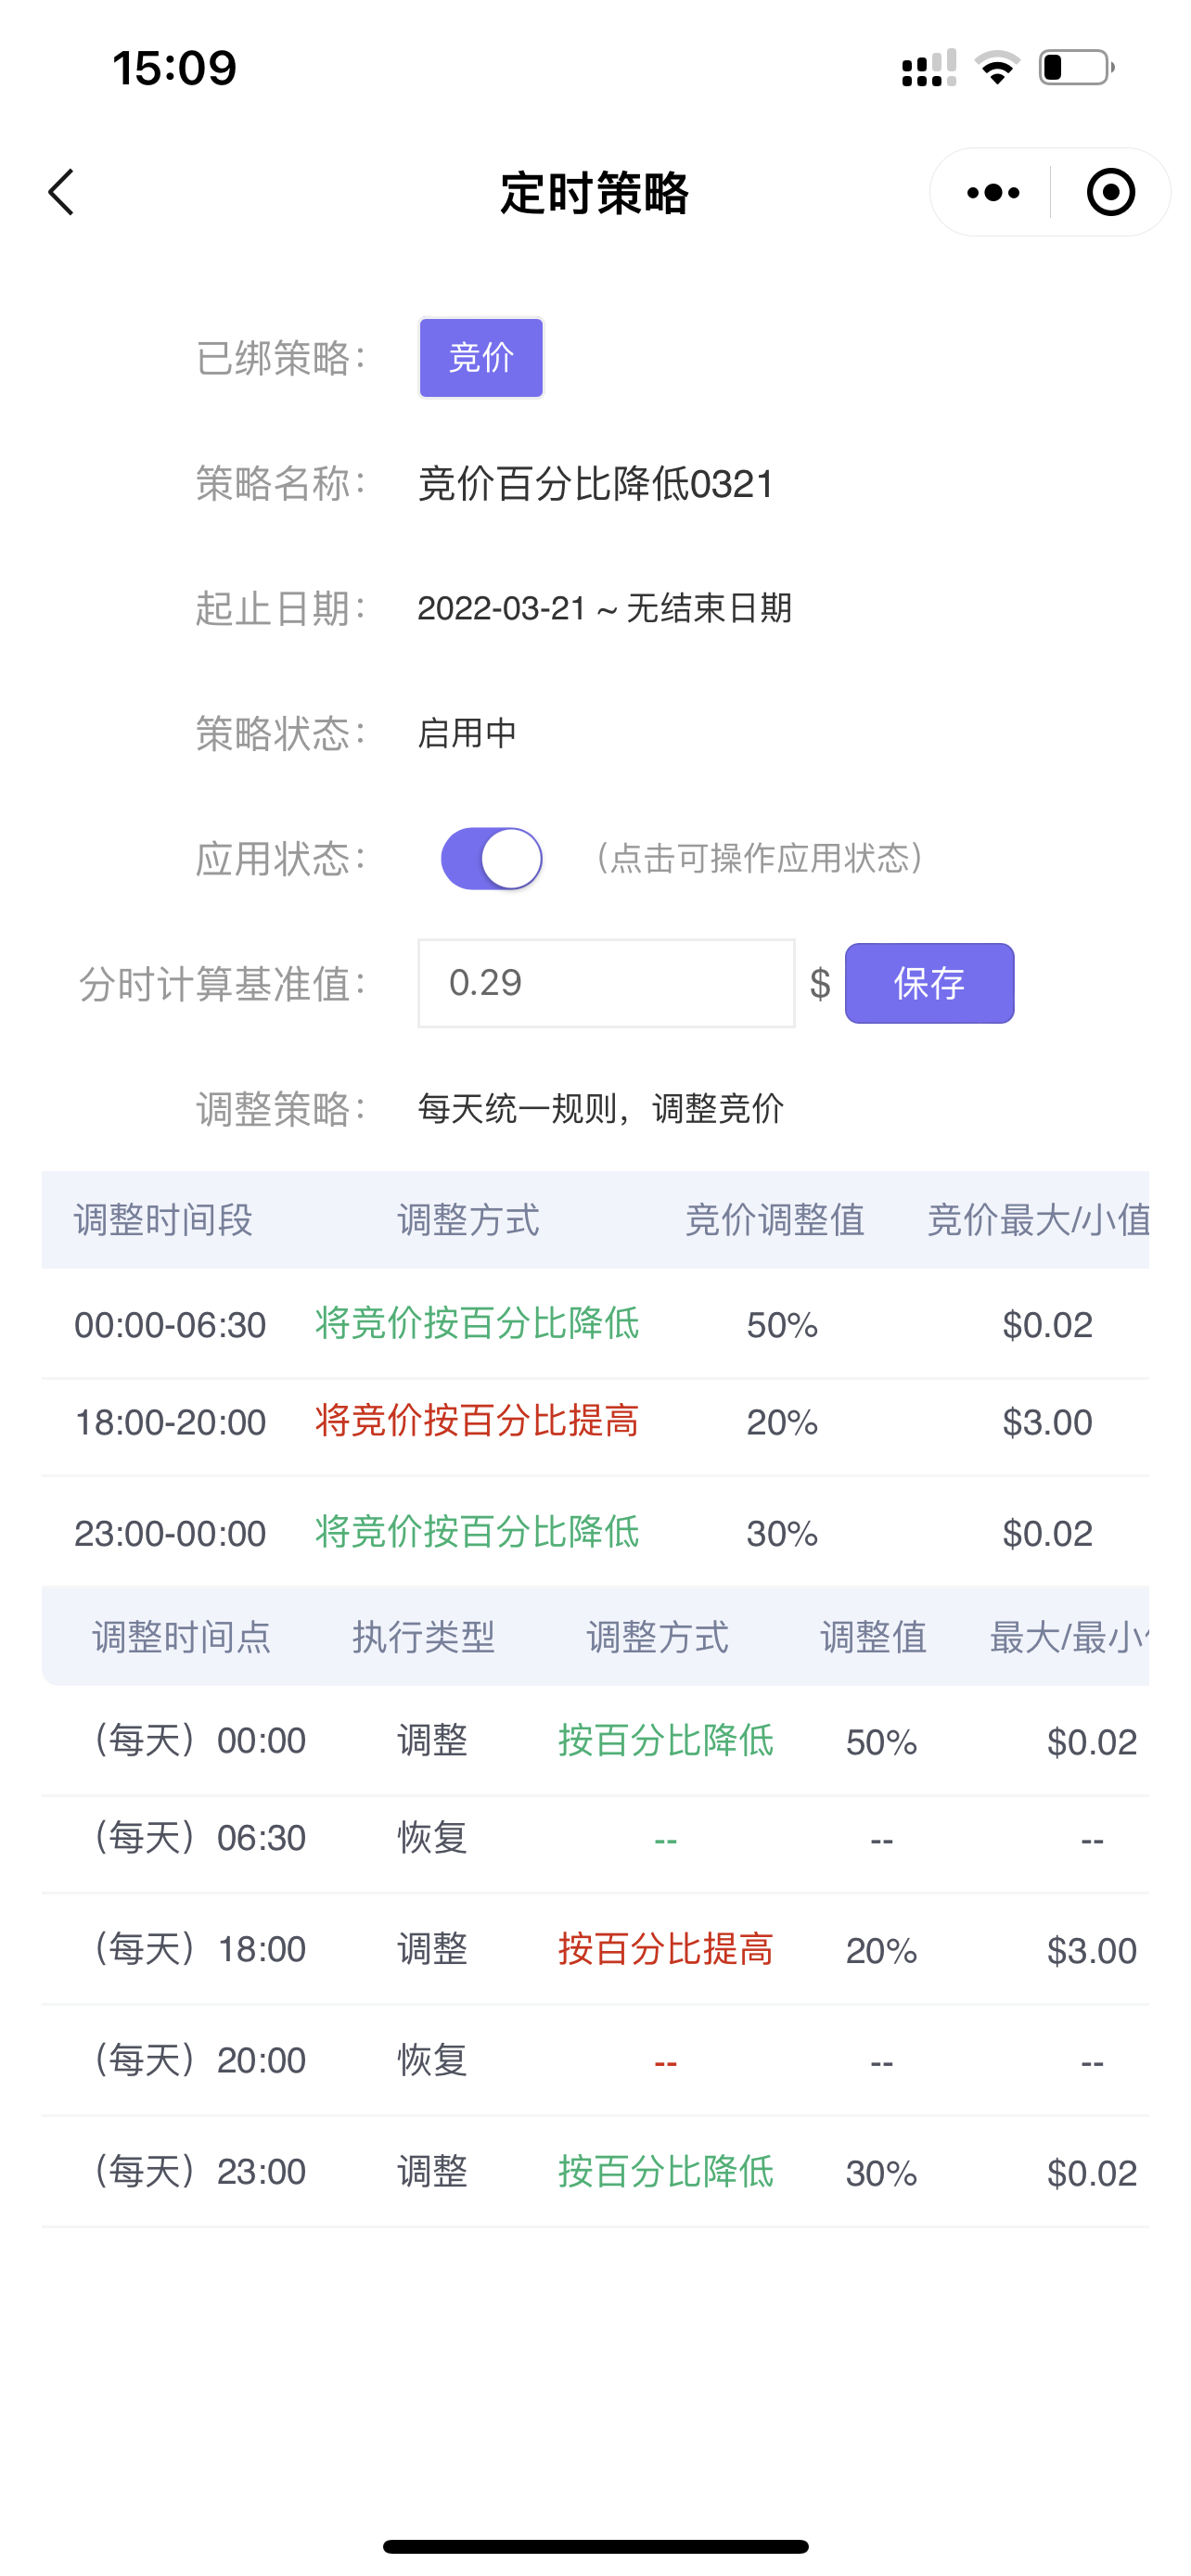
Enter the “Scheduled Strategy” page,
You can view the strategy adjustment rules, execution plan, etc., and support adjusting the application status and modifying the hourly calculation baseline value.
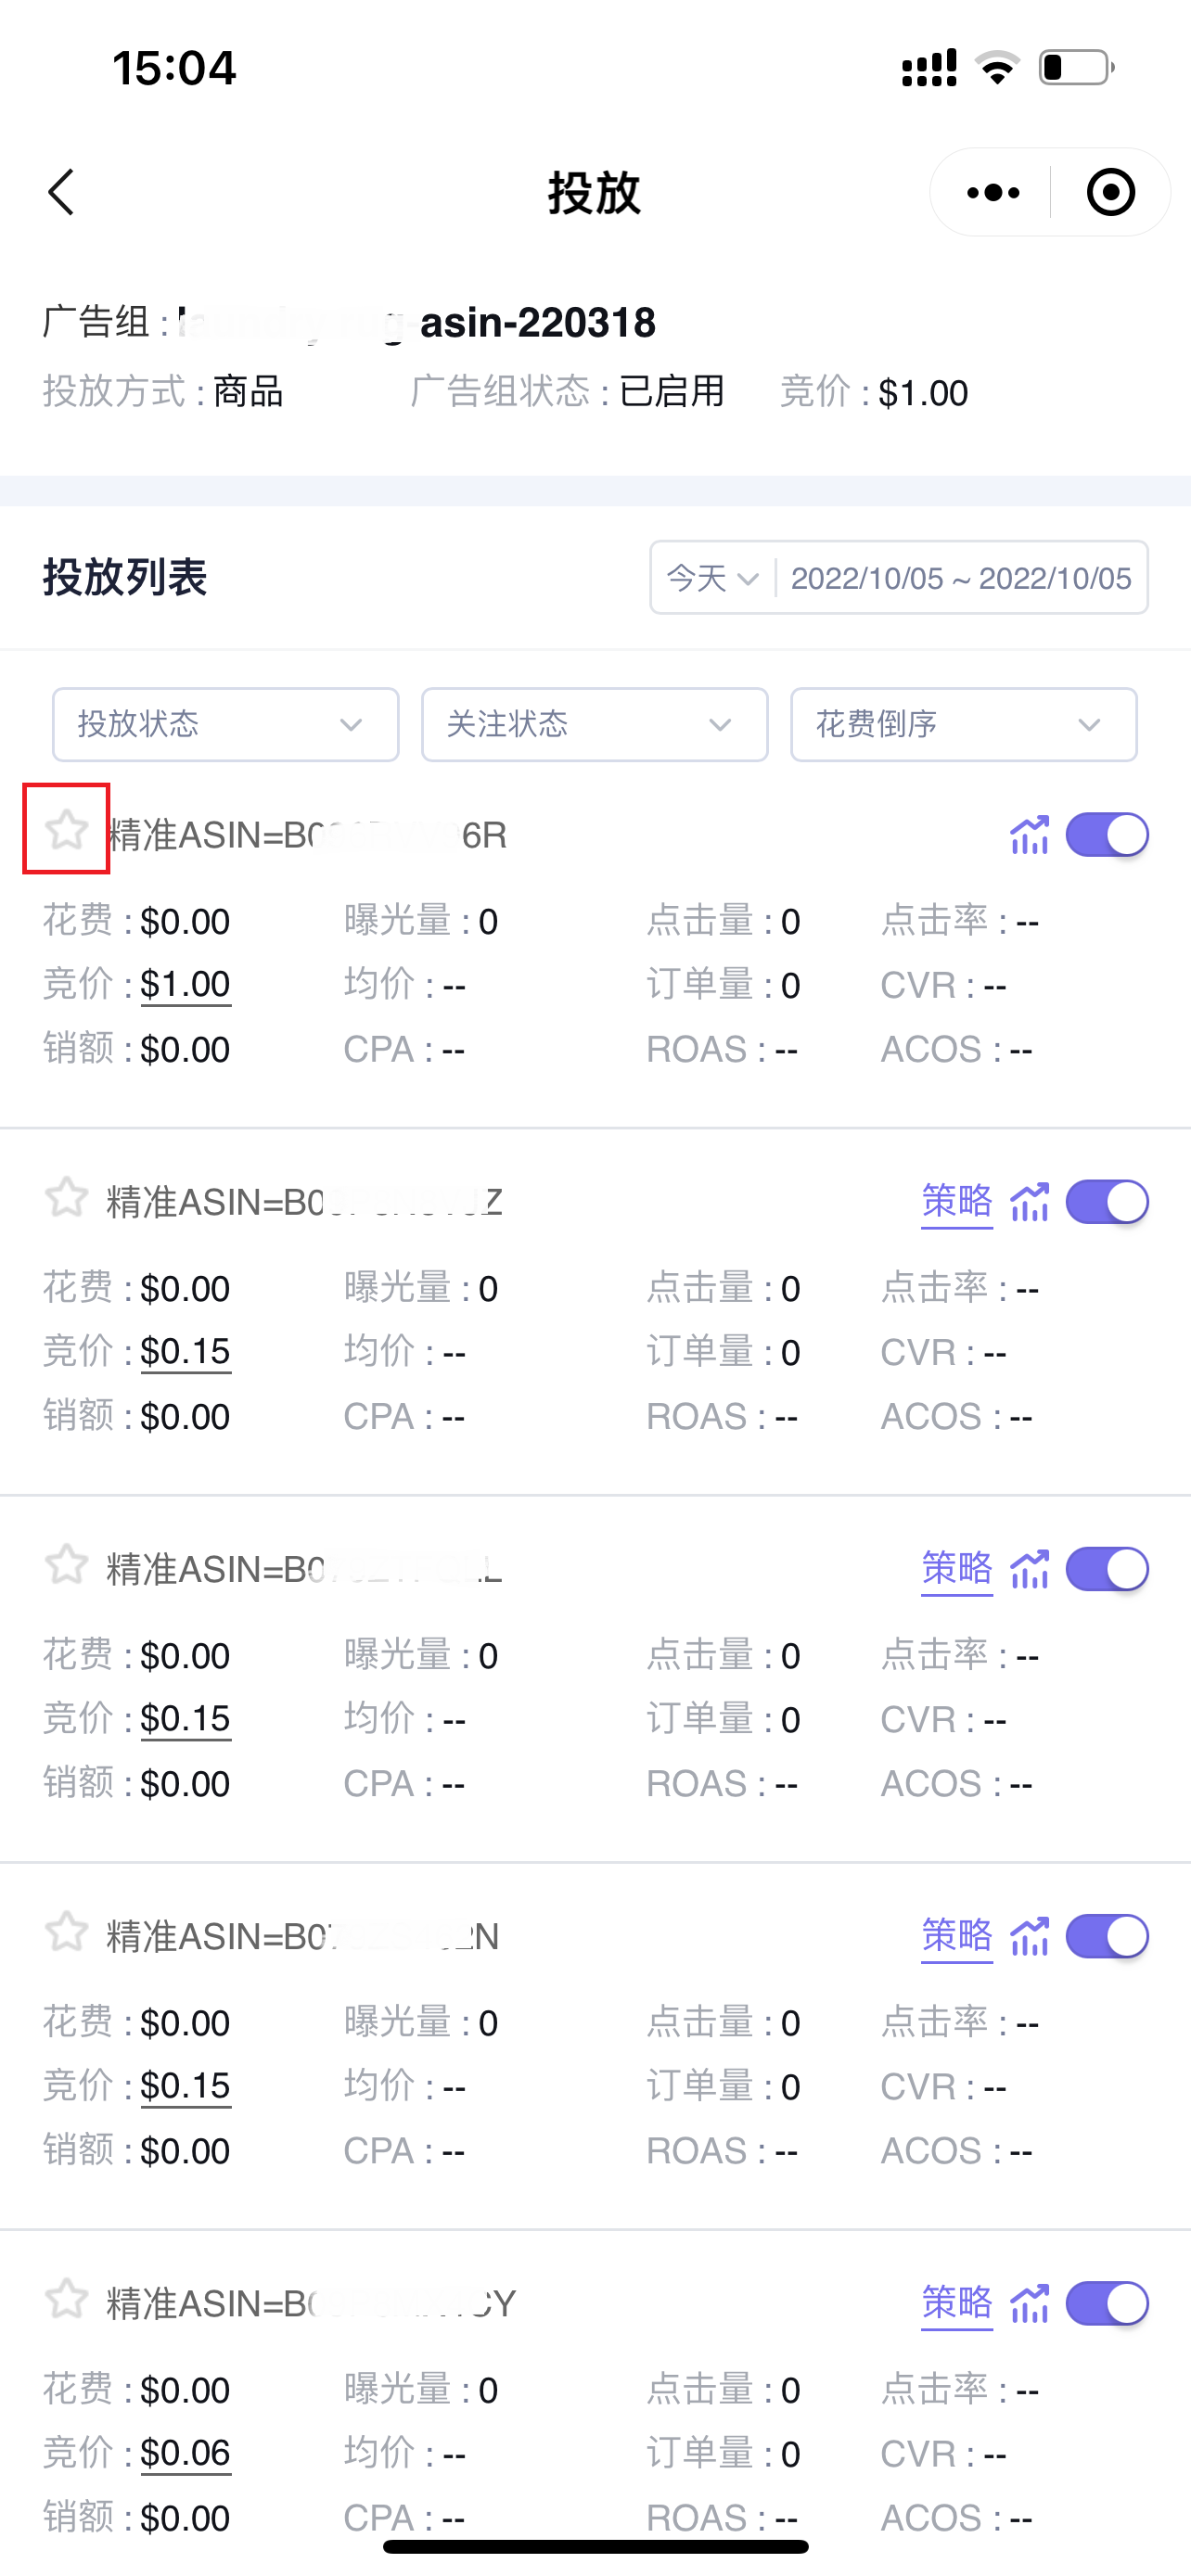
1.5 Adding to Watchlist(Advertising data across all dimensions can be added to the watchlist)
Click the “☆” symbol before the non-keyword targeting to add to the watchlist. After adding to the watchlist, the targeting data will be ranked at the top by default.
2. Adjusting Non-Keyword Targeting
You can directly adjust the targeting enable/pause status of keywords and modify bids.
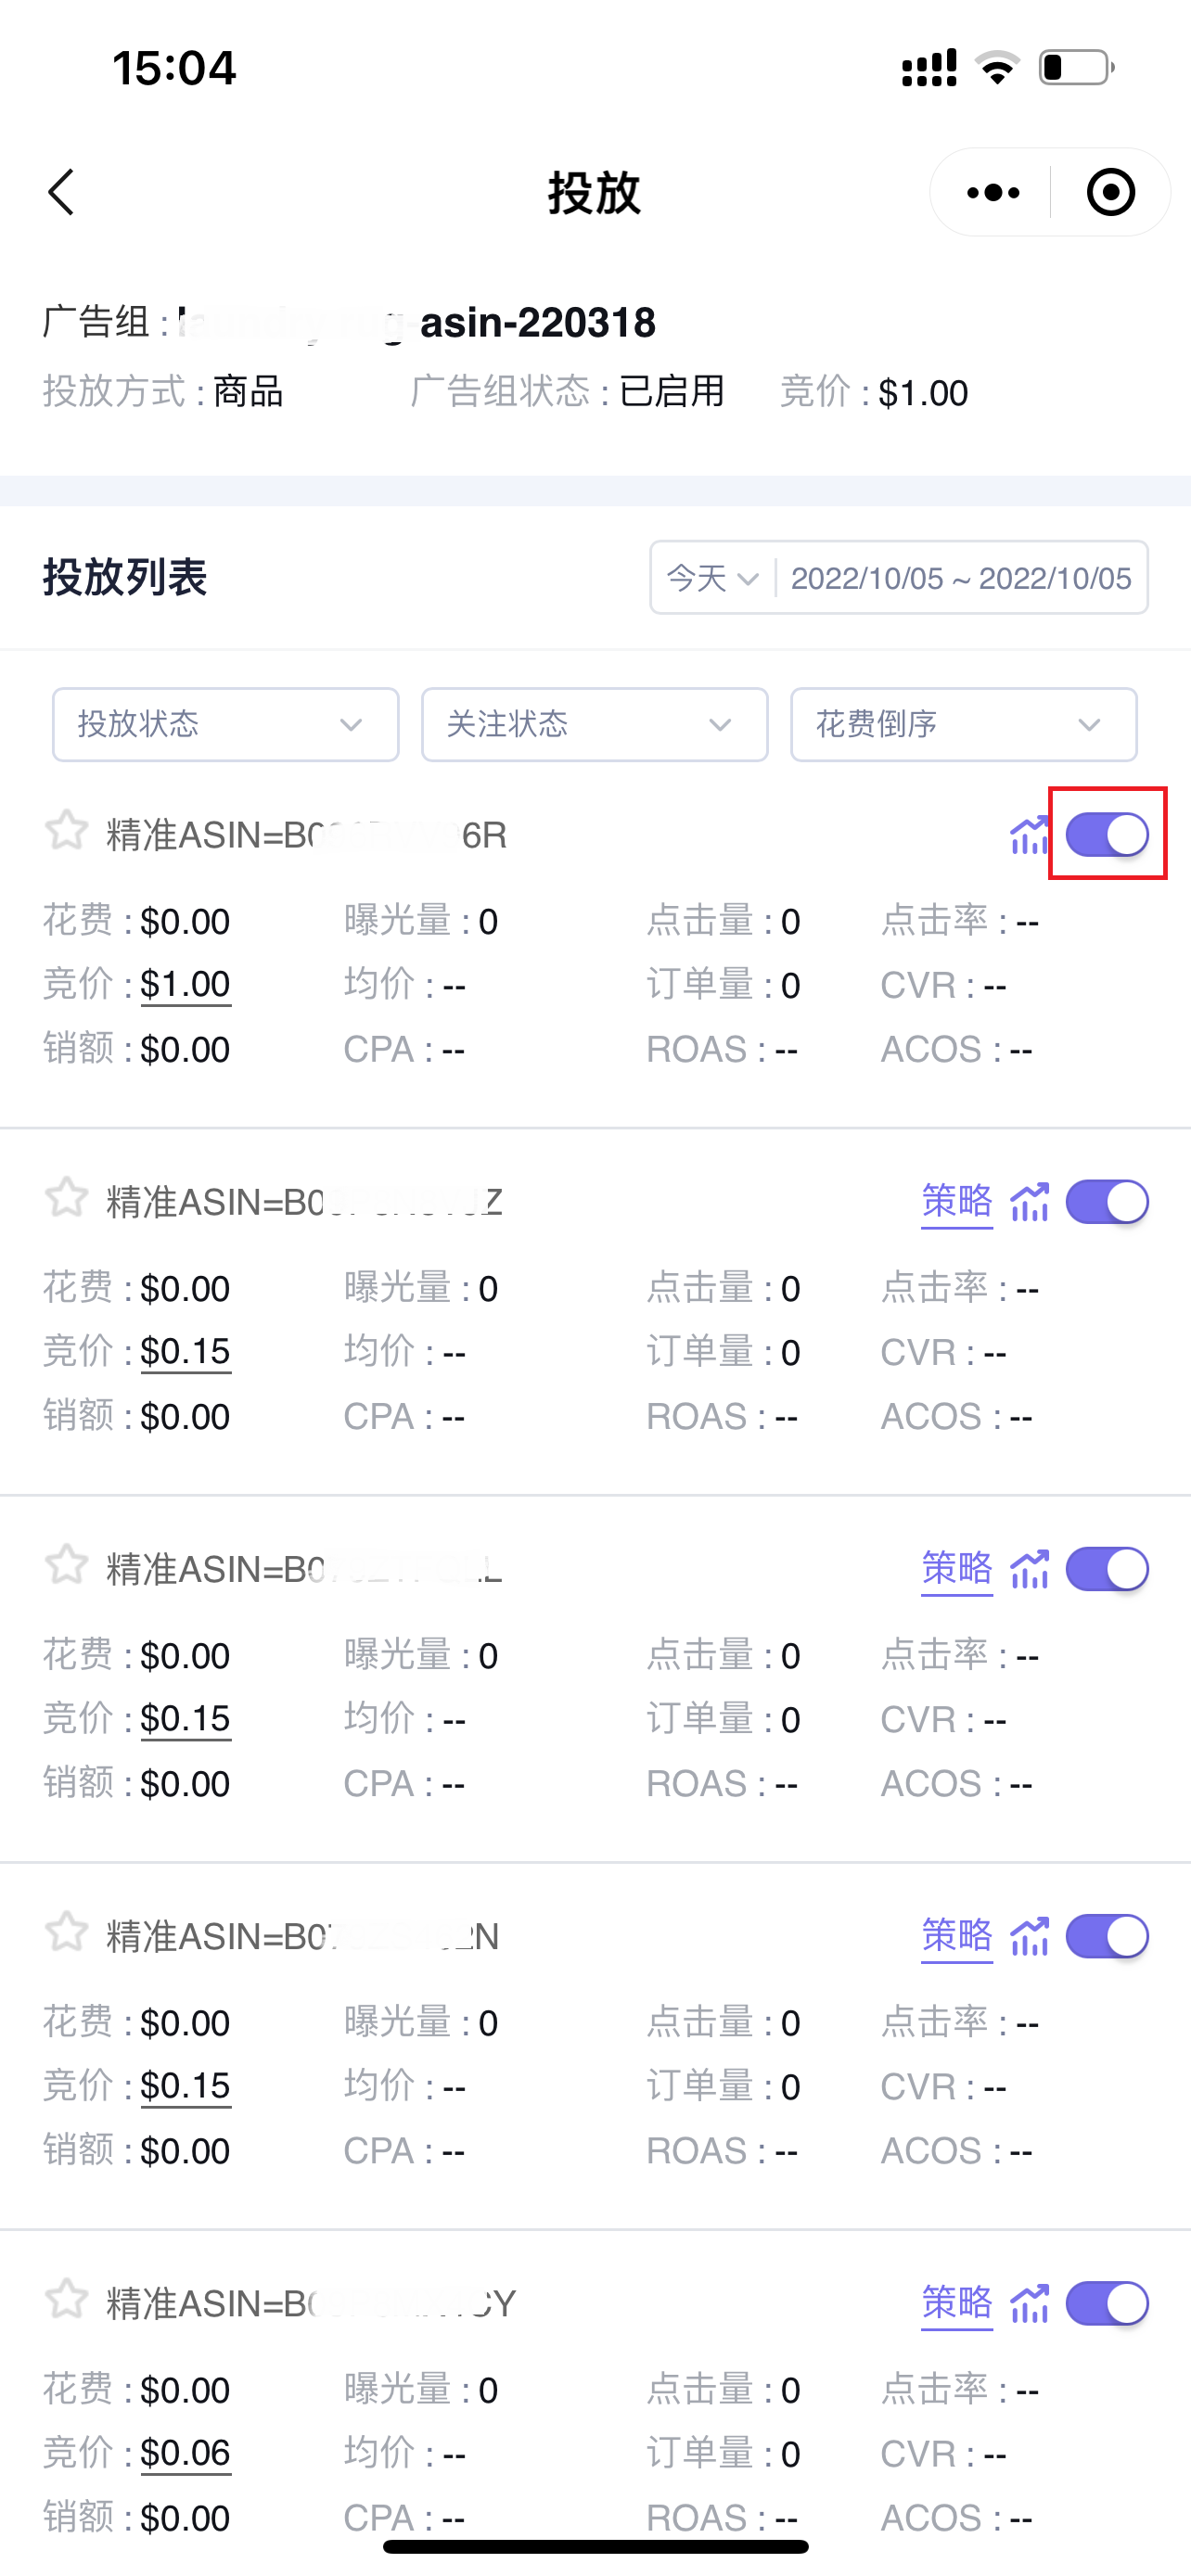
2.1 Adjusting Enable/Pause Status
Click the enable/pause button on the right side of the keyword to individually enable or pause the keyword targeting.
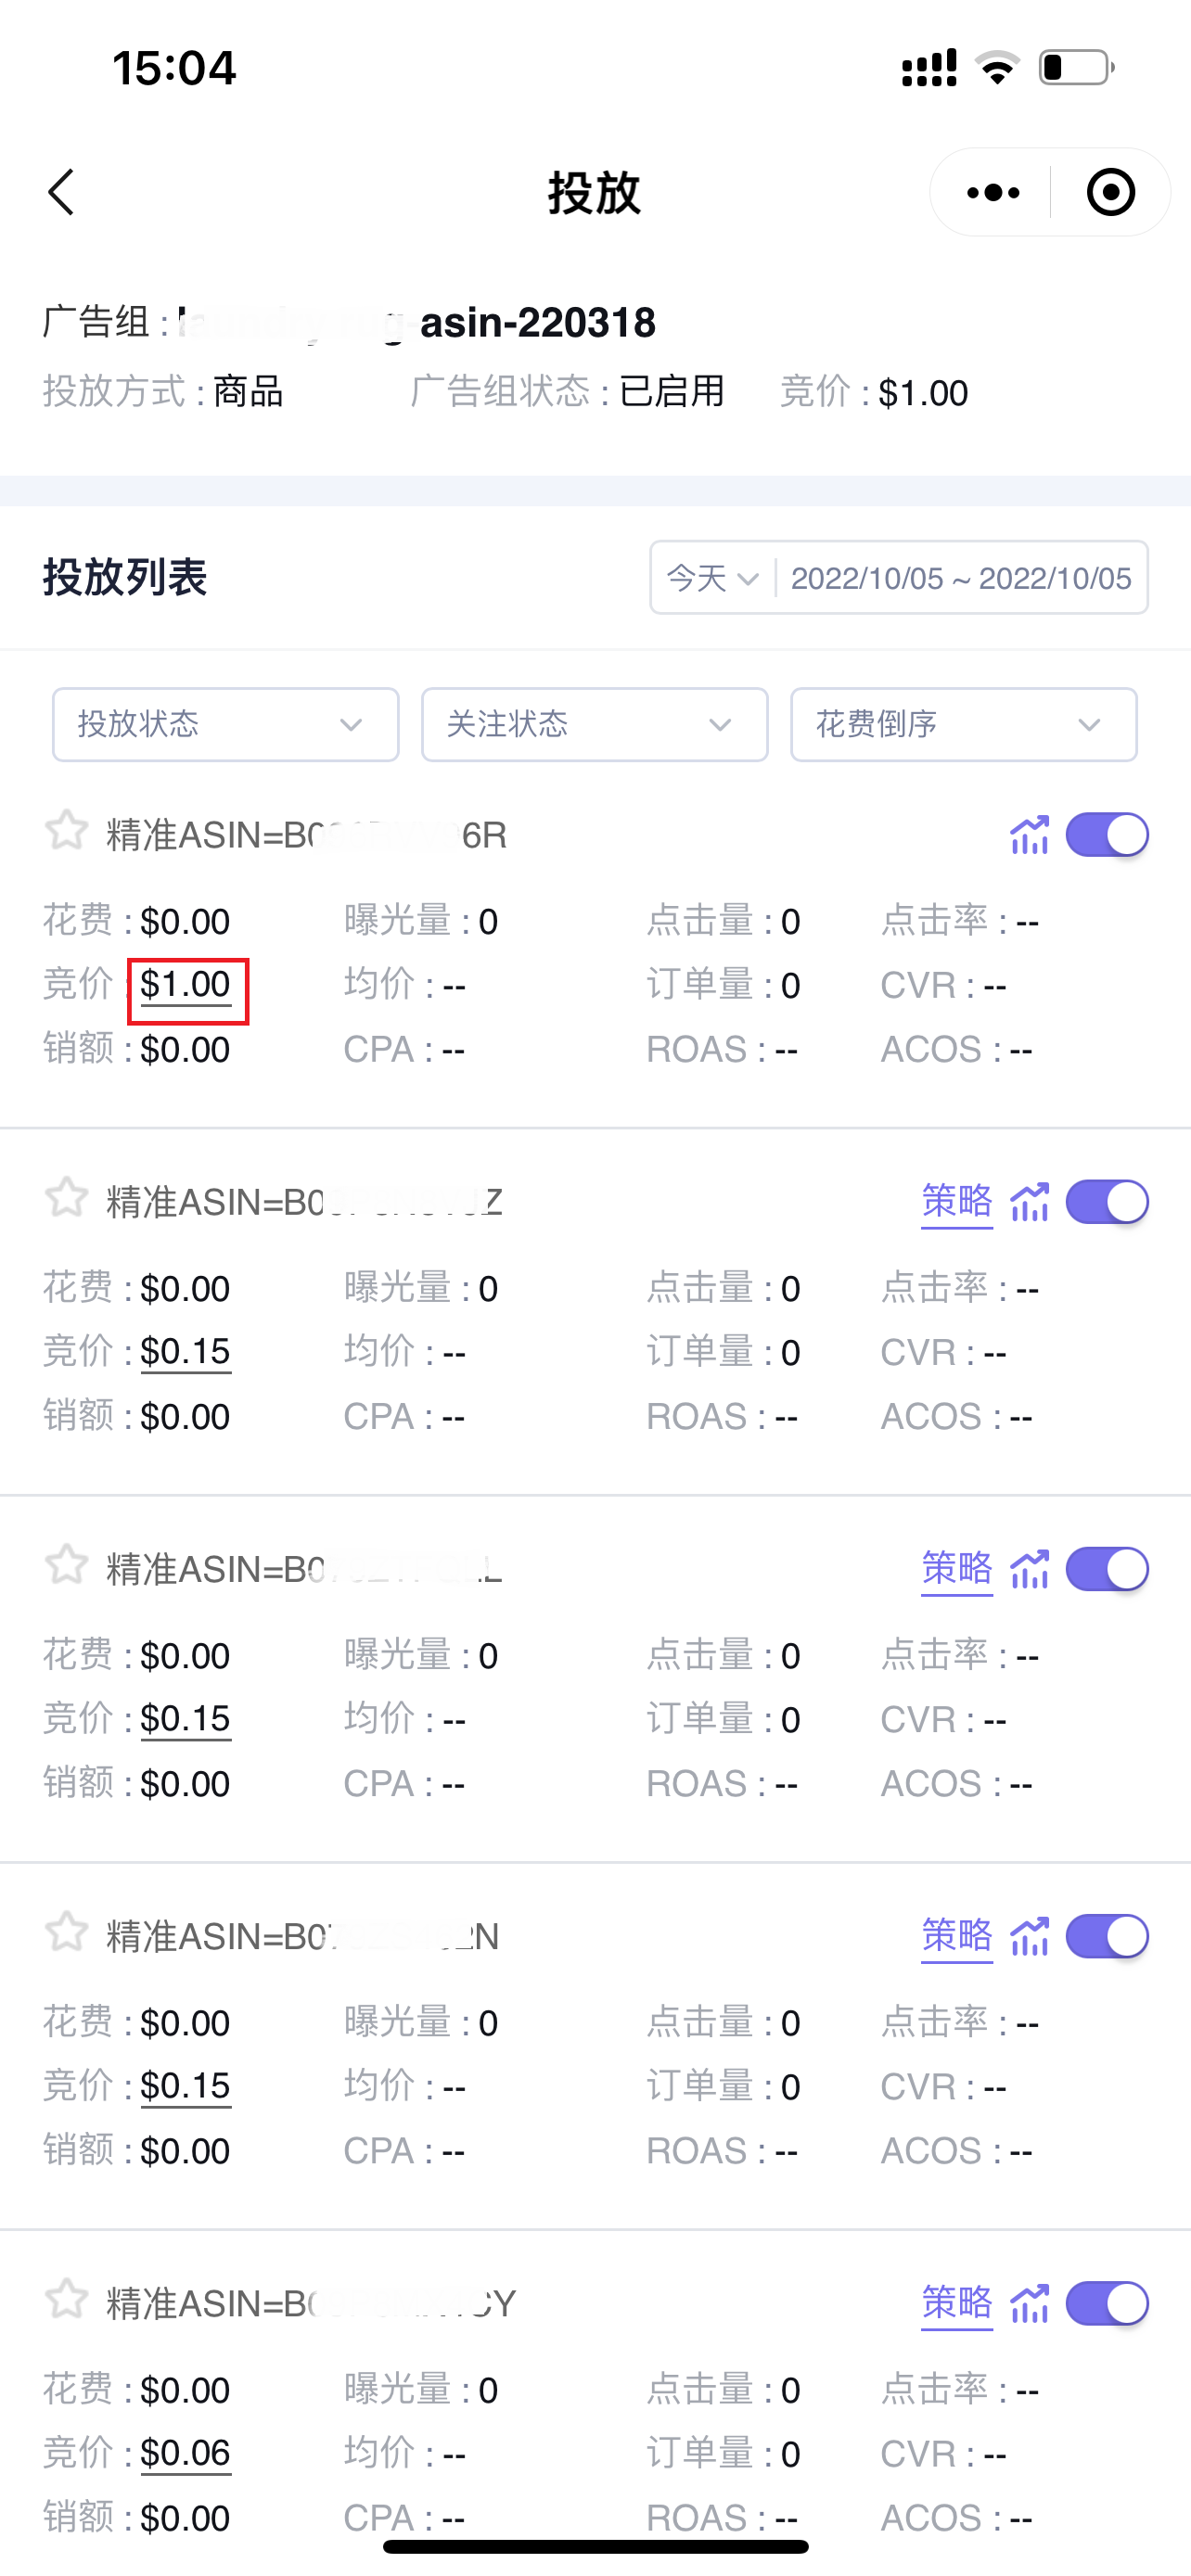
2.2 Modifying Bid
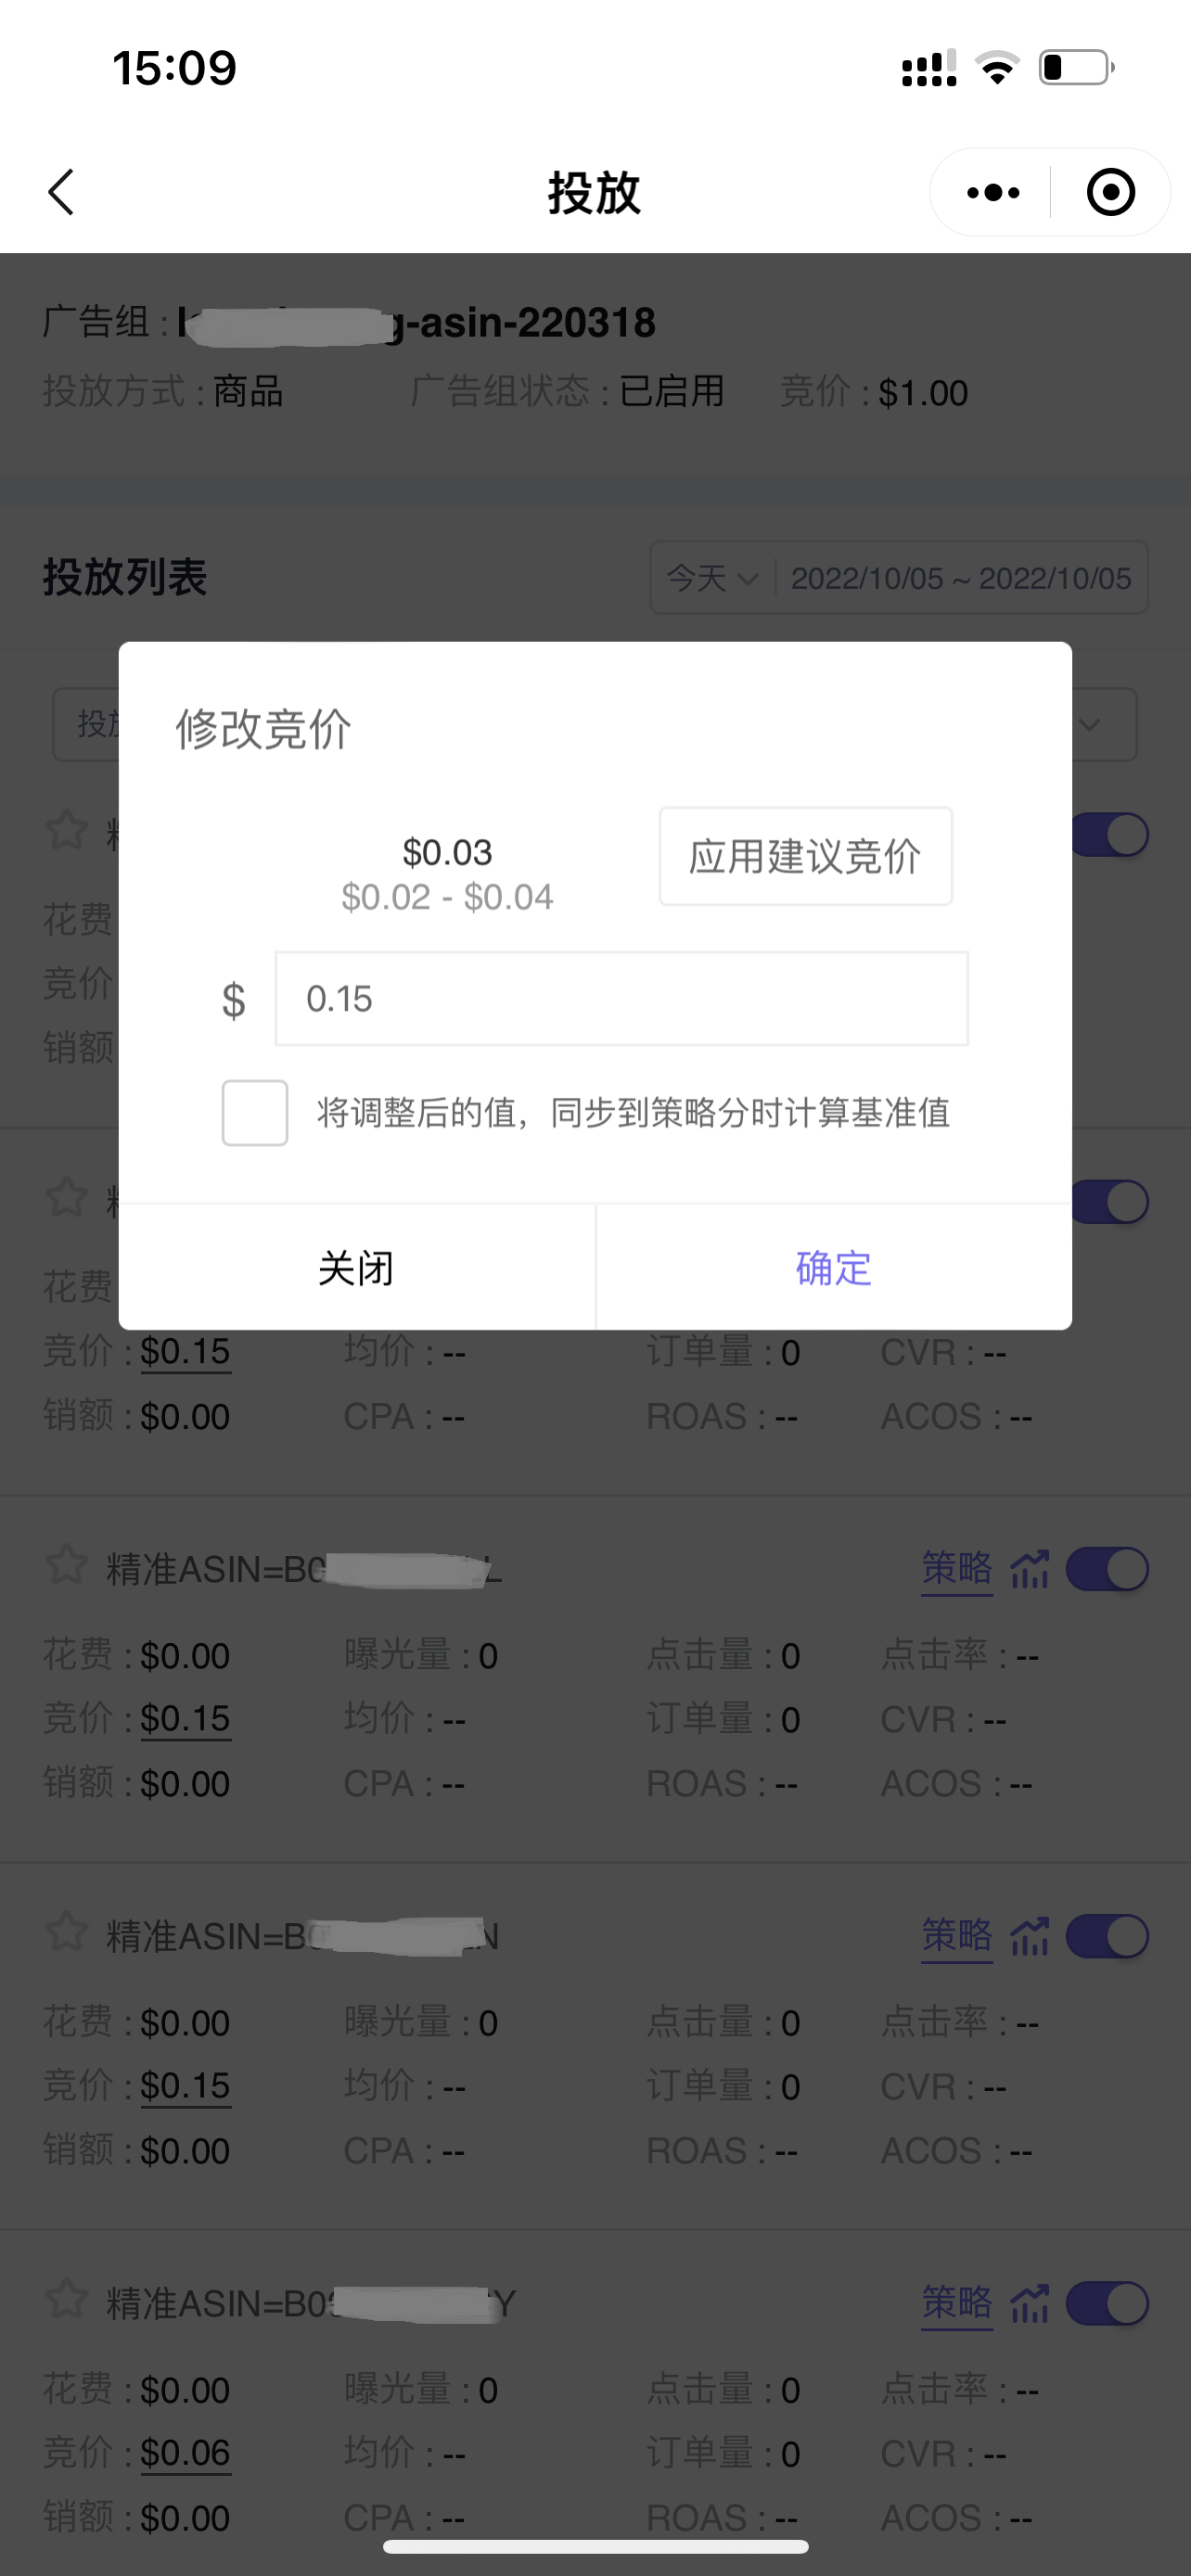
Click the bid amount of the keyword to modify the bid of the keyword;
When modifying, you can refer to the suggested bid to help you better adjust and optimize.
Search Terms
Search terms synchronize ad search term report data. It refers to the actual keywords searched by buyers, including keywords and associated ASINs.
You can directly view your search term report on your mobile phone and analyze whether search terms have already been targeted in ads, and operate to add new targeting and negative targeting.
1. Finding and Analyzing Search Terms
1.1 Viewing Search Terms
Click the 【View Search Terms】 button in the upper right corner of the campaign page to enter and view the ad search term report for the current store.
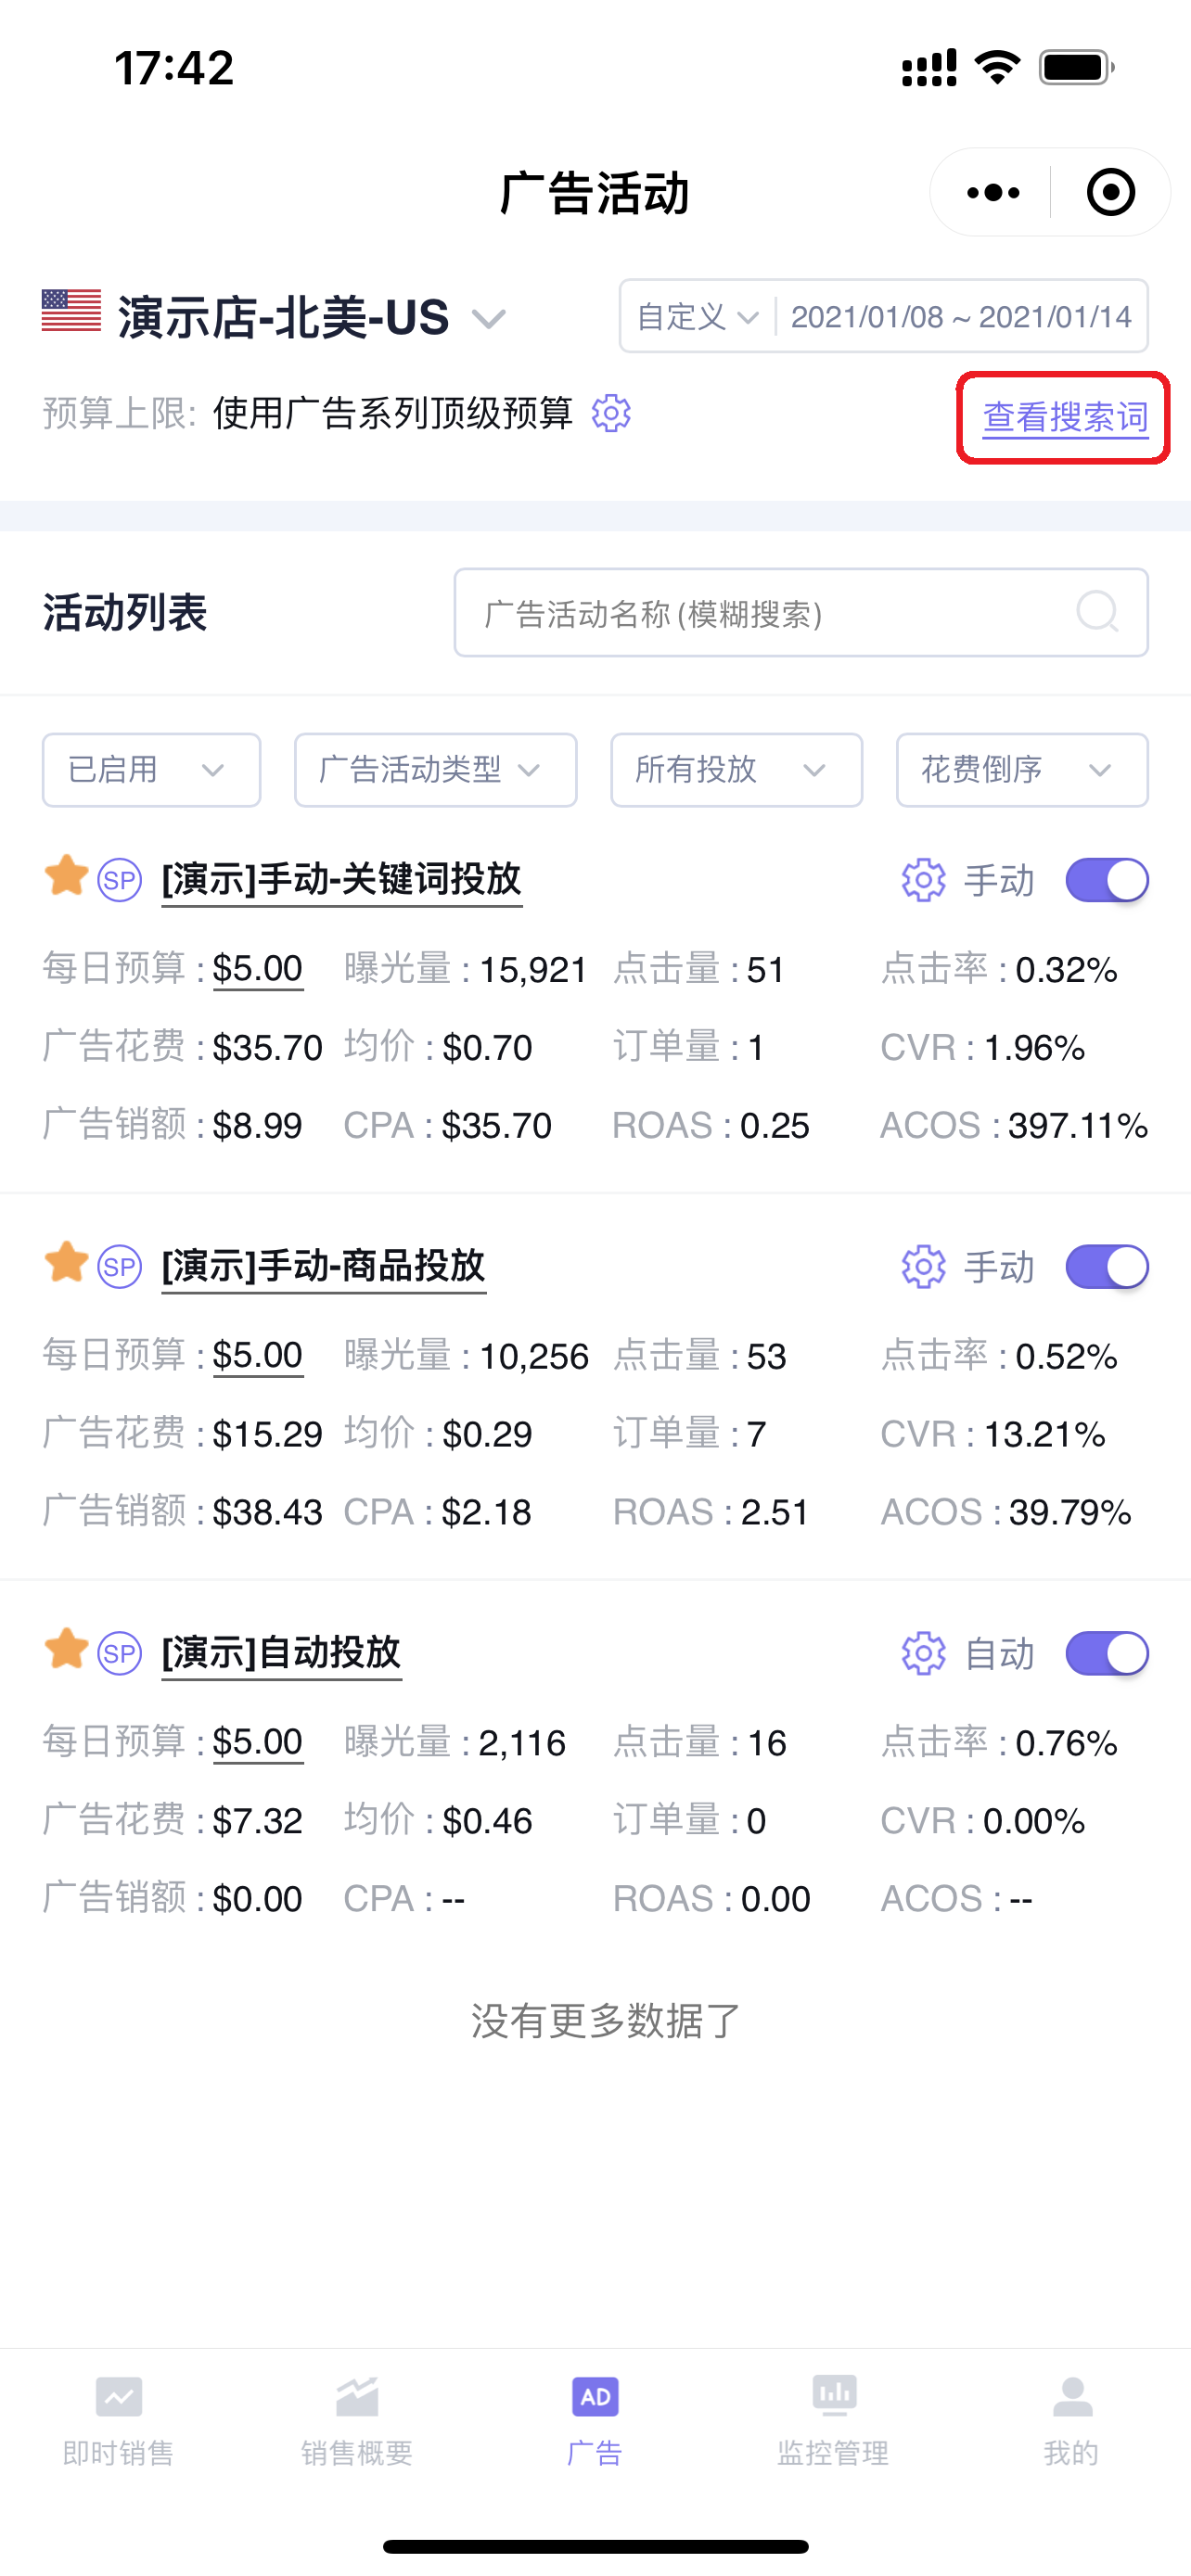
Enter the “Search Term List” page,
The data time range for search terms defaults to today. You can also customize the time range to view data;
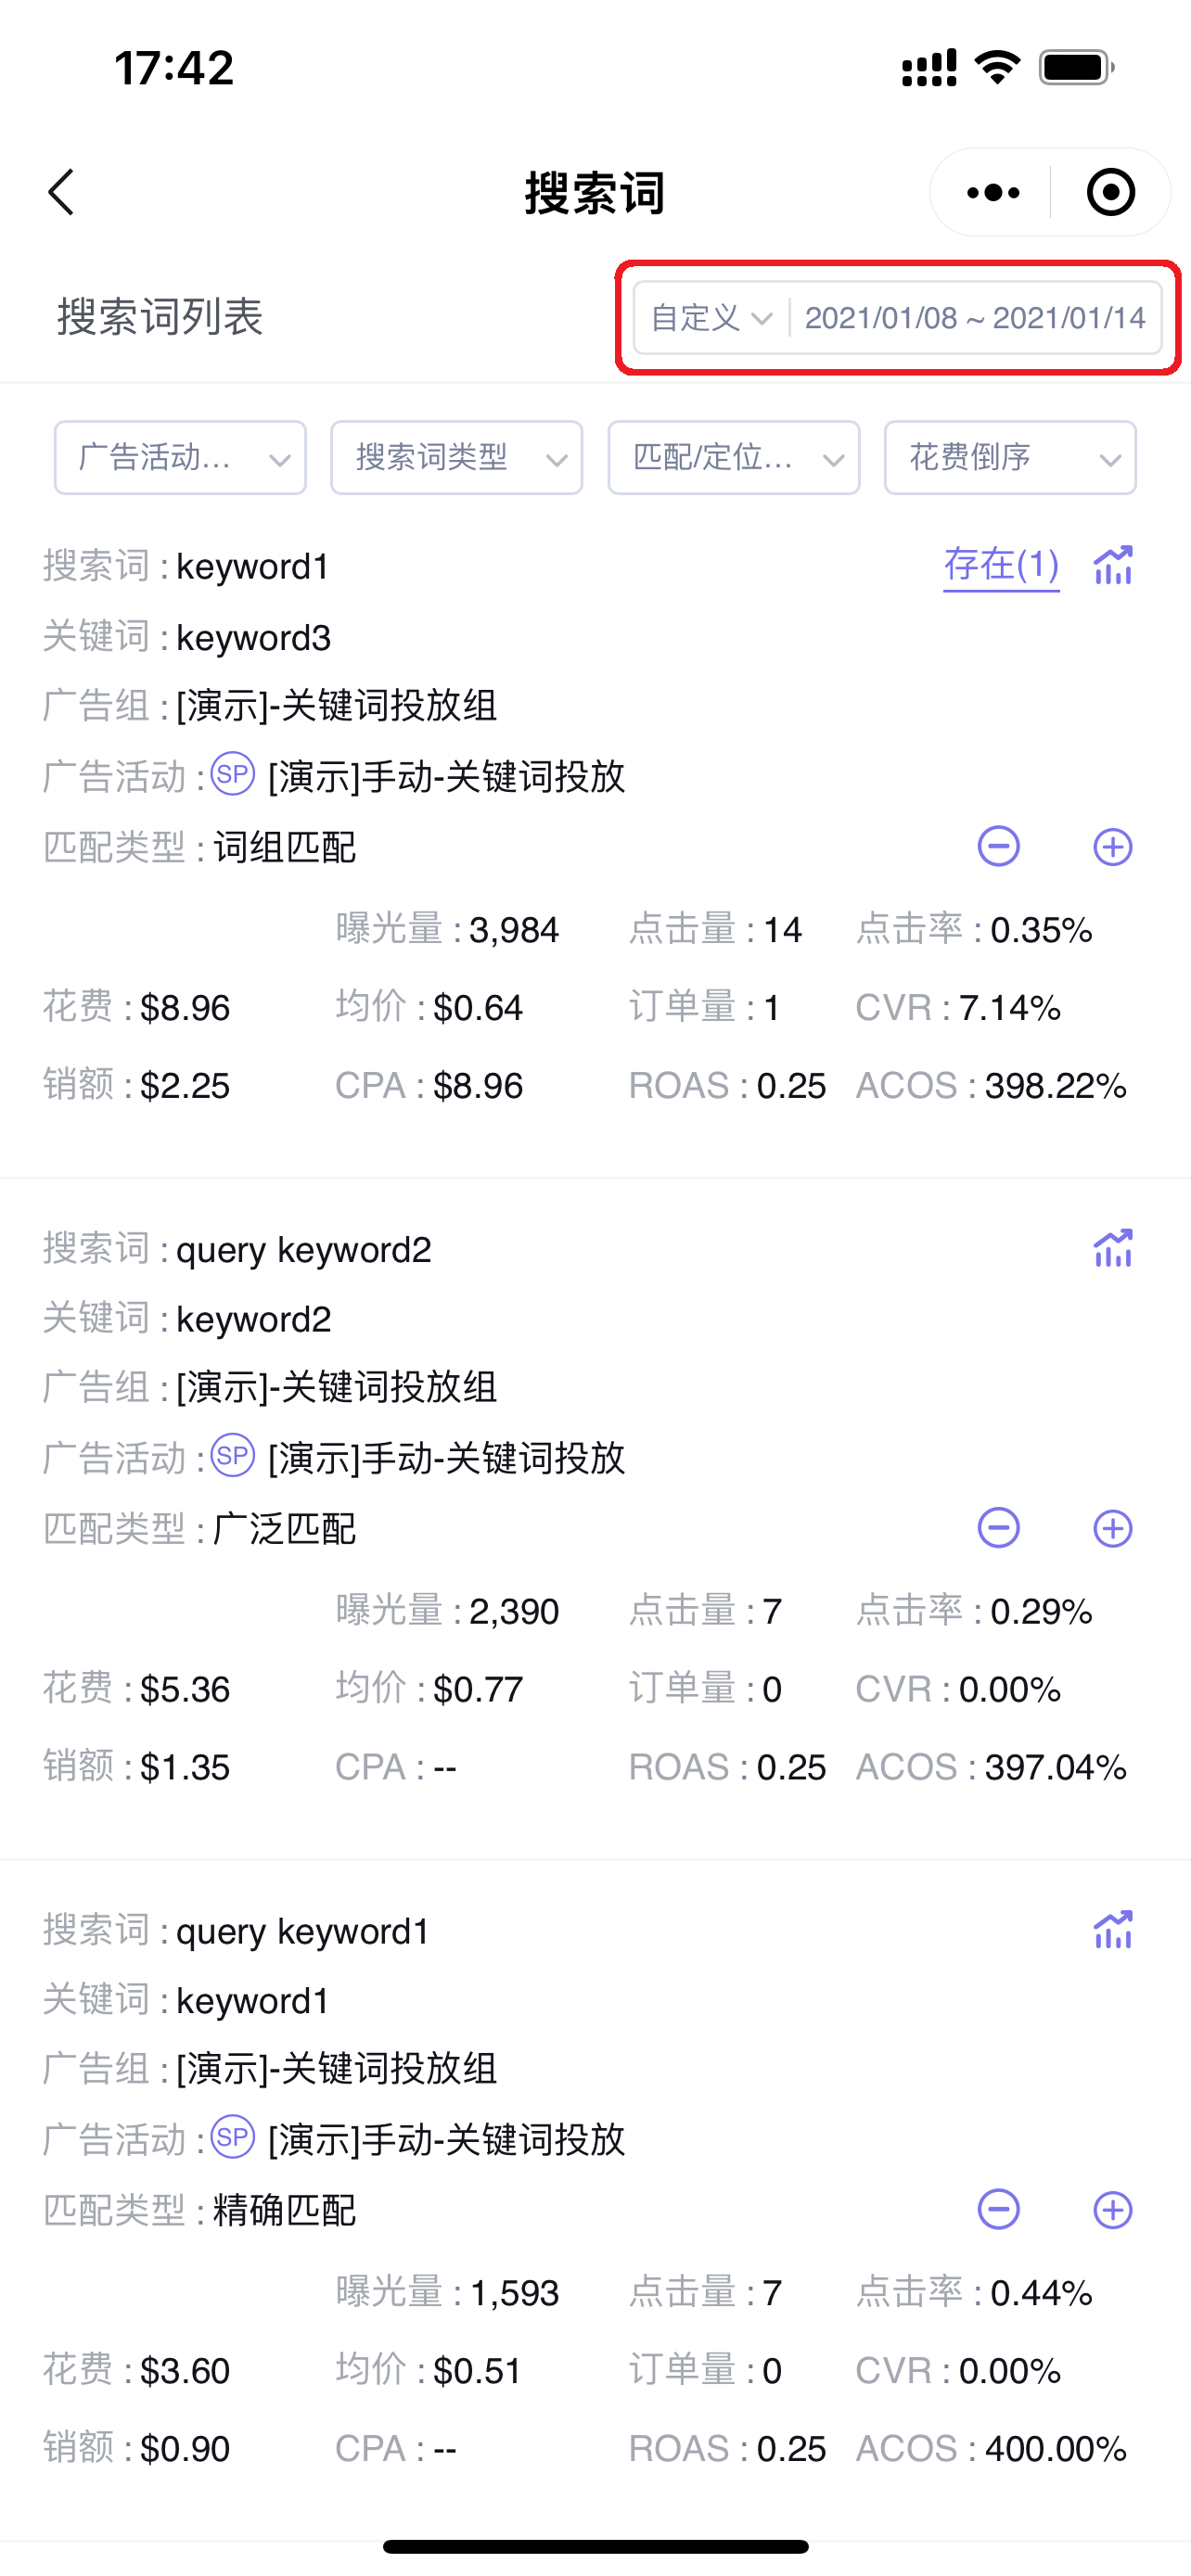
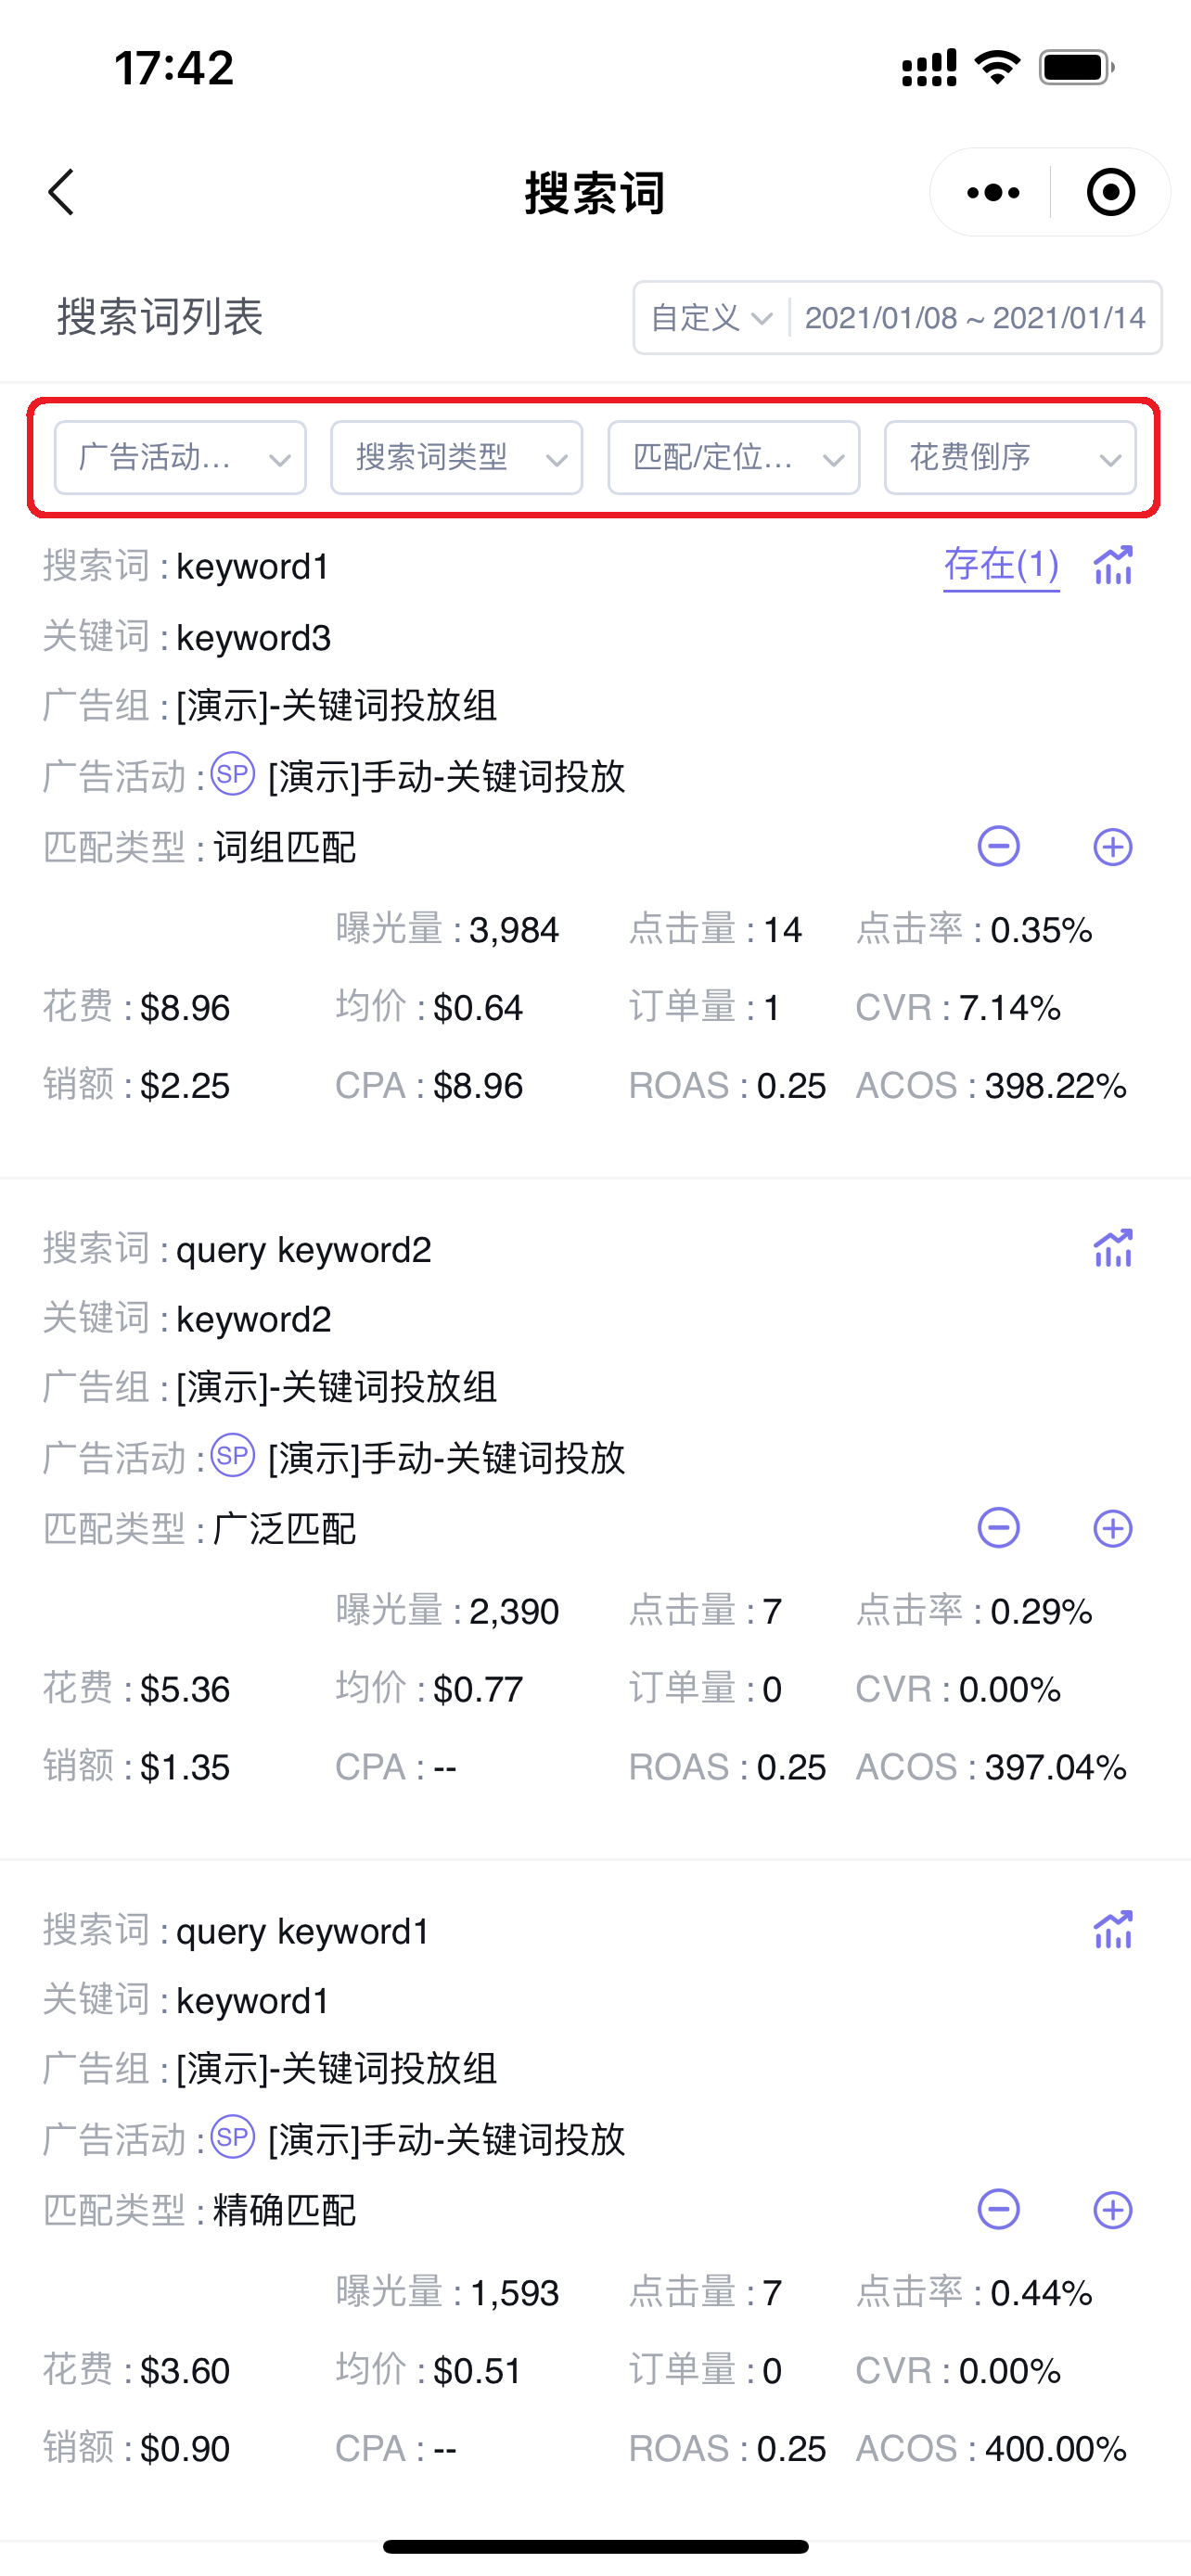
After selecting the time range, you can filter to view search term data for corresponding ad campaigns, including: campaign type, search term type, match targeting type, sort by performance metrics, etc.;
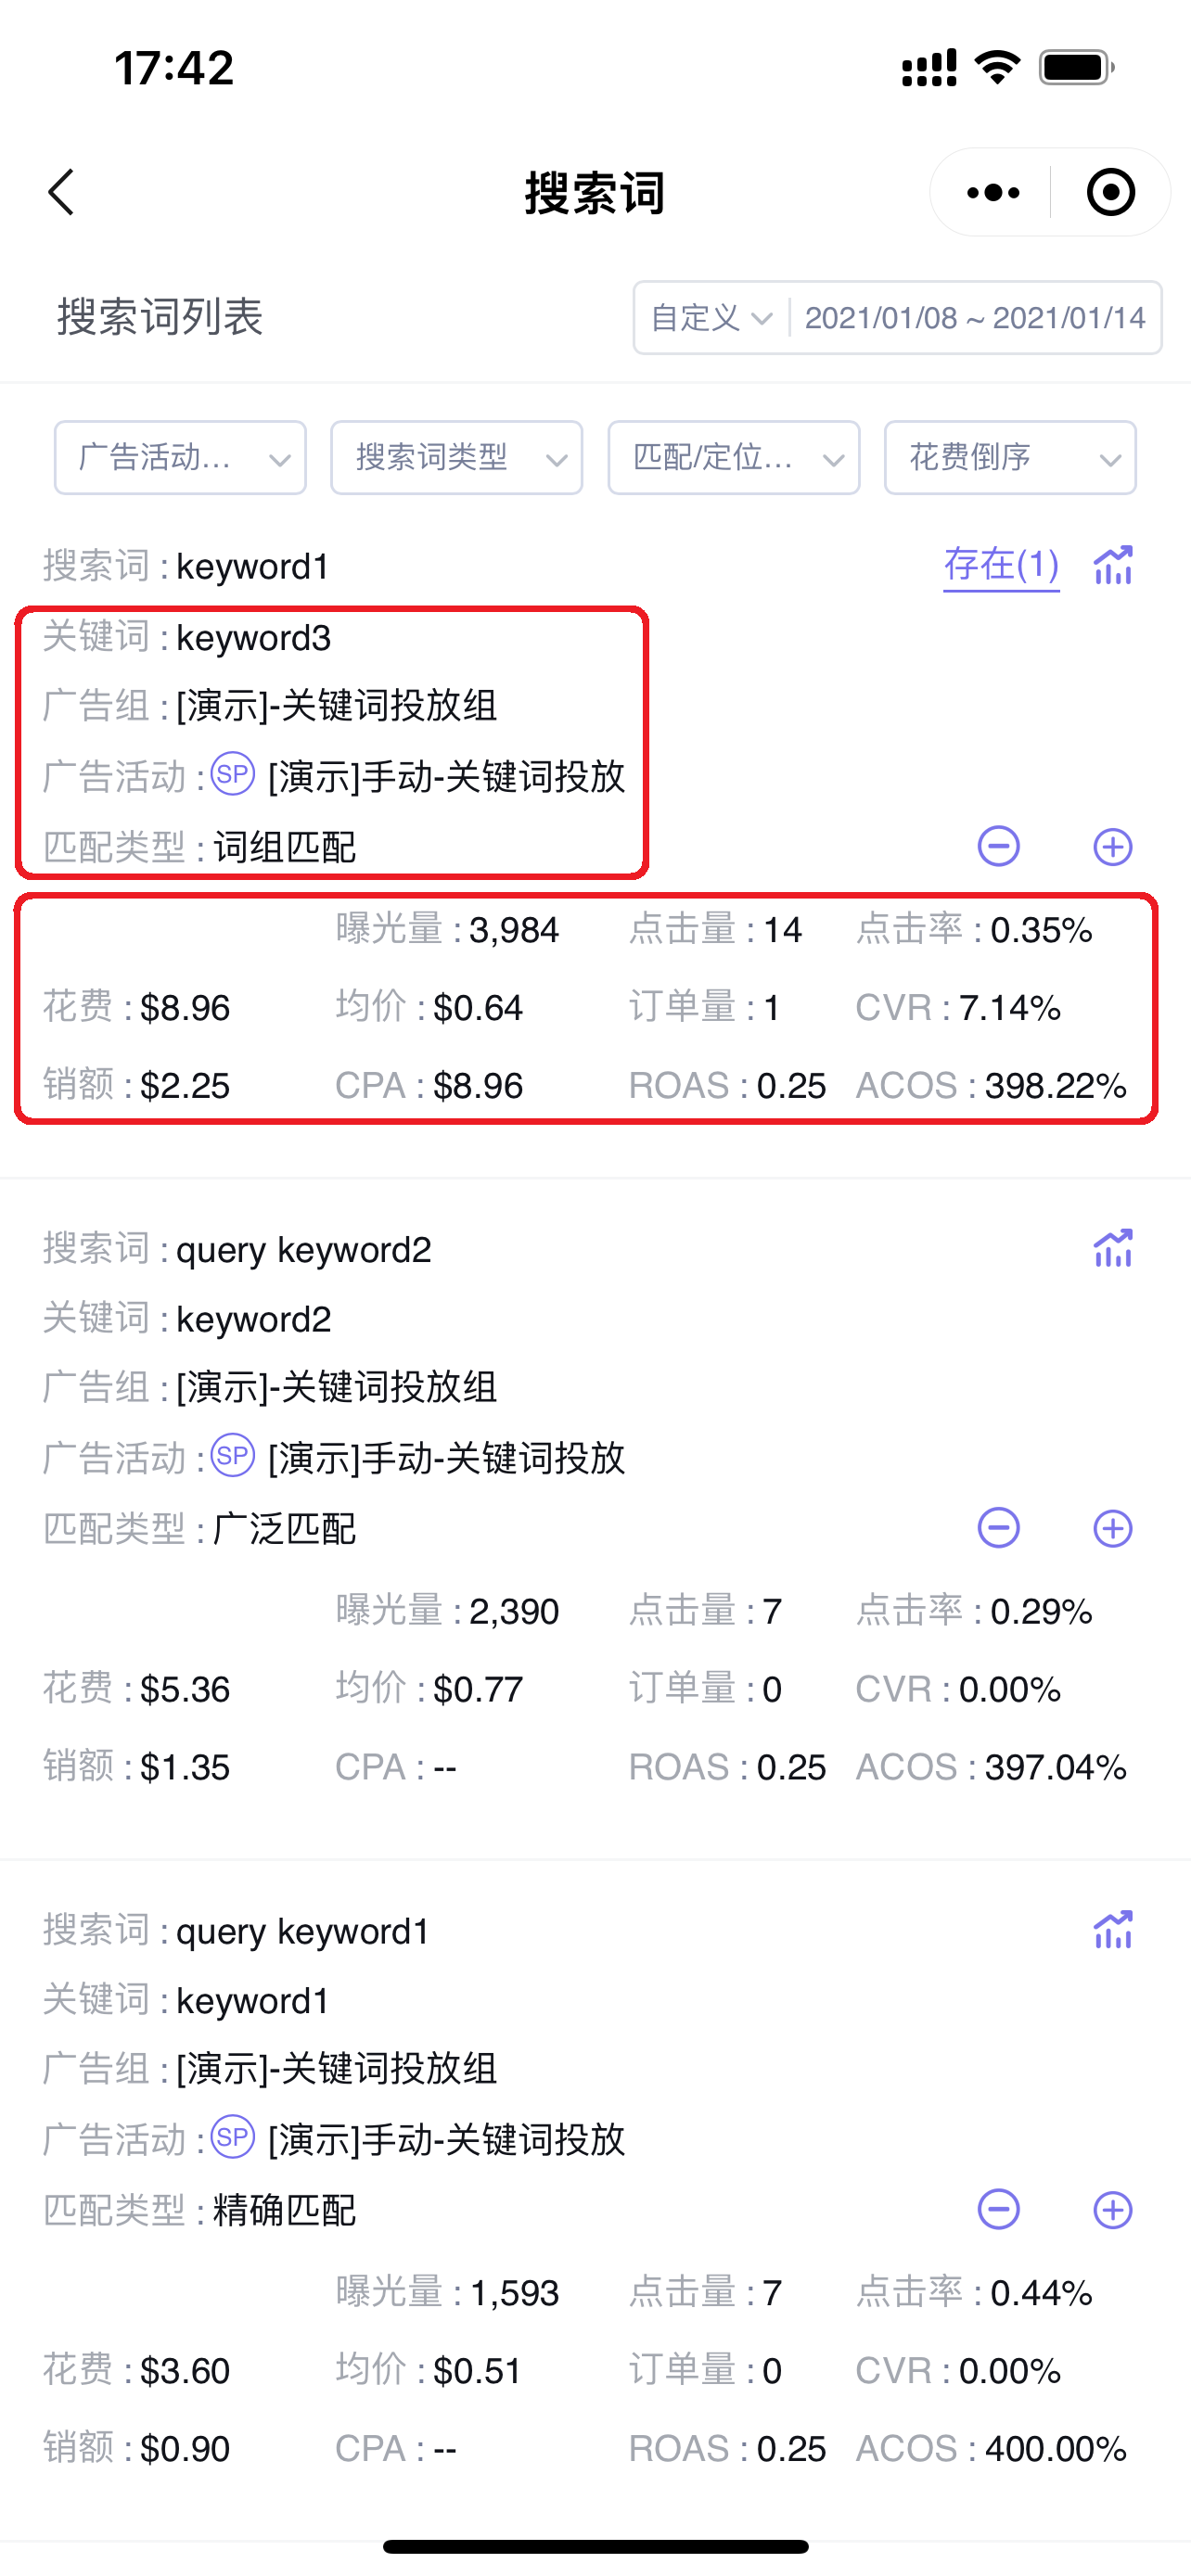
You can directly view which campaign and Ad group the search term belongs to, which keyword matched the search, and analyze the specific performance of the search term;
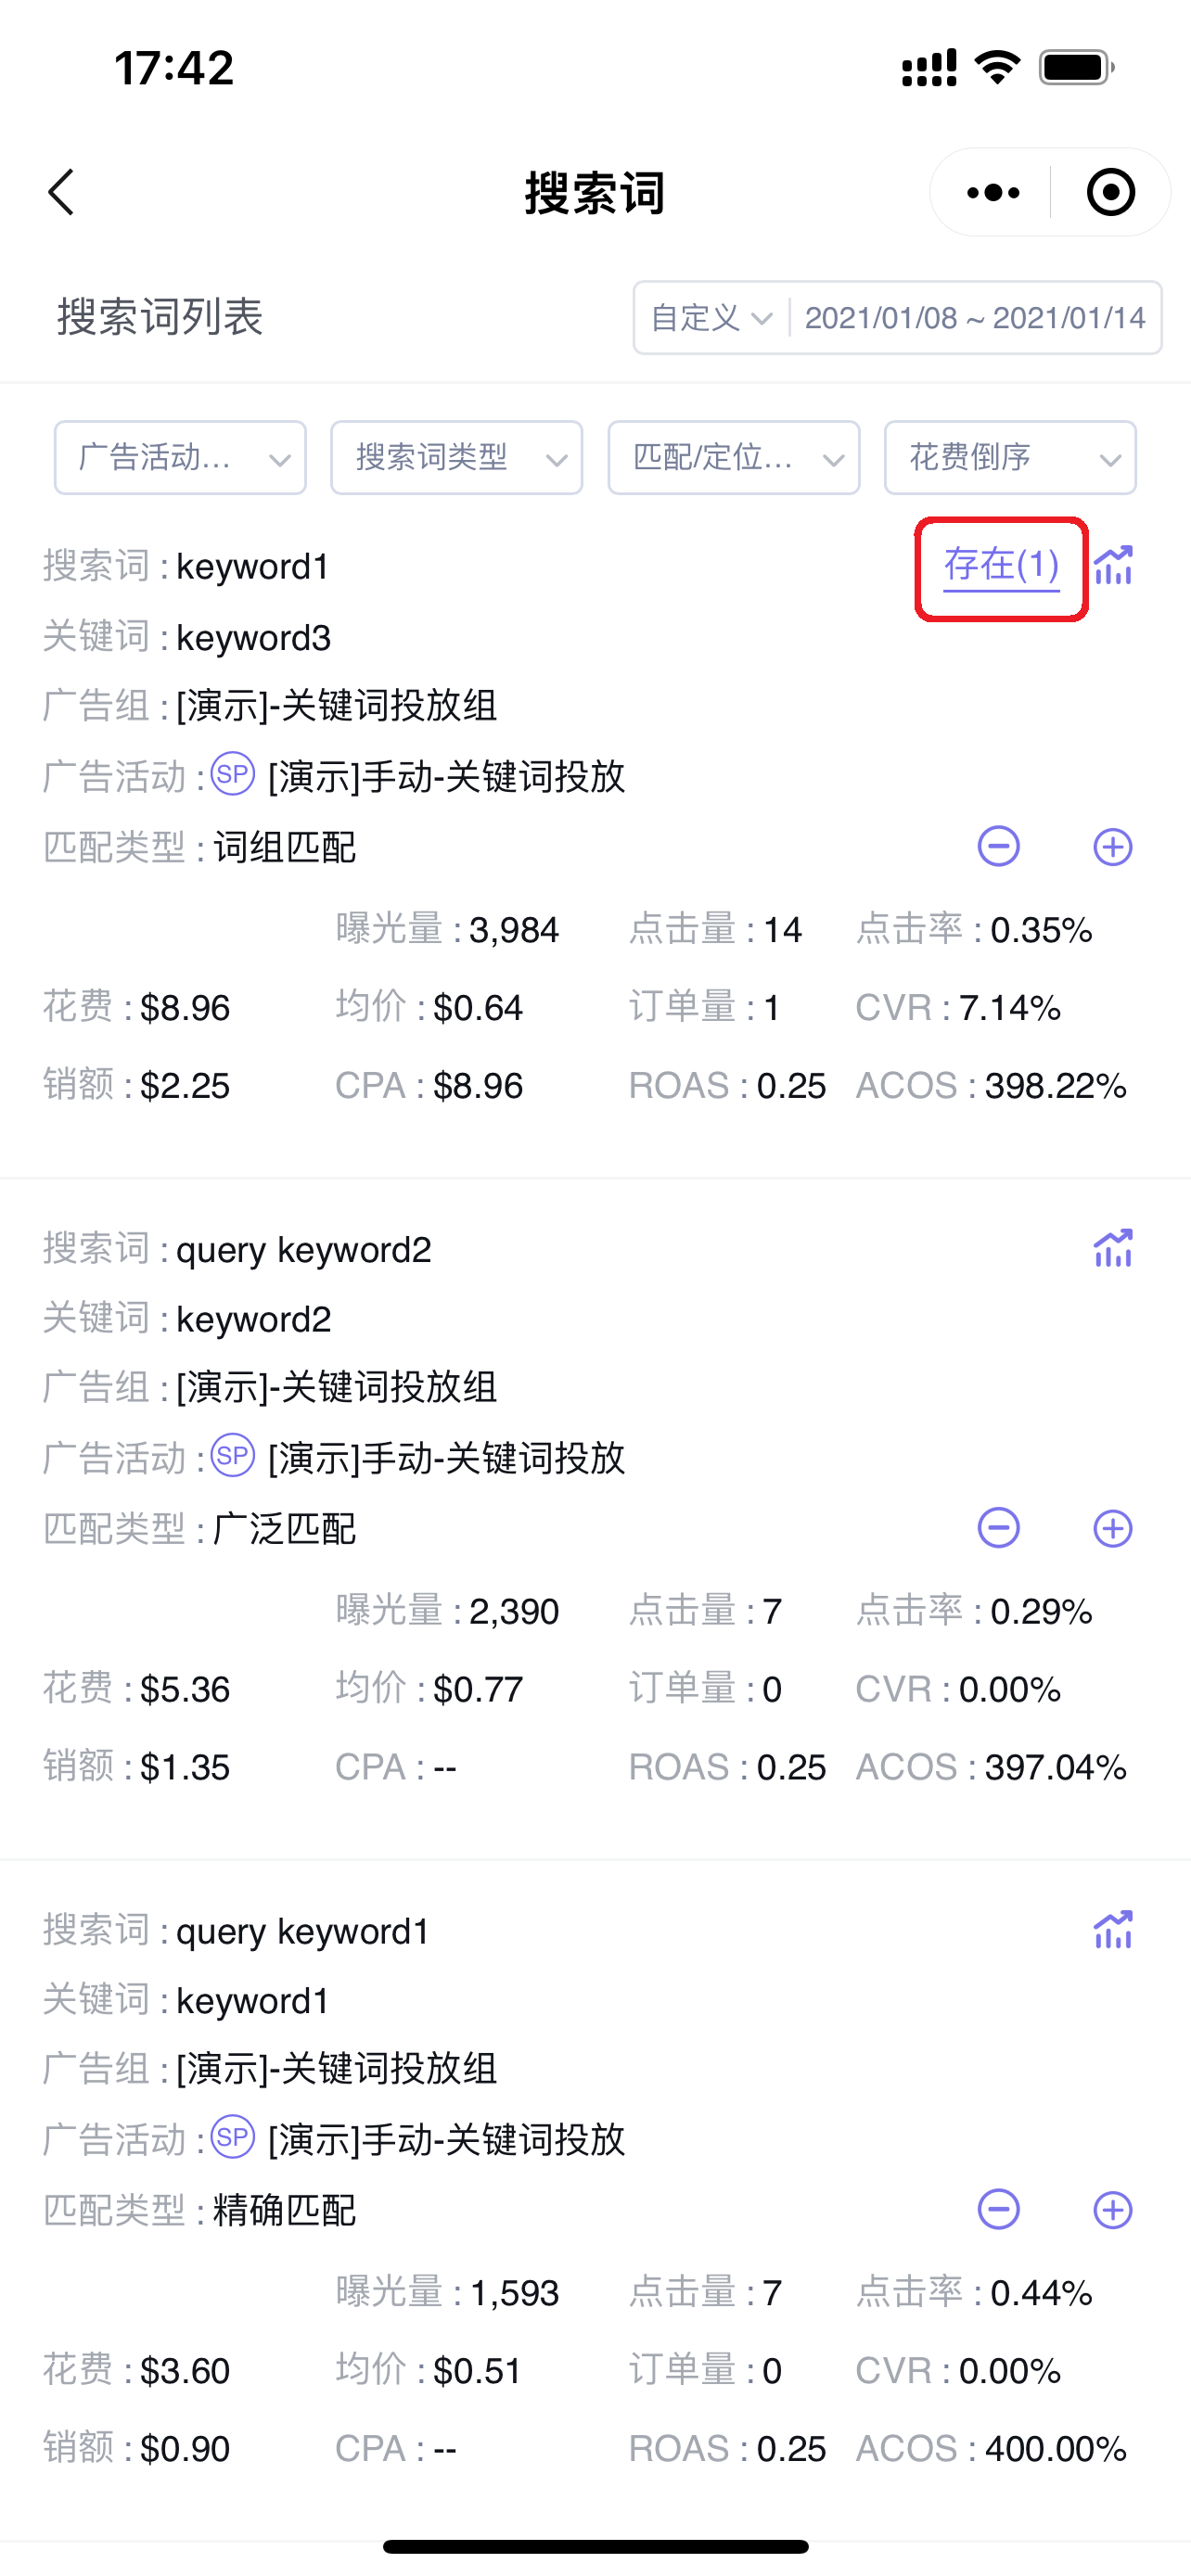
1.2 Analyzing Whether Targeting 【Exists】
In addition to basic performance, you can also view whether the search term exists in other existing ad targeting, to reverse-identify undiscovered high-quality search terms.
Click 【Exists】 to enter and view corresponding targeting. The number next to Exists indicates how many ads the search term exists in.
Search Term Usage Details:

1.3 Analyzing Historical Performance of Search Terms (The data presentation format for historical performance of advertising data across all dimensions is consistent.)
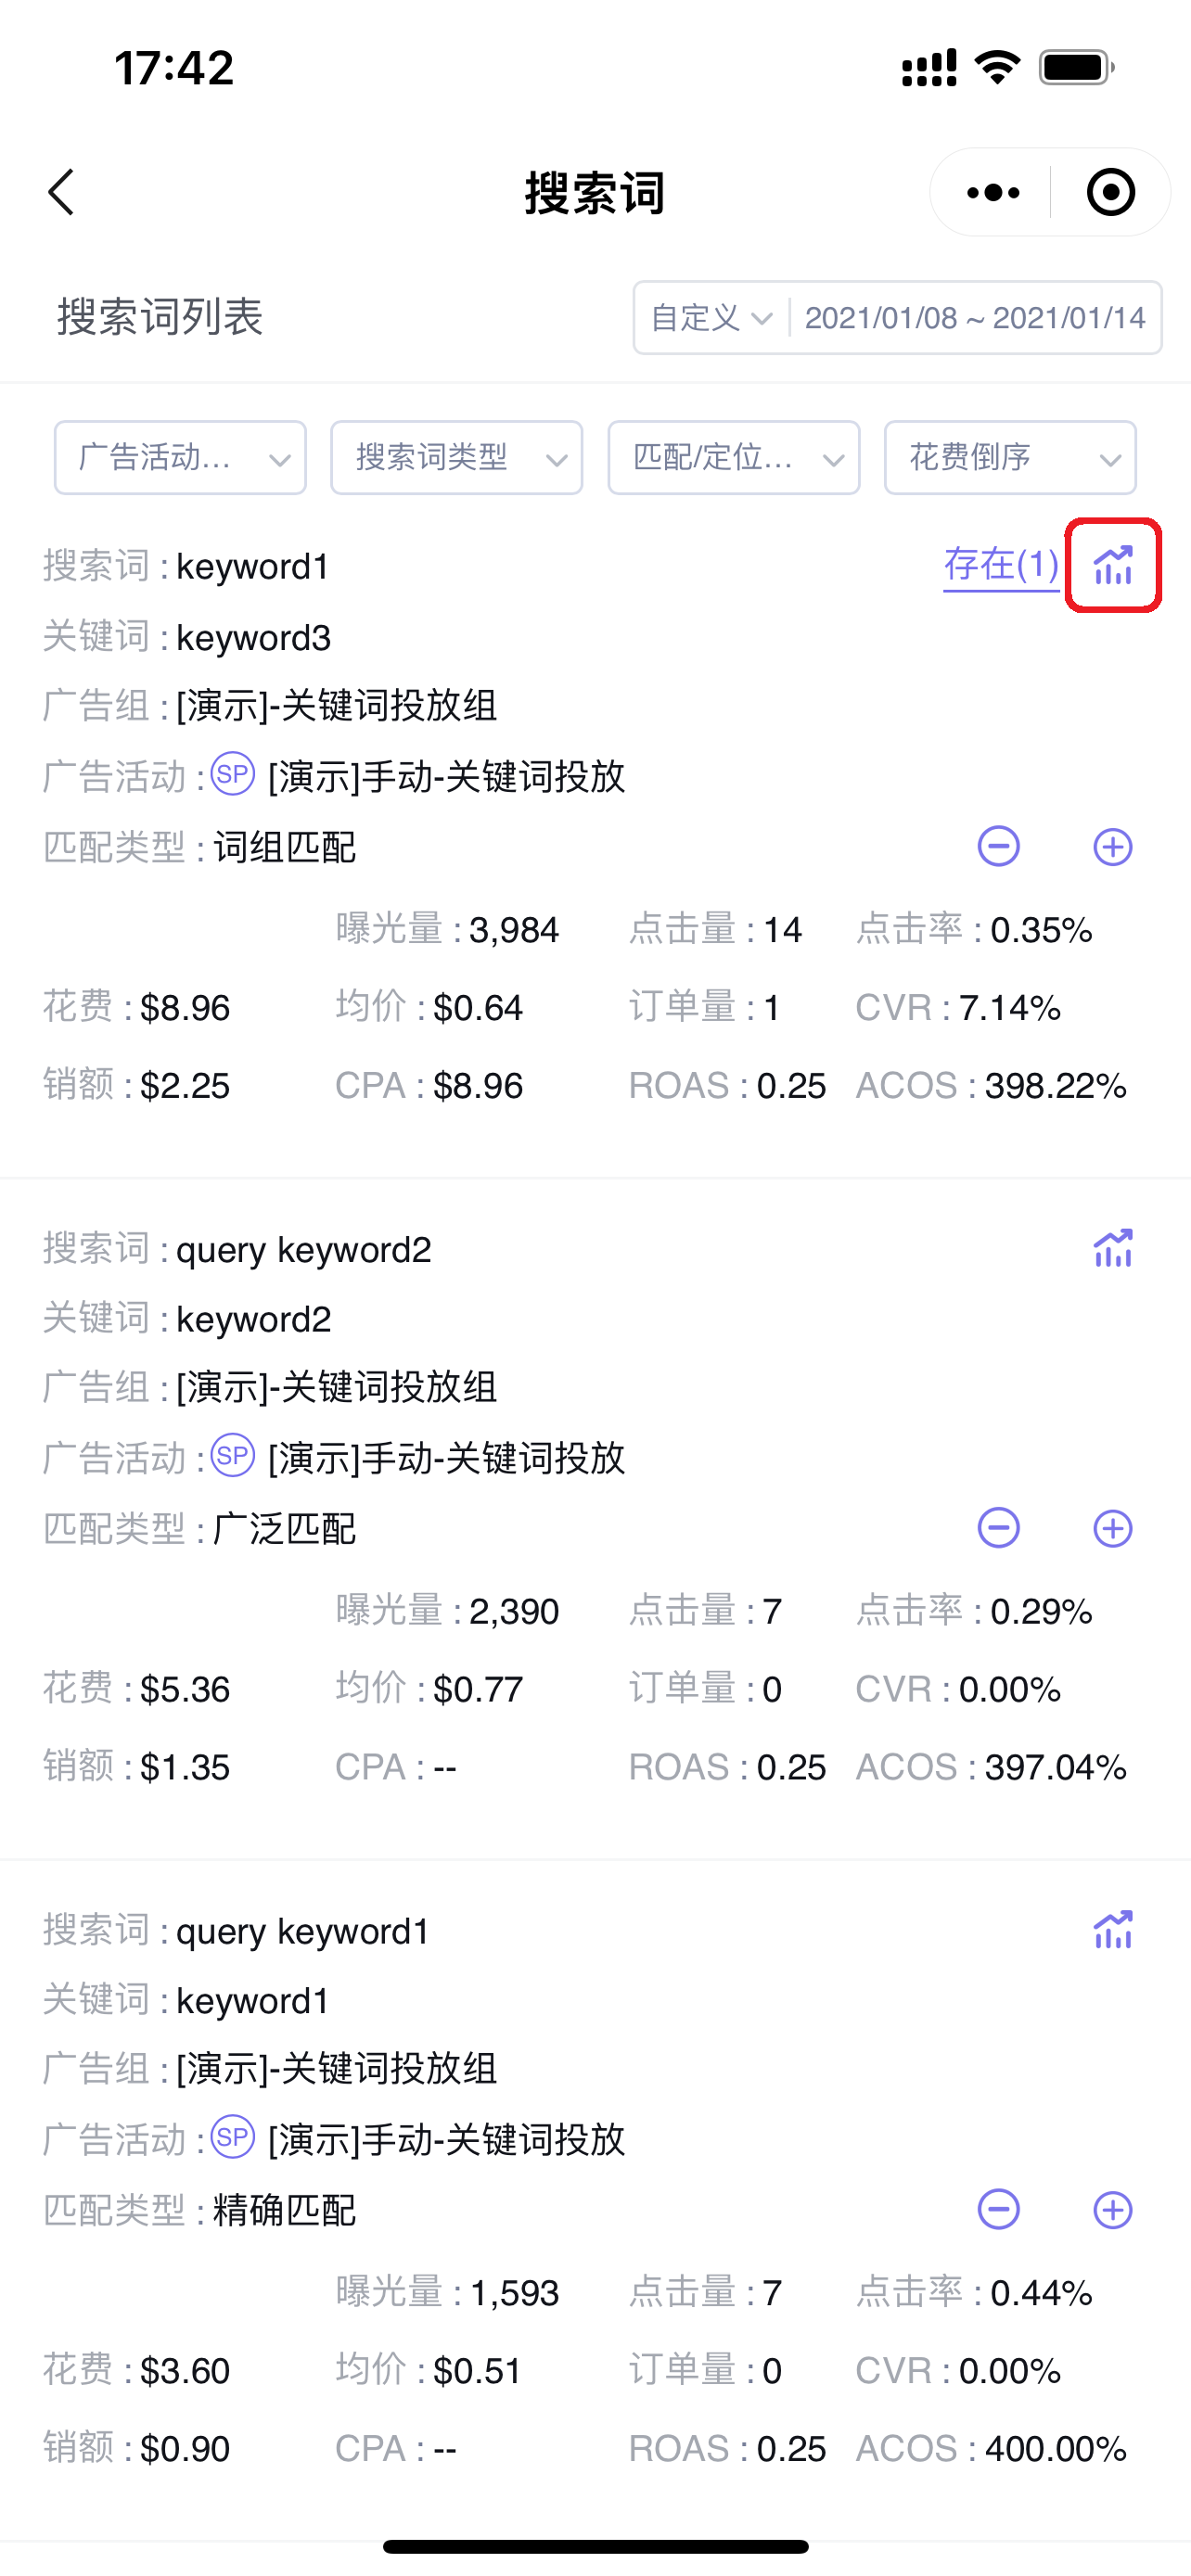
Click the historical trend button on the right side of the search term to enter and view the historical performance data of the search term;
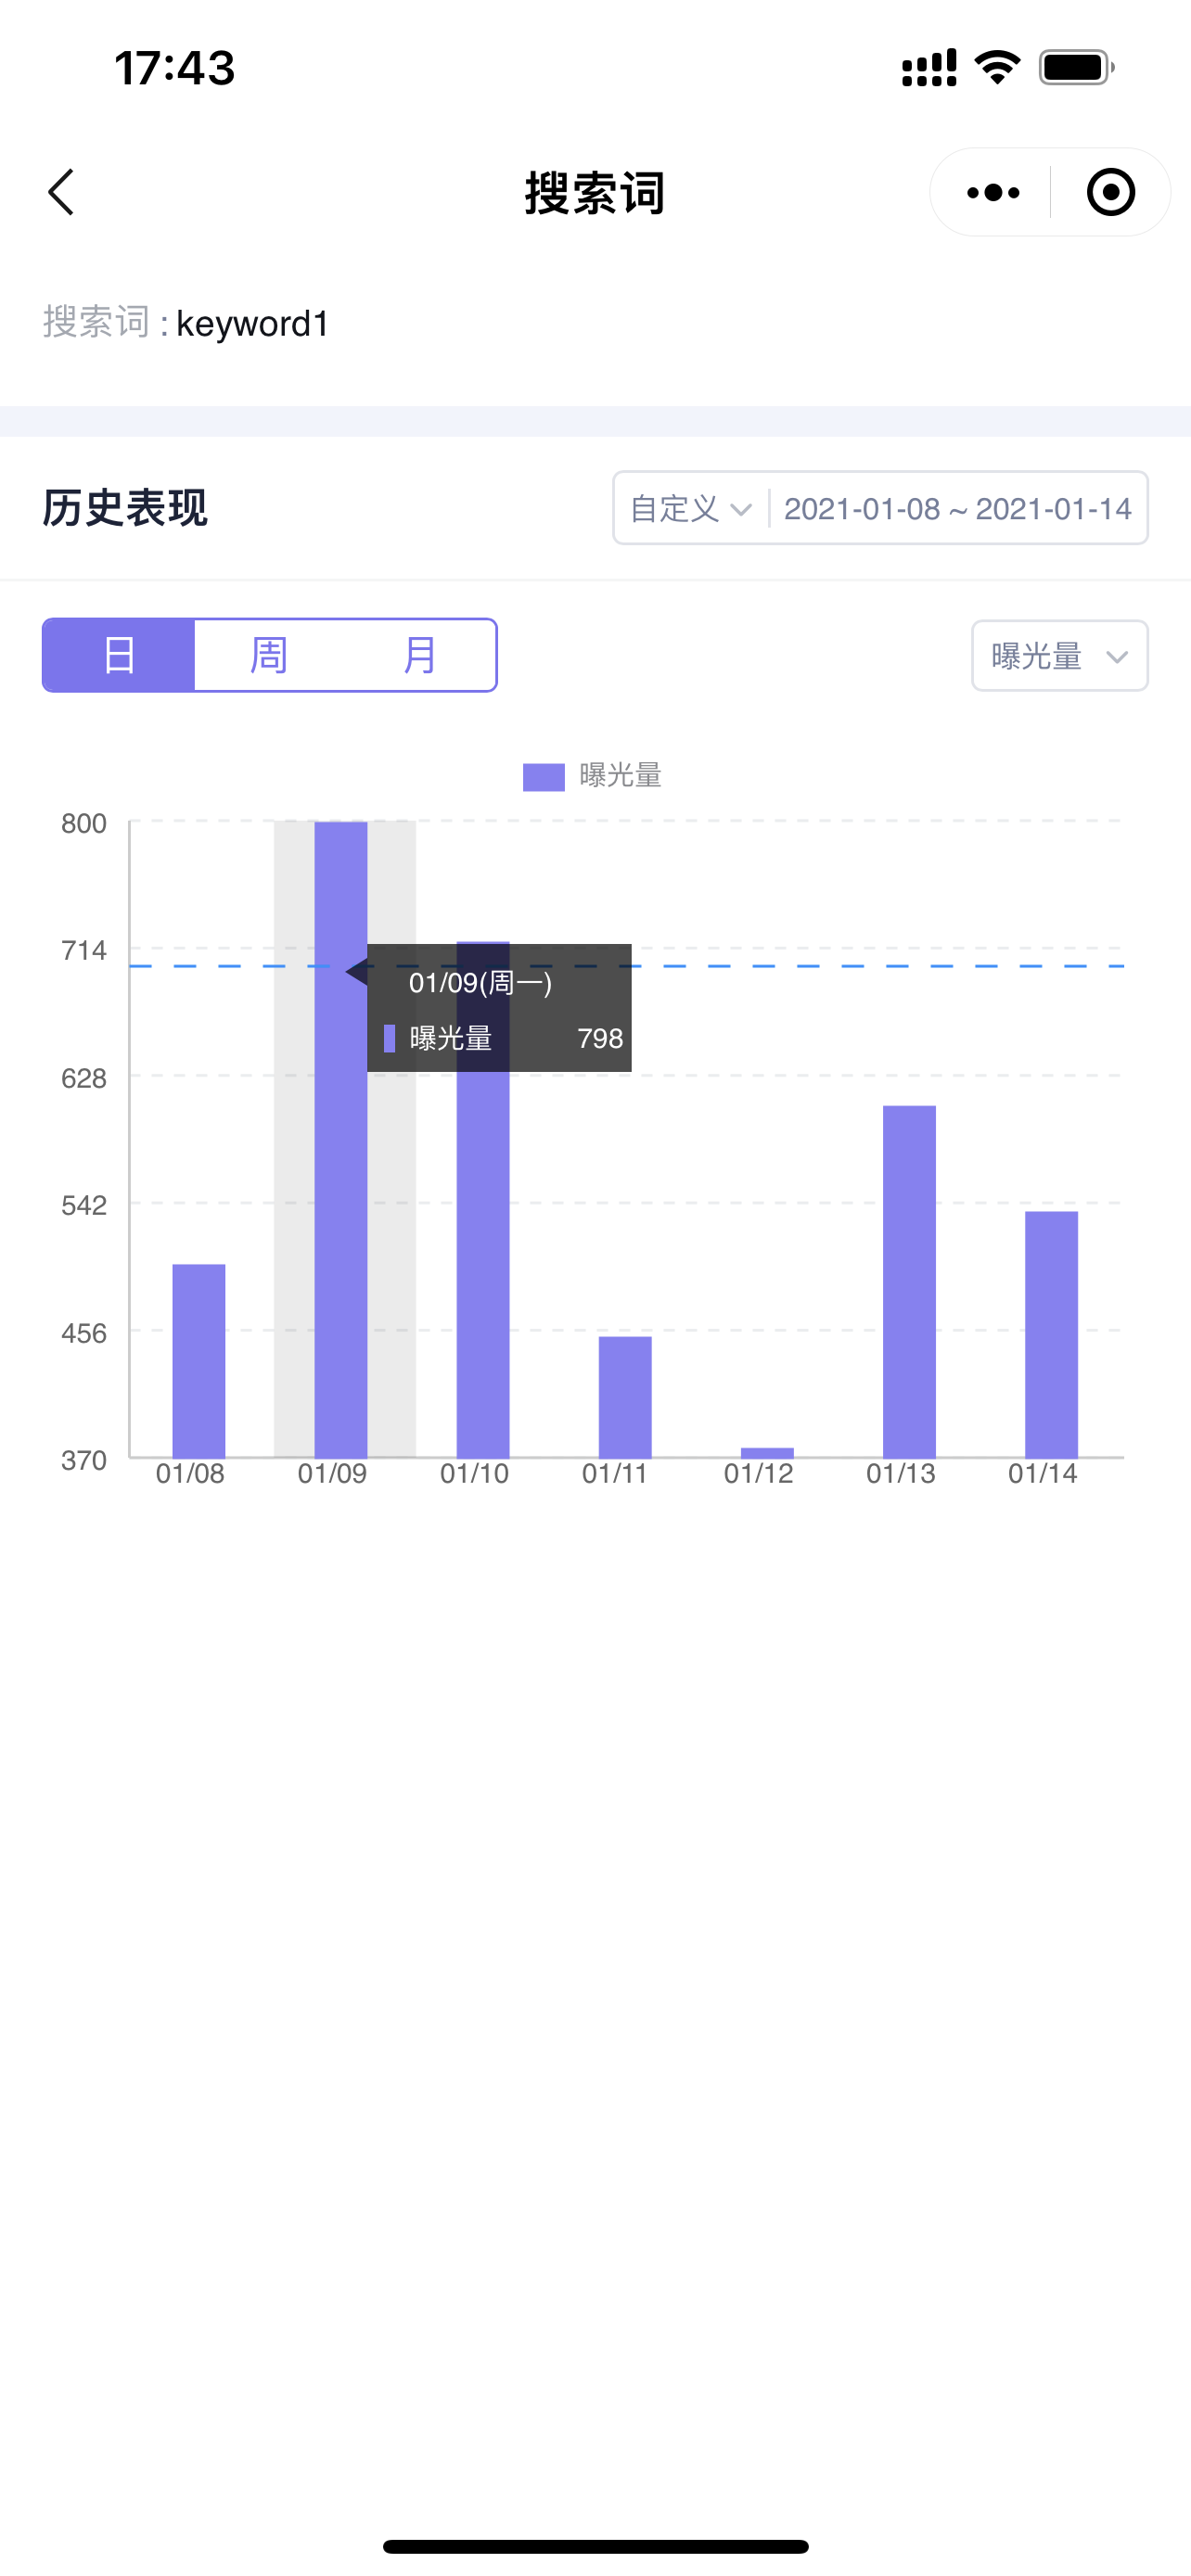
Enter the “Historical Performance” page,
You can customize the time range (default is the last 30 days), and switch to view data such as: Impressions, Clicks, Click-Through Rate, Spend, Average CPC, (Advertising) Orders, (Advertising) Sales, etc. Click on the bar chart to view detailed data.
2. Adding Targeting and Negative Targeting
You can directly add search terms to their matched Ad groups for individual keyword targeting, product targeting, or negative targeting.
2.1 Adding New Targeting
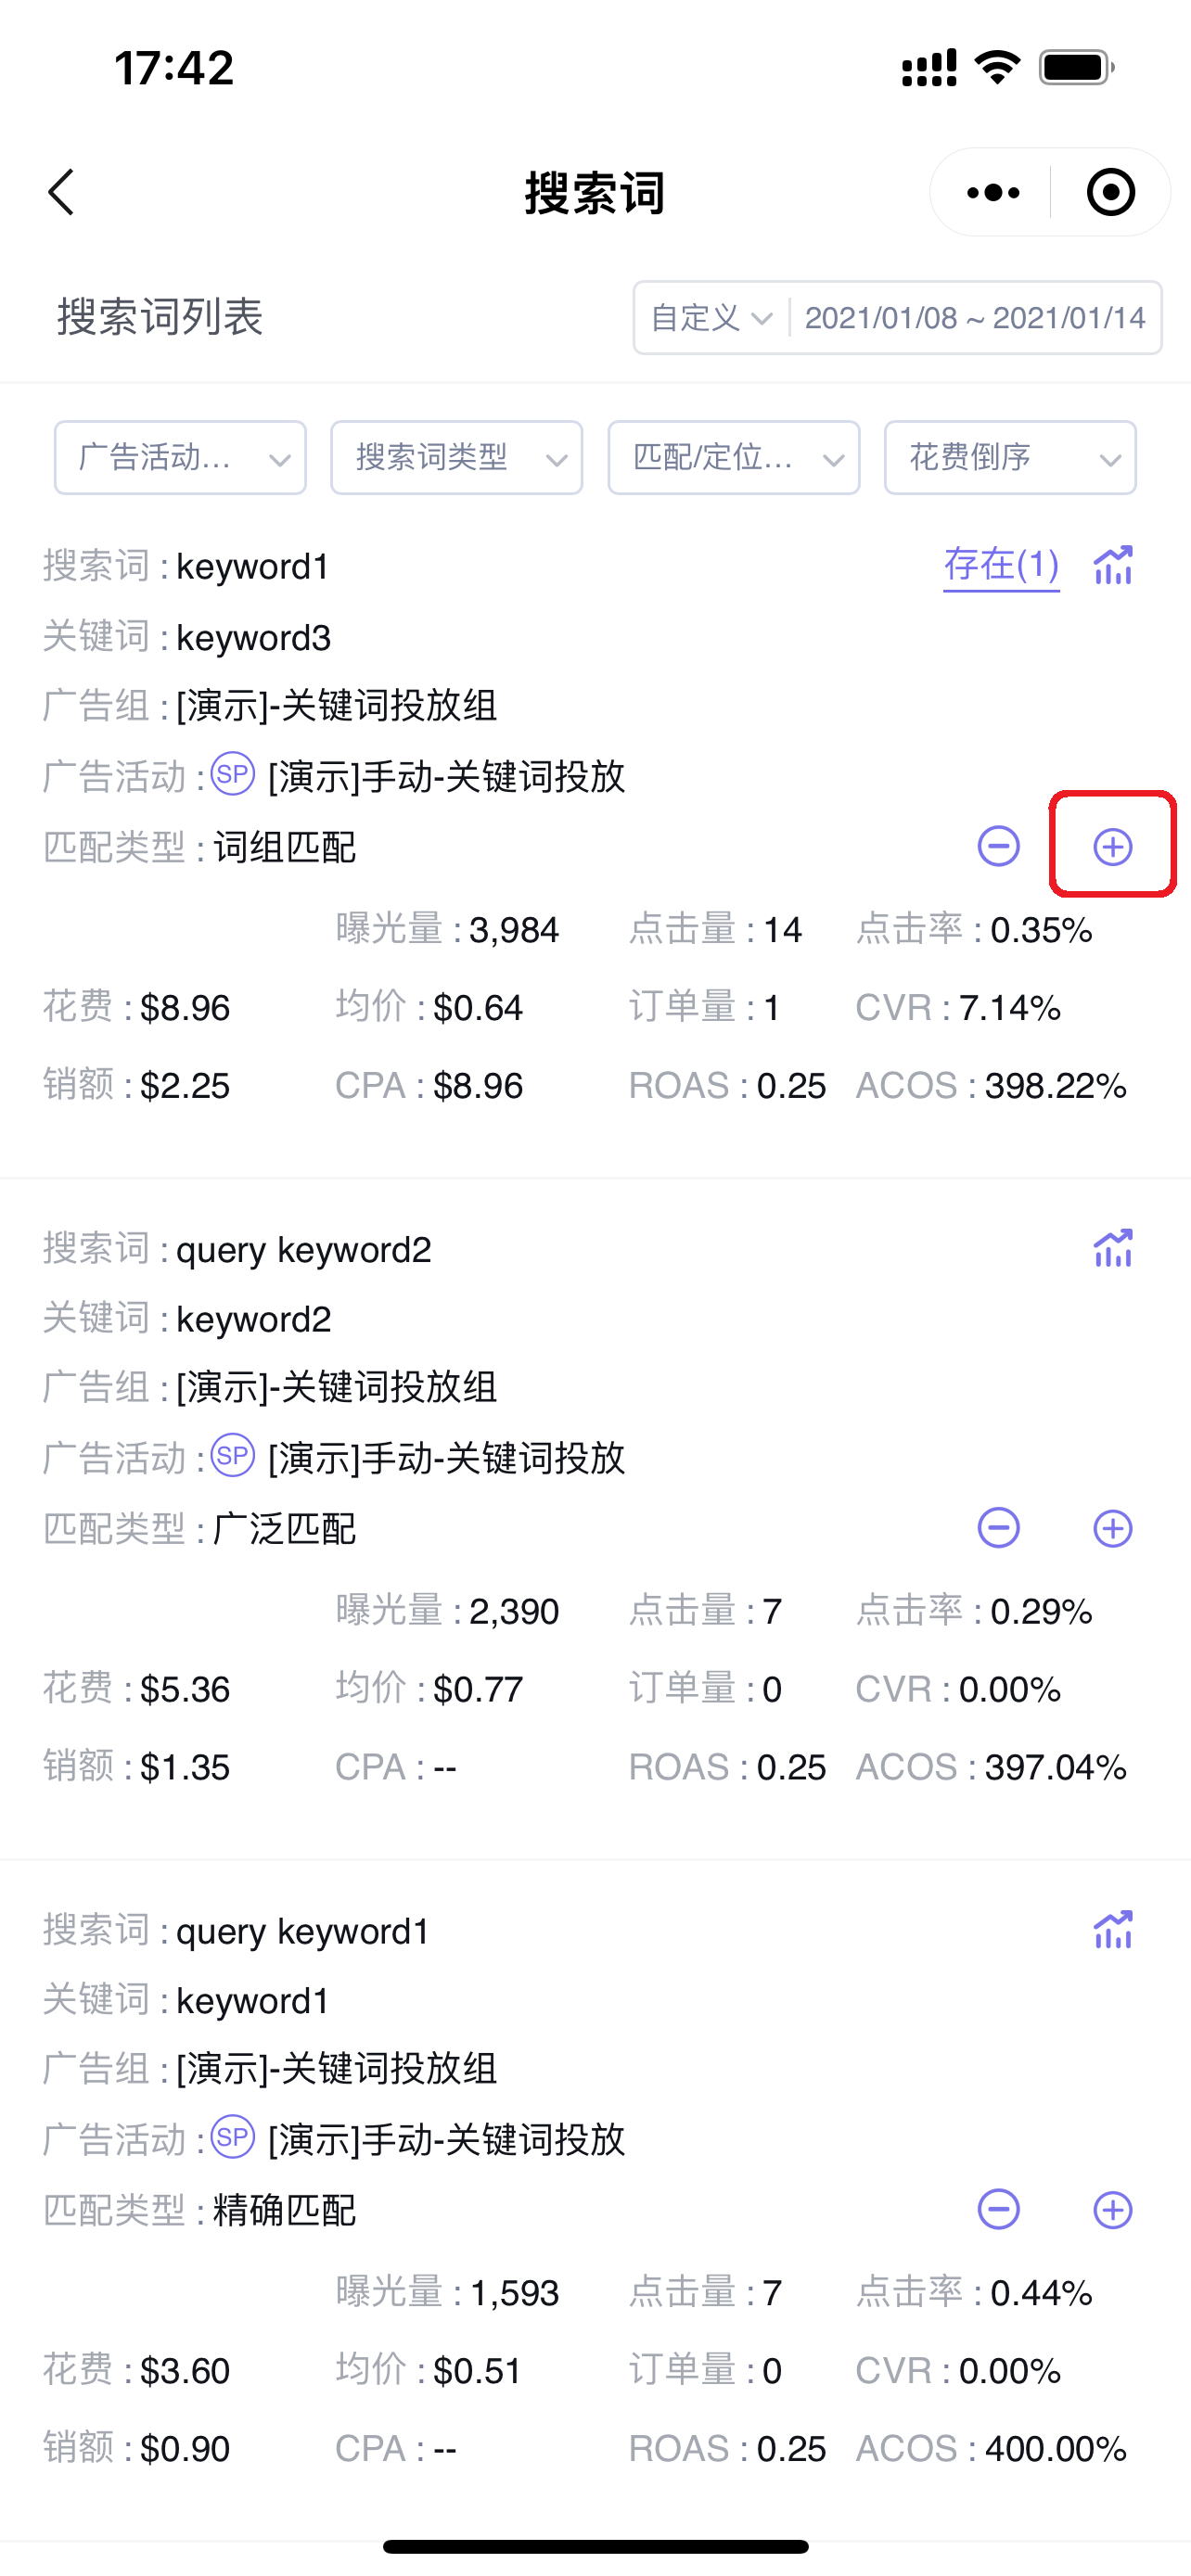
Click the 【+】 button to add the search term to its matched Ad group for individual targeting;
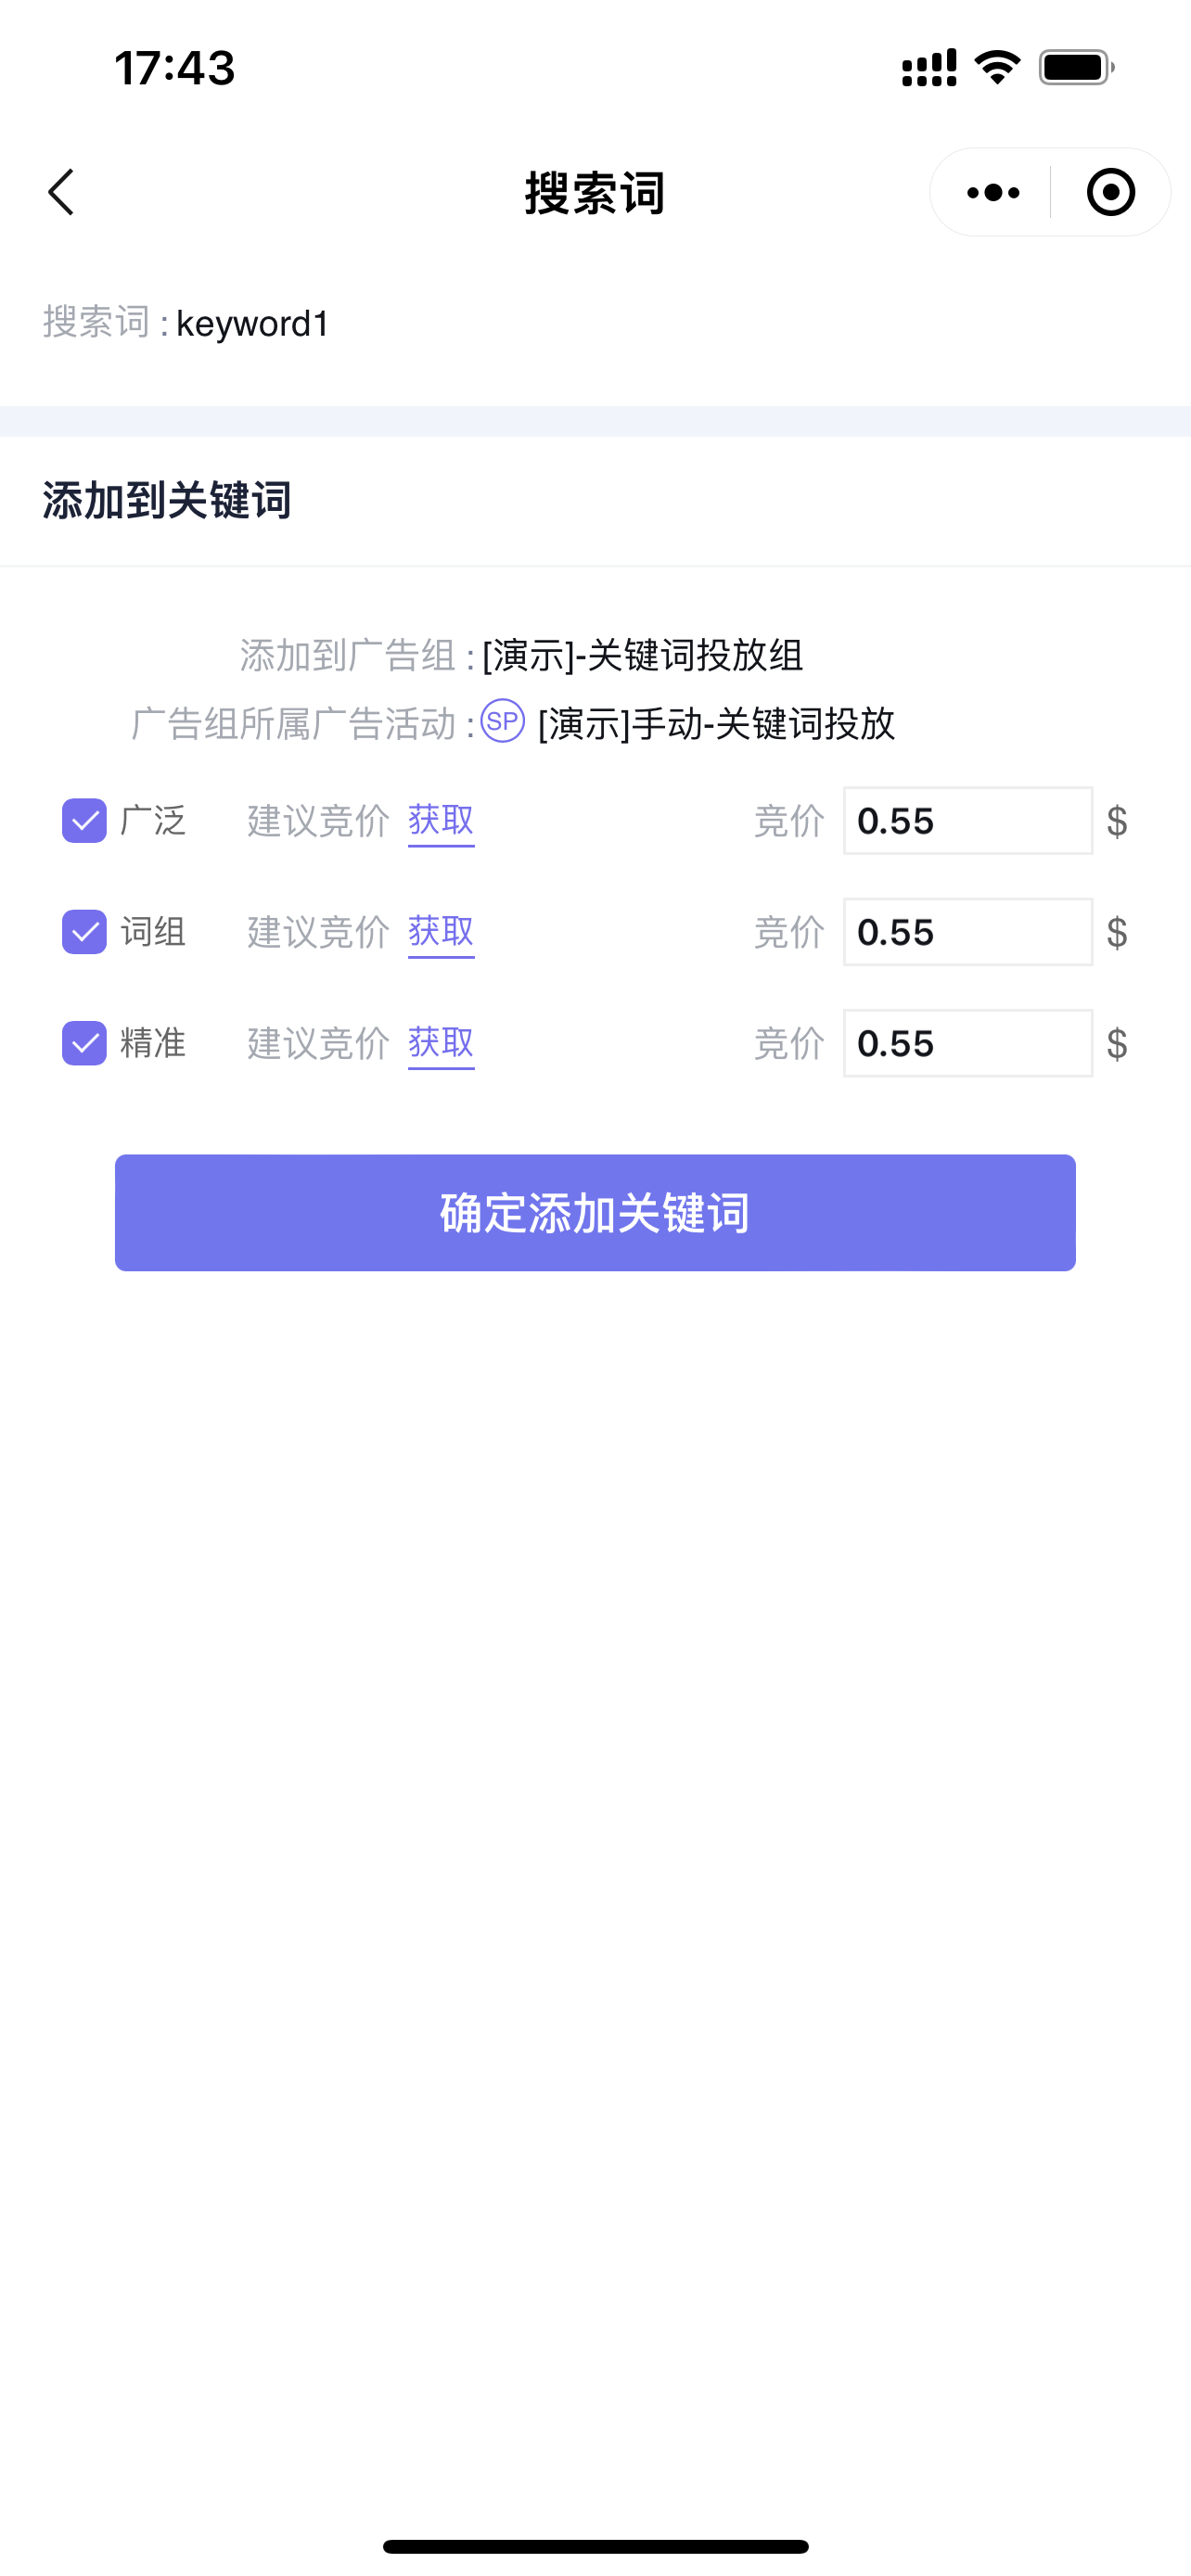
Enter the “Add to Keyword/Product” page,
You can select its targeting match type, get Amazon's suggested bid, and set its ad bid.
2.2 Adding New Negative Targeting
Click the 【-】 button to add the search term to the Ad group for new negative targeting (negative exact/negative phrase).
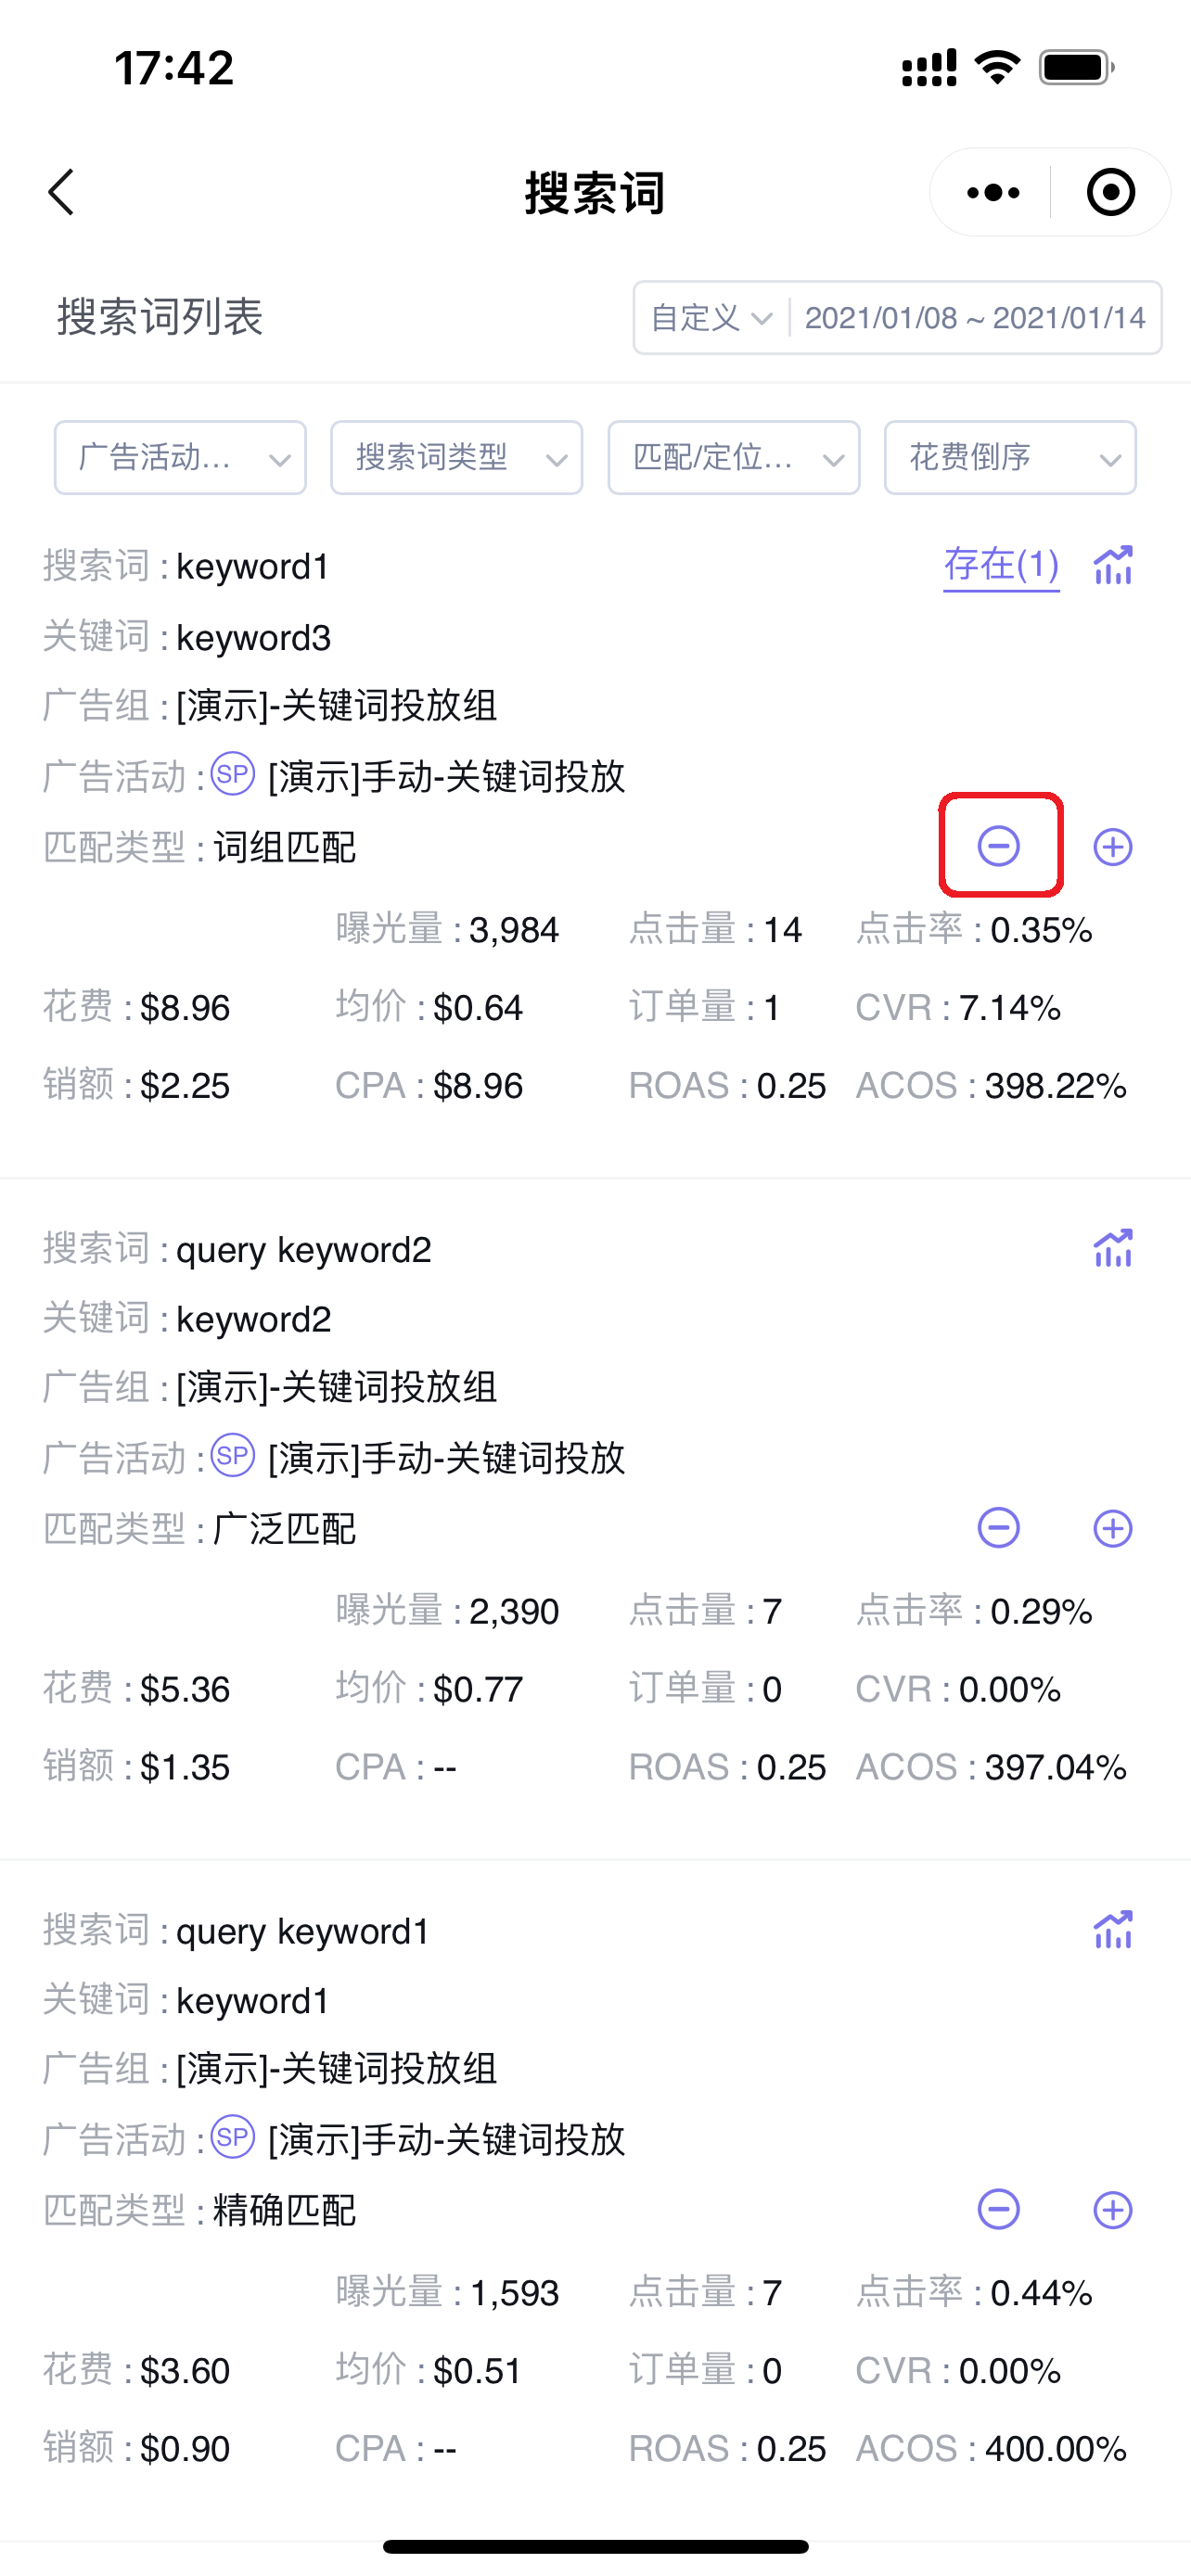
Enter the “Add to Negative Targeting” page,
You can select the negative match type and add negative targeting with one click.


