2025/04/08Views(878)Reviews(0)
I. Target Audience
Warehouse, Operations
II. Feature Overview
Integrating with Amazon's Send to Amazon shipment workflow, you can view and edit Send to Amazon type shipments through the YouMail Cloud system or Amazon Seller Central.
Note: Legacy shipping shipments and Send to Amazon shipments are not interconnected and operate independently.
III. Use Cases
- Directly create "Send to Amazon" workflow FBA shipments through YouMail Cloud
IV. Operation Guide
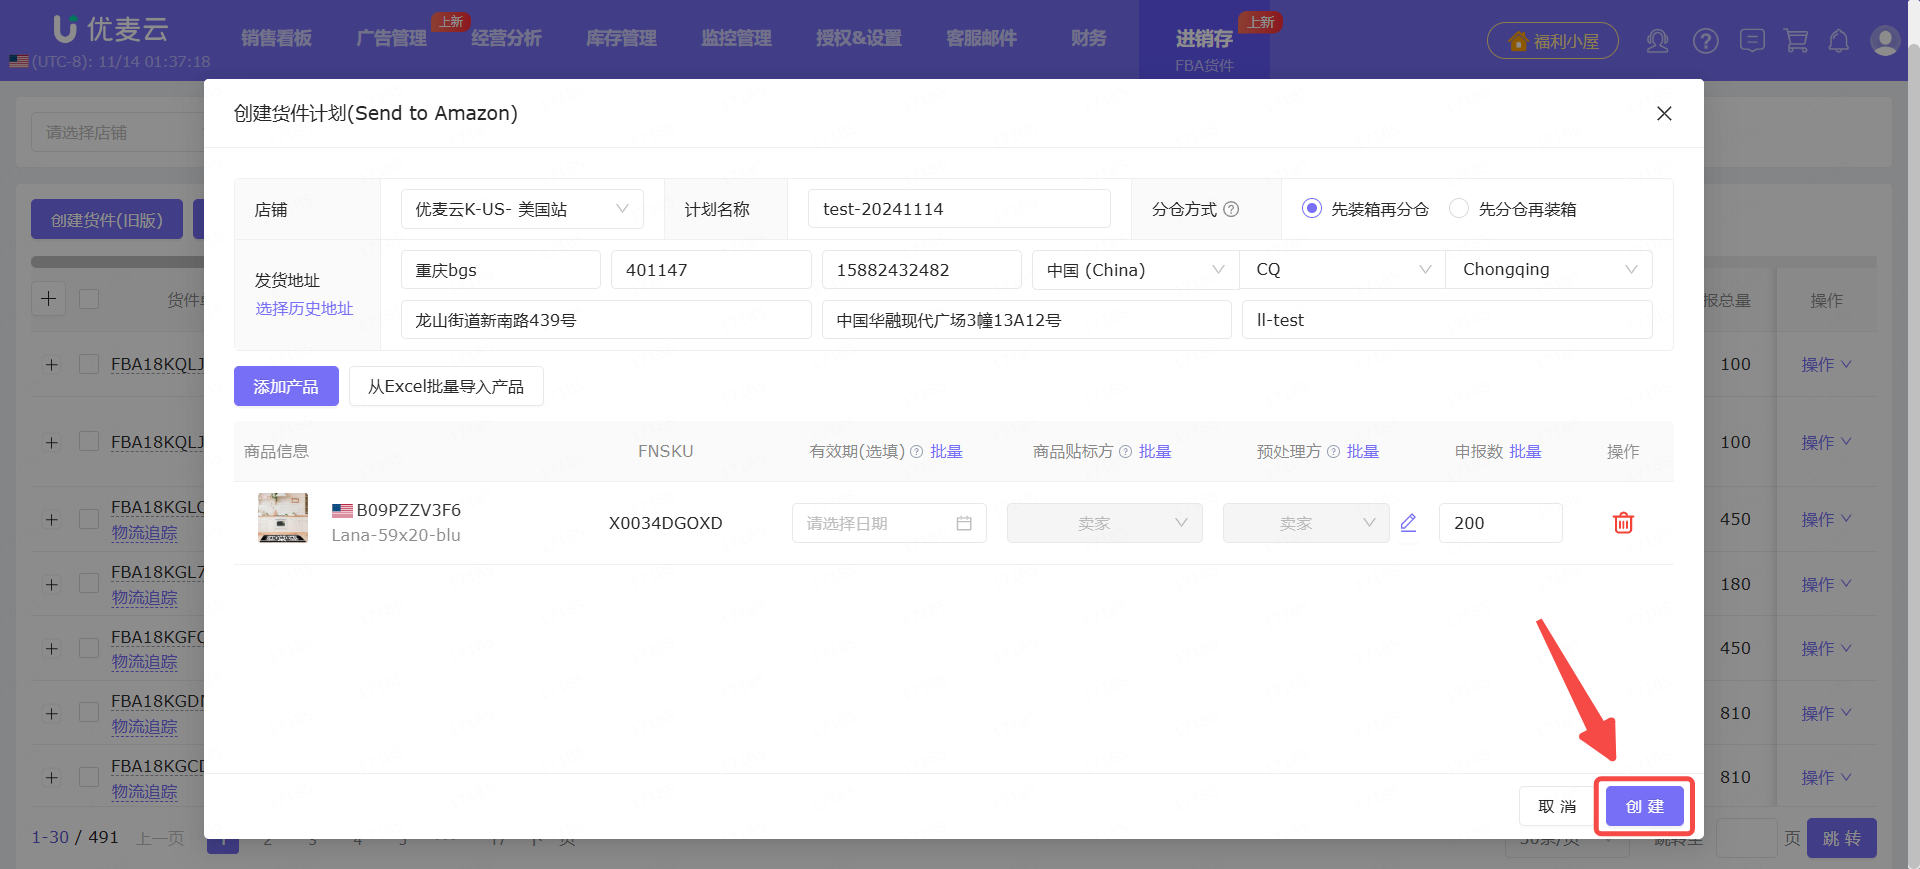
Using the example of "replenishing 200 units of product Lana-59x20-blu from the Chongqing warehouse to the US marketplace of store: YouMail Cloud K-US," this guide introduces the Send to Amazon shipping operation and important notes.
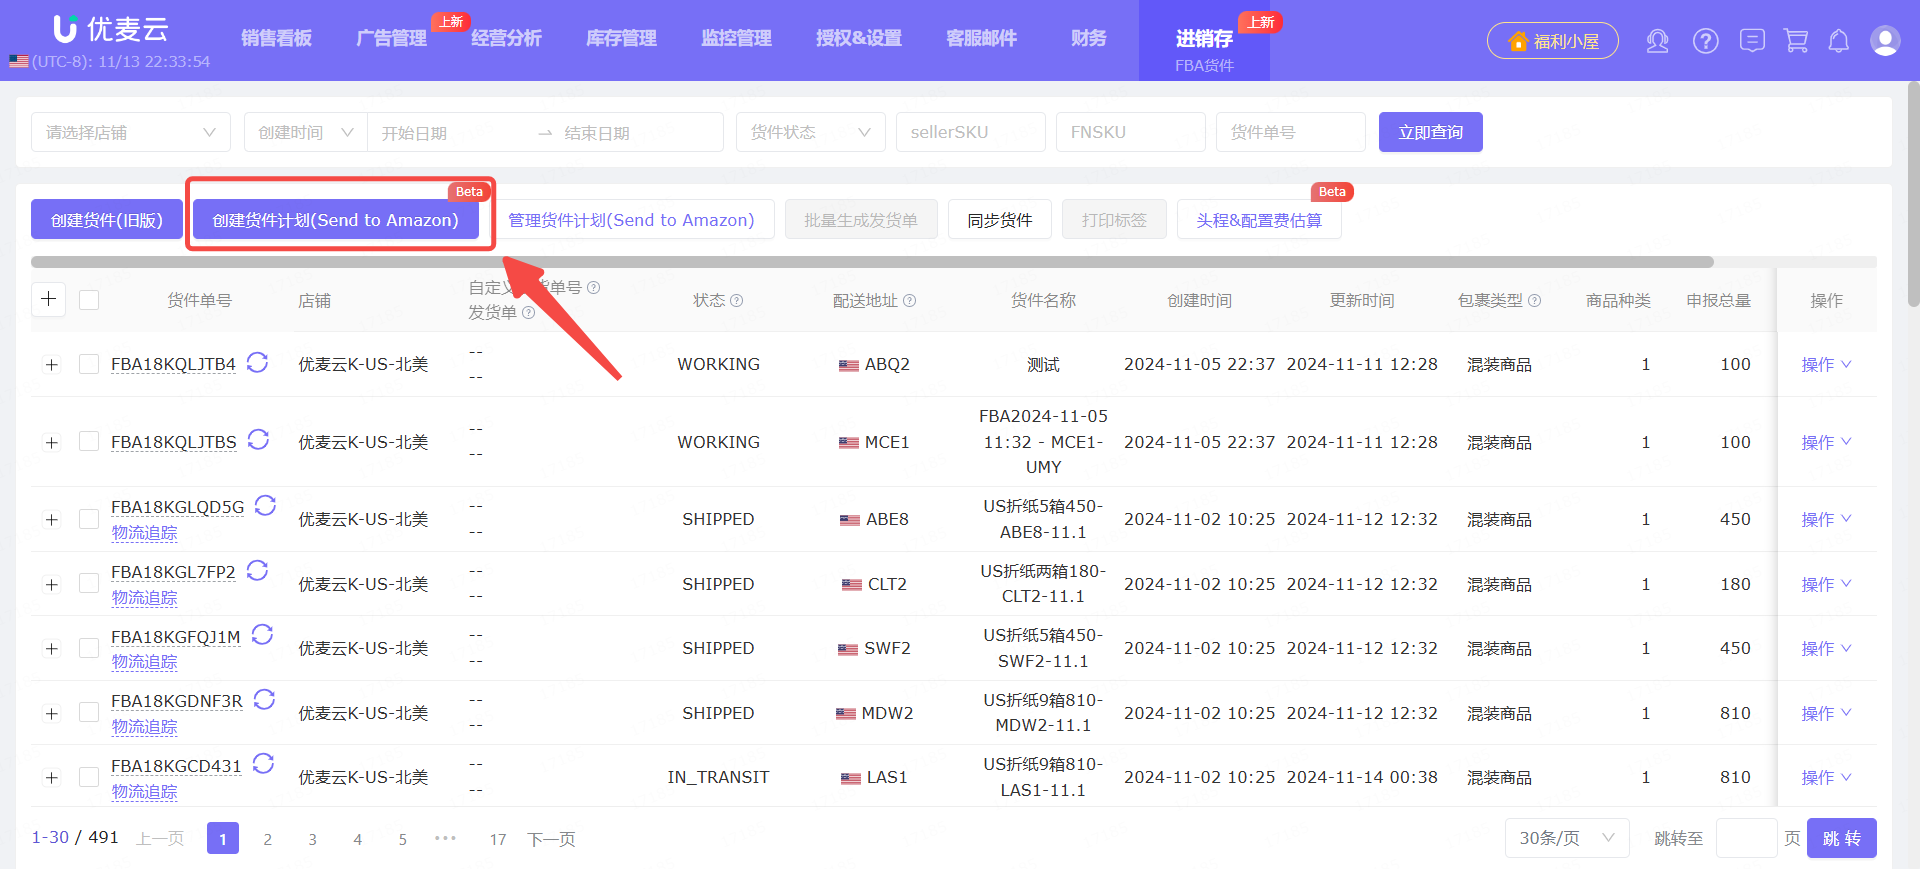
1. Create a Shipment Plan
Click 【Create Shipment Plan (Send to Amazon)】 to enter the shipment creation page.
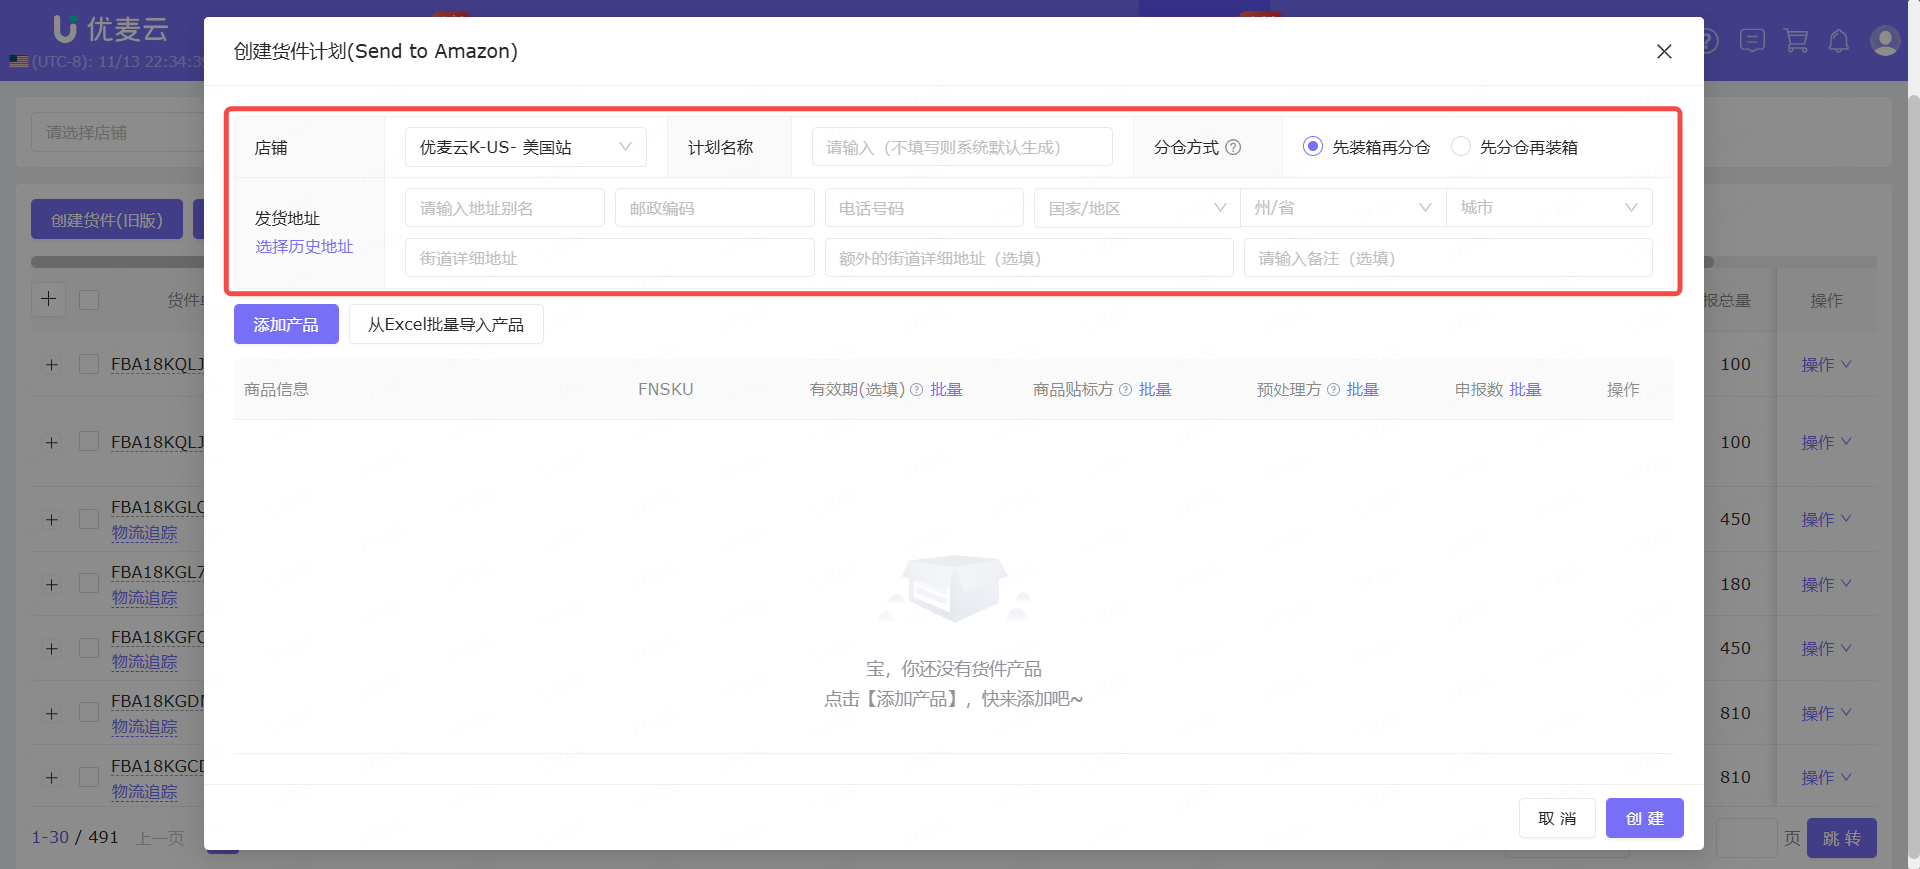
On the "Create Shipment Plan (Send to Amazon)" page,
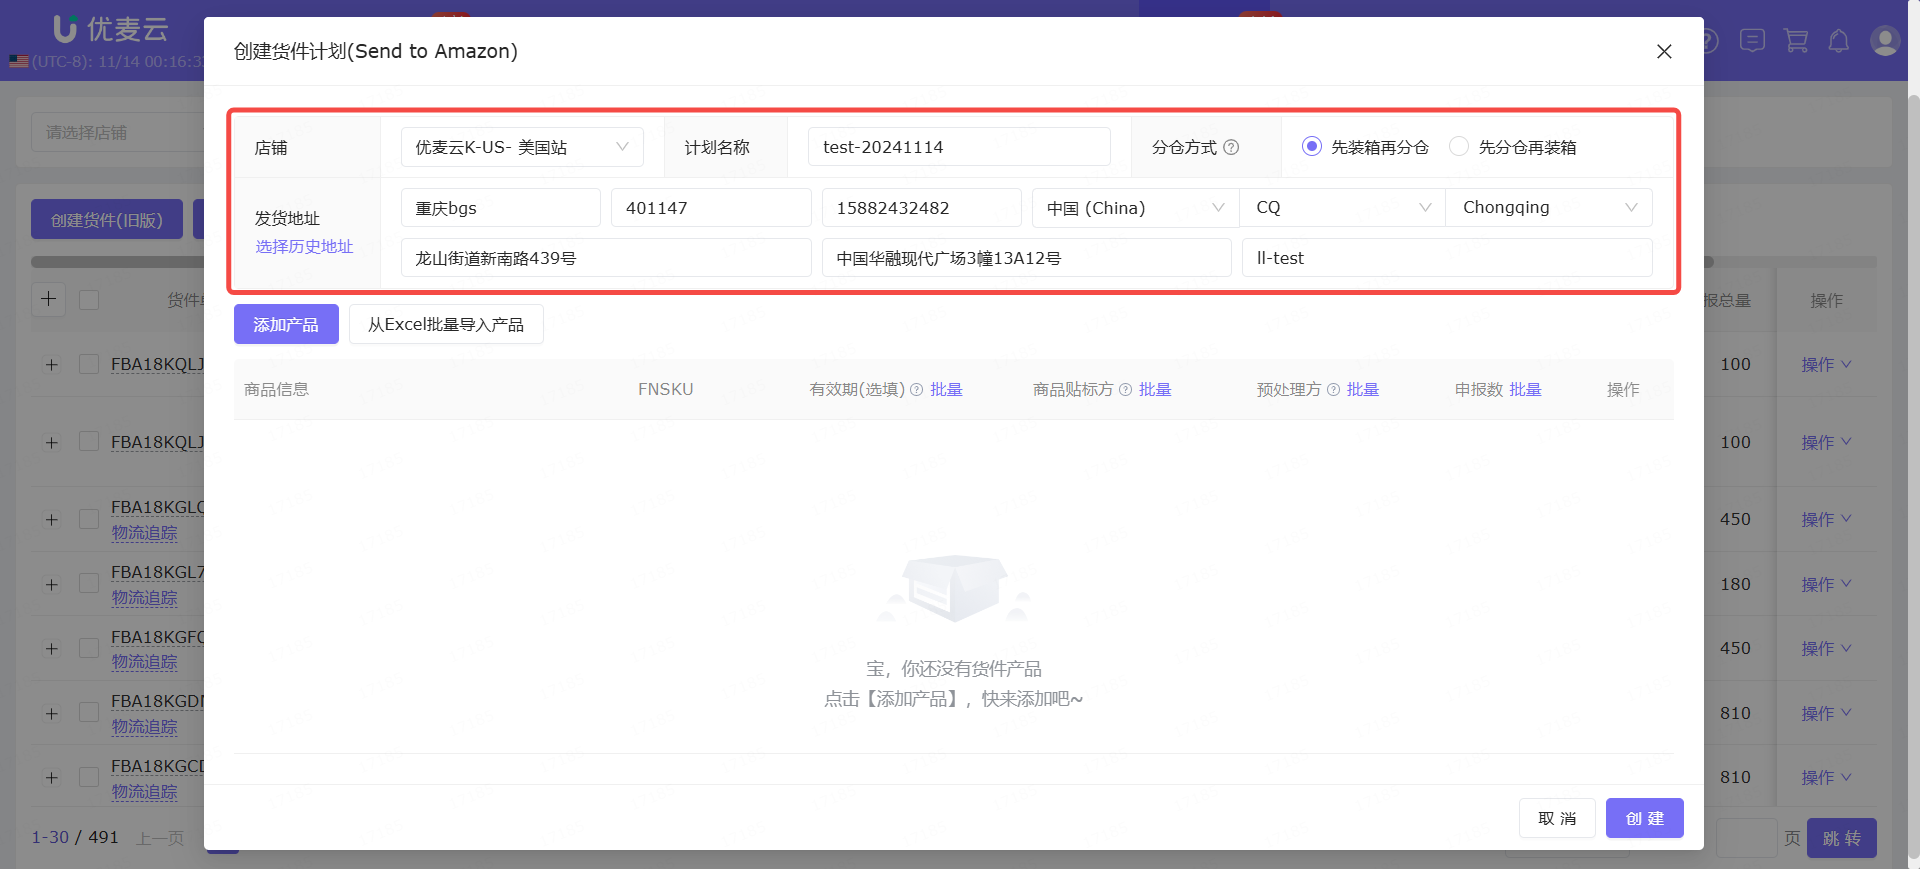
First, pre-fill the shipping information, including: Shipping Store, Plan Name, Inventory Placement Option, and Ship-from Address.
① Select Shipping Store: The store must be authorized.
② Fill in Plan Name: It is recommended to fill in an easily distinguishable name for management. If not filled, the system will generate one.
③ Select Inventory Placement Option: Pack single-SKU boxes or Case-packed boxes.
Pack single-SKU boxes: Pre-pack boxes and preview the split shipment results based on the packing data after submitting the box information.
Case-packed boxes: Do not pre-pack boxes, directly submit to preview the split shipment results, and then pack and ship. This method is only applicable to Less than Truckload (LTL) shipping mode.
④ Fill in Ship-from Address: The ship-from address pre-filled when creating the shipment will be automatically saved after creation. You can select and fill it in from 【Select Historical Address】.
According to our example requirement, fill in as follows.
Next, add products to the shipment.
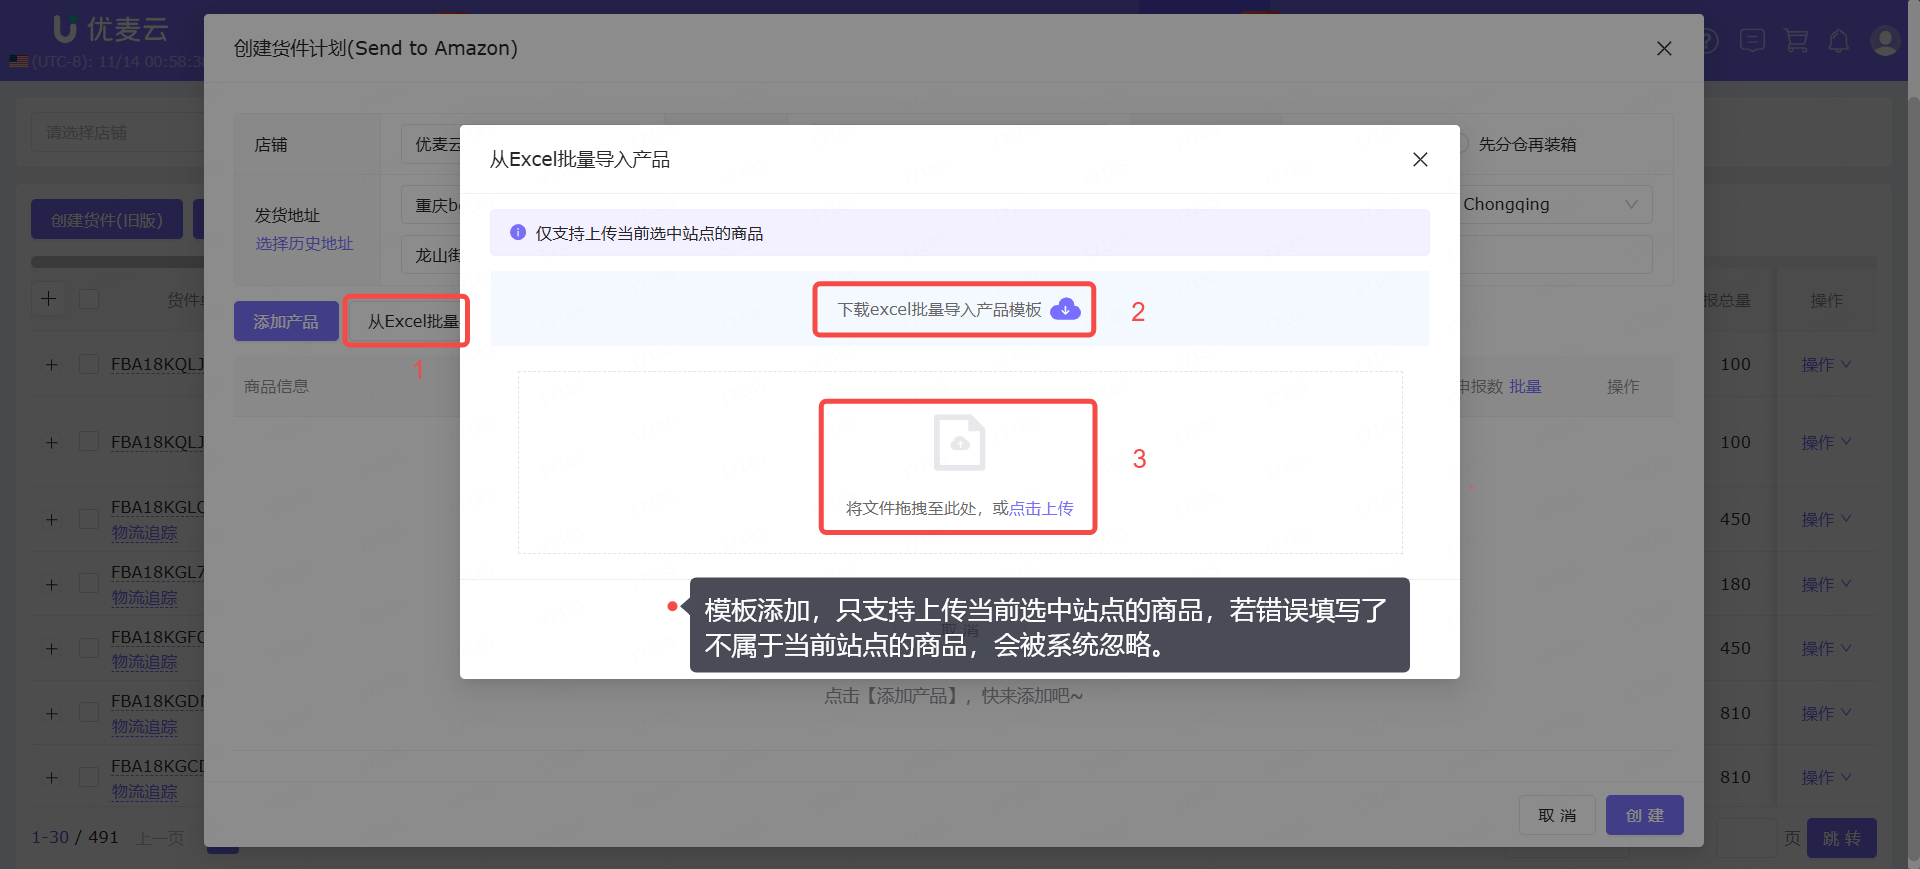
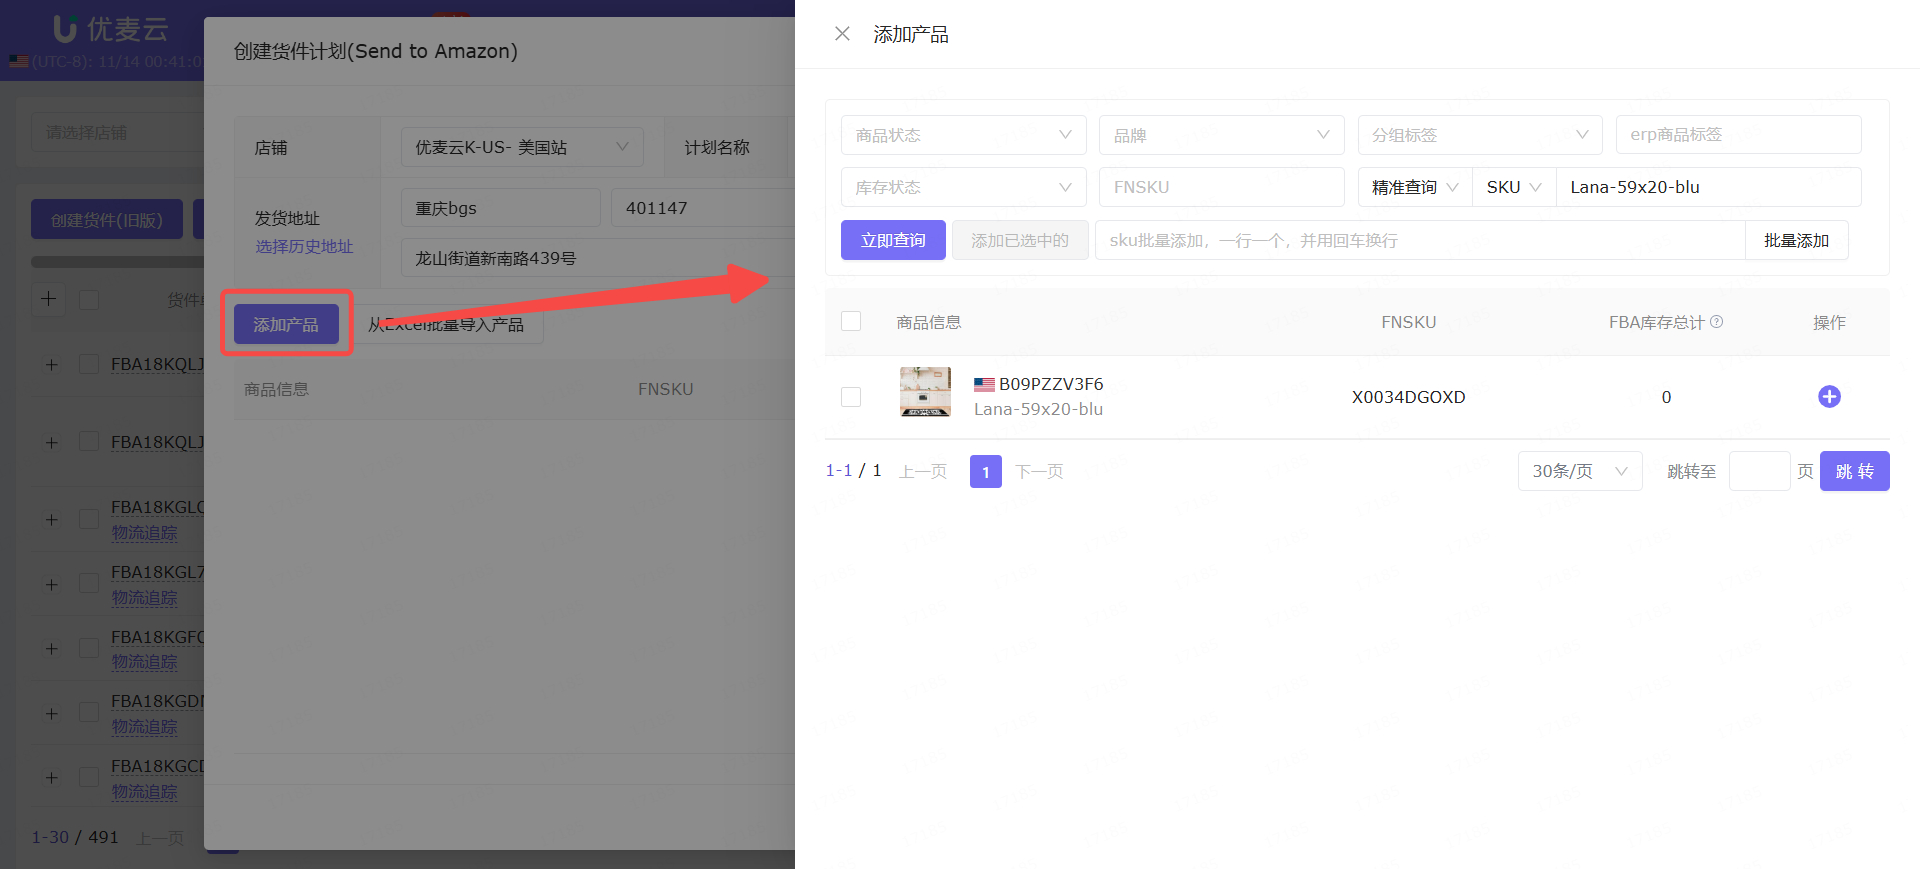
There are 2 ways to add products: Add Individually + Batch Add.
Add Individually: Find the product by filtering product information and add it with one click. This method is suitable for situations with fewer SKUs to ship.
Batch Add: Upload all shipping products to the shipment by filling in an Excel template. This method is suitable for situations with many SKUs to ship.
Add Individually steps:
Batch Add steps:
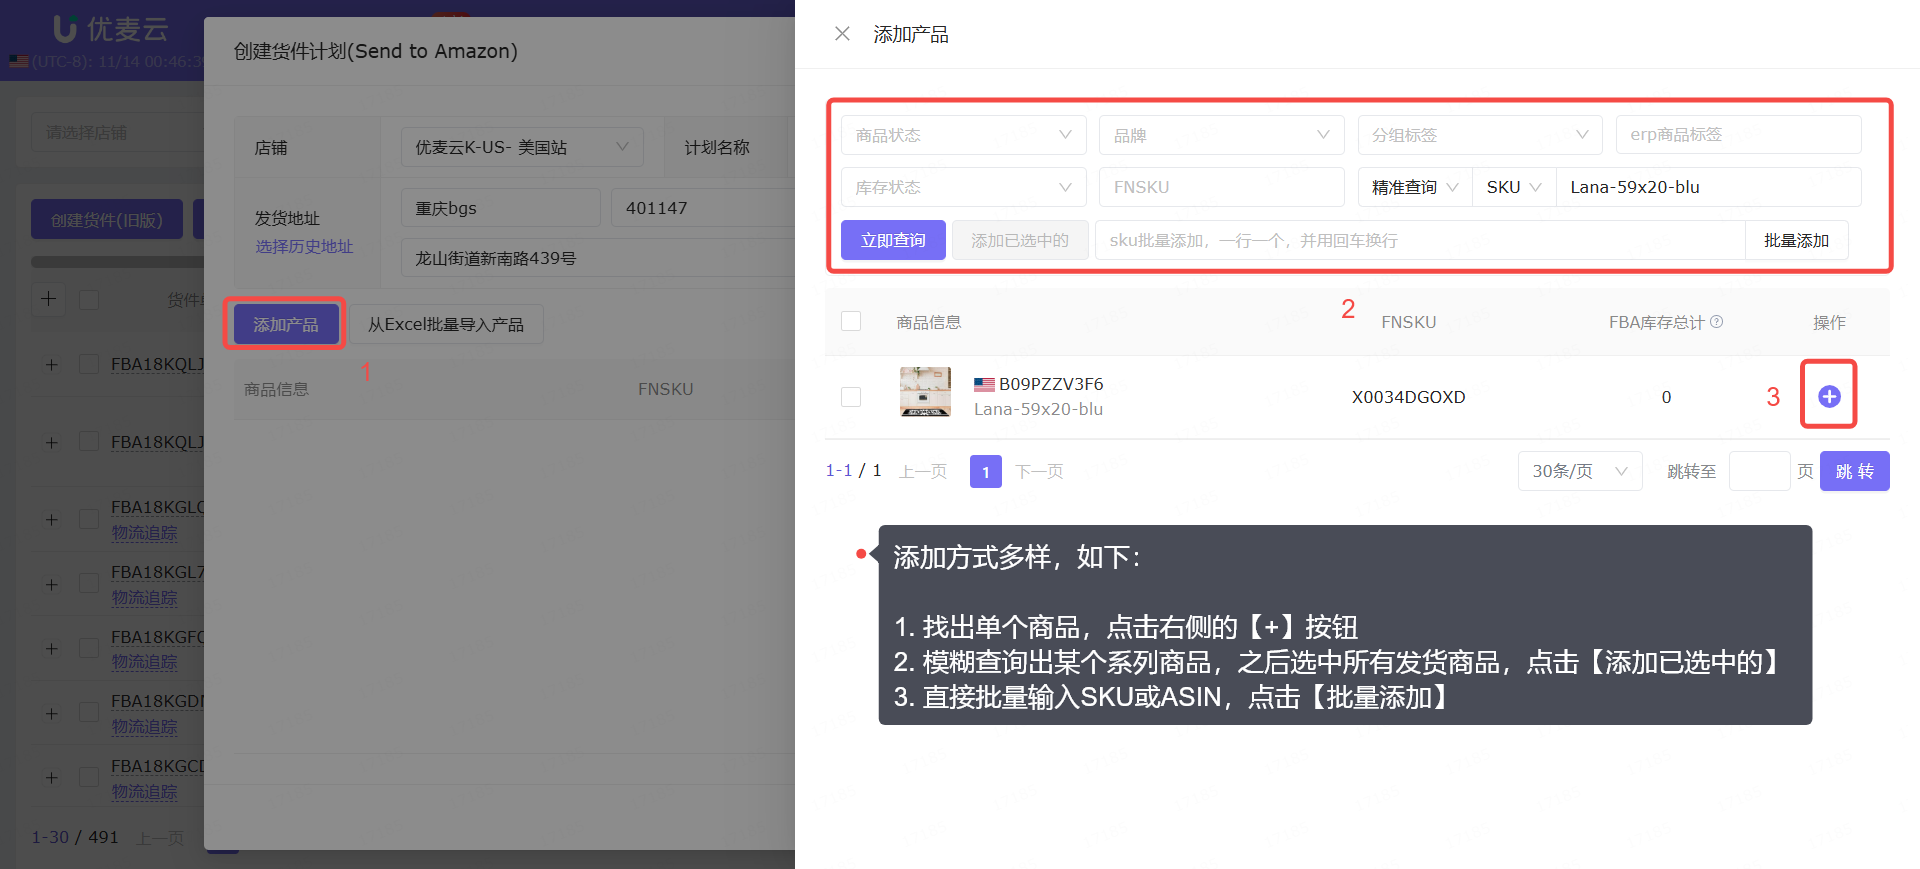
According to the example requirement, we choose "Add Individually".
Click 【Add Products】 to enter the "Add Products" page.
Then filter by SKU: Lana-59x20-blu, find the product, and click the 【+】 button on the right to add it to the shipment with one click.
Next, confirm the shipping information and fill in the declared quantity.
Shipping information includes: Expiration Date, Who Labels, Who Prepares.
These three pieces of information can be edited and modified. Click 【Batch】 to modify them.
Preparation information can be set in advance. Click the edit button to the right of the product's "Who Prepares" to edit it.
After confirming the product shipping information, fill in the corresponding declared quantity, which is the shipping quantity.

According to the example requirement, we do not fill in the expiration date, seller labels and prepares, and fill in 200 for the declared quantity.
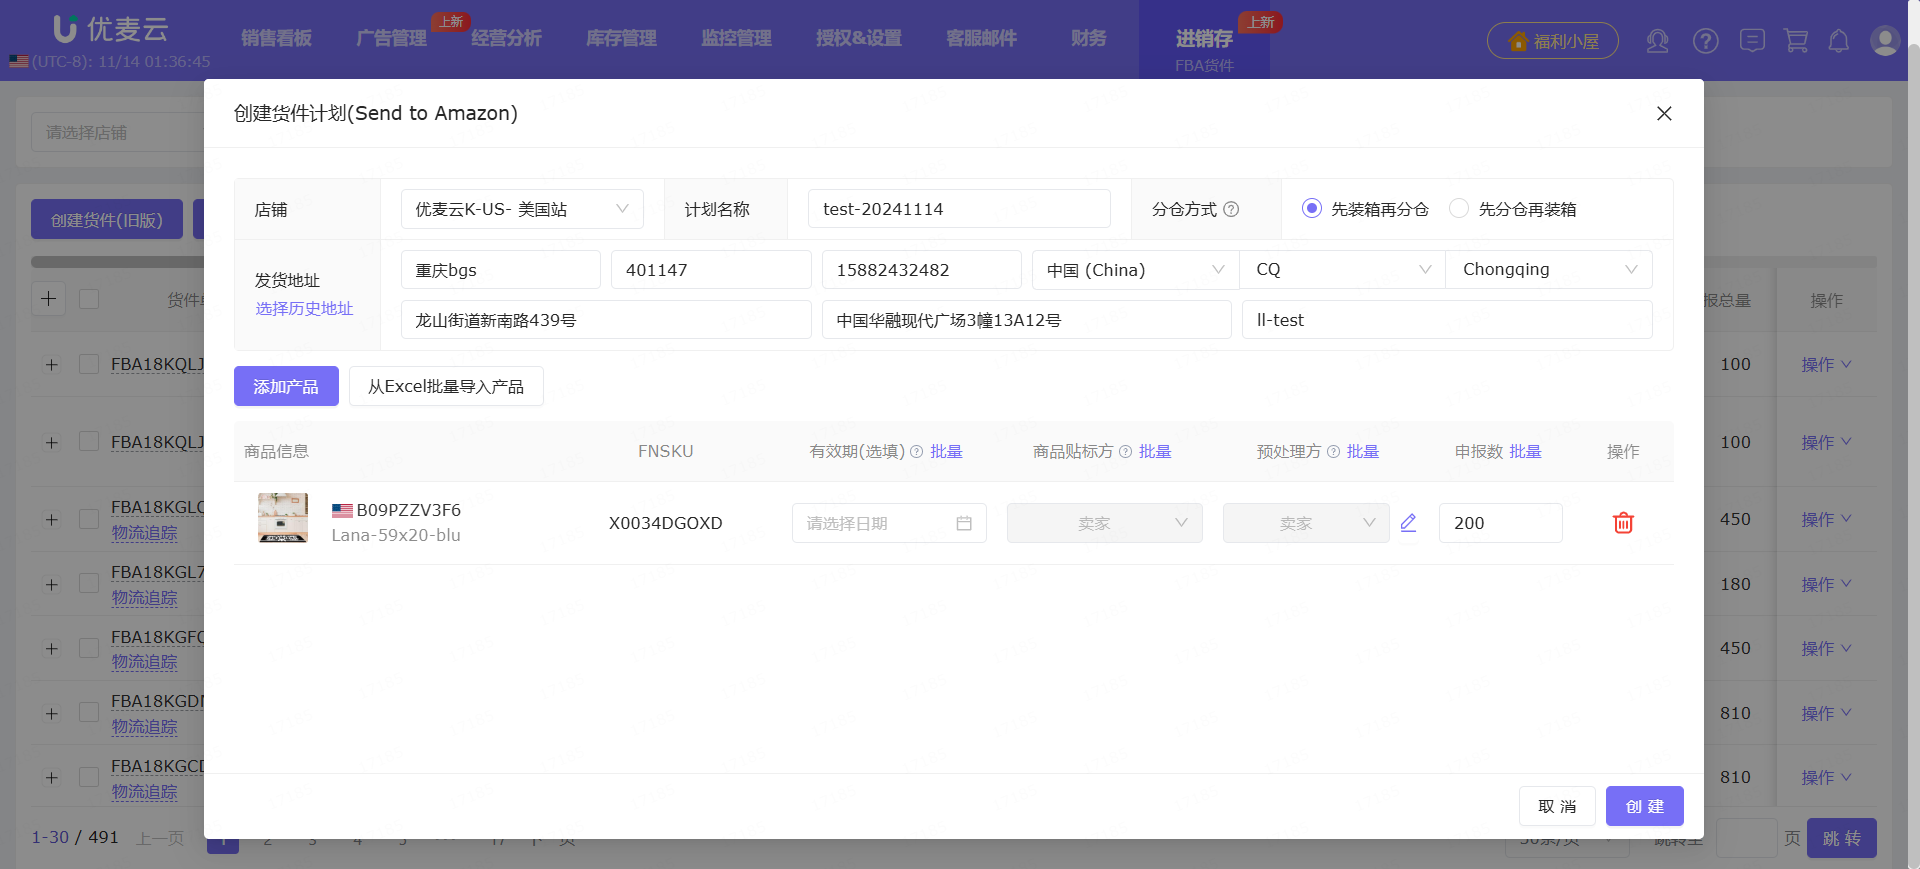
Finally, submit the creation information.
After confirming that all information is correct, click 【Create】 to submit the shipment creation to Amazon. After submission, it will be redirected to the "Active" workflow in Amazon Seller Central.
After completing the Amazon platform process, we temporarily need to connect with the local warehouse ourselves and use the 【Outbound Order】 function to pack, ship, and fulfill the outbound order.
Outbound Order - Tutorial: Click to view
2. Pack Boxes
After submitting the creation information, Amazon will automatically generate a shipment and jump to the step: Pack Boxes.
Packing boxes refers to uploading the number of boxes after packing, weight, and dimensions.
Since product labels are downloaded and printed in step 5 【Print Labels】, it is recommended to confirm the shippable quantity and box dimensions with the local warehouse personnel in advance.
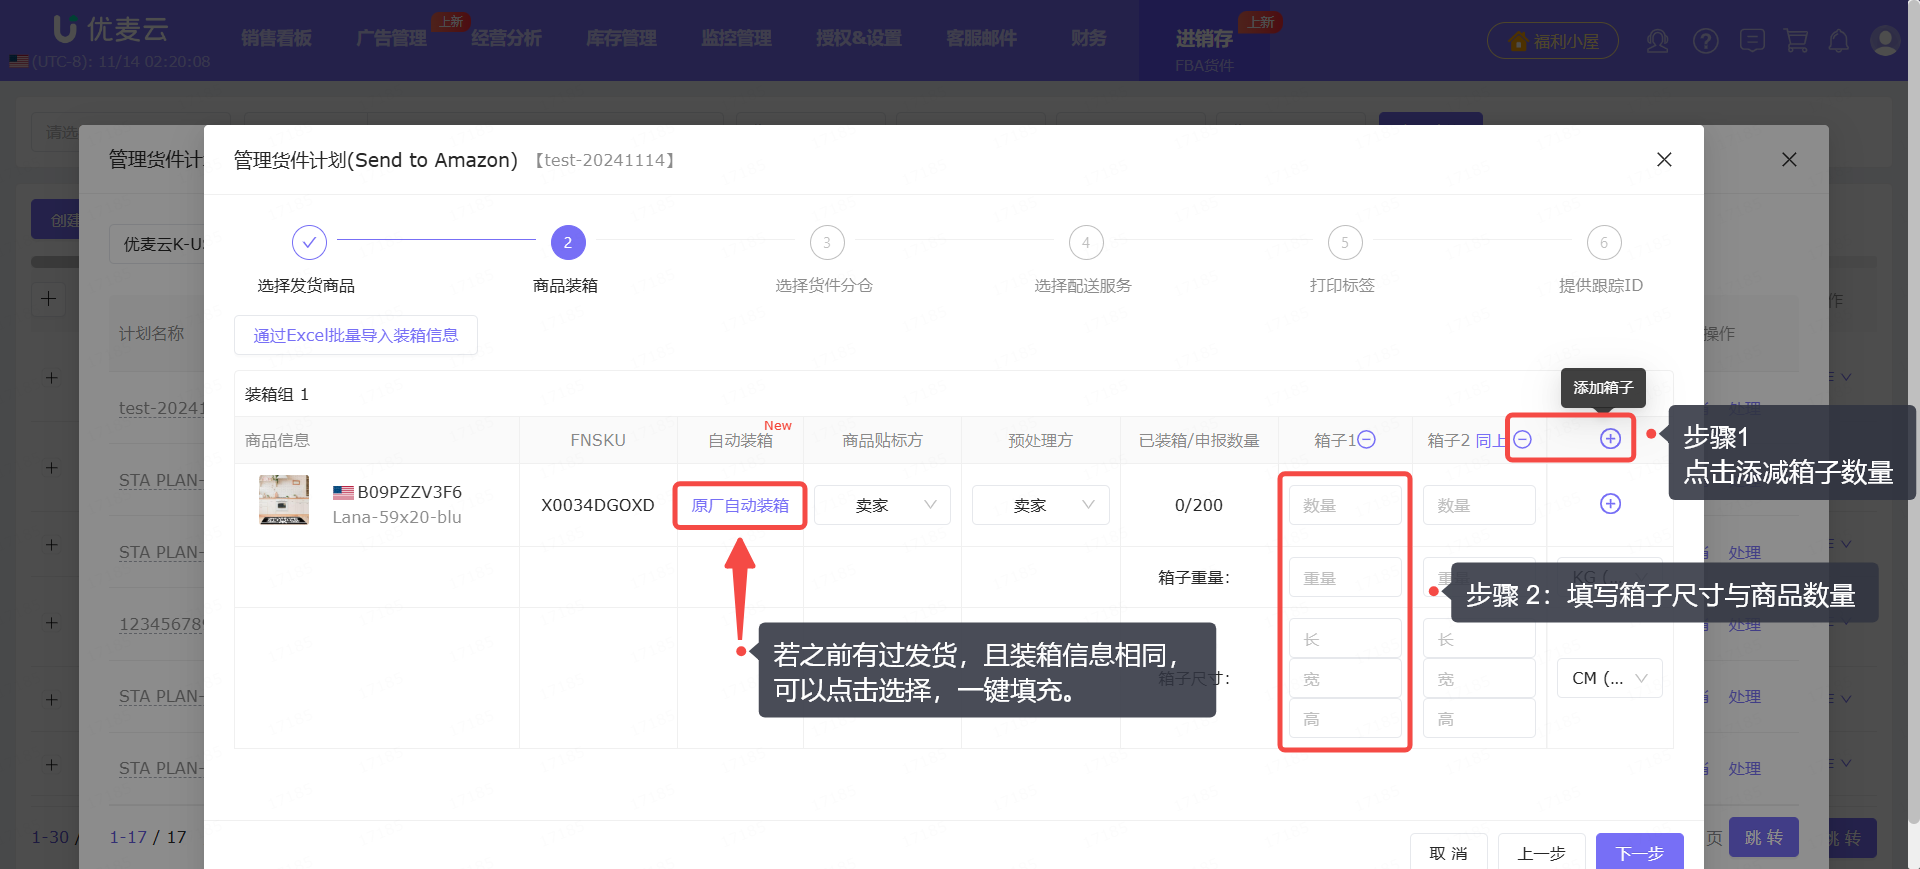
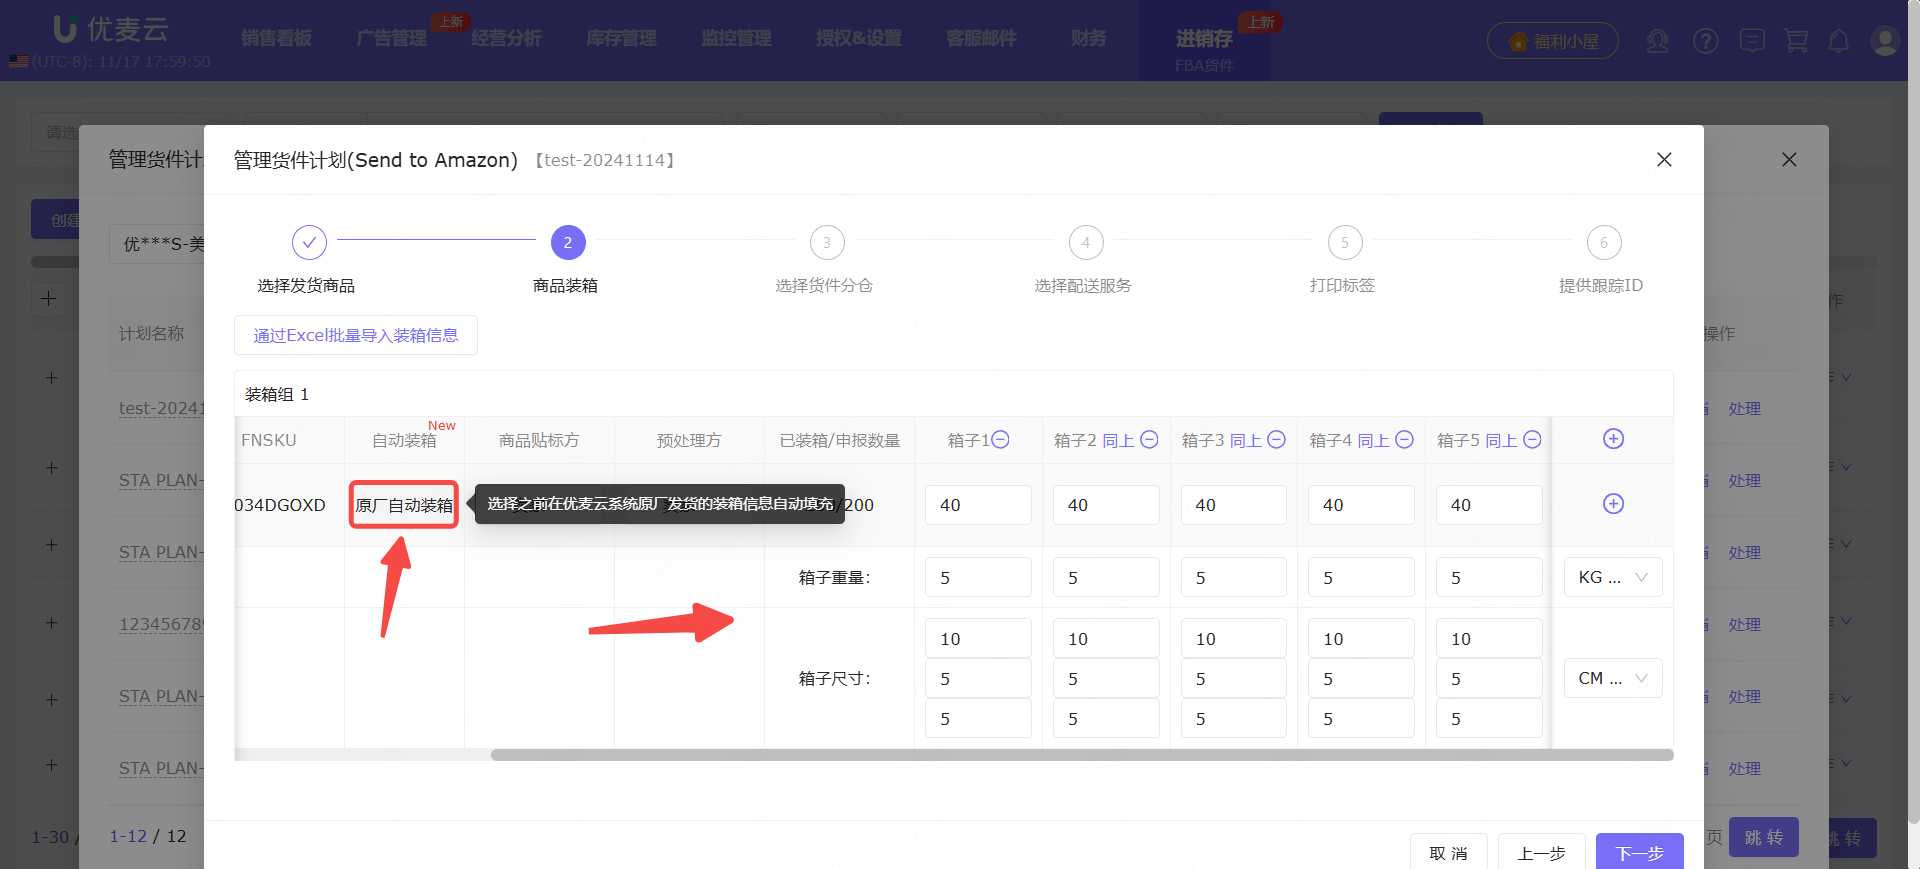
Among them, there is a function: Original Factory Auto-Packing.
This refers to, if it is a batch shipment, and each box only contains this SKU product, the dimensions and weight of the shipping box will be saved by the system for future shipments to select and automatically fill in. For the same SKU with different quantities, it will be saved as different templates, and you can freely choose for future shipments.
Click 【Original Factory Auto-Packing】 to fill in existing packing information with one click.
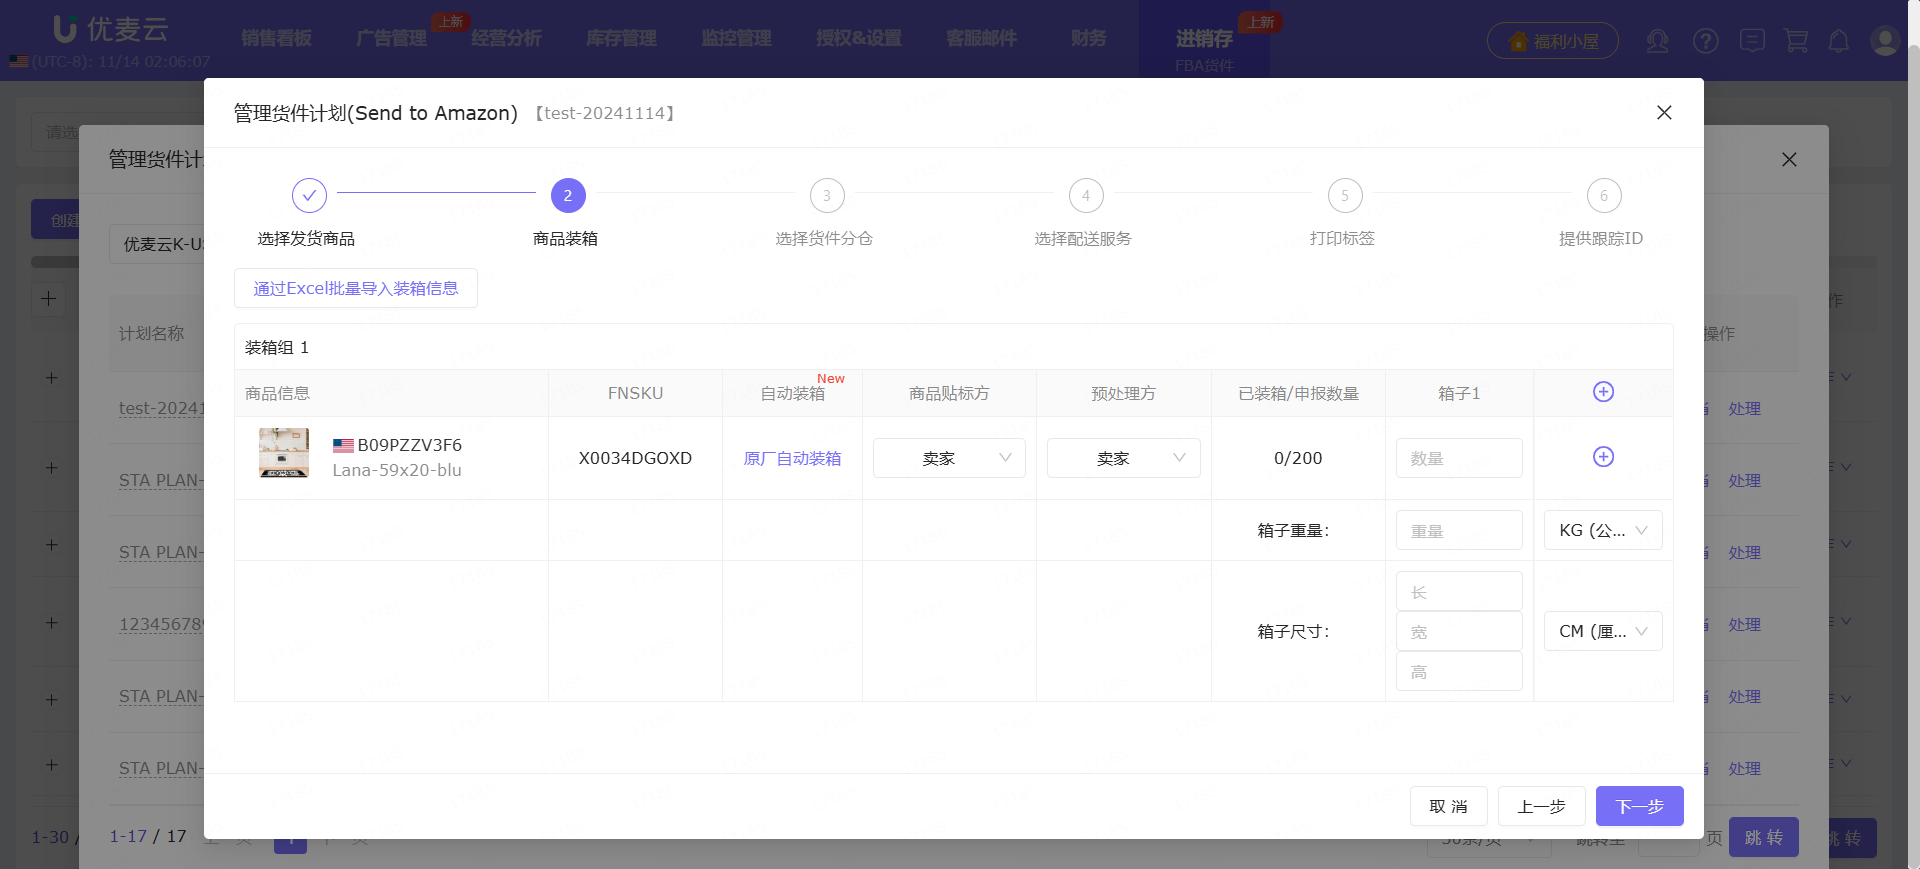
There are 2 ways to upload packed product information: Enter Individually + Template Import.
Enter Individually: Manually enter box by box. It is recommended to choose when the quantity of products and boxes is small.
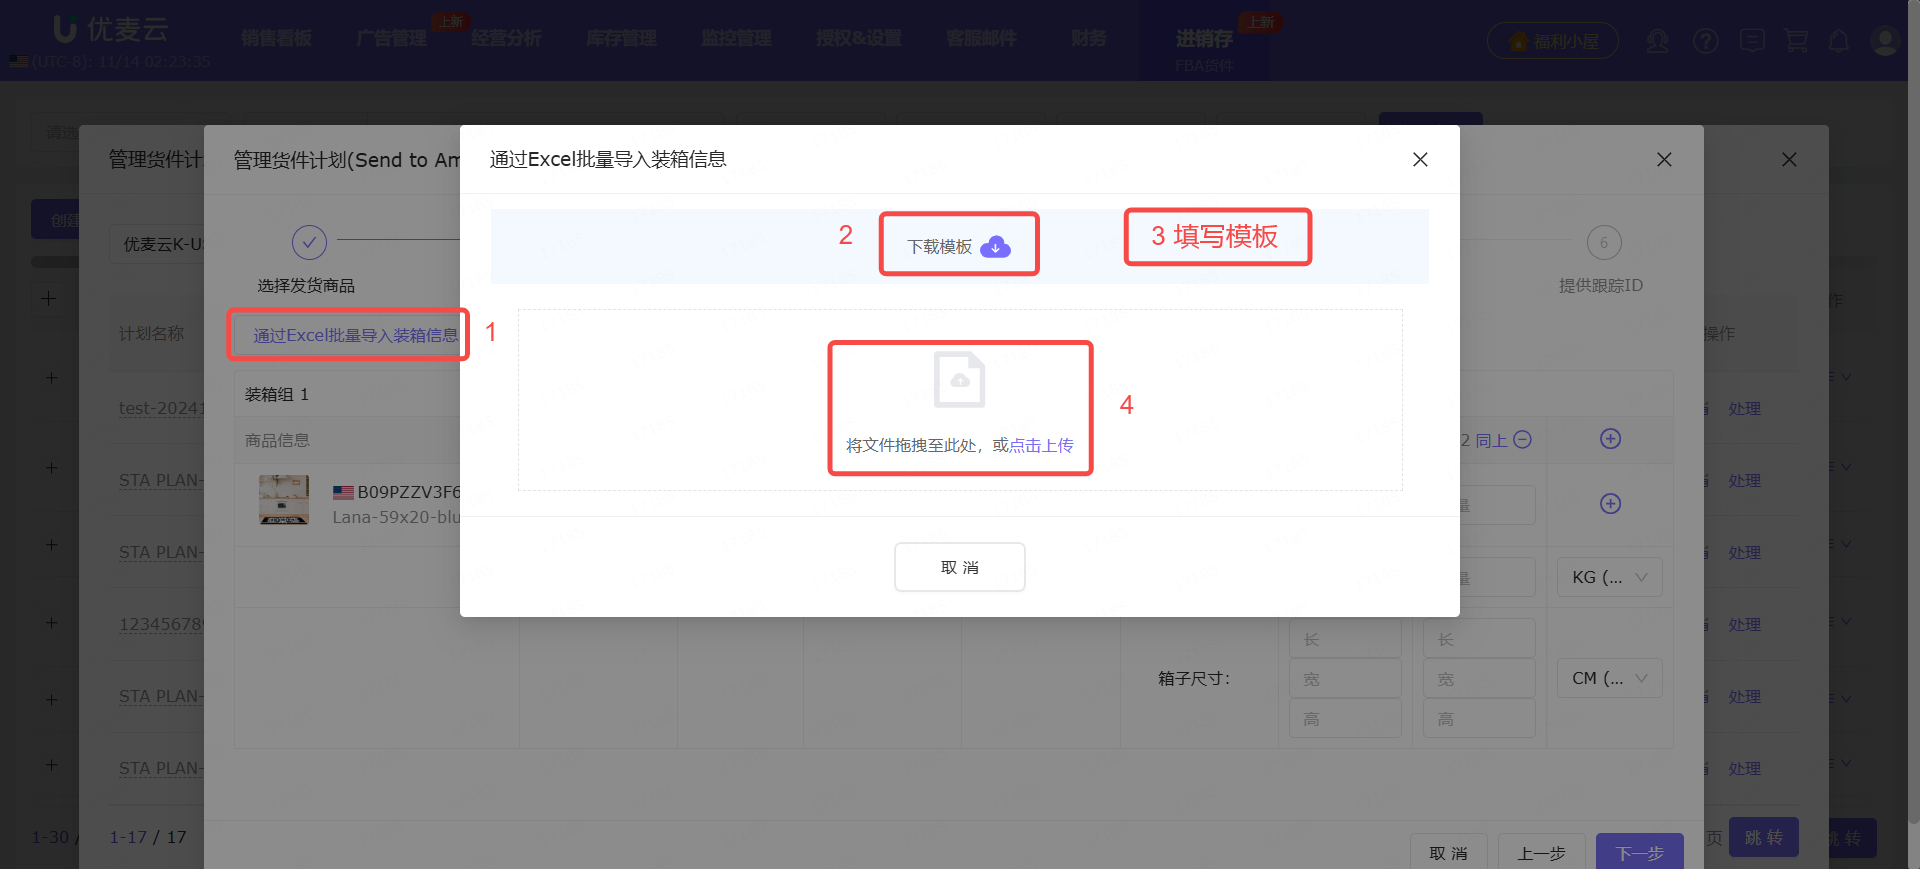
Template Import: Through an Excel spreadsheet, enter all product packing information and upload it to this shipment. It is recommended to choose when the quantity of products and boxes is large.
Enter Individually steps:
Template Import steps:
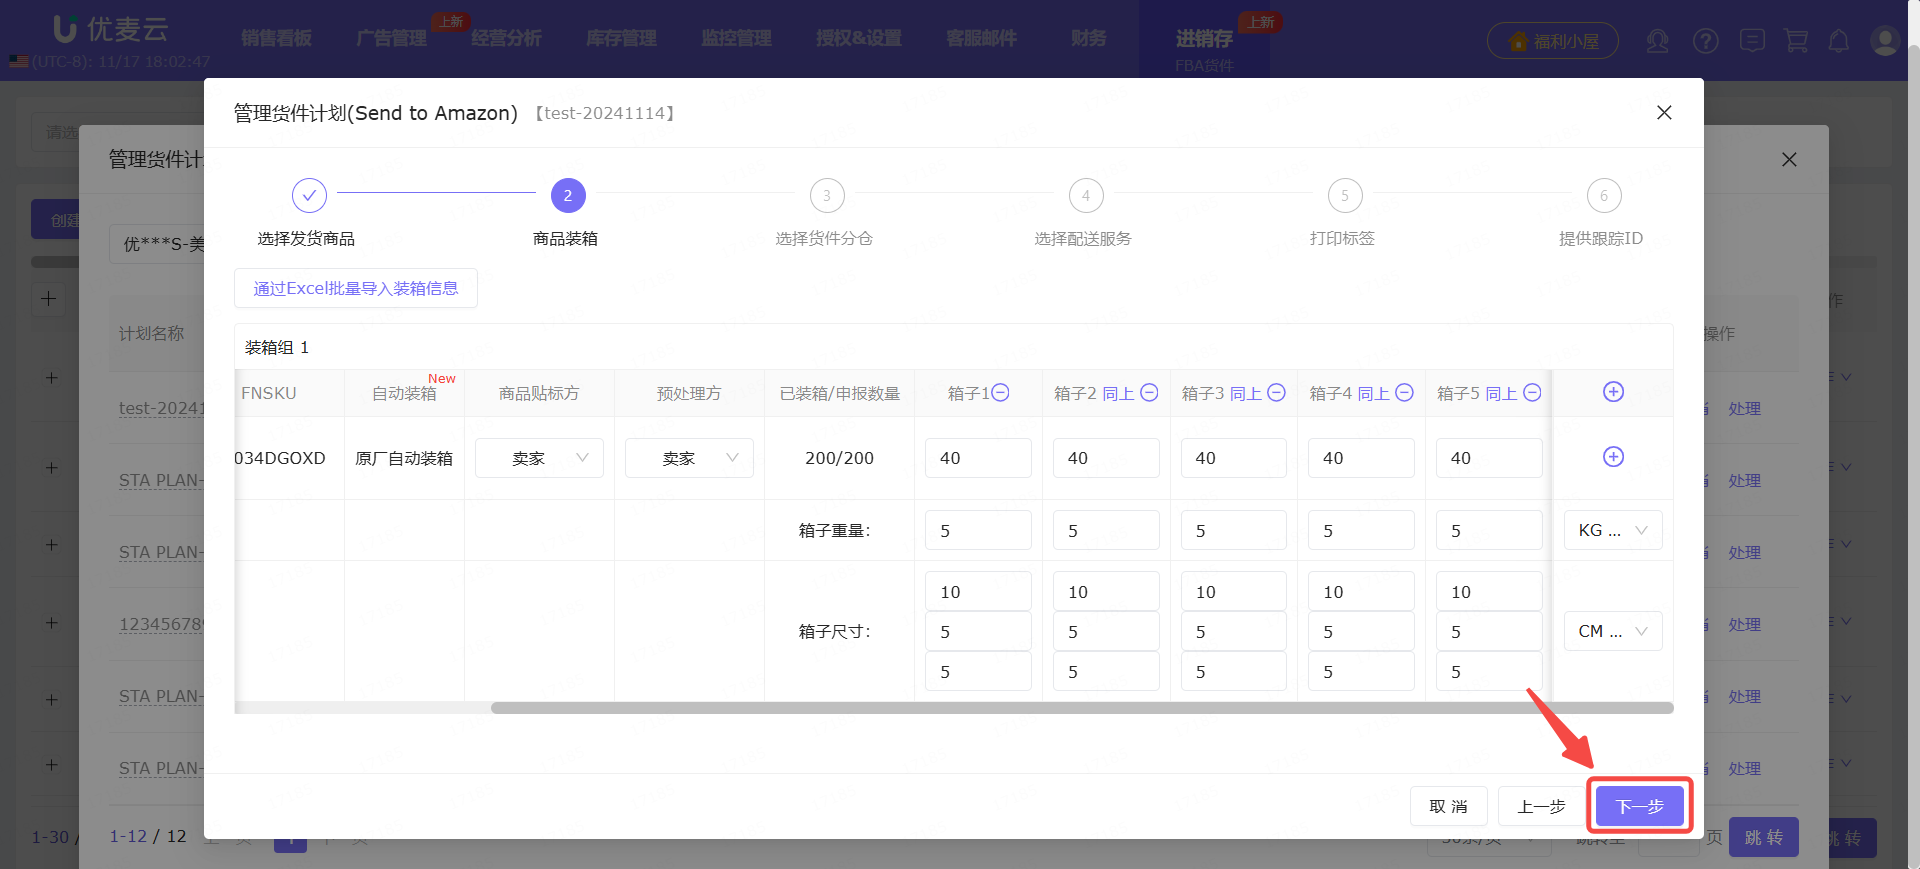
According to the example requirement, we have shipped this product before, and this time we are shipping the same quantity. Click 【Original Factory Auto-Packing】 to fill in the packing information with one click, saving time.
After confirming that the packing information is correct, click 【Next】 to proceed with warehouse selection.
3. Choose Ship-to Warehouses
After we fill in the packing information, the next step is to choose the ship-to warehouses.
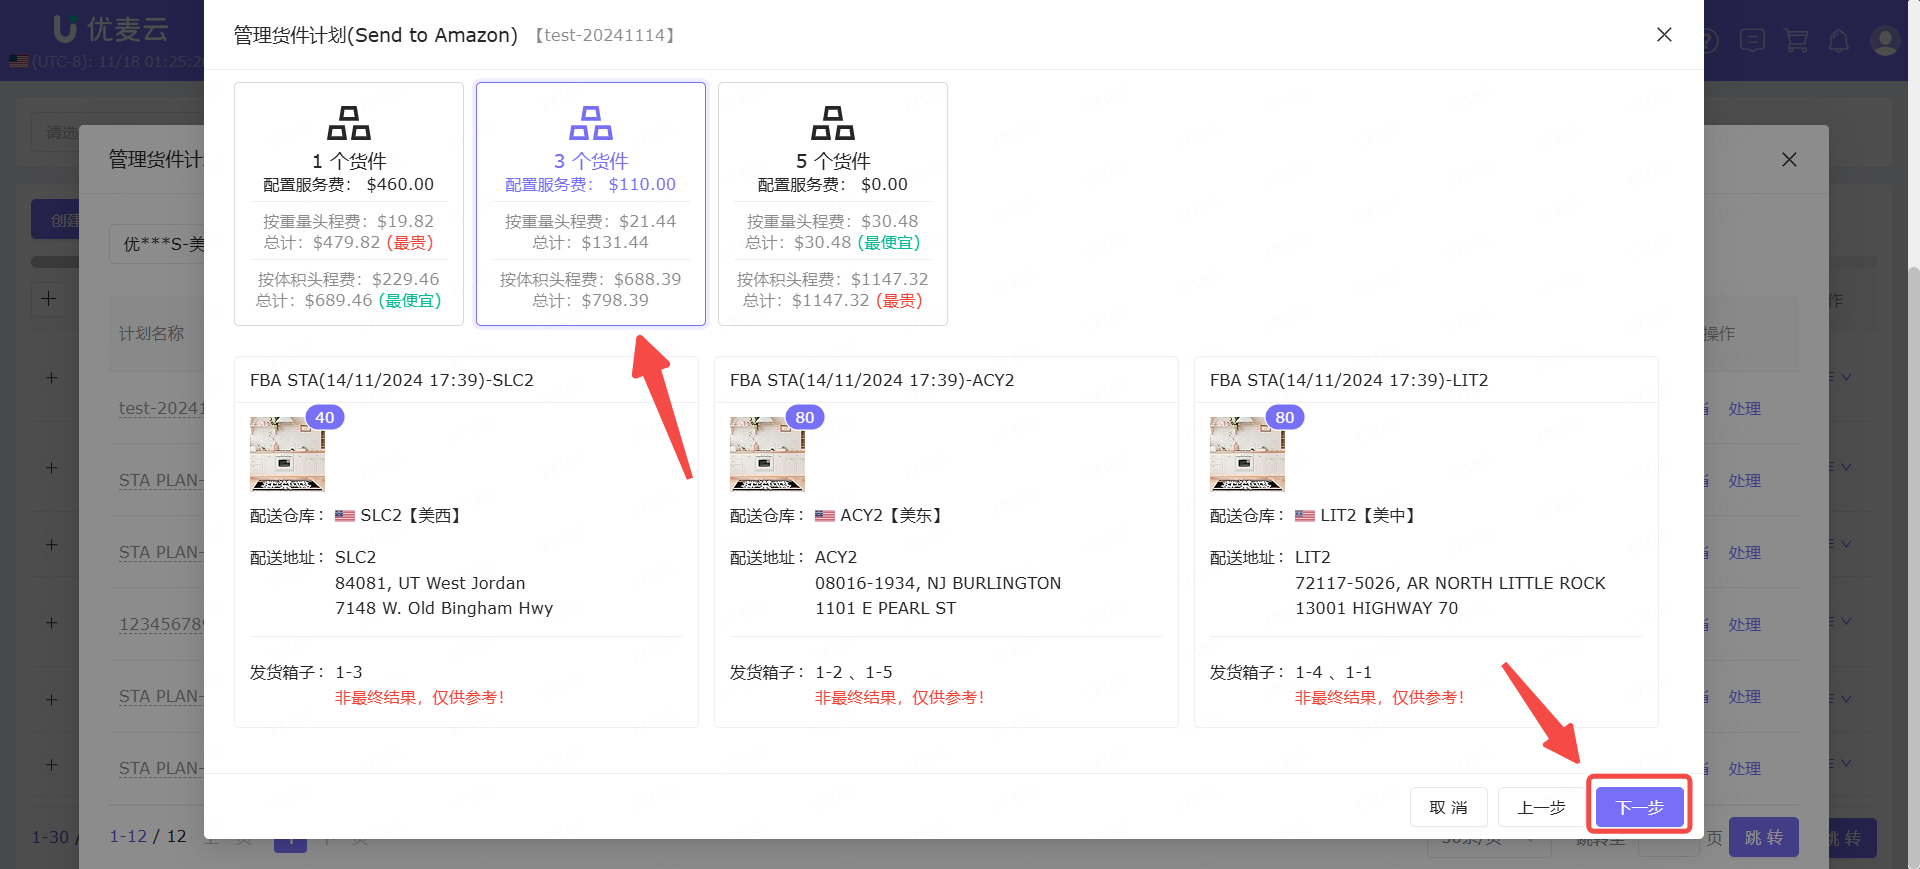
According to Amazon's shipping rules, our shipping products may be assigned to different Amazon warehouses.
However, we can choose to split shipments to different warehouses, or pay a configuration service fee to ship to the same warehouse. The fewer warehouses shipped to, the higher the configuration service fee.
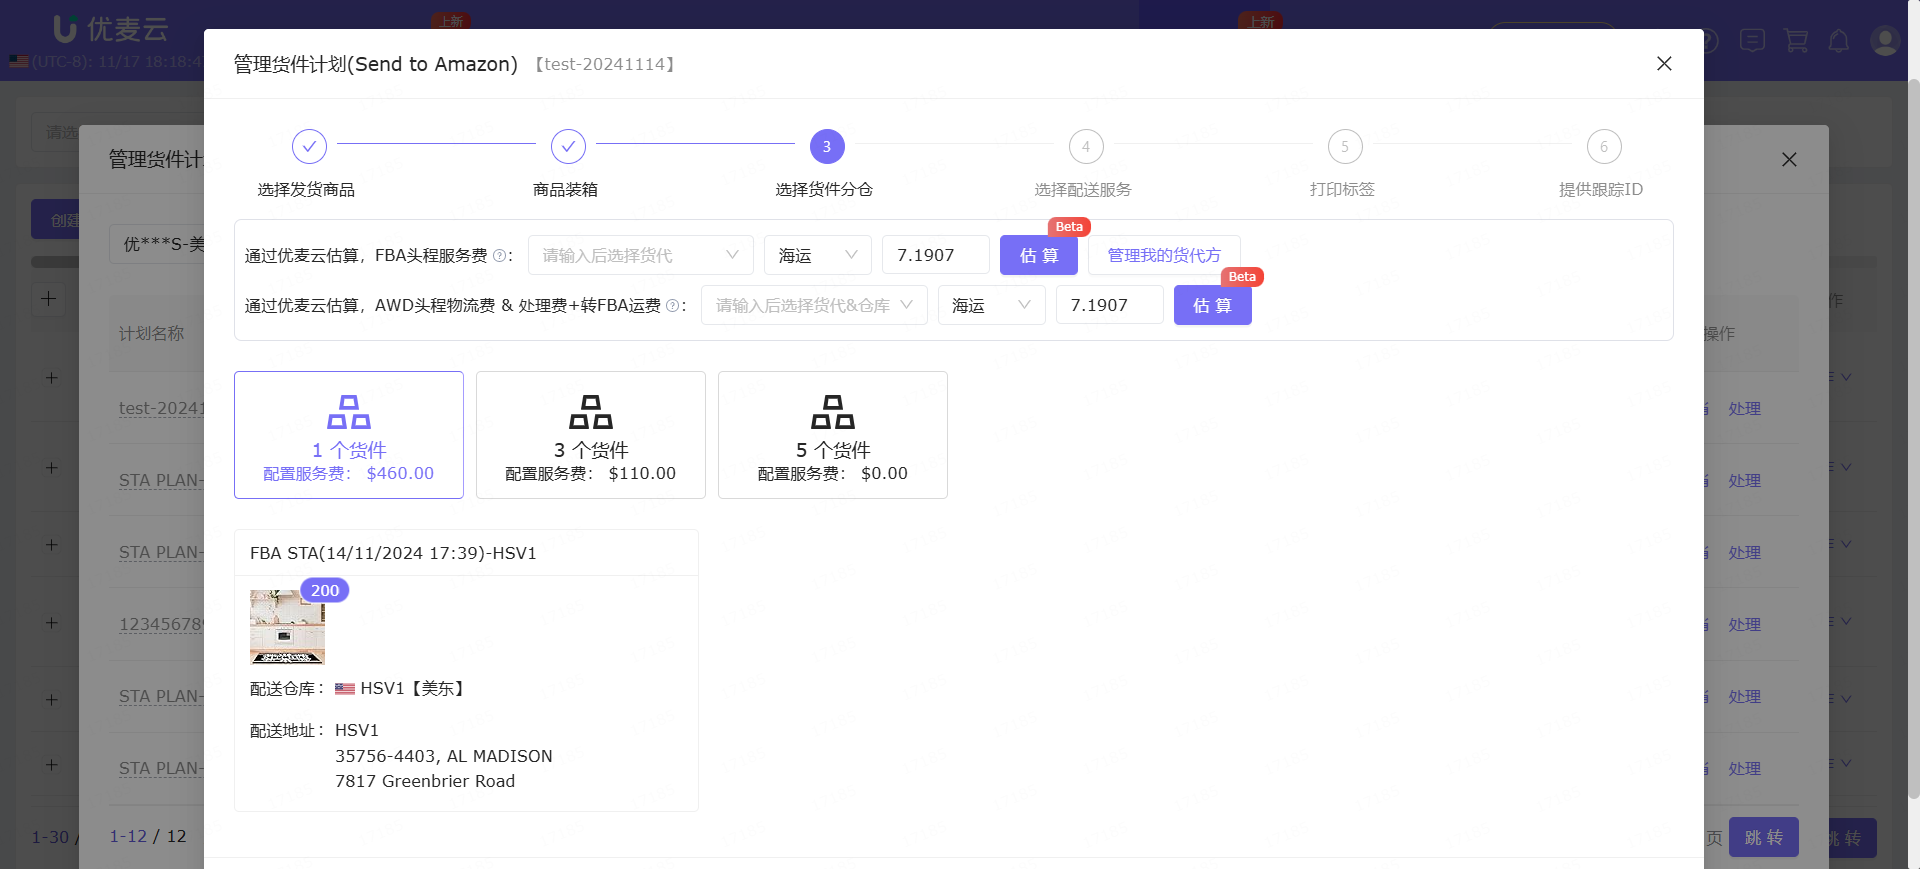
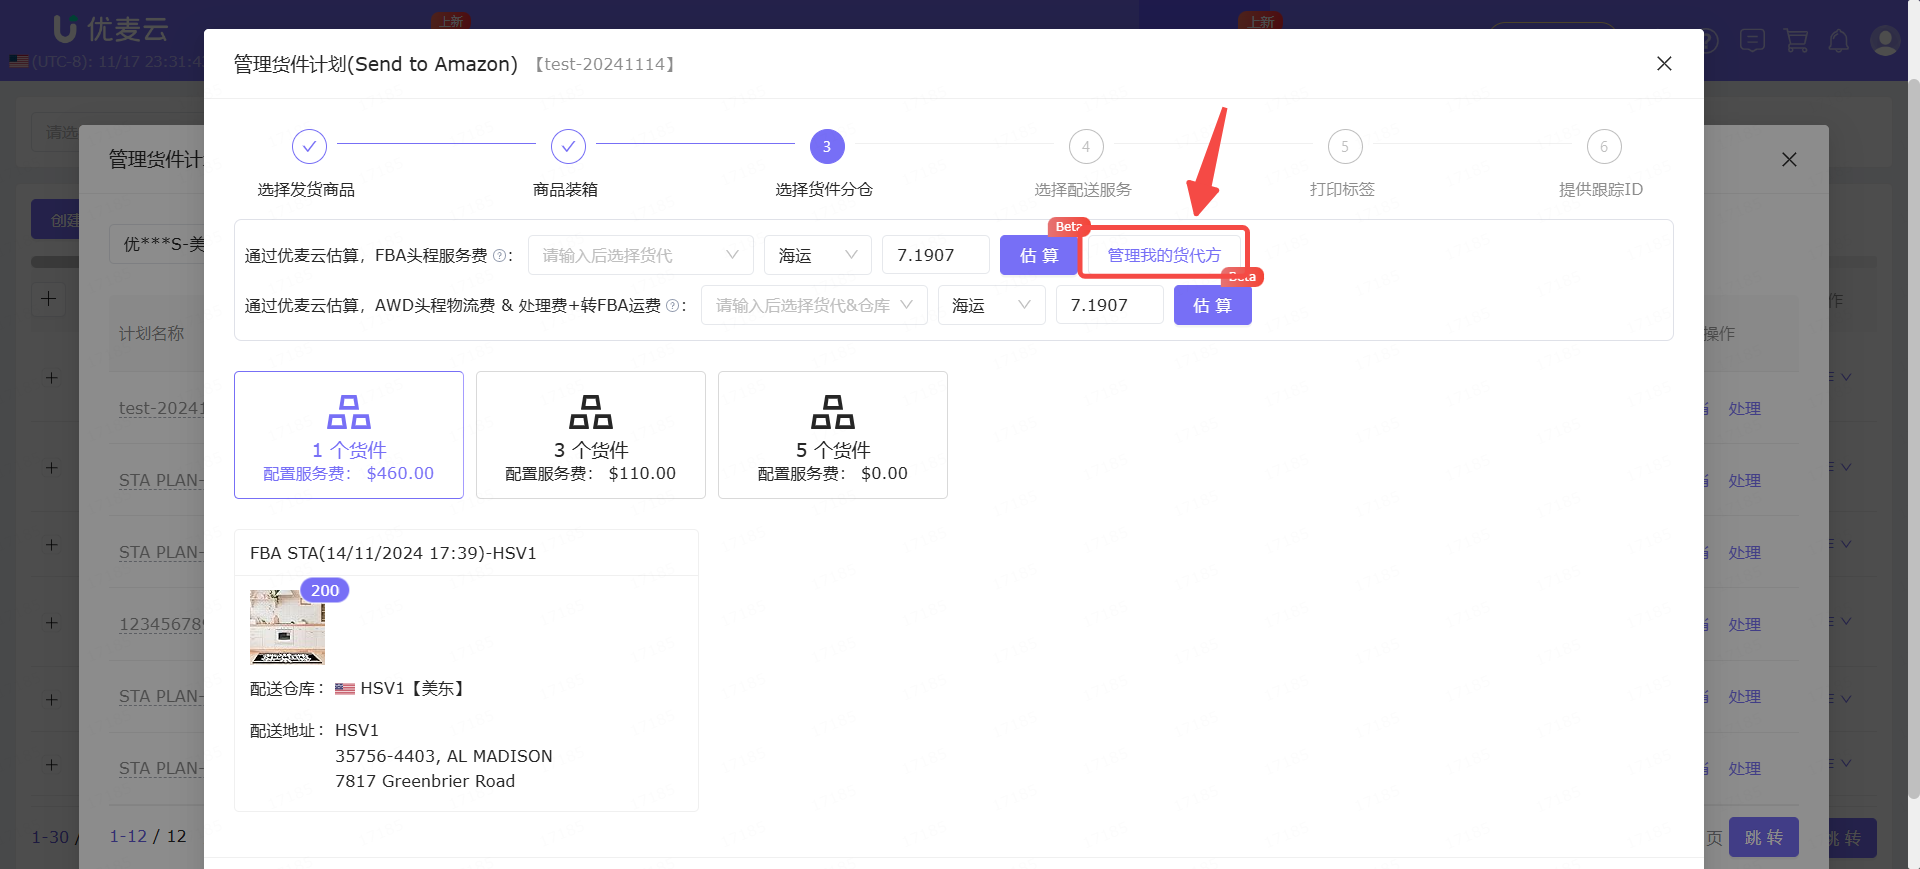
Estimated Inbound & Configuration Fees
Regarding the choice of warehouse split, which is more reasonable and suitable for us, we can calculate the fees based on our needs and choose the appropriate number of warehouses.
At this time, you can also use YouMail Cloud's 【Estimated Inbound & Configuration Fees】 function to directly calculate and display all corresponding fees for each warehouse selection, including FBA fee calculation for regular logistics and AWD shipping-related fees, helping us make decisions faster and save time.
Currently, fee estimation only supports the US marketplace.
The following is a tutorial on how to use the "Estimated Inbound & Configuration Fees" function.
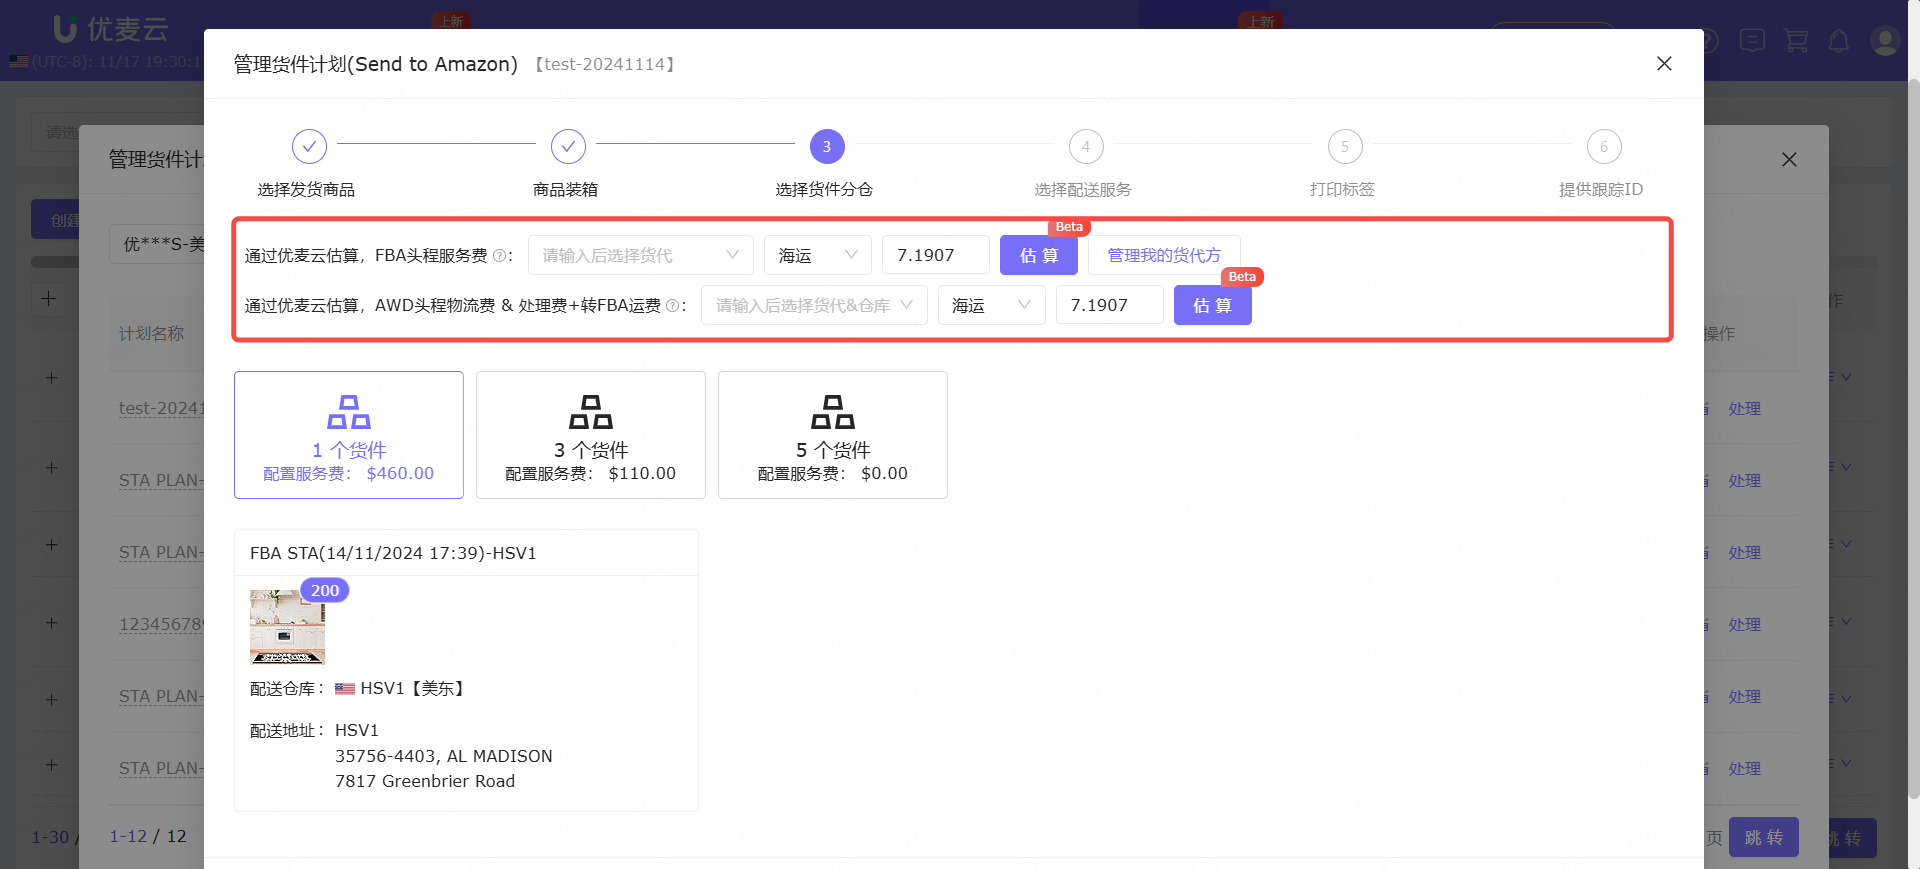
First, upload freight forwarder information.
Click 【Manage My Freight Forwarders】 to enter the page for uploading freight forwarder information.
Enter the "My Freight Forwarders" page.
There are 3 ways to upload freight forwarder information: Excel template upload, manual single upload, and copy existing creation.
The steps are as follows.
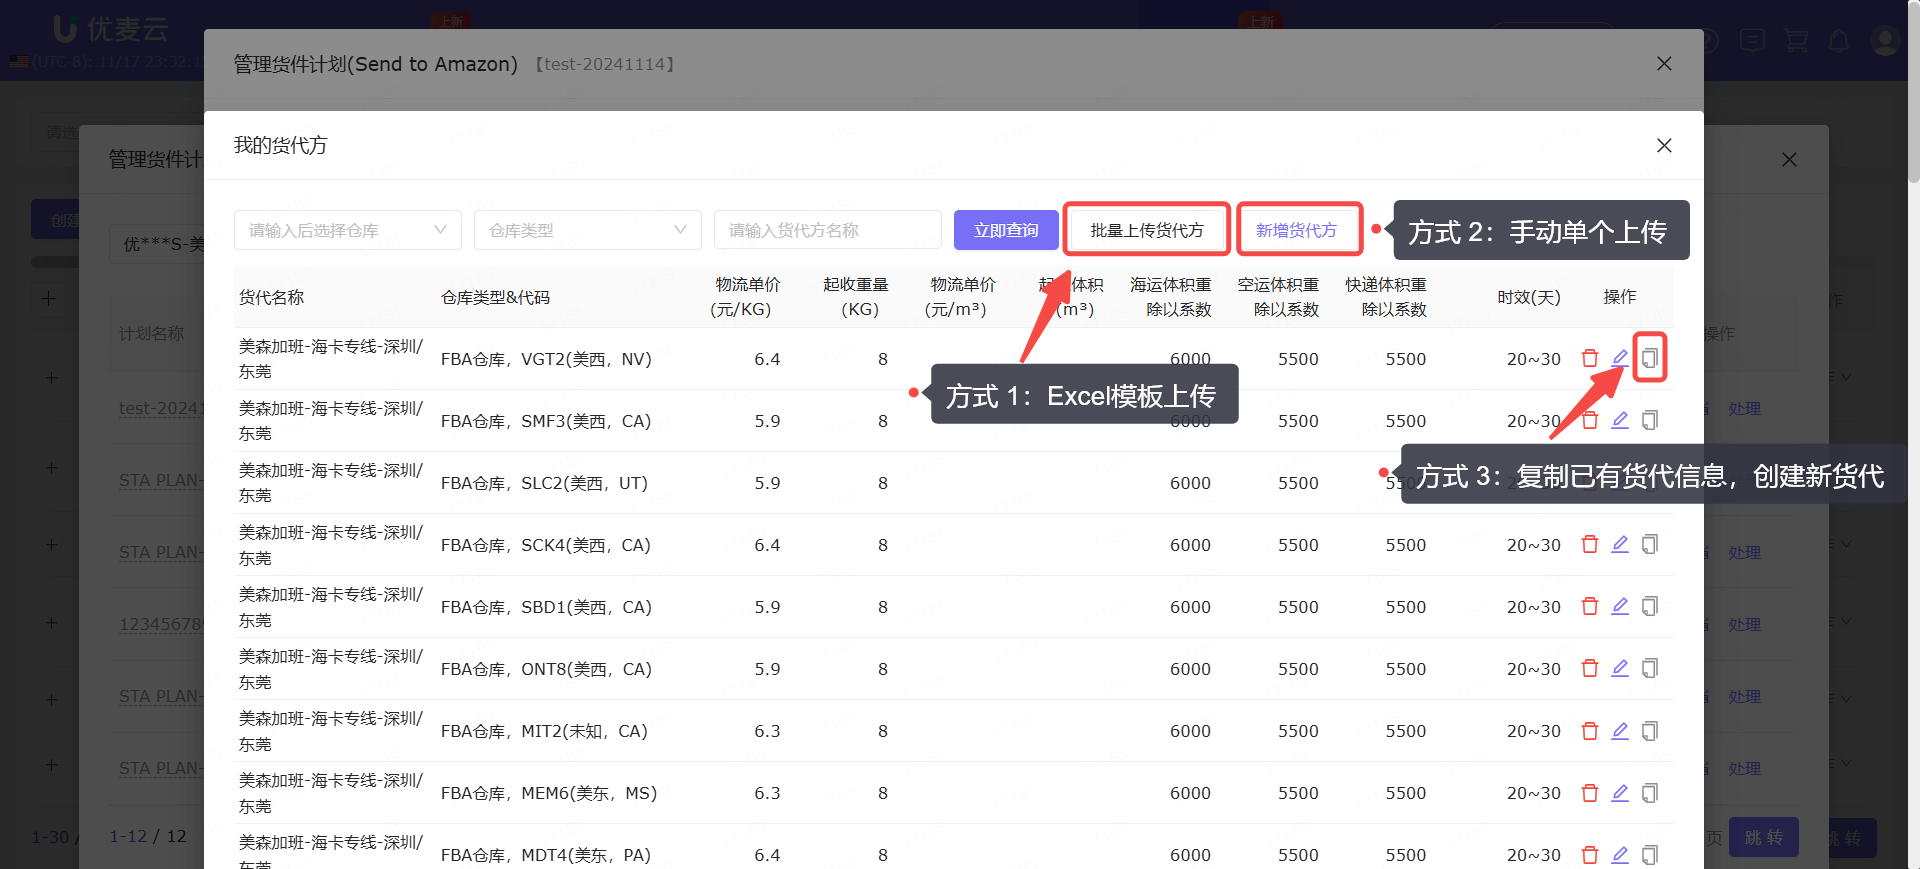
Method 1: Excel Template Upload

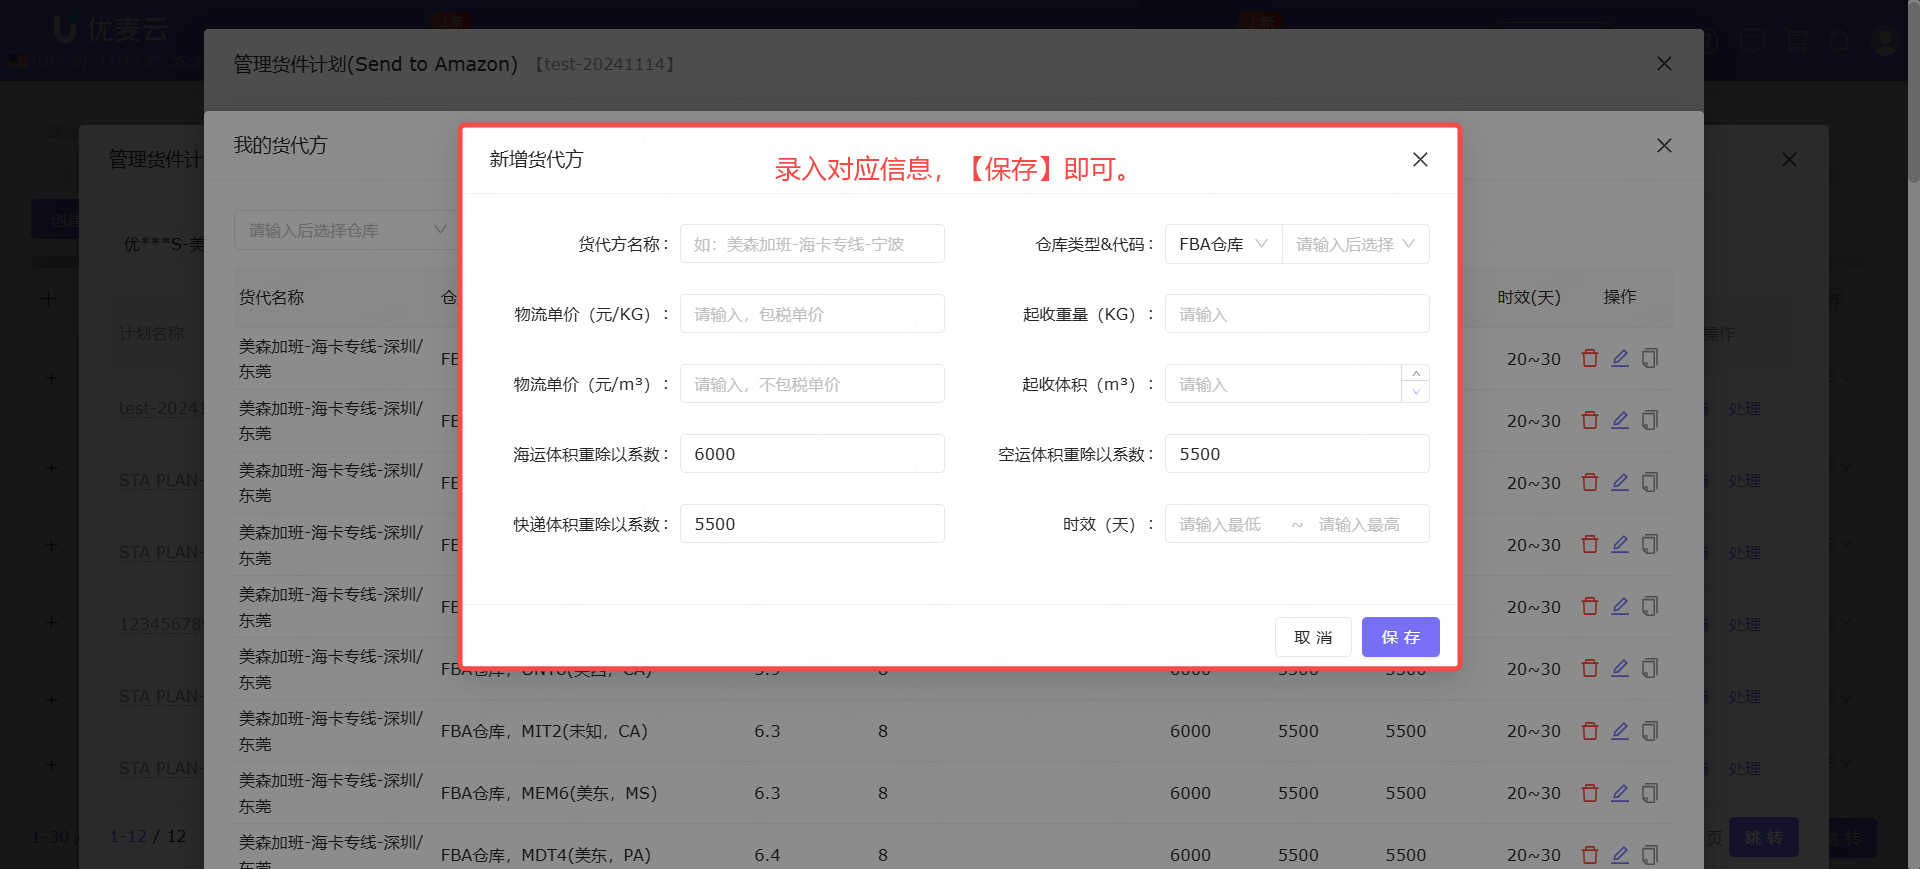
Method 2: Manual Single Upload
Tips:
In manual single upload, the selectable warehouse information displayed when selecting "FBA Warehouse" or "AWD Warehouse" is built into the system. If you cannot find the target warehouse, you can contact customer service to ask the technical team to add it for selection.
In addition, using an Excel template to upload freight forwarder information can also successfully upload warehouse information that is not in the system, but it will be displayed as 【Unknown】 without specific warehouse information displayed.
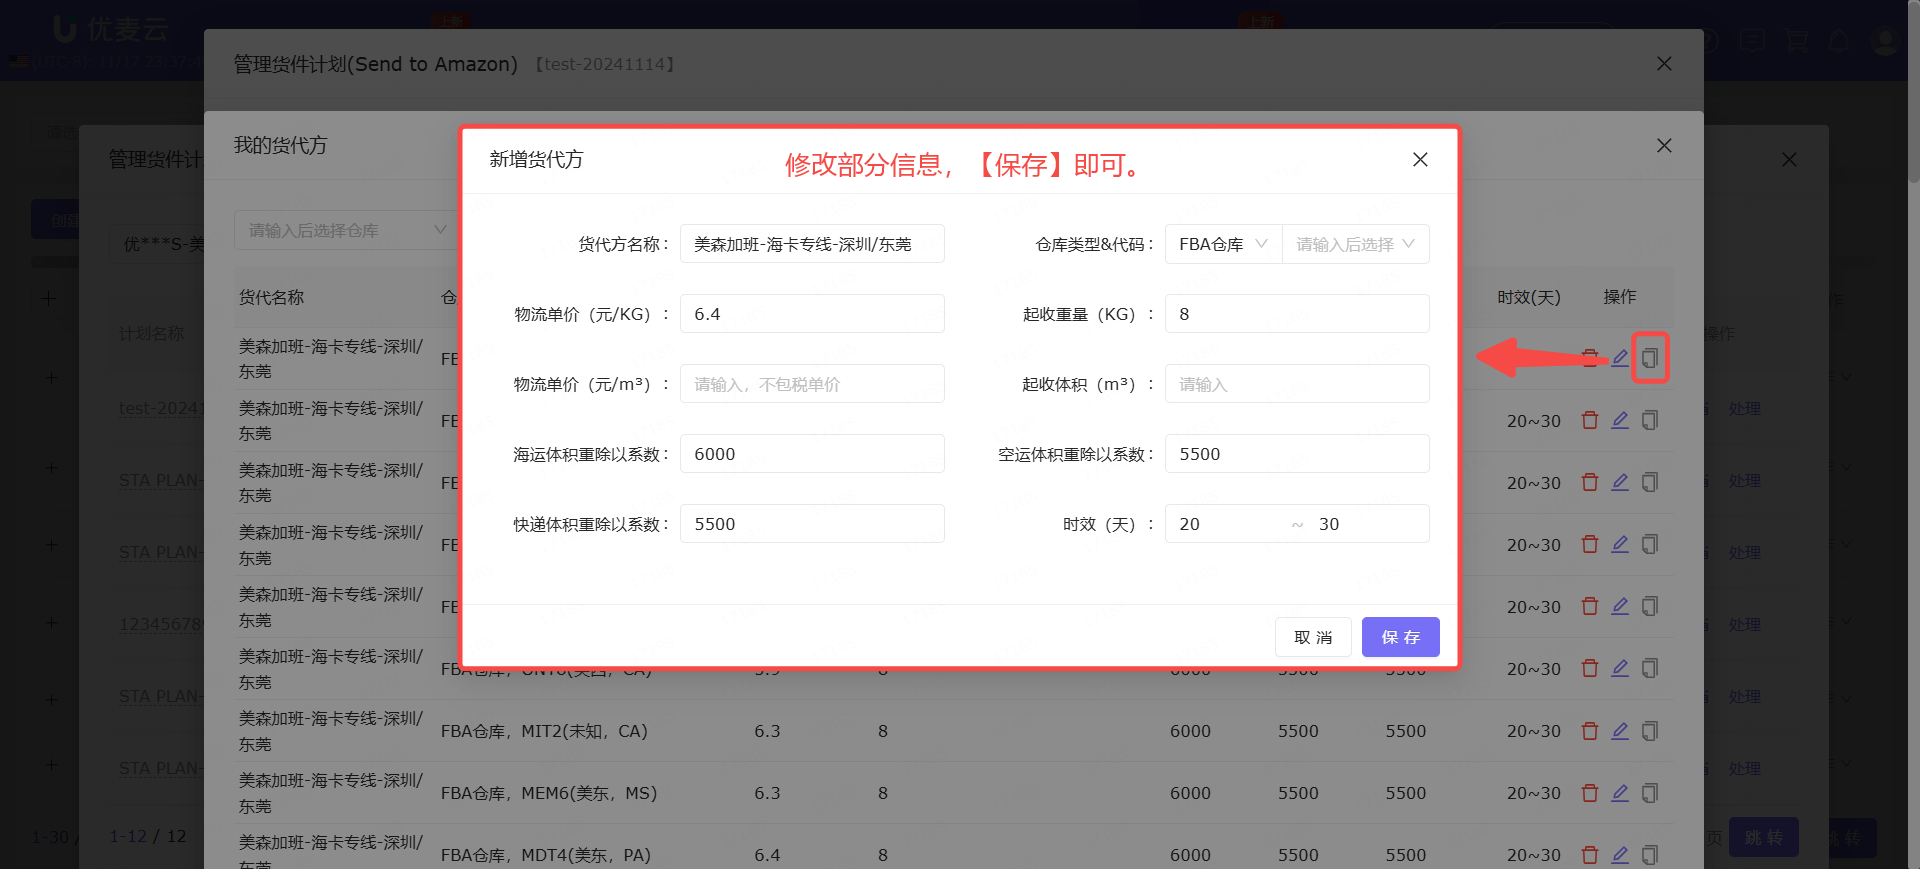
Method 3: Copy Existing Creation
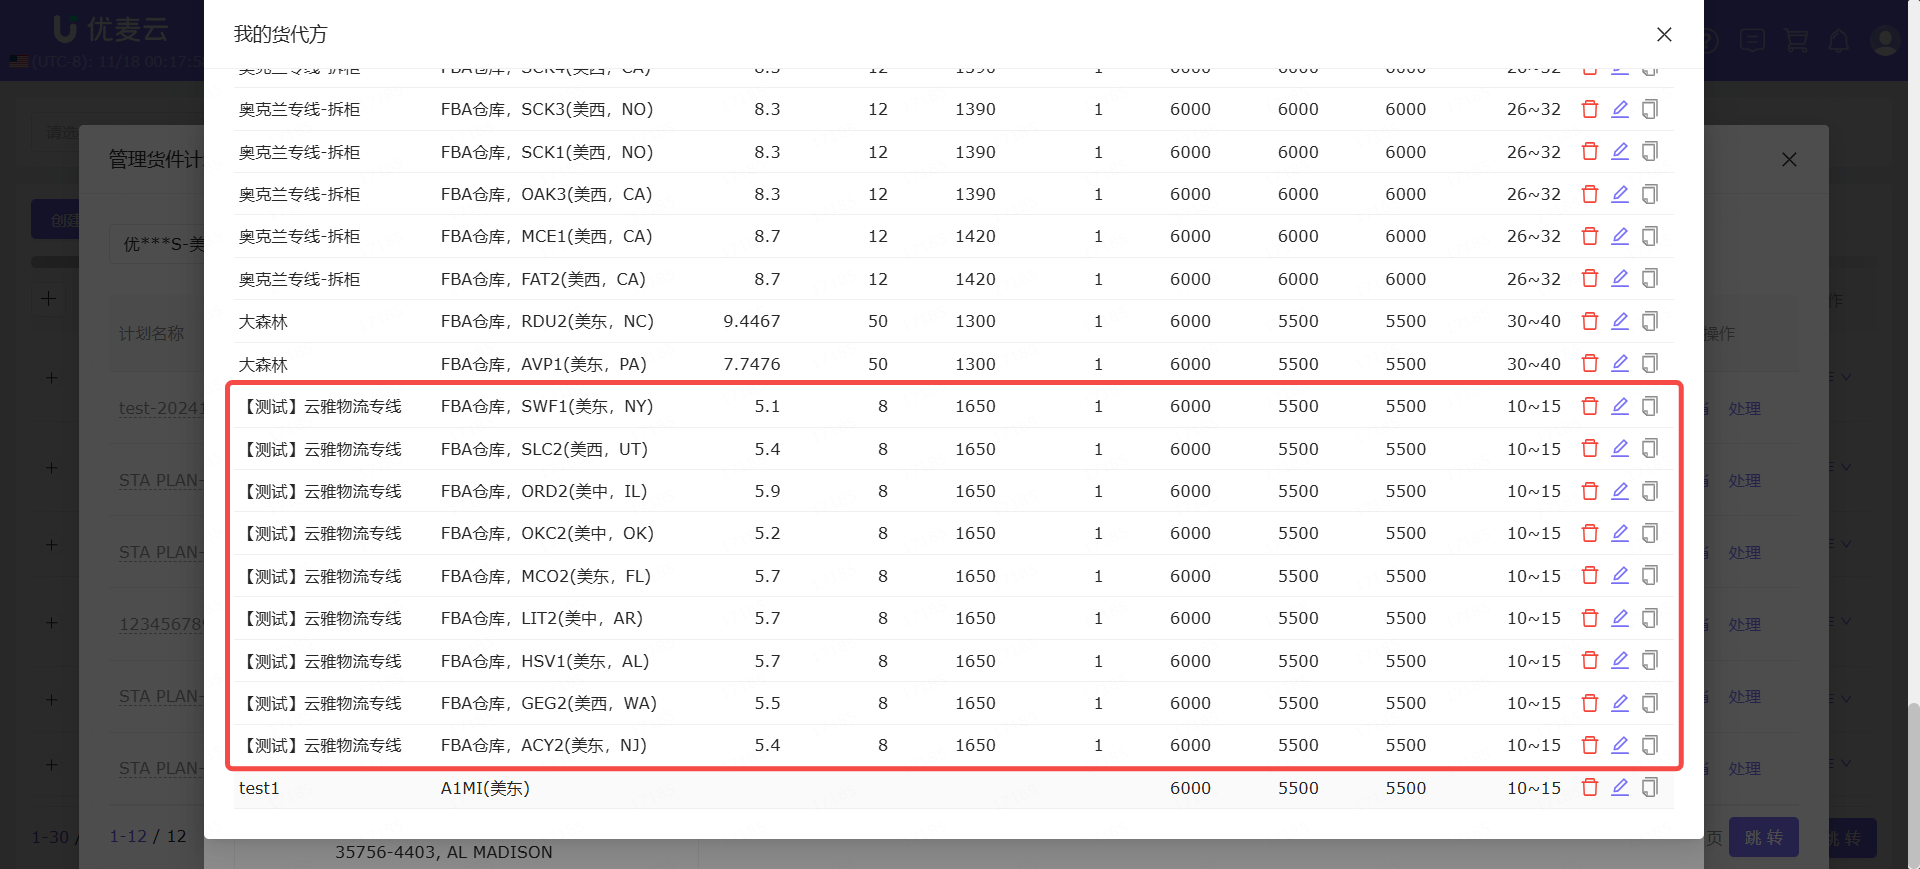
According to the warehouses split in our example requirement, there are 3 warehouse split types to choose from, including warehouses: SLC2, ACY2, OKC2, MCO2, GEG2, ORD2, SWF1, HSV1. We choose the Excel template upload method to pre-enter this warehouse information into the YouMail Cloud system.
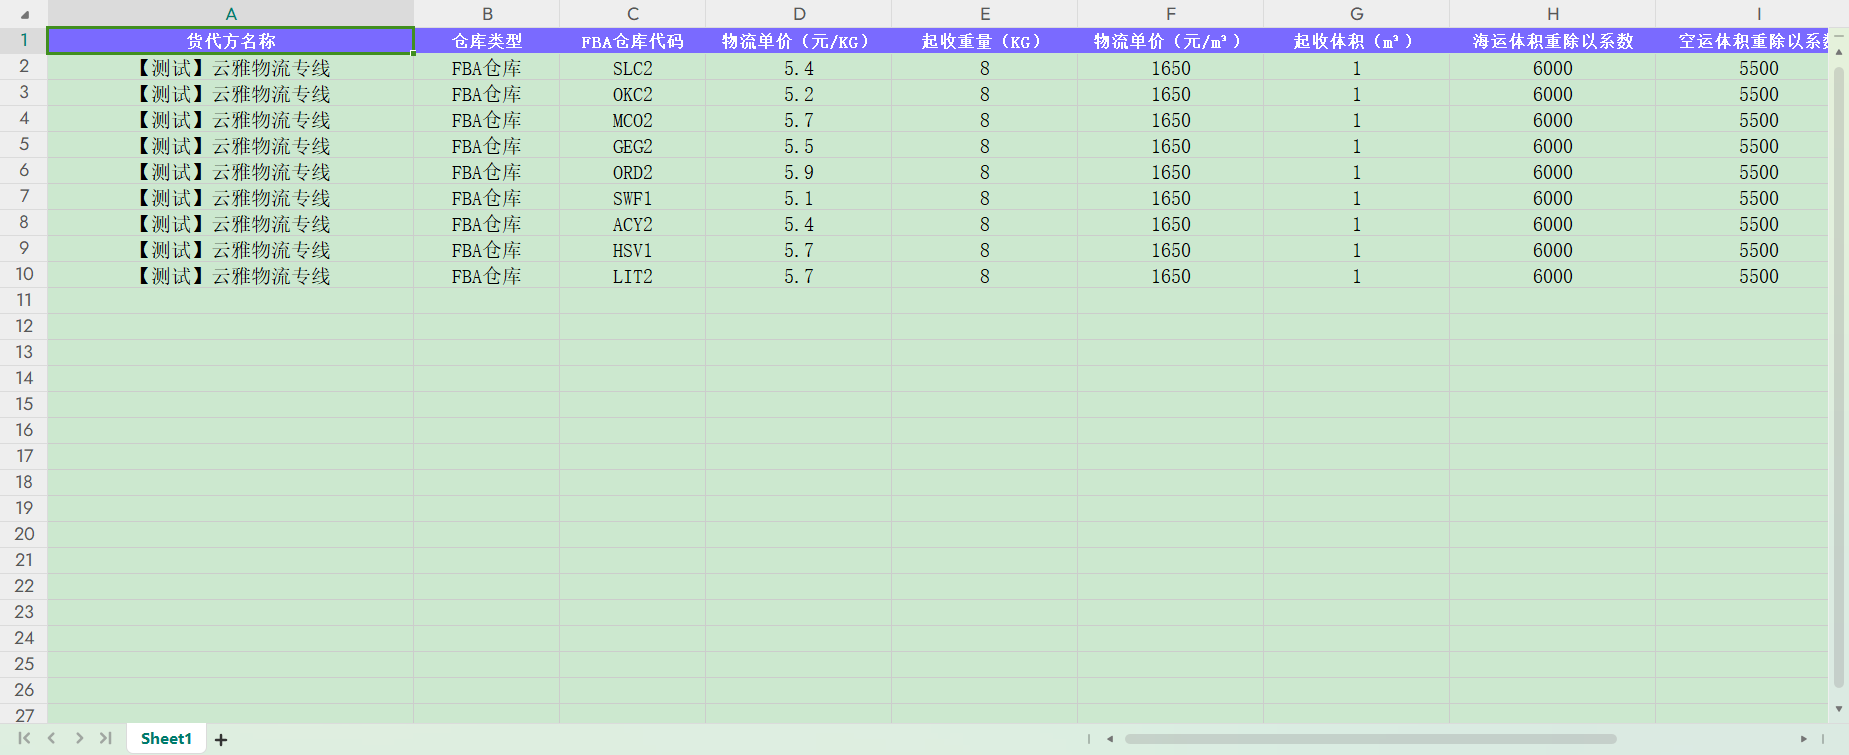
Upload successful:
After uploading the freight forwarder information, we can proceed with fee estimation.
First, select the freight forwarder.
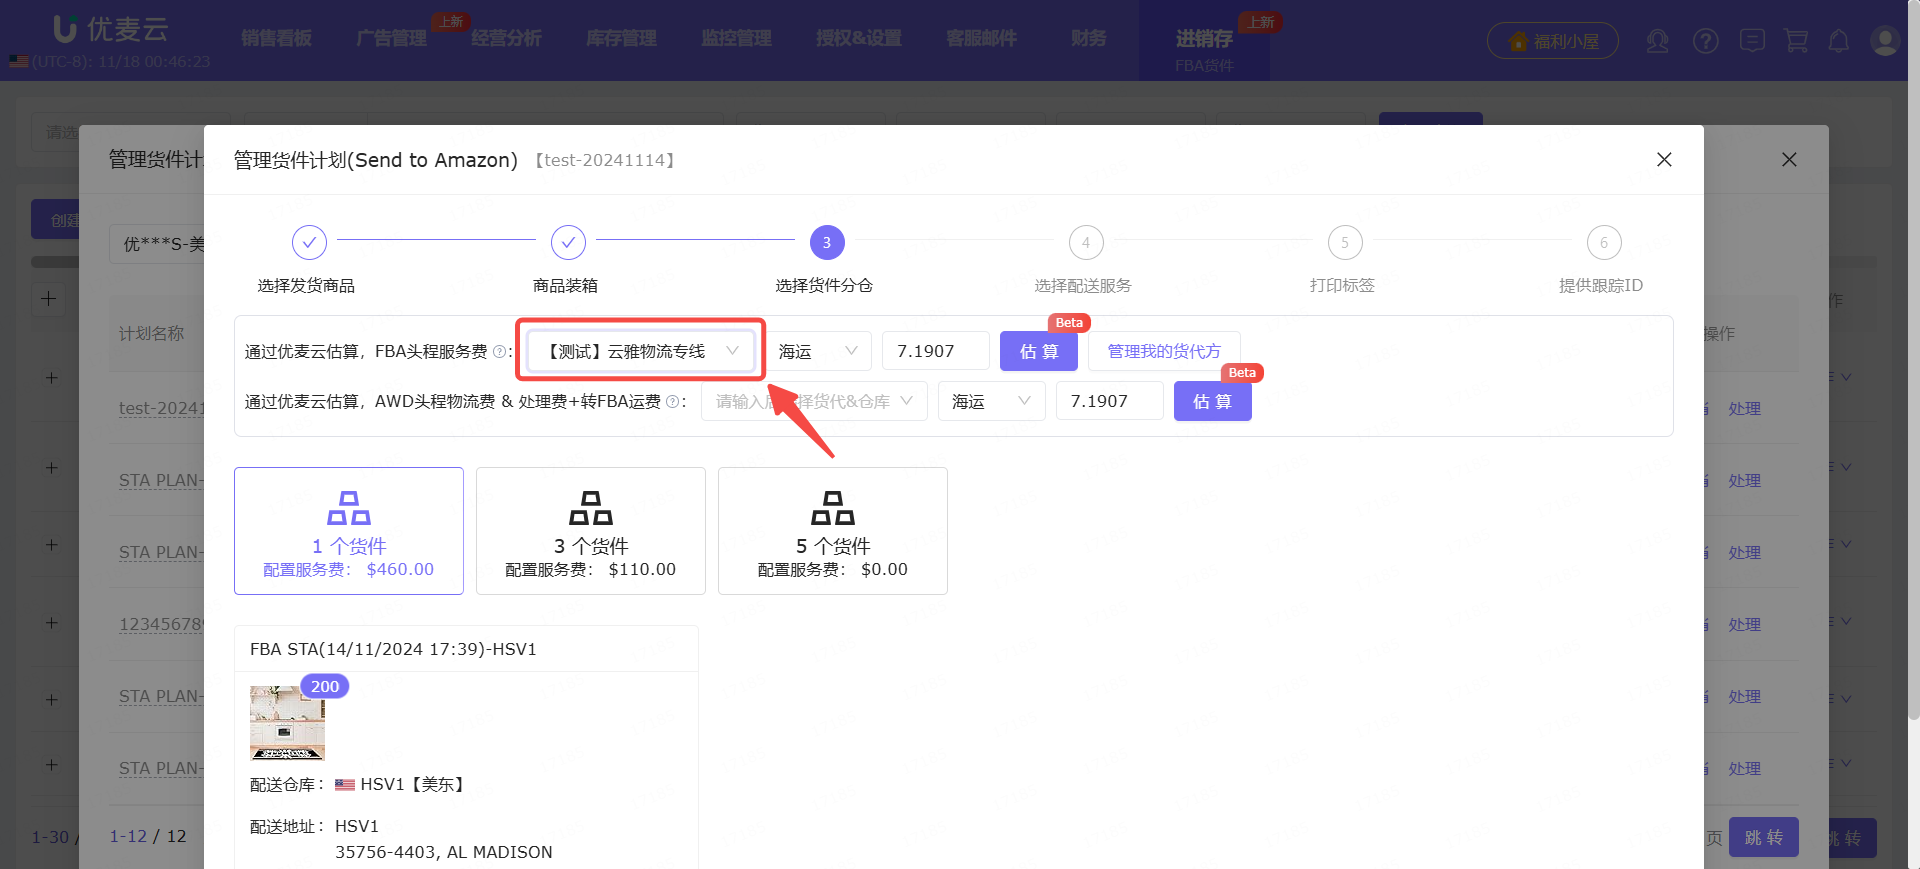
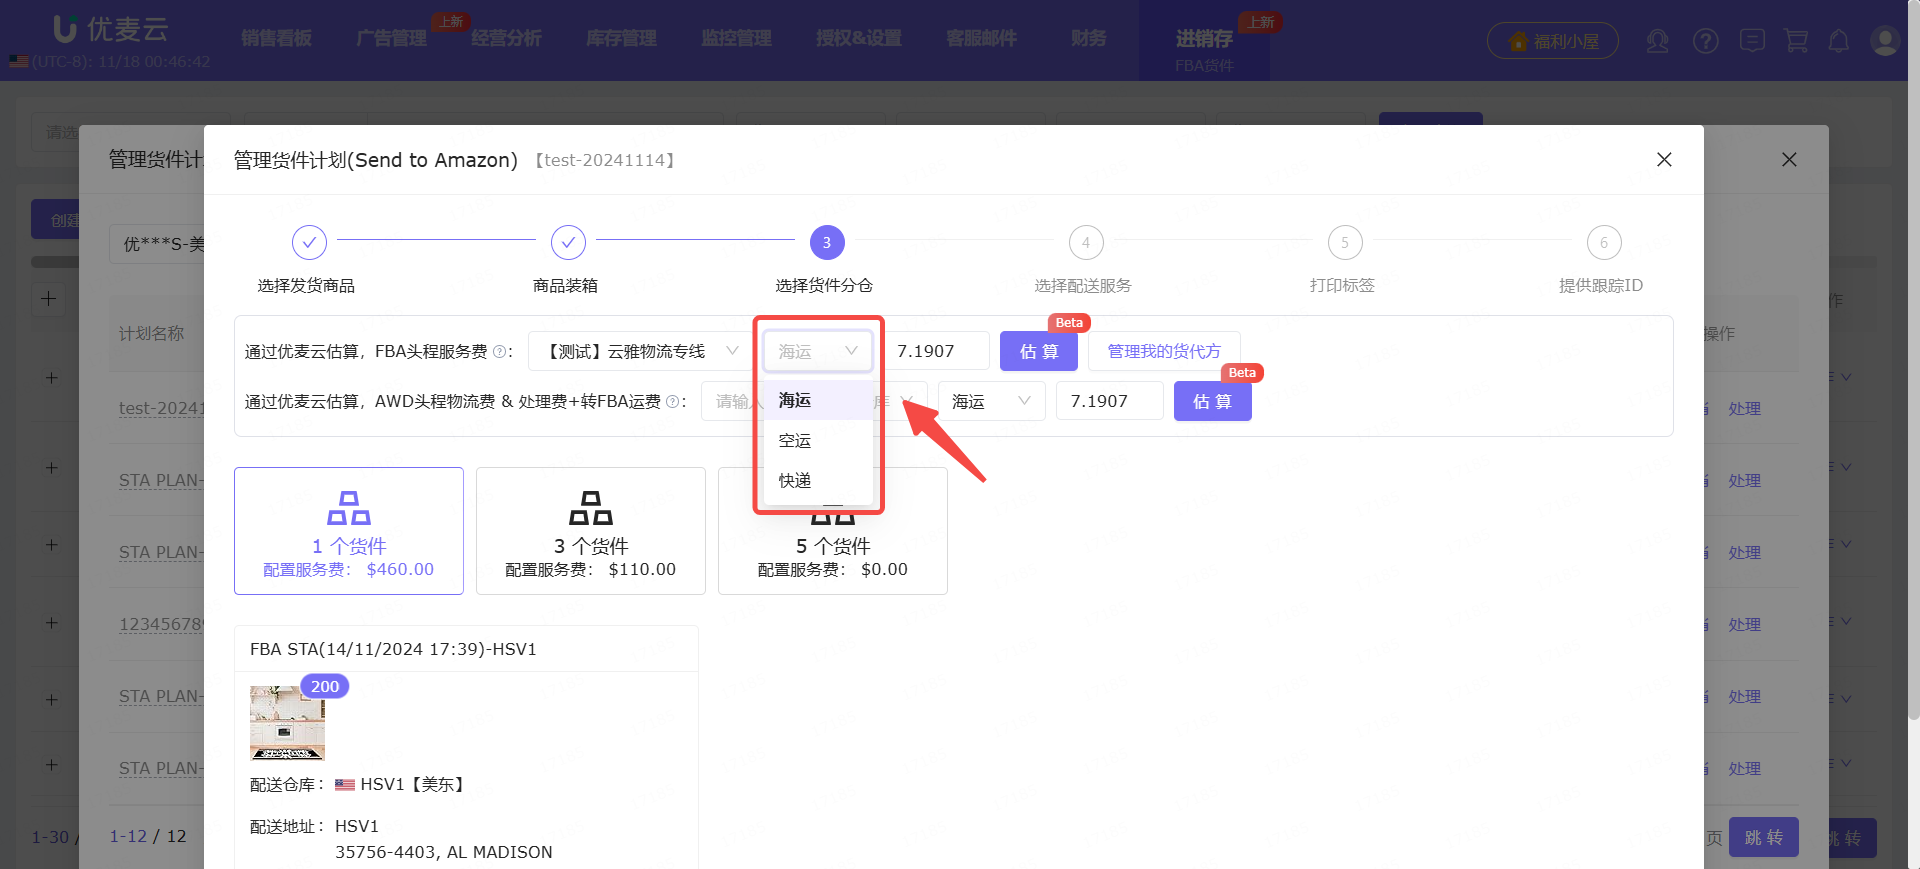
Then, select the shipping method: Sea, Air, Express.
The estimated results will vary depending on the shipping method.
Finally, set the exchange rate.
Since we ship from China, settlement is generally in RMB. However, Amazon's inbound configuration fees and other fees are settled in USD, so it is necessary to set the exchange rate.
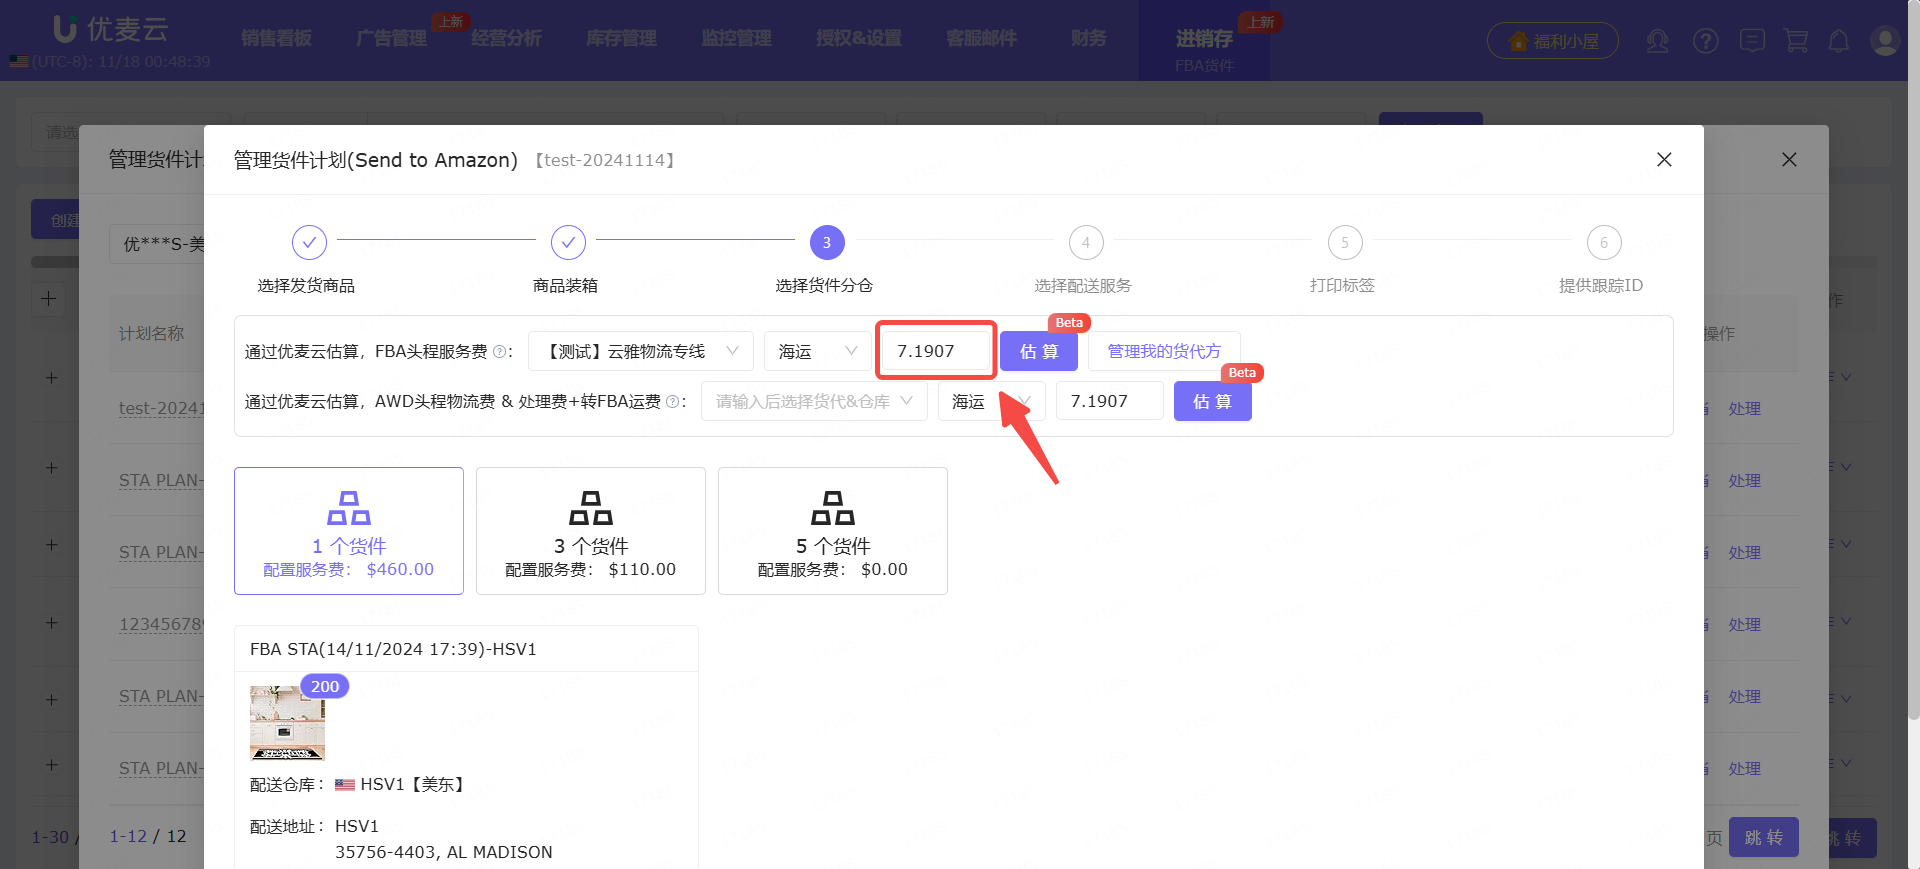
After selecting all the information, click 【Estimate】 to view the inbound fee results for different warehouse split results with one click.
The system will display the inbound fee situation for both "by weight" and "by volume" billing methods, and mark the "cheapest" and "most expensive" shipping options to help us quickly compare and decide which shipping method to choose.

In addition, if we have AWD shipping needs, we can also directly estimate the inbound and AWD fees for this shipping method.
The estimation setting method is the same as the FBA inbound fee setting.
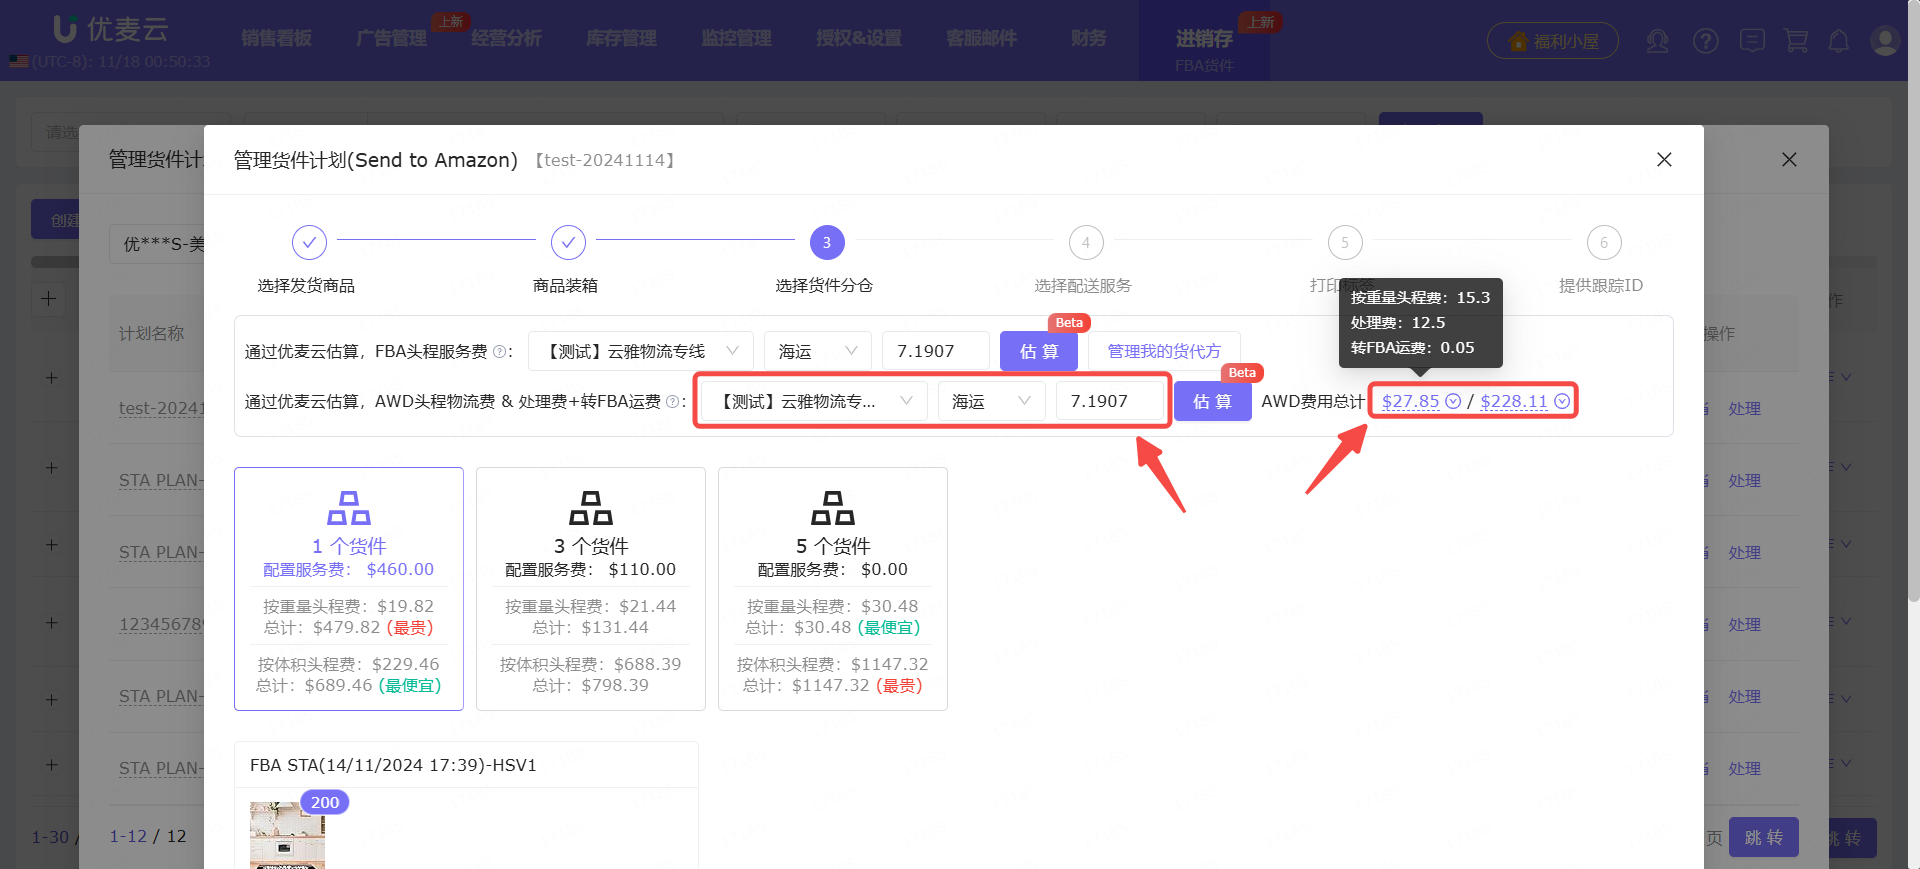
According to our example requirements and estimation results, we choose to ship 3 shipments and choose the shipping method calculated by weight.
After confirming that the information is correct, click 【Next】 to select the delivery service.
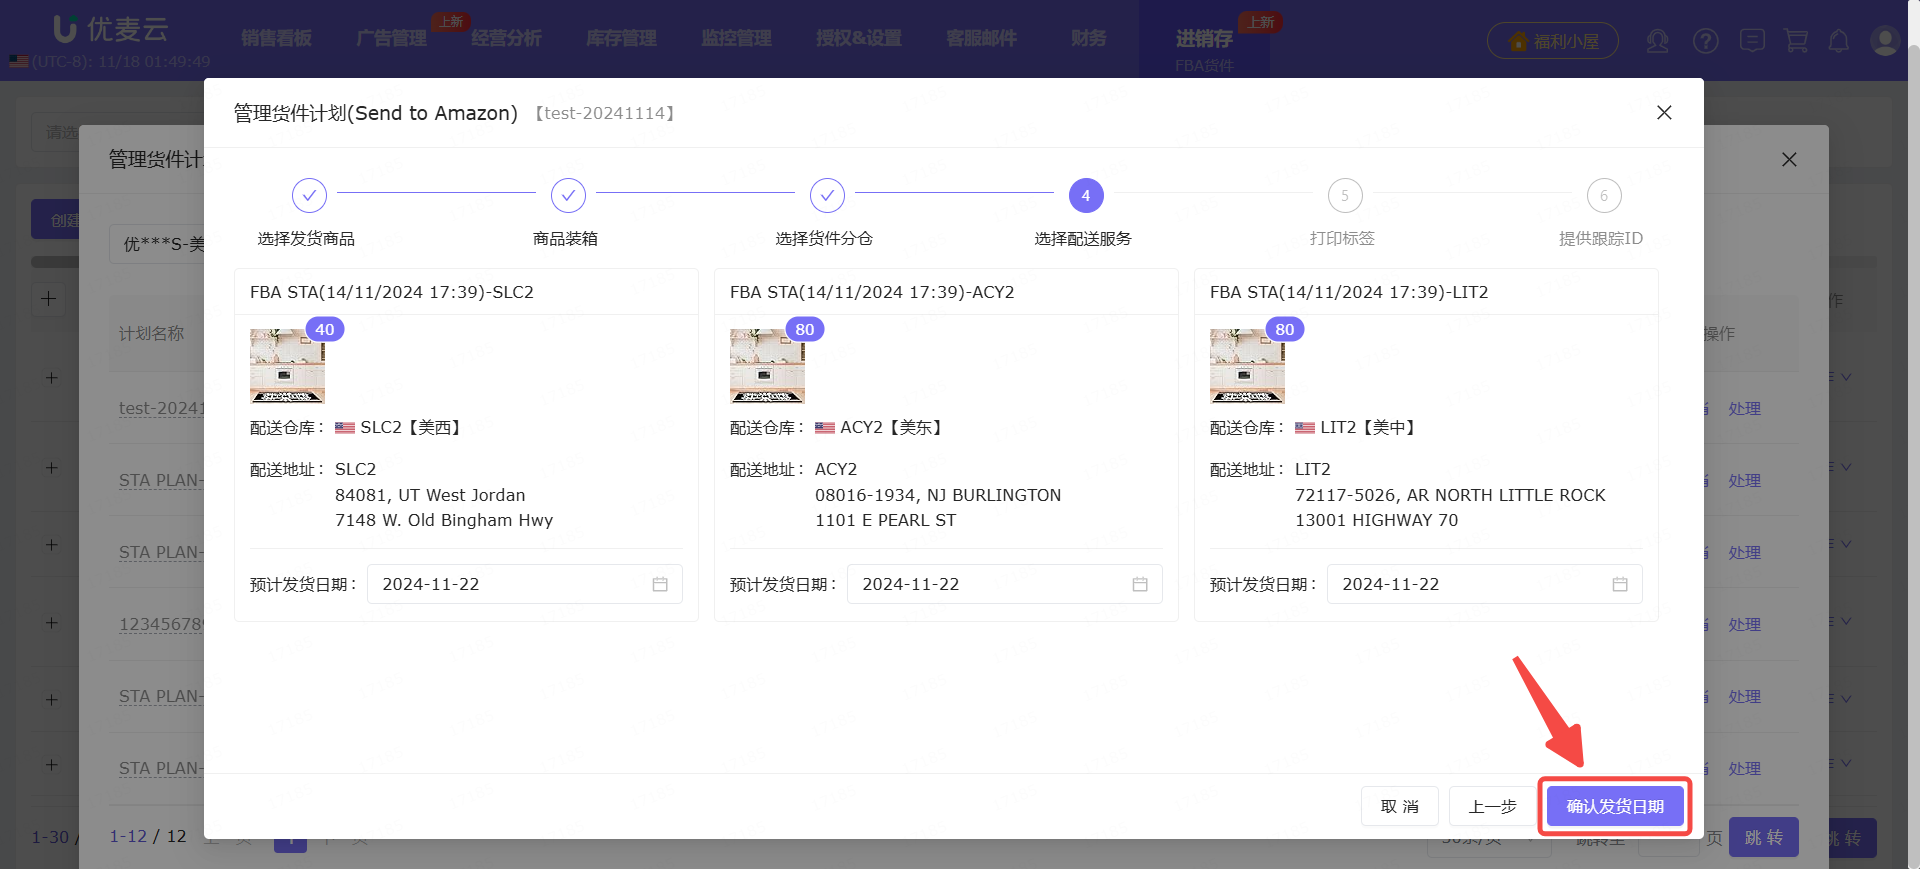
4. Select Delivery Service
The selection of delivery service is basically the same as in Amazon Seller Central.
First, select "Estimated Ship Date".
We choose according to the actual stock preparation time of the local warehouse.
After selecting, click 【Confirm Ship Date】 to proceed to the next step.
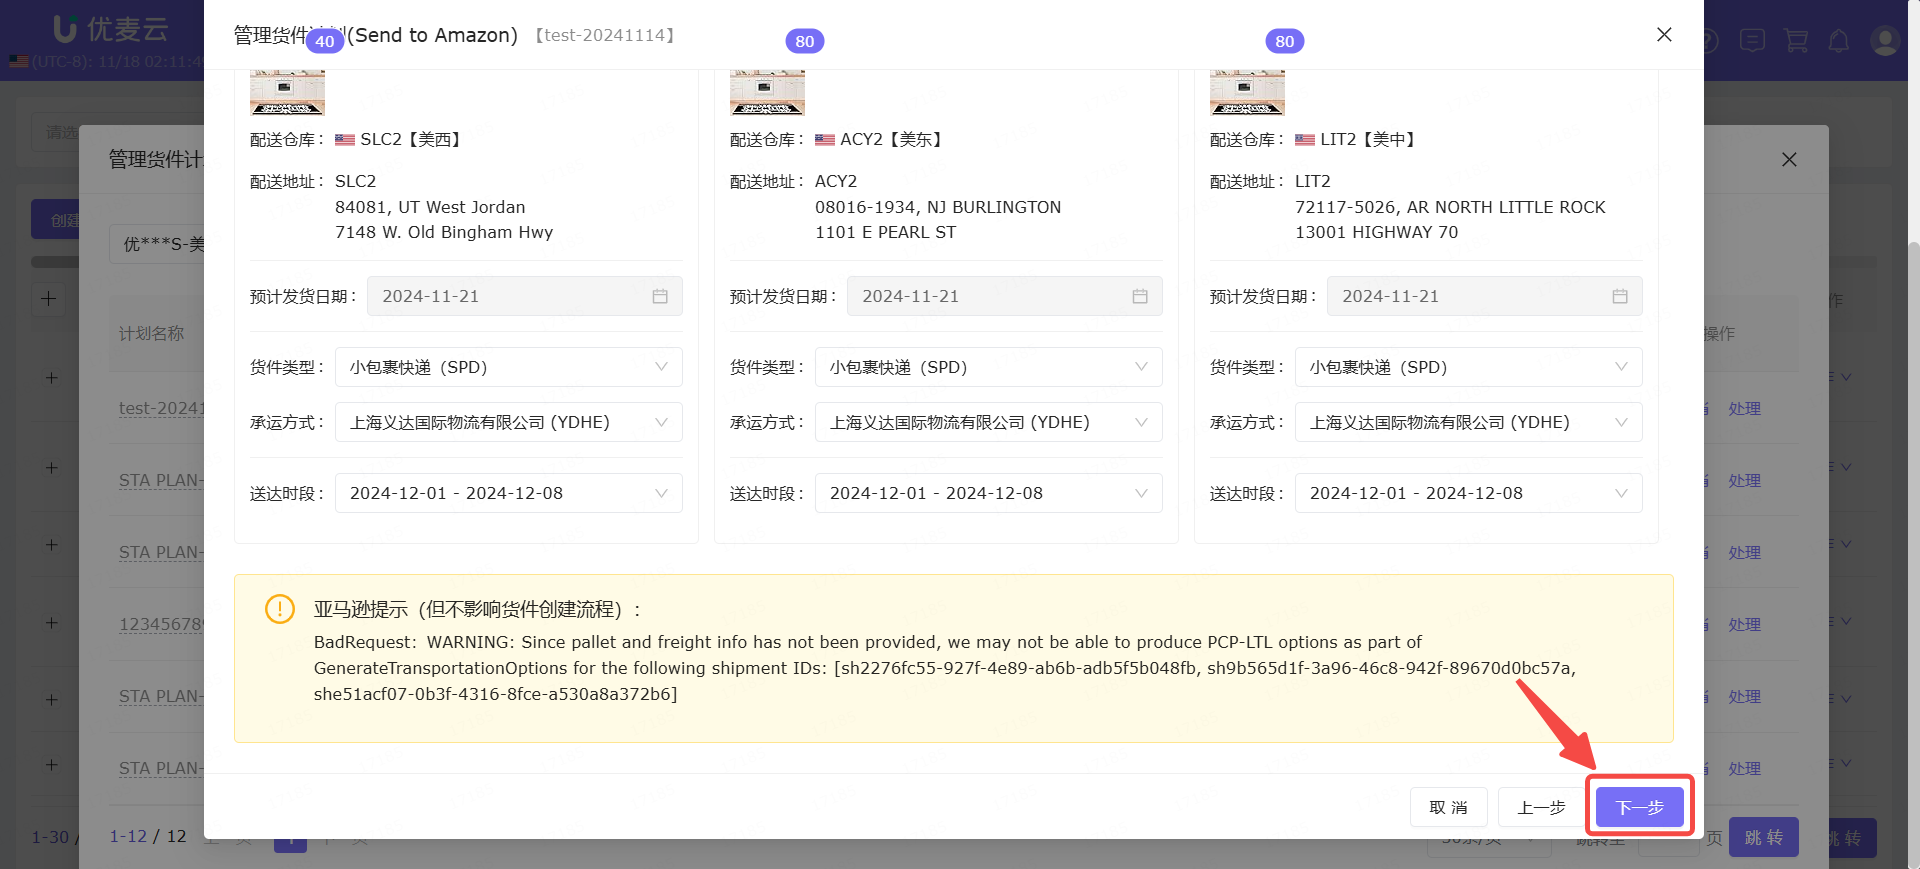
Then, confirm the shipment type, carrier mode, and delivery timeframe.
Shipment Type: Small Parcel Delivery (SPD) / Less than Truckload (LTL).
Carrier Mode: Amazon-Partnered Carrier. Collaborative Carrier mode is not supported temporarily.
Delivery Timeframe: Estimated delivery timeframe. After initial submission here, it can also be modified again in the final step 【Provide Tracking ID】.
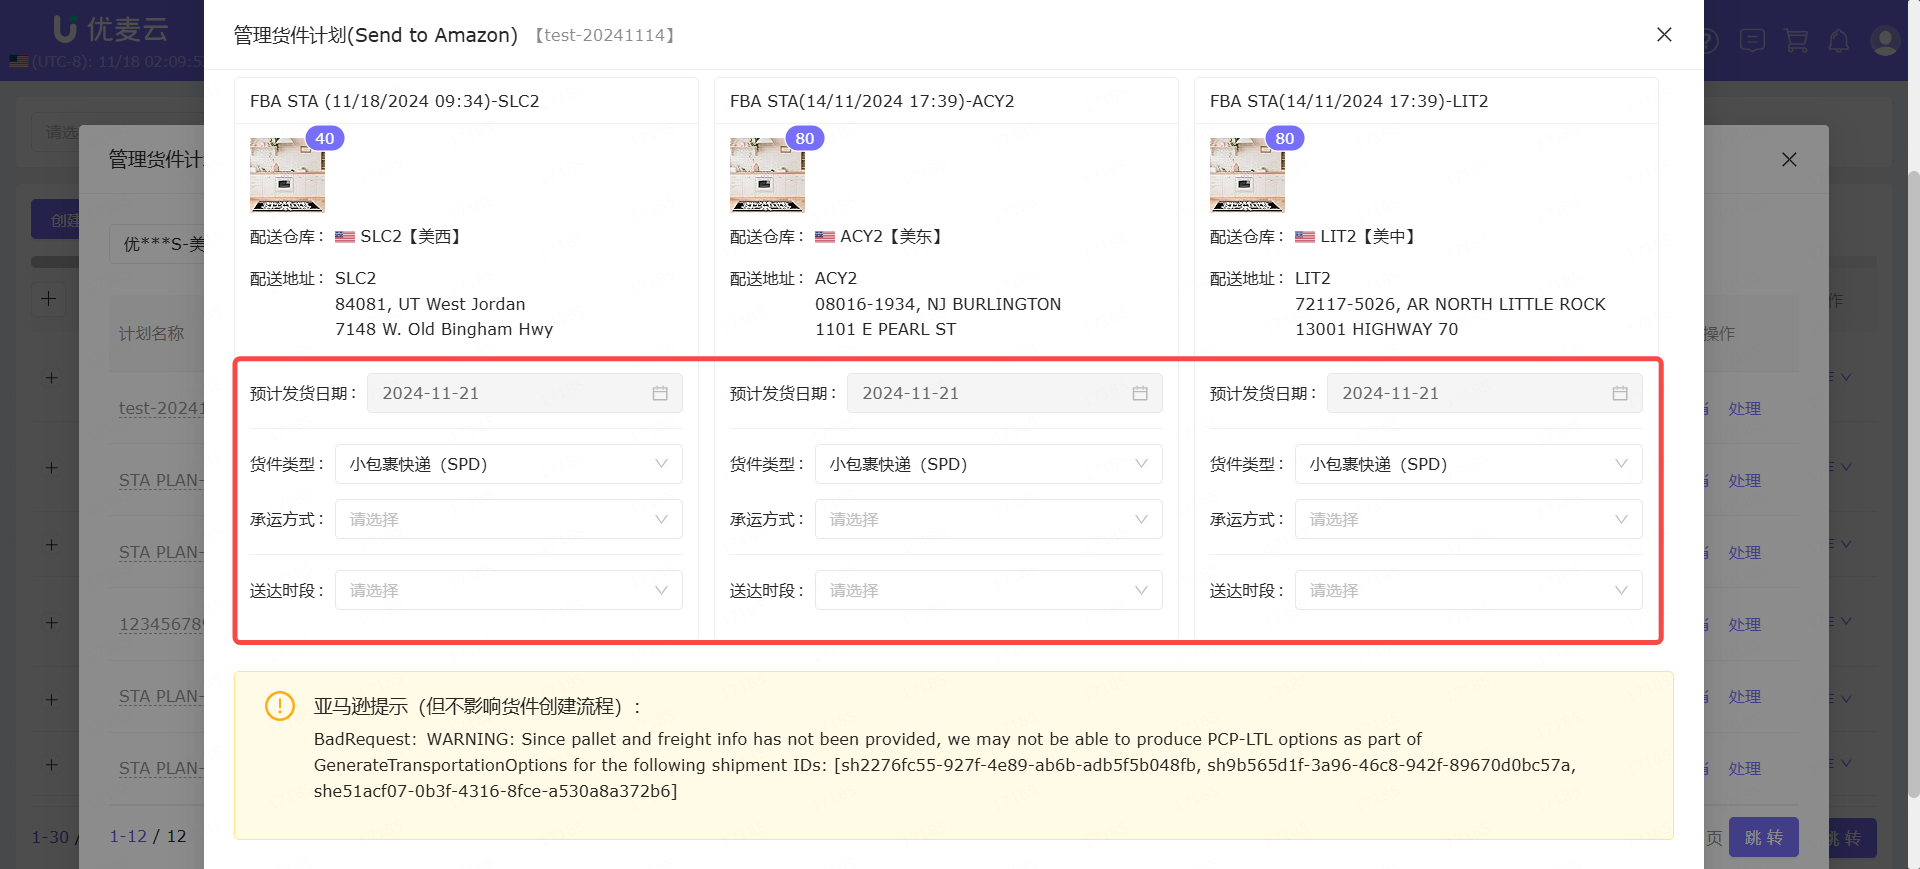
Finally, after confirming that all information is correct, click 【Next】 to proceed to label printing.
5. Print Labels
Labels are divided into 2 types: Product Labels and Box Labels.
Product Labels: Affixed to individual product packaging for warehouse identification and receiving.
Box/Pallet Labels: Affixed to boxes or pallets containing packed products for shipping identification and warehouse receiving.
Each shipment needs to print product labels and box/pallet labels separately.
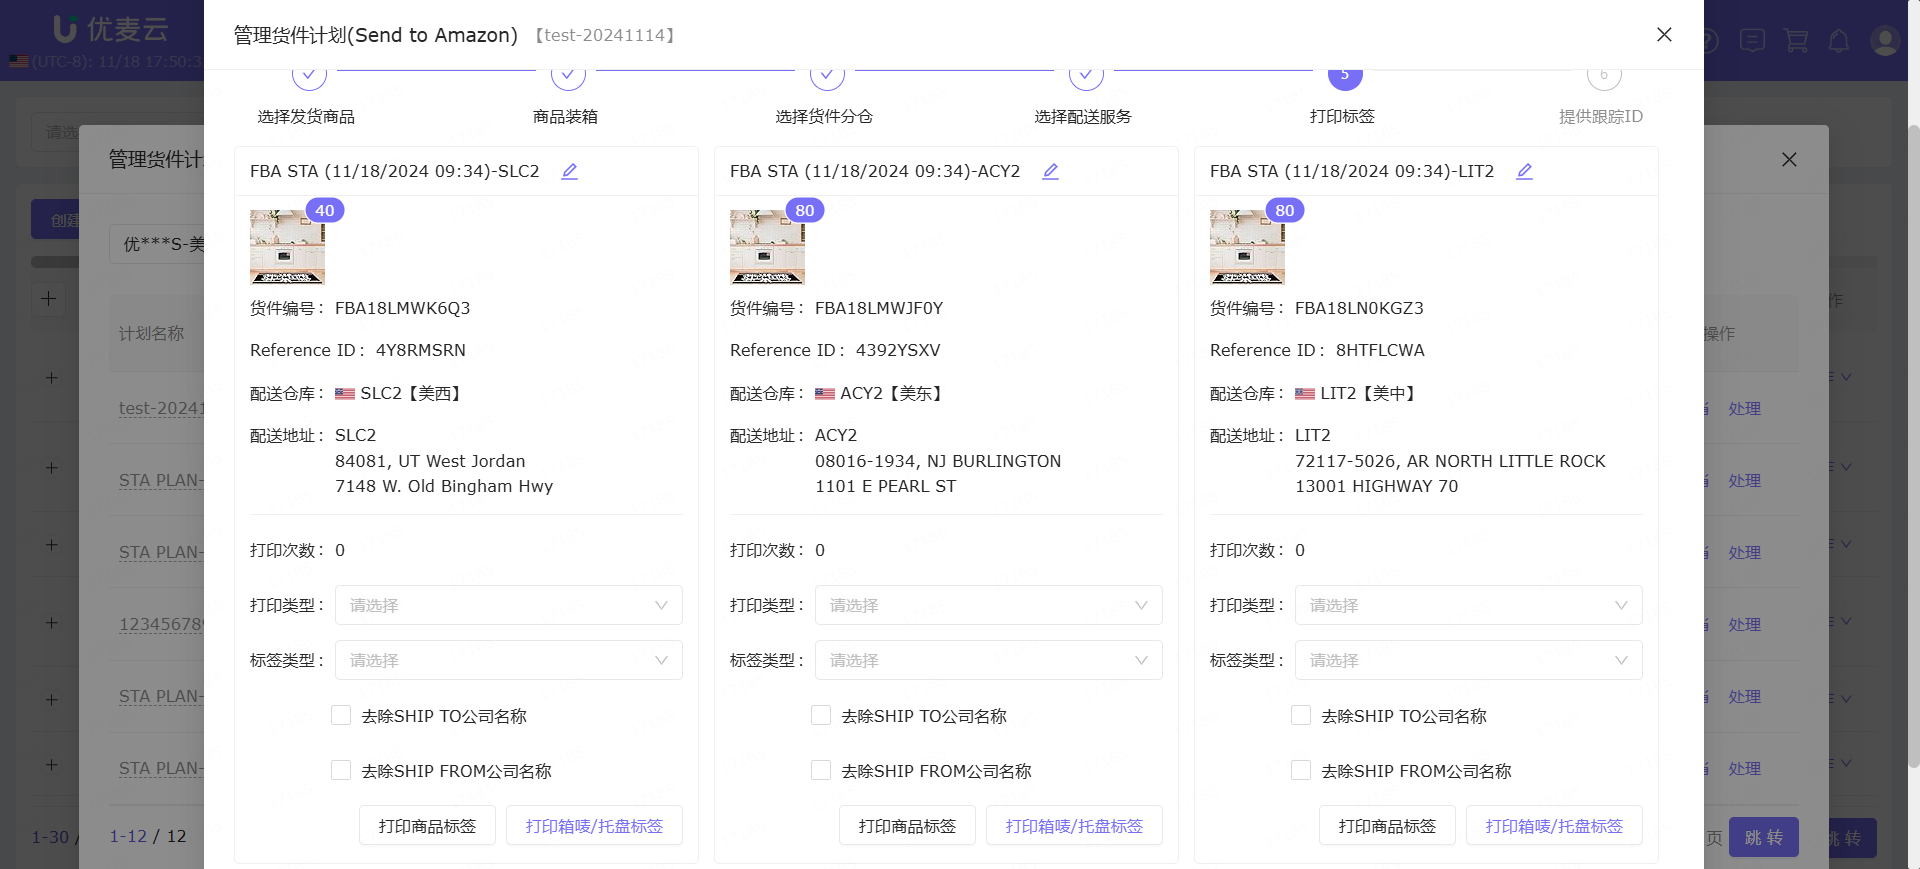
Product Labels
Click 【Print Product Labels】 to enter the product label printing settings page.
Enter the "Print Labels" page.
First, set up printing settings.
Print Type: Optional "Product Labels" and "Amazon-generated Product Labels", choose as needed. Generally, choose "Product Labels".
Paper Type: Optional thermal paper or A4 paper type with different specifications, choose as needed.
Print Custom Content: Custom content displayed on the label, such as: Made in China. You can click the 【Fill in Made in China】 button to fill it in with one click.
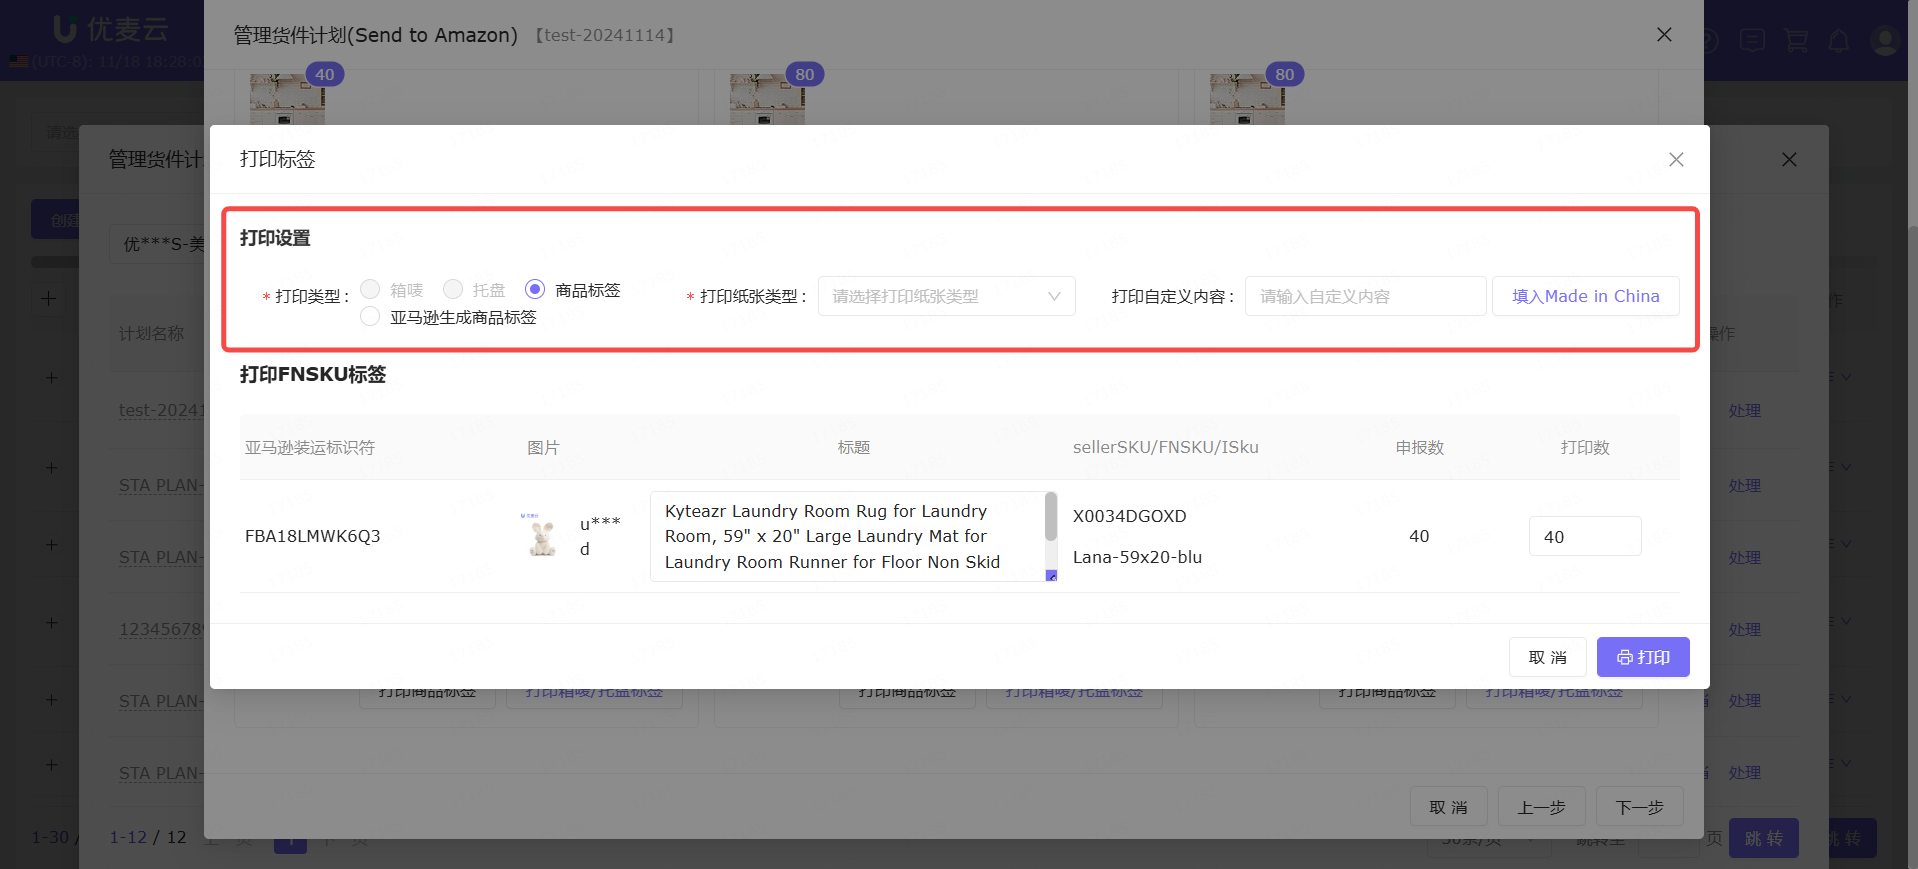
Then, confirm FNSKU label information and print quantity.
We need to confirm whether the product information of the printed label is correct. Among them, the product title can be edited.
The product label print quantity is generally consistent with the declared quantity.
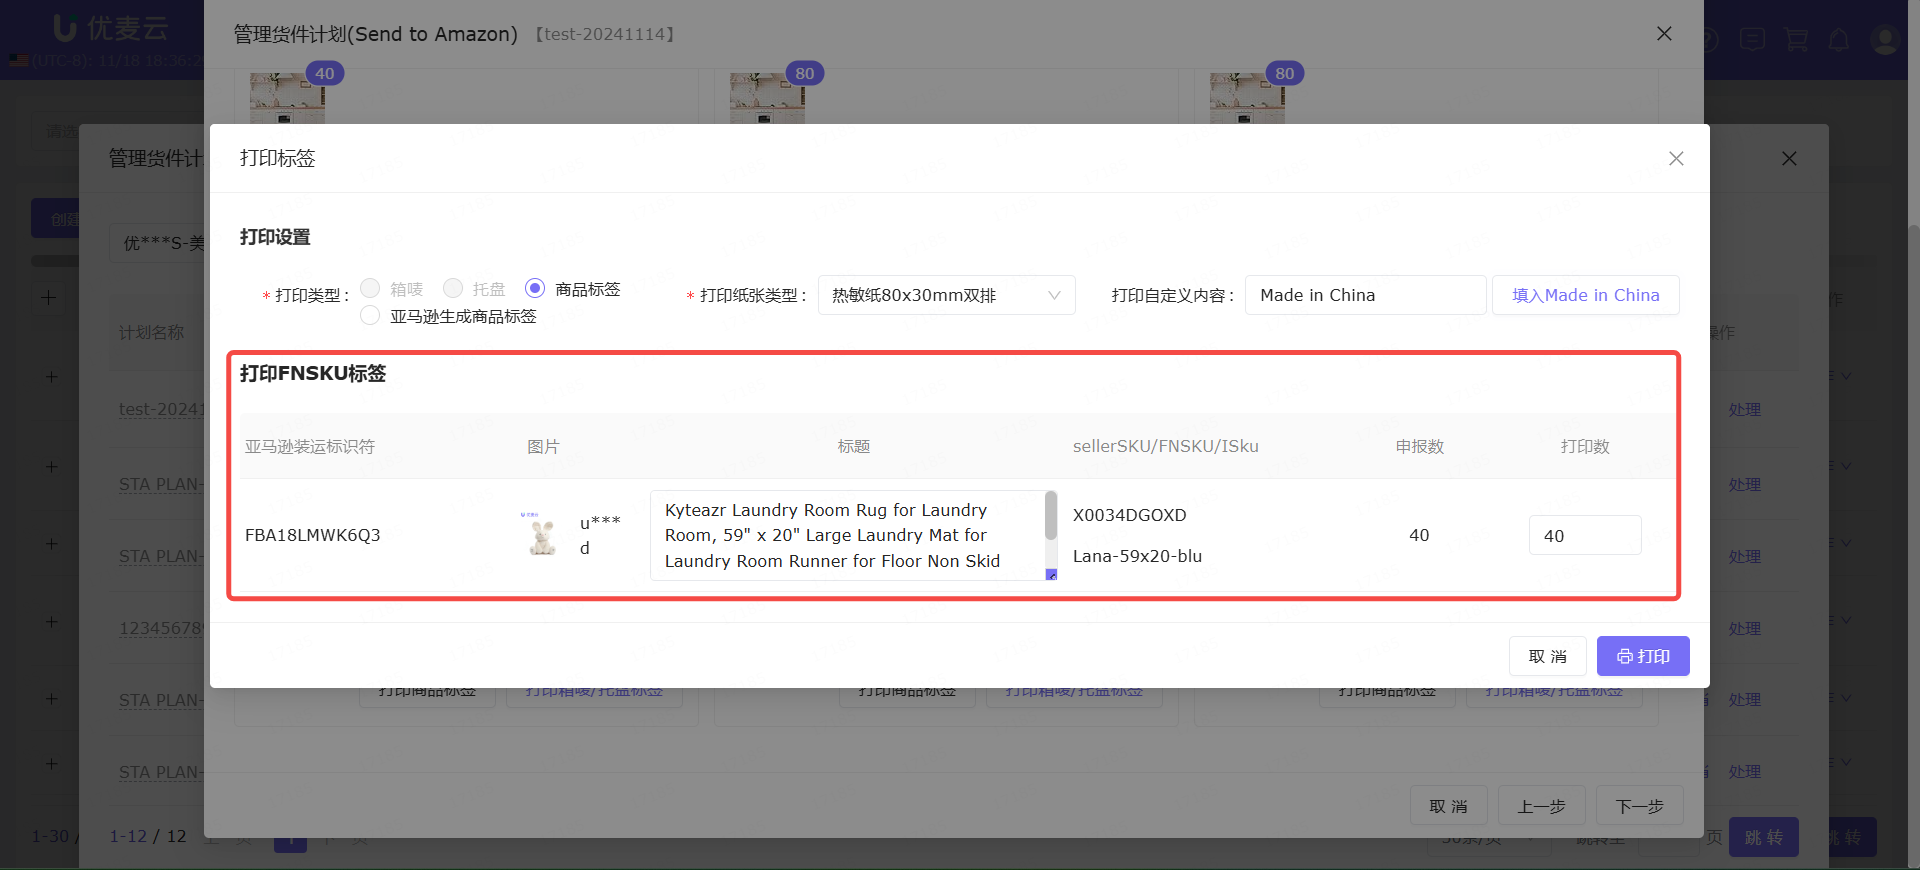
Finally, print product labels.
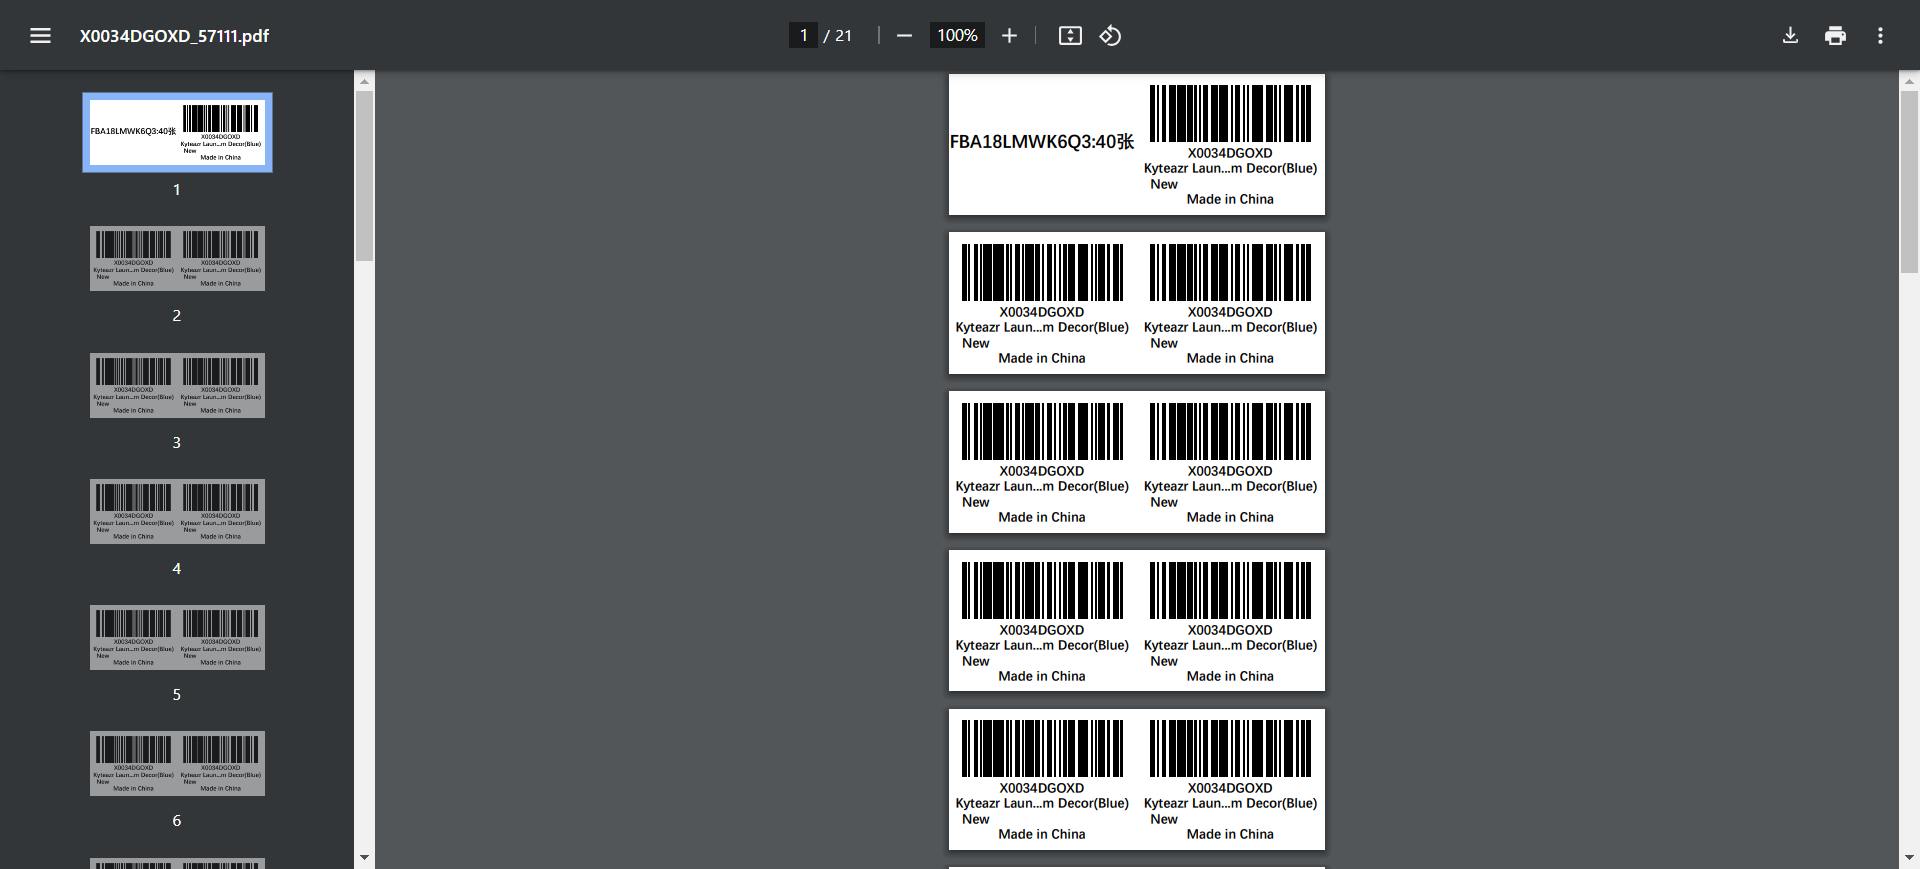
After confirming that all information is correct, click 【Print】 to enter the print preview page.
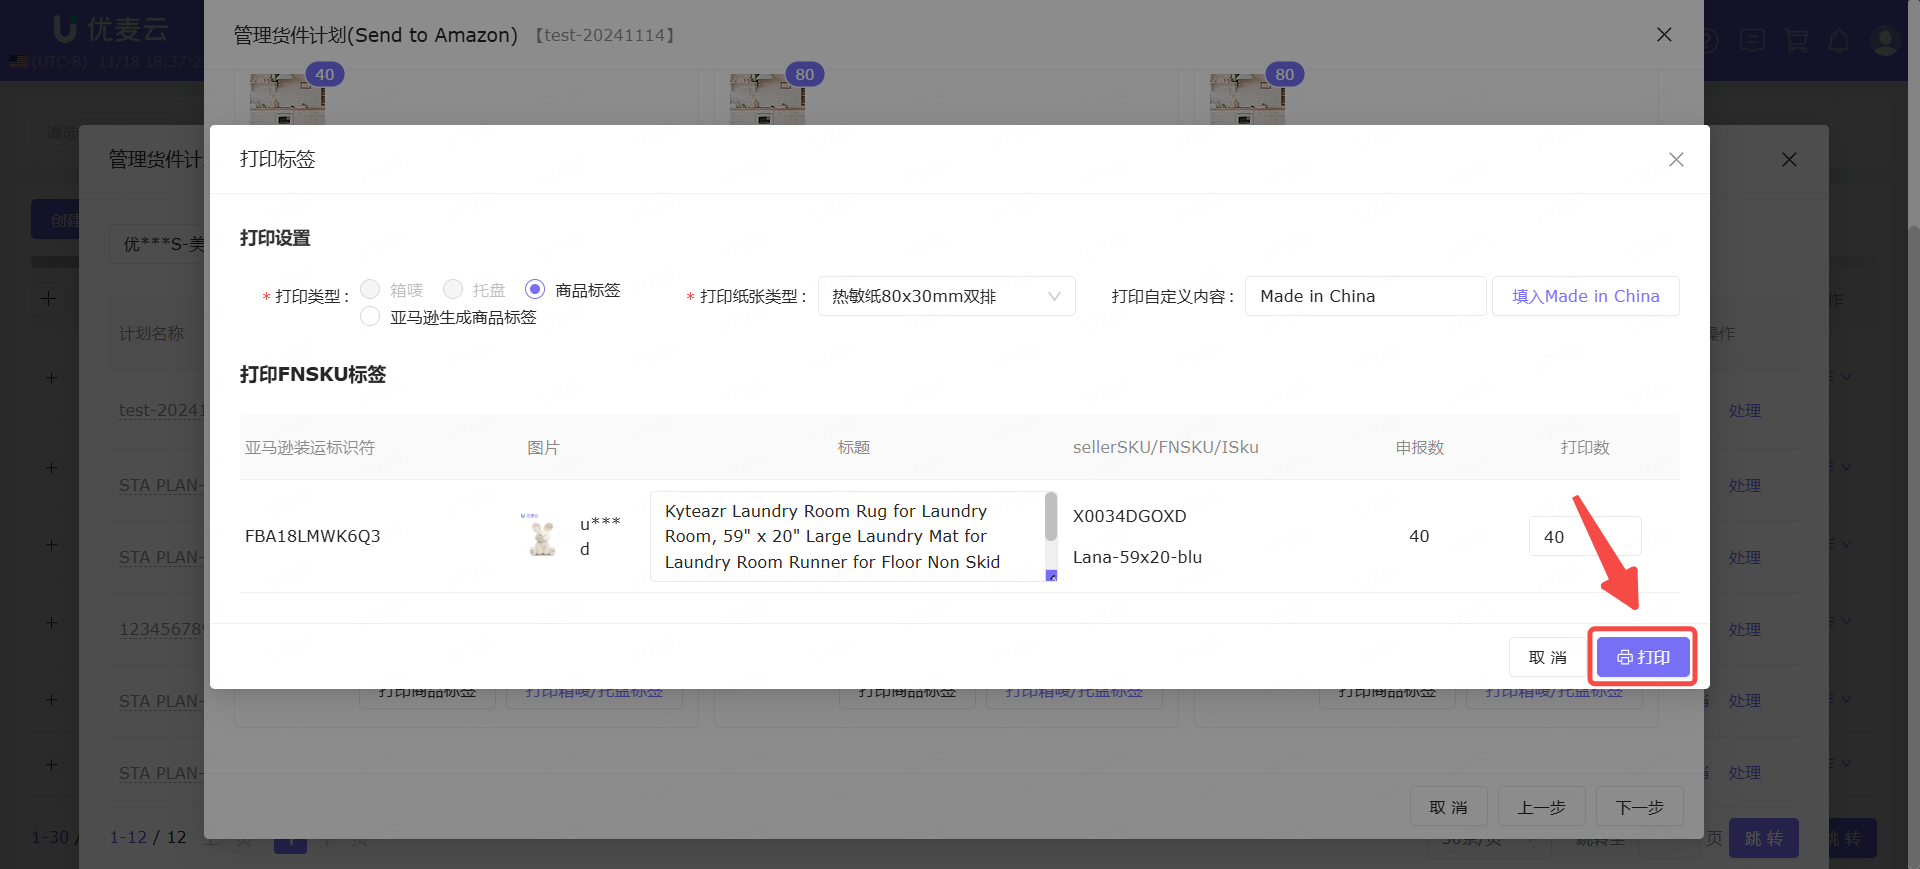
Preview the product labels to be printed, and after re-confirming that they are correct, click the print button in the upper right corner to connect to the printer for printing.
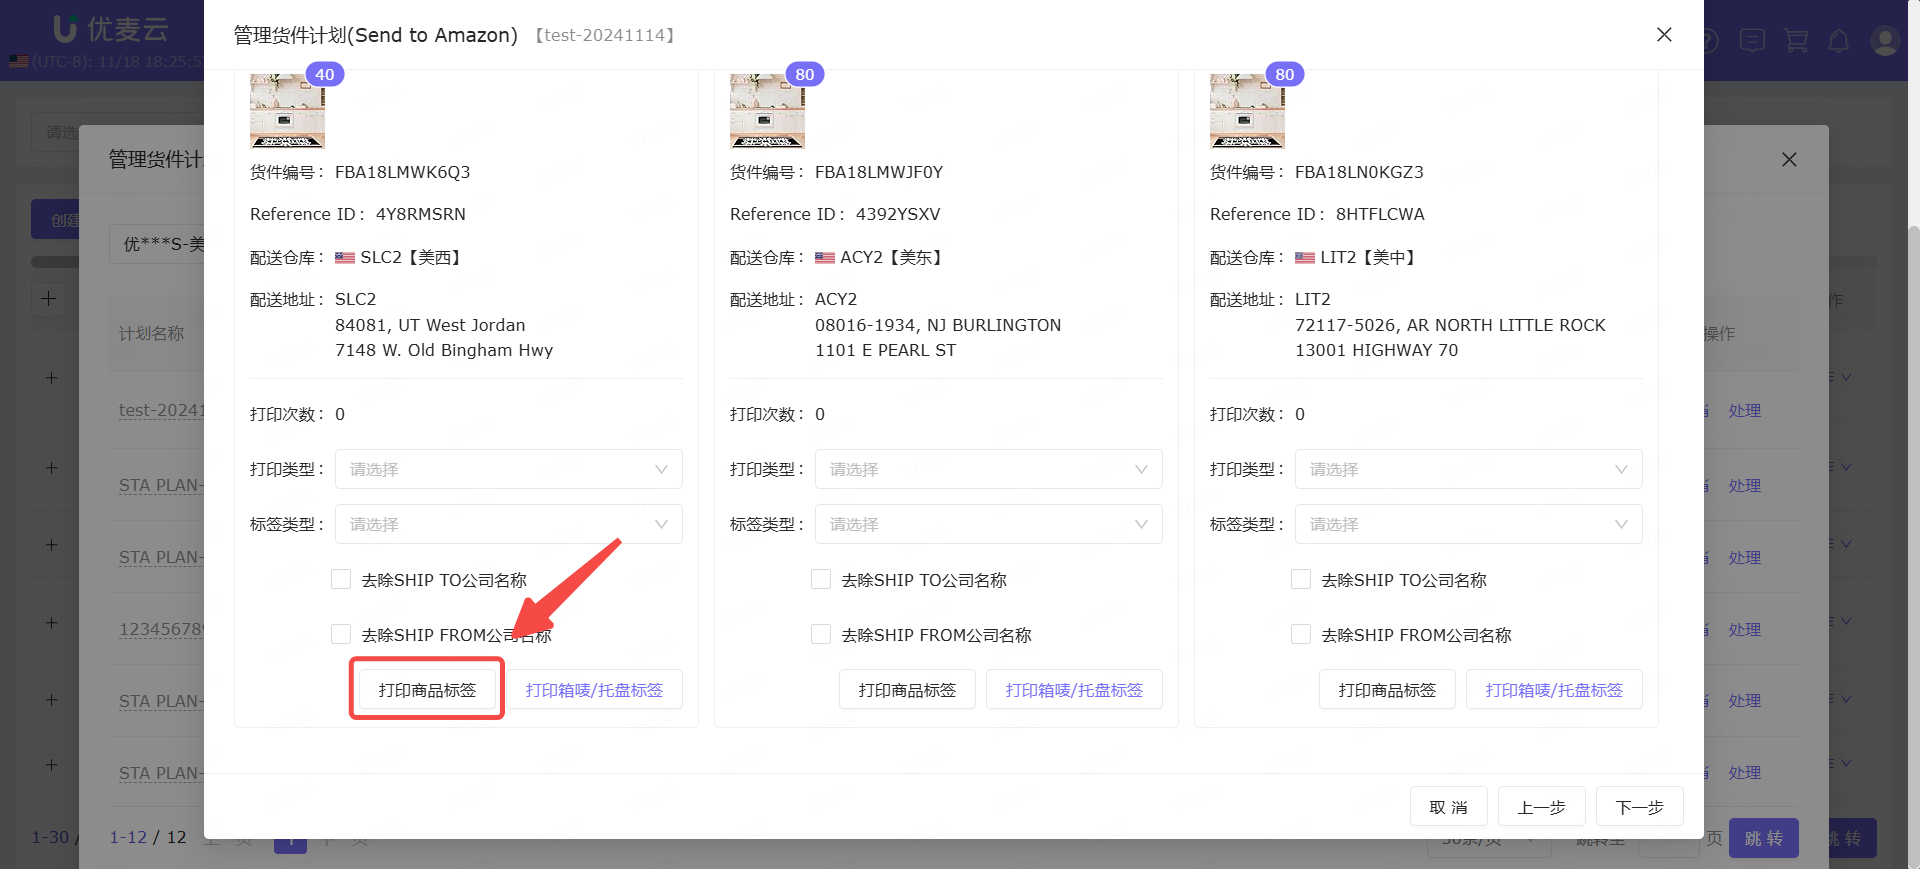
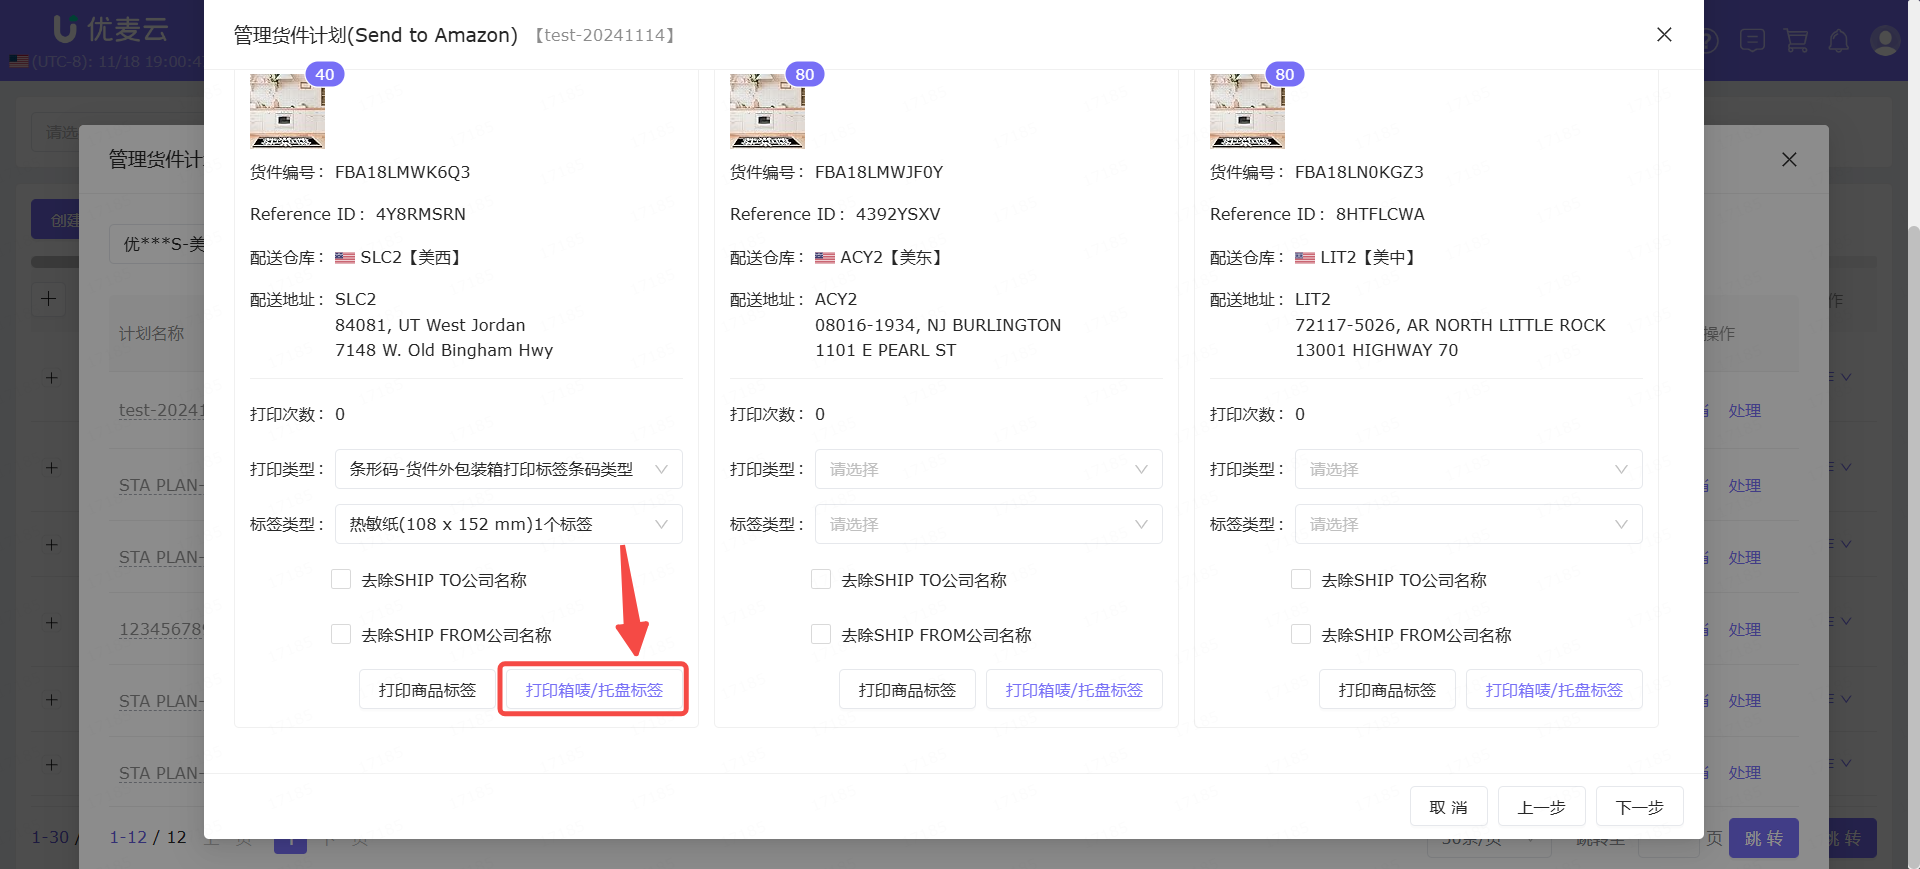
Box/Pallet Labels
First, set "Print Type" and "Label Type".
Print Type: Includes QR code, barcode, and pallet label types, choose as needed.
Label Type: Includes thermal paper, US letter paper, A4 paper, and other types, choose as needed.
At the same time, we can also choose whether to remove SHIP TO and SHIP FROM company names. However, it should be noted that after removing the company name, the printed box label will be inconsistent with the Amazon Seller Central, so operate with caution.
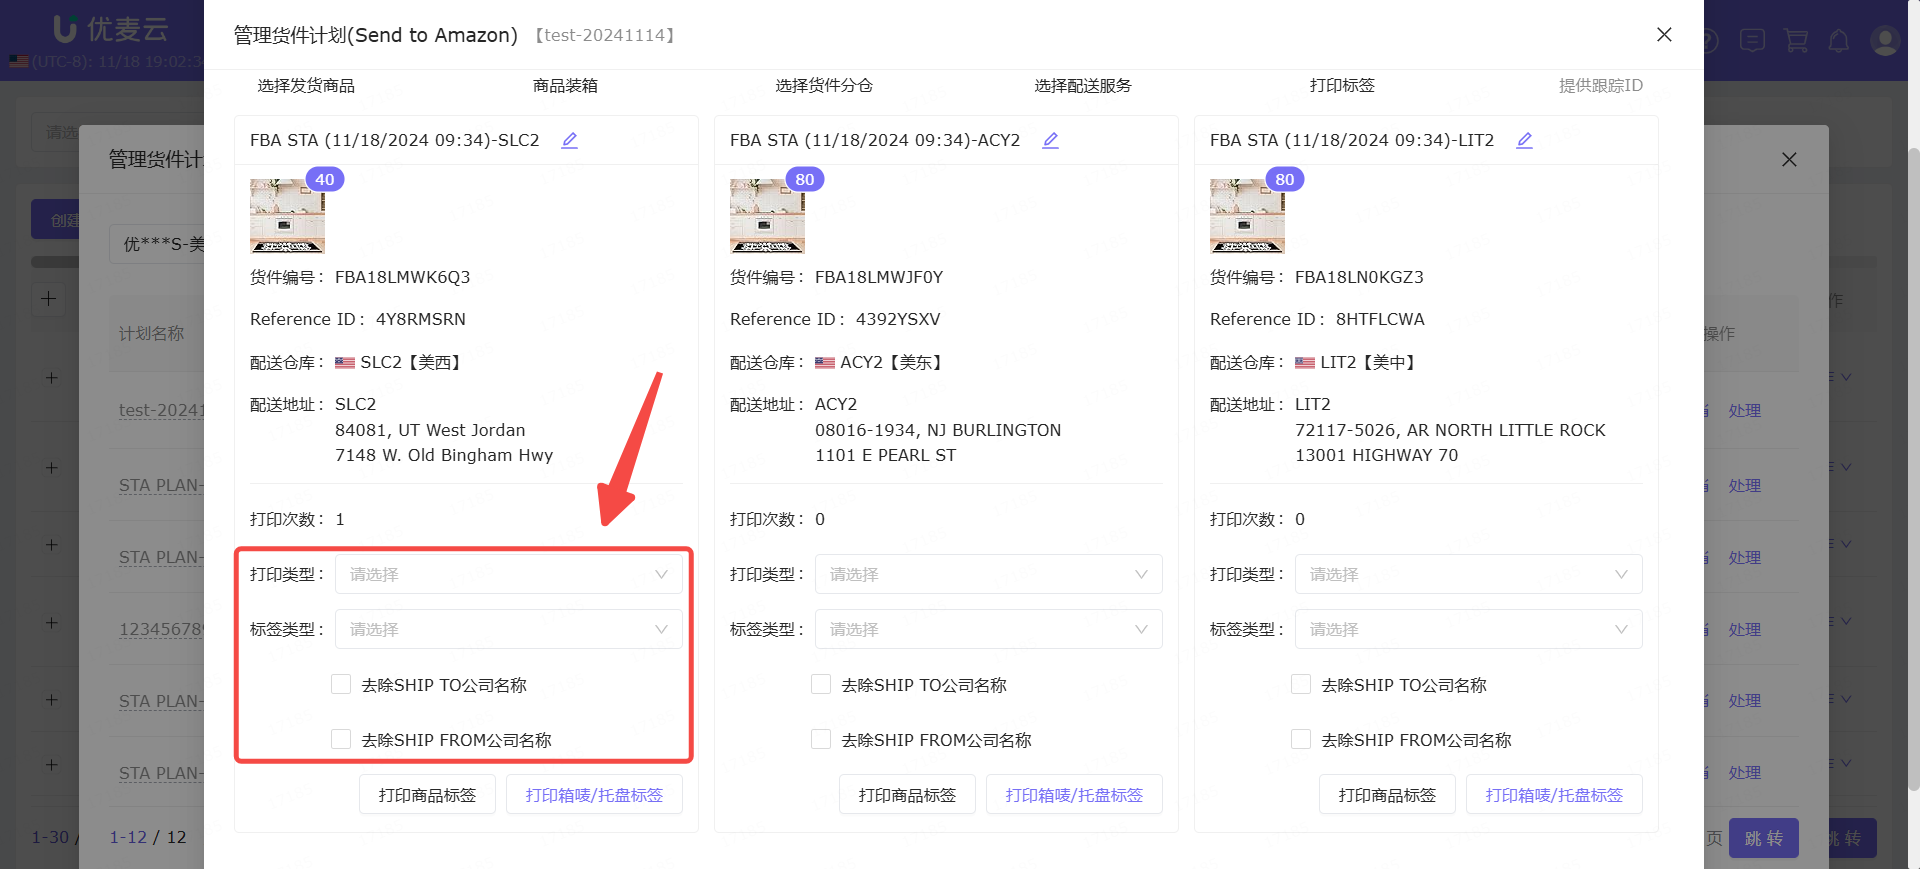
After all information is set, click 【Print Box/Pallet Labels】 to directly download the print file, and then print it yourself.
After all labels are printed and delivered to the warehouse for packing and shipping, click 【Next】 to submit the shipment tracking ID.
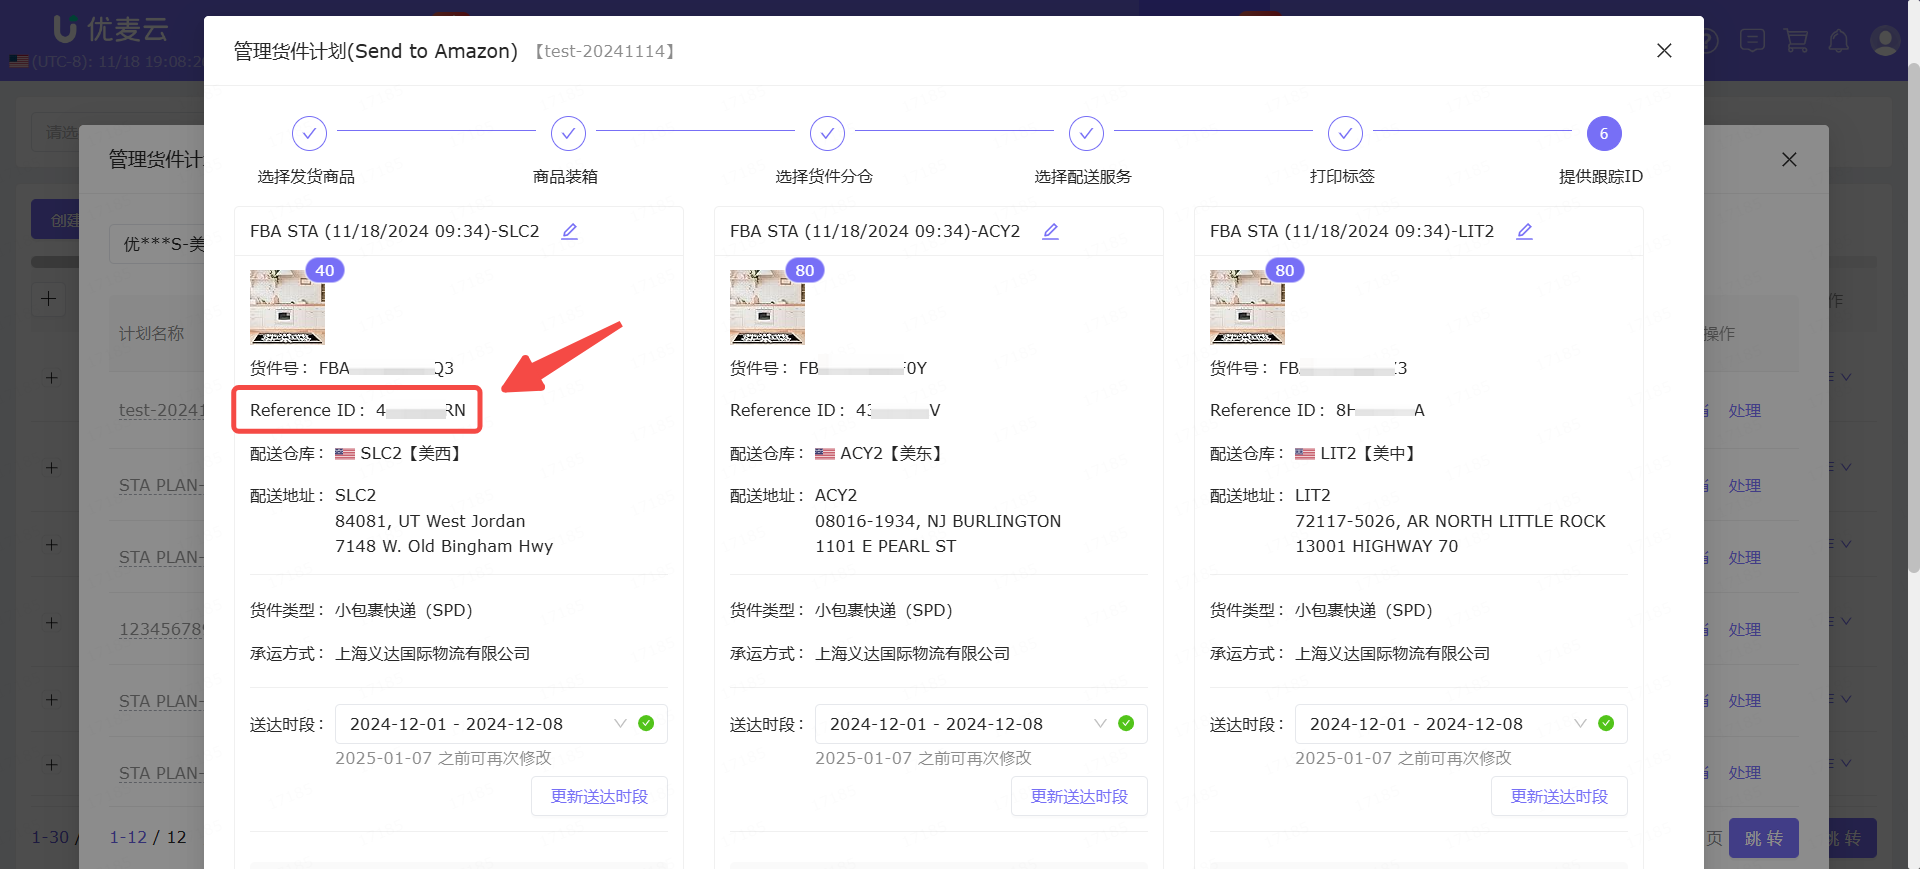
6. Provide Tracking ID
Providing the tracking ID is the last step in Send to Amazon shipping.
After the warehouse ships, each shipment has a corresponding tracking number. We need to upload it to Amazon to track the logistics progress.
If there is an error in the upload, you can also click 【Modify Shipment Tracking Information】 to correct it.
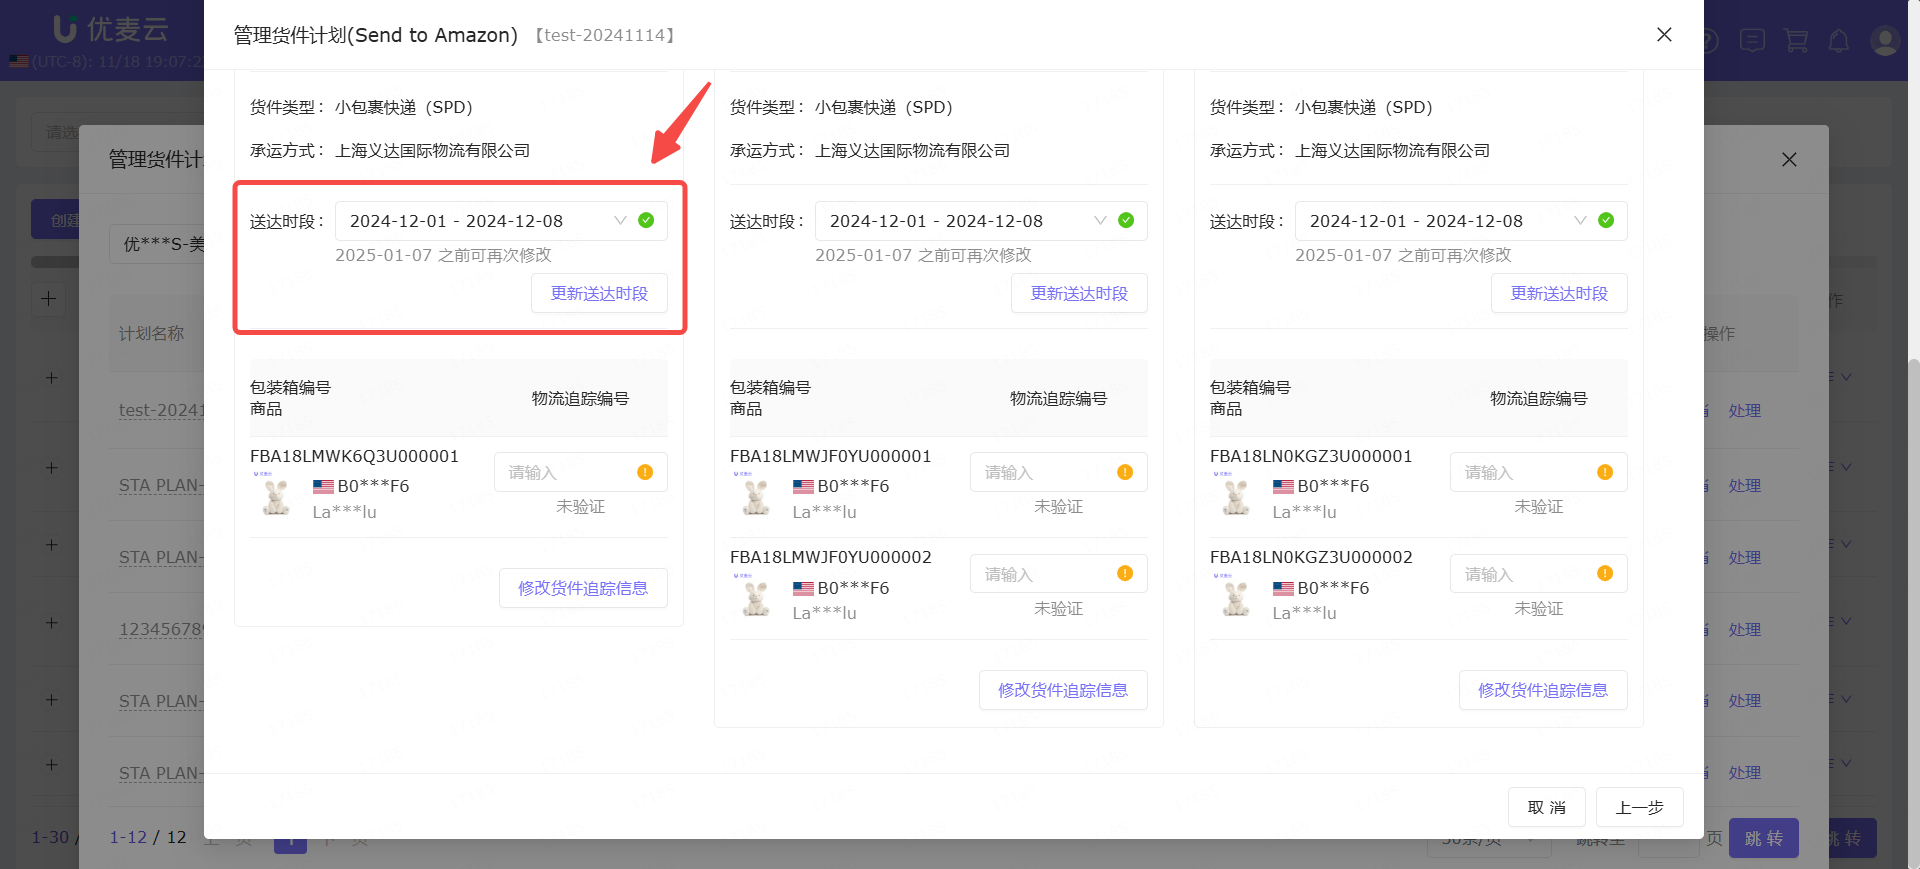
Currently, for shipped shipments, only modification of tracking information and delivery timeframe is supported. The delivery timeframe can only be modified before the start time.
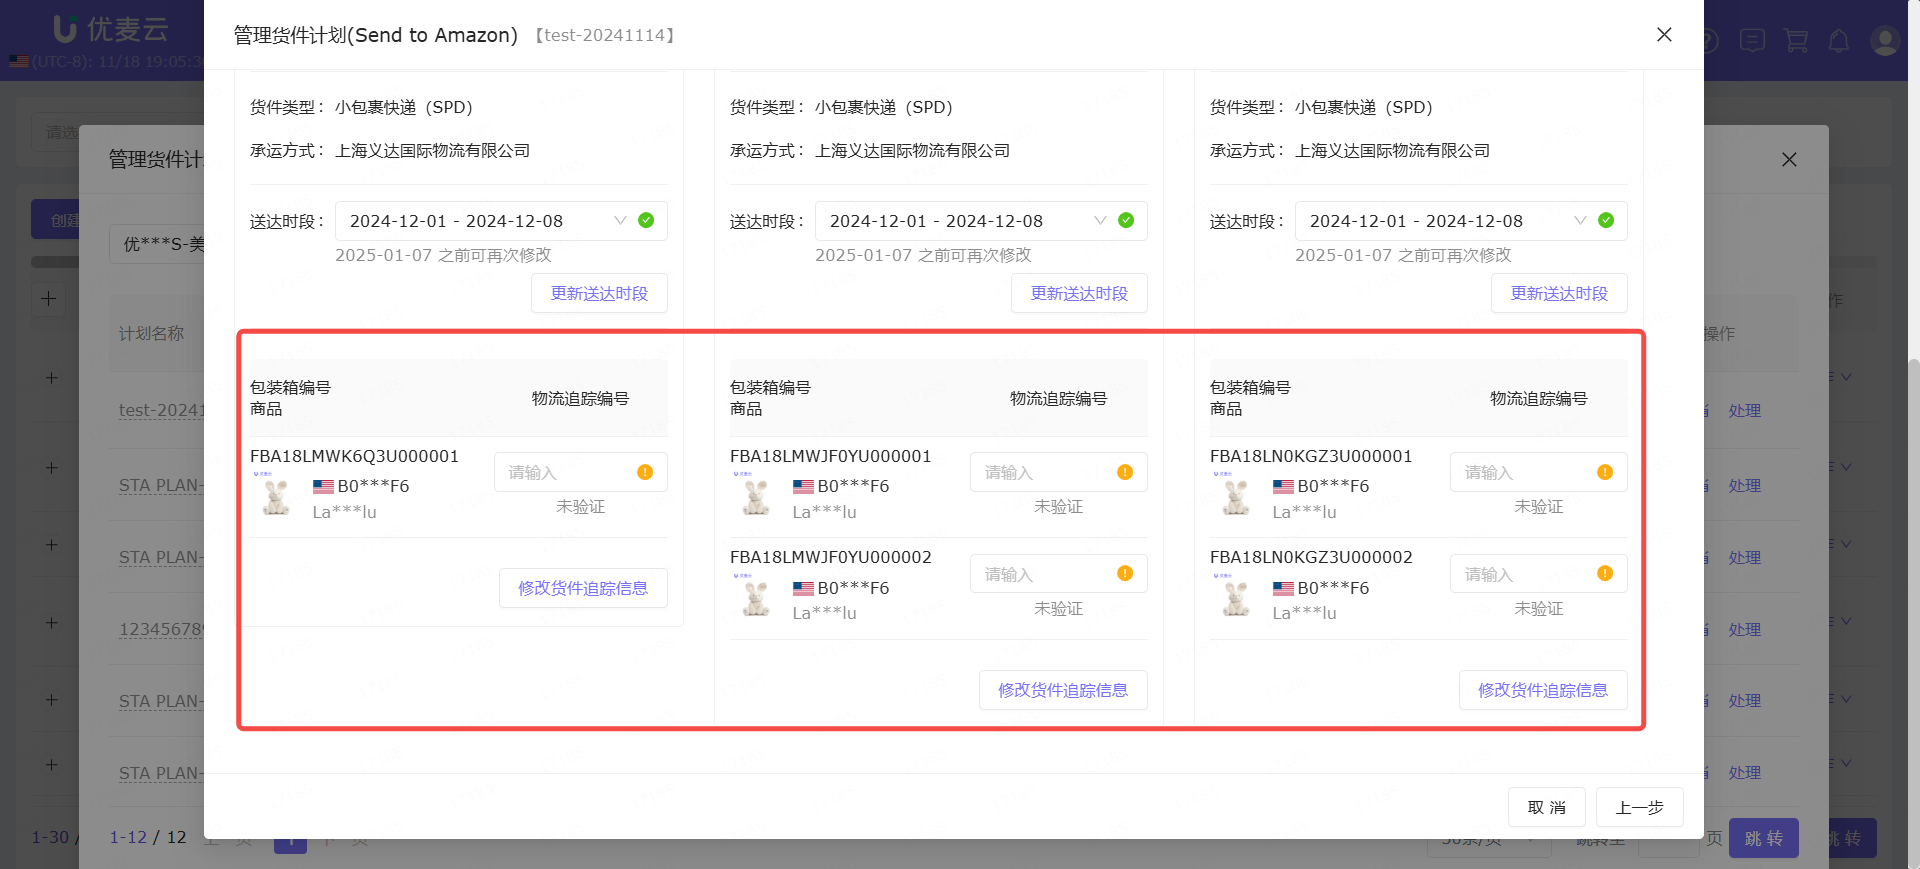
In addition, we can also update the delivery timeframe here.
Select the latest estimated delivery timeframe and click 【Update Delivery Timeframe】 to update directly.
At the same time, the Reference ID that everyone is concerned about can also be viewed directly here.
So far, the entire Send to Amazon shipping process is complete.
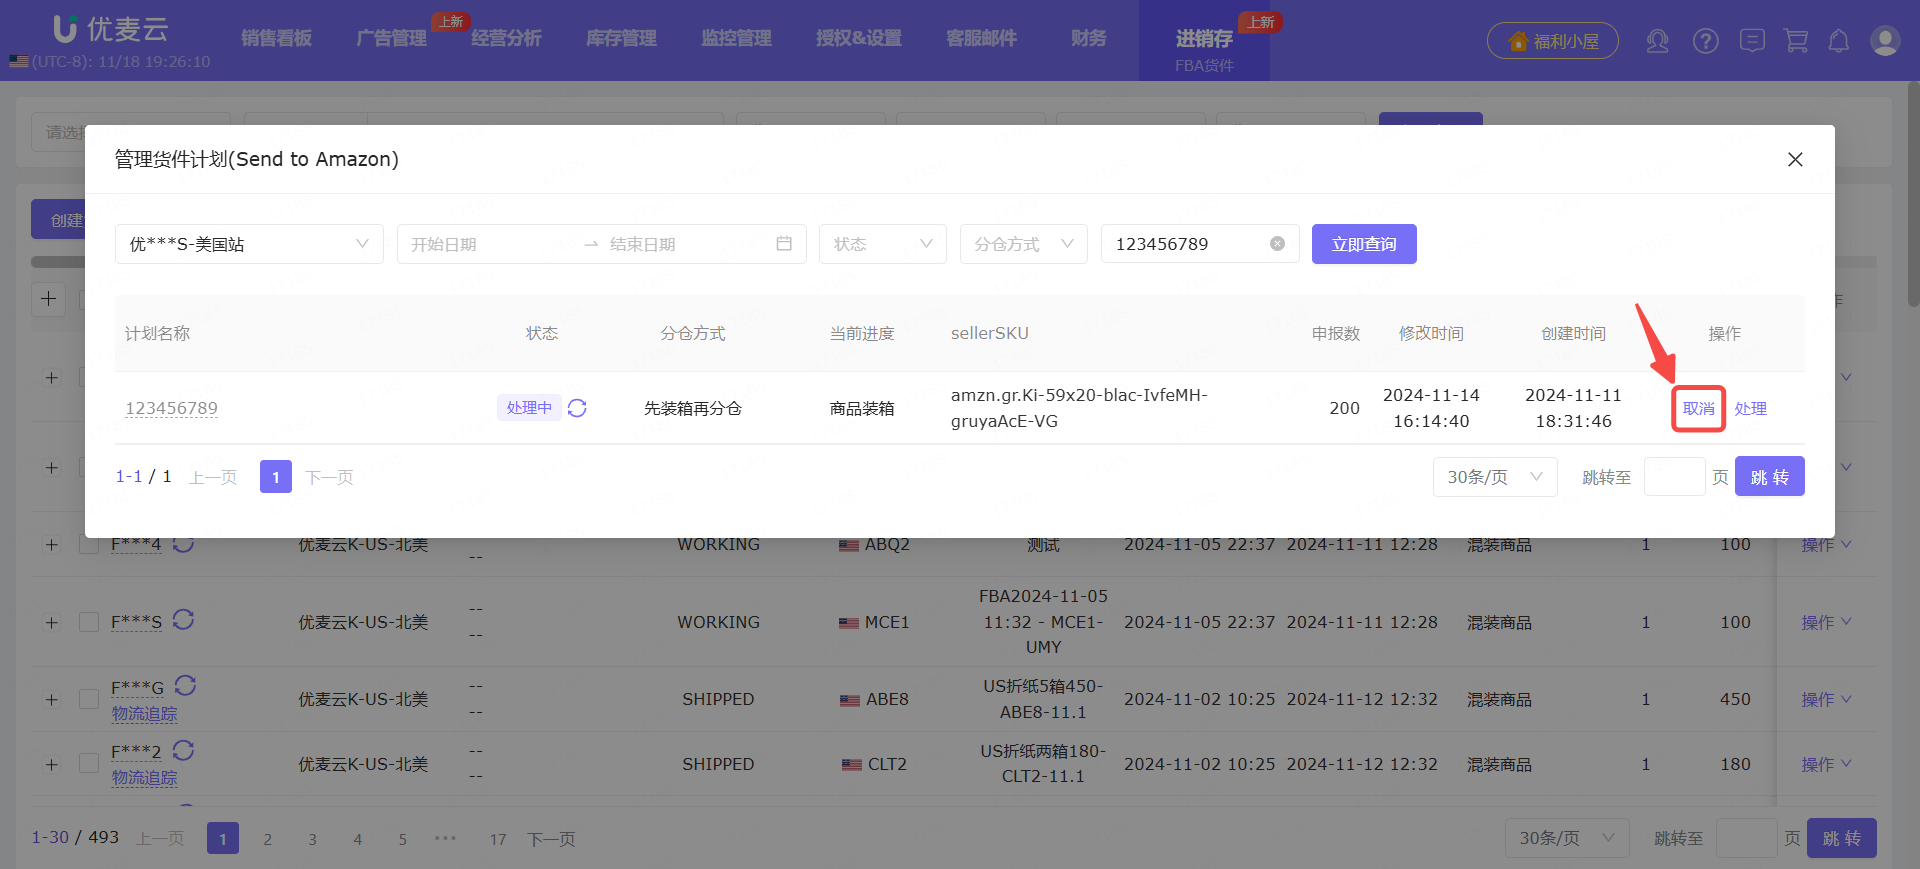
Manage Shipments
All created Send to Amazon shipments, including those in processing, canceled, completed, and other statuses, can be viewed and continued in 【Manage Shipment Plans (Send to Amazon)】.
Click "Manage Shipment Plans (Send to Amazon)" to enter to view and continue processing.
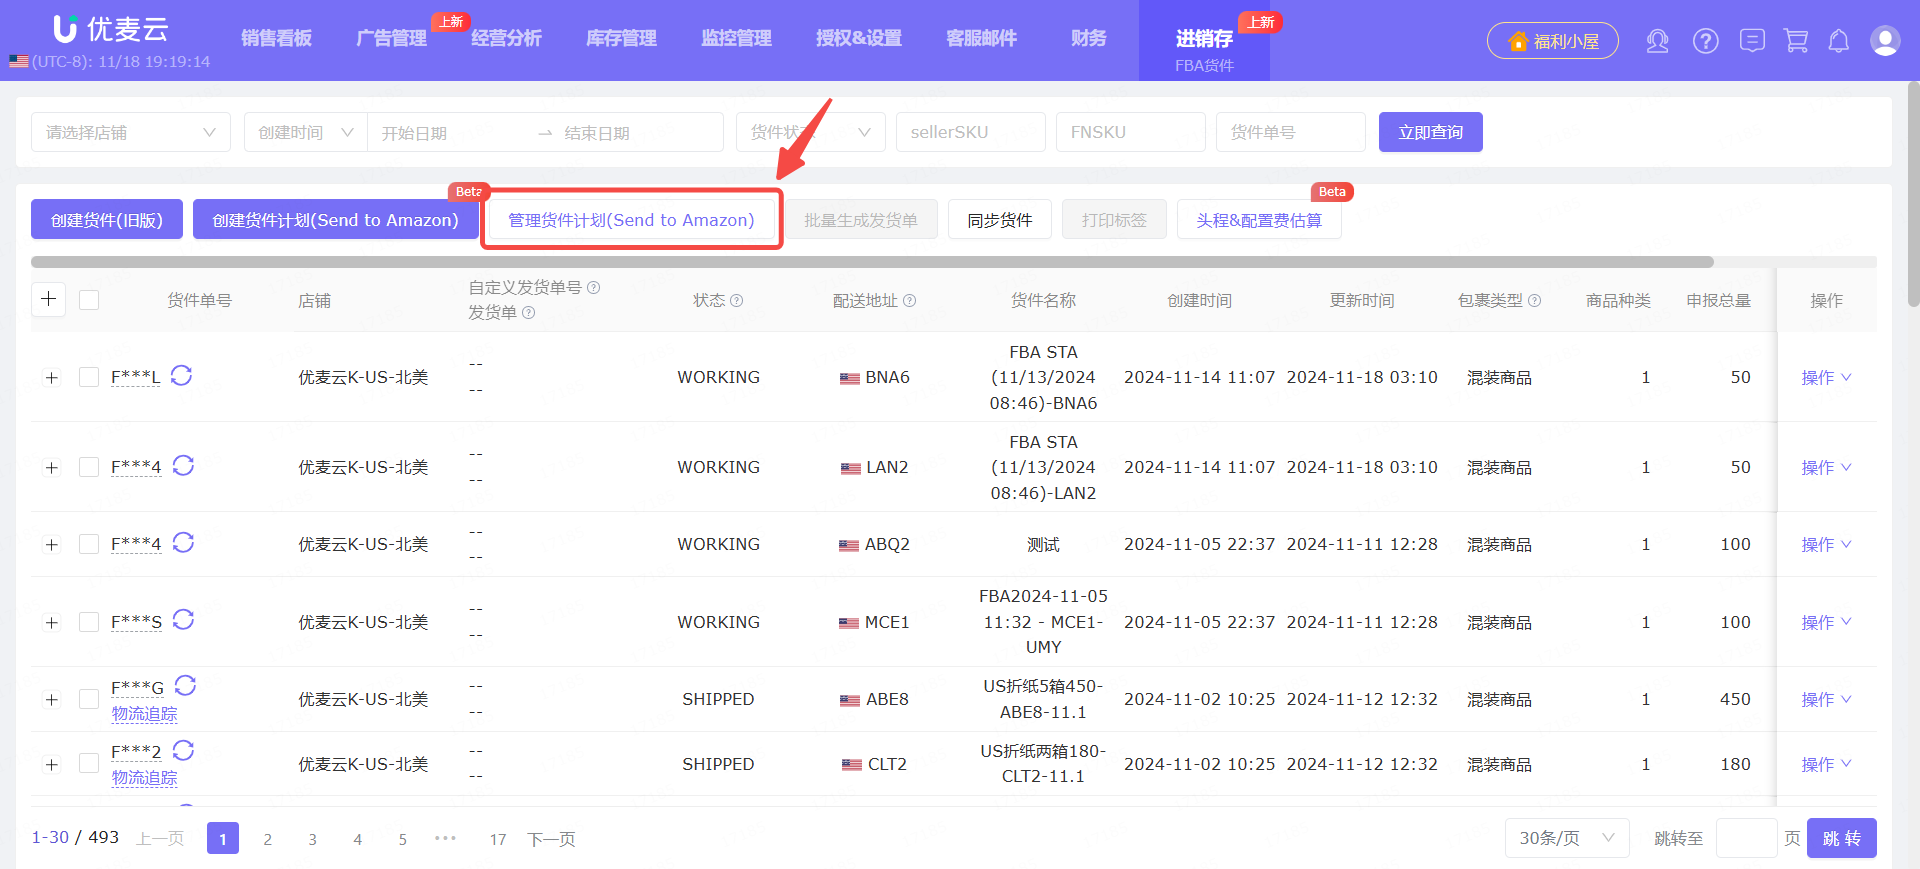
Enter the "Manage Shipment Plans (Send to Amazon)" page.
Through the search bar above, filter by marketplace, time, status, warehouse split option, and other conditions to find the target shipment. Then, click the corresponding 【Operation】 on the right to view or continue processing.
If the shipment status does not match the actual status, click the refresh button next to the status to refresh with one click.
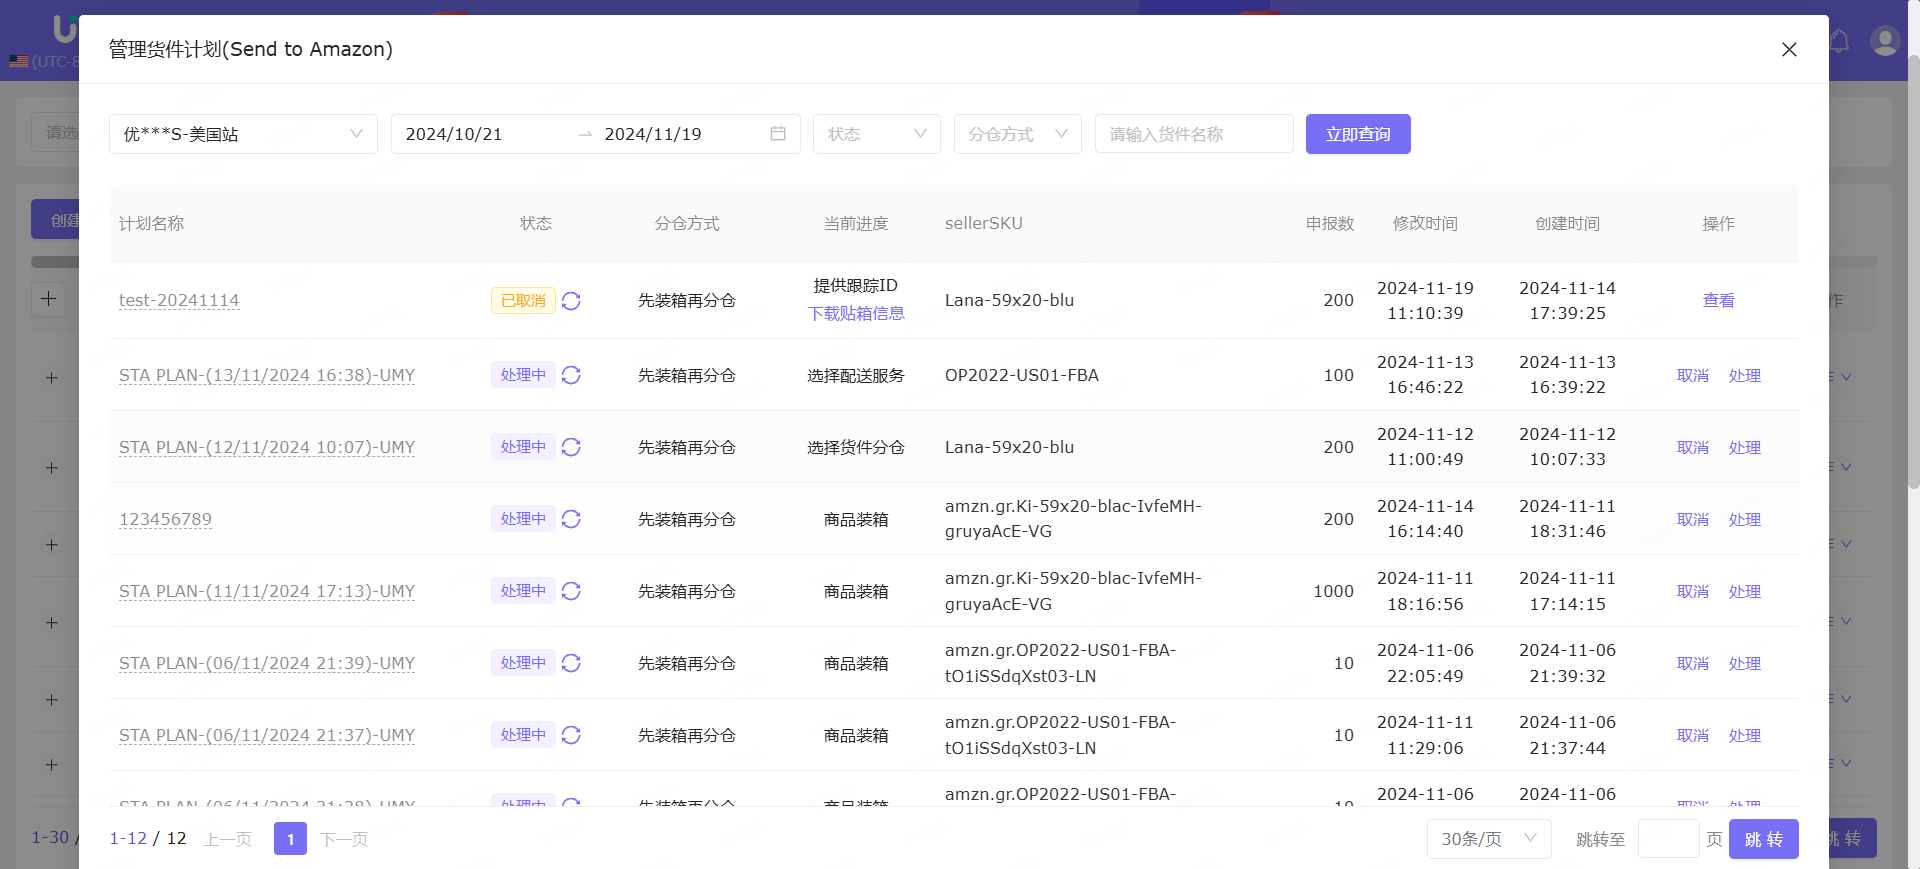
Cancel Shipment
If we want to stop shipping, we can directly cancel the shipment. After cancellation, all shipments under this process will be canceled.
However, canceling after the shipping process is completed may affect shipping performance. It is recommended to operate cancellation with caution.
Enter the "Manage Shipment Plans (Send to Amazon)" page.
Find the target shipment and click 【Cancel】 on the right to cancel with one click.