2025/03/21Number of reading(43902)Number of comments(0)
一、Target Audience
Operators
二、Feature Introduction
SellerSpace's Keyword Rank Tracker plugin solves the pain point of manually tracking keyword rankings. It automatically monitors both your own and your competitors' keyword rankings for organic search and sponsored ads (Sponsored Products, Sponsored Brands, and Sponsored Brands Video). The plugin meticulously records keywords and product information that have appeared within the top 3 pages of search results. This empowers sellers to gain deeper insights for optimizing advertising campaigns and improving product ranking performance.
三、Use Cases
- Automatically monitor keyword rankings and record ranking trends.
- Analyze the relevance of keywords and products to optimize keyword placement in listings.
- Analyze advertising ranking trends, including the number of times and percentage of appearances in the top 3 pages, to further optimize ad campaigns.
- Analyze and determine competitors' advertising strategies to inform your own advertising approach.
- Gain insights into competitors' historical promotional information to better plan your own promotions and deals.
四、Operation Guide
1. Installation and Setup
To use the Keyword Rank Tracker feature, you need to install the SellerSpace plugin in the browser you use to access the Amazon storefront.
After successful installation, click the plugin icon in the browser's upper right corner, select 【Open Plugin】, and log in to your SellerSpace account.
Important Note: To use the Keyword Rank Tracker feature, ensure that both your browser and the plugin are running simultaneously. If you close the browser or the plugin logs out, data scraping will stop immediately.
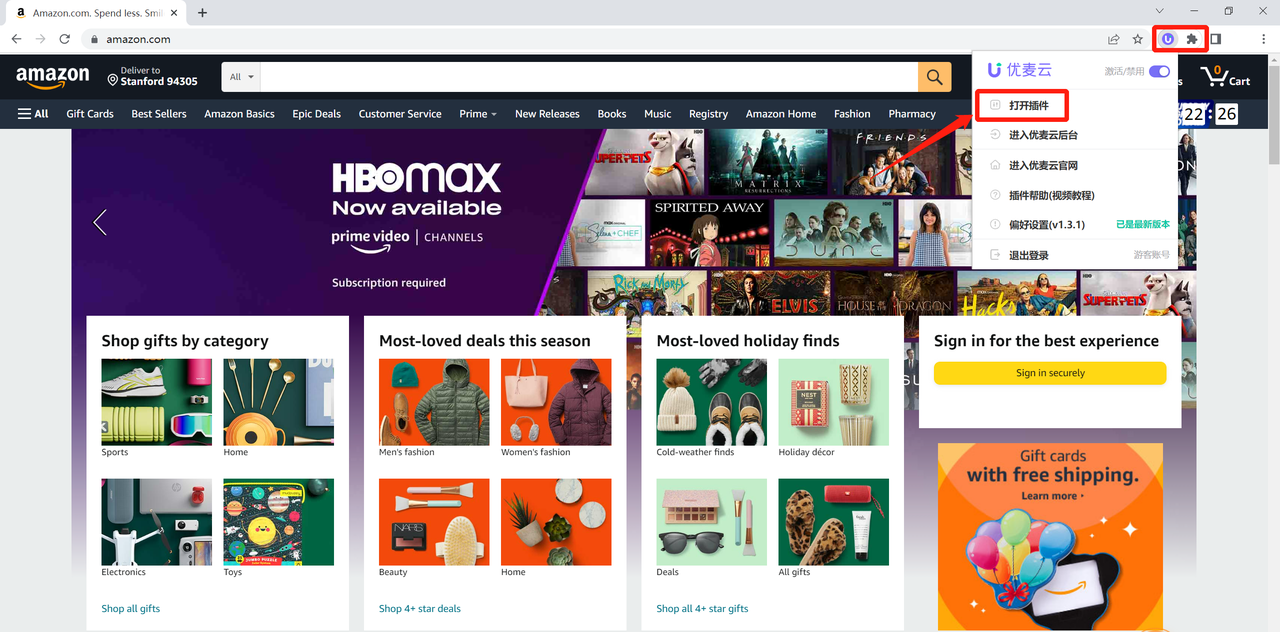
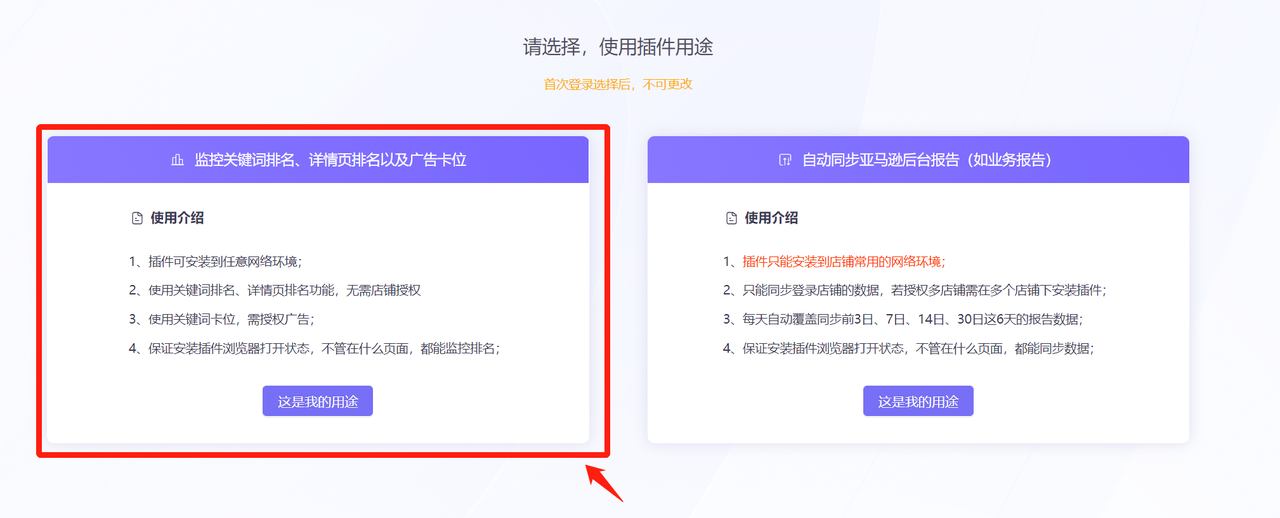
Upon first use, you need to select the plugin's purpose.
Choose 【Monitor Keyword Ranking, Detail Page Ranking, and Ad Placement】 to access the feature page.
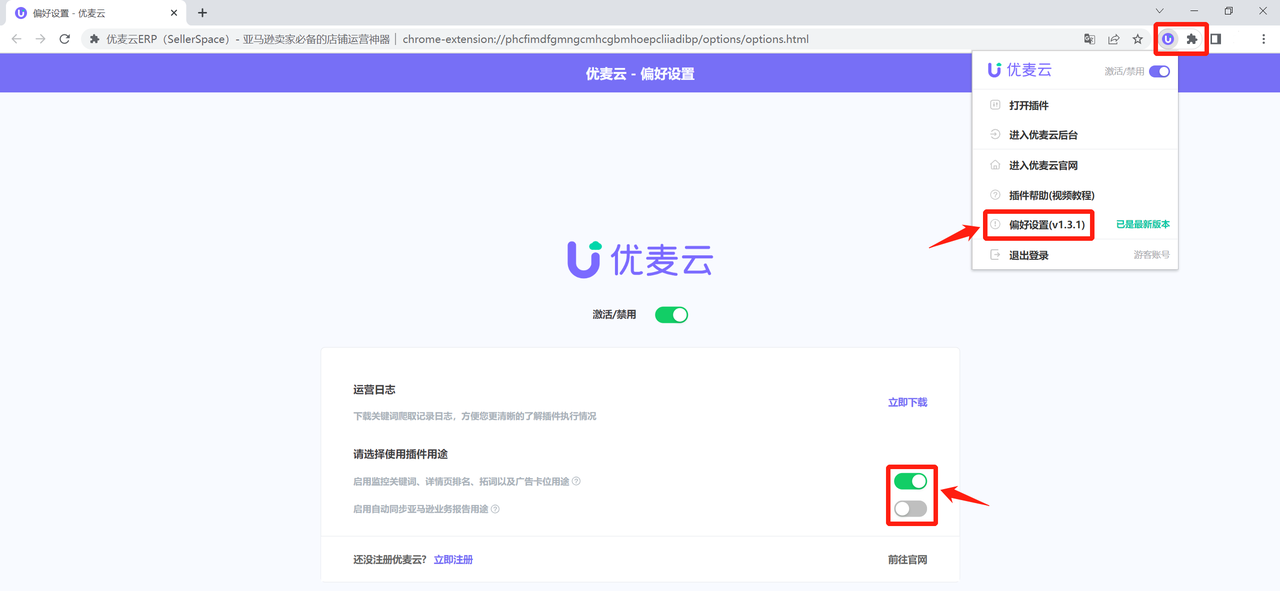
You can switch the plugin's purpose at any time in the 【Preferences】 settings.
2. Configure Monitoring
To effectively use the keyword rank monitoring feature, you need to complete the following steps.
1) Select Monitoring Interval
The SellerSpace plugin supports automatic data monitoring at intervals of 2, 3, 4, 6, 8, 12, or 24 hours. You can choose a monitoring frequency that suits your needs. Due to Amazon's traffic limitations, it is recommended to select a larger interval frequency. Monitoring time is based on the corresponding marketplace's time zone.
Click 【Scraping Configuration】 and select the desired frequency.
 +
+
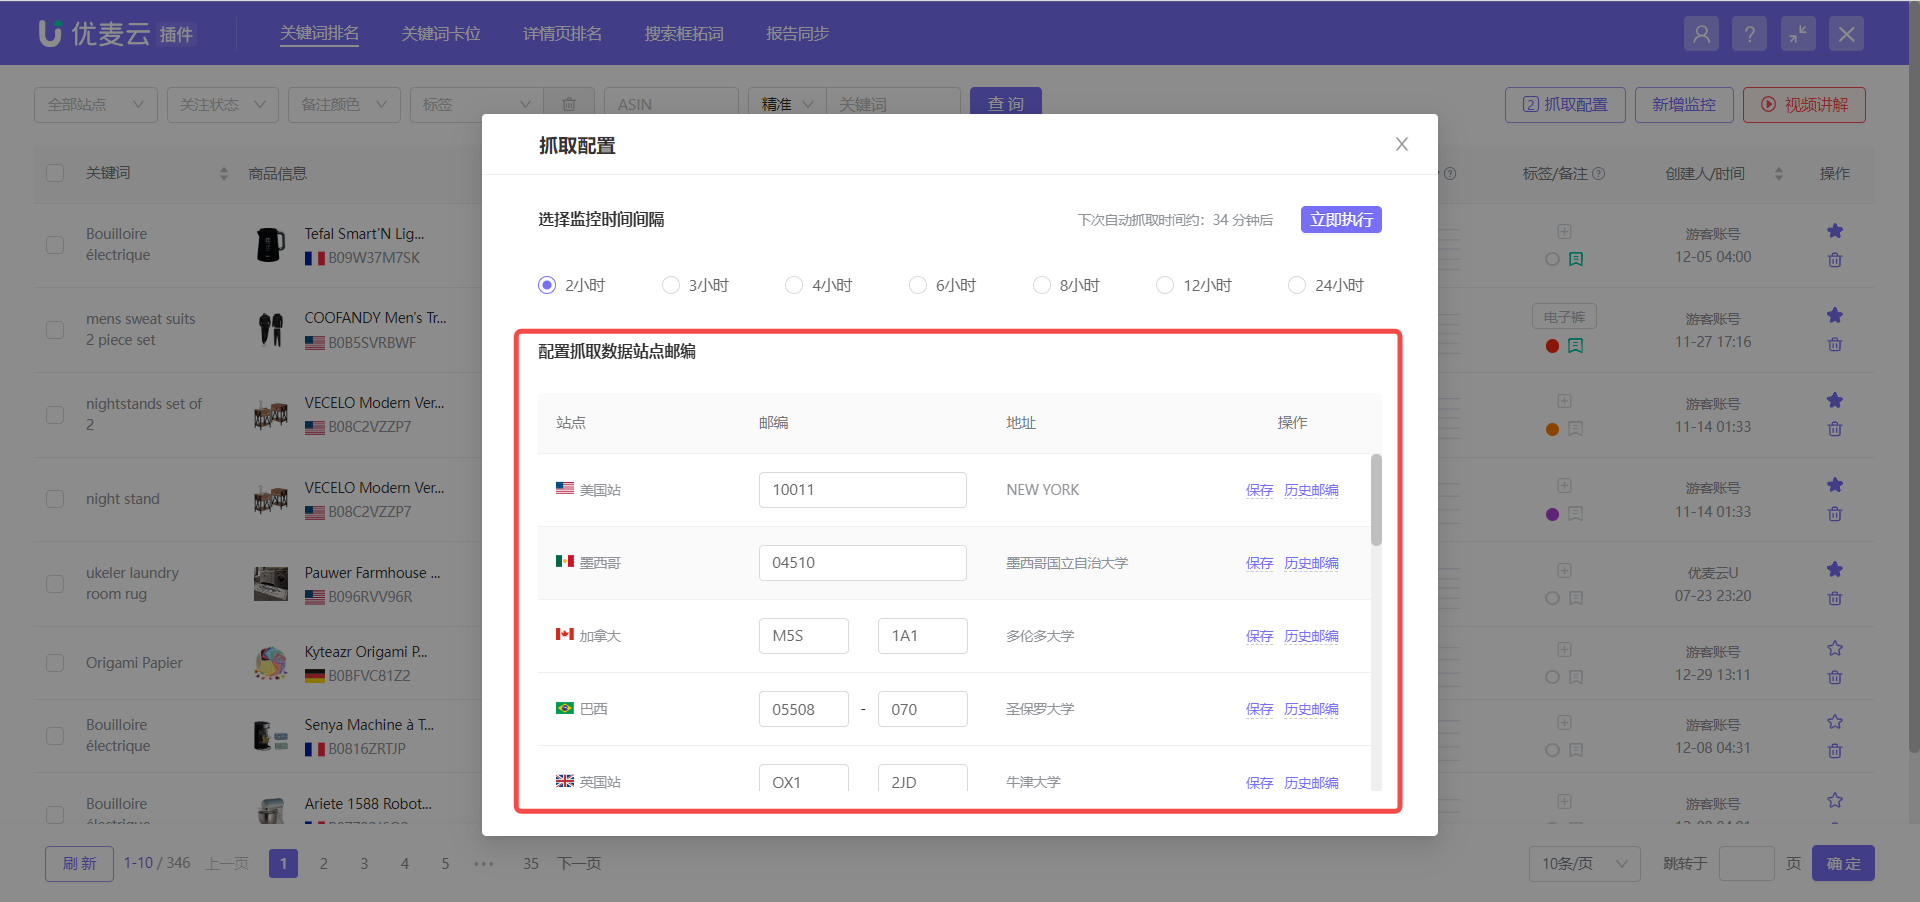
2) Configure Marketplace Zip Code for Data Scraping
The marketplace zip code is equivalent to a buyer's address. Search results for the same keyword can vary in different regions. Therefore, you need to set a fixed marketplace zip code to ensure consistent results.
It is recommended to set the zip code based on the peak sales region in your Seller Central backend. You can also modify the marketplace zip code at any time.
Go to the 【Scraping Configuration】 page.
 +
+
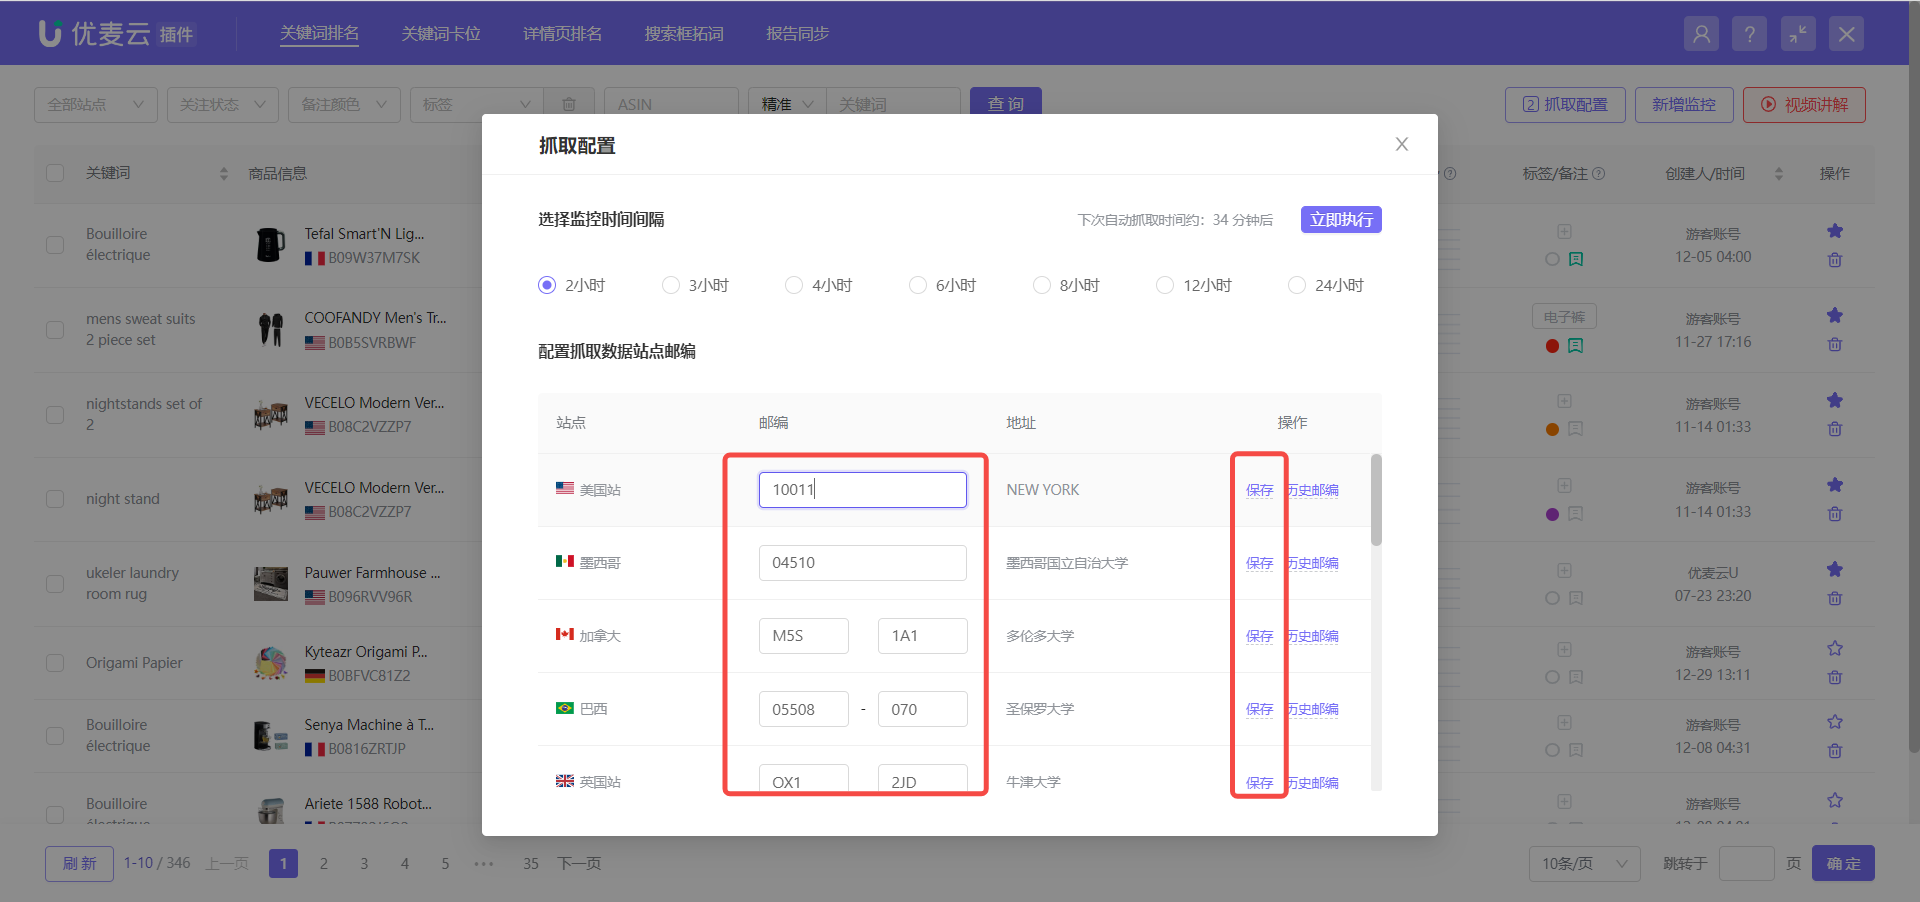
Enter the zip code for the corresponding marketplace and click 【Save】.
 +
+
3) Add Monitoring
After configuring the marketplace zip code and monitoring interval, you can add products and keywords to monitor. You can also directly add group tags to new monitoring entries.
Each SellerSpace account can add a maximum of 500 monitored keywords.
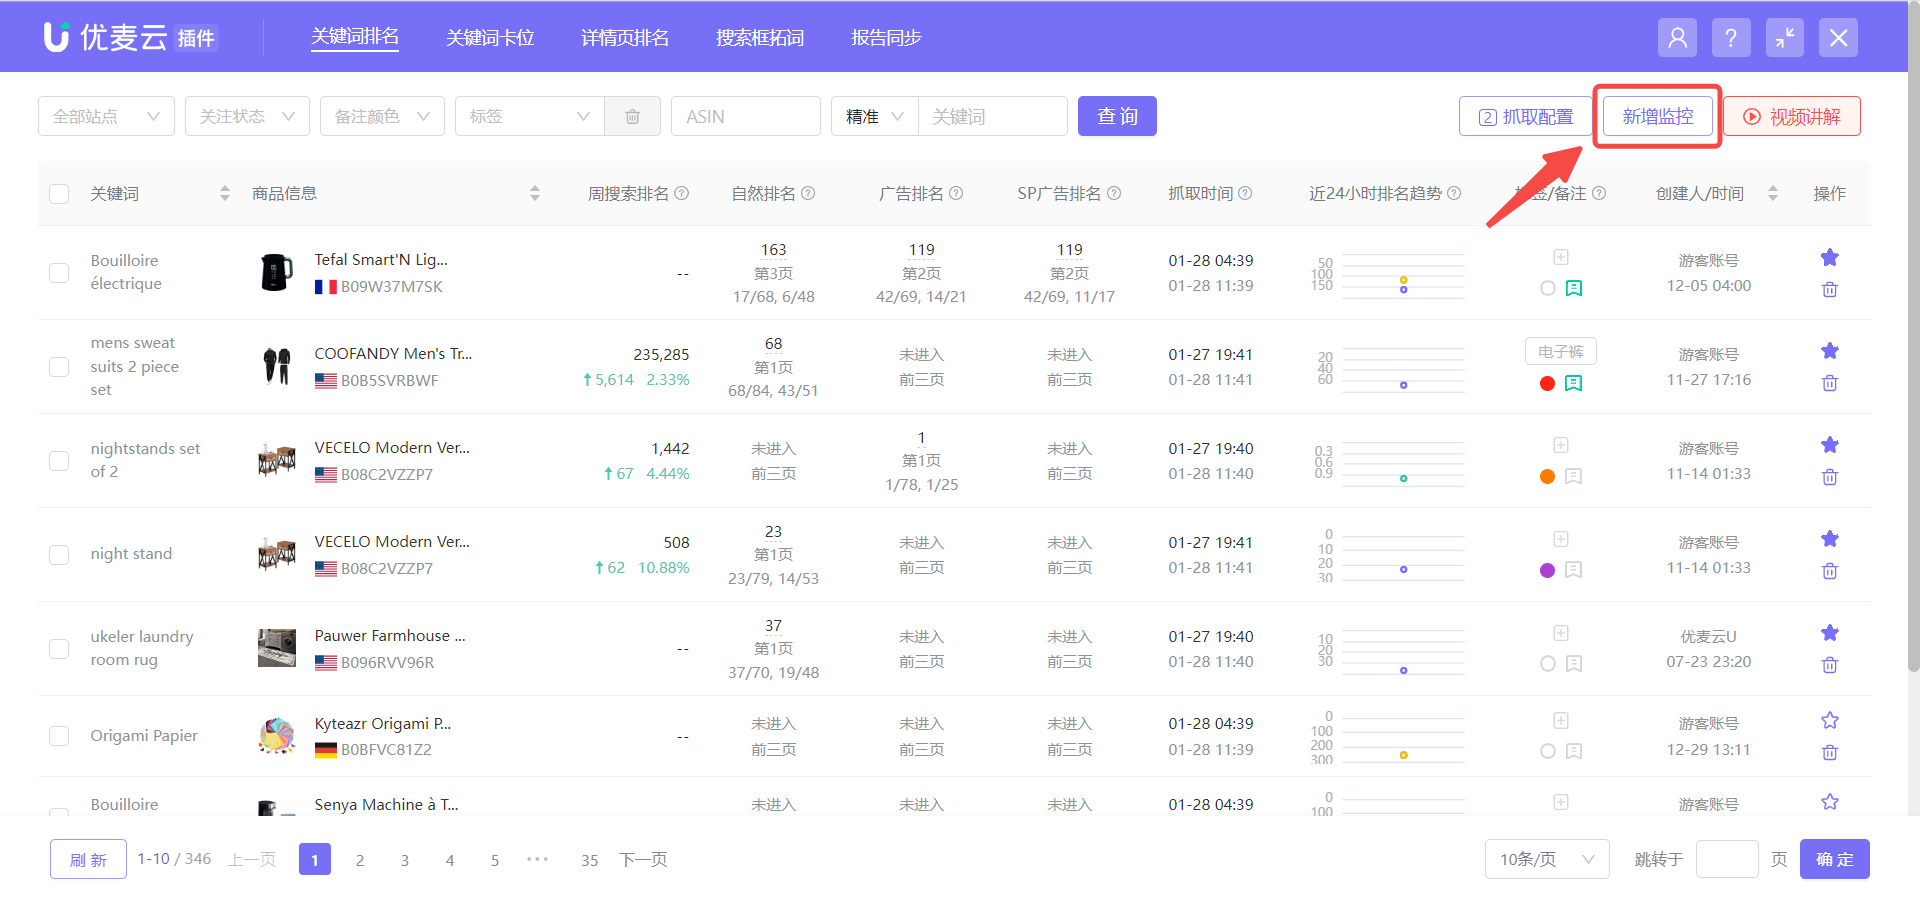
Click 【Add Monitoring】 to access the adding page.
 +
+
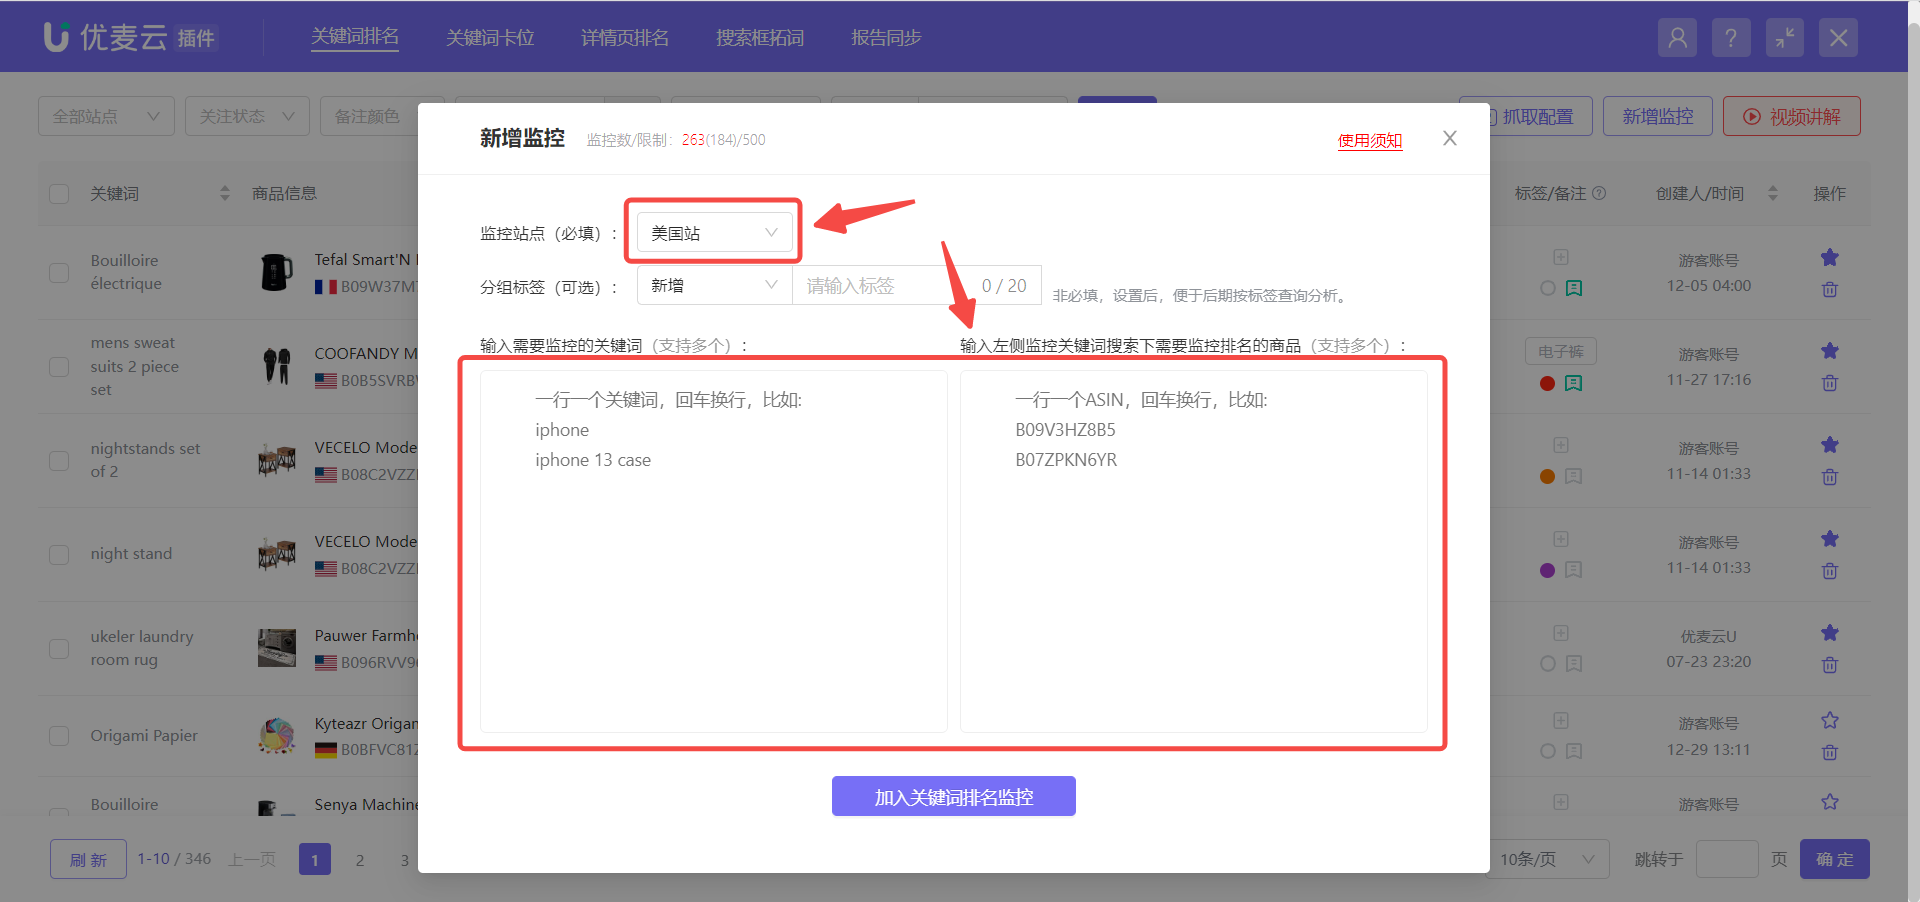
Select the marketplace to monitor, enter the keyword to monitor, and the product ASIN associated with the keyword, then save.
 +
+
4) Manually Execute Monitoring Immediately (Optional)
After you add monitoring, the system will not execute monitoring immediately. It will start the first monitoring at the first interval time based on the monitoring interval you selected.
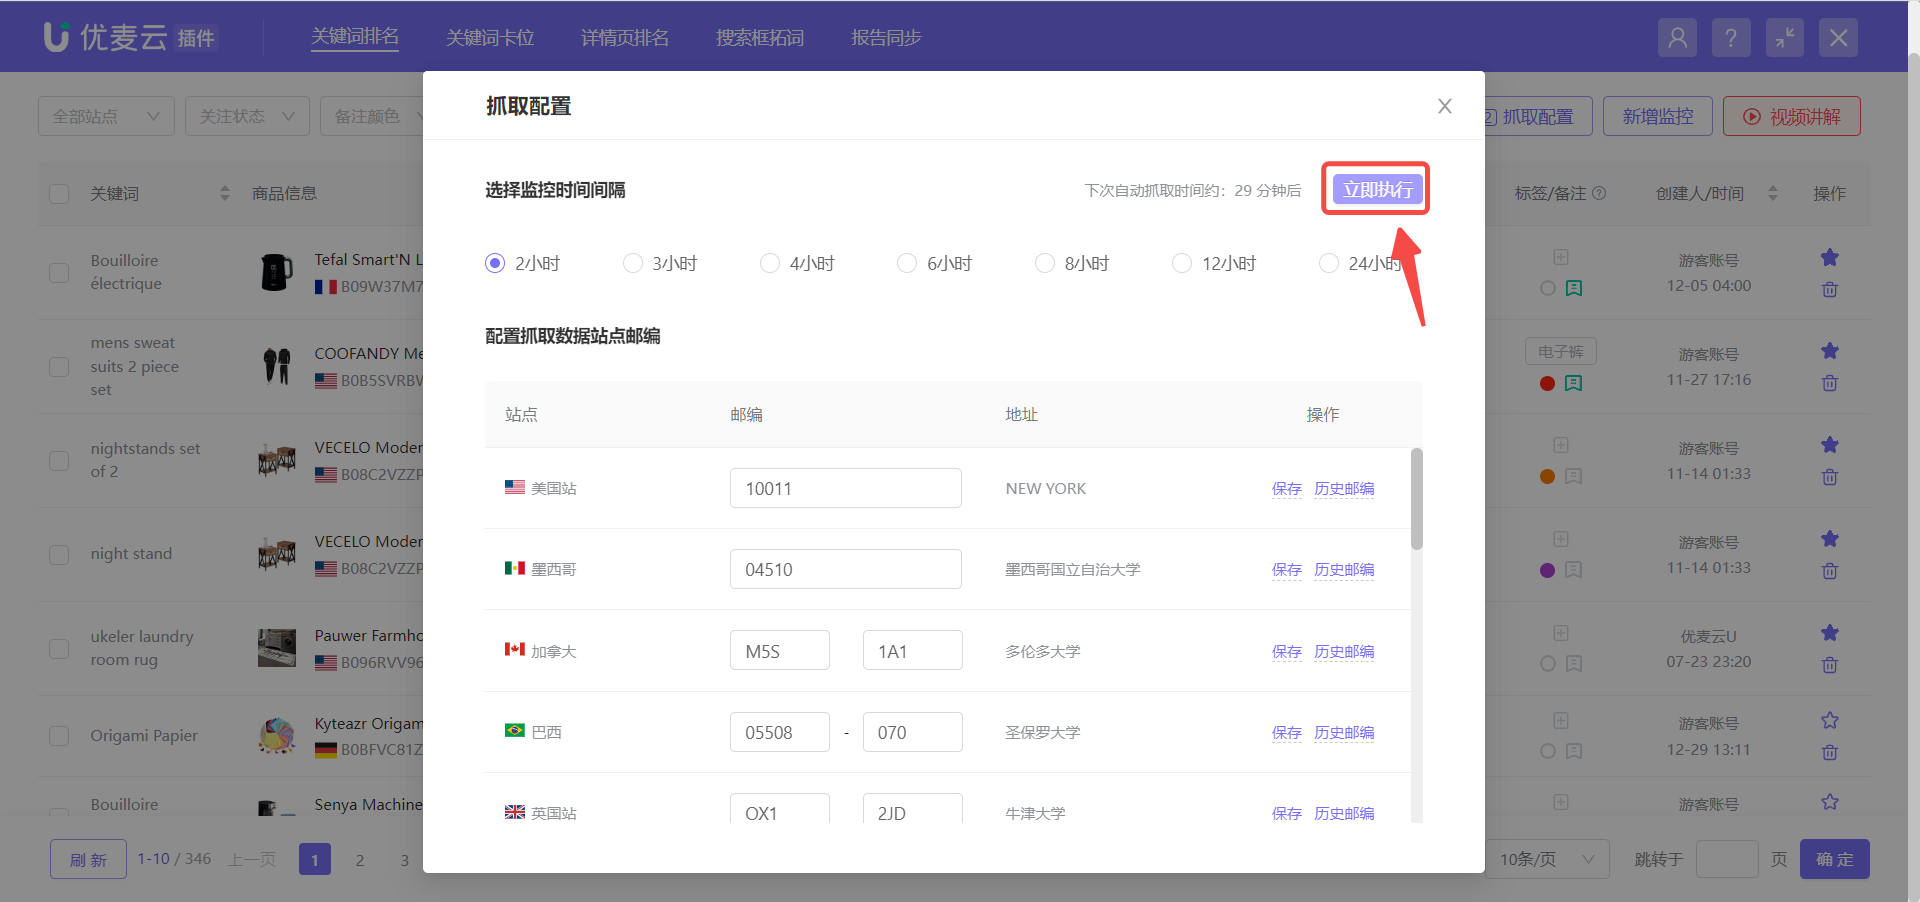
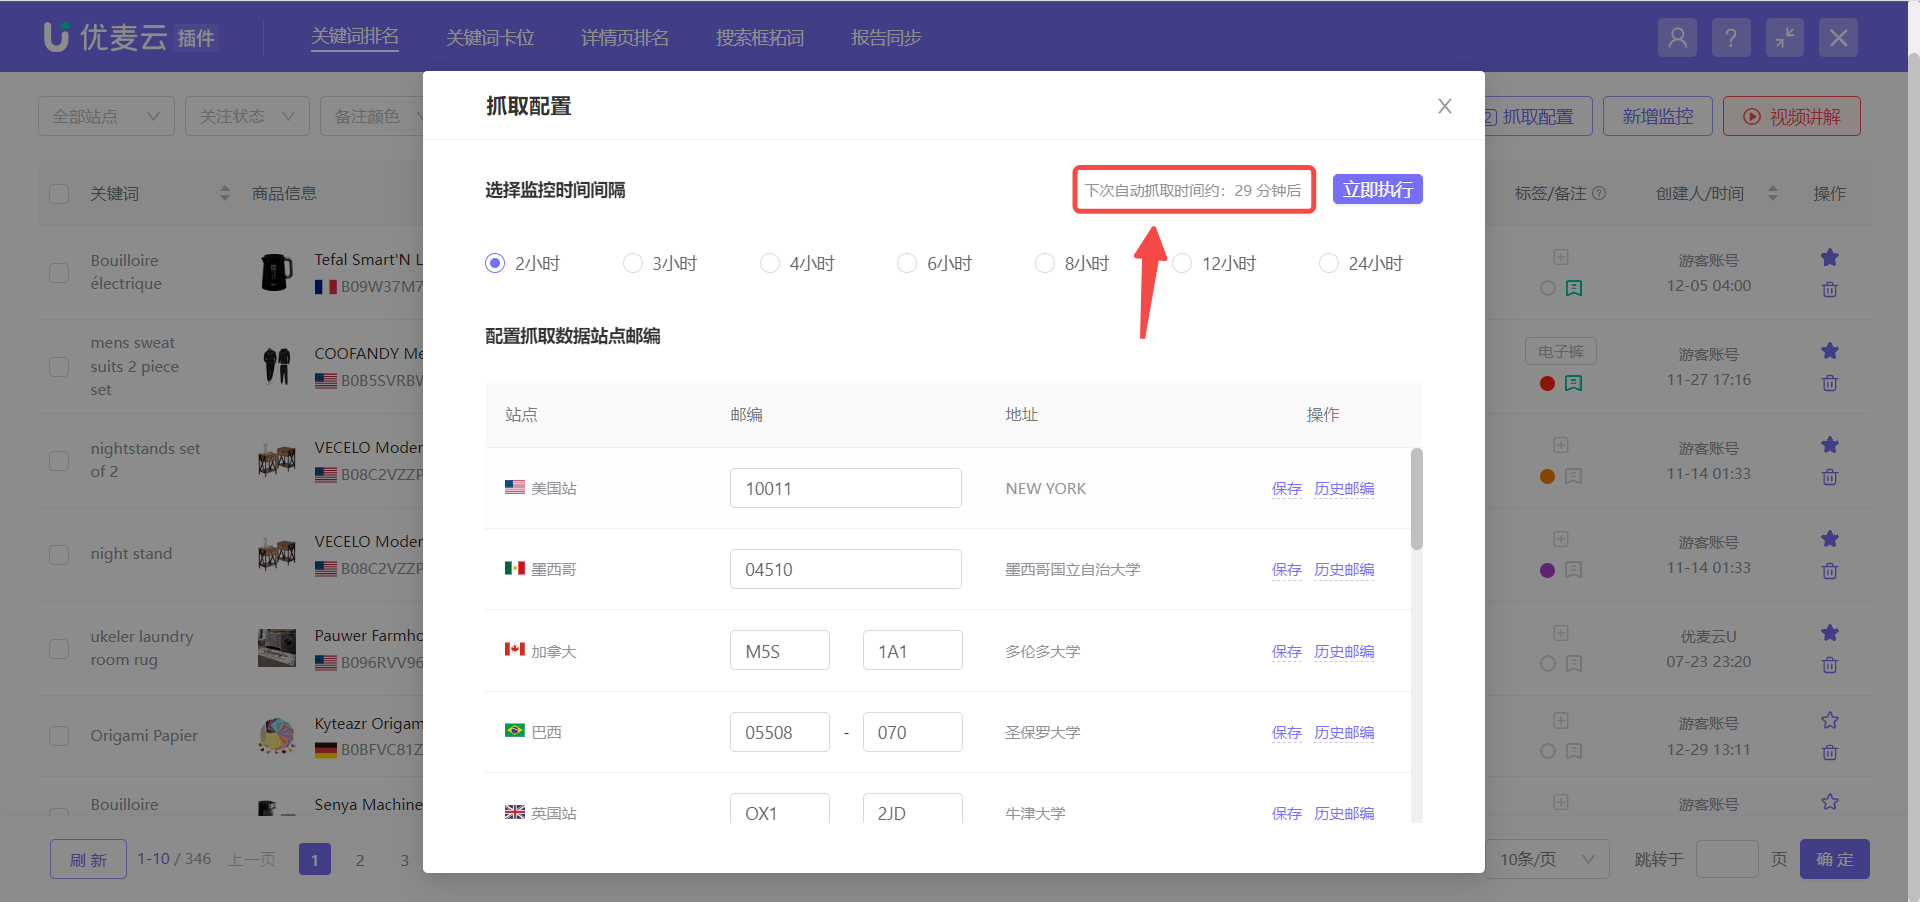
Therefore, if you want to execute monitoring immediately after adding, you can go to the 【Scraping Configuration】 page and click 【Execute Now】. The immediate execution operation interval is once per hour.
 +
+
In addition, you can also view the next scheduled monitoring time here.
 +
+
5) Add Tags/Notes
After adding monitoring, you can add tags and notes to your monitored keywords for easy management.
There are multiple ways to add tags: add when creating new monitoring entries, or add individually or in batches after creating.
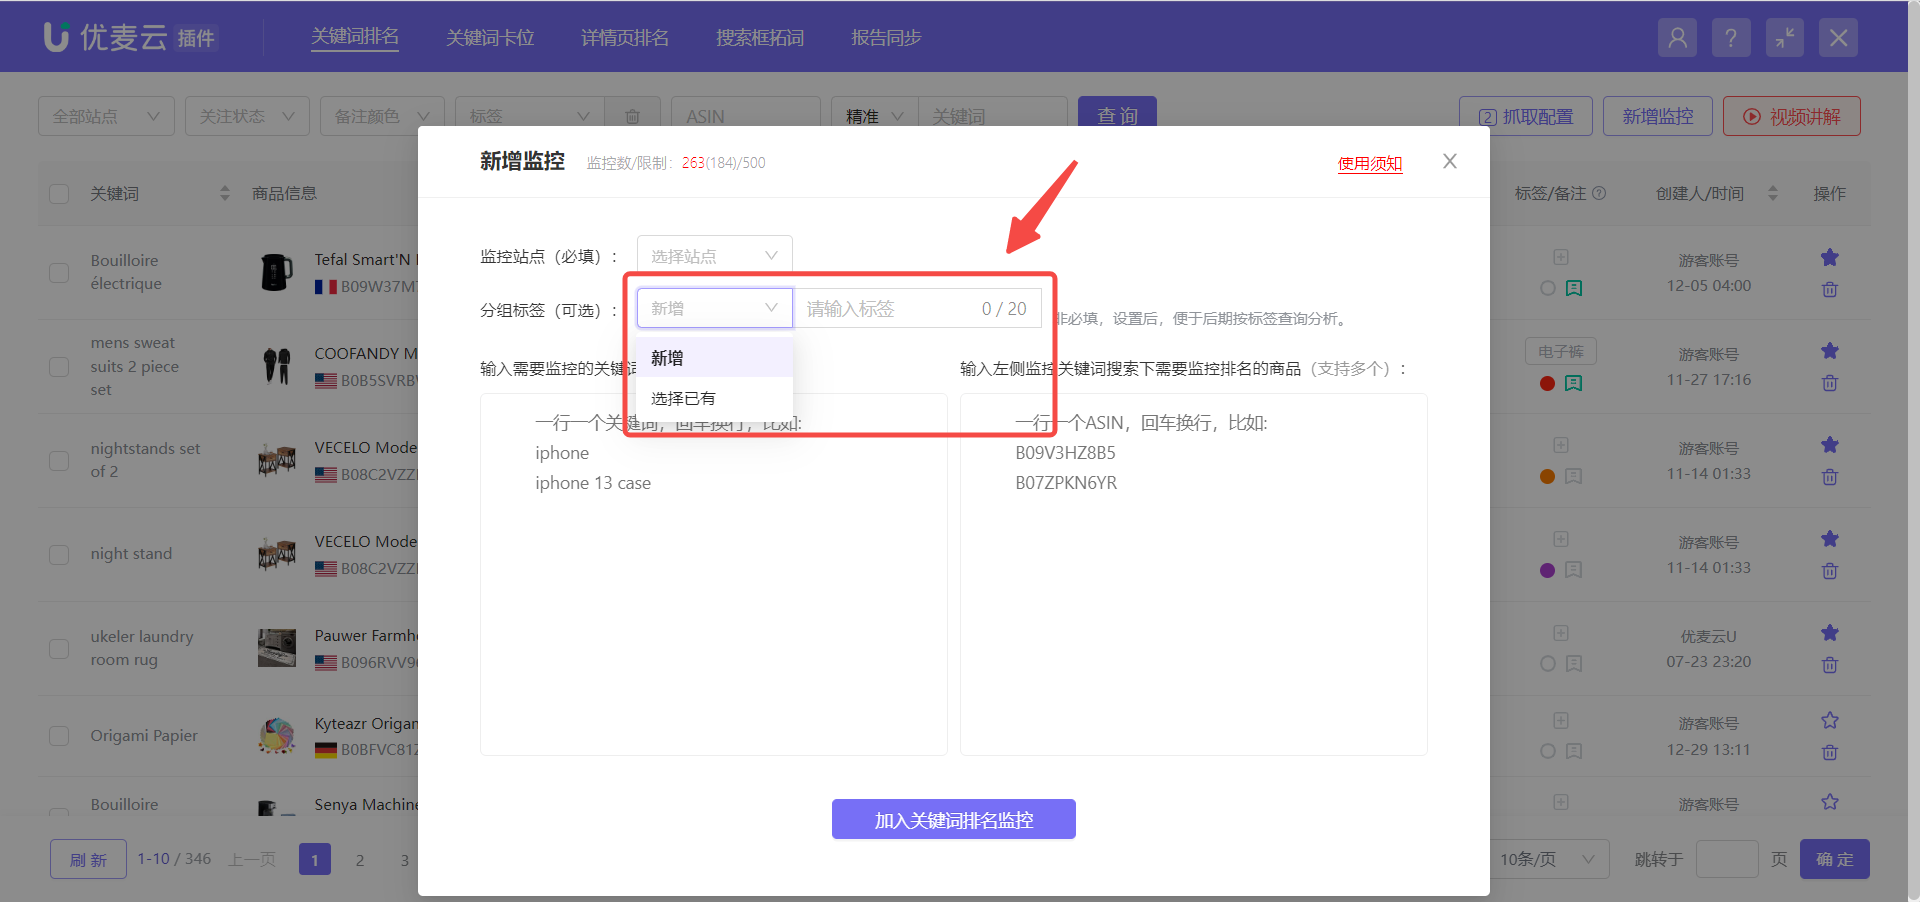
Add group tags when creating new monitoring entries:
 +
+
If you select an existing tag when creating a new monitoring entry, you can also automatically populate the monitored keywords and ASINs under that tag, making it convenient for you to quickly add keyword monitoring.
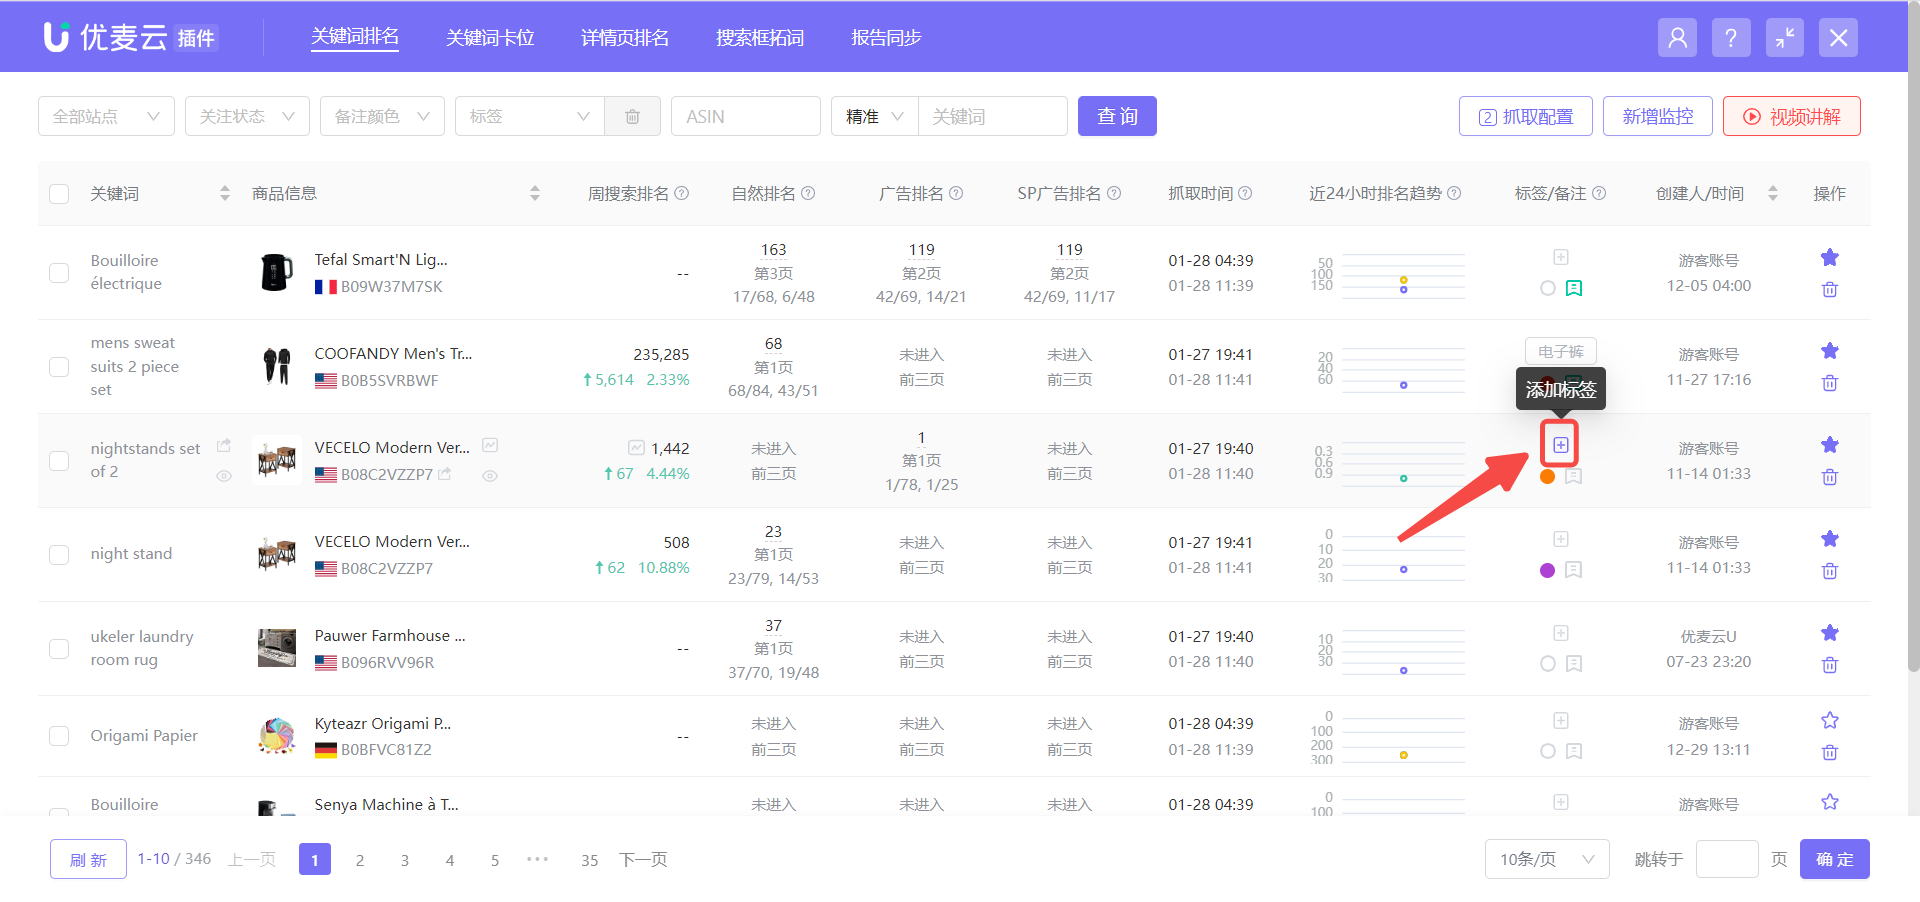
Add tags individually after creating new monitoring entries:
 +
+
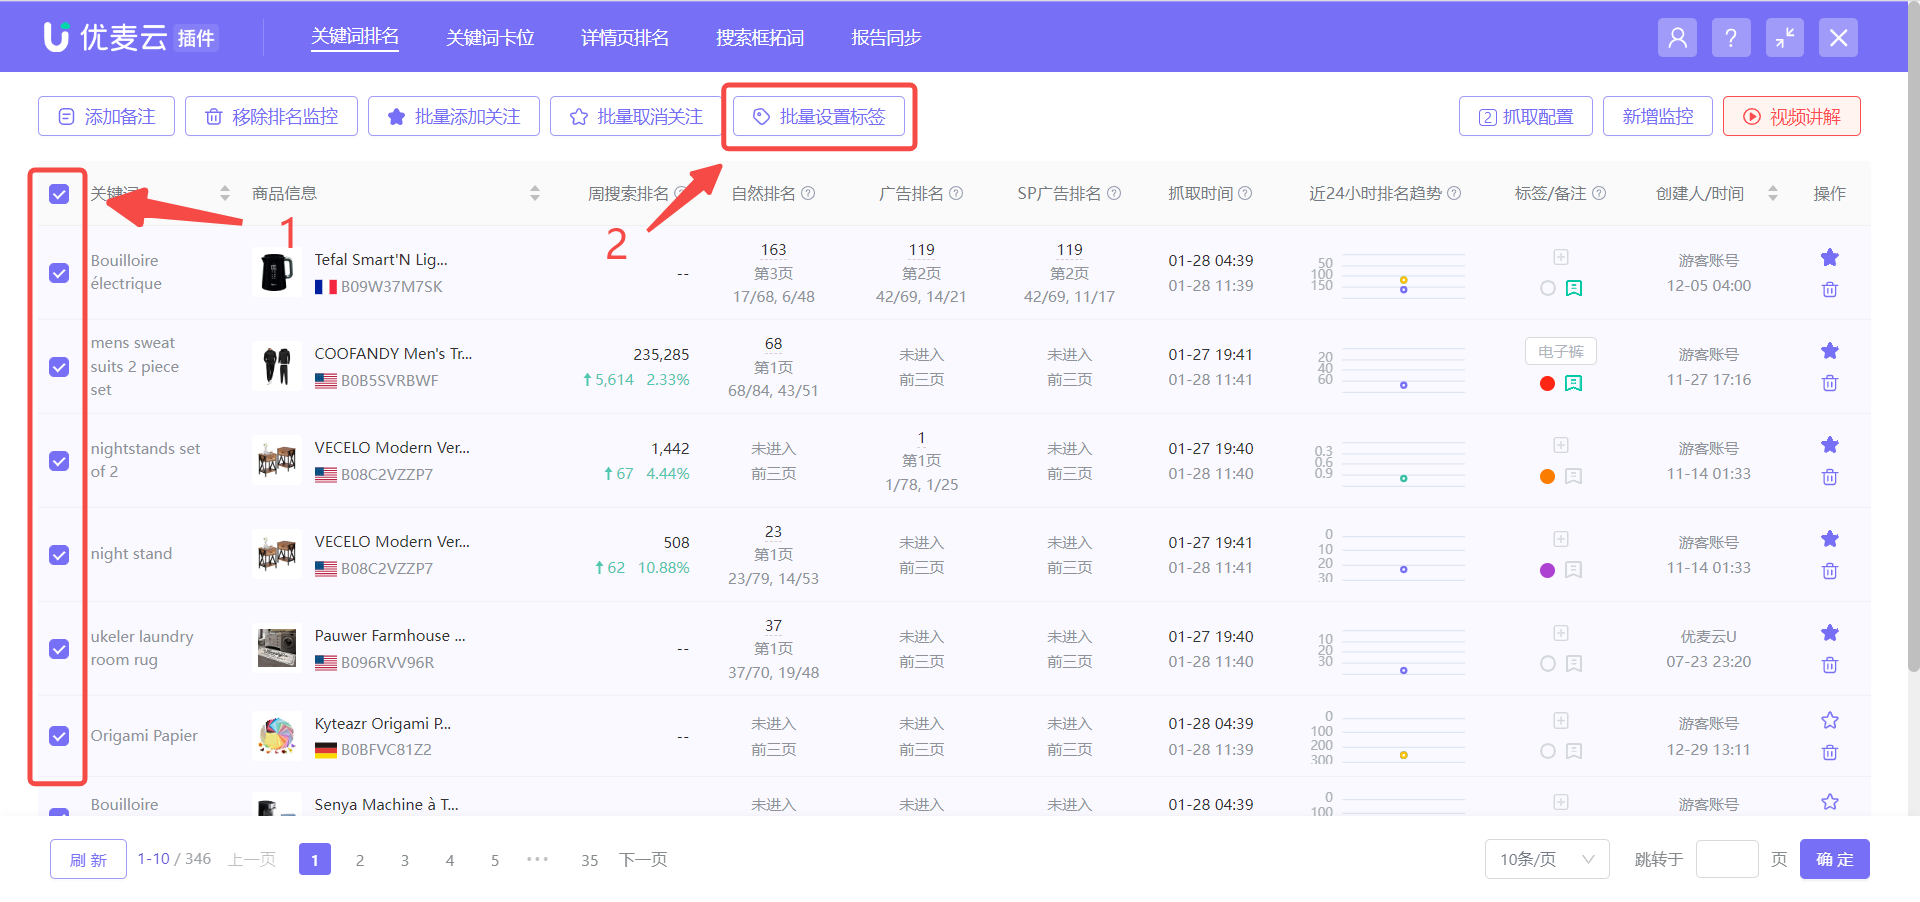
Add tags in batches after creating new monitoring entries:
 +
+
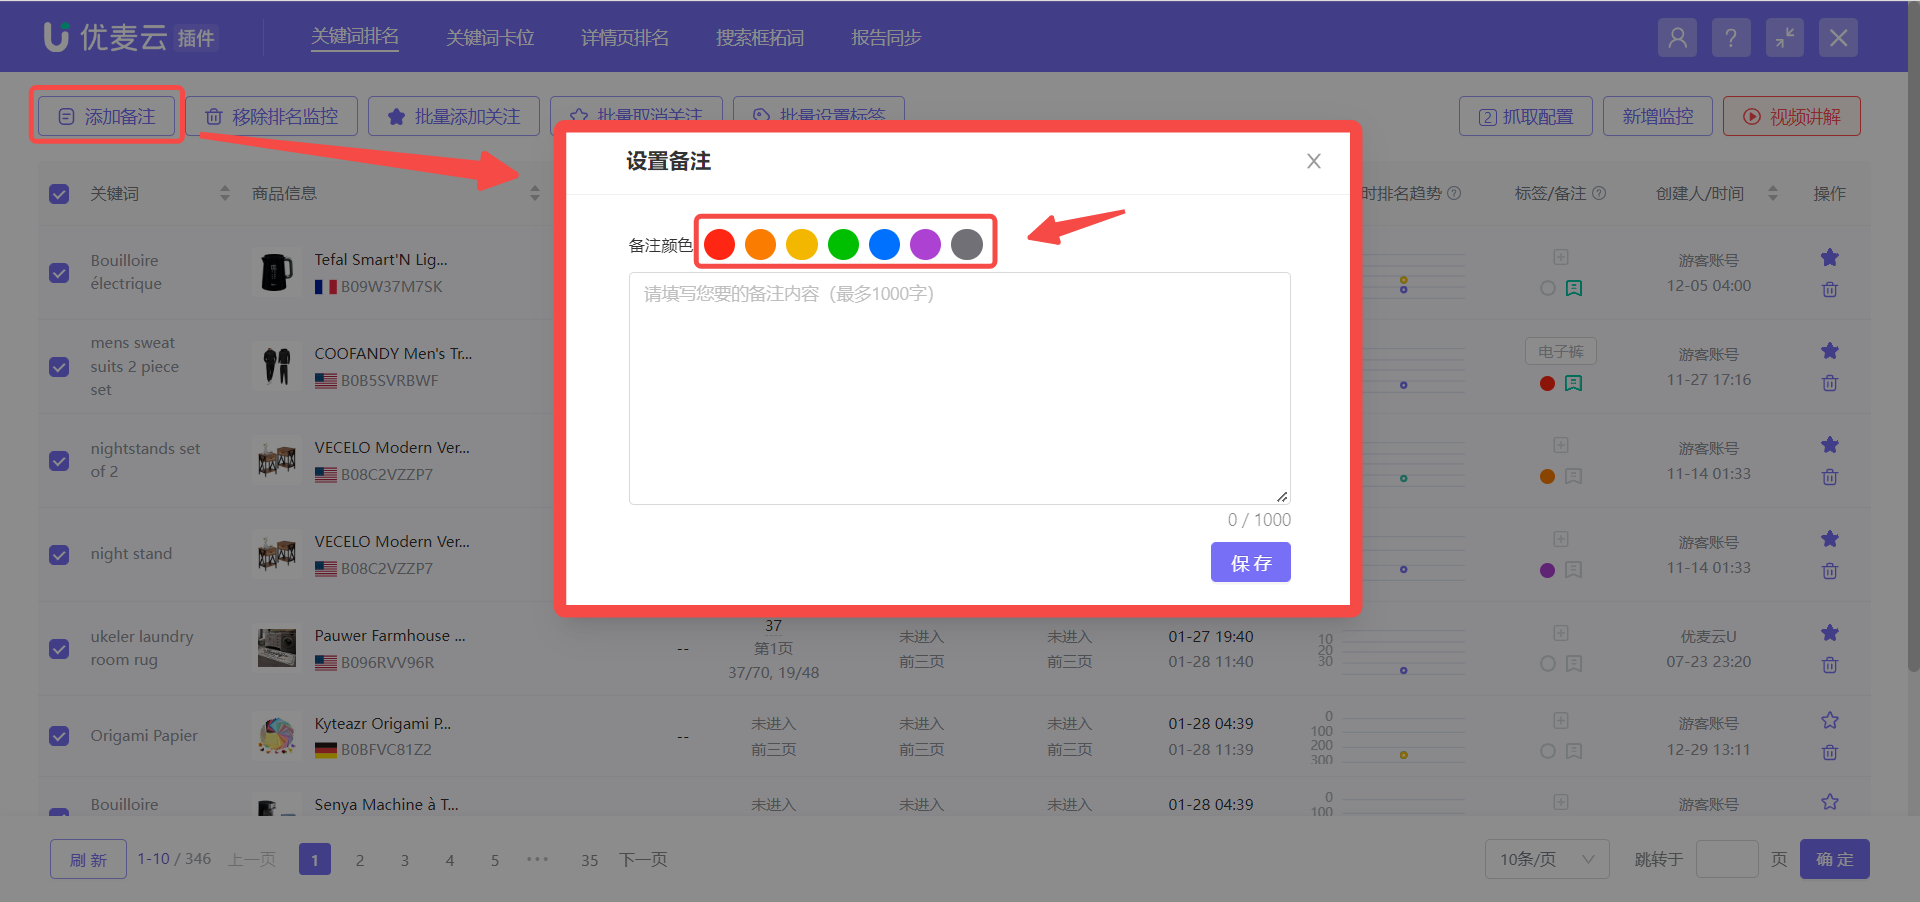
Notes are added in the same way as tags, and you can also add colors to notes for categorization.
 +
+
6) Add to Watchlist
In addition to tags/notes, you can also add important monitored keywords to your watchlist. After adding, the data for these monitored keywords will be displayed at the top by default for easy viewing and tracking.
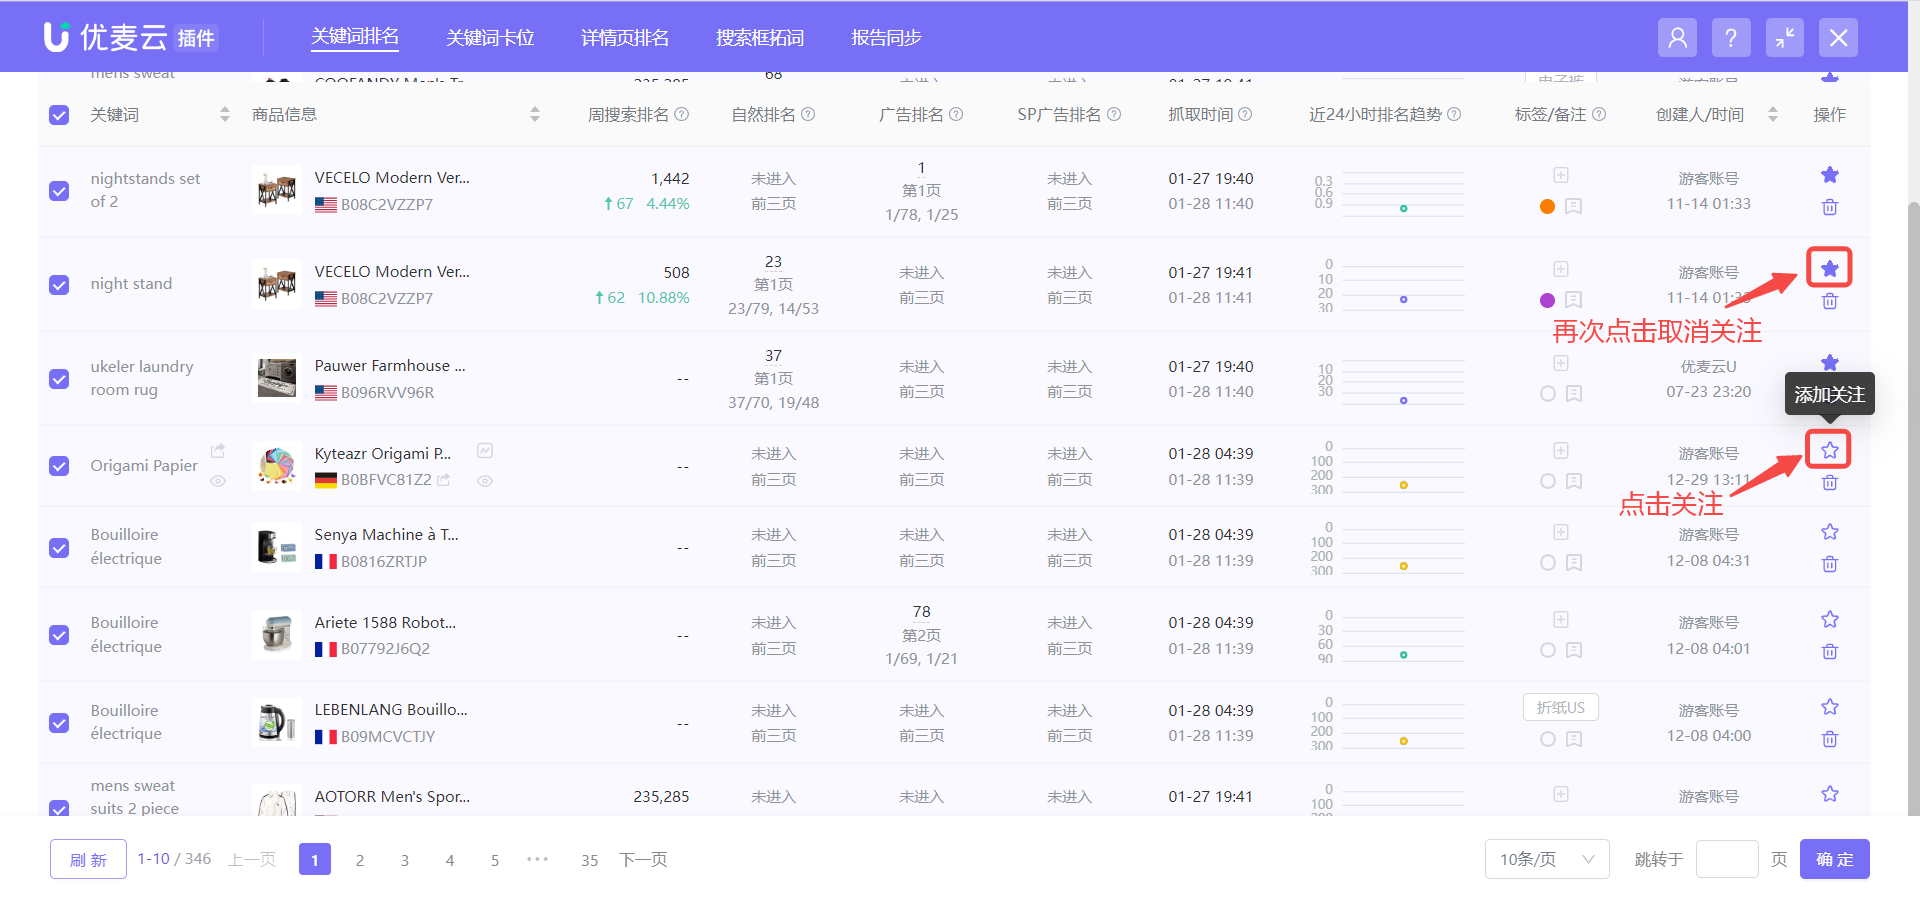
Find the monitoring entry you want to watch, click the watchlist button on the left side of the monitoring entry to add it with one click.
 +
+
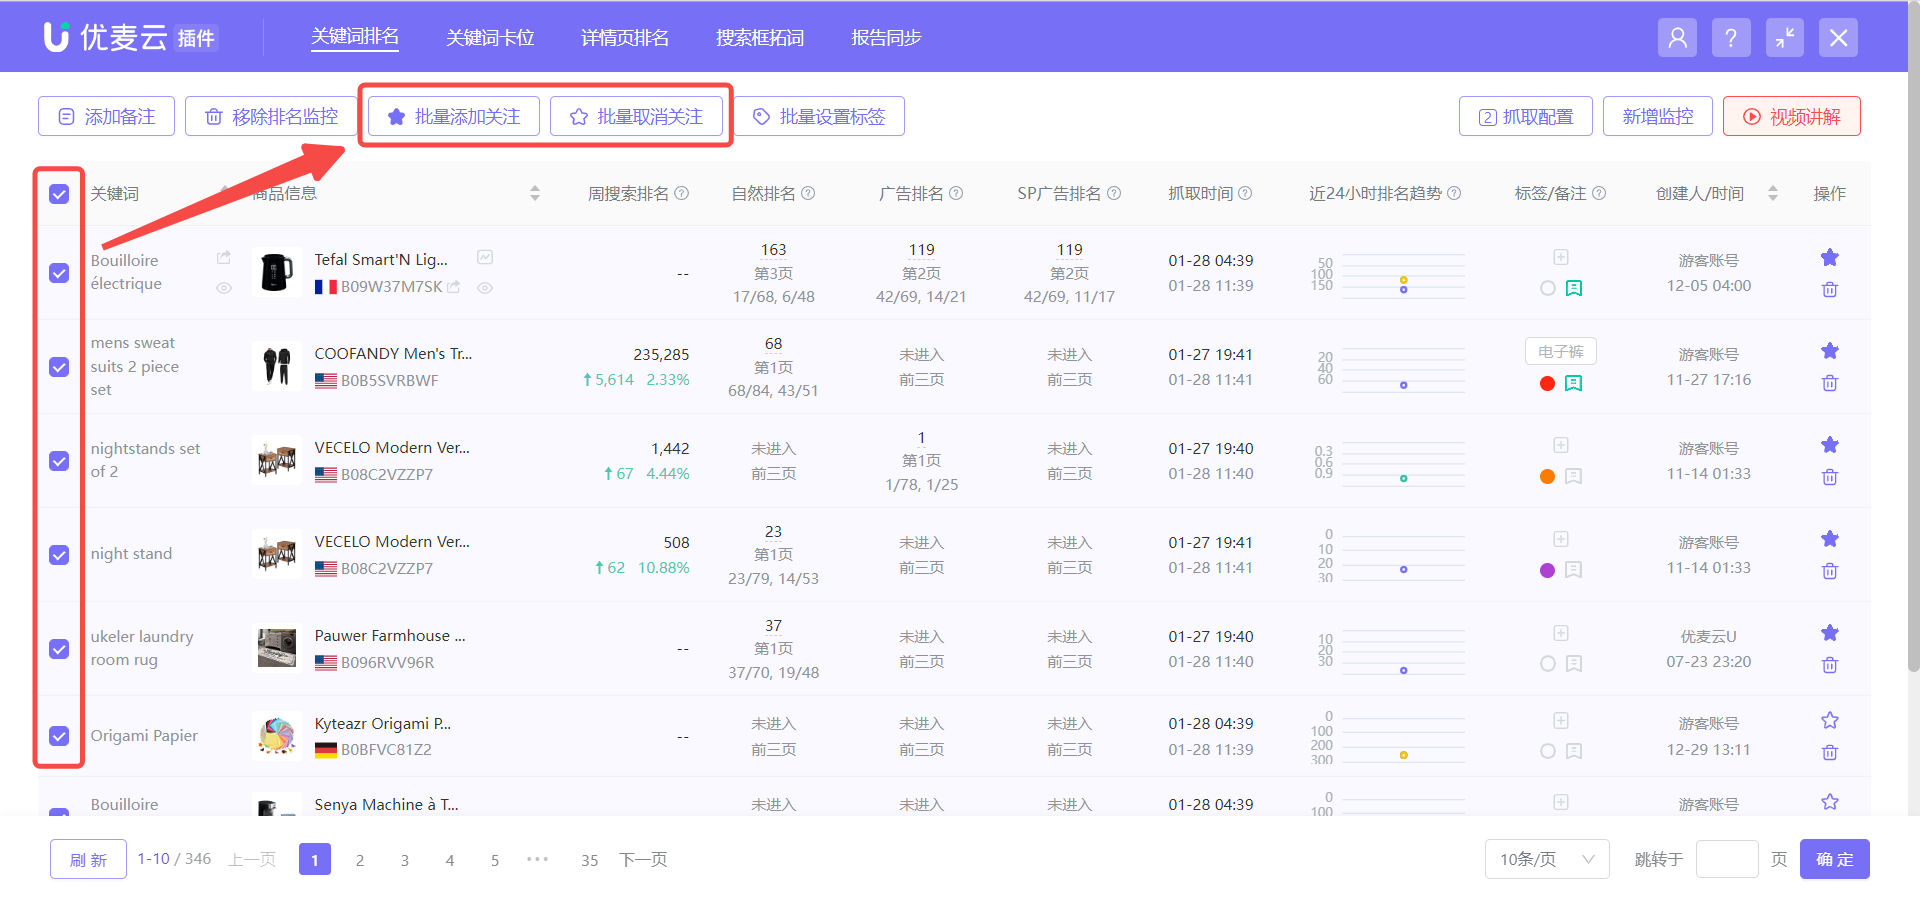
Or select the monitoring entries you want to watch and choose 【Add to Watchlist in Batches】 to save with one click.
 +
+
7) Remove Rank Monitoring
You can remove keywords you no longer want to monitor at any time.
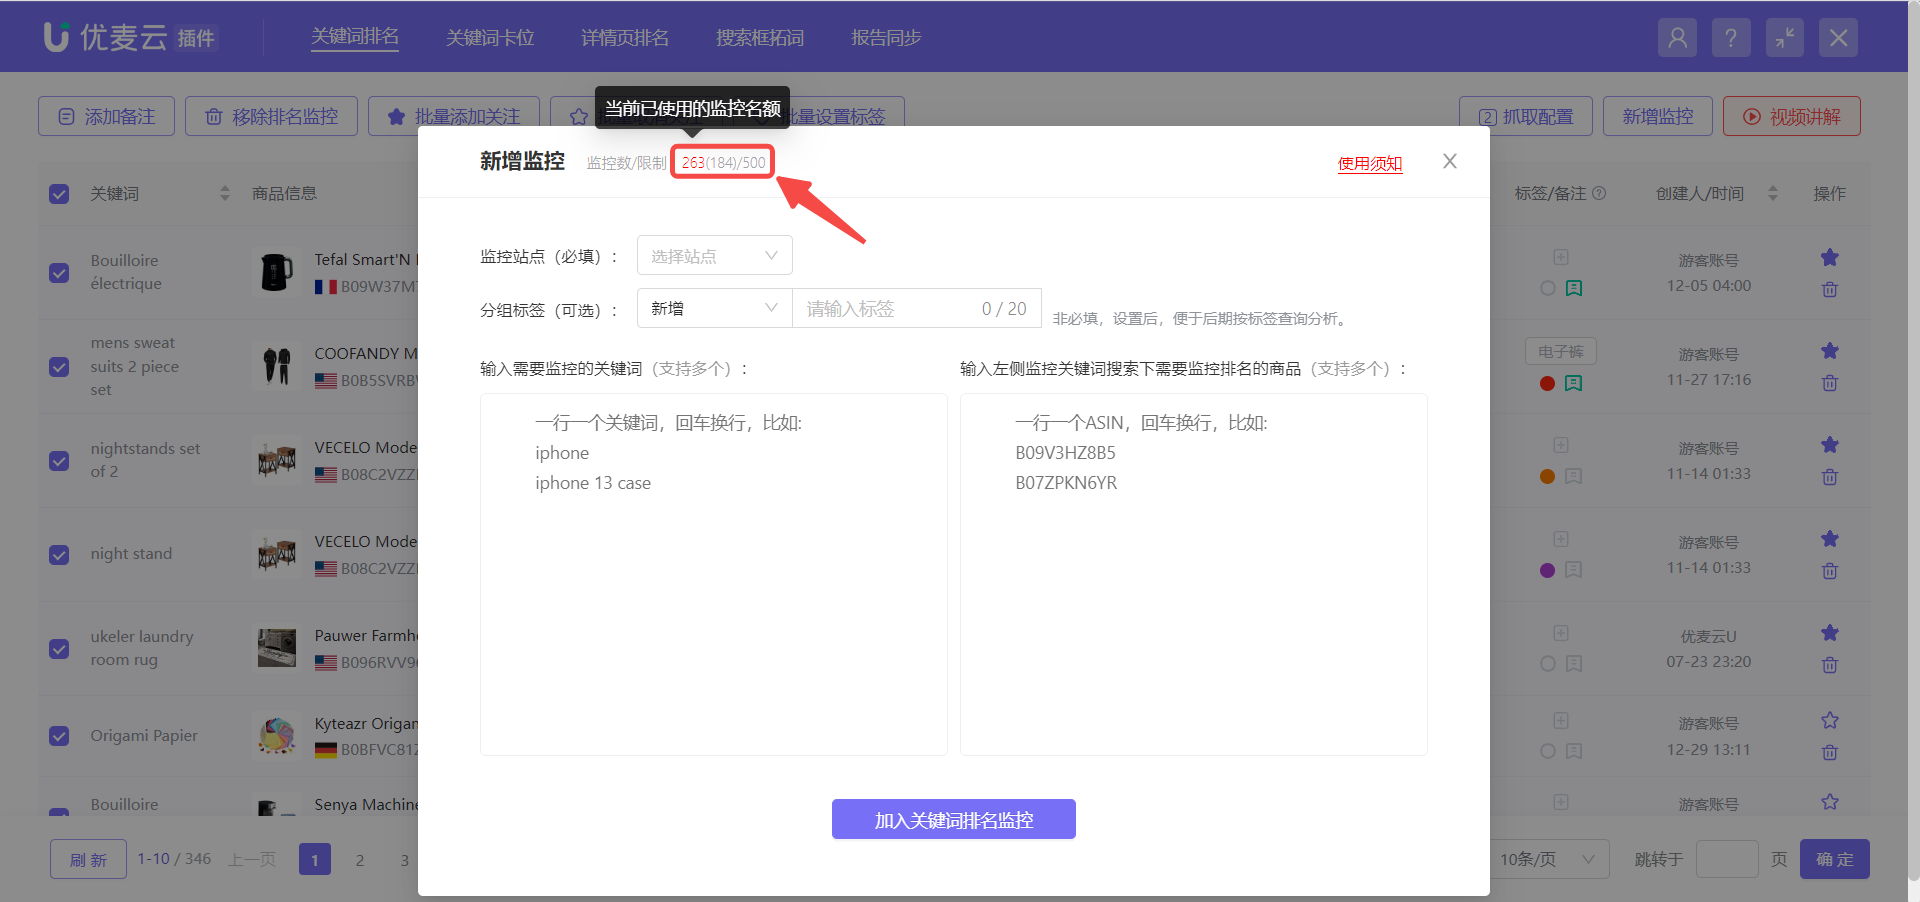
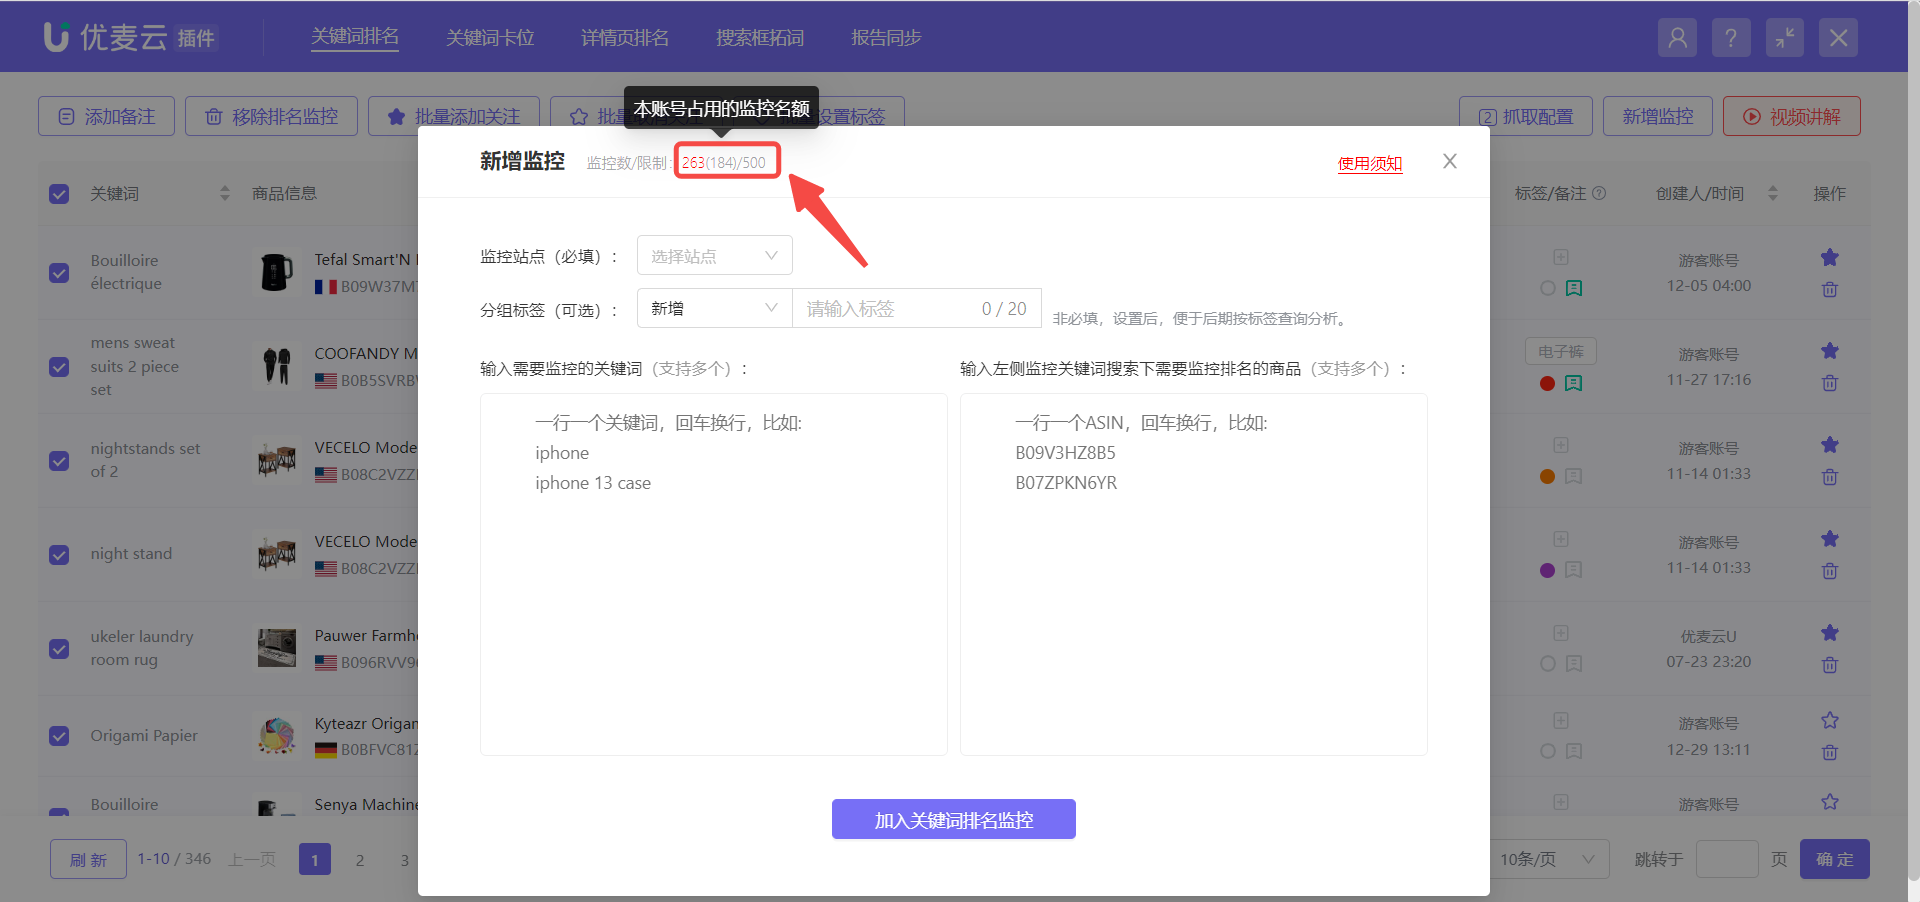
The keyword rank and detail page rank monitoring share a maximum quota of 500 for master and sub-accounts. You can view the current usage of the monitoring quota on the 【Add Monitoring】 page.
 +
+
And the monitoring quota currently used by the logged-in plugin account.
 +
+
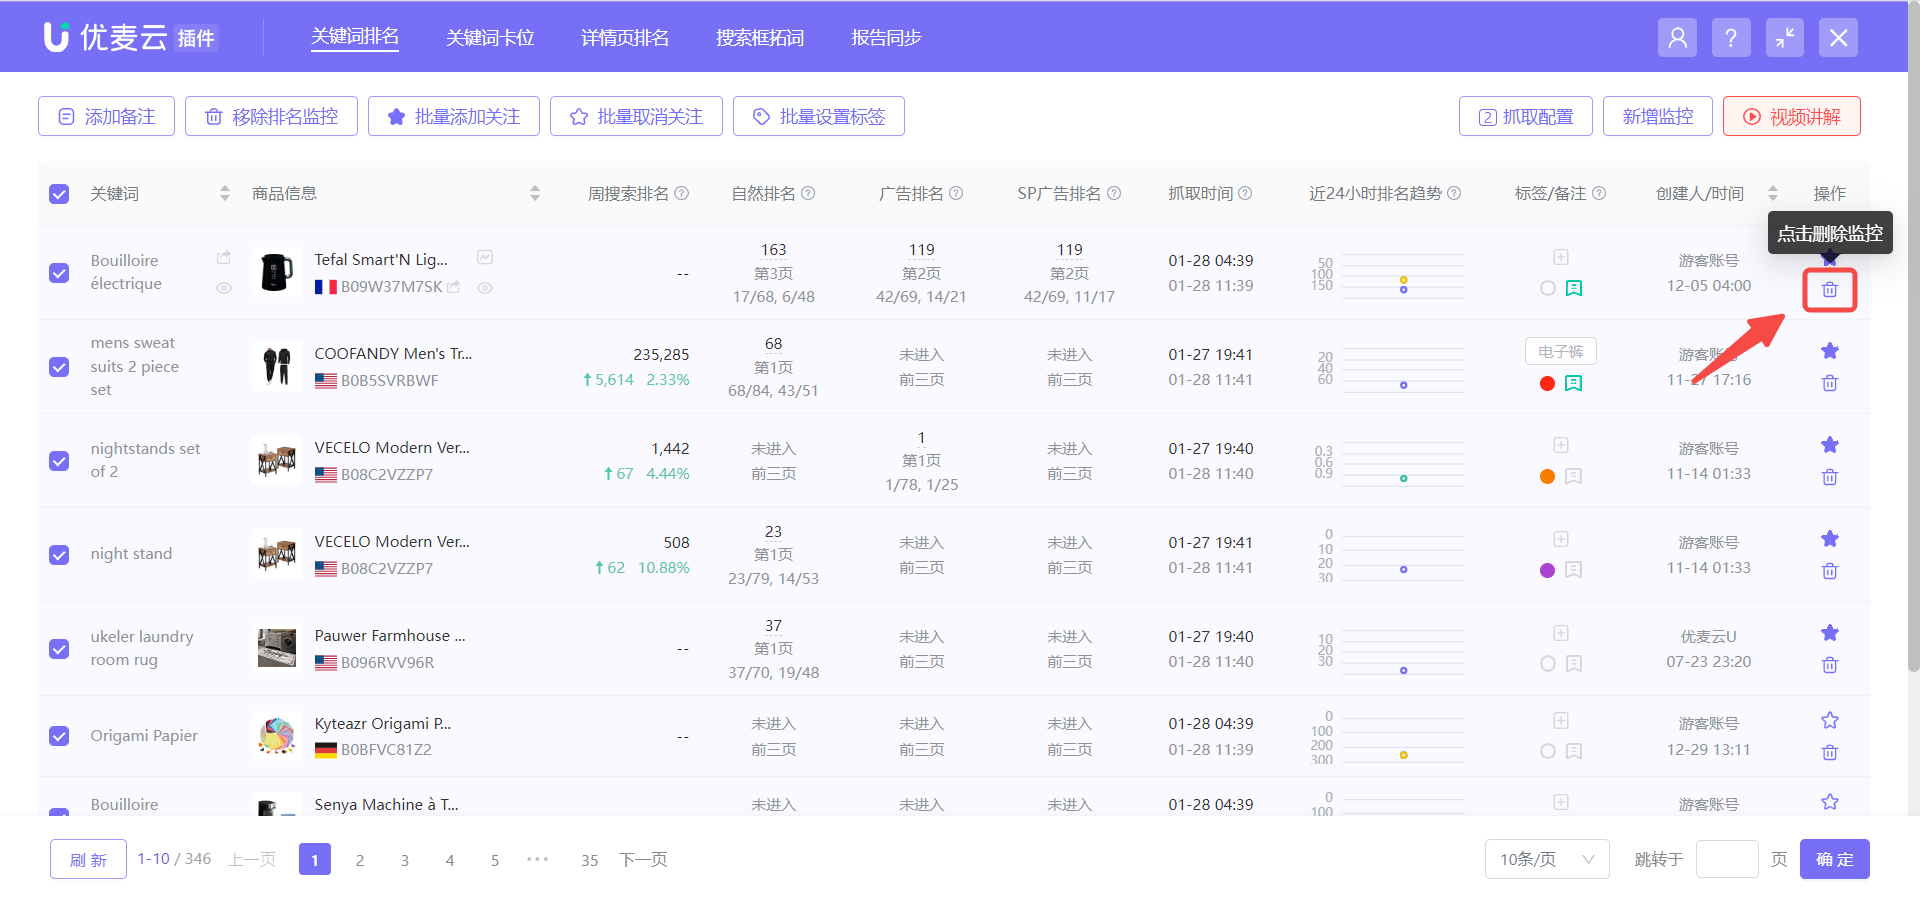
If you have used up all your quota but want to add new keywords, you can also remove some monitored keywords to add new ones.
Find the monitored keyword you want to remove, and in the 【Operation】 column on the right, click 【Delete Monitoring】.
 +
+
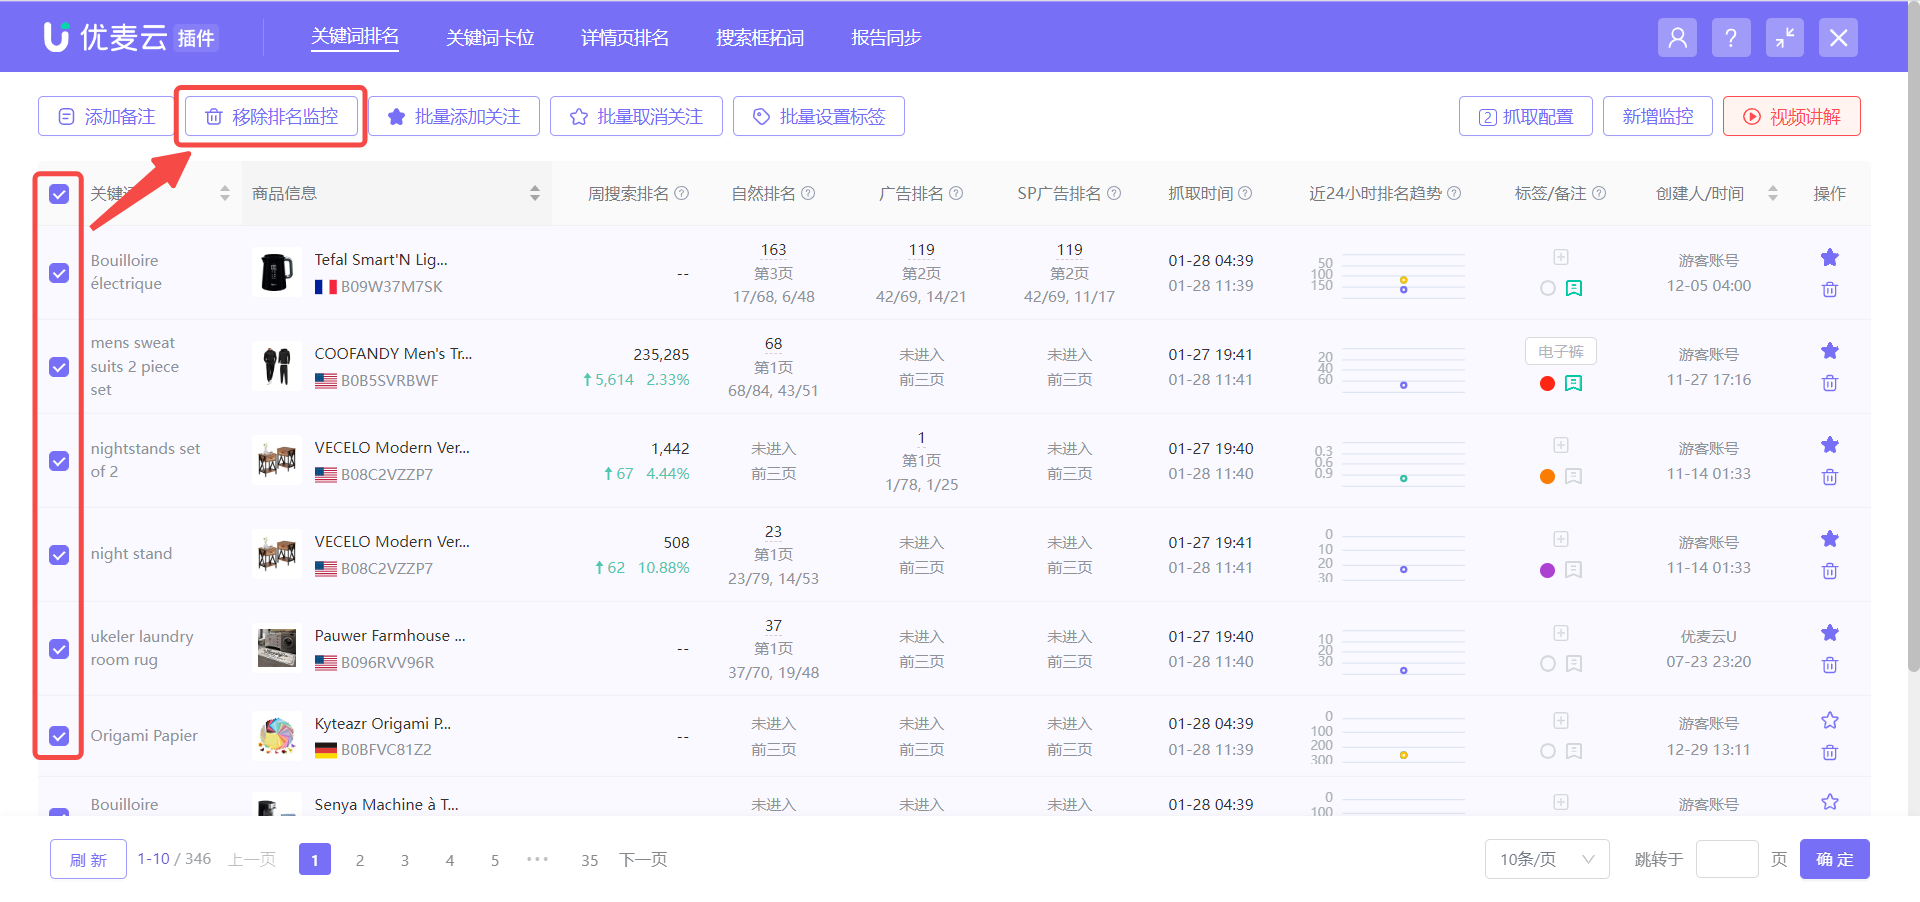
Or select the monitored keywords you want to remove and click 【Remove Rank Monitoring】 to remove them in batches.
 +
+
3. Analyze Monitoring Data
The data scraped by monitoring is automatically saved by the SellerSpace system for 30 days.
Keyword rank monitoring data is divided into four main categories: ranking and trend data, product information that has appeared in the top 3 pages under the keyword dimension, a list of keywords that have appeared in the top 3 pages under the product dimension, and detailed product information on the top 3 pages at each ranking node.
Through this data, you can quickly understand the effectiveness of advertising campaigns, identify areas for optimization, determine the relevance of keywords to products, know how to better select keywords for optimization, analyze competitors' advertising strategies, and competitors' promotion timings and methods, etc., helping you better operate on Amazon and increase revenue.
1) Latest Ranking and Historical Ranking Trends
Latest ranking and historical trend data, in addition to ranking information, also includes product details (including promotional information) from the top 3 pages at each time node. This helps you track ad placement, analyze whether you need to optimize ad bids, whether your optimization strategies are correct, etc. At the same time, you can also analyze competitors' product promotion dynamics: when they promote, product prices, etc.
Latest Ranking Data:
On the homepage of the Keyword Rank Tracker feature, you can directly view the monitoring data of monitored keywords, including product information, latest scraping time, latest synchronized ranking data, ranking trend data for the last 24 hours, tags, notes, etc.
 +
+
Among them, both organic and ad rankings include relative ranking (excluding ad placements) and absolute ranking (including ad placements).
 +
+
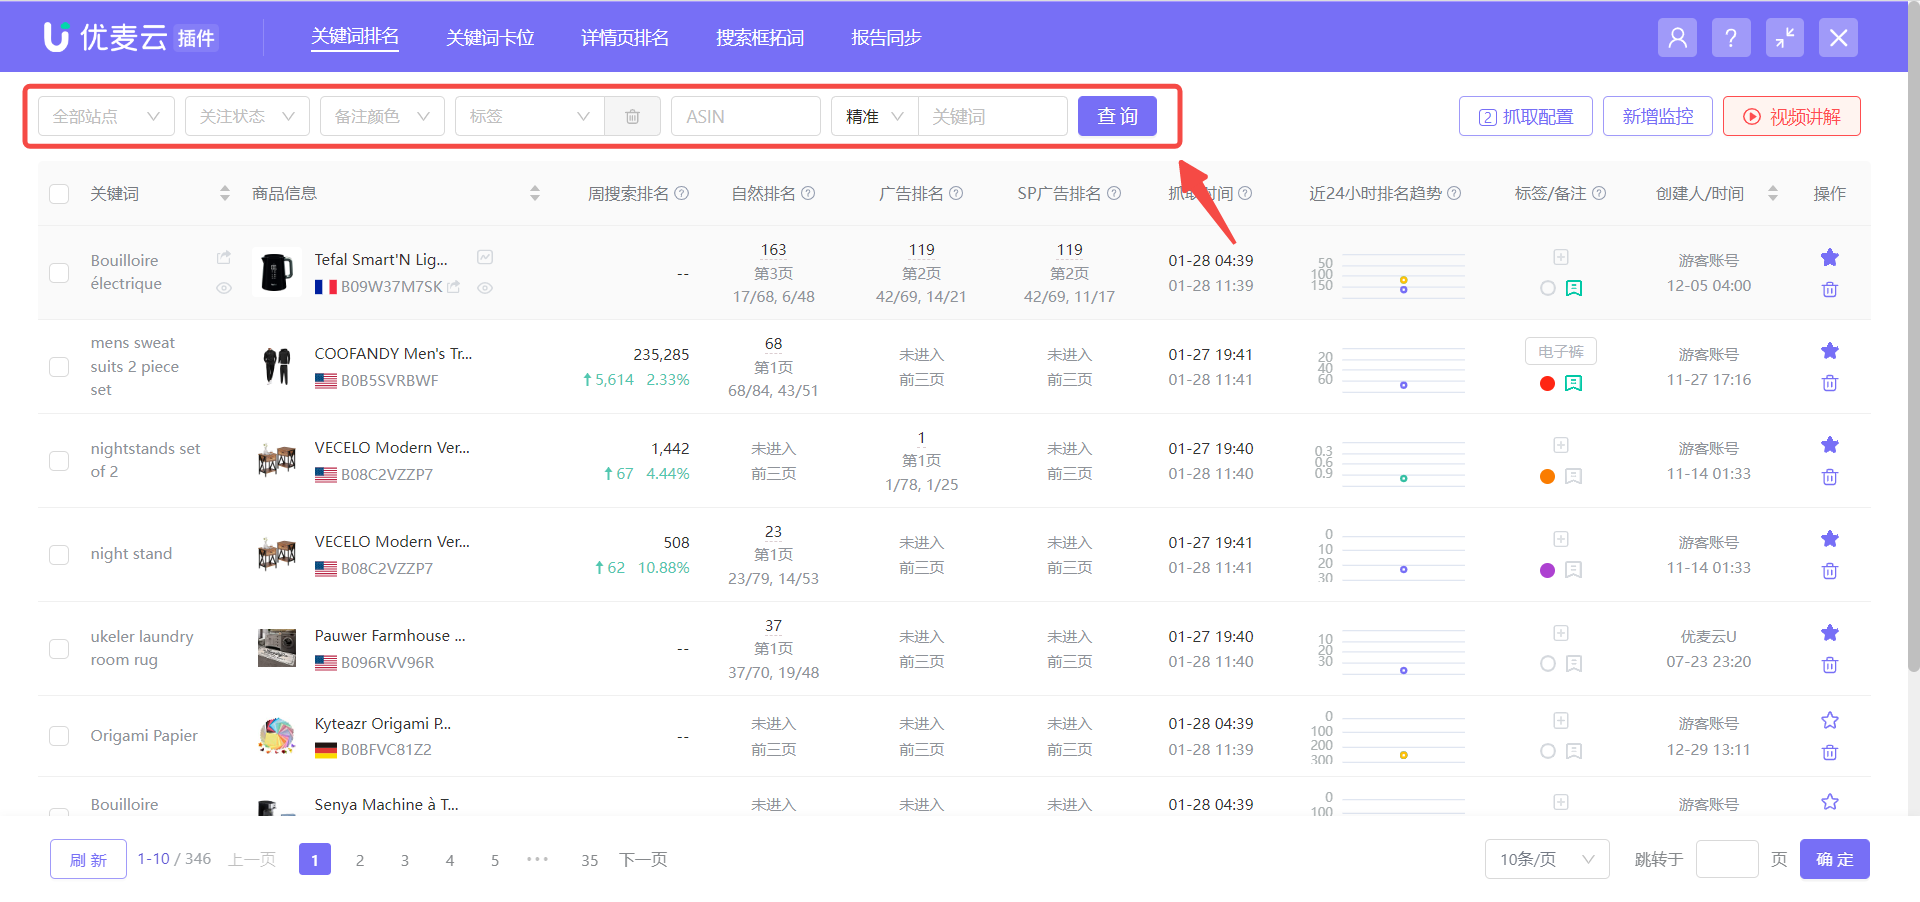
When there are many monitoring entries, you can also use the filter bar to filter and view the data of corresponding monitored keywords.
 +
+
Product Ranking Trends:
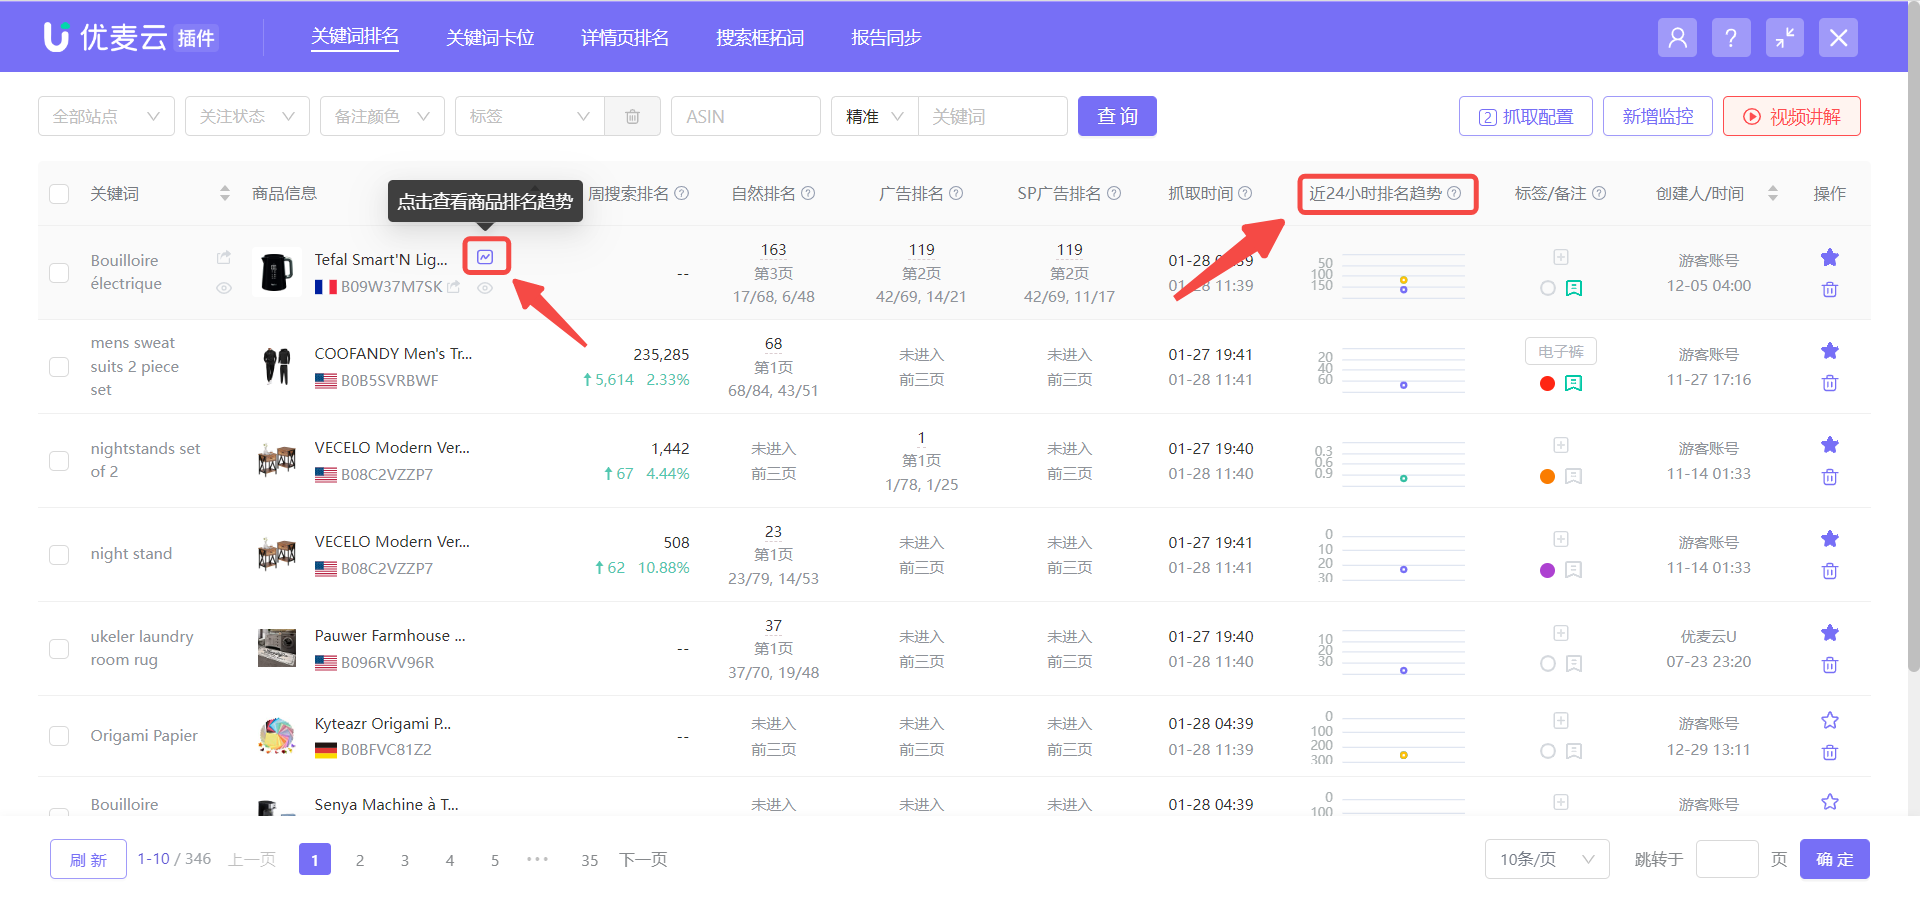
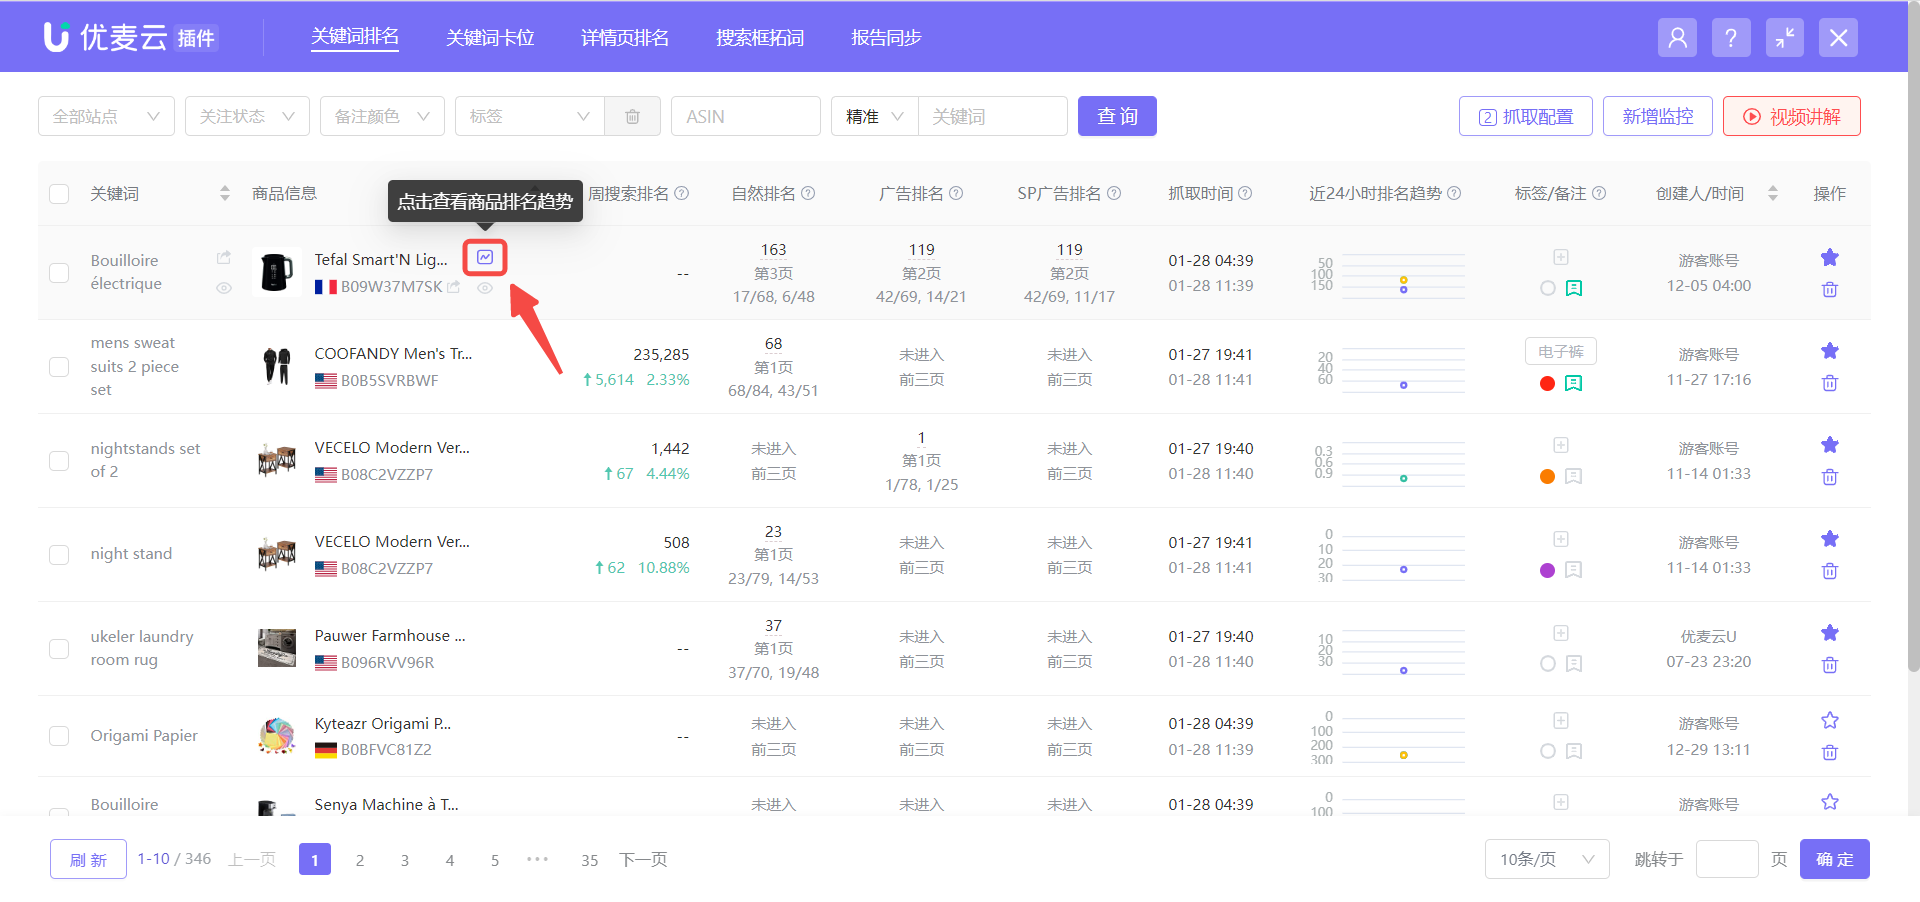
There are two entry points to view the product ranking trend of monitored keywords: next to product information and on the homepage ranking trend (last 24 hours).
 +
+
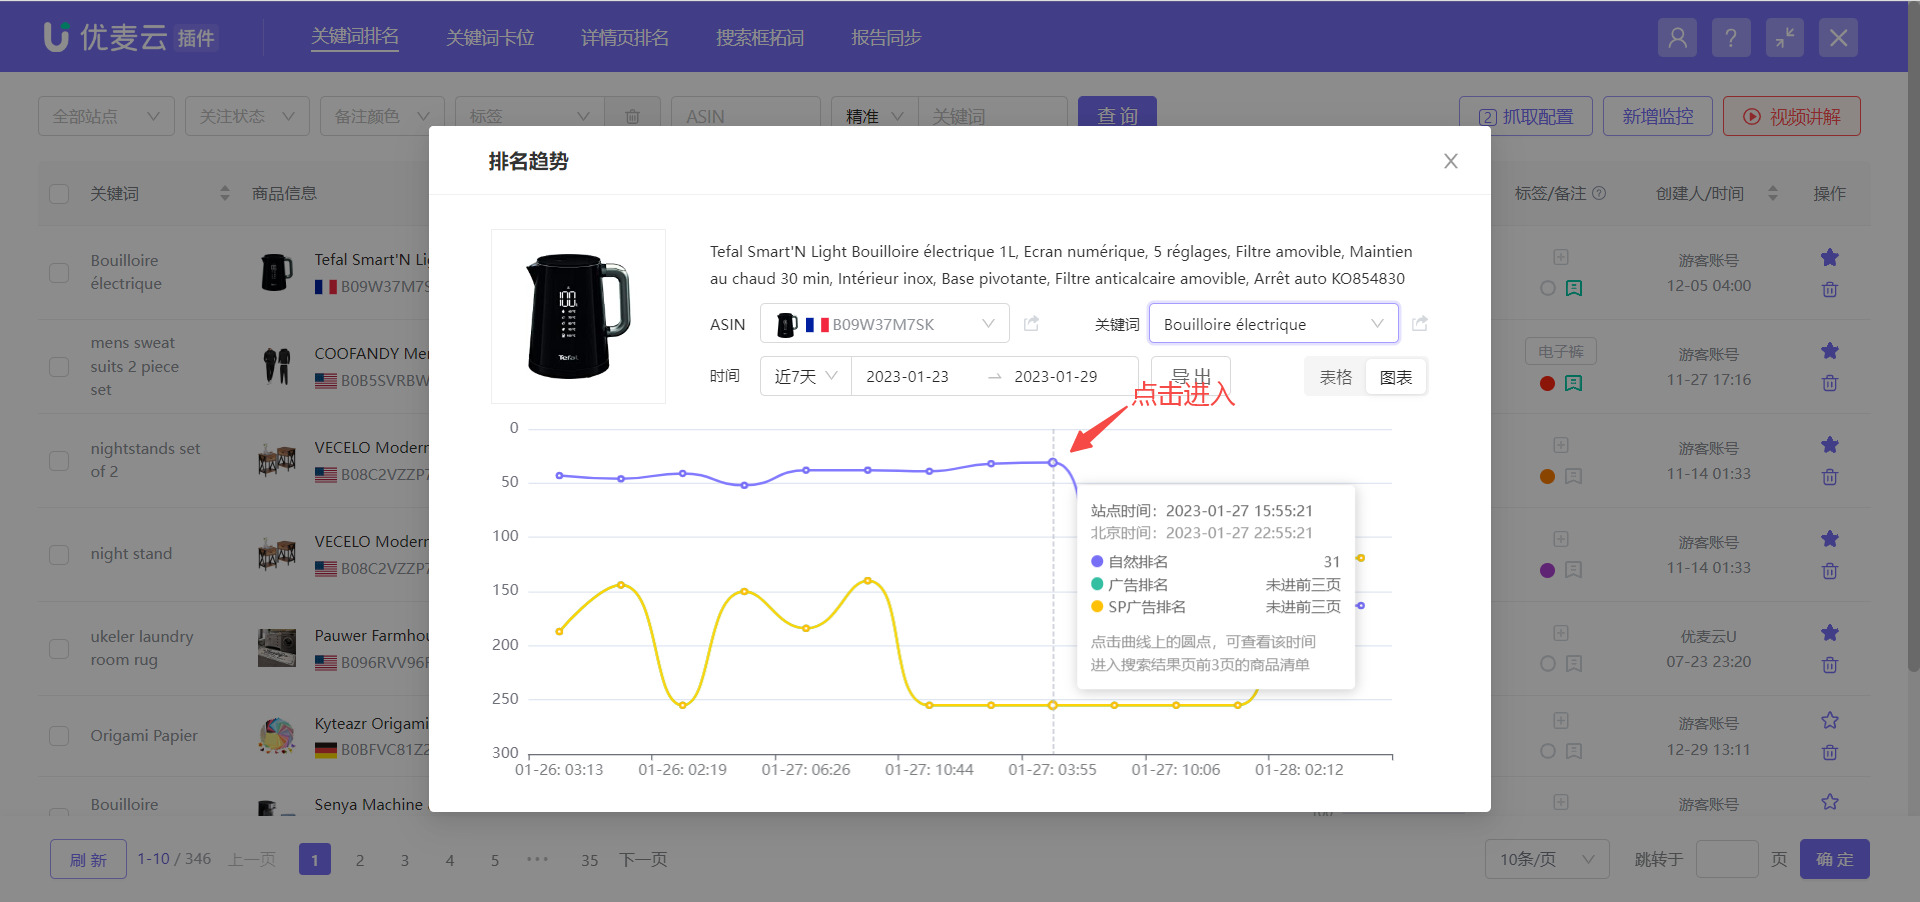
Click the trend icon to access the historical ranking trend data of the monitored keyword and product.
 +
+
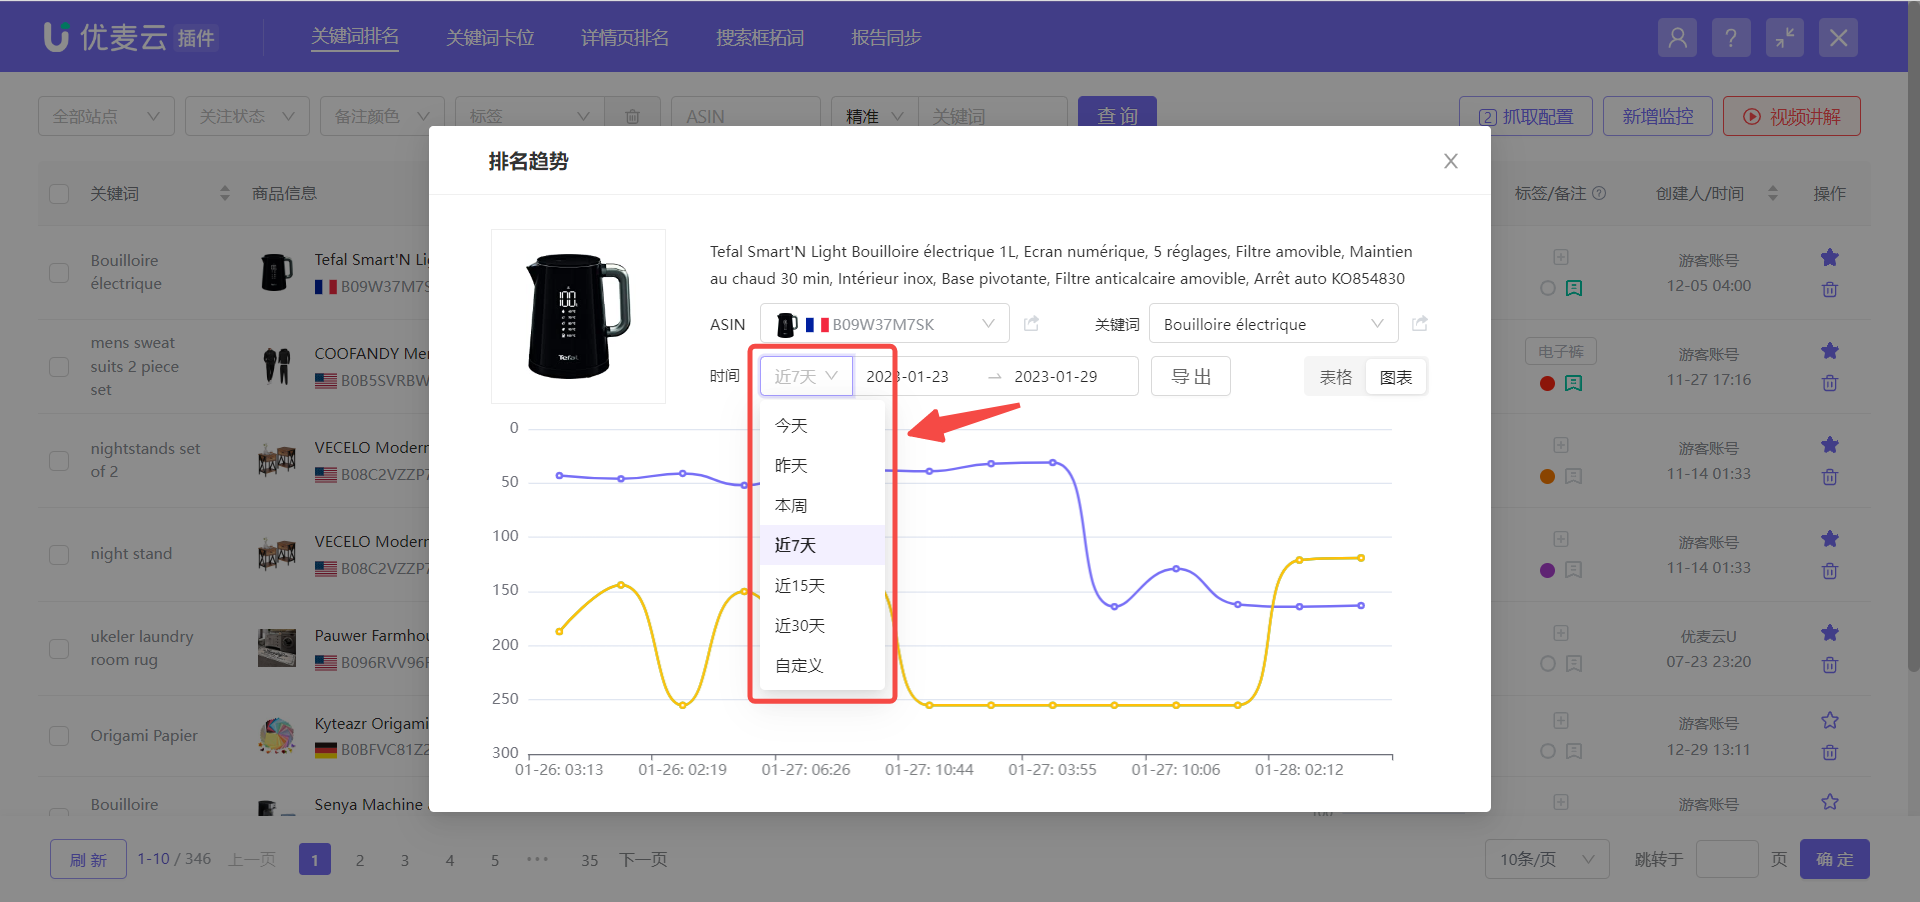
On the historical ranking trend page,
The system displays data for the last 7 days by default. You can also customize and select other time ranges to view data.
 +
+
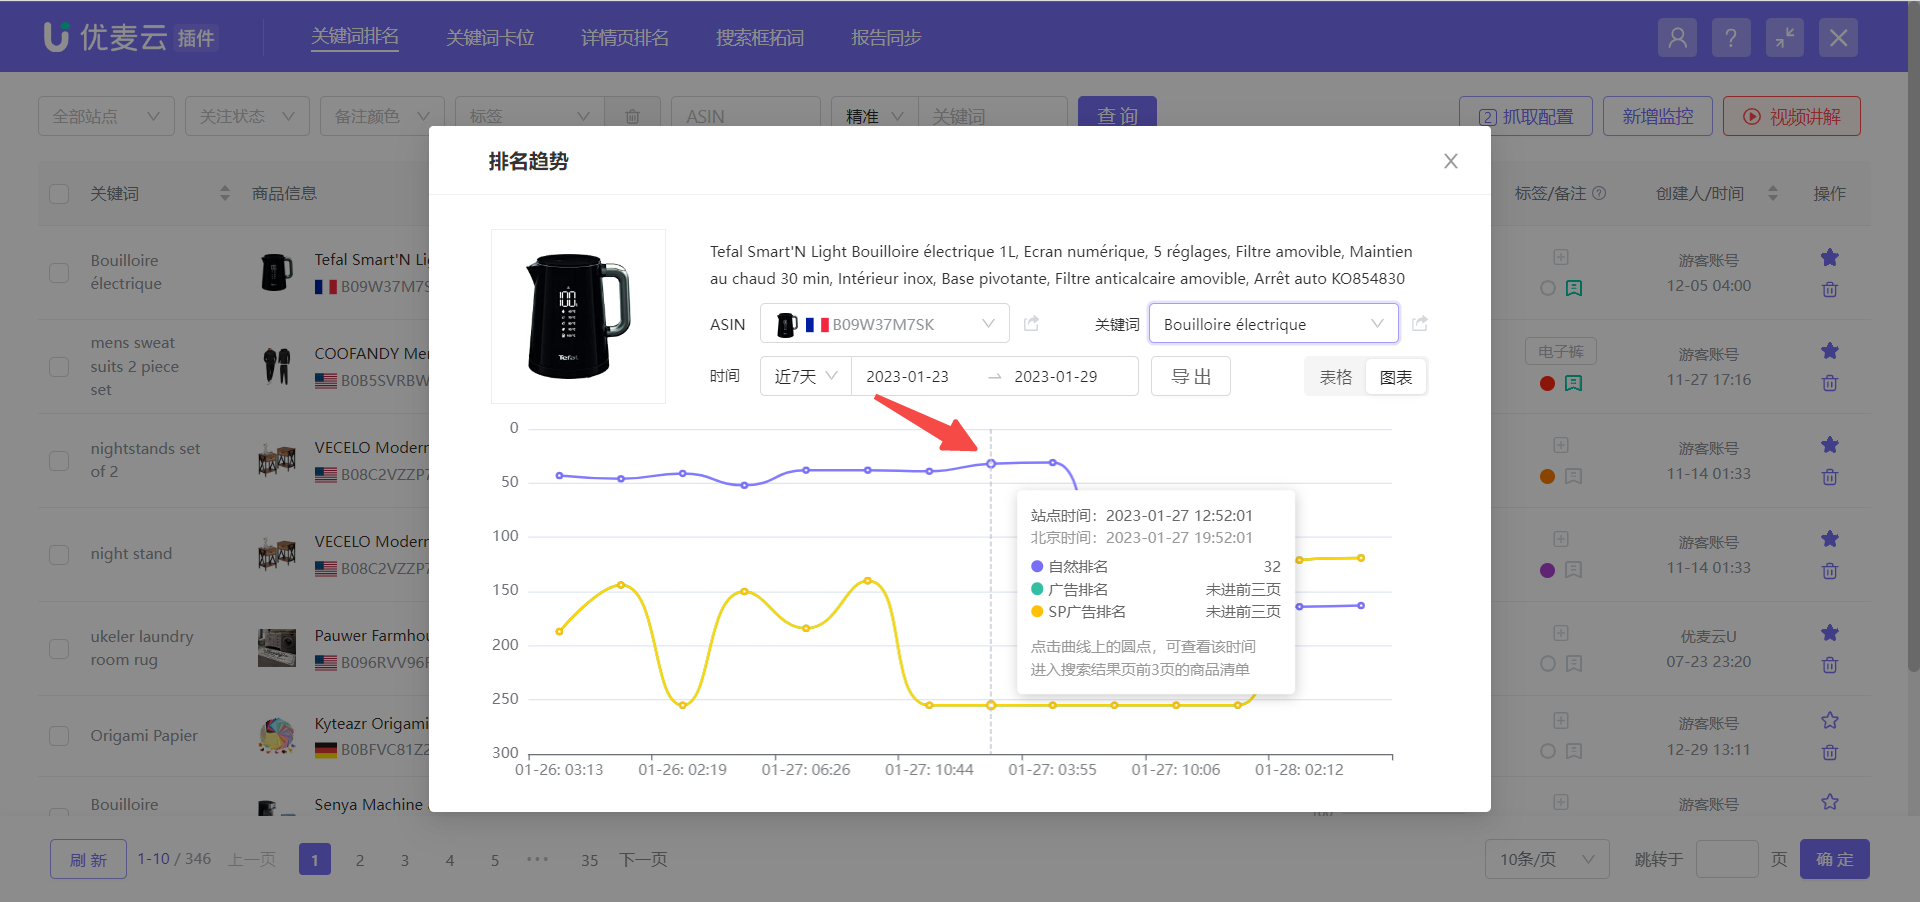
Hover your mouse over a node to view the organic and ad rankings at that time node. This ranking is the absolute position (including ad placements).
 +
+
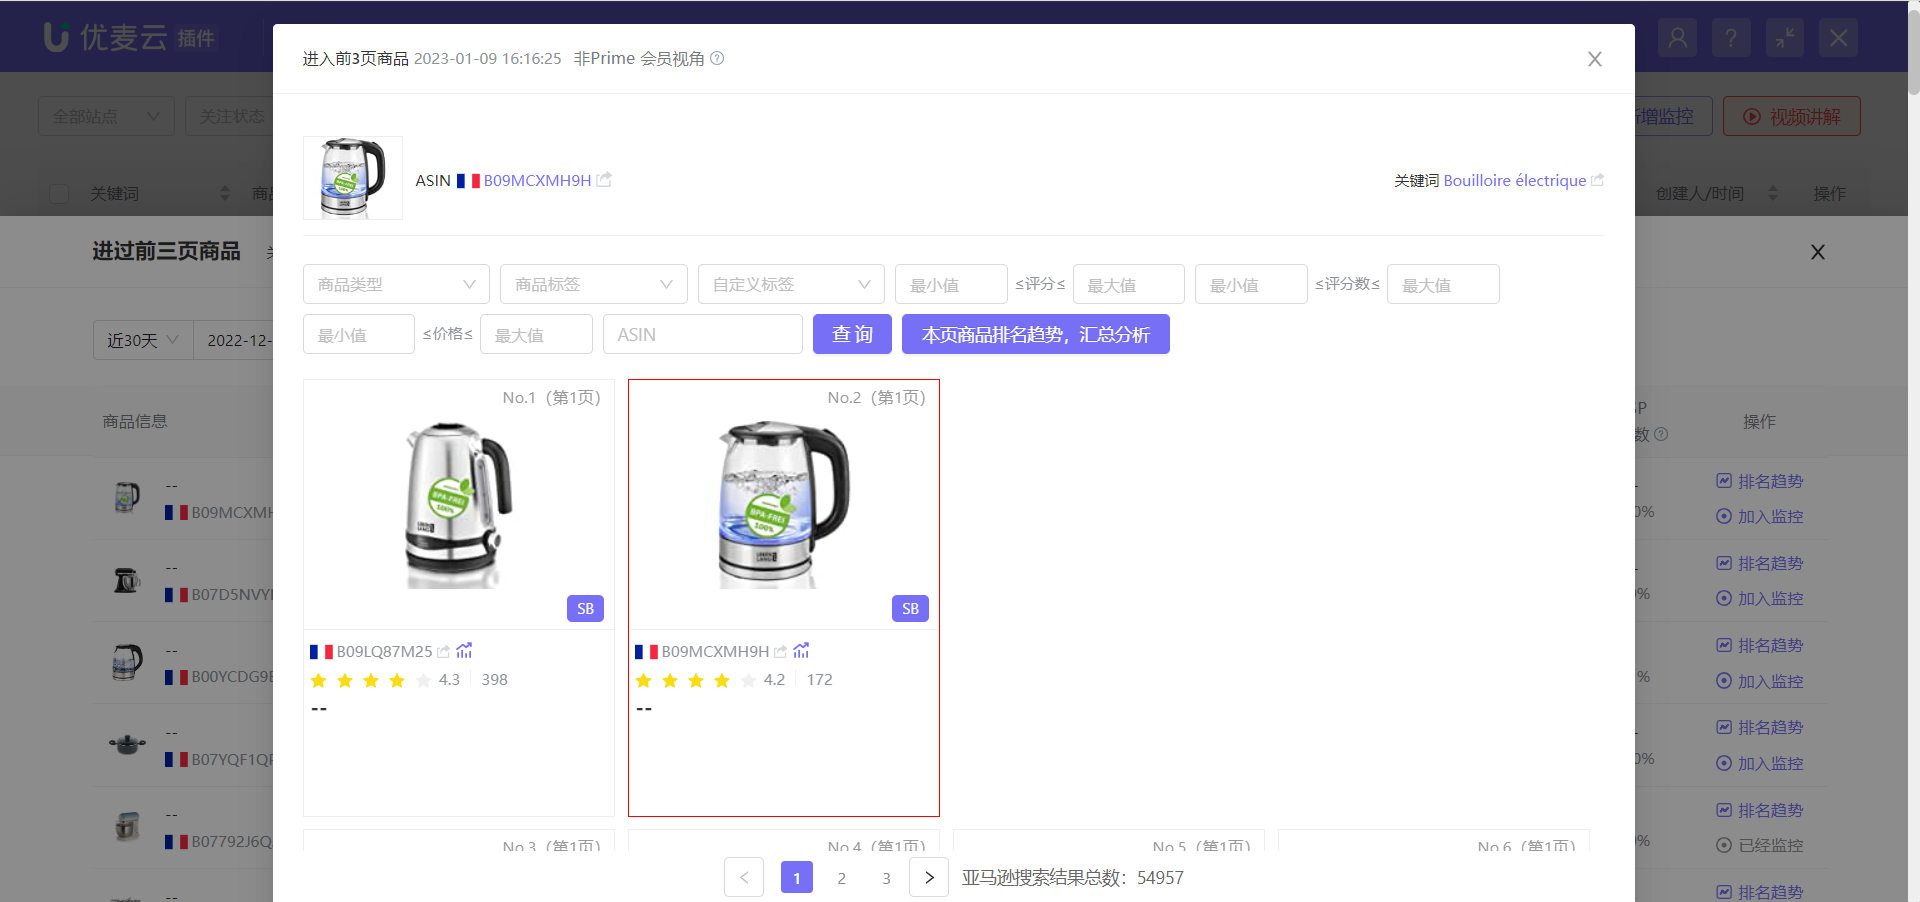
Click a time node to also view the product details of the top 3 pages at that time node, including: product price, reviews, promotional information, etc.
All ranking trend icons have the same viewing operation.
 +
+
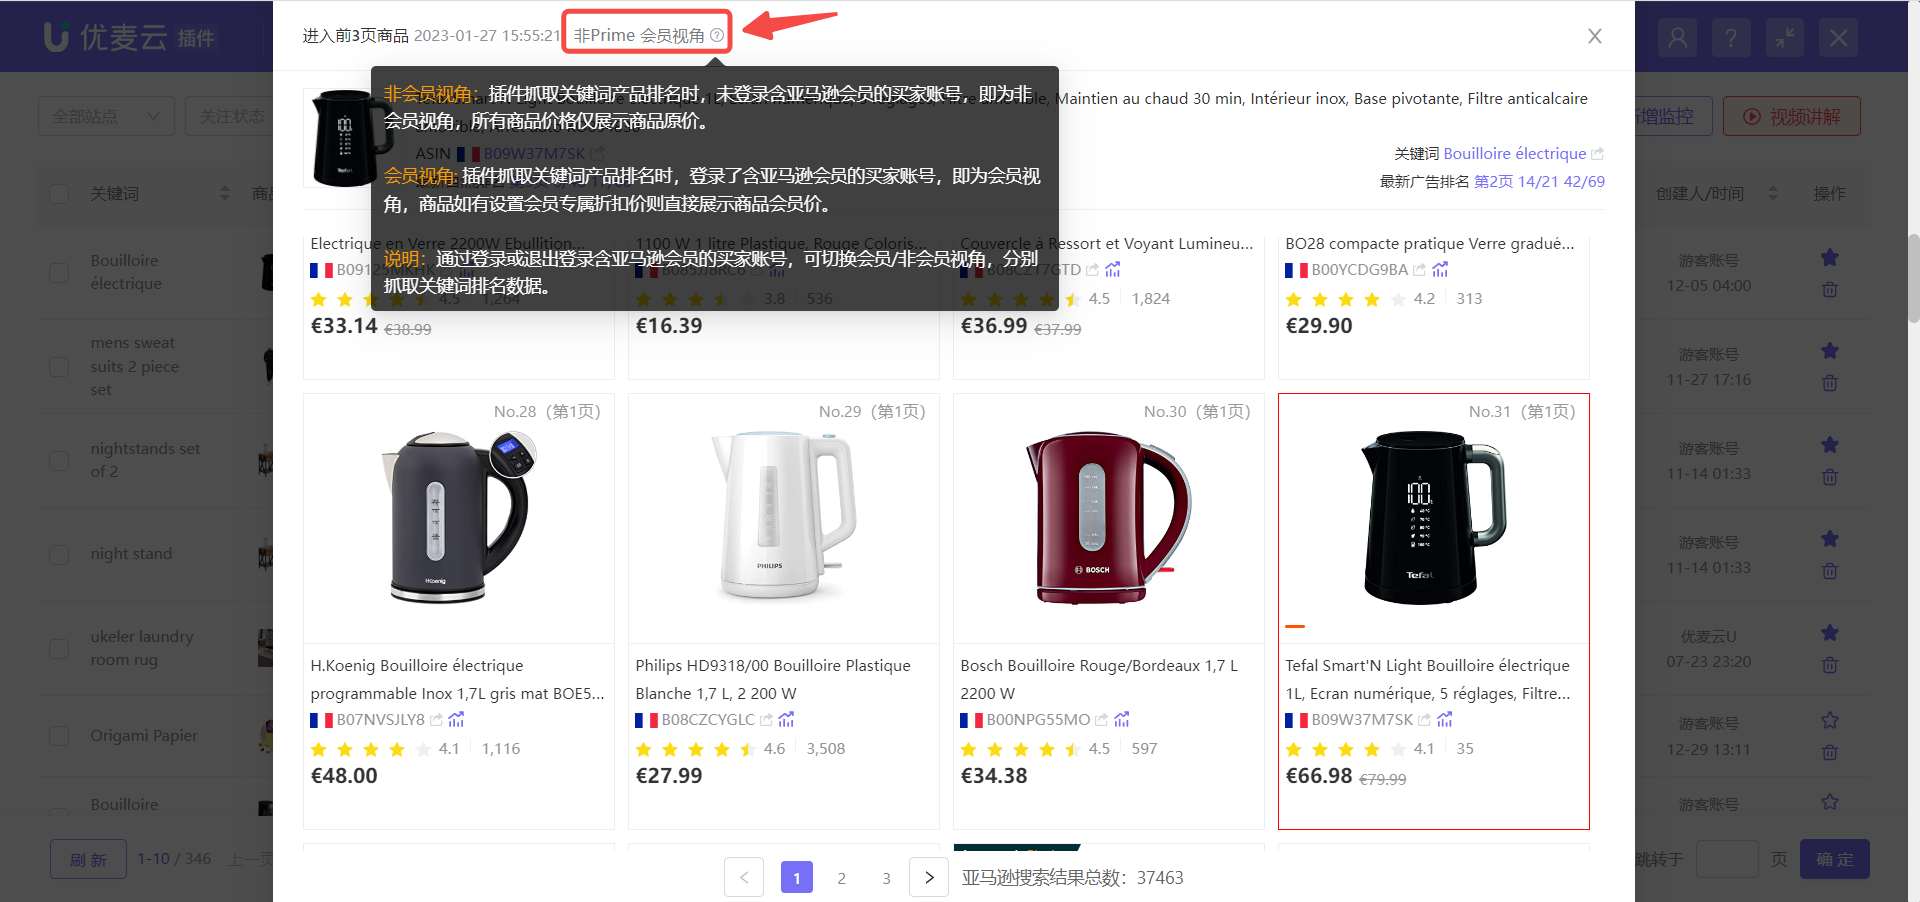
On the 【Top 3 Page Products】 page,
The displayed data is divided into "Prime Member View" and "Non-Prime Member View" data.
Prime Member View: If the browser where the plugin is installed is logged into a buyer account with Amazon Prime membership, you are viewing the top 3 page product information page from a member's perspective.
Non-Prime Member View: If the browser where the plugin is installed is not logged into an Amazon buyer account, or is logged into a buyer account without Amazon Prime membership, you are viewing the top 3 page product information page from a non-member buyer's perspective.
 +
+
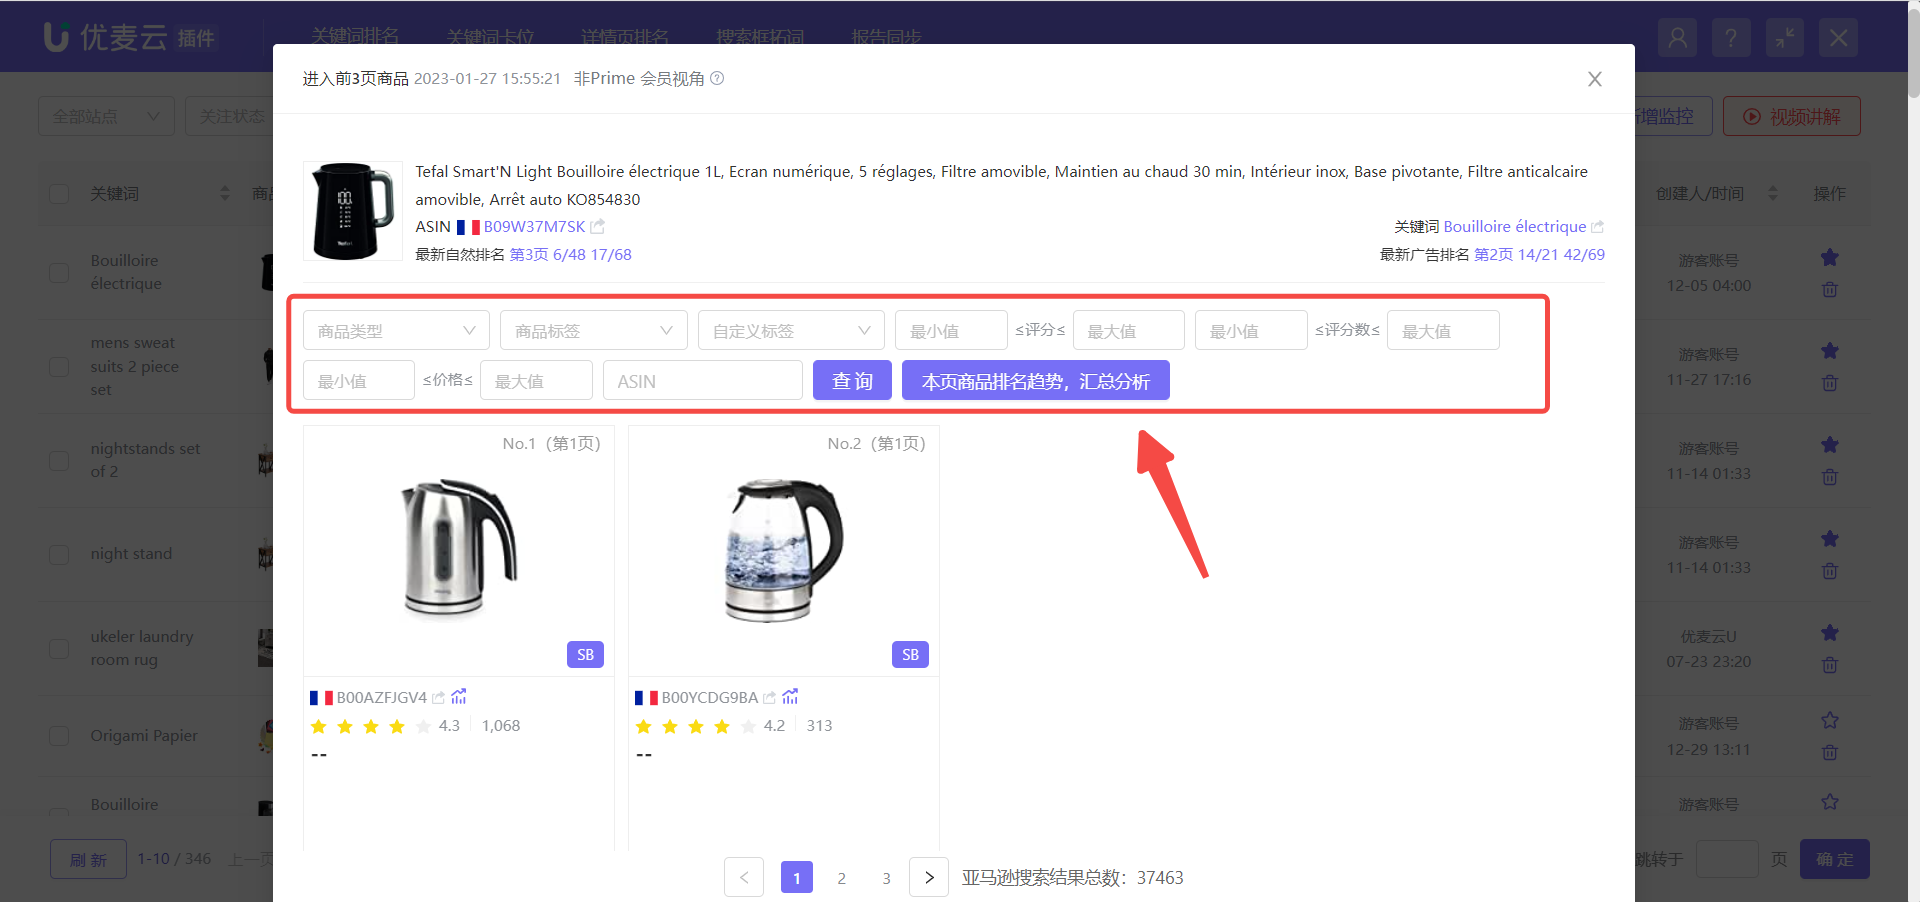
Through the filter bar, you can analyze the competitive landscape at that time from multiple dimensions. For example: the proportion of new products, the price range and proportion of competitors, whether target competitors appear, etc.
 +
+
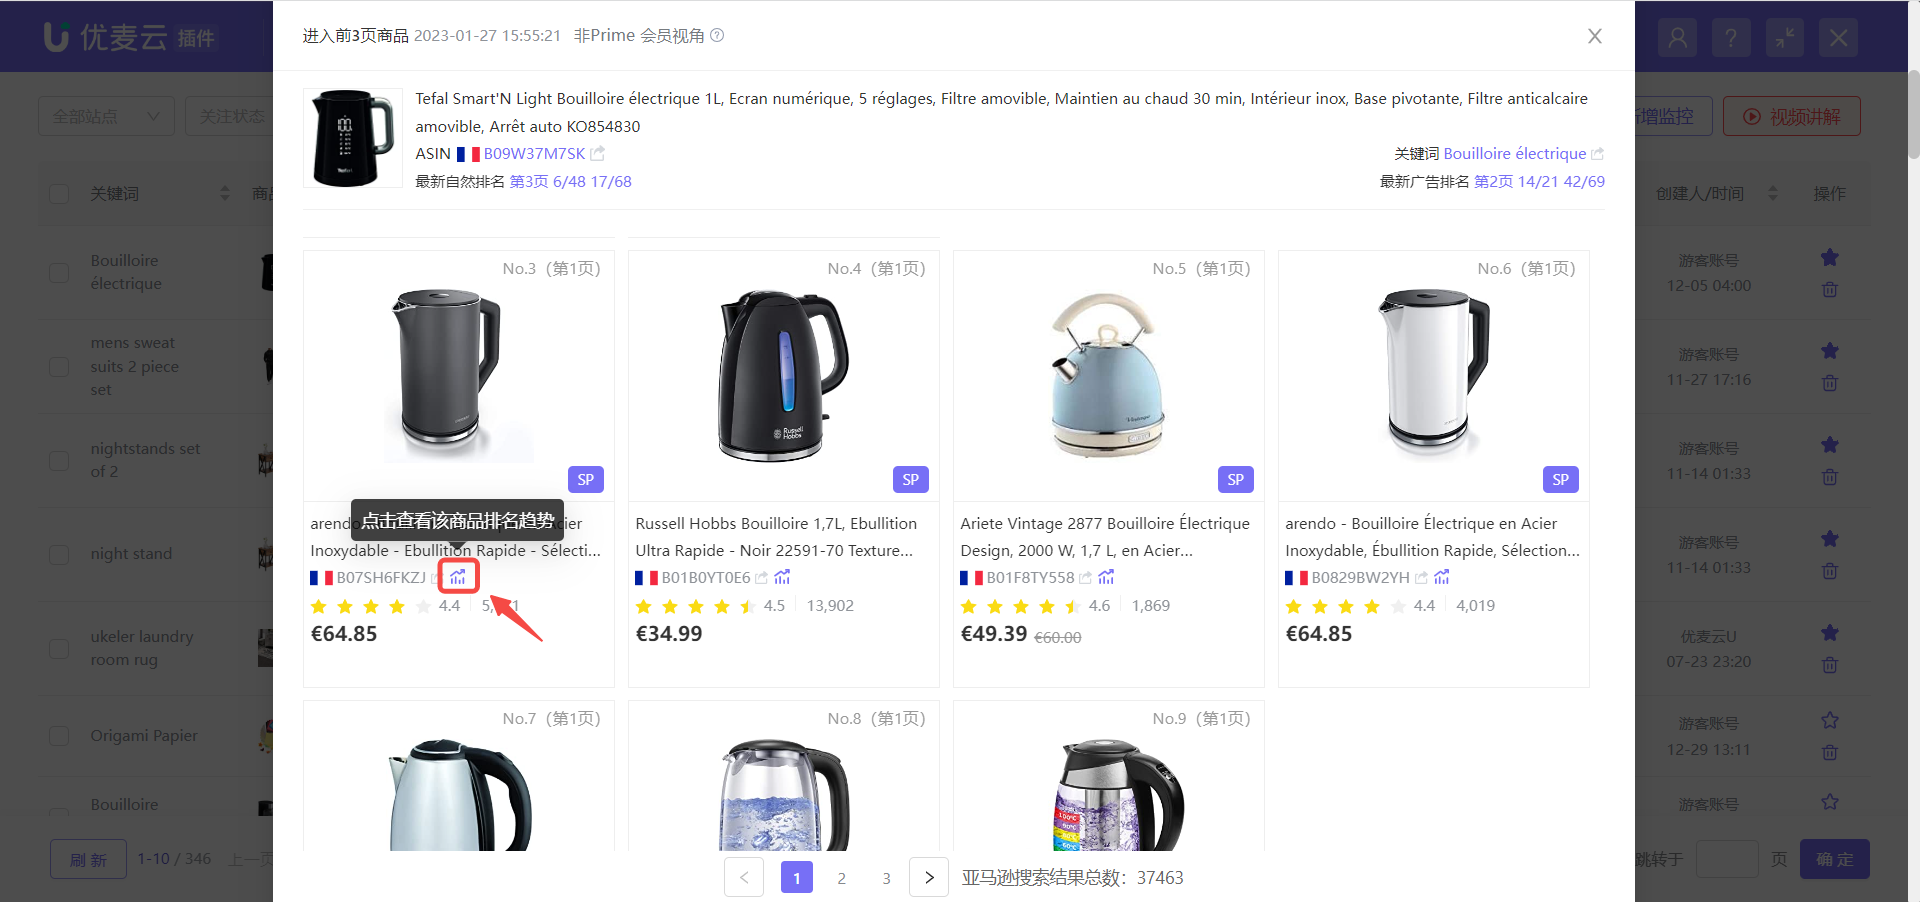
If you are interested in a particular product, you can also click the trend icon next to the product to further view the historical keyword ranking trend data of that product.
 +
+
On the ranking trend chart page, in addition to viewing the currently selected keyword and ASIN, you can also switch and select to view the ranking trend data of other monitored products and keywords. The viewing and analysis operations are consistent with those described earlier.
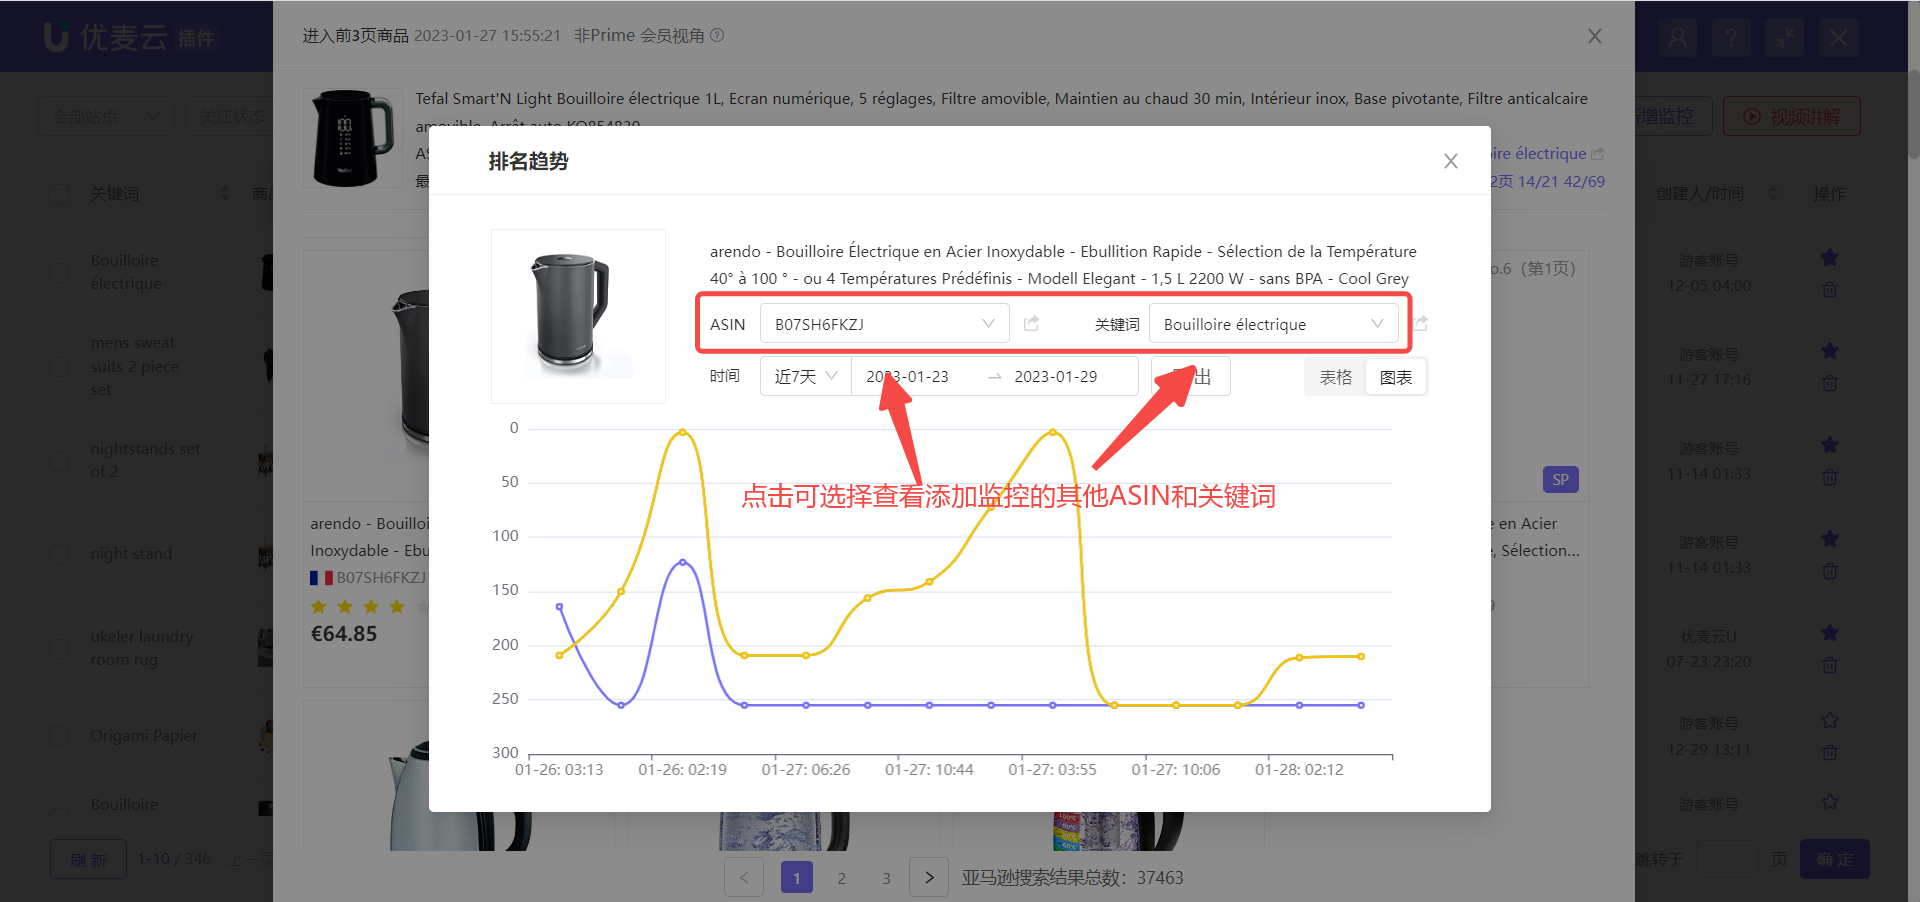 +
+
Click 【Export】 to download and export the keyword ranking data of the product in spreadsheet format.
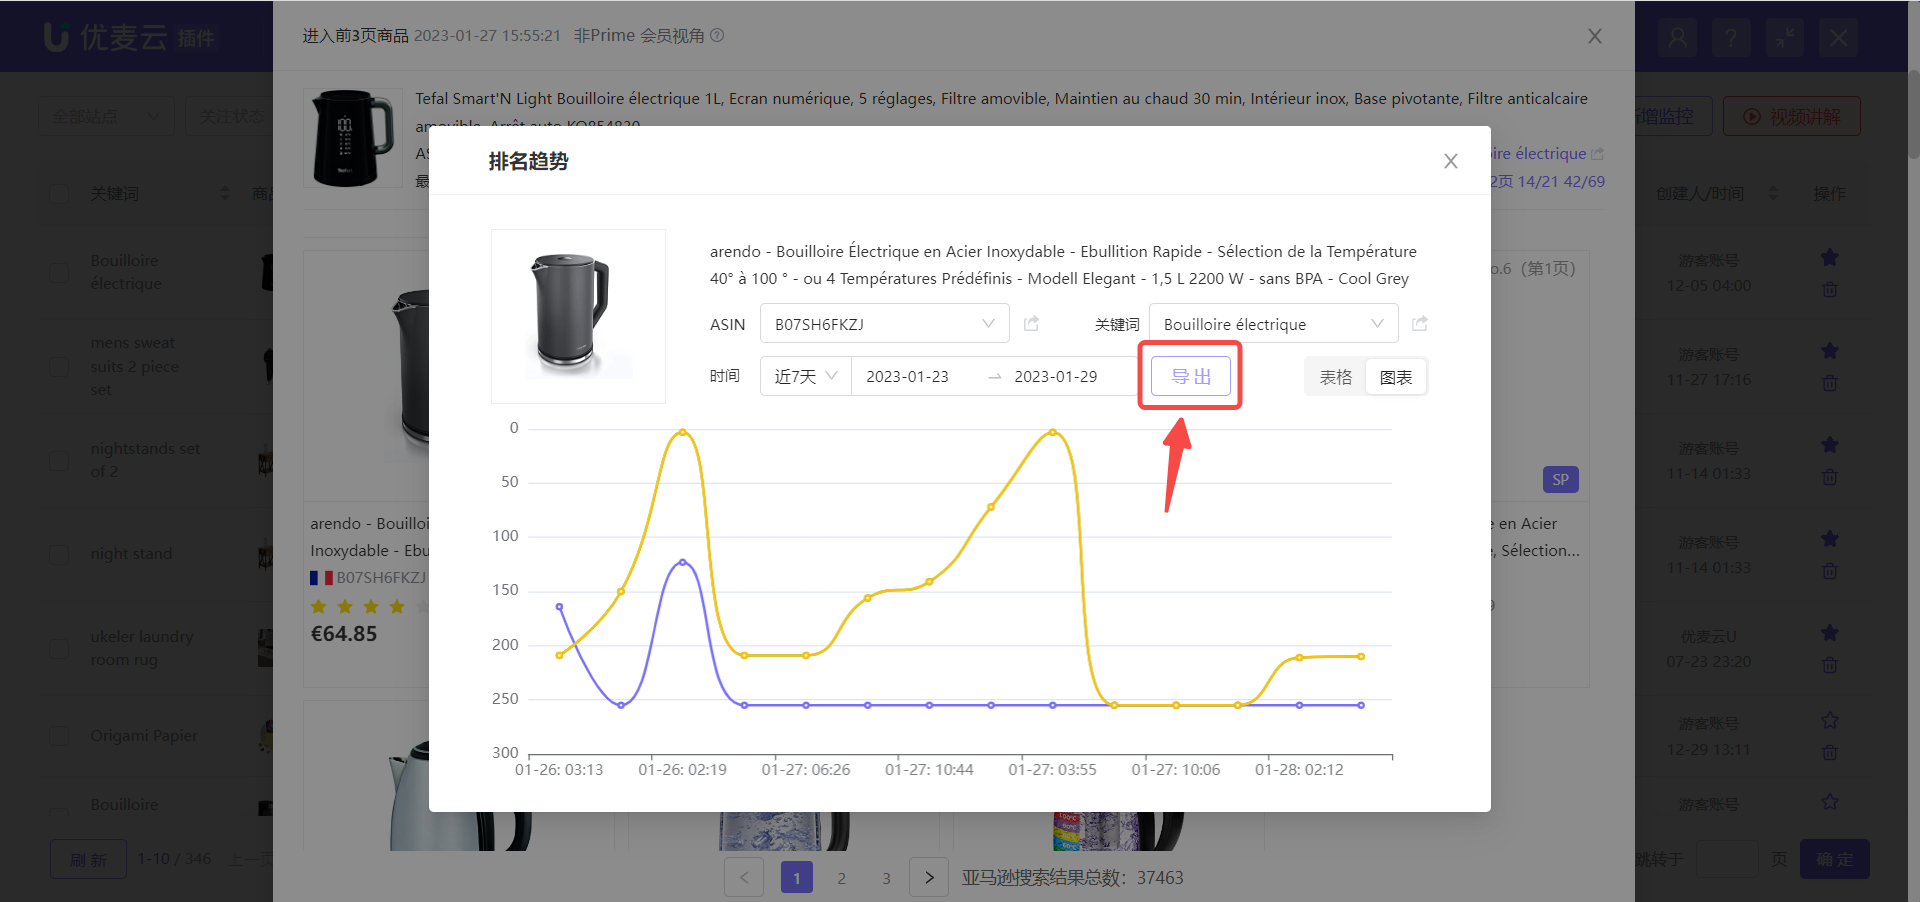 +
+
Click 【Product Ranking Trend on This Page, Summary Analysis】 to view the keyword ranking trend of all products on this page.
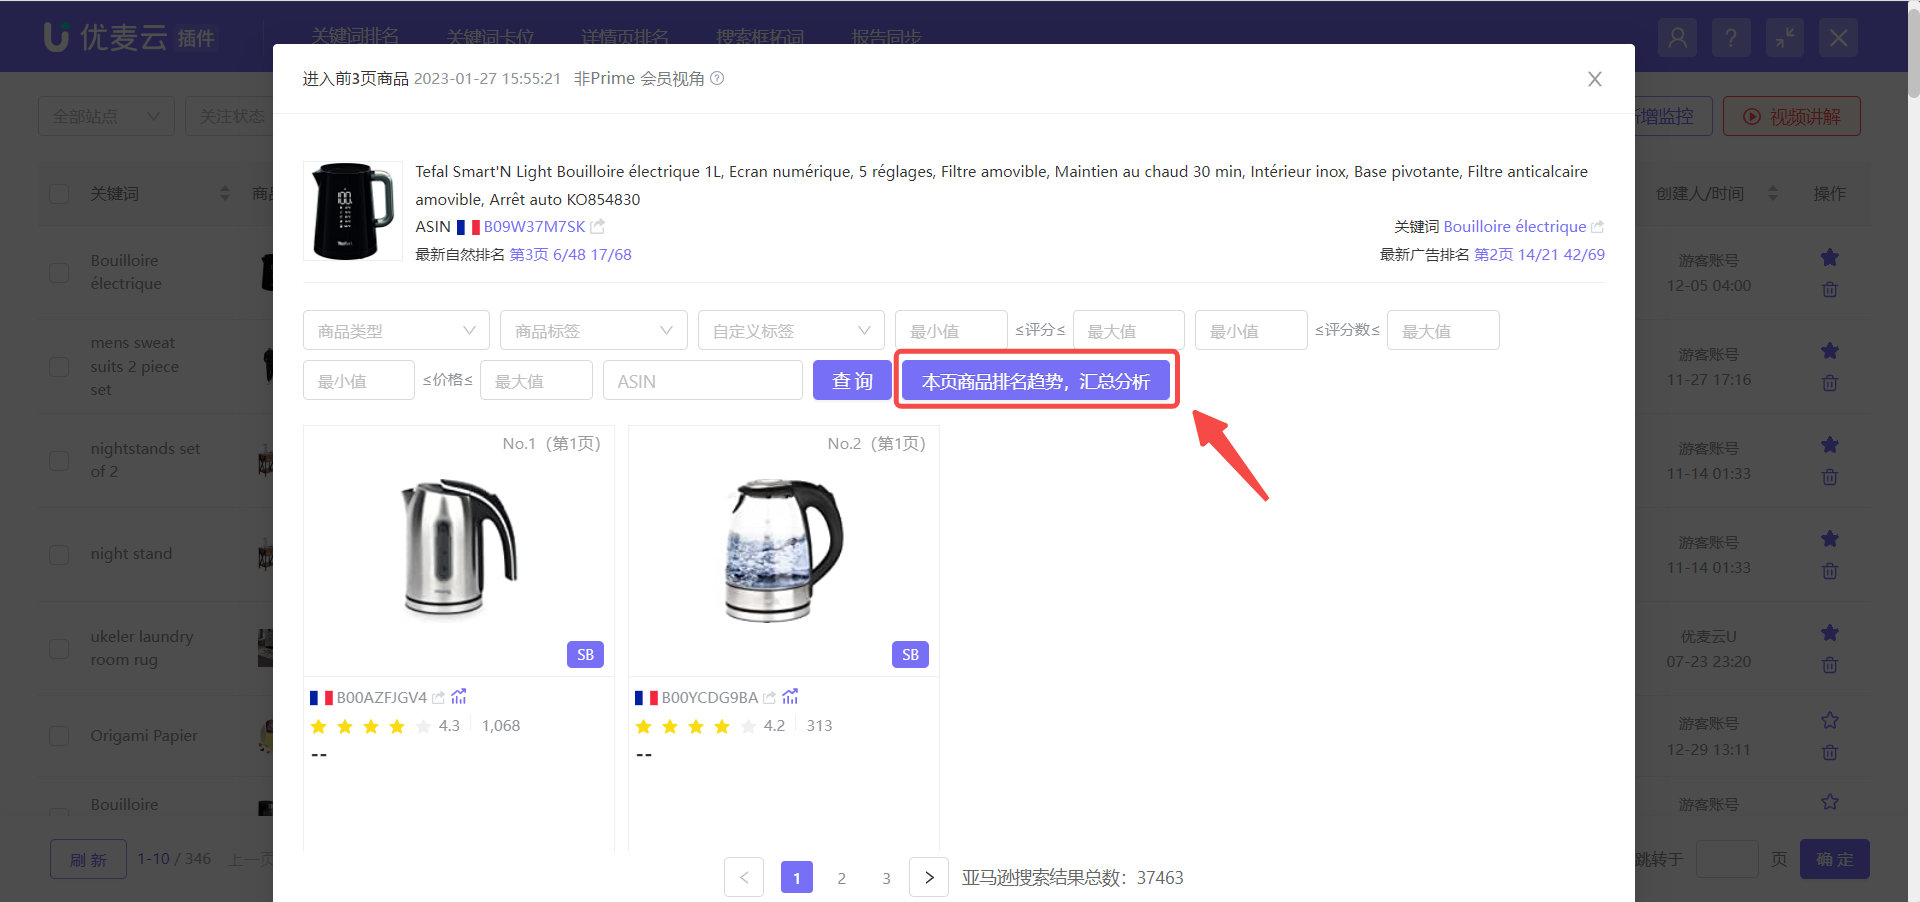 +
+
Supports viewing product ranking trends on this page in 【Chart】 form, 【Merged】, for vertical analysis of the ranking of different products at the same time point.
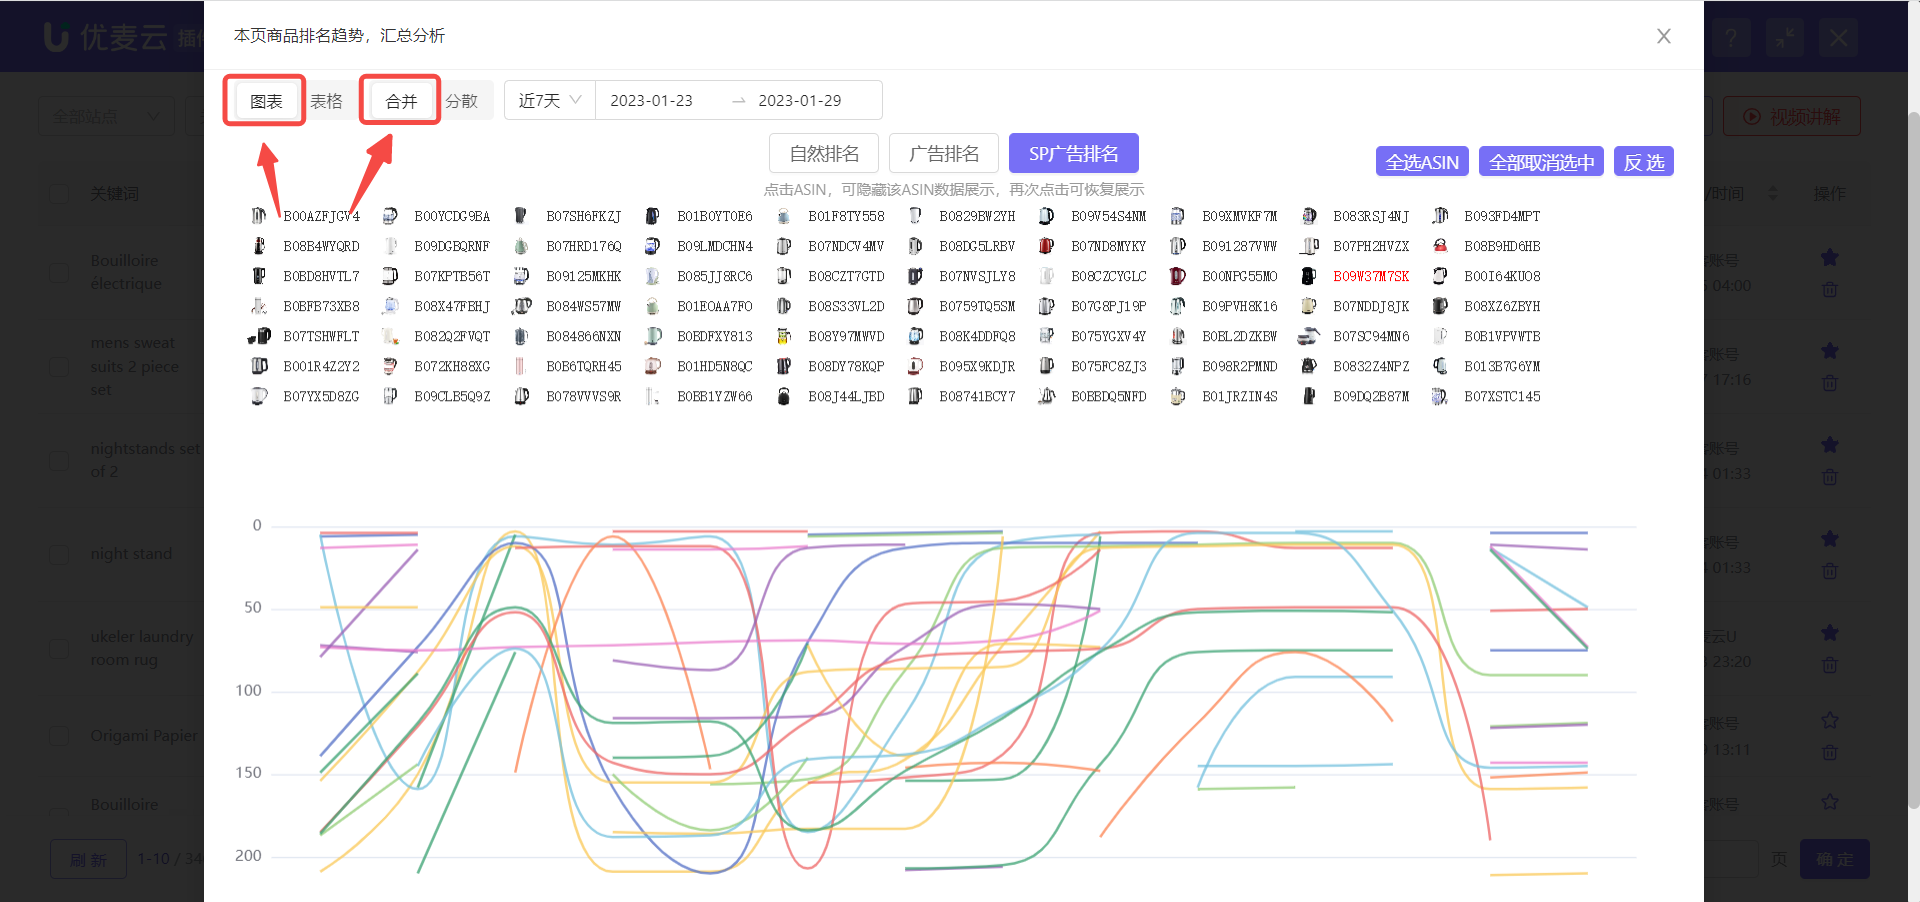 +
+
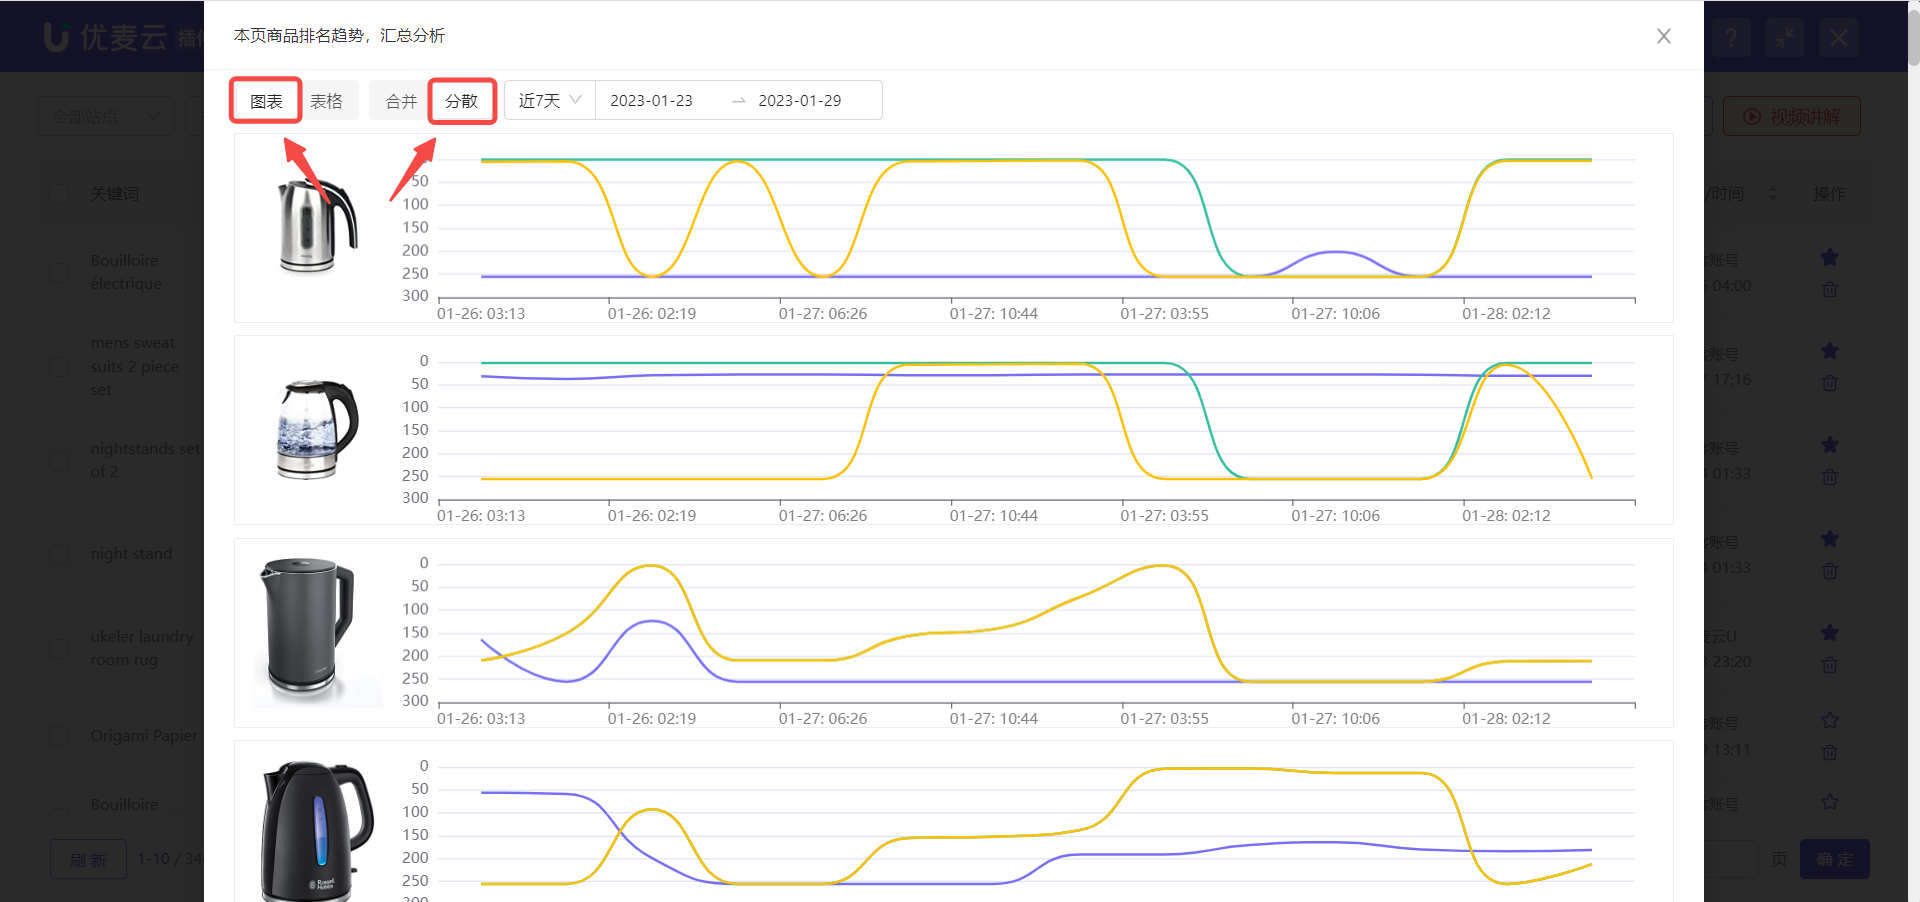
Supports viewing product ranking trends on this page in 【Chart】 form, 【Separated】, for horizontal analysis of the keyword ranking trend of a single product.
 +
+
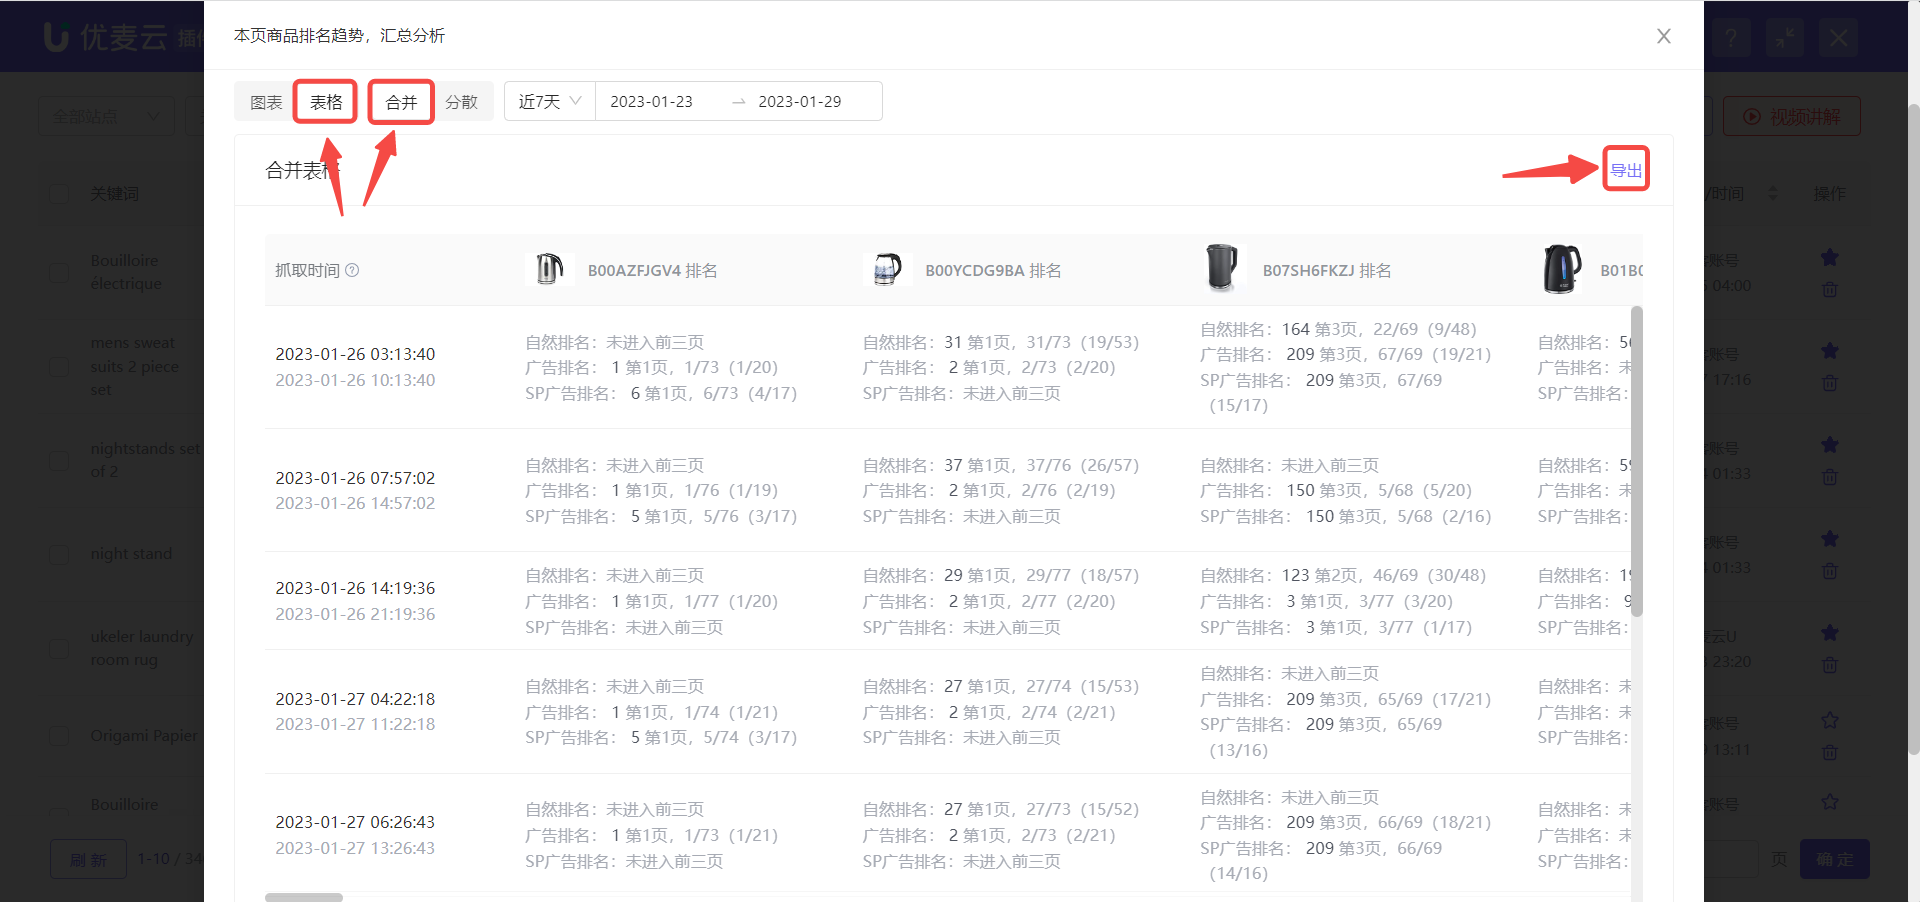
Supports viewing product ranking data on this page in 【Table】 form, 【Merged】, current data supports export.
 +
+
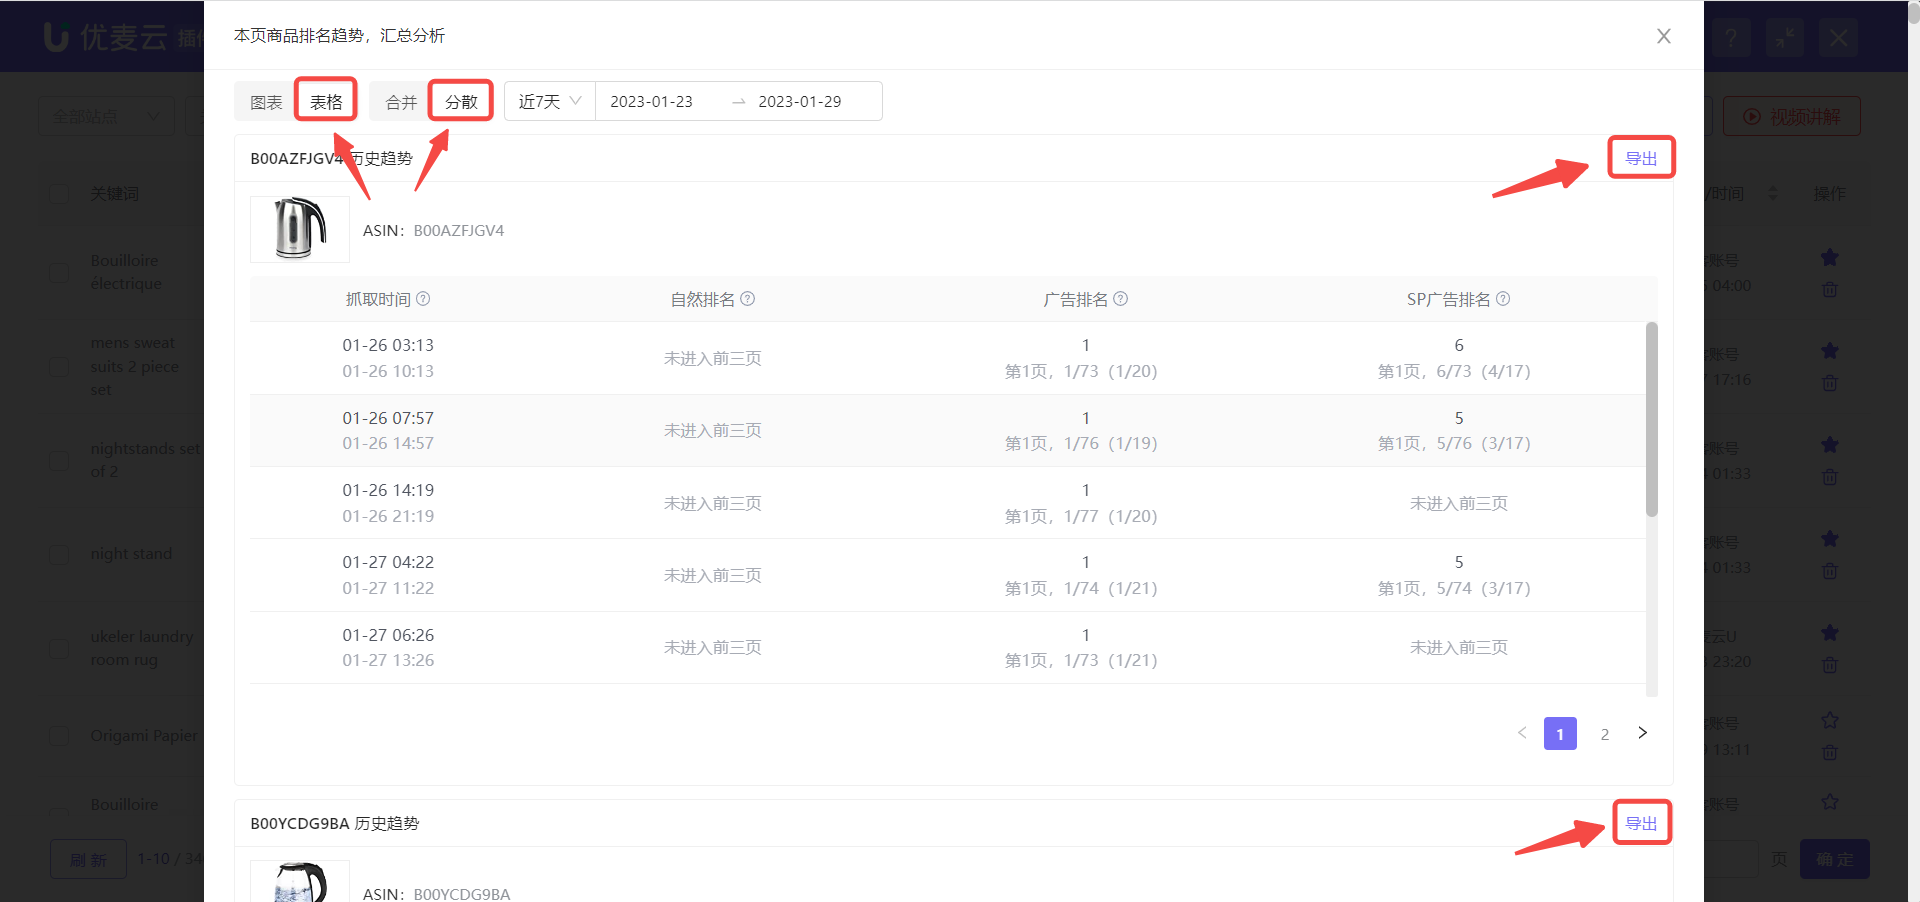
Supports viewing ranking data of a single product on this page in 【Table】 form, 【Separated】, supports exporting data of a single product.
 +
+
2) Keyword Dimension: Products that Have Appeared in the Top 3 Pages
Starting from the keyword dimension, view all product information that has appeared in the top 3 pages under the monitored keyword.
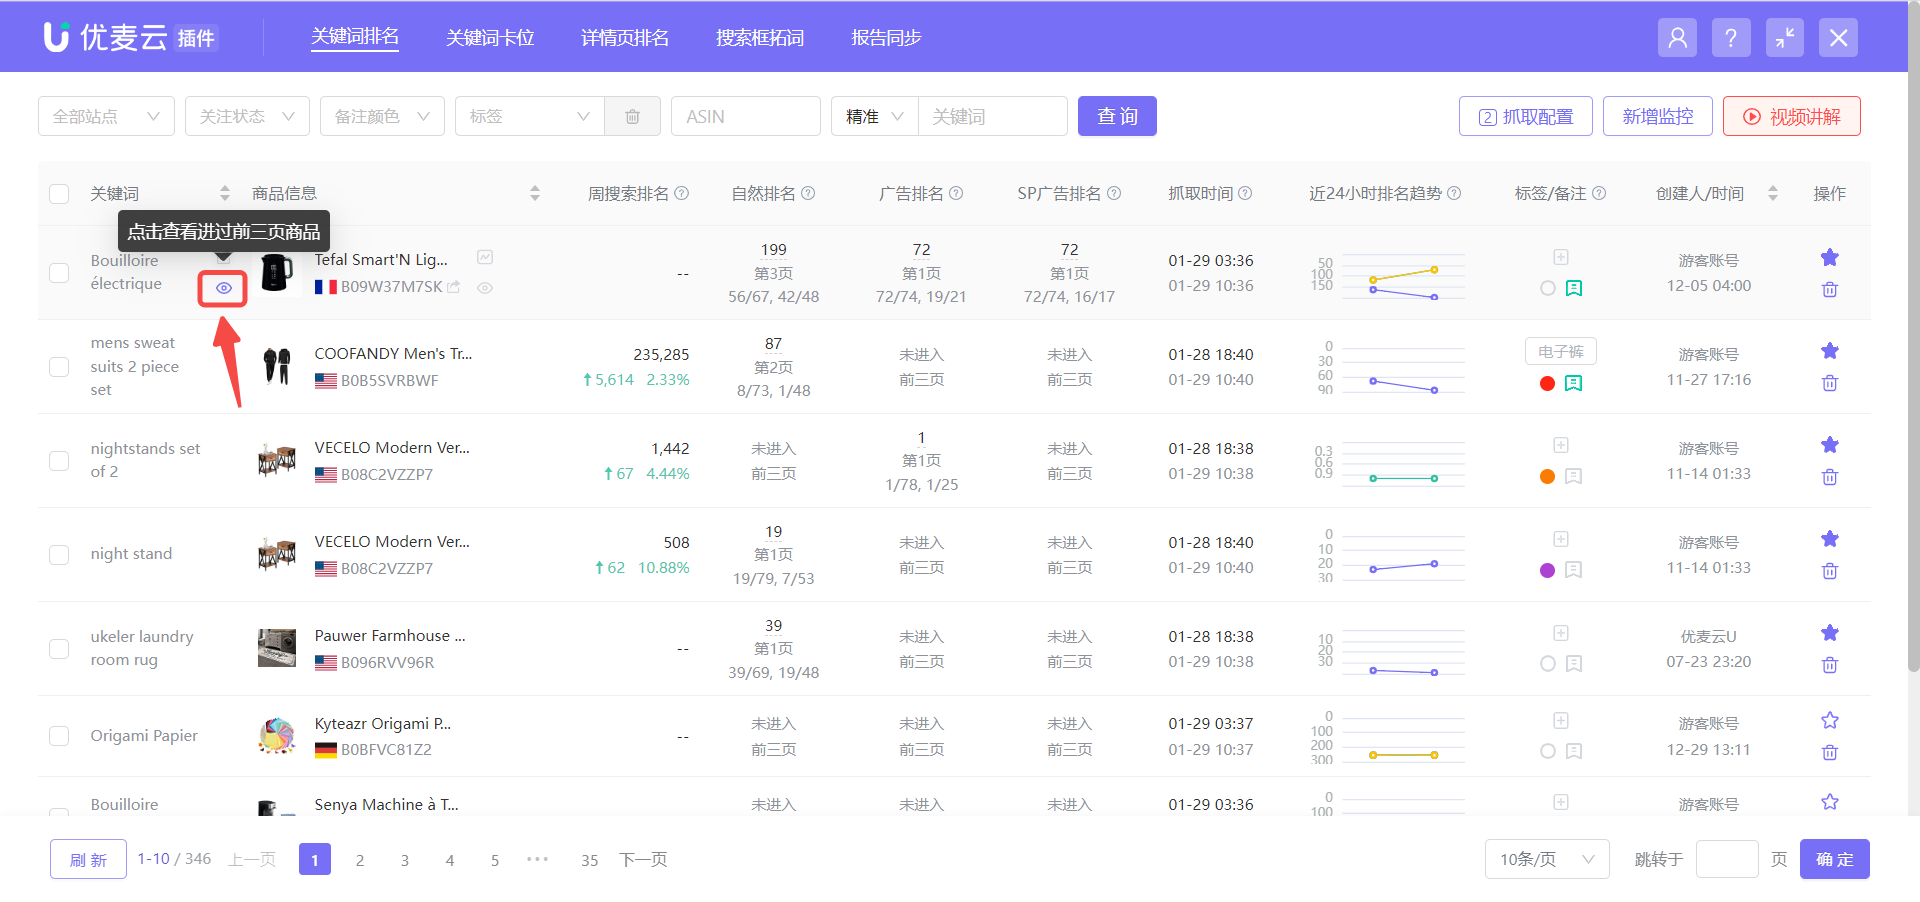
Find the corresponding monitored keyword, click the view icon on the left to enter the data page.
 +
+
On the 【Top 3 Page Products】 page,
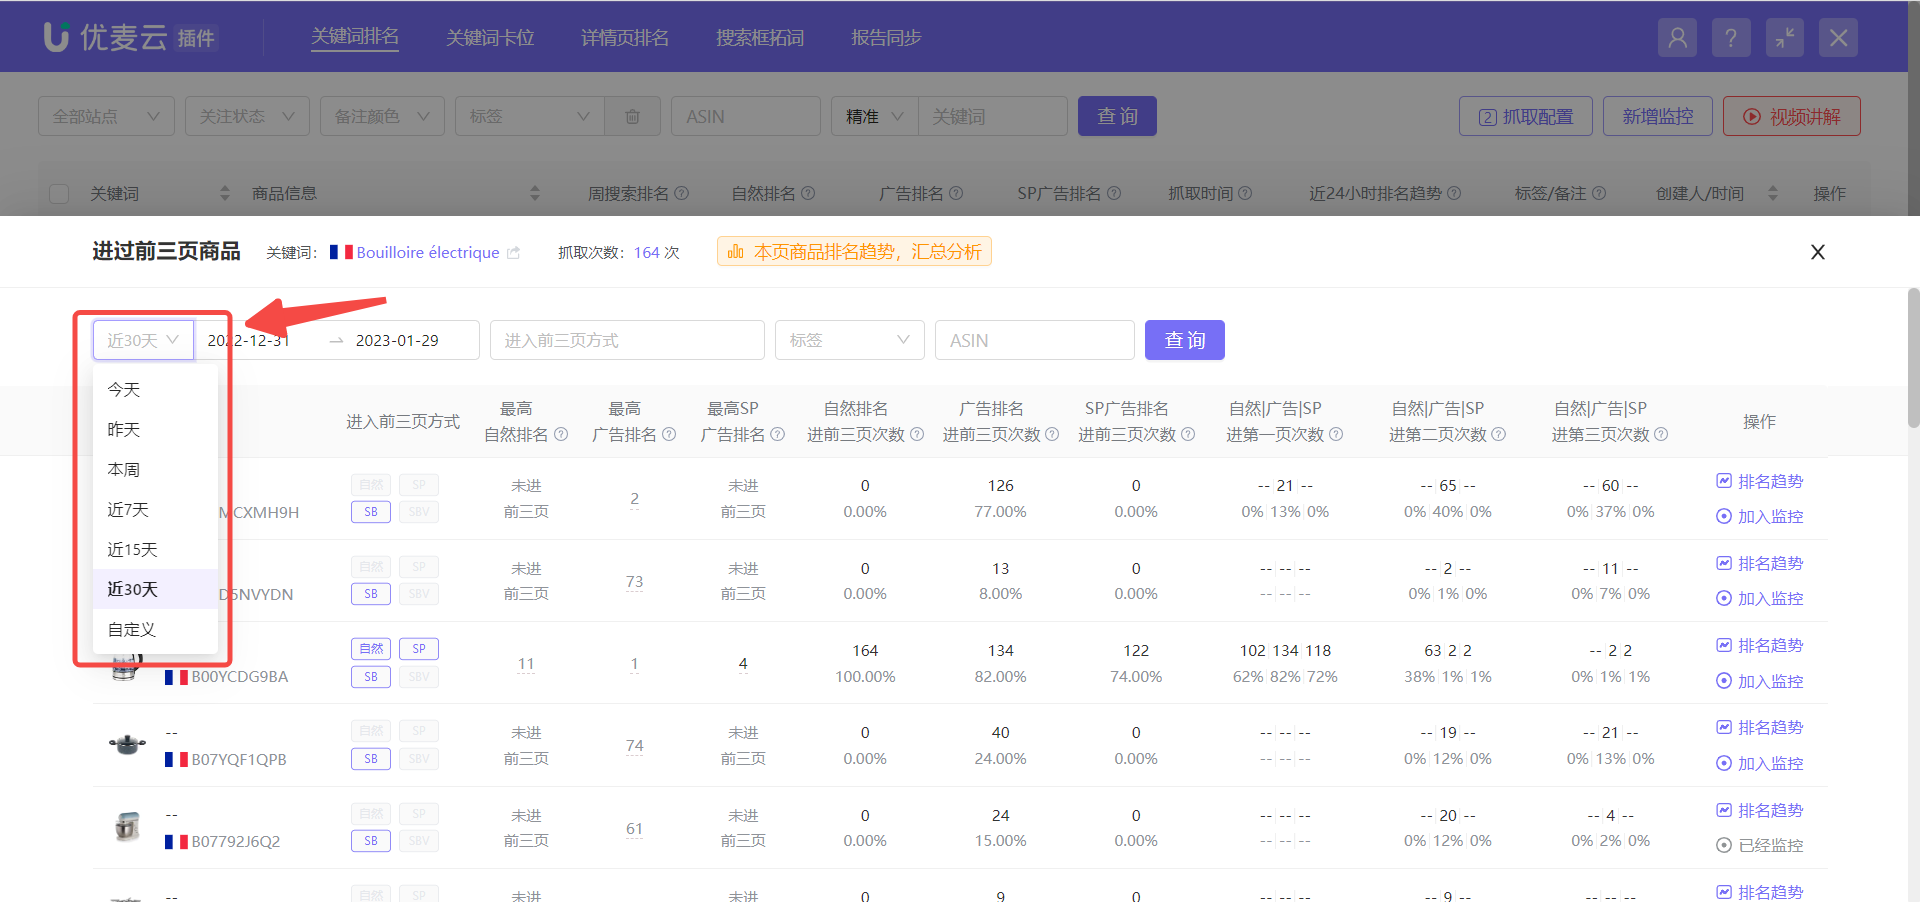
The system displays data for the last 30 days by default. You can also choose to view data for other time periods, up to the last 30 days.
 +
+
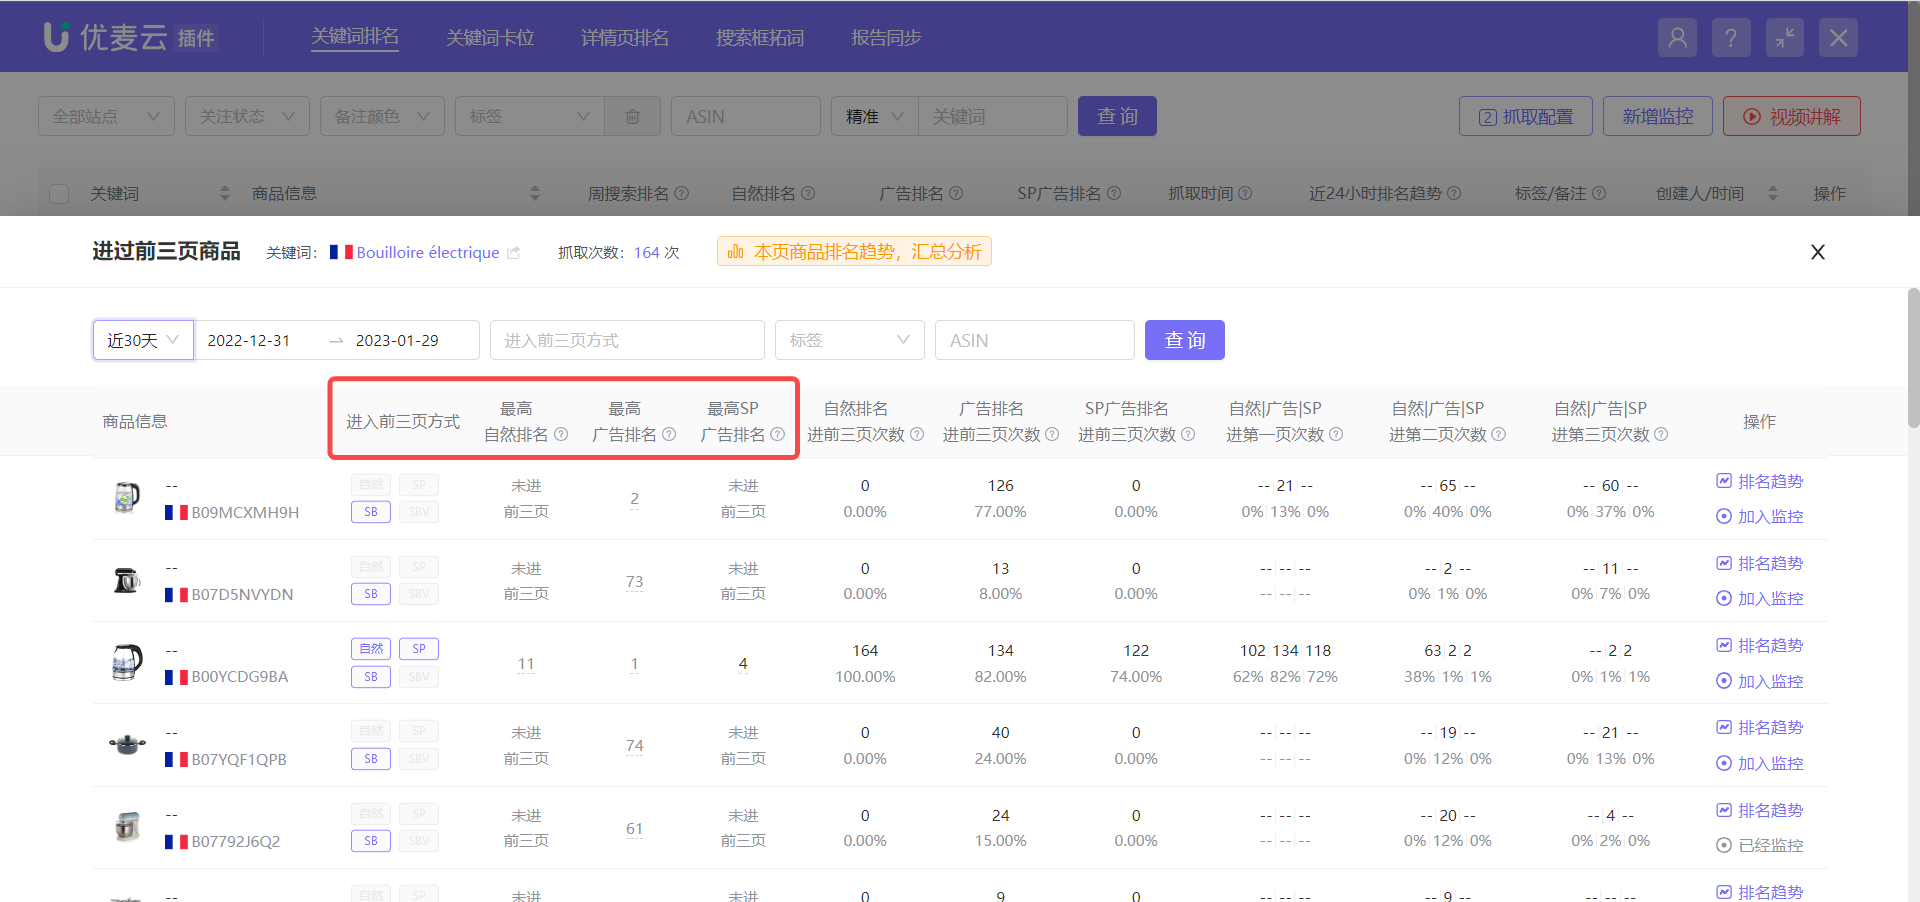
Data is divided into 3 categories: Ways to enter the top 3 pages + Detailed data on the number of times in the top 3 pages + Detailed data on the number of times in each of the top 3 pages.
Ways to Enter the Top 3 Pages:
The way the product enters the top 3 pages is divided into: Organic Ranking, Ad Ranking (SP/SB/SBV), or SP Ads.
 +
+
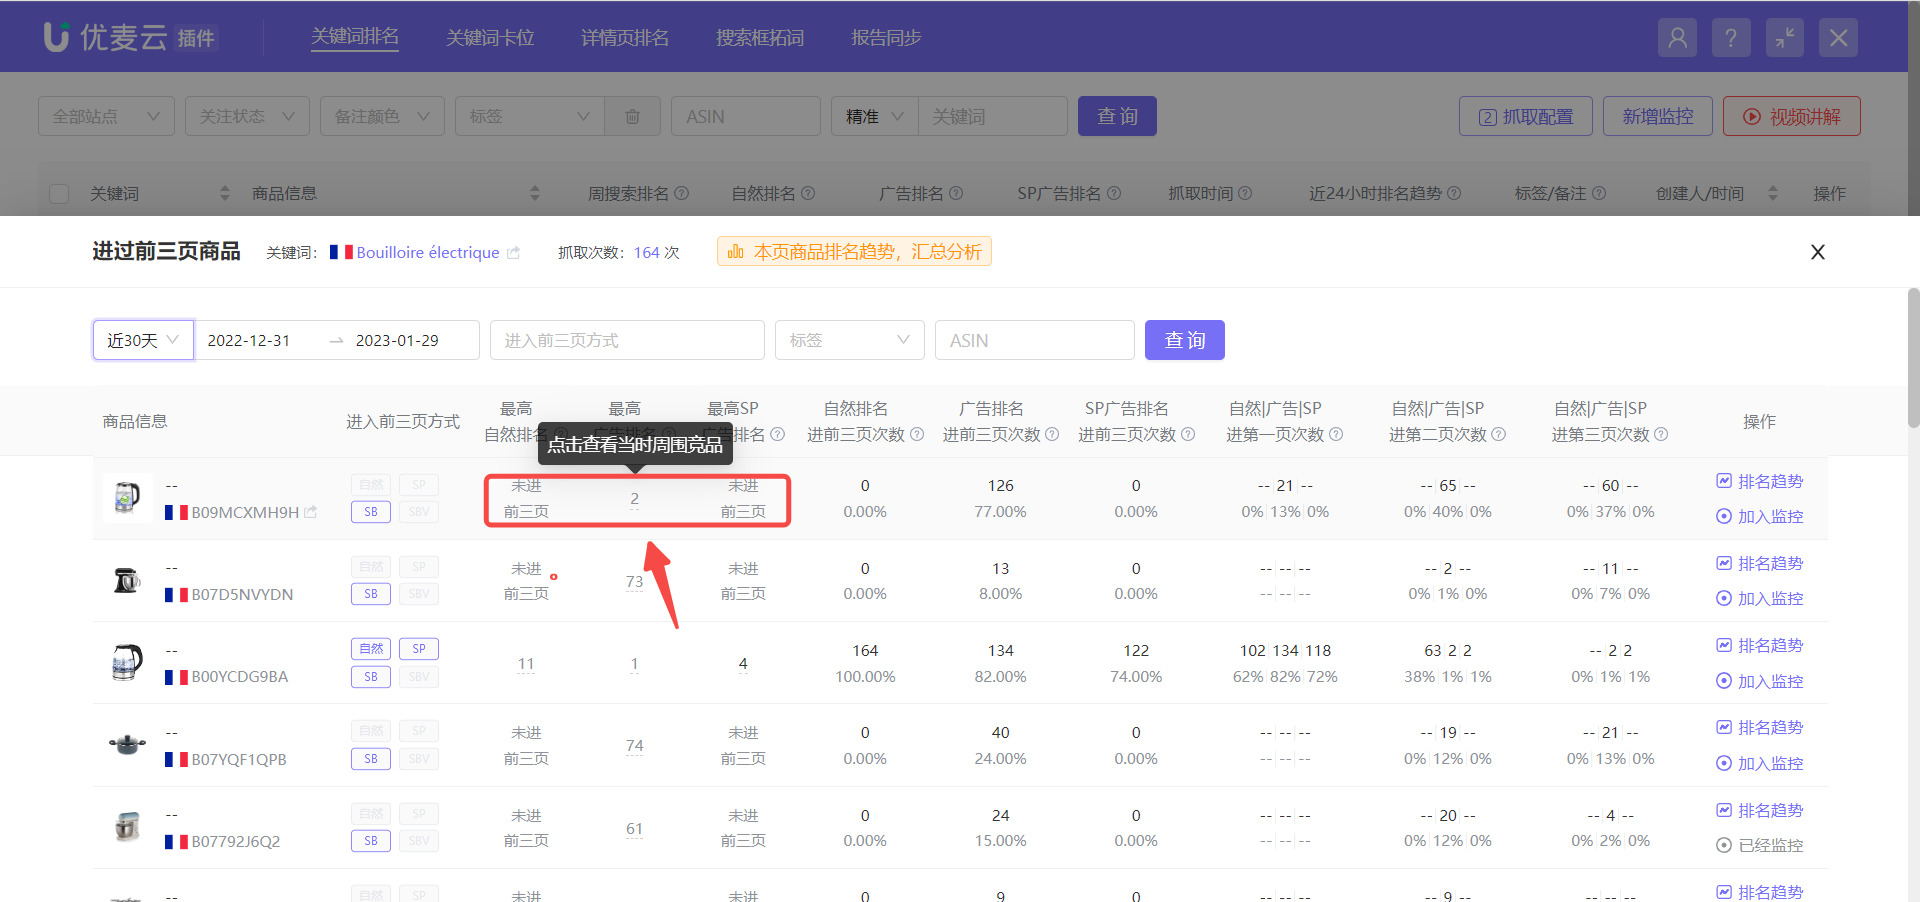
Click the corresponding ranking number to further view detailed information about surrounding competitors at that time.
 +
+
Viewing and analysis operations are consistent with product information analysis at ranking trend nodes.
 +
+
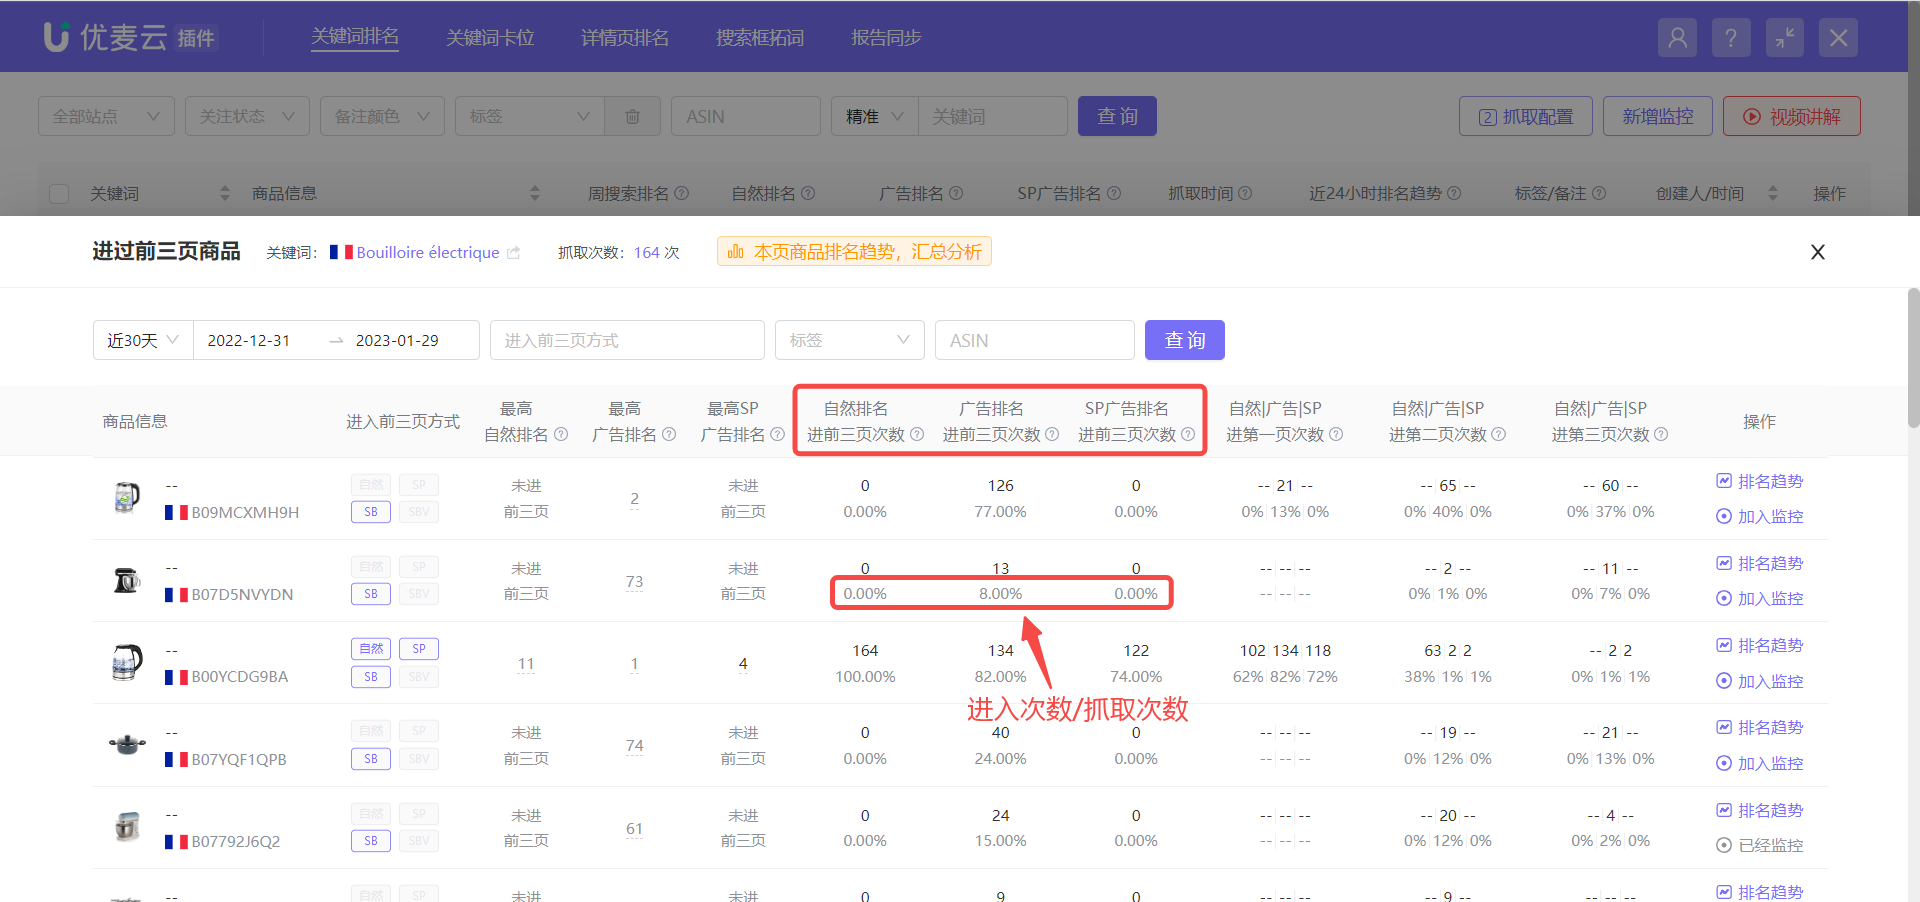
Detailed Data on the Number of Times in the Top 3 Pages:
Among all times entering the top 3 pages, the number of times for organic, advertising, and SP ads respectively. Among them, the percentage below the number of times is the ratio of the number of entries to the number of scrapes.
 +
+
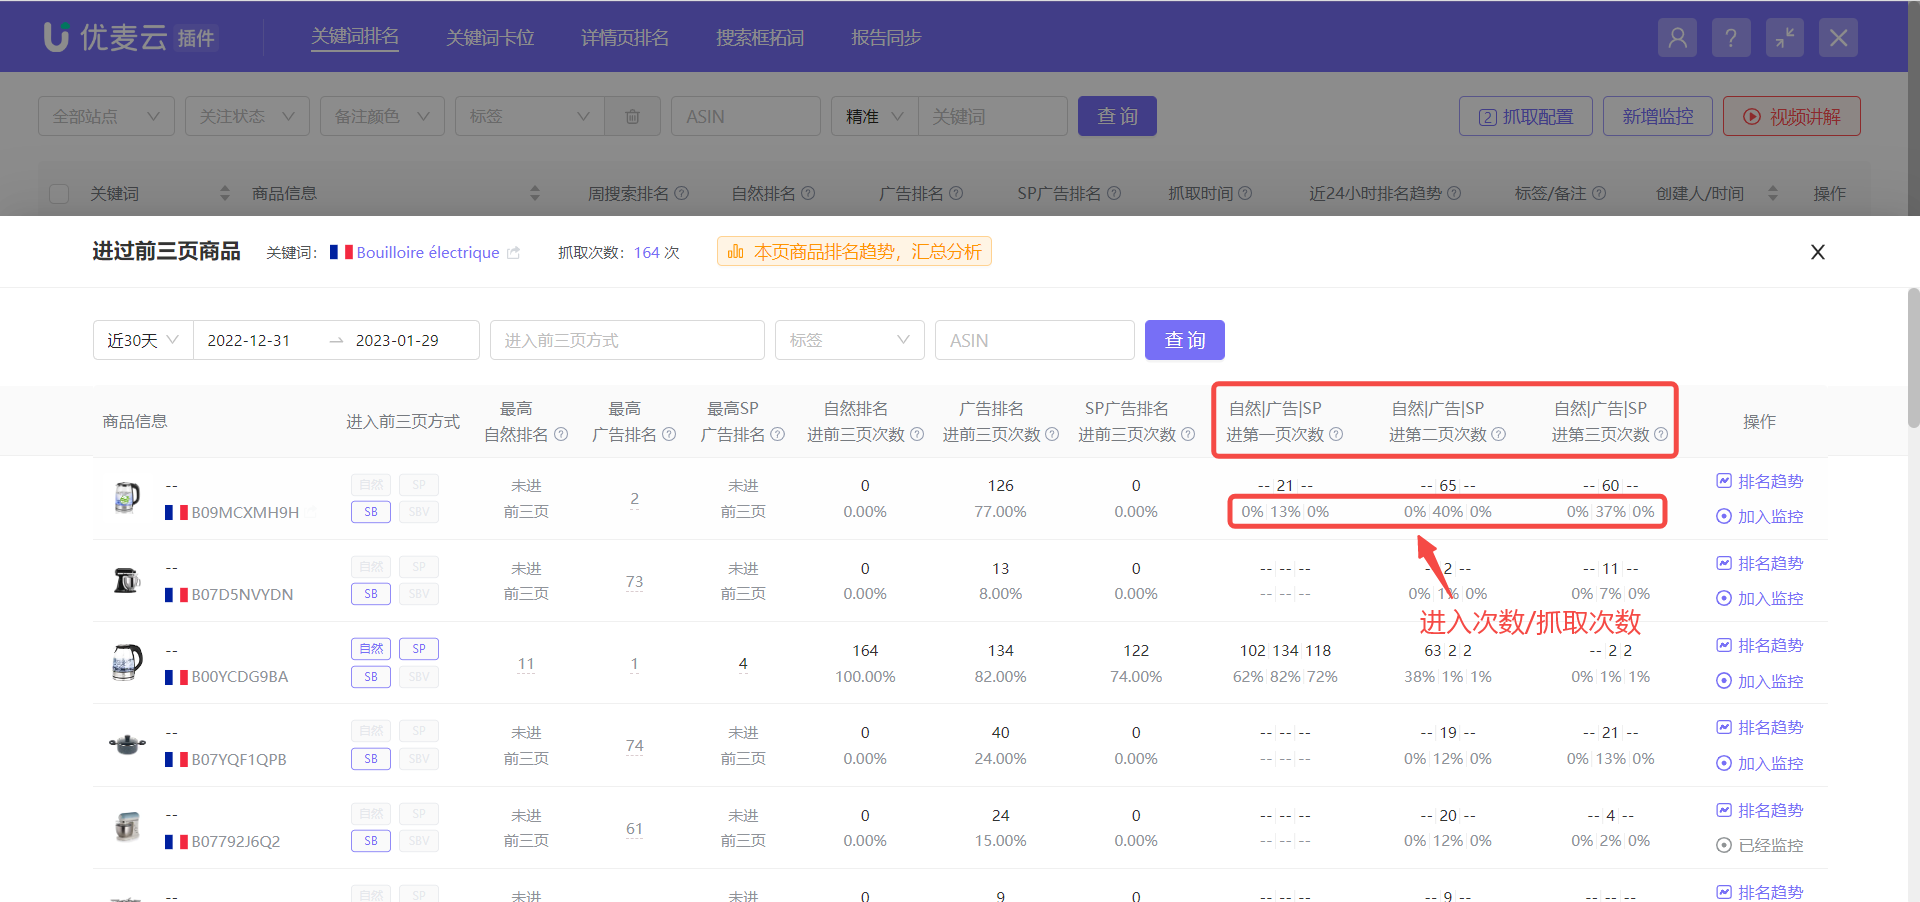
Detailed Data on the Number of Times in Each of the Top 3 Pages:
The number of times for organic, advertising, and SP ads to enter the top 1, 2, and 3 pages respectively. The percentage algorithm below the number of times also refers to the ratio of the number of entries to the number of scrapes.
 +
+
Through these three data points, you can quickly understand the ad placement of keywords. By analyzing the percentage of times entering the top 3 pages in the top three pages, you can determine whether the relevance of the keyword to the product is high, and help decide whether to increase or abandon the placement of the keyword, etc.
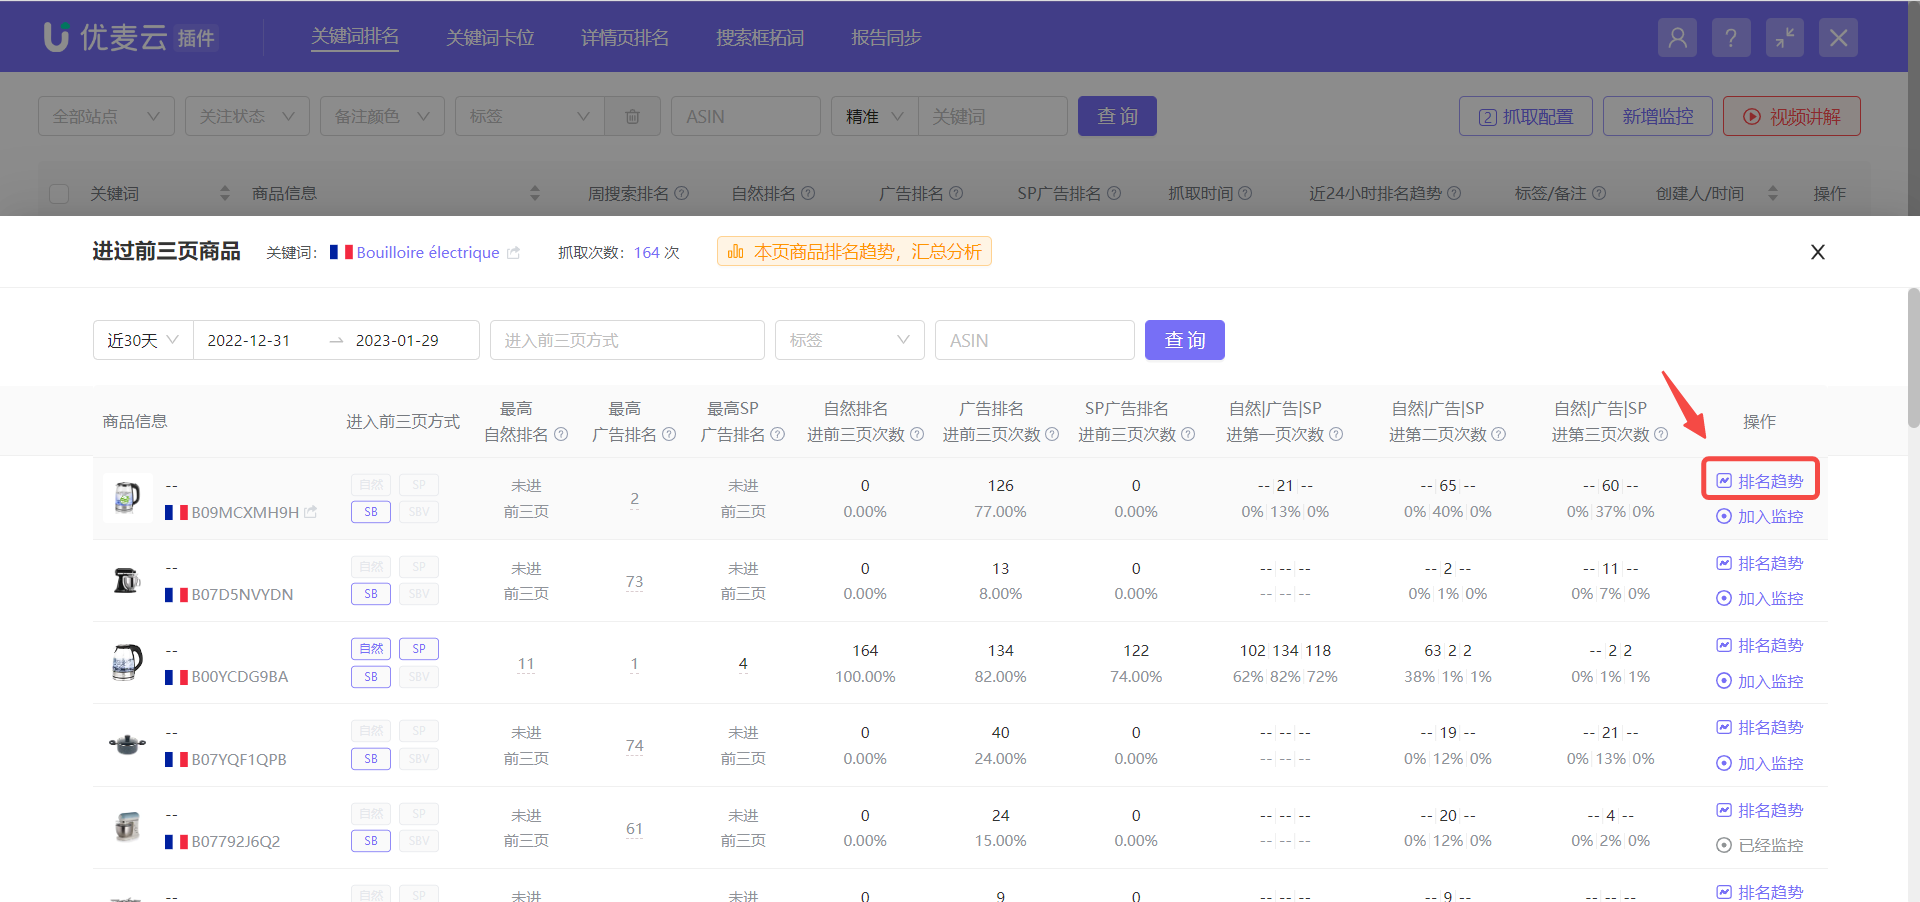
In addition to the analysis of the above three data points, you can also view product ranking trends here. The viewing method is consistent with what was introduced earlier.
Click 【Ranking Trend】 on the right of the product to access the view.
 +
+
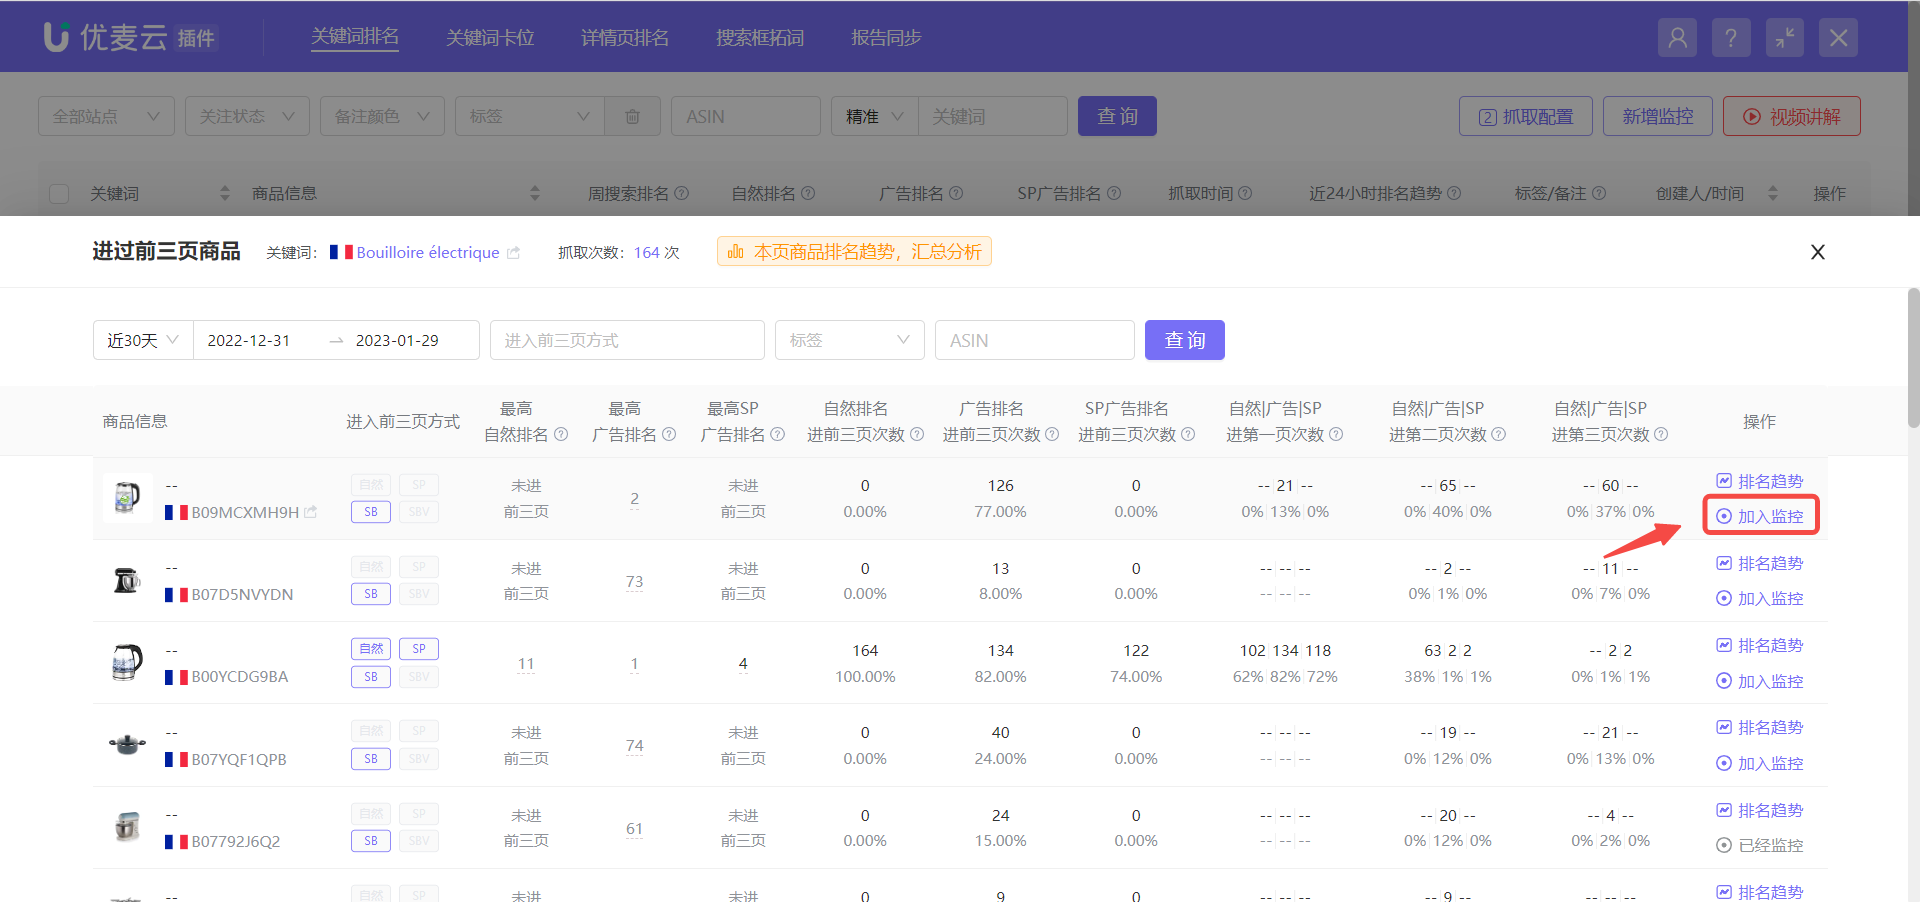
If you are very interested in a certain product, you can also choose to directly add it to monitoring to scrape subsequent ranking-related information.
Click 【Add to Monitoring】 to add with one click.
 +
+
3) Product Dimension: Monitored Keywords that Have Appeared in the Top 3 Pages
Starting from the product dimension, view which monitored keywords have appeared in the top 3 pages under the product.
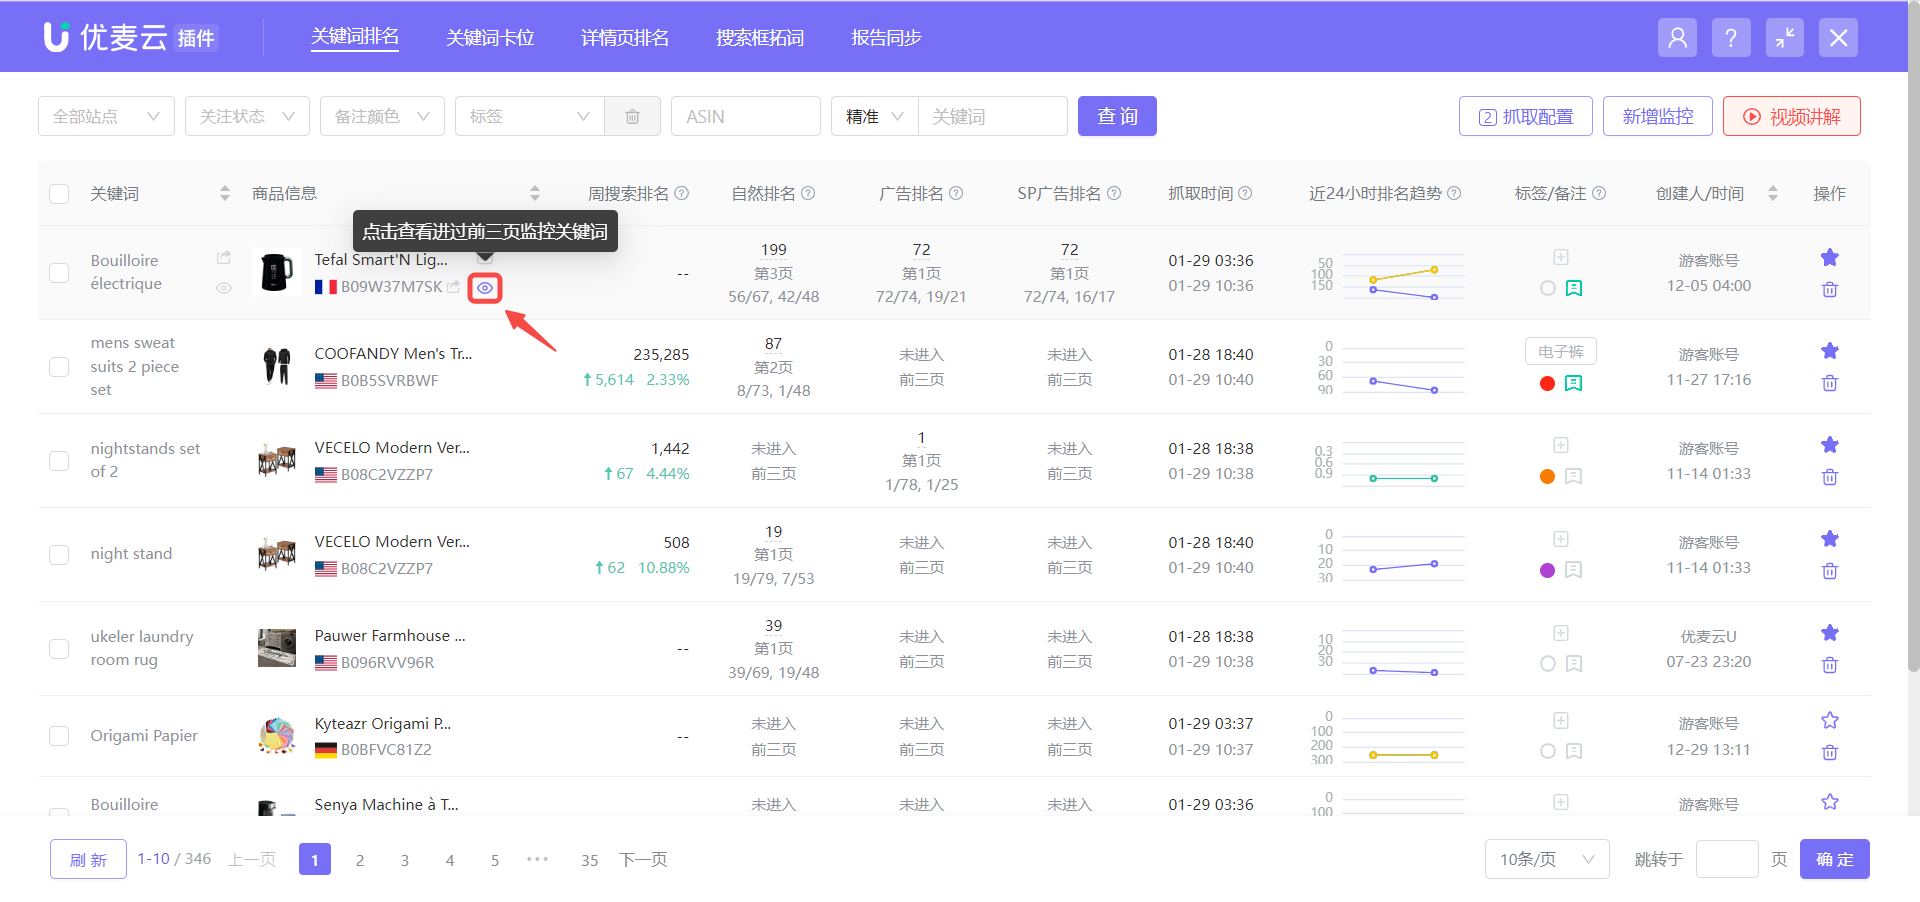
Find the corresponding monitored product, click the view icon on the right 【Click to View Monitored Keywords that Have Appeared in the Top 3 Pages】 to enter the data page.
 +
+
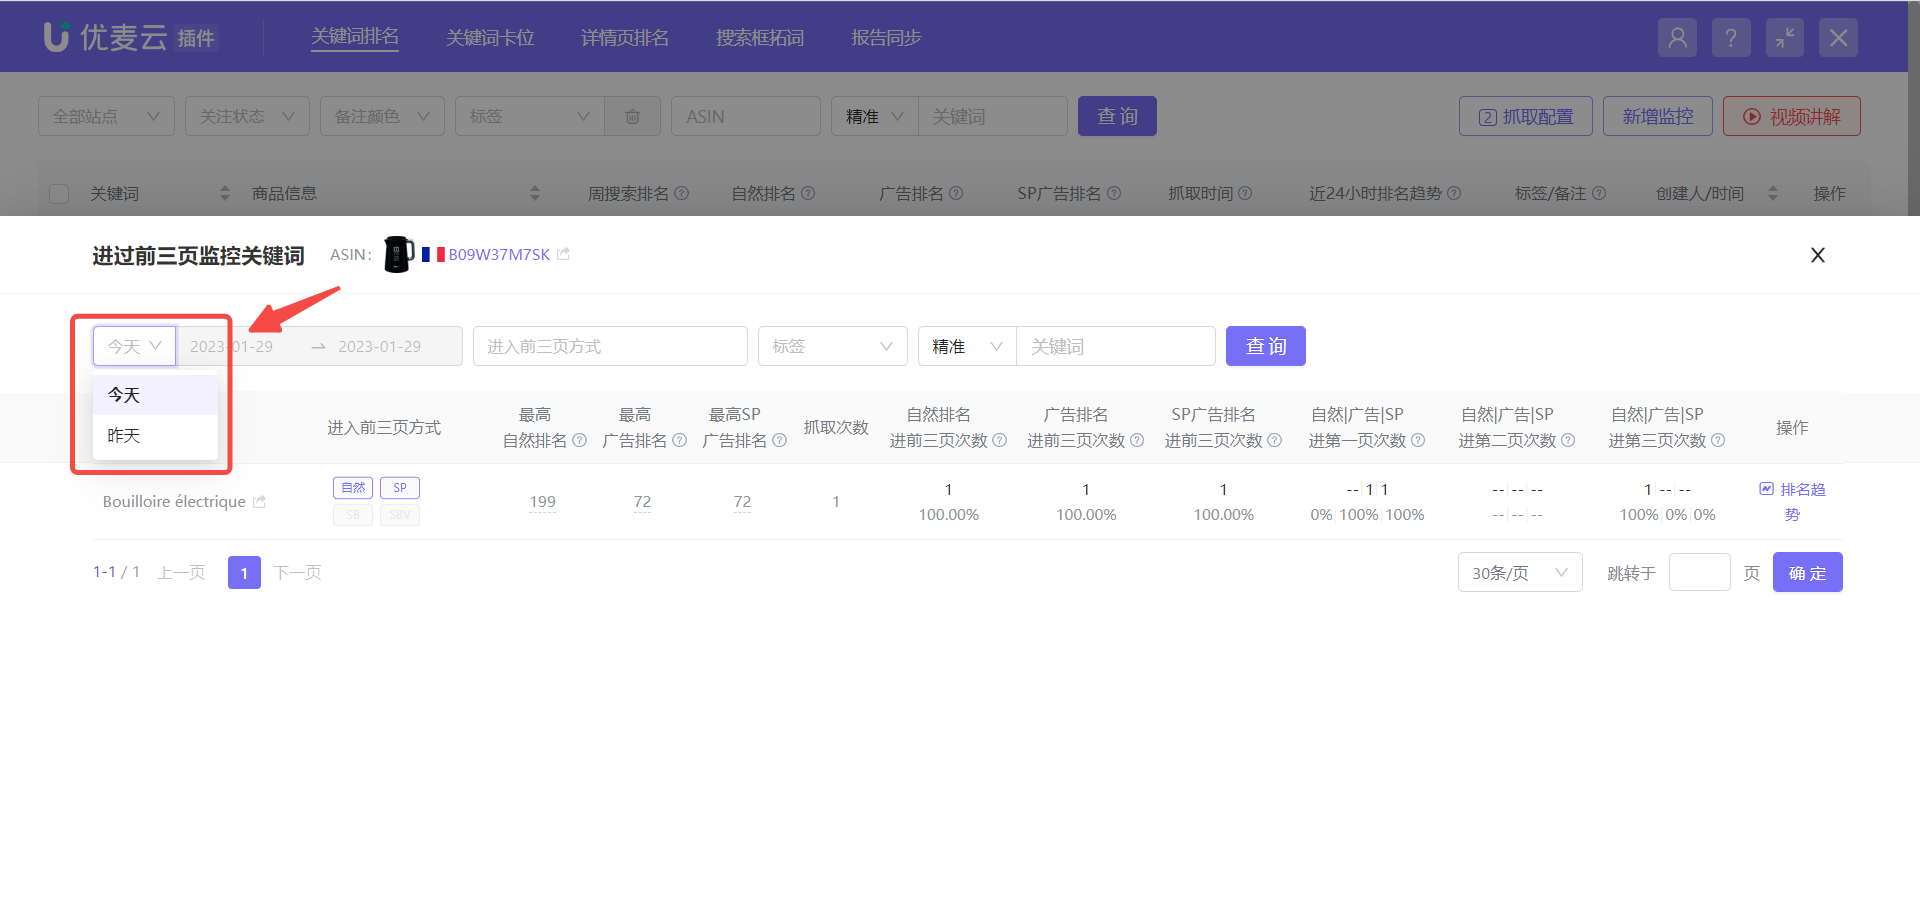
On the 【Top 3 Page Keywords】 page,
You can choose to view data for today or yesterday.
 +
+
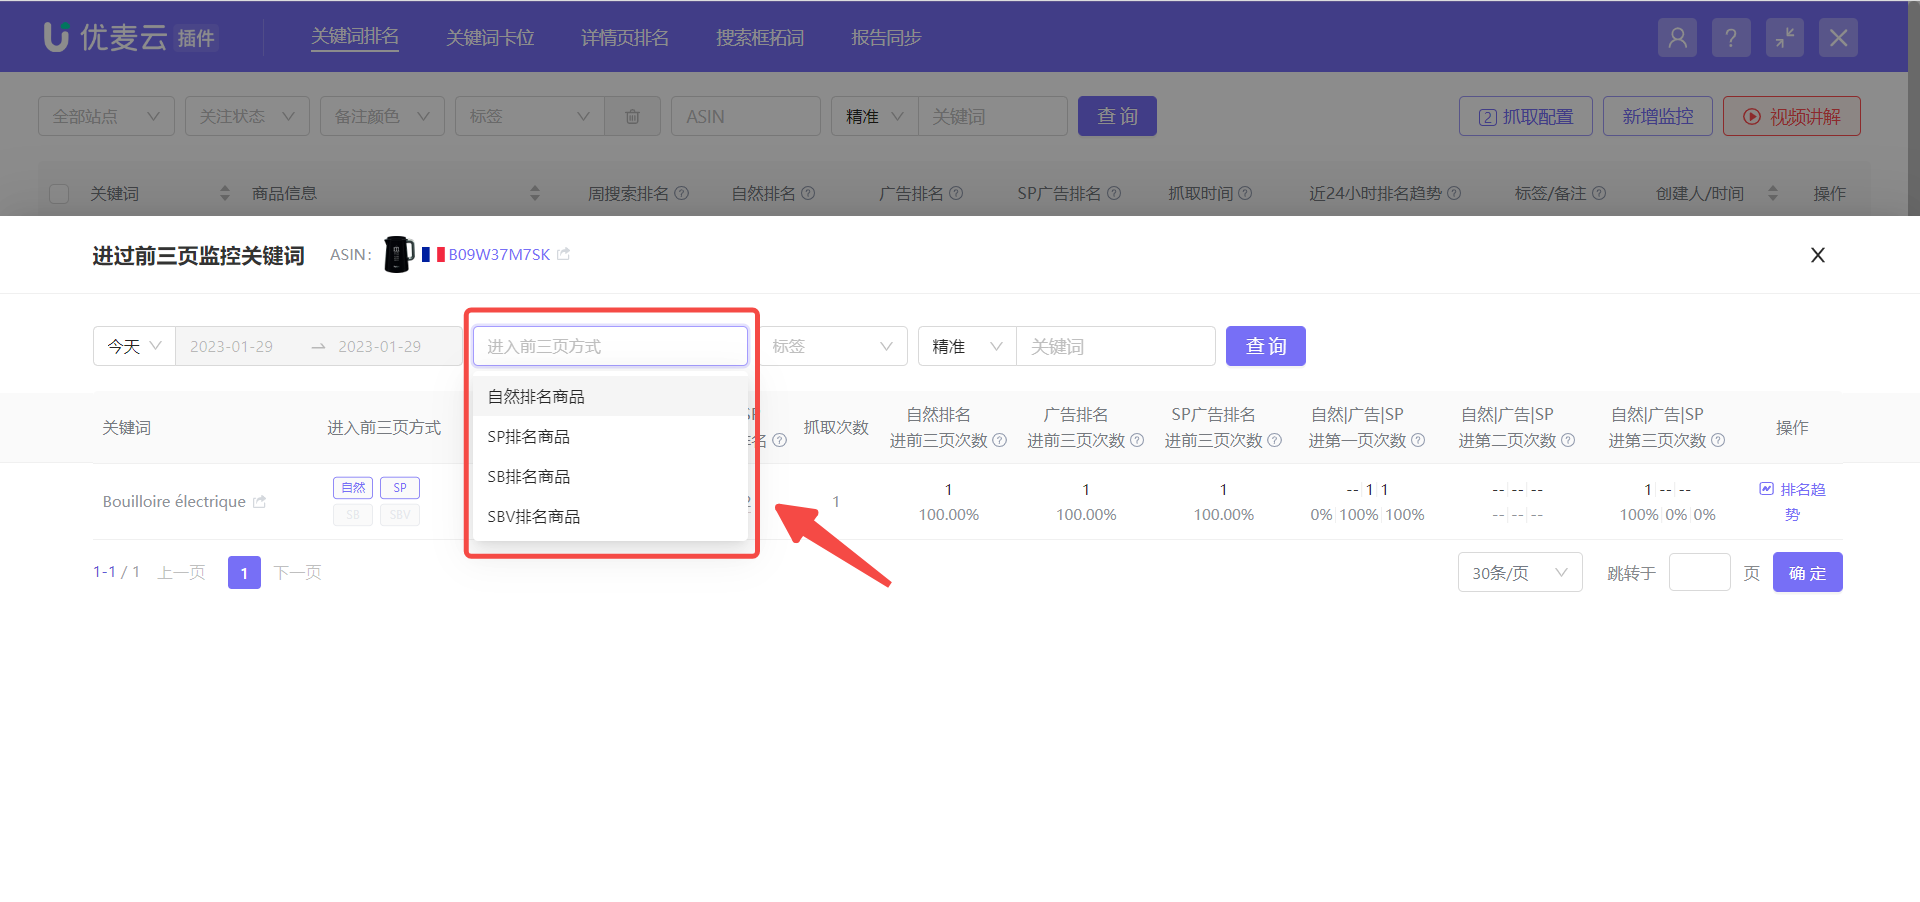
You can choose the way to enter the top three pages: Organic Ranking, SP Ranking, SB Ranking, or SBV Ranking to view product ranking data.
 +
+
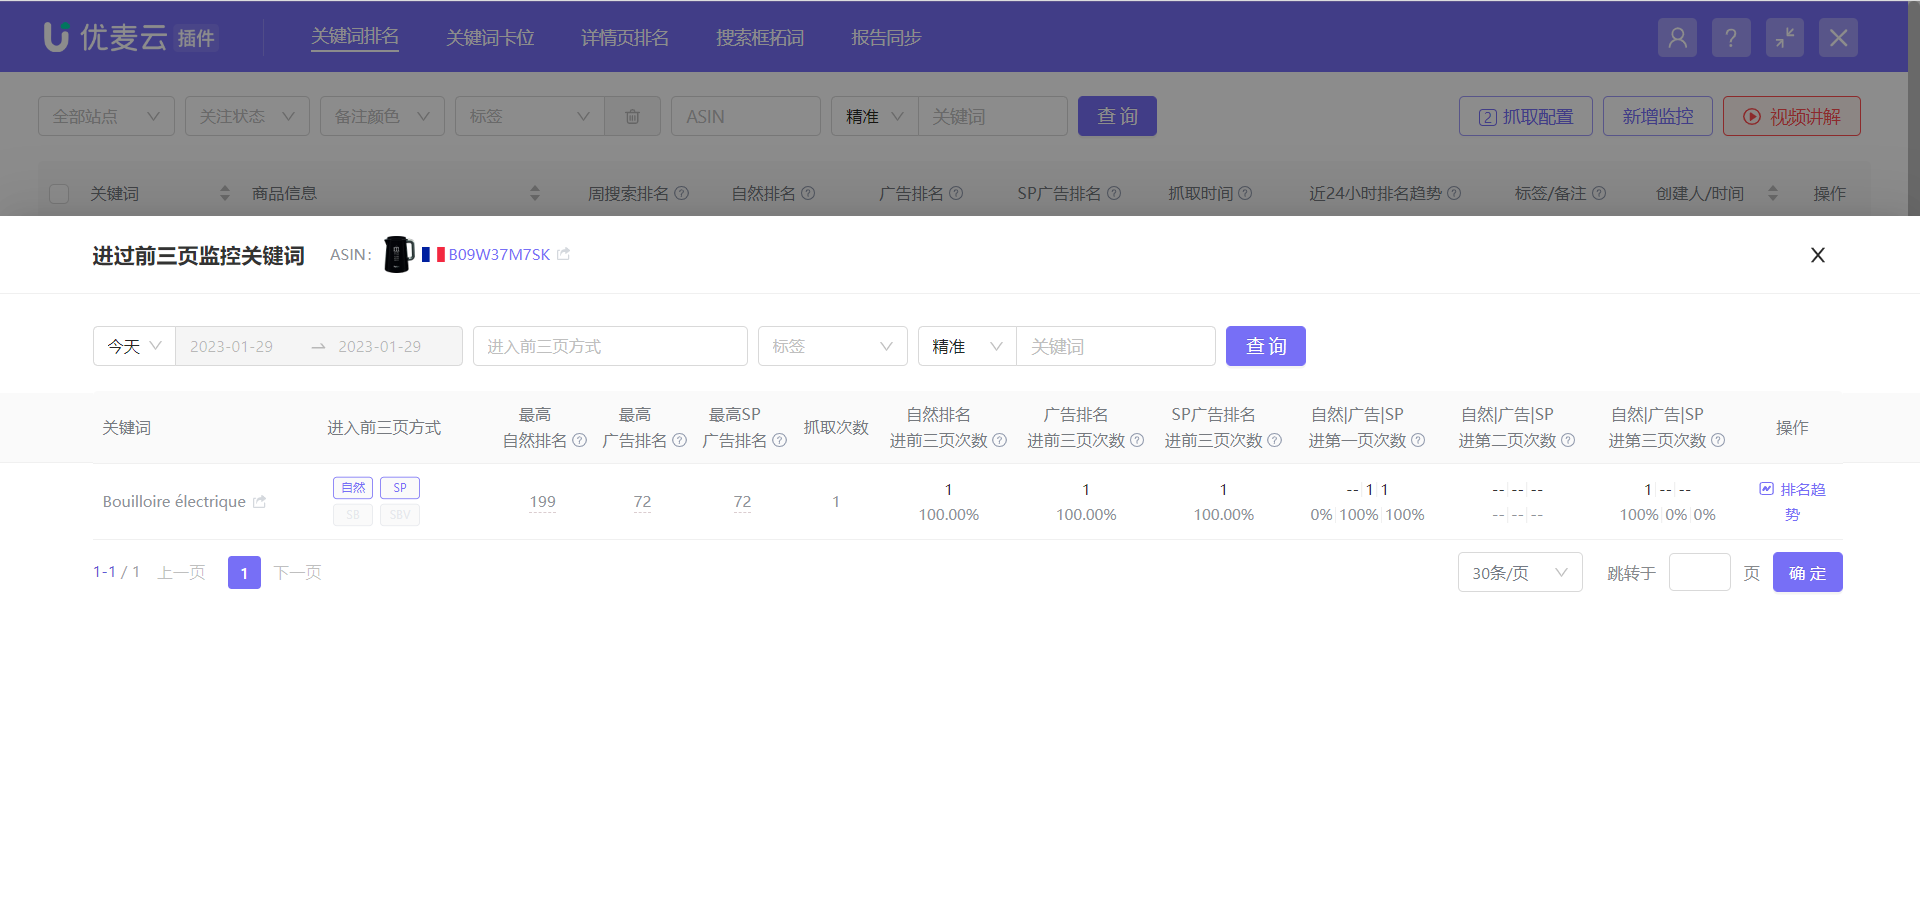
The data display is basically consistent with Keyword Dimension: Products that Have Appeared in the Top 3 Pages.
 +
+


