2025/03/21Number of reading(4303)Number of comments(0)
I. Target Audience
Operators, Ad Specialists
II. Feature Introduction
The Keyword/Product List feature is one of the features integrated with SellerSprite.
SellerSpace, in conjunction with SellerSprite, has upgraded and launched the [Keyword List] and [Product List] features, consolidating them into a new feature called: Keyword/Product List.
Now, in addition to creating your own Keyword/Product Lists in SellerSprite through features like Keyword Research, Reverse ASIN Lookup, and Product Selection, you can also use SellerSpace to add keywords that appear in your ads, such as from Search Term Reports, Amazon Recommended Keywords, and Amazon Recommended Products. This enriches your Keyword/Product Lists and broadens your product's traffic sources.
Keywords and products added in SellerSpace will also be synchronized and updated in the corresponding features of SellerSprite, enabling a two-way connection to help you create Keyword/Product Lists better and faster.
SellerSprite - Keyword List: Click to View
SellerSprite - Product List: Click to View
After creating Keyword/Product Lists, you can directly use the data from these lists in SellerSpace when creating ads for targeted advertising or negative targeting, quickly structuring your advertising framework.
Related Reading: Ad Campaign Builder - Tutorial (Chinese)
Tip: To use the integrated features of SellerSpace and SellerSprite, you need to bind your accounts.
SellerSpace & SellerSprite - Account Binding Tutorial: Click to View
III. Usage Scenarios
- View and manage Keyword/Product Lists created in SellerSprite
- Add keywords and products from advertising to the Keyword/Product List
IV. Operation Guide
The Keyword/Product List feature has 2 sub-features: Keyword List + Product List. Next, we will explain how to use each of them.
1. Keyword List
SellerSprite Feature: Keyword List is a tool used in conjunction with SellerSprite's keyword features such as Keyword Research, Reverse ASIN Lookup, Expand Traffic Keywords, and Keyword Product Selection.
When using the above tools to filter keywords, you can add intended keywords to the [Keyword List] with one click. Then, in the Keyword List, you can further organize and categorize keywords based on purposes such as Listing keyword embedding and ad placement, or compare and analyze keyword niche markets, helping you solve the problems of slow keyword collection and difficult research.
The [Keyword List] feature in SellerSpace, in addition to synchronously displaying keywords found using SellerSprite tools, also allows you to directly add keywords that perform well in your ads to the Keyword List, further enriching your keyword data and broadening traffic sources.
1.1 Adding Keywords
1) How to Add Ad Keywords to Keyword List
Keywords from ads come from 2 sources: Search Term Reports + Amazon Recommended Keywords. Let's look at them one by one.
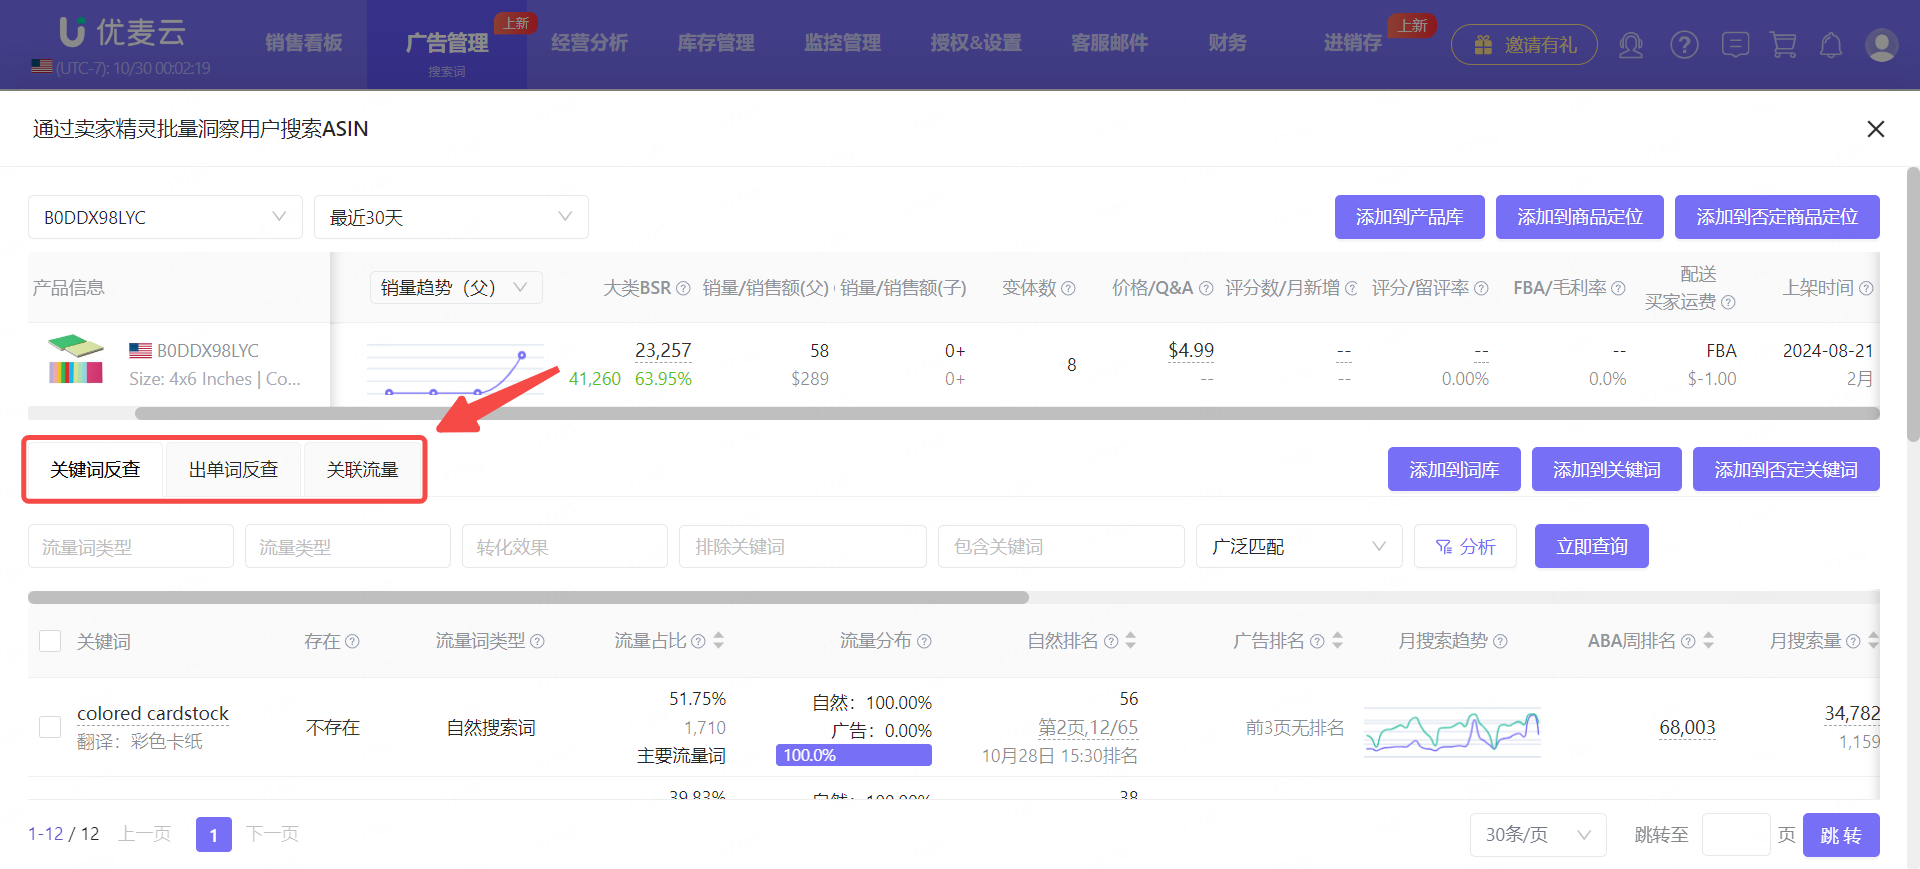
① Adding from "Search Term Report"
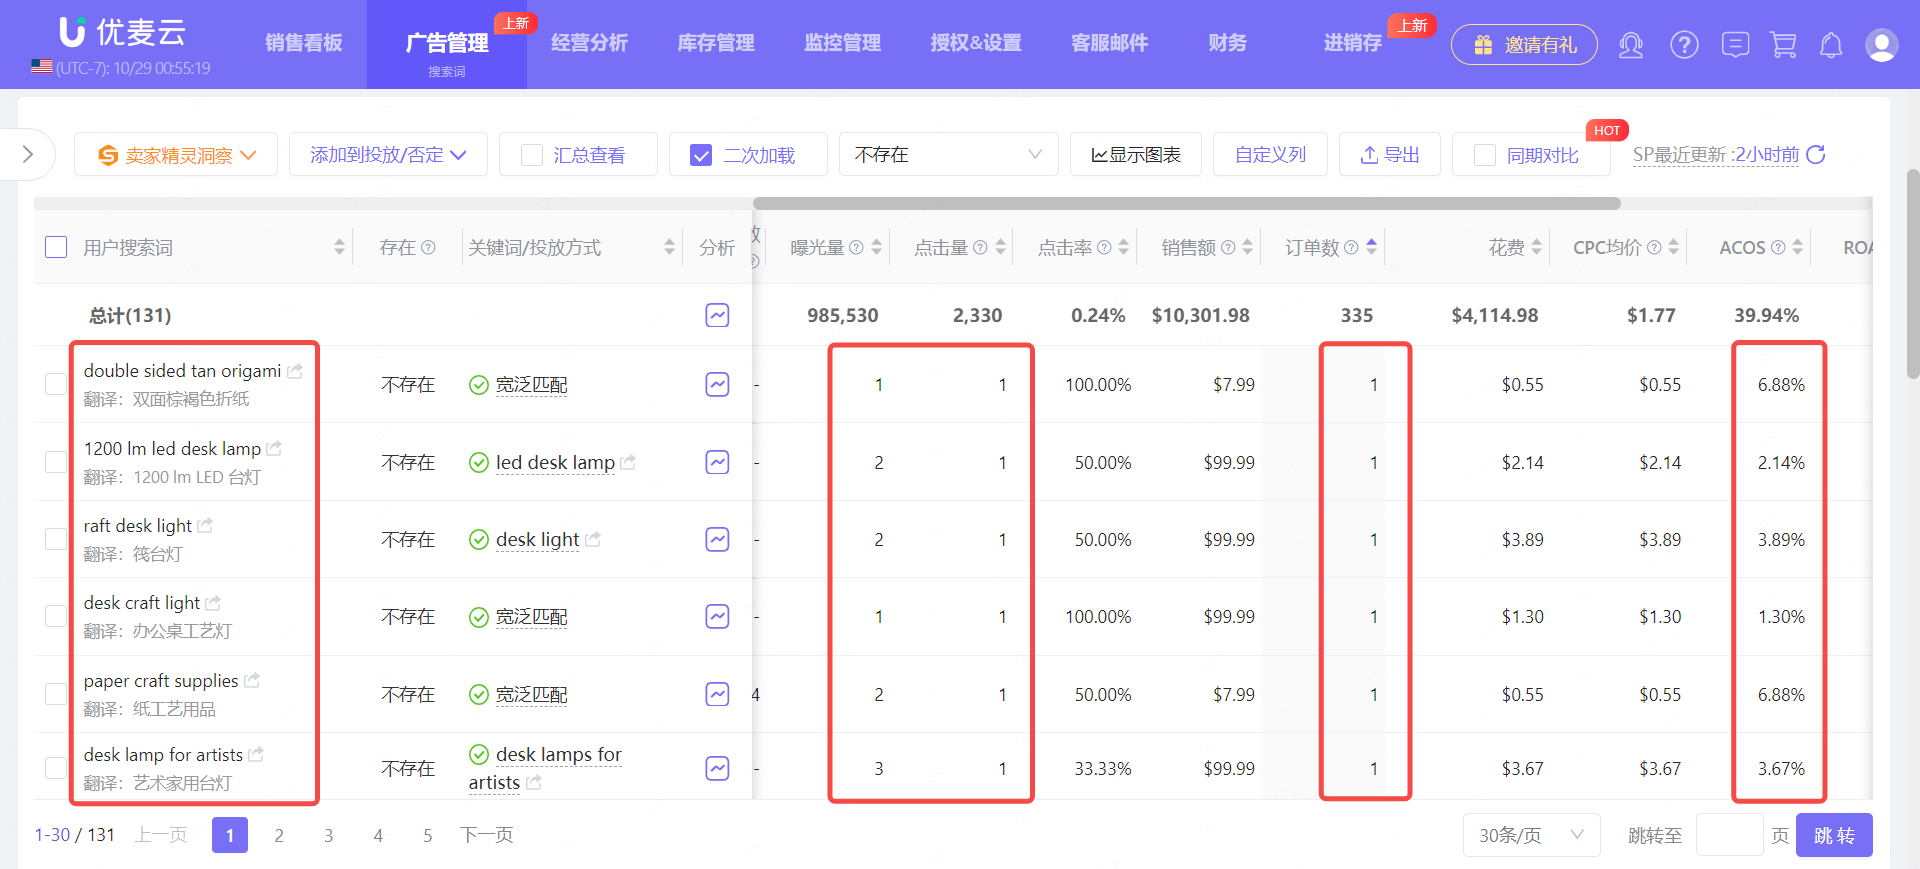
Let's take "adding newly added high-quality long-tail keywords from the Search Term Report of SellerSpace K-US US marketplace in the last 30 days" as an example.
Go to the [Search Terms] feature, filter and select the marketplace: SellerSpace K-US US marketplace, time range: Last 30 days, Search Terms not existing in current ads.
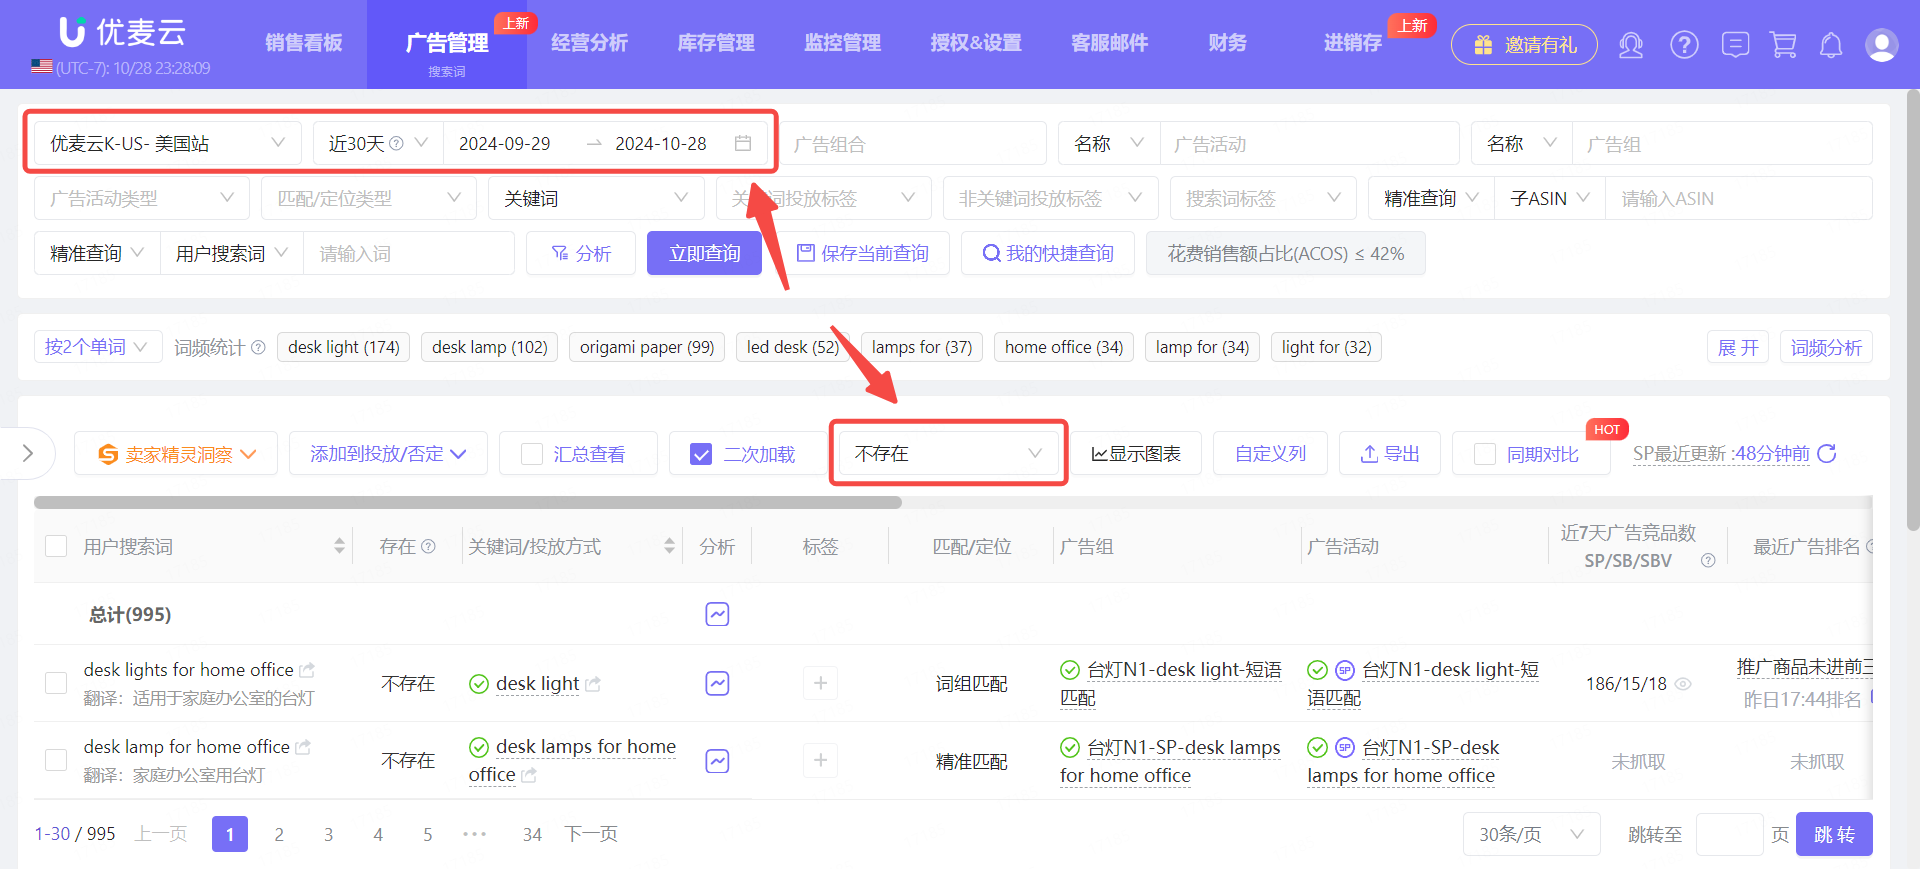
After filtering, click [Analyze] to further filter for higher quality search terms.
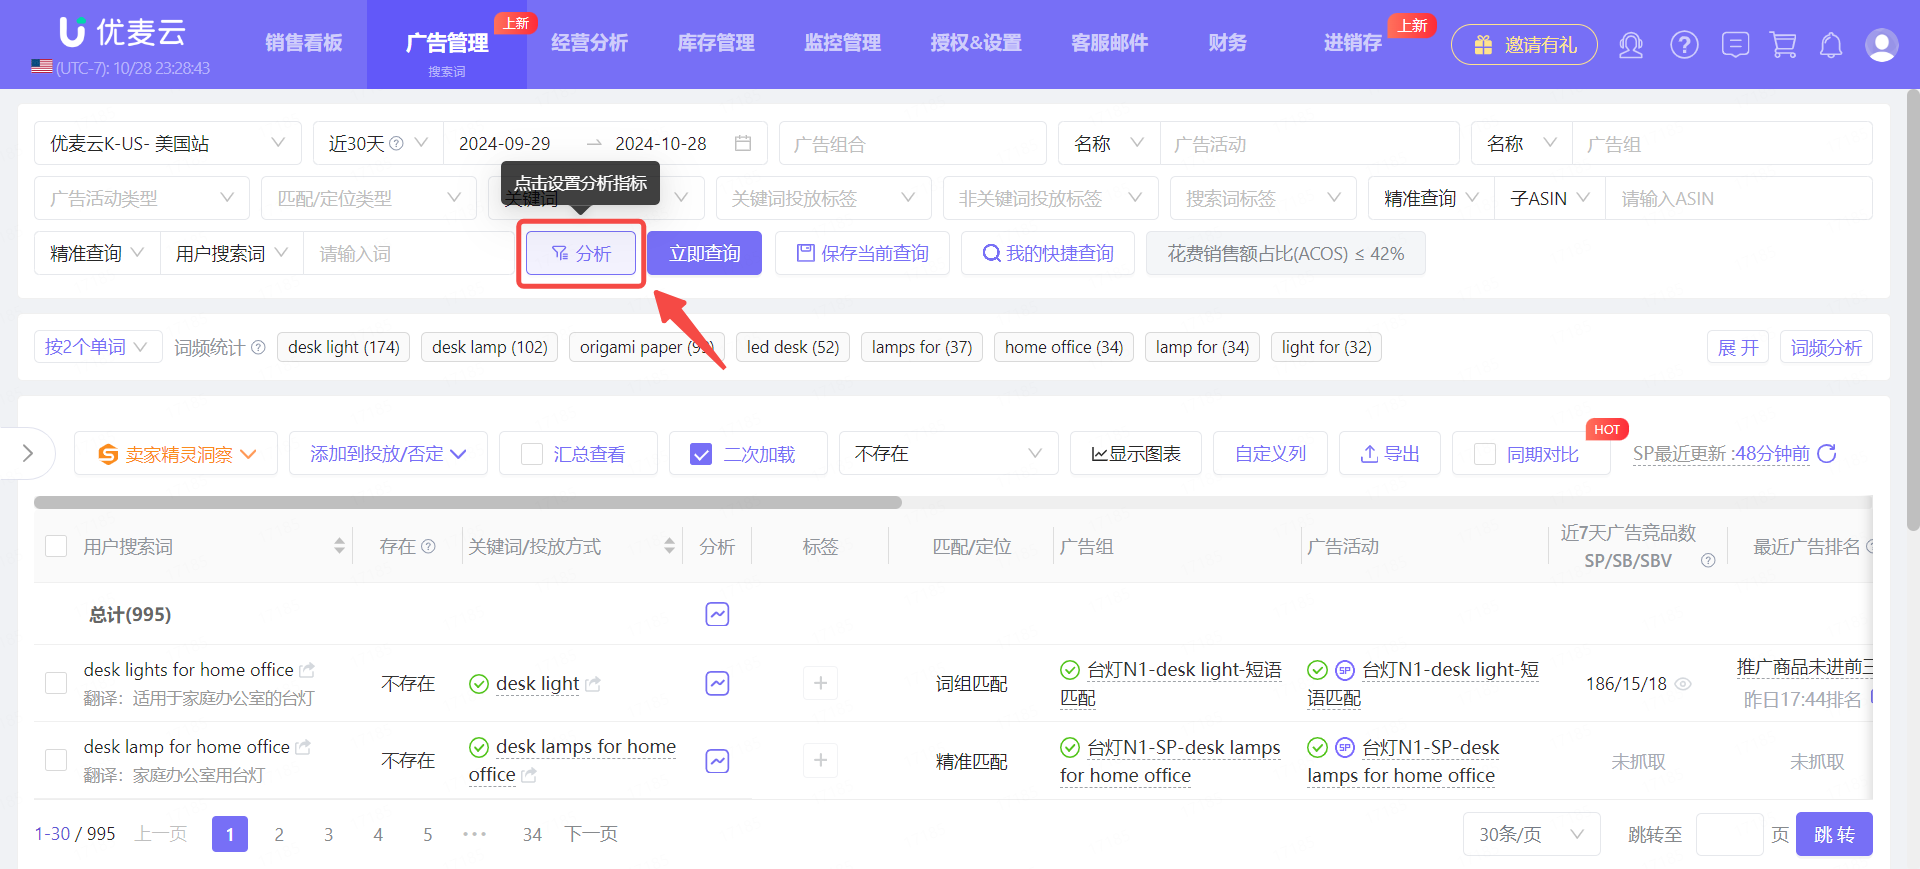
Enter the "Performance Metrics" page.
For this example, we roughly filter for search terms that have generated 2 or more orders and have an ACOS no higher than 35%.
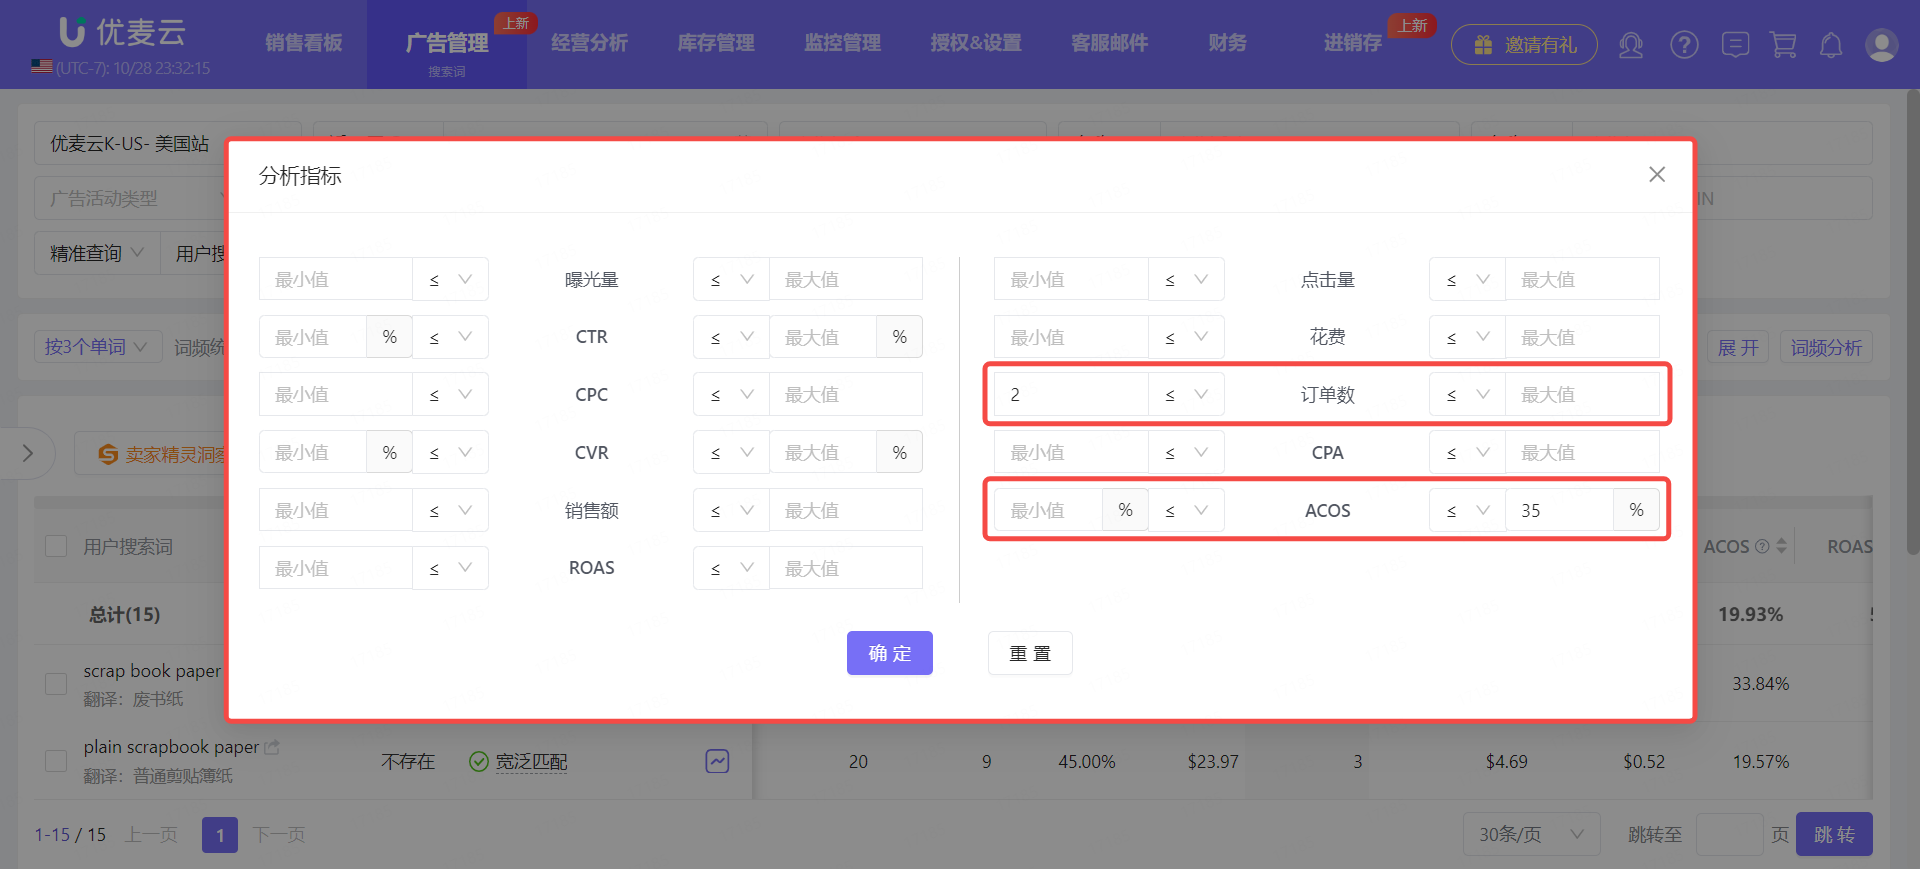
After confirming the performance metrics, the system automatically filters out the results we want.
Then, we can click "Orders" to sort in descending order to view the performance of the corresponding search terms and confirm which search terms can be used and advertised separately.
PS: The criteria for selecting search terms vary depending on individual sales goals. We need to determine the search terms to keep based on our own goals.
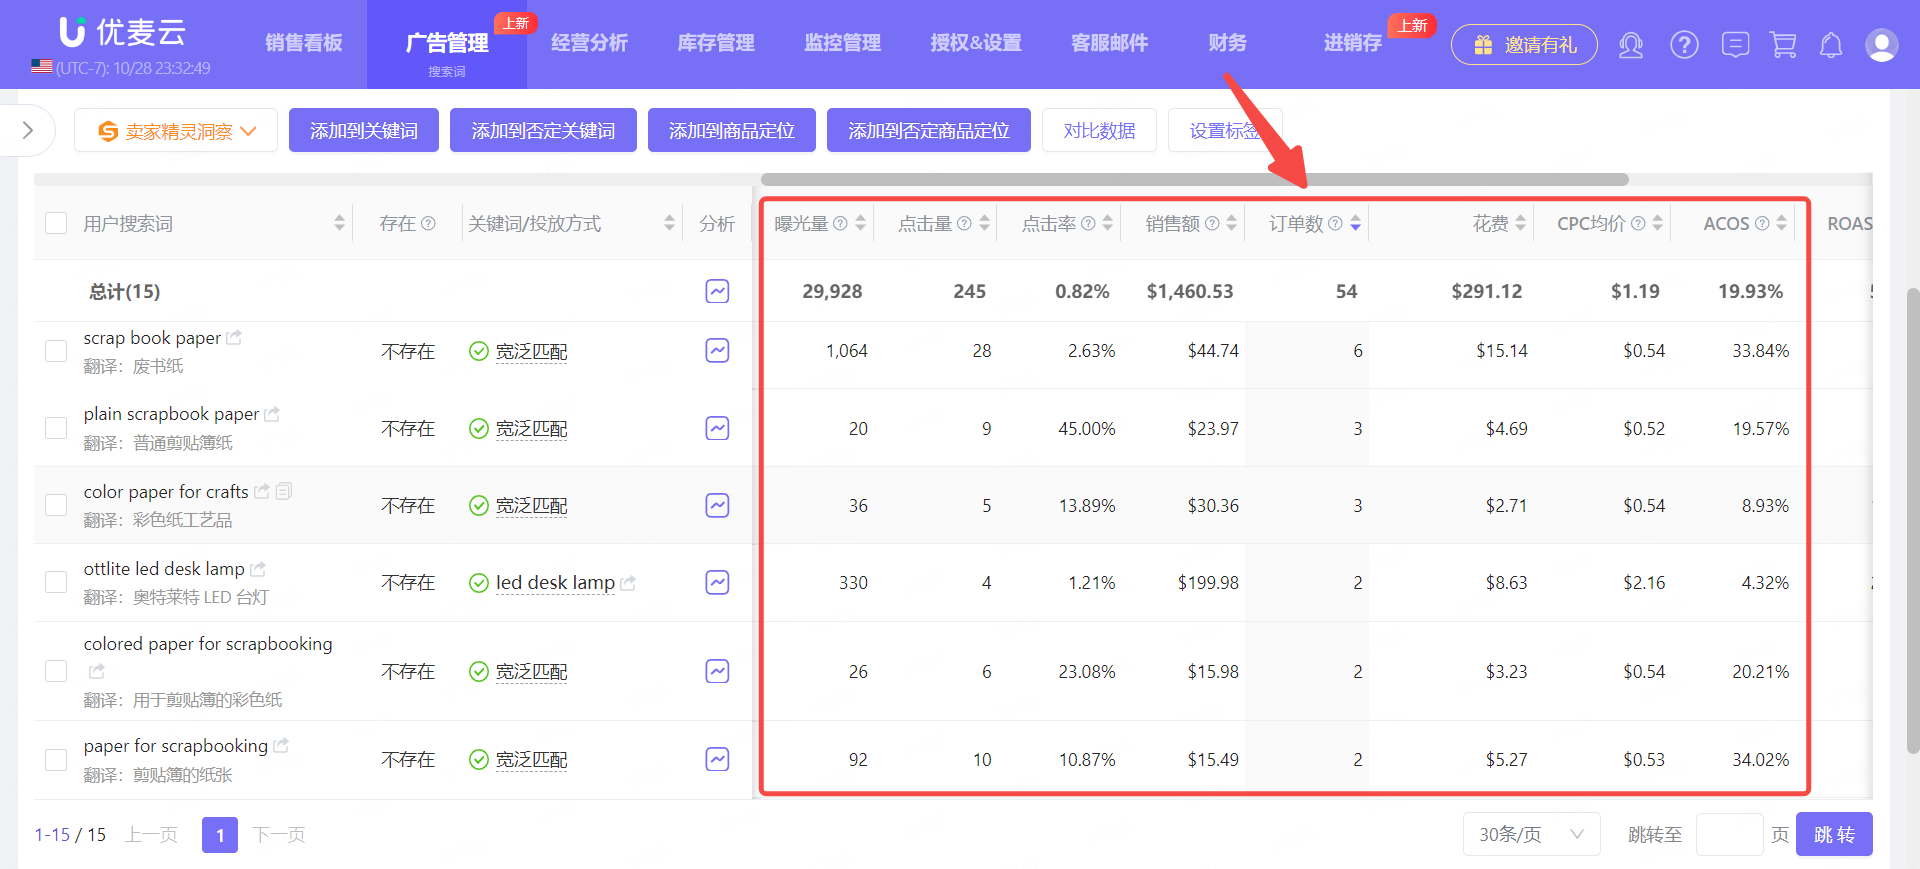
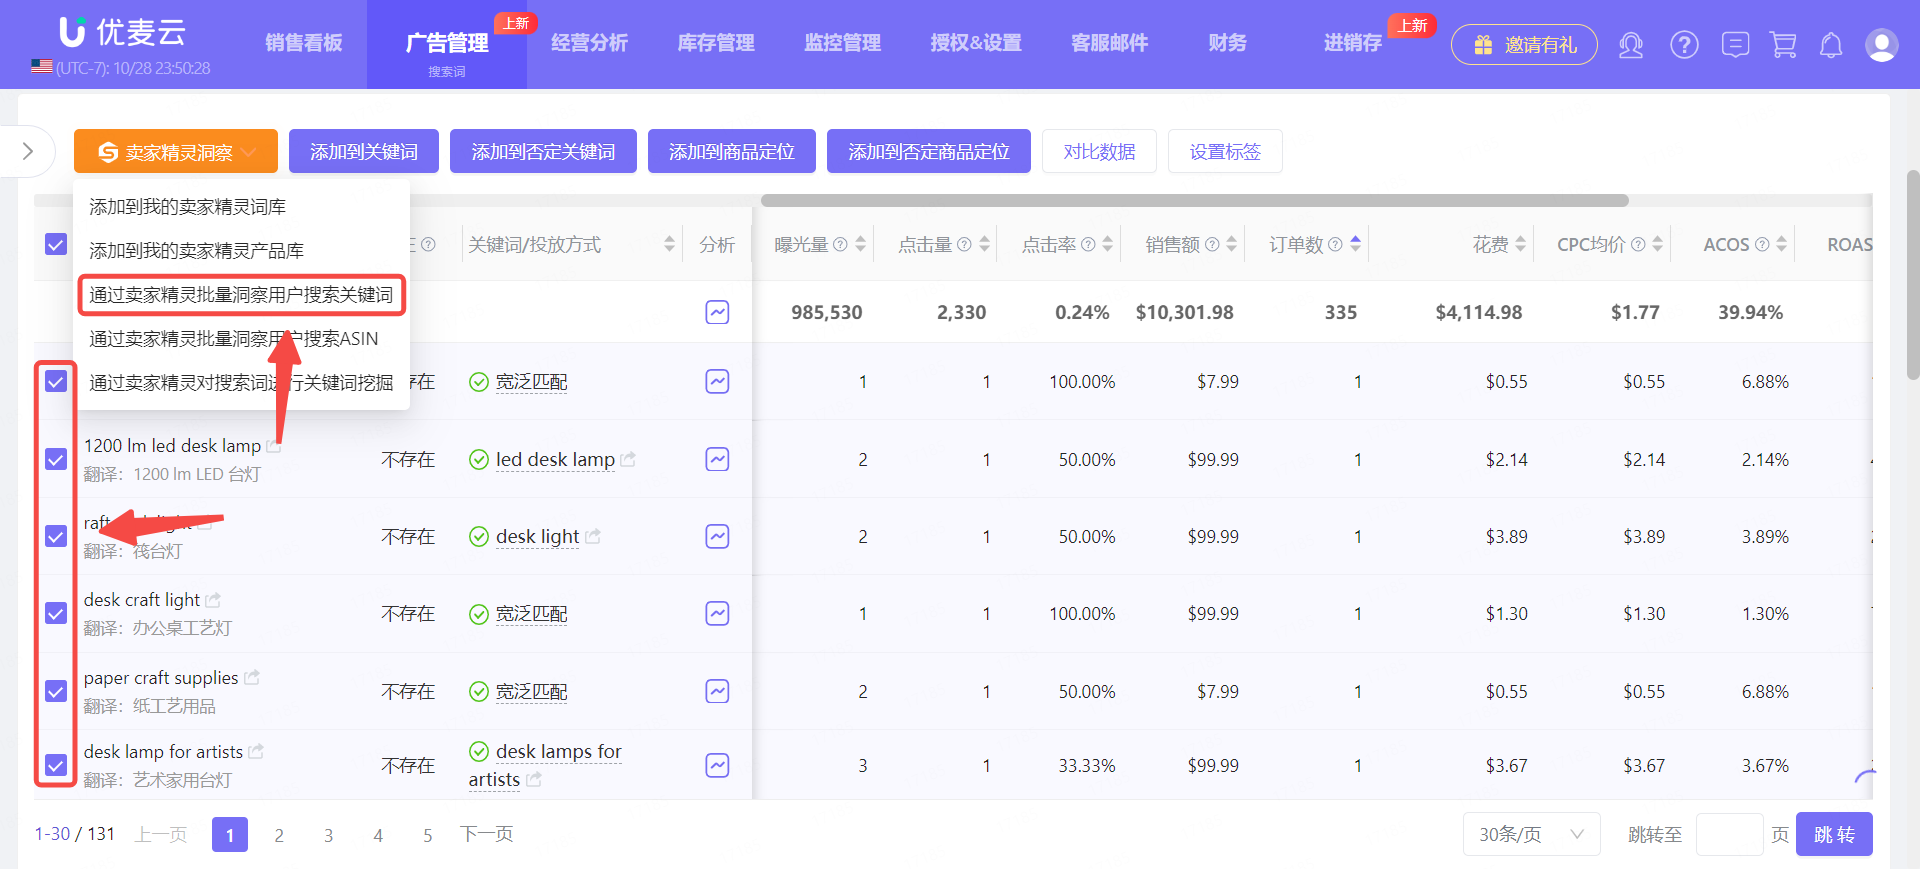
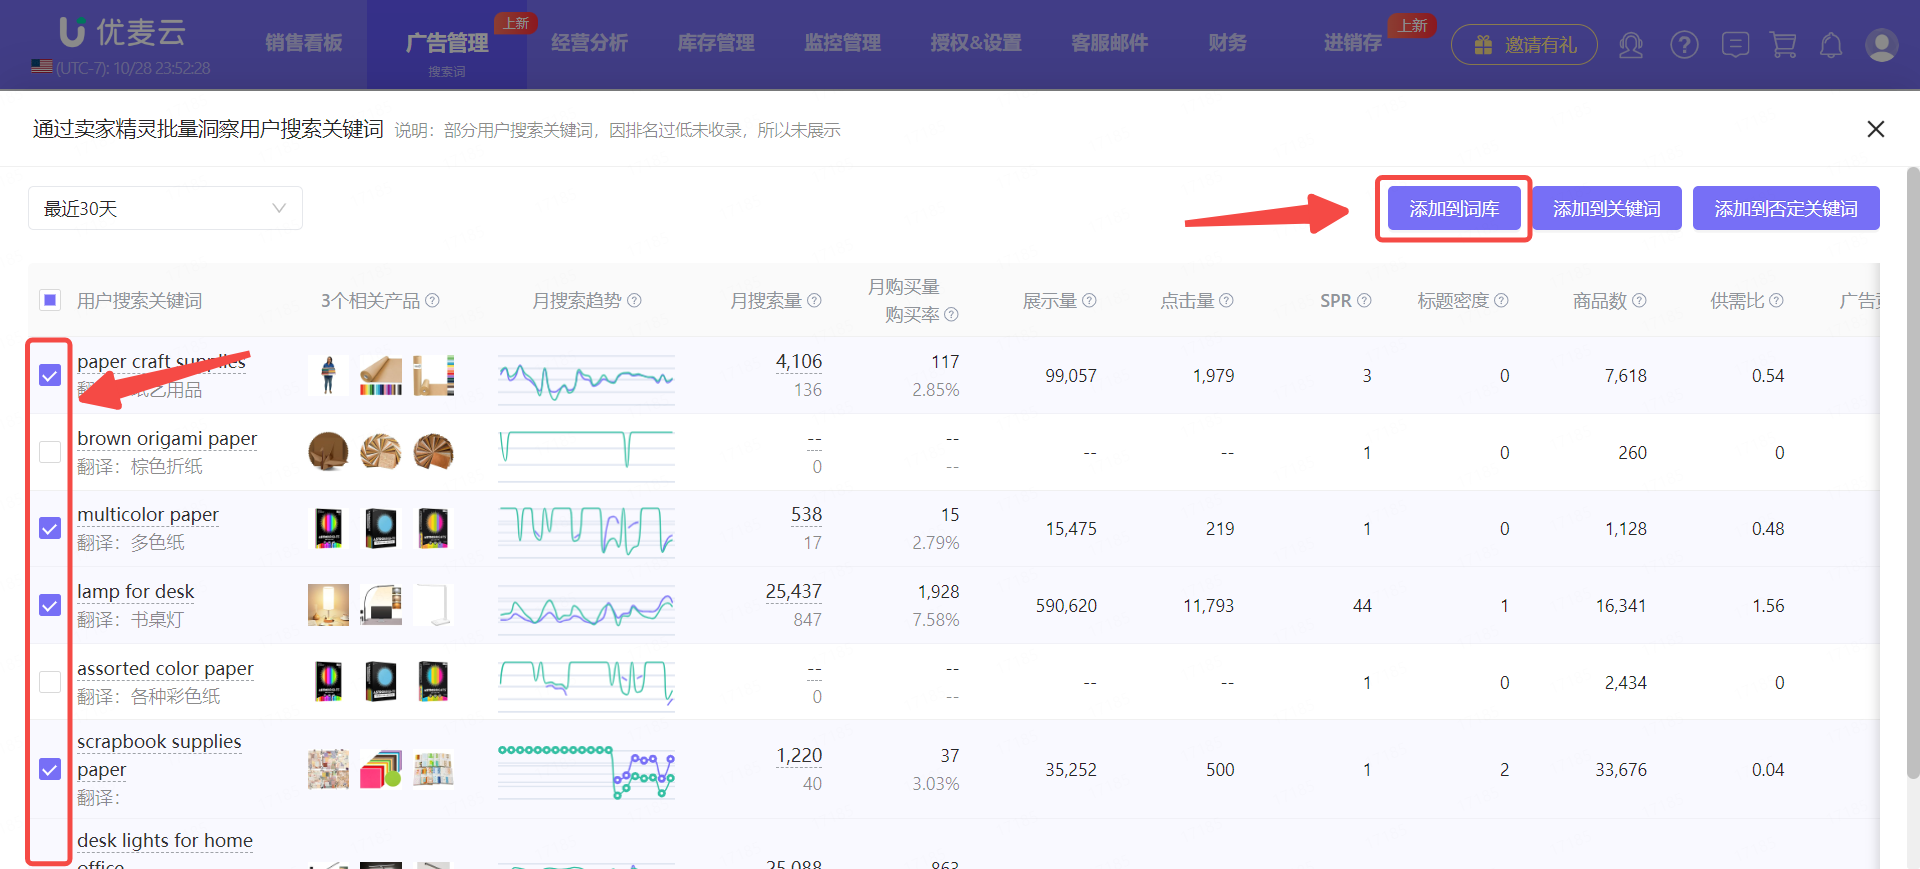
After we have confirmed the keywords that can be used,
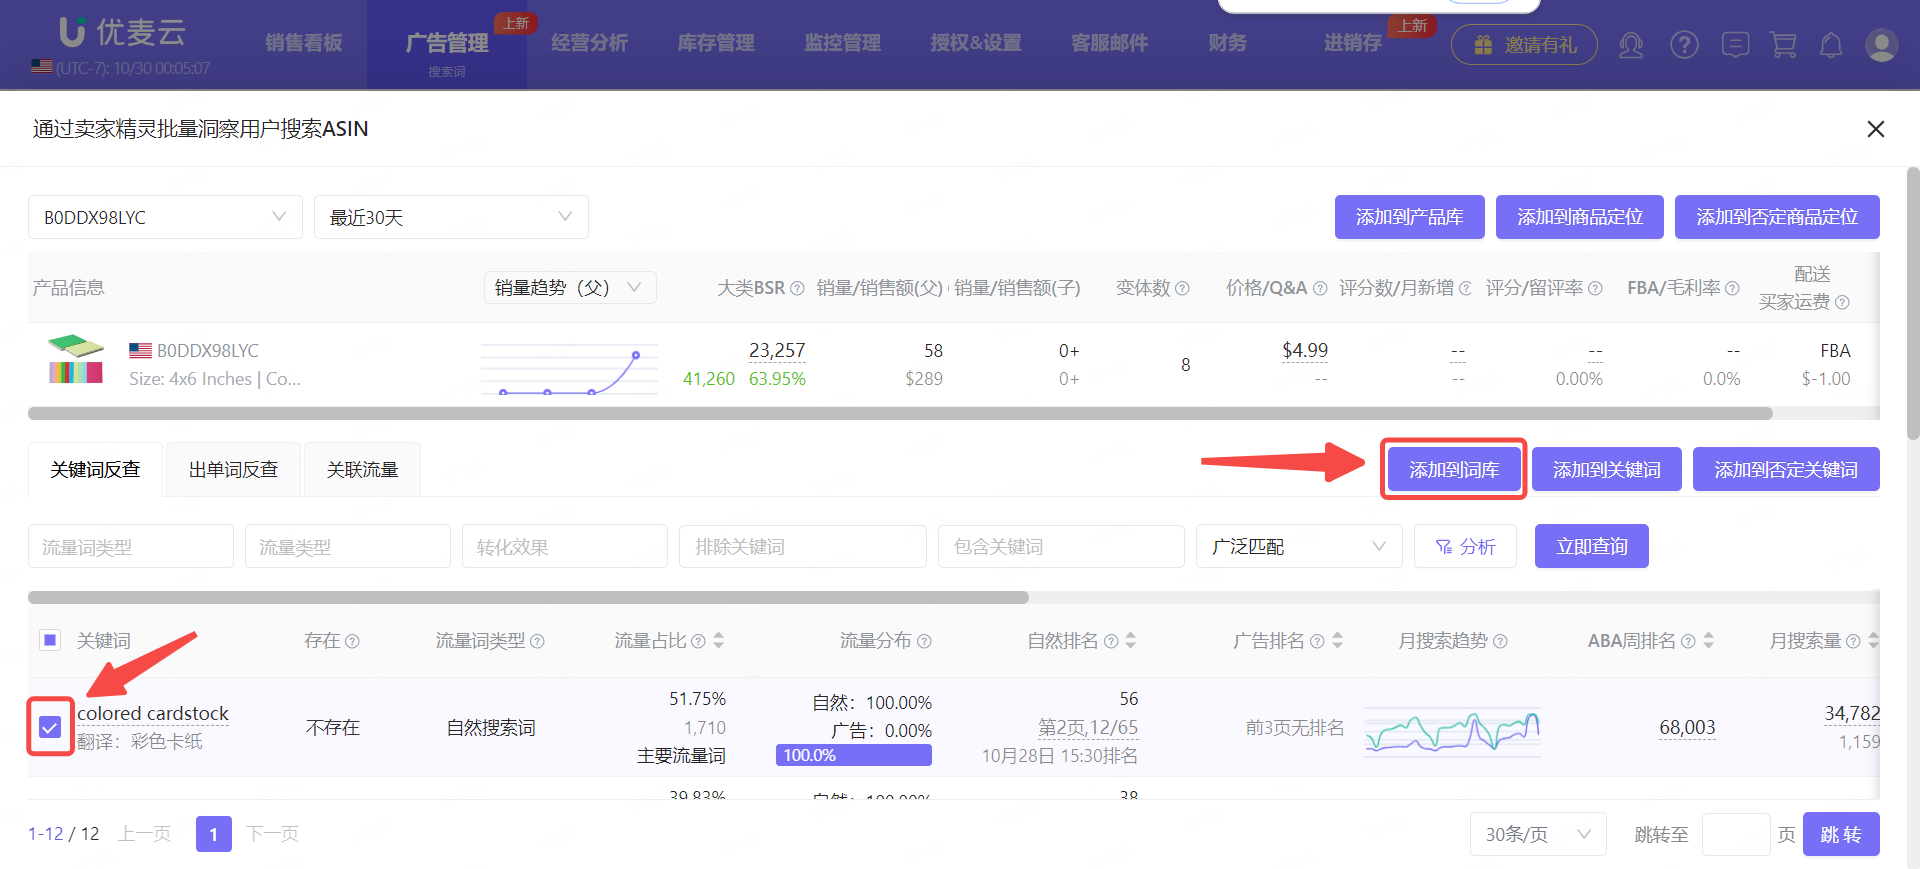
Check the corresponding keywords, click [SellerSprite Insight], and then click [Add to My SellerSprite Keyword List] to enter the adding operation page.

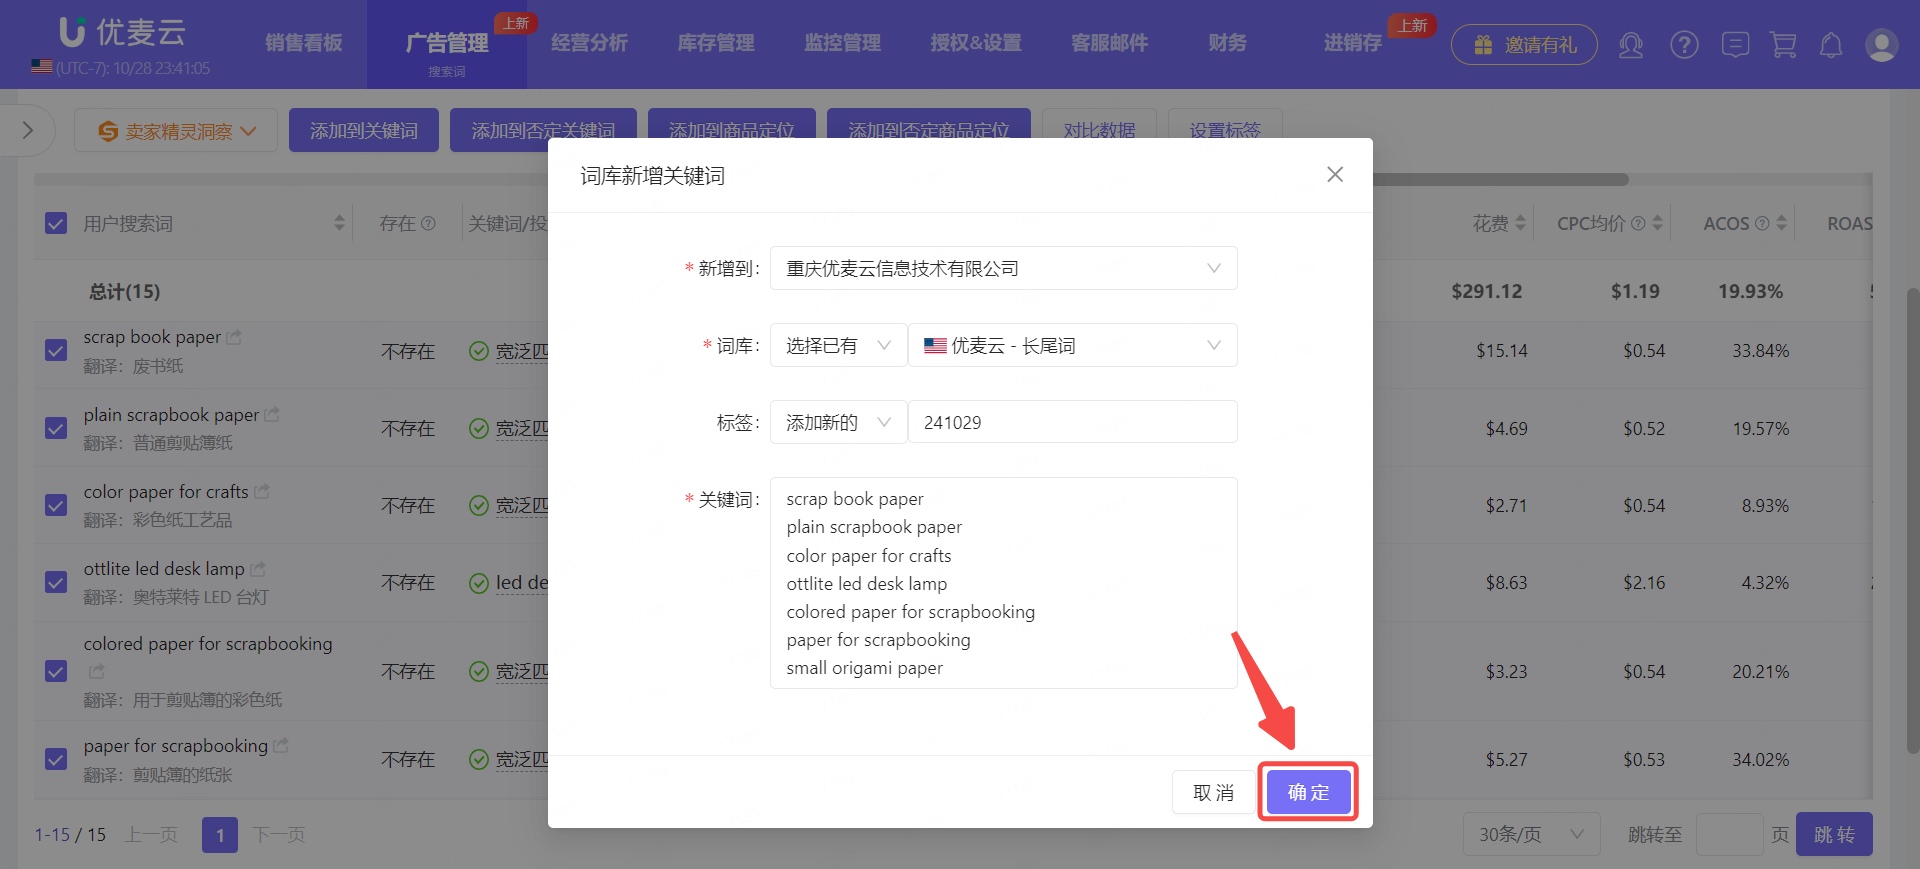
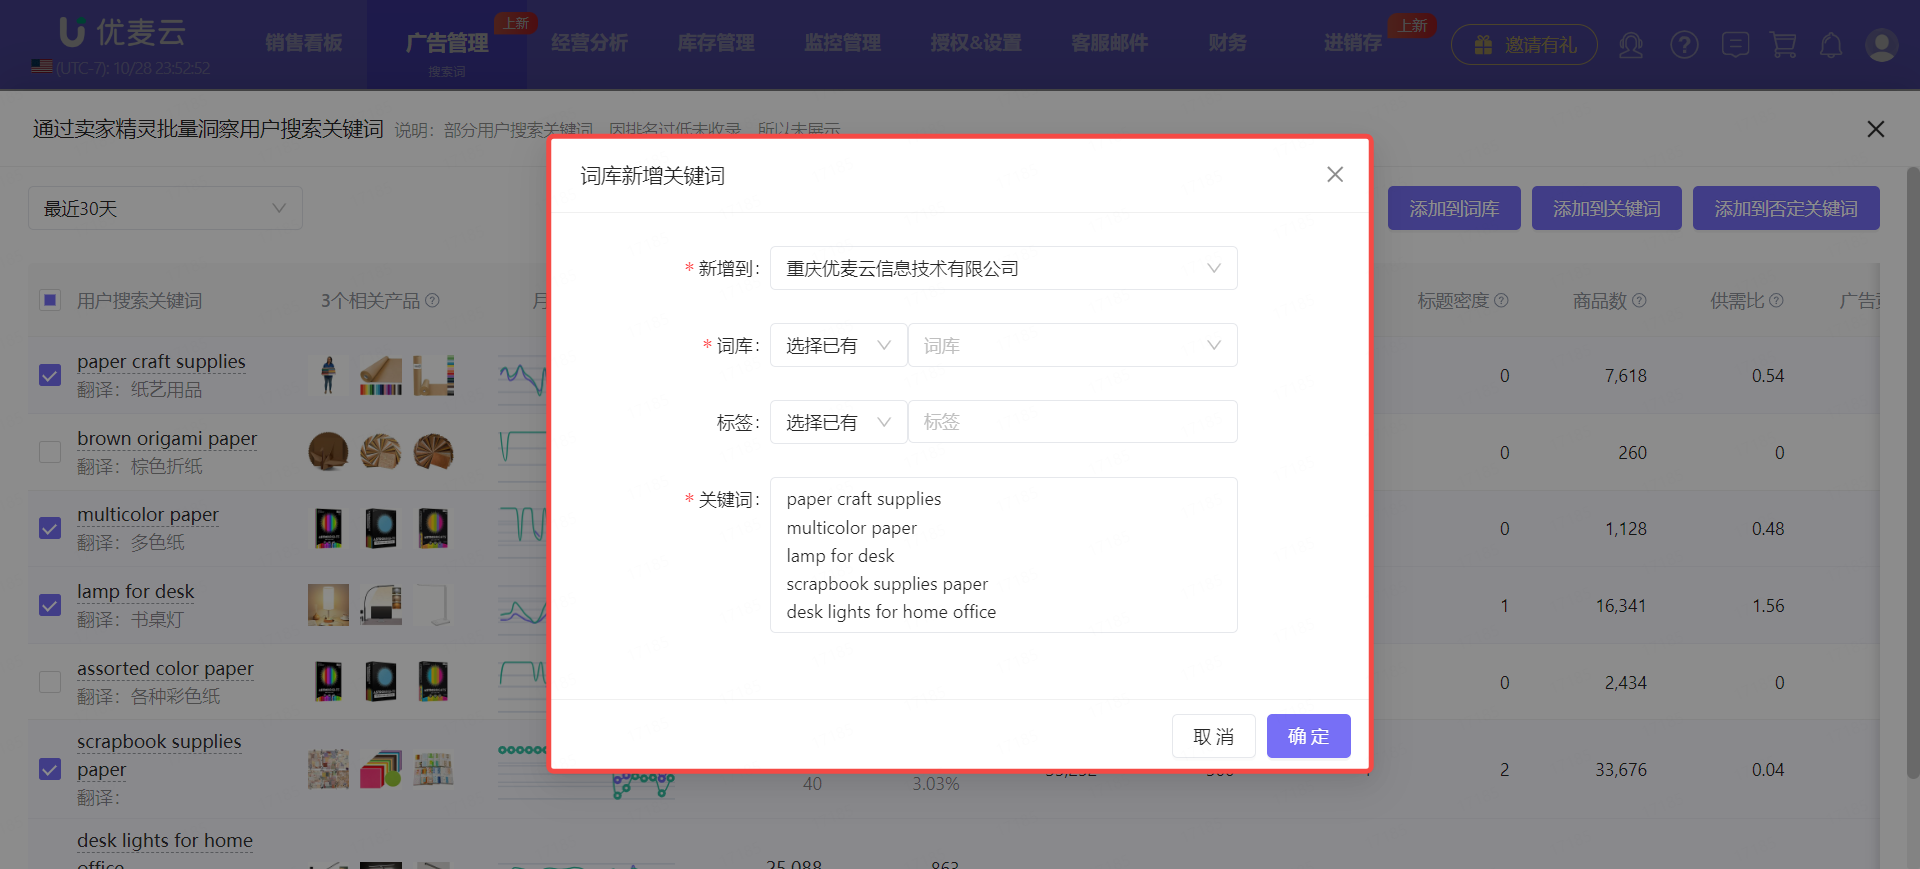
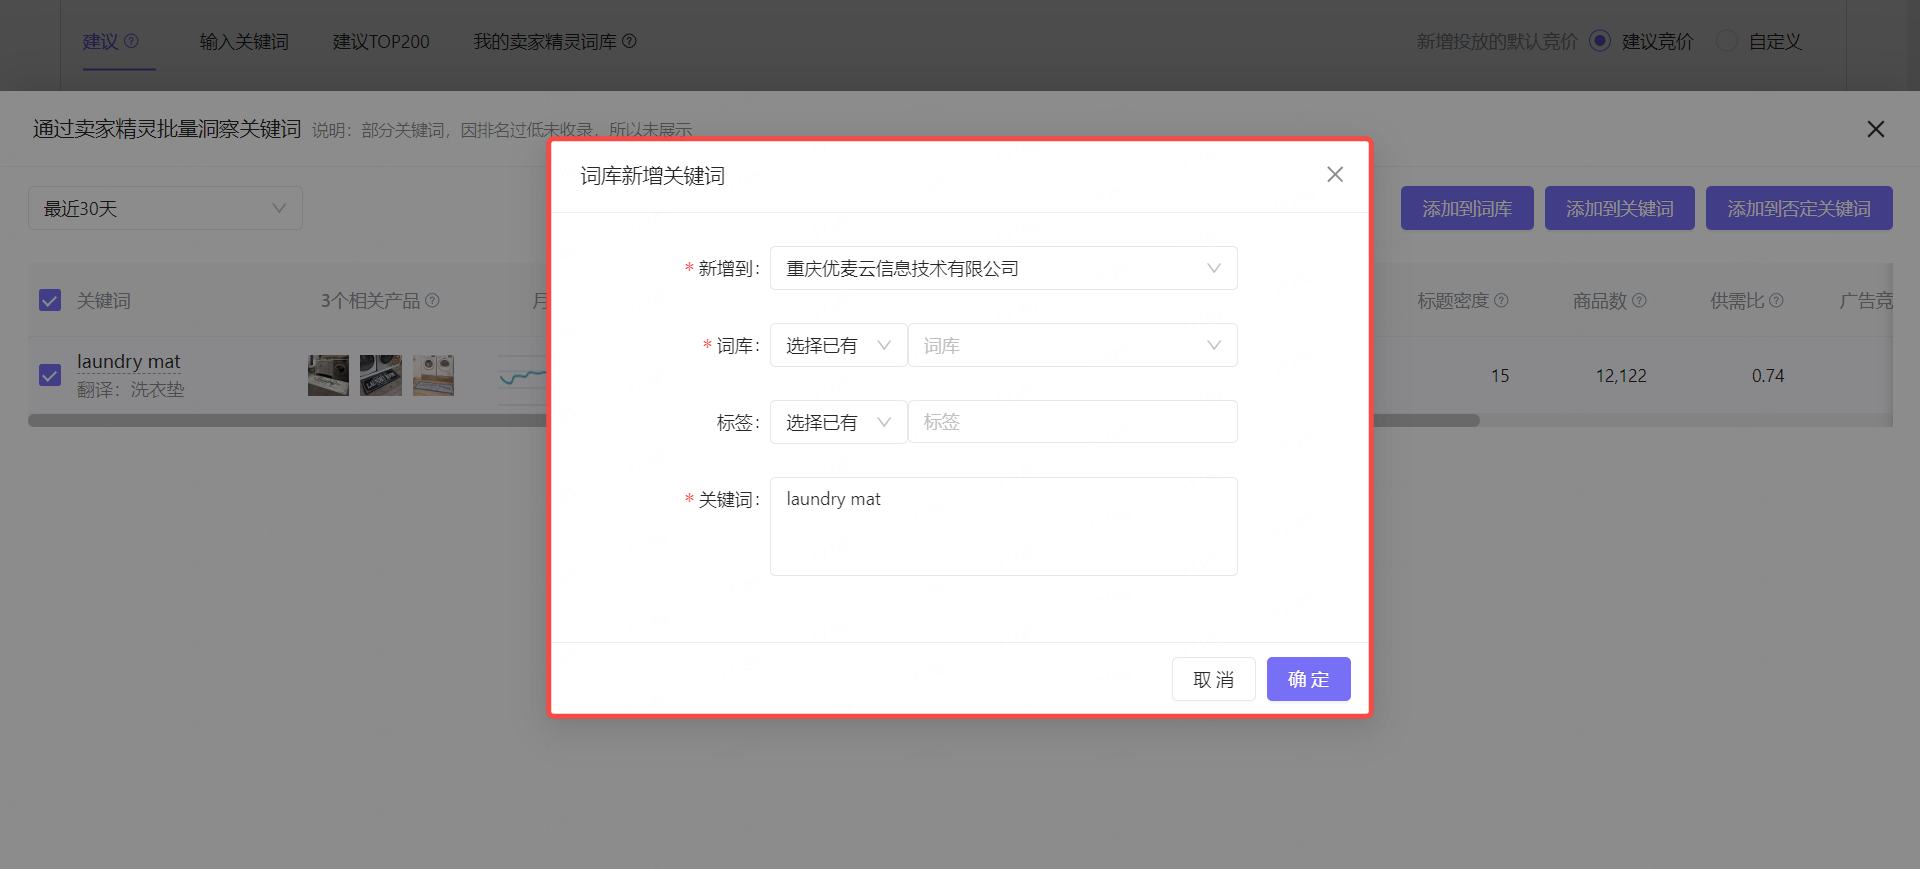
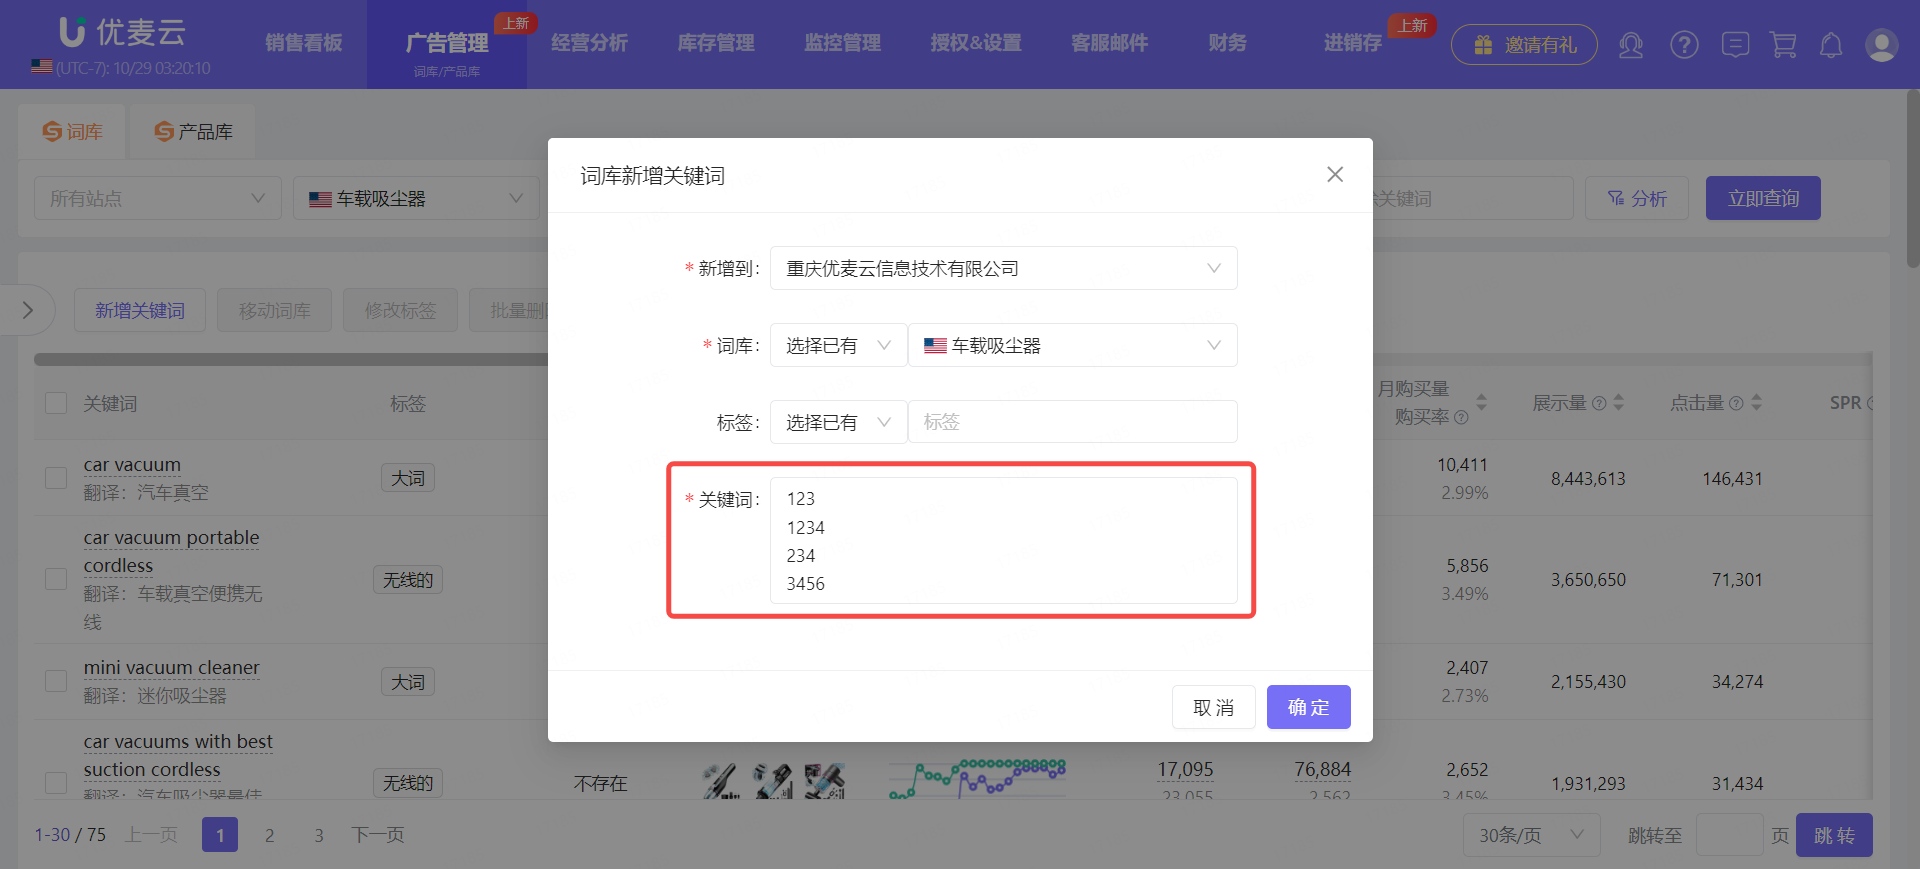
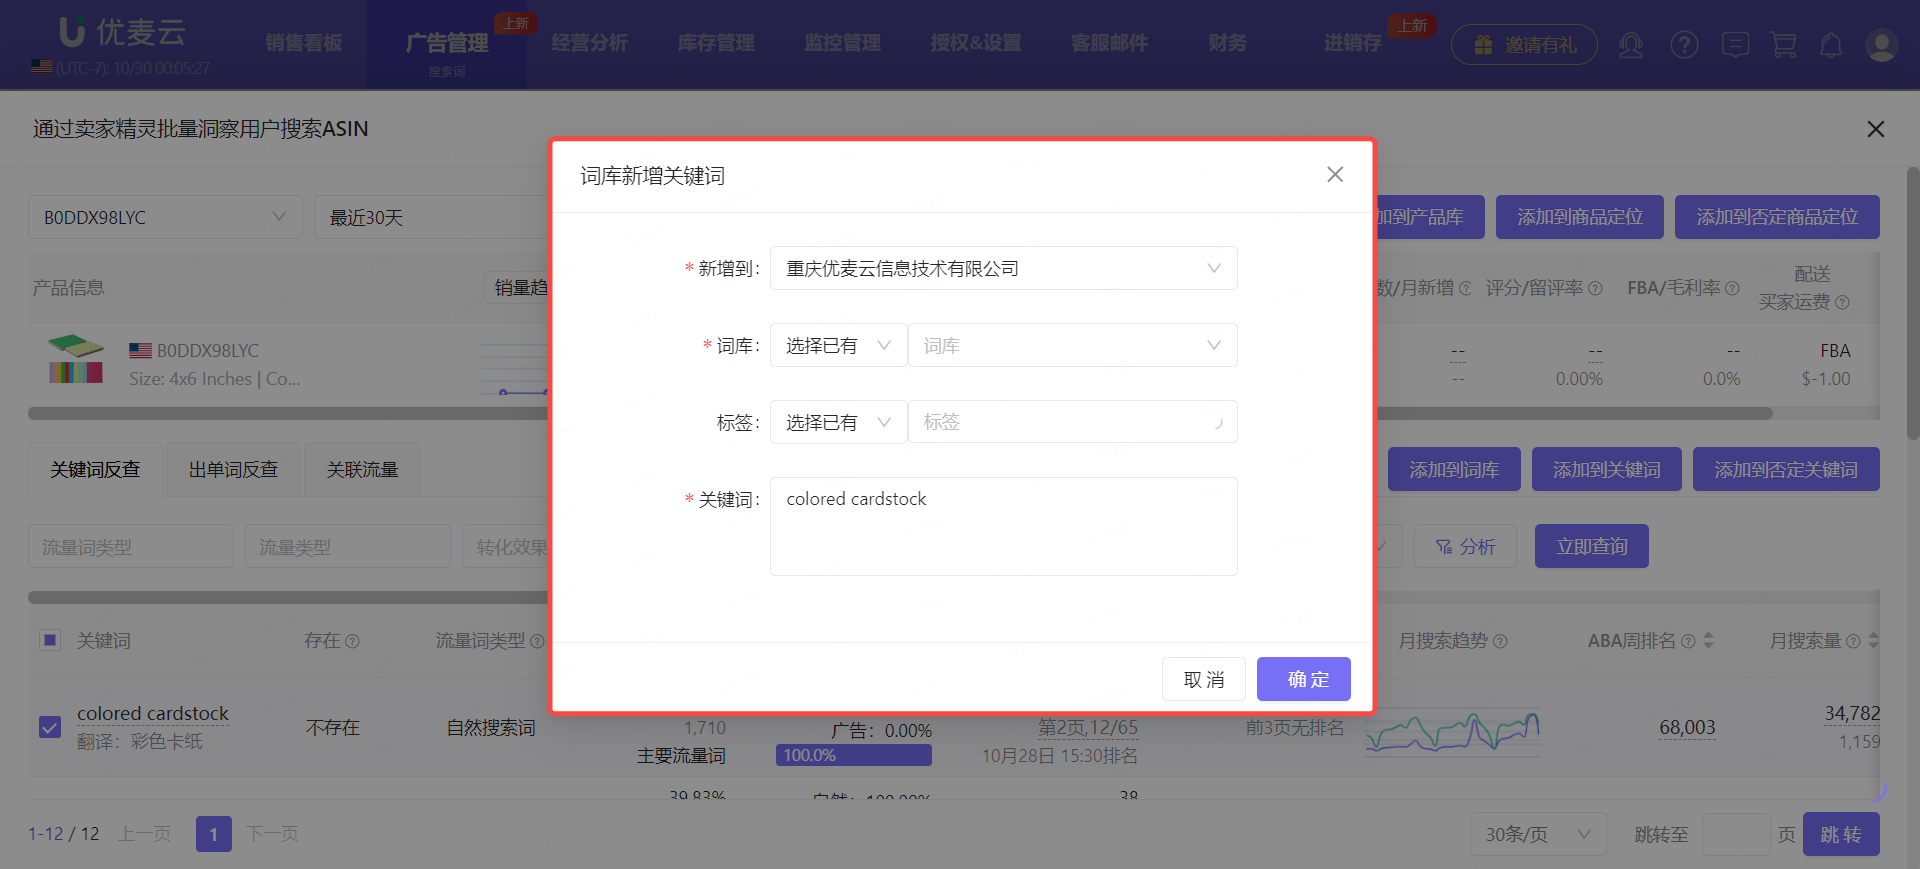
Enter the "Add Keywords to Keyword List" page.
First, we need to select which account to add to.
Why is there an account selection?
To use the integrated features of SellerSpace and SellerSprite, you need to bind the two accounts. One SellerSpace account can only be bound to one SellerSprite account.
However, both accounts have main and sub-accounts. When a SellerSprite sub-account is bound to a SellerSpace sub-account, and the main account to which the SellerSpace sub-account belongs agrees to let it view the SellerSprite main account information, then the sub-account on the SellerSpace side has the permissions of 2 accounts. Therefore, there will be an account selection here.
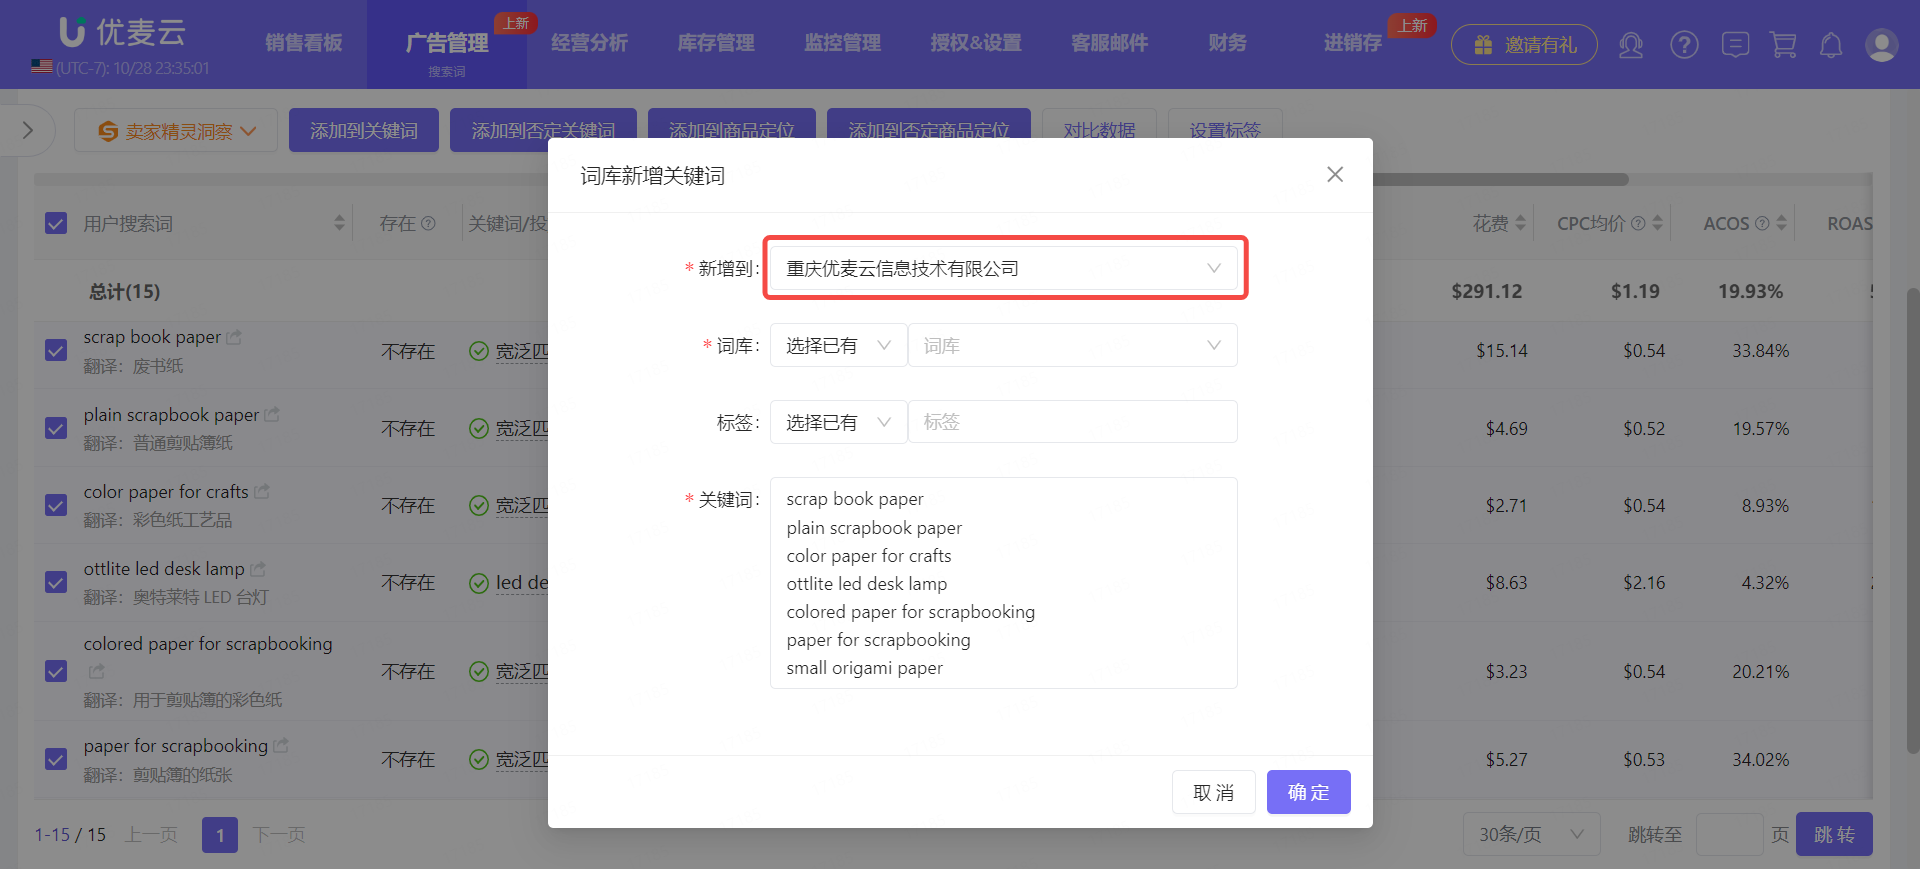
Next, we select which Keyword List to add to.
For Keyword List selection, you can directly select an existing Keyword List, or directly create a new Keyword List and add to it.
According to our needs, we have already created a long-tail keyword list, so we directly add to the existing Keyword List: SellerSpace - Long-tail Keywords.

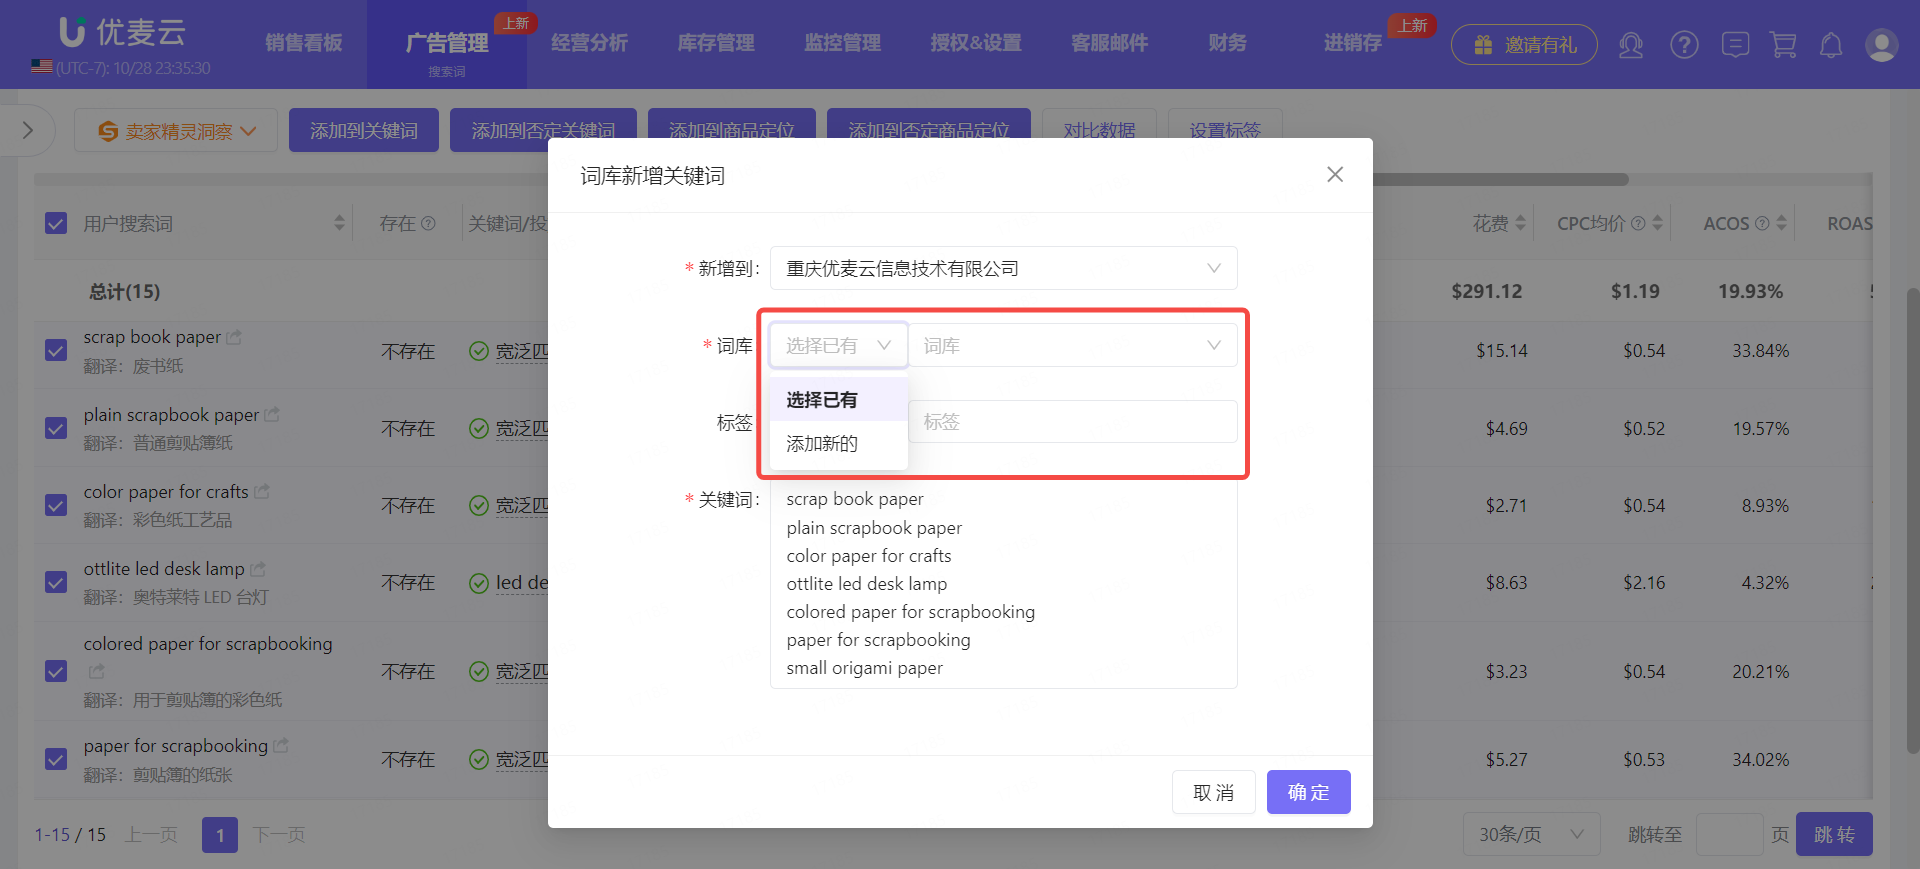
Then, select to add tags. This is optional.
Adding tags to keywords is a classification management operation, which is convenient for our subsequent analysis and advertising. Sellers in need can choose to use it.
Similar to the "Keyword List" settings, we can select existing tags or add a new tag to set.

Finally, confirm the keywords we are adding.
The system will automatically fill in the keywords we checked. We can also manually delete and add other keywords again.
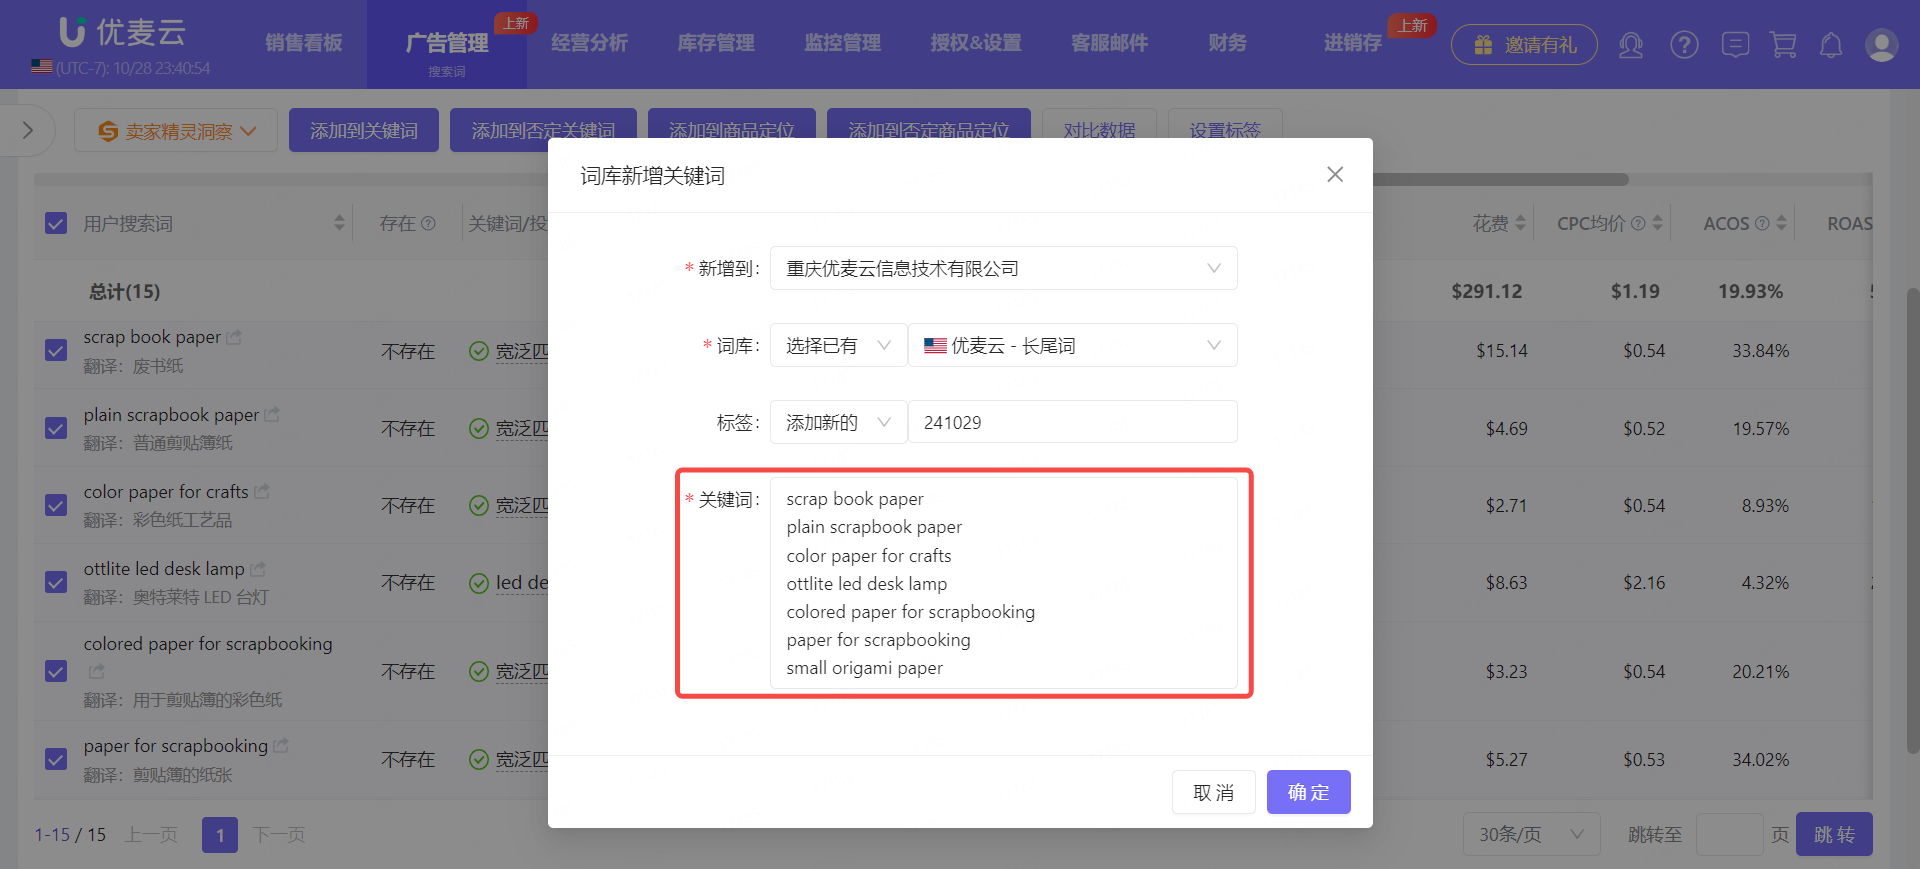
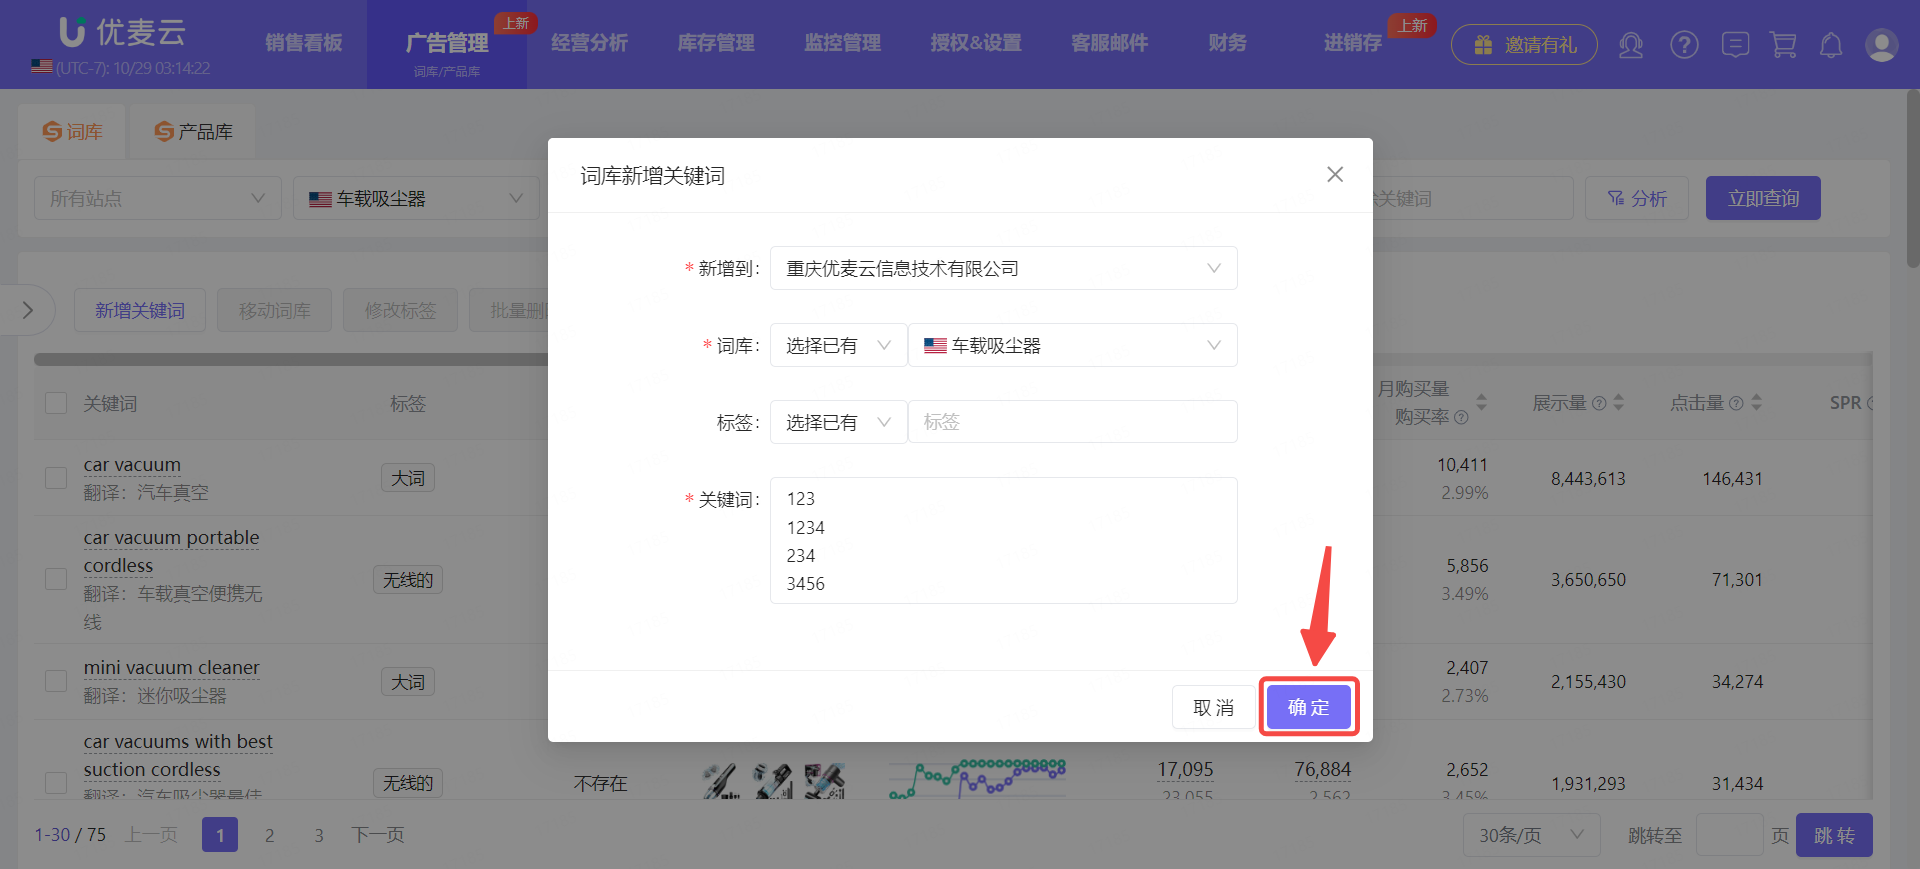
After confirming that all information is correct, click [Confirm] to complete the addition.
SellerSprite Insight and Keyword List
In the Search Term Report, there are always some keywords that look potentially useful but are not quite certain, such as: 2 impressions, 1 order. How should we choose these keywords?
At this time, we can use another integrated feature of SellerSpace and SellerSprite: SellerSprite Insight, to help judge and then categorize them into our Keyword List.
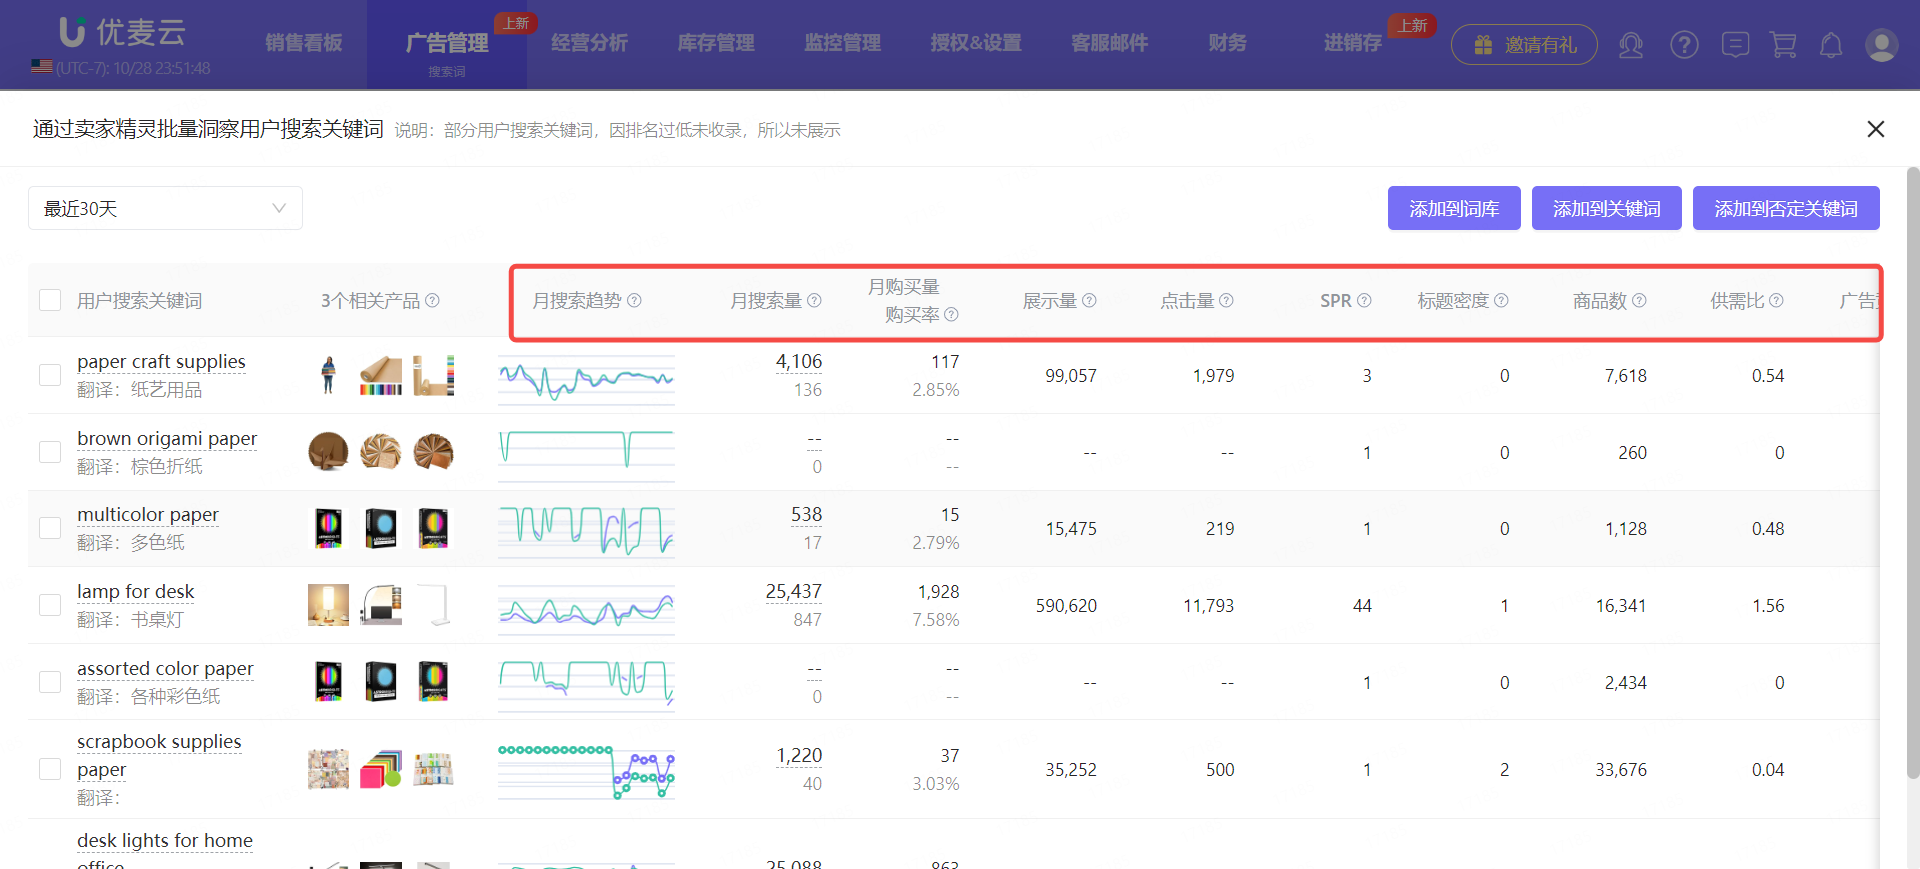
Through the "Search Terms" filter conditions, find search terms with 1 order and not very high impressions and clicks, and judge by the meaning of the word whether it is related to our product and whether the relevance is high enough.
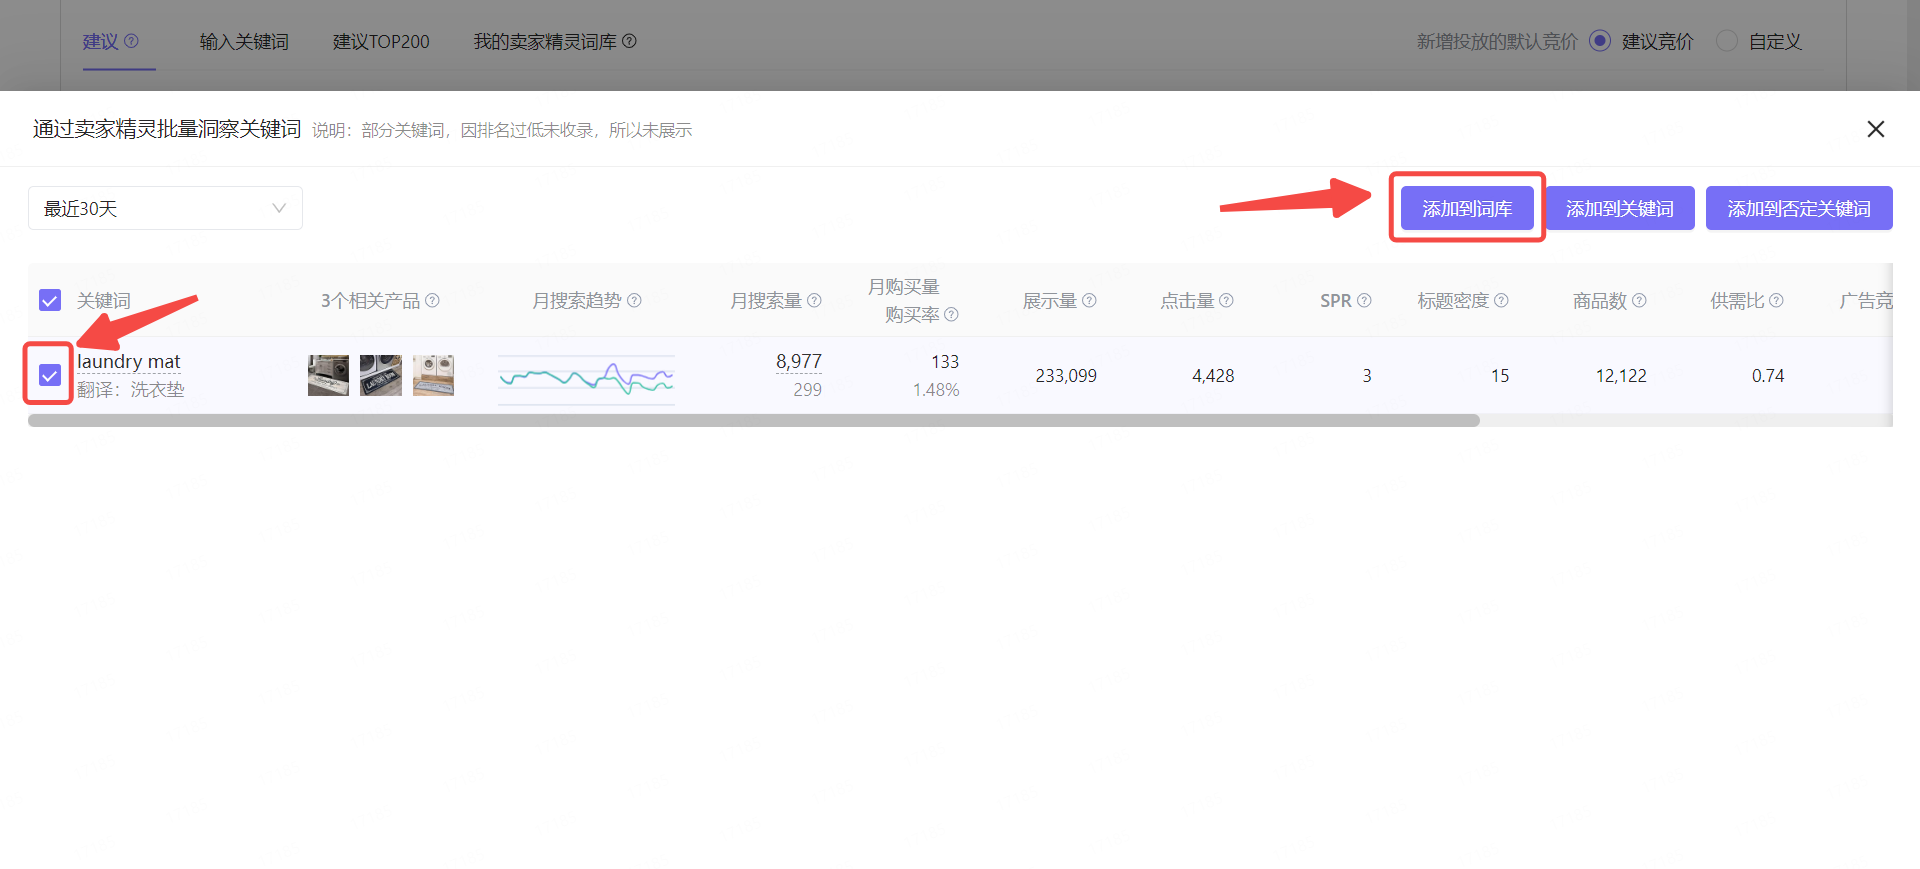
Then, check the search terms we selected, click [SellerSprite Insight], and then select [Batch Insight User Search Keywords via SellerSprite] to analyze the market performance of these keywords on Amazon to see if there is market potential and whether it is worth trying to advertise.
Through SellerSprite Insight, analyze the market data of search terms, such as: Monthly Search Volume, Impression Share, SPR (Sponsored Product Rank), Click Concentration, etc., to understand whether the search term is still "profitable".
Finally, based on our judgment, check the corresponding search terms, click [Add to Keyword List], and categorize them.
The subsequent operation steps are the same as directly adding search terms to the Keyword List.
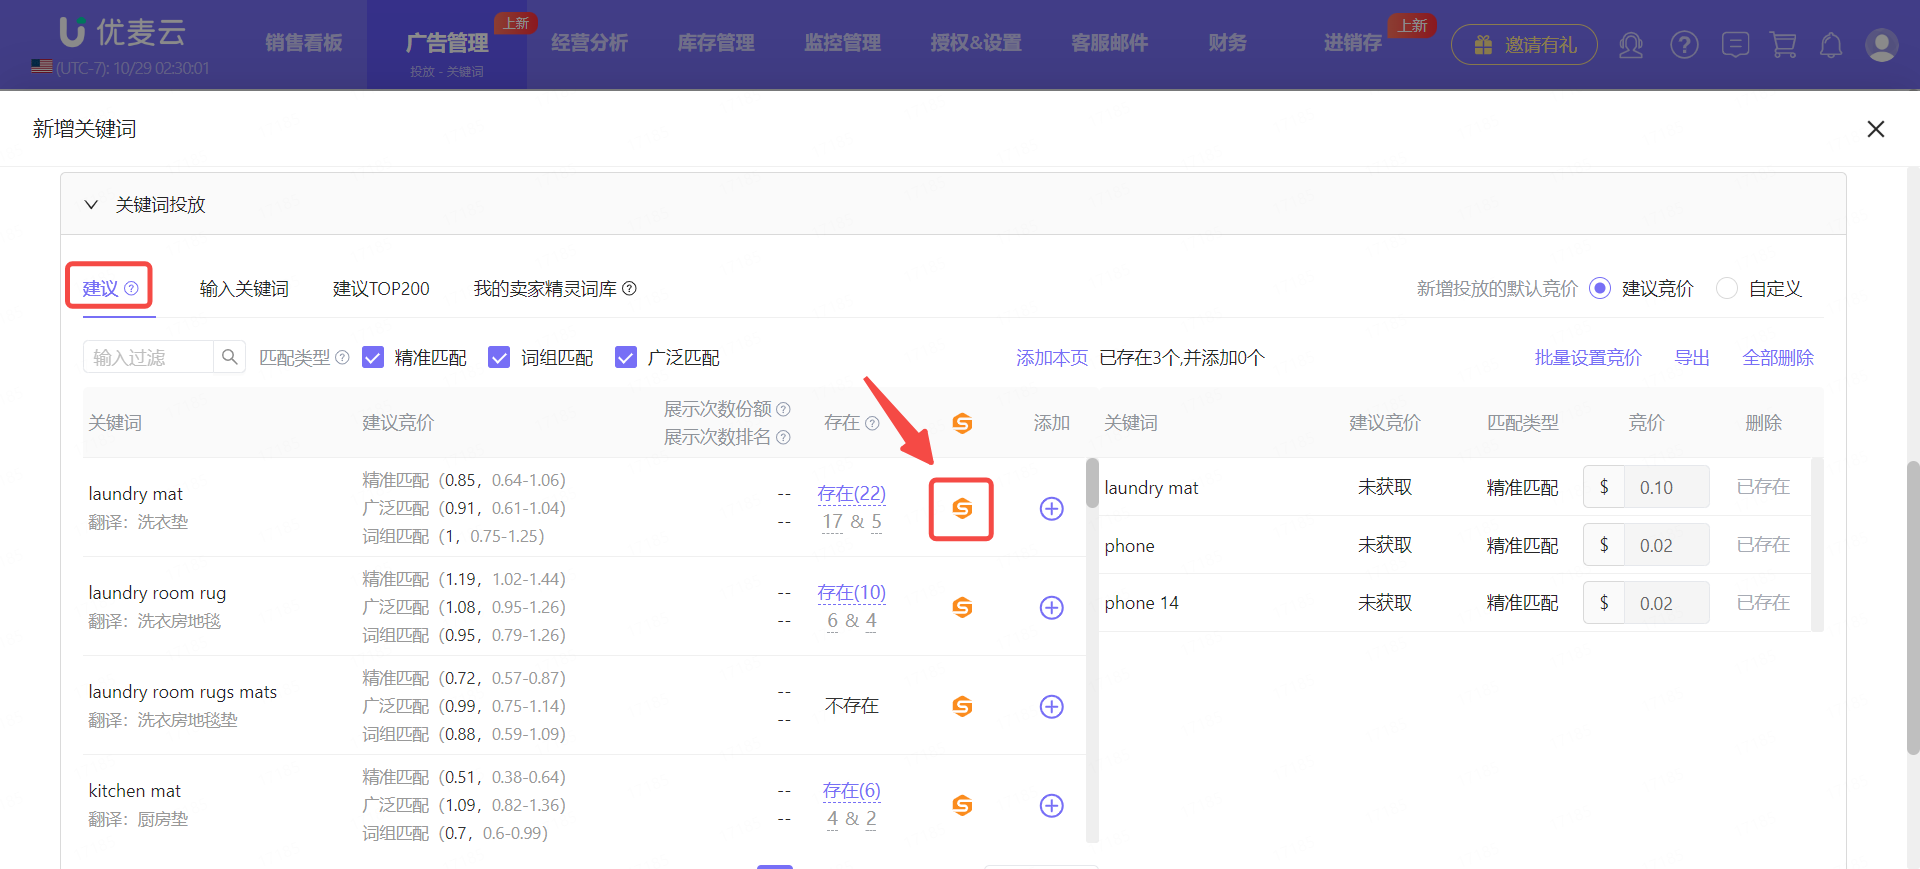
② Adding "Amazon Suggested Keywords"
Amazon Suggested Keywords are related keywords recommended by the Amazon system based on the description of our Listing. We can dig out some high-quality keywords that can be used from them. The more accurate the Listing keyword embedding, the better the recommended keywords.
When we add new keywords for advertising, we can find keywords to advertise in Amazon Suggested Keywords, or add them to our Keyword List for unified management and utilization after finding them. All new keyword adding operation pages are applicable.
The operation method is as follows:
Go to the "Advertising - Keywords" feature and click [Add Keywords] to enter the page for adding advertising keywords.
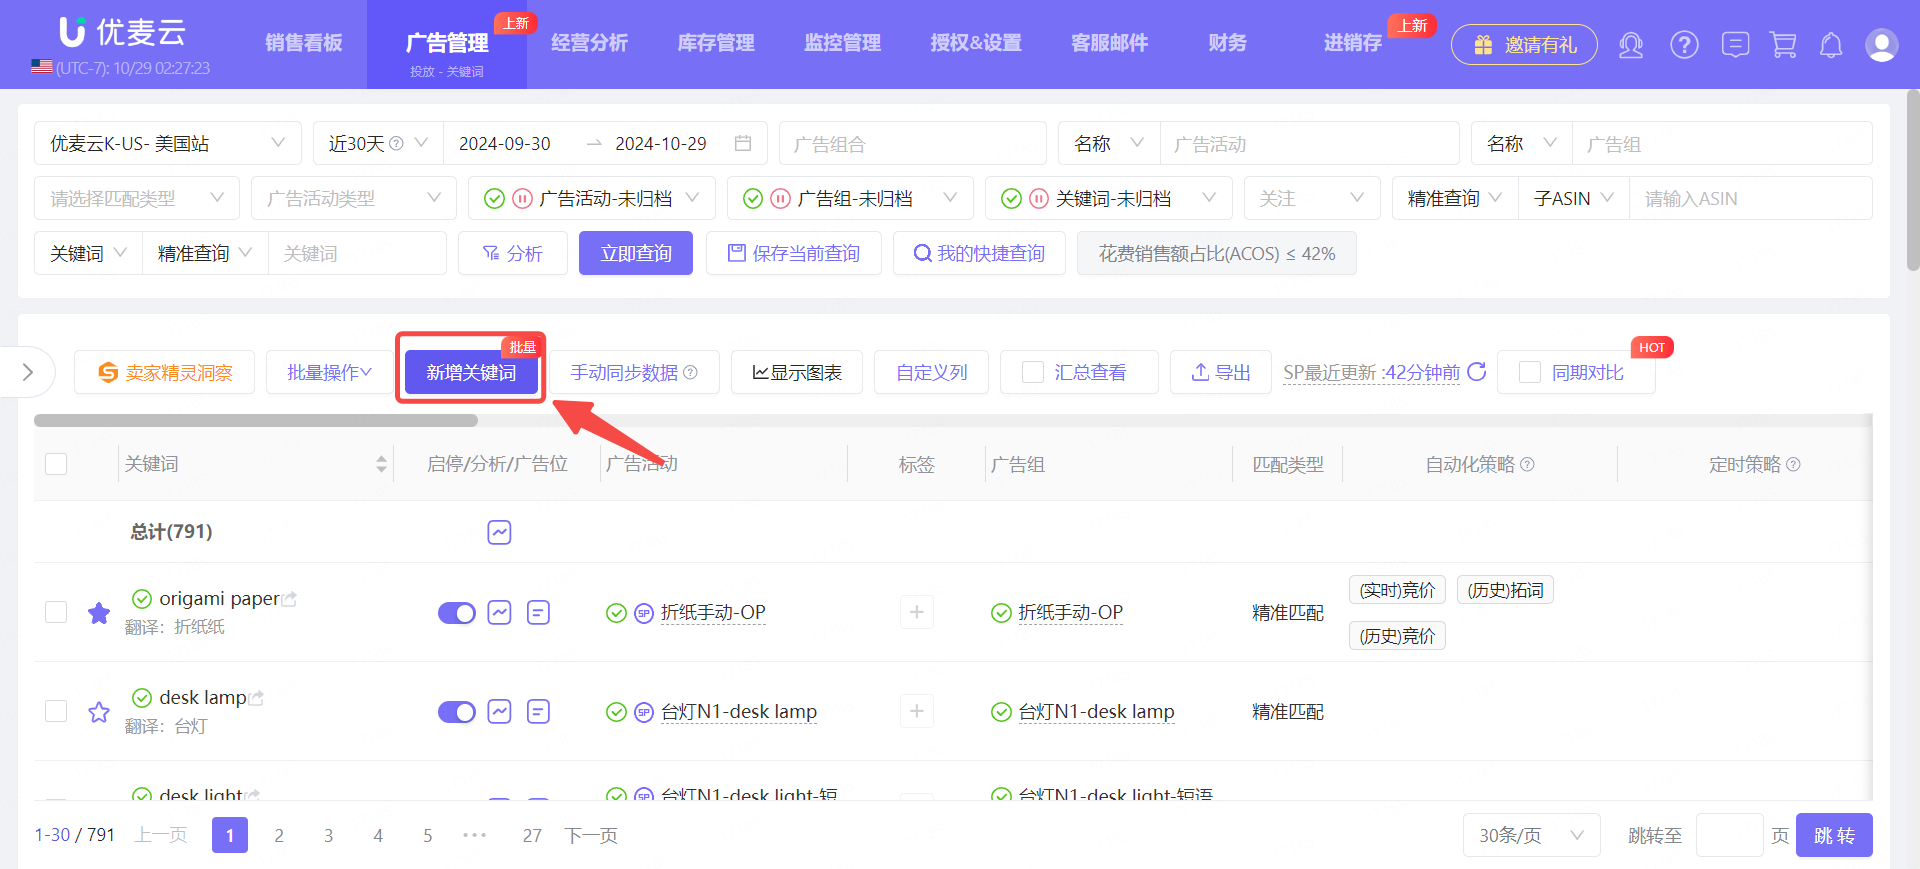
Enter the "Add Keywords" page.
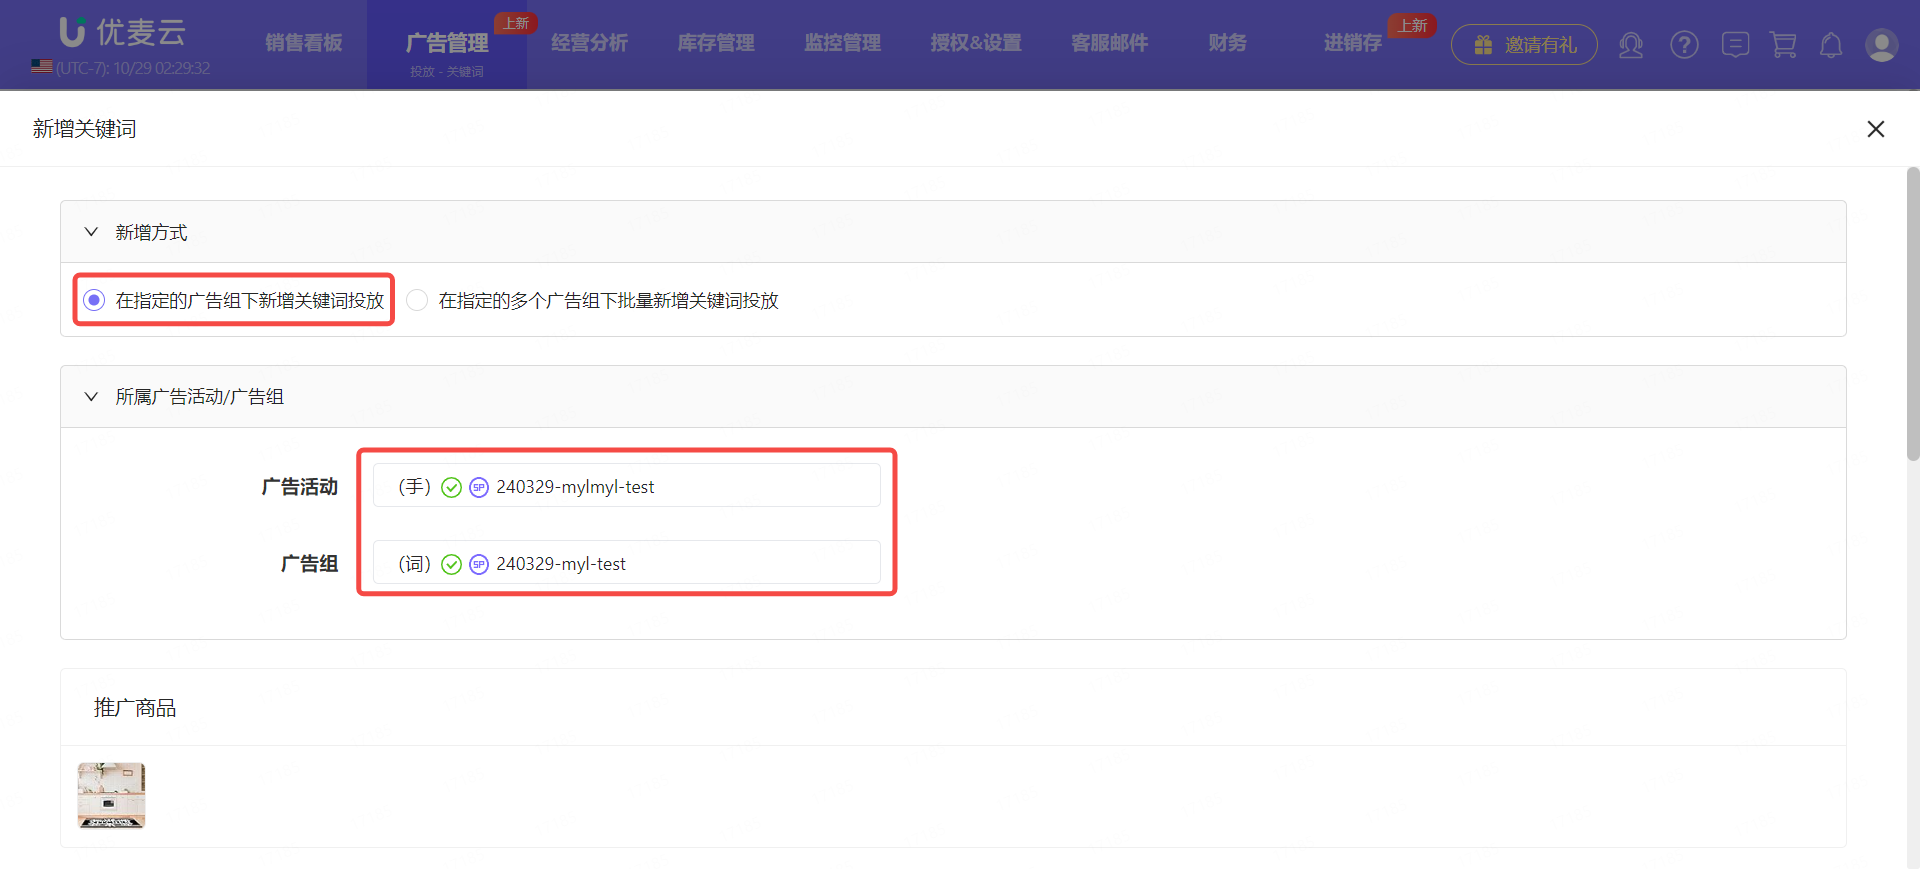
Select [Add keyword targeting under the specified Ad Group], and then select the corresponding Ad Campaign and Ad Group. After selection, the corresponding targeting operation items will be automatically displayed.
Find the "Keyword Targeting" setting item and select [Suggested] to see Amazon's suggested keywords.
We can briefly analyze the performance of the keyword through existing data, such as Impression Share and Rank, Amazon Suggested Bid, and Whether it exists in Ads, or further analyze the market performance of the keyword through SellerSprite Insight to help us judge whether it can be used.
Click the SellerSprite icon on the right side of the suggested keyword to enter the SellerSprite Insight data page.
Enter the "Batch Insight Keywords via SellerSprite" page.
Analyze the market performance of the keyword. After confirming that you want to keep it, check the keyword, and then click [Add to Keyword List] to enter the adding operation page.
Enter the "Add Keywords to Keyword List" page.
The subsequent adding operations are the same as adding from the "Search Term Report".
2) Manually Adding Keywords
In addition to adding keywords through SellerSprite and SellerSpace, when we find usable keywords through other channels, we can also manually add them to our Keyword List.
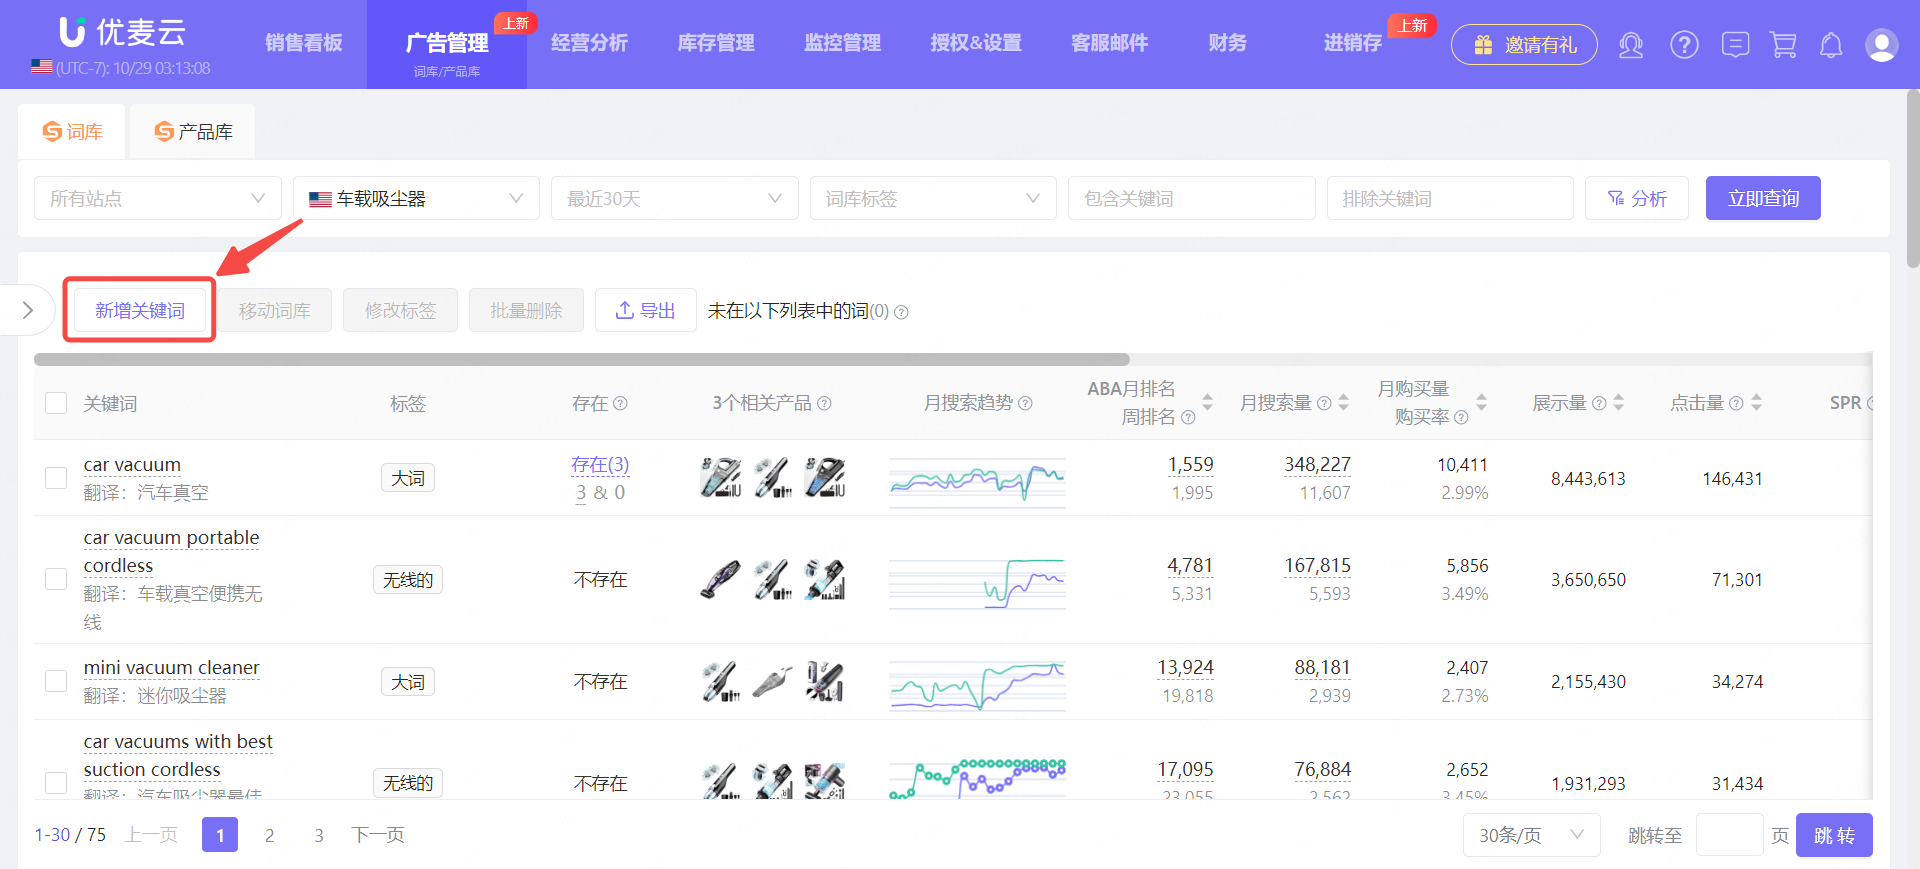
Enter the "Keyword List" feature page and click [Add Keywords] to enter the adding page.
Enter the "Add Keywords to Keyword List" page.
The adding operation is basically the same as the previous introduction, except that in the last step, you manually enter the keywords.
After entering, click [Confirm] to complete the addition.
1.2 Managing Keyword List
1) Moving Keywords
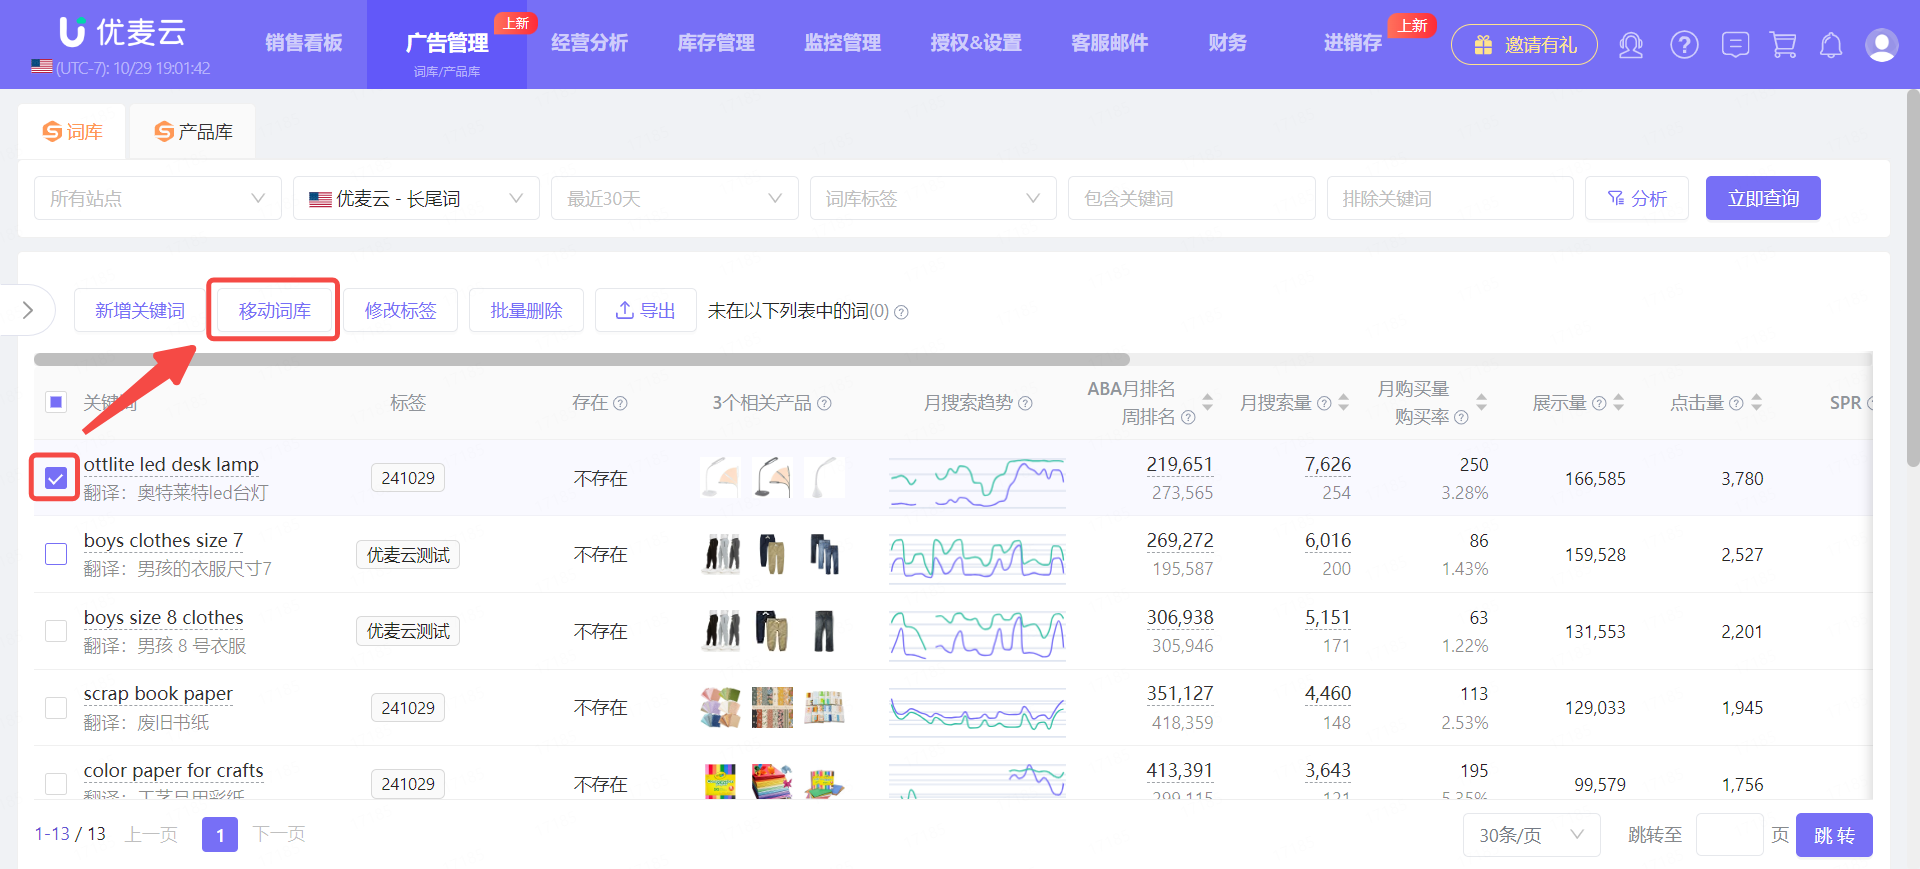
If you encounter a situation where you have assigned keywords to the wrong Keyword List, or want to re-divide the Keyword List, you can choose to move keywords.
Check the keywords to be reassigned to the Keyword List, click [Move Keyword List] to reassign the Keyword List for the keywords.
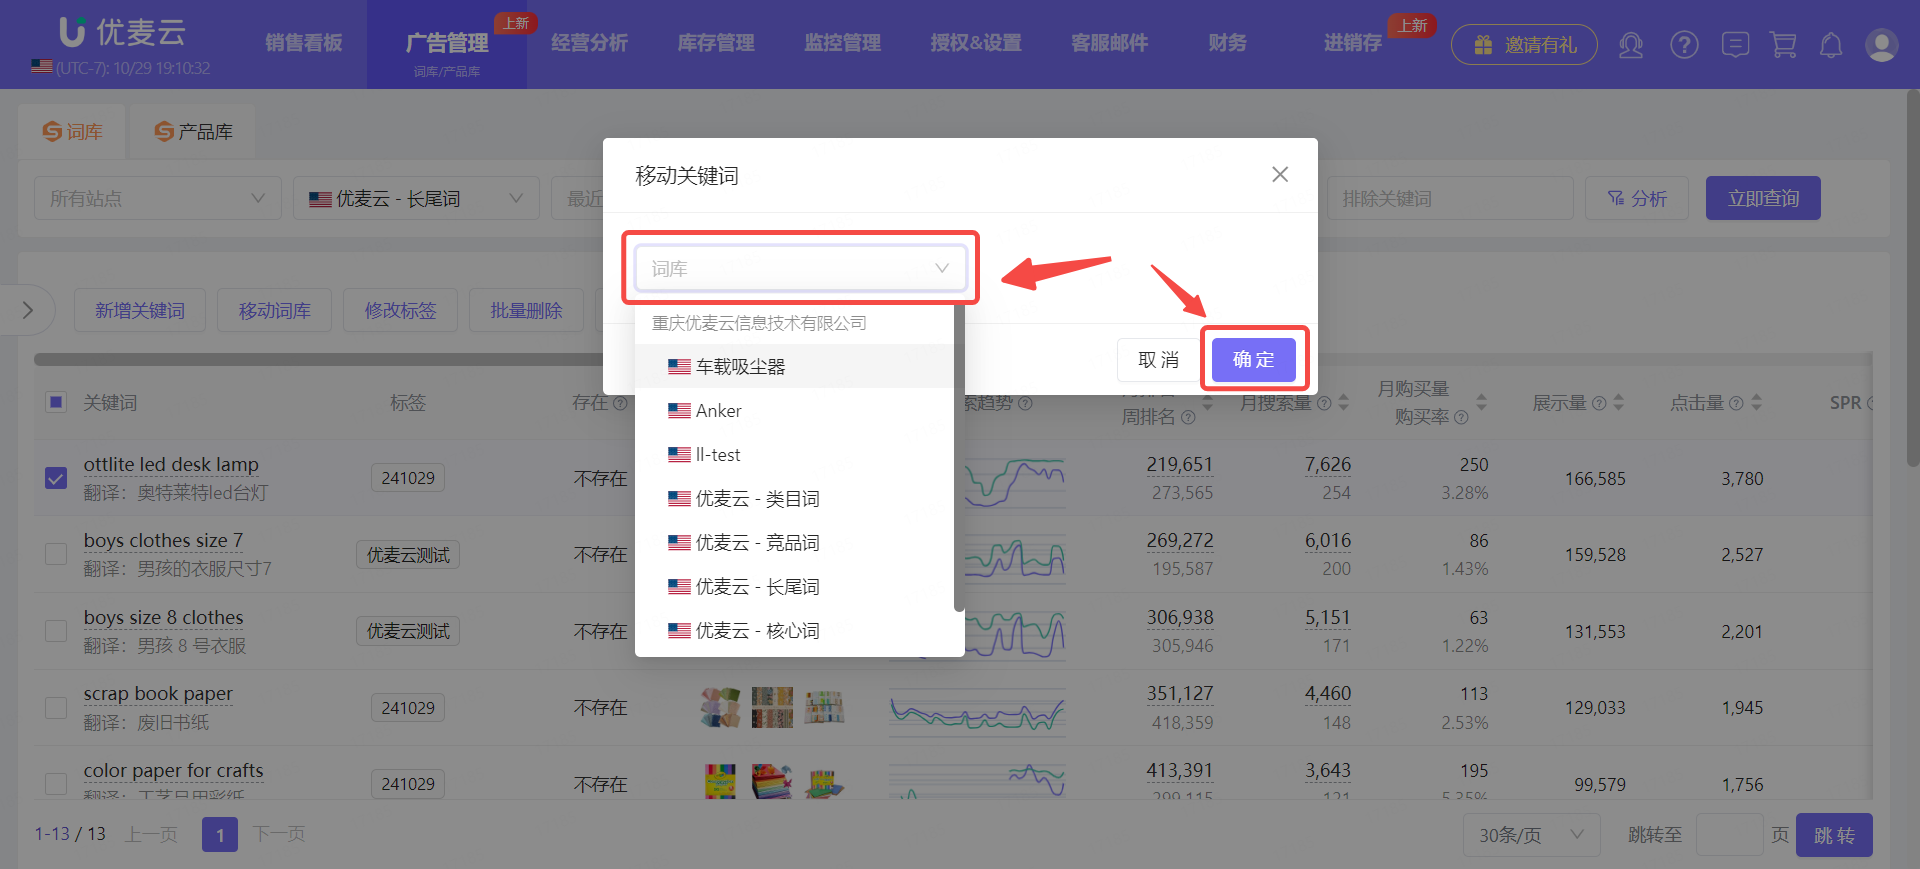
Enter the "Move Keywords" page.
Click the Keyword List column, select the target Keyword List, and finally click [Confirm] to complete the move.
2) Modifying Tags
We can set tags for keywords in the Keyword List to facilitate classification management. When the tag setting is wrong or you want to change a tag, you can choose to modify the tag.
Check the keywords to be modified, click [Modify Tags], and then select existing tags or add new tags according to your needs to modify and replace them.

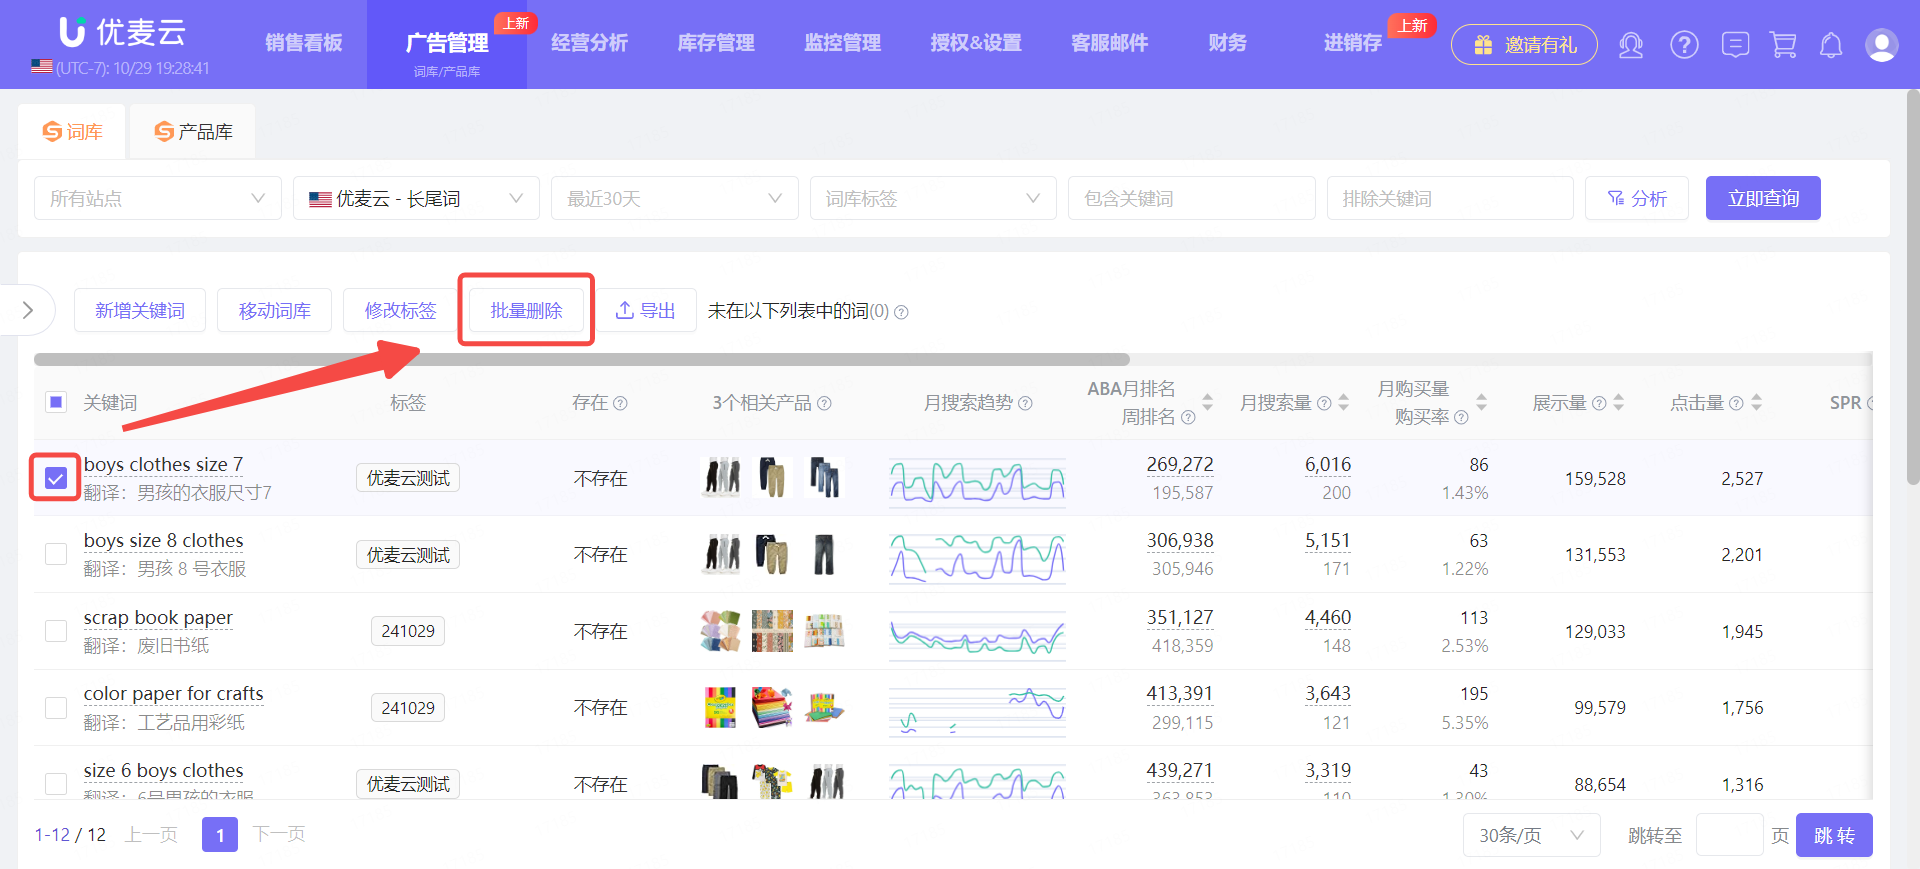
3) Deleting Keywords
When we no longer need a keyword, we can choose to remove it.
Check the keywords to be removed and click [Batch Delete] to delete them with one click.
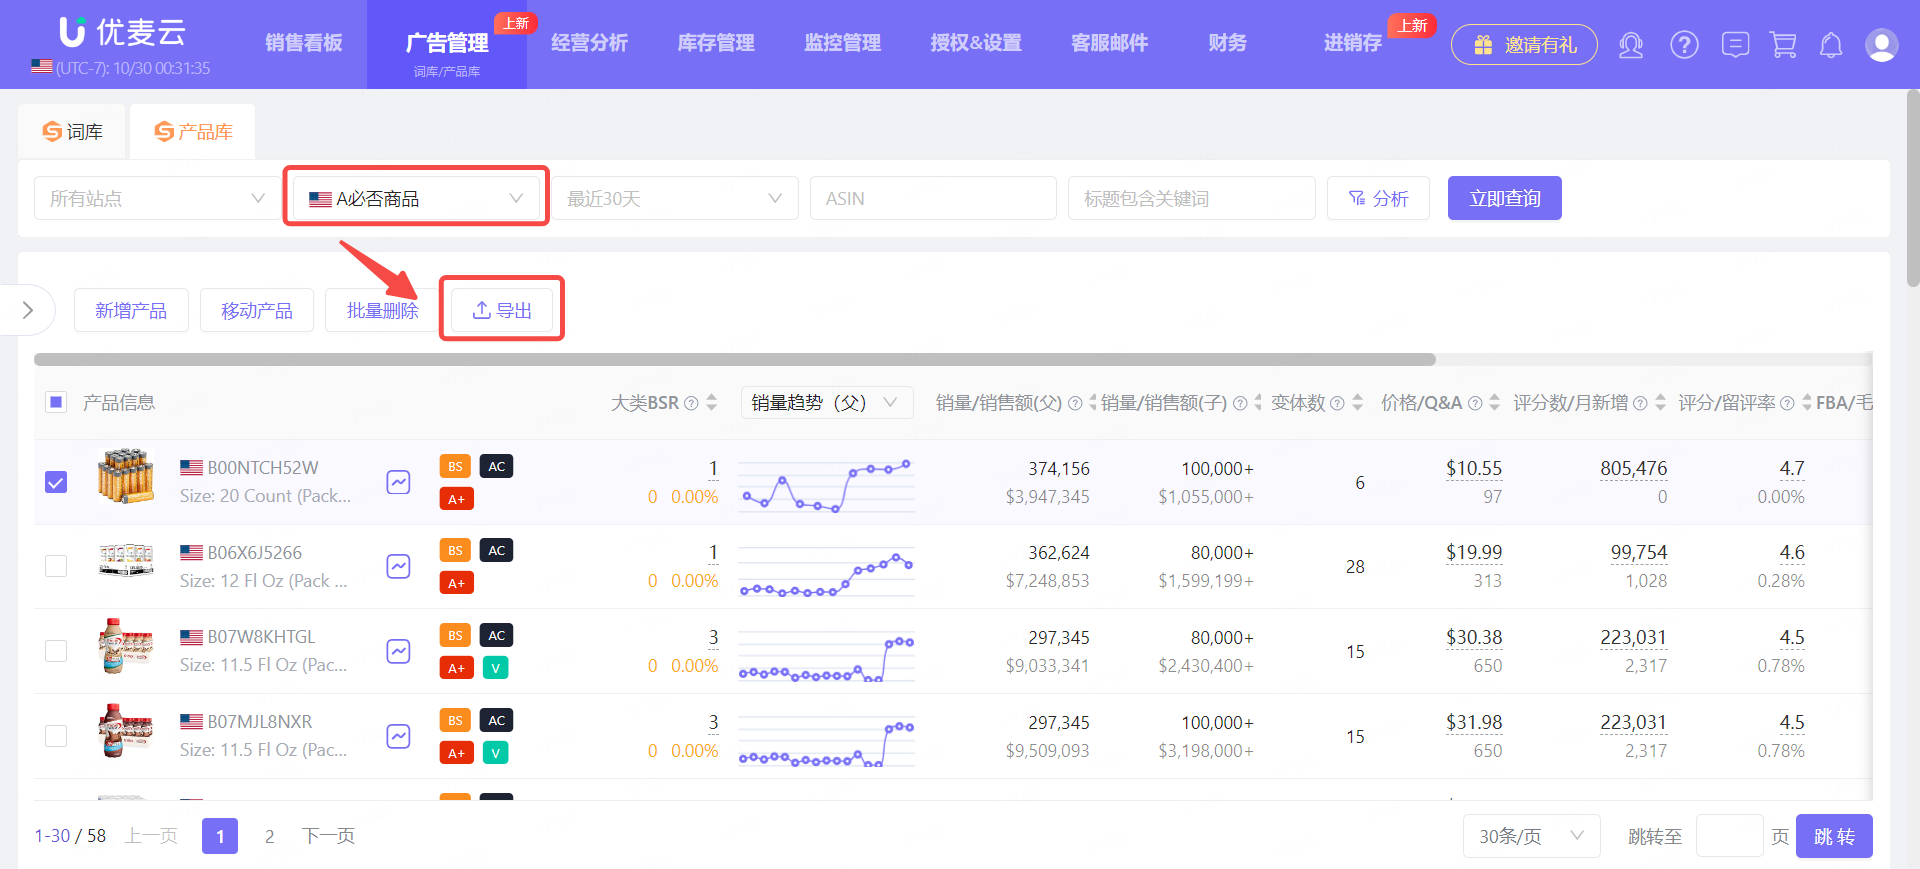
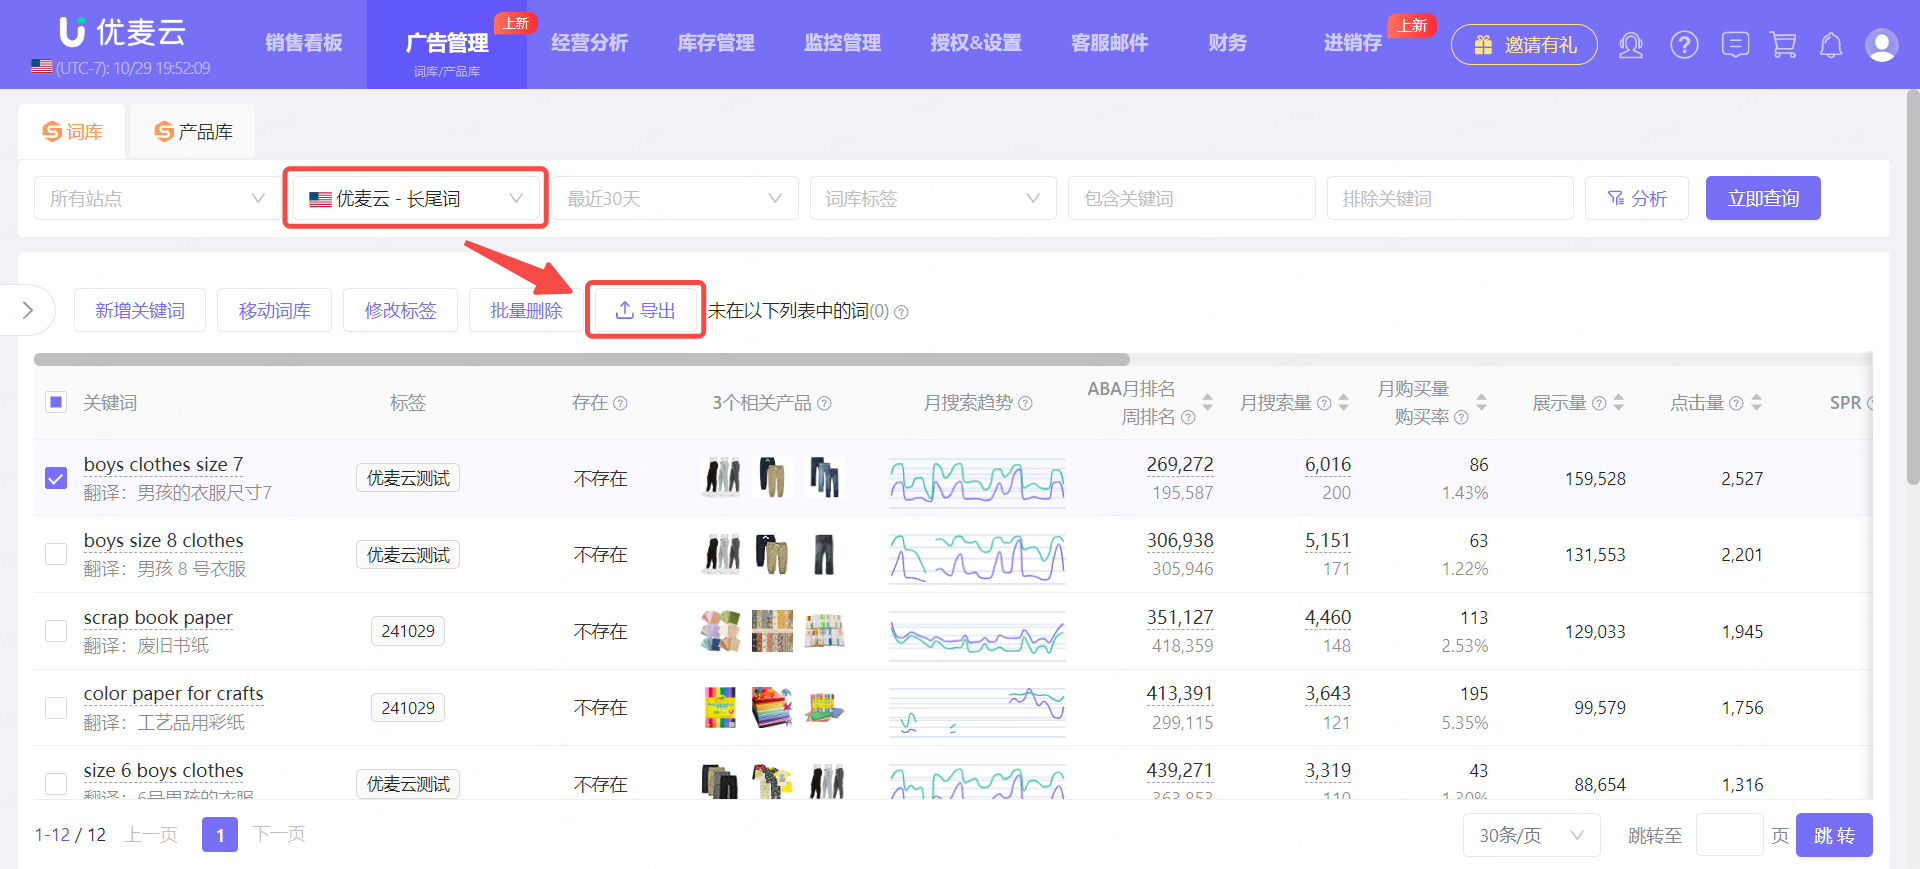
4) Exporting
The currently selected Keyword List data supports exporting to an Excel spreadsheet. Each Keyword List needs to be selected and exported separately.
Select the corresponding Keyword List, and then click [Export] to export it with one click.
2. Product List
SellerSprite Feature: Product List is actually a product collector, which is convenient for us to collect products at any time when browsing Amazon pages. Clicking a button can add ASINs to the research list with one click, saving the trouble of manually copying and pasting ASINs before.
Moreover, after product collection is completed, you can also conduct keyword research and market research on these products in batches, helping us quickly improve the efficiency of finding products.
The [Product List] feature of SellerSpace, like the [Keyword List] feature, in addition to connecting and displaying data from the SellerSprite Product List feature, can also add products from search terms or manually add products found by yourself to expand our Product List data.
The [Product List] feature is basically the same as the [Keyword List] in terms of operation and use, except for the data being different. Therefore, the operation path is introduced directly below.
2.1 Adding Products
1) Adding from "Search Term Report"
Go to the [Search Terms] feature and find the corresponding product ASIN type search terms according to your own needs.

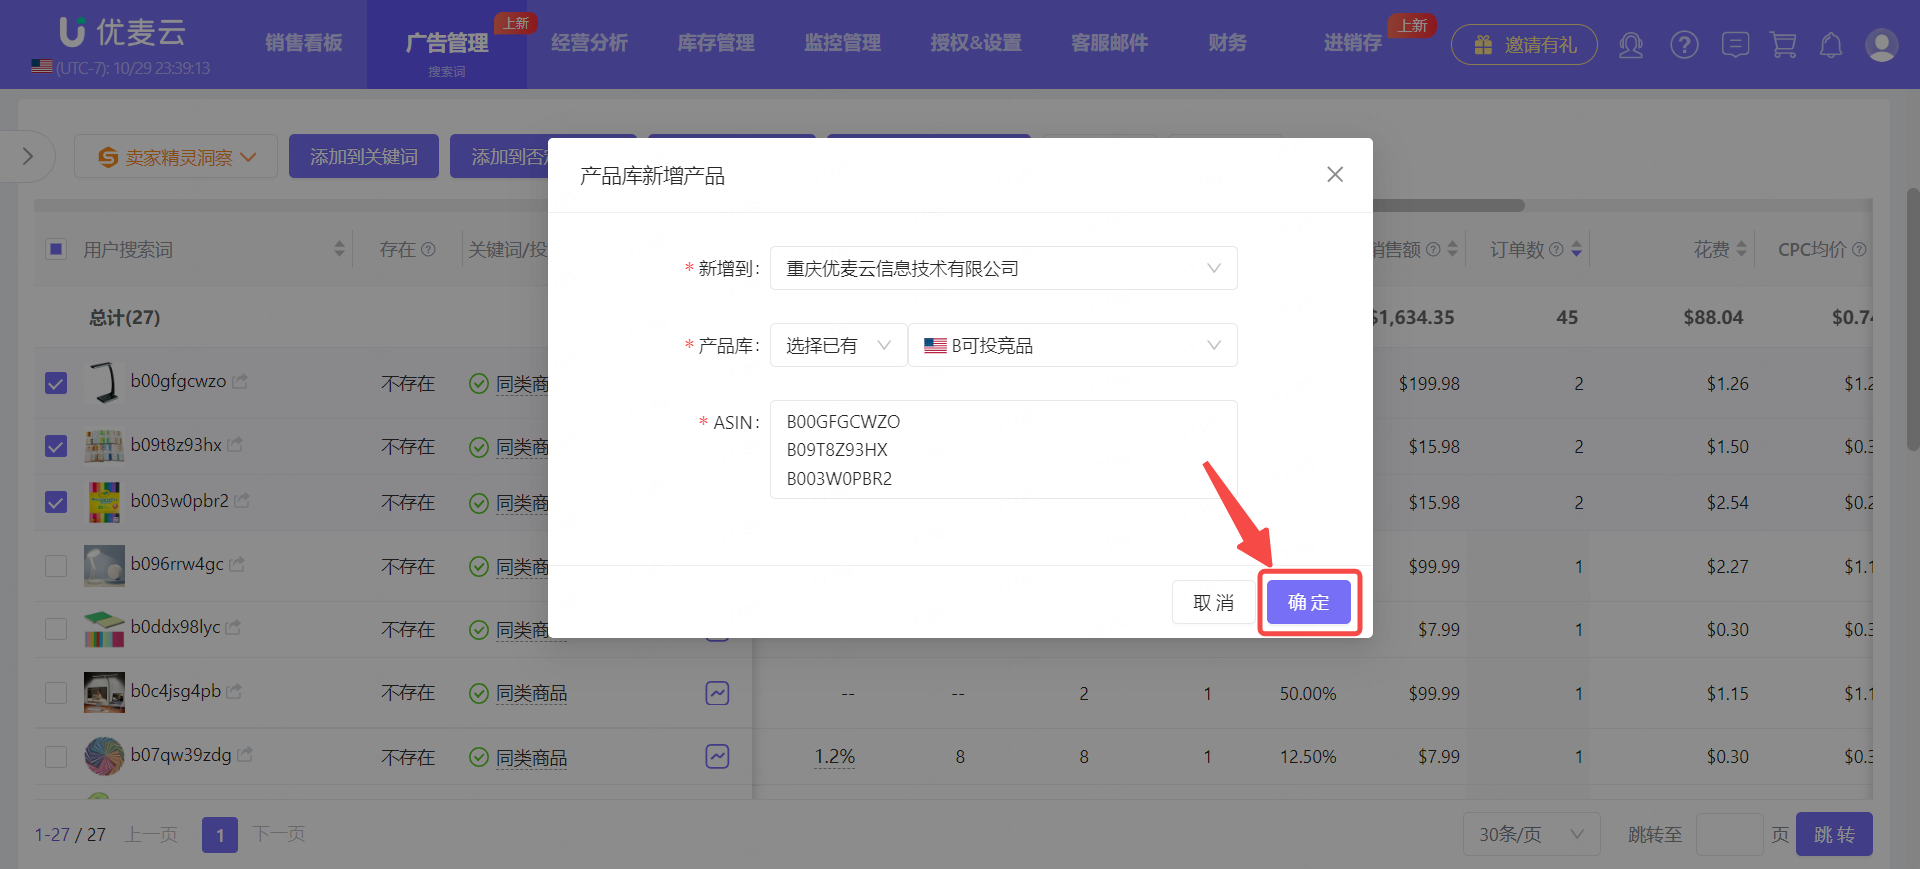
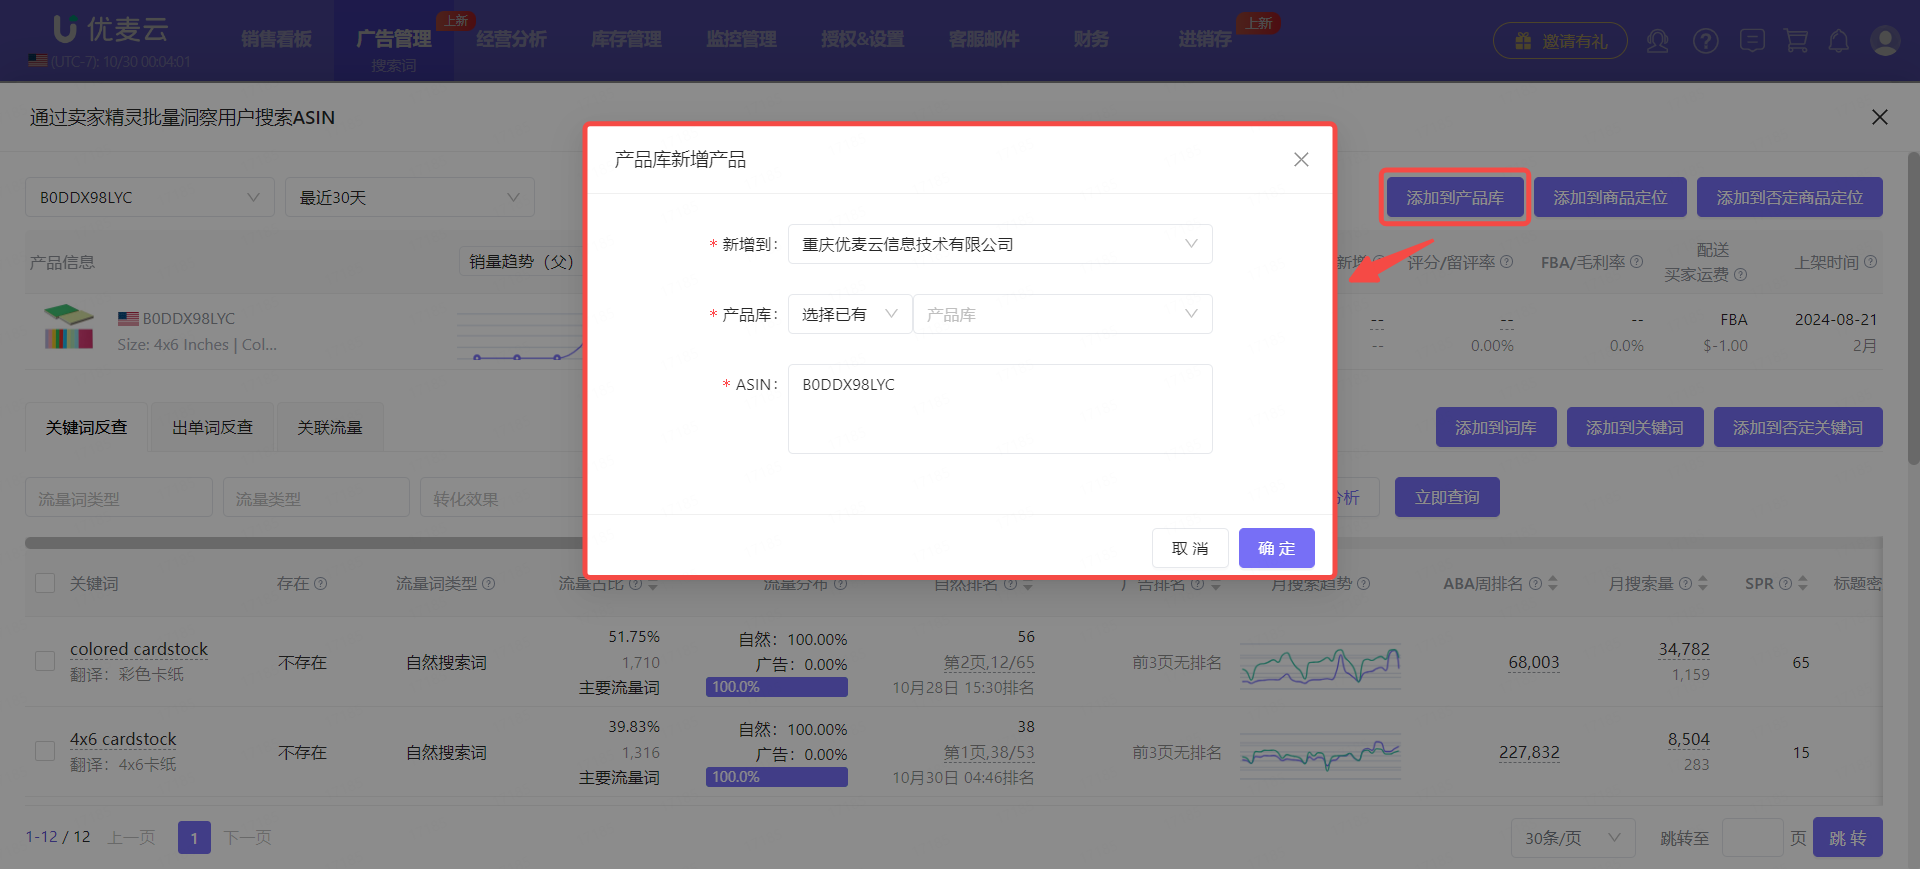
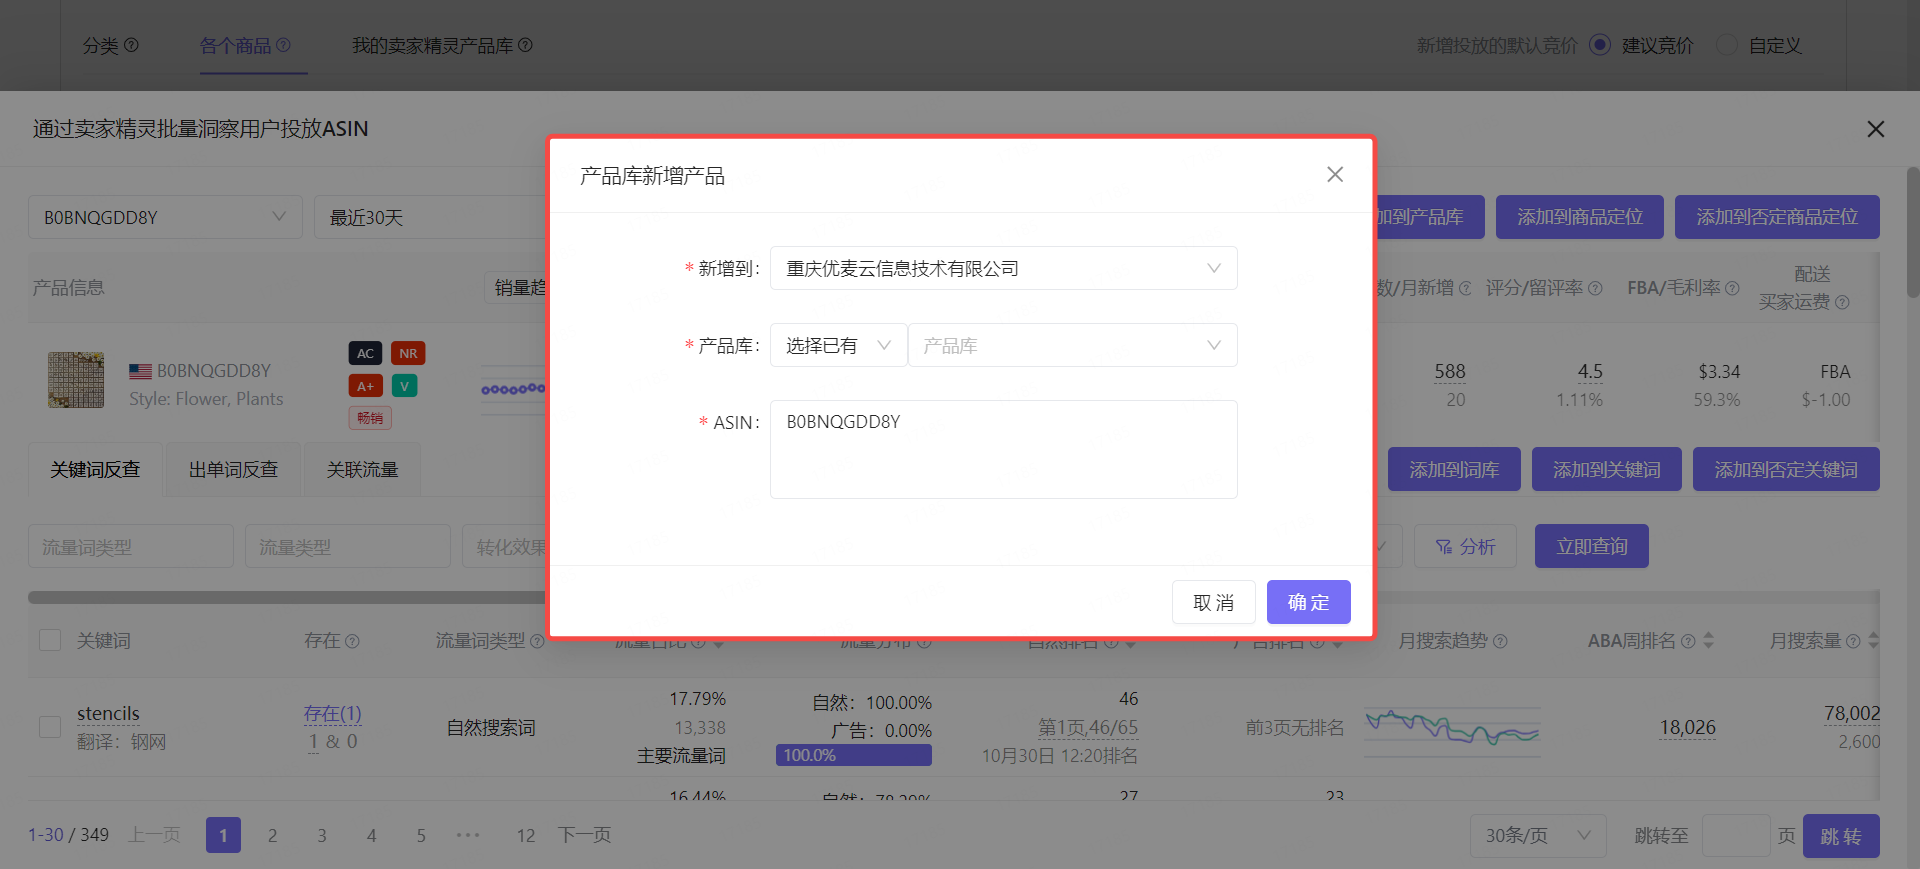
Check the corresponding ASIN, click [SellerSprite Insight], and then click [Add to My SellerSprite Product List] to enter the adding operation page.
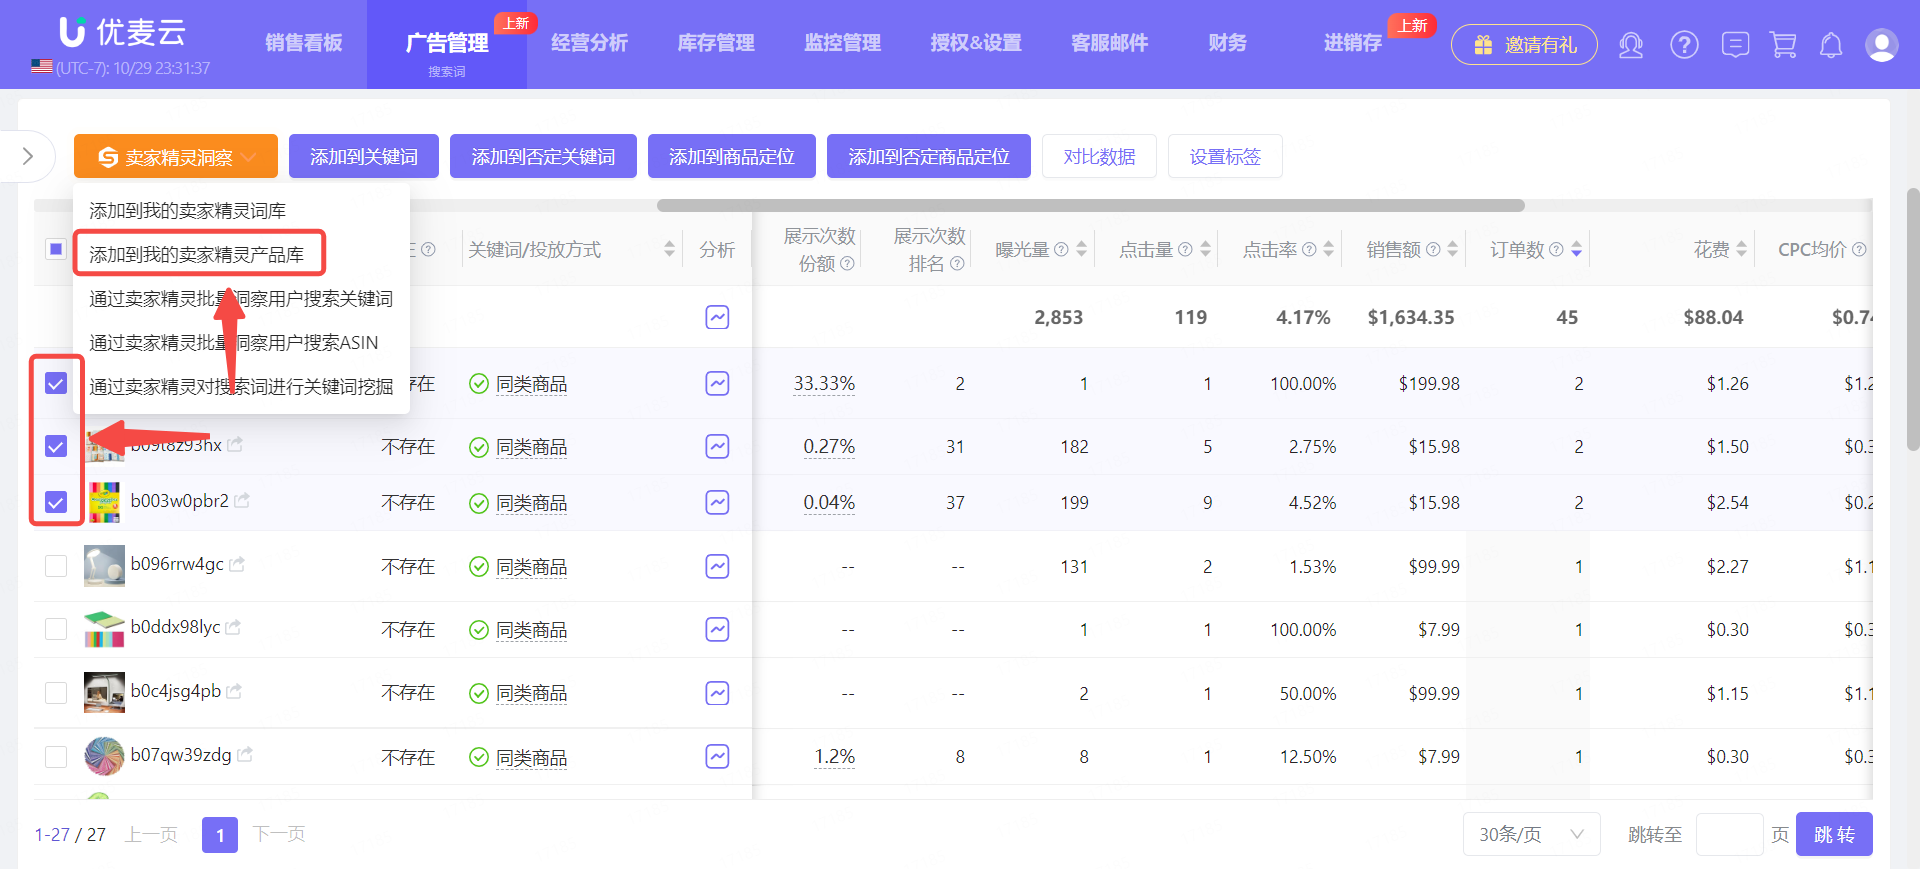
Enter the "Add Products to Product List" page.
According to your own needs, select which account and Product List to add to, and confirm the product ASINs to be added.
Why is there an account selection?
To use the integrated features of SellerSpace and SellerSprite, you need to bind the two accounts. One SellerSpace account can only be bound to one SellerSprite account.
However, both accounts have main and sub-accounts. When a SellerSprite sub-account is bound to a SellerSpace sub-account, and the main account to which the SellerSpace sub-account belongs agrees to let it view the SellerSprite main account information, then the sub-account on the SellerSpace side has the permissions of 2 accounts. Therefore, there will be an account selection here.
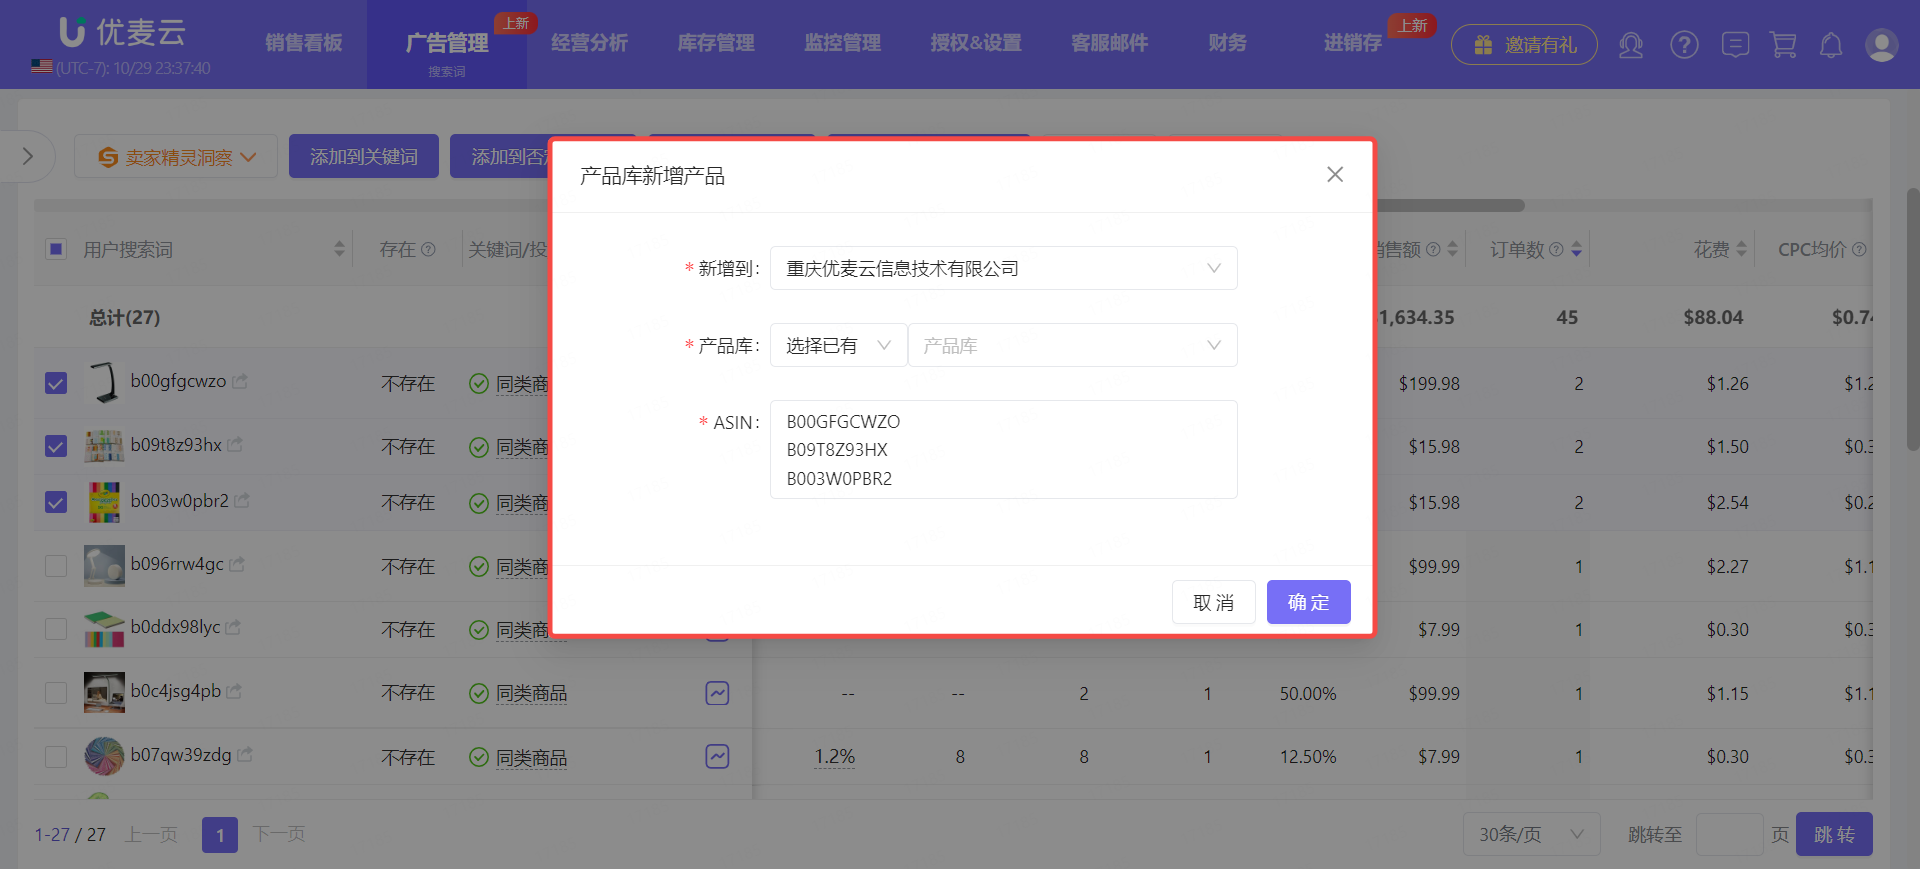
After confirming that all information is correct, click [Confirm] to complete the addition.
SellerSprite Insight and Product List
Like the [Keyword List], when we encounter product ASINs with mediocre performance, we can also use the [SellerSprite Insight] feature to deeply explore the performance of the ASIN to help us make judgments.
Through the "Search Terms" filter conditions, find product search terms with 1 order and not very high impressions and clicks.
For these products, we don't know whether the order is accidental or whether it can be further advertised. We can use the [SellerSprite Insight] feature to analyze the market performance of the product to help us make judgments.
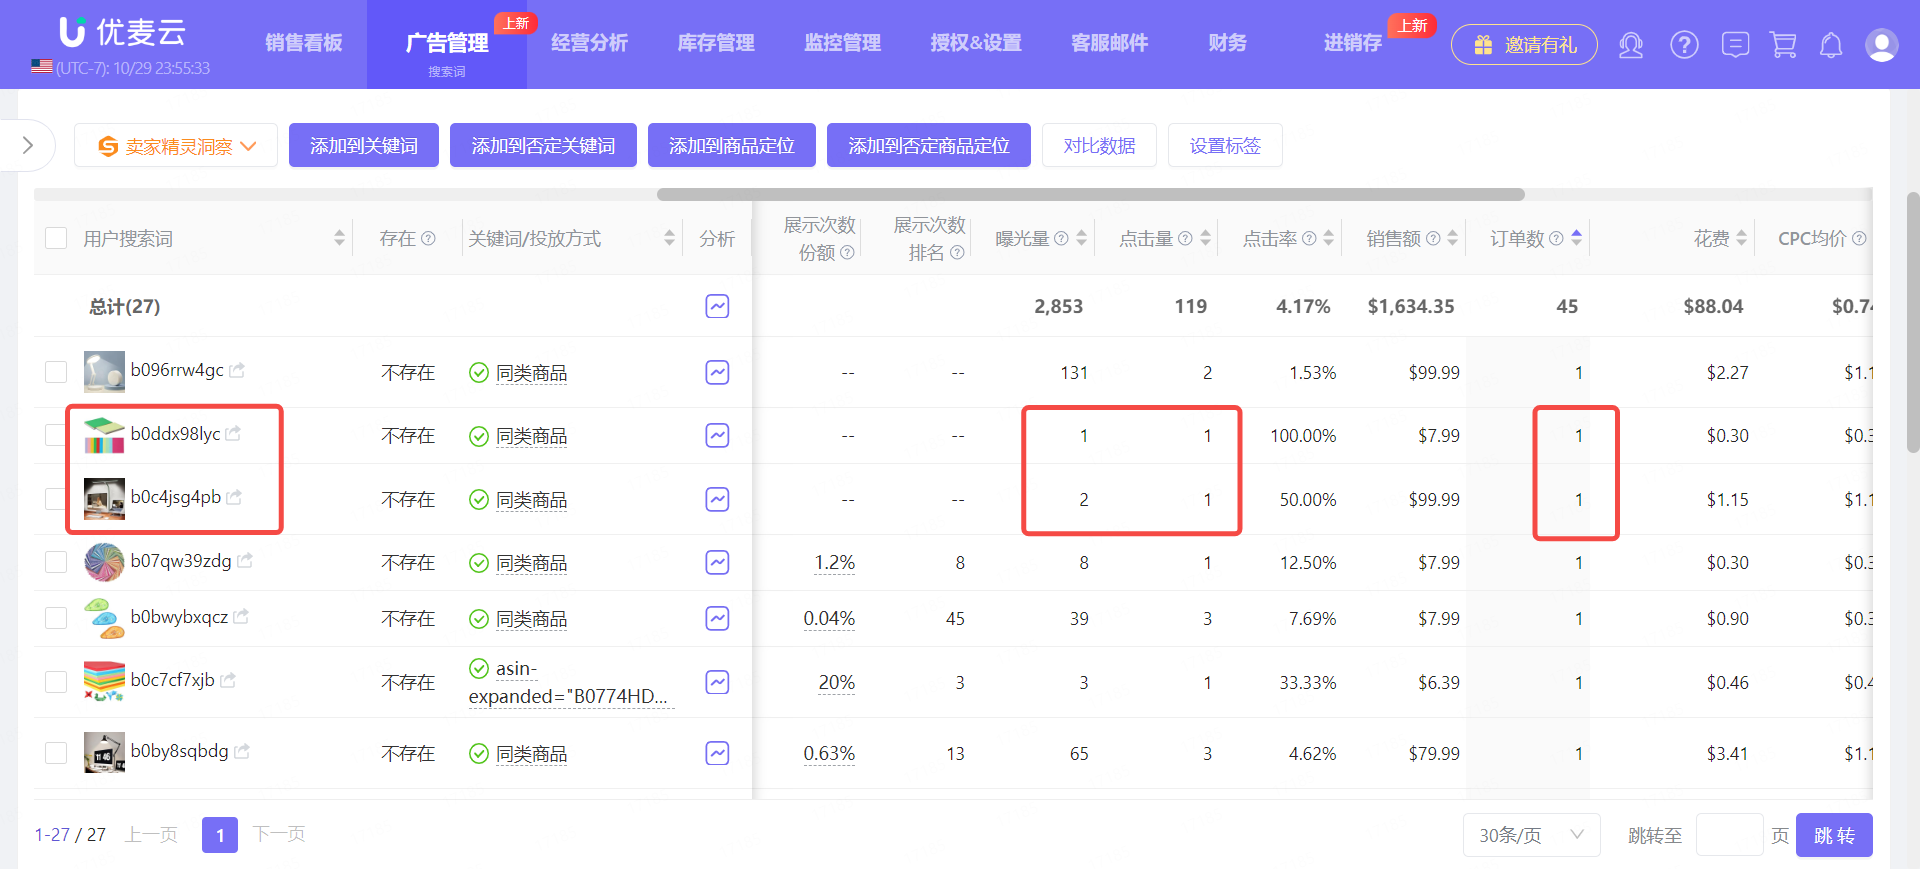
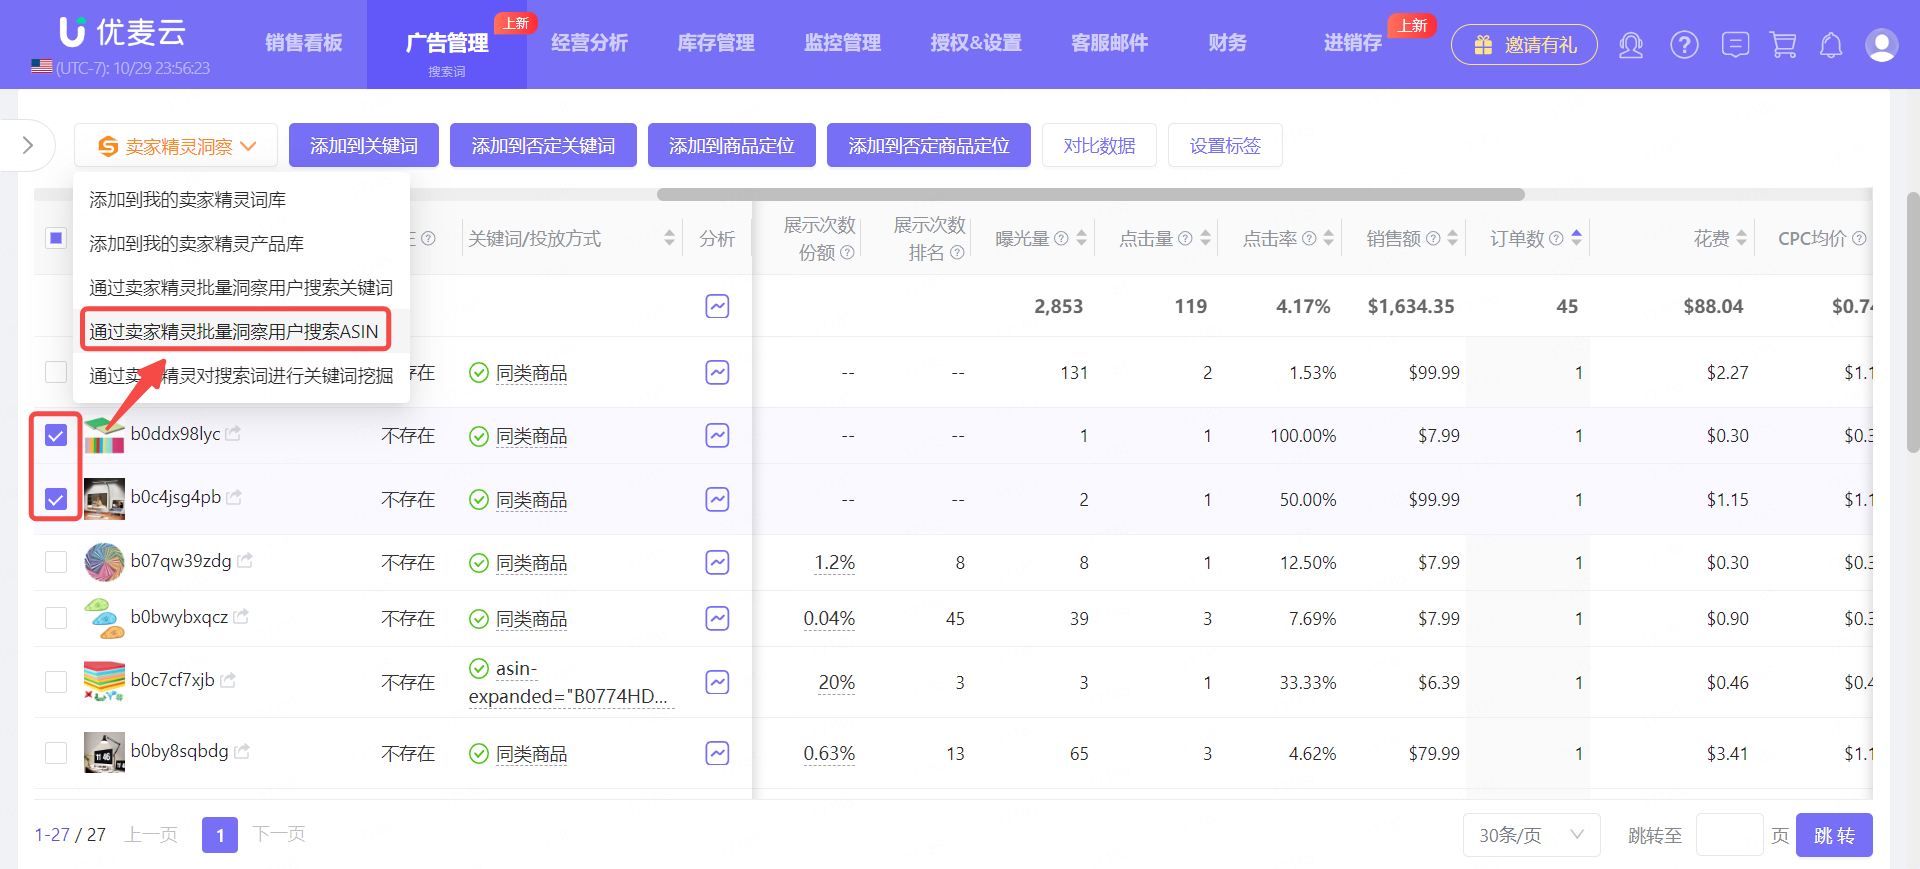
Then, check the product search terms we selected, click [SellerSprite Insight], and then select [Batch Insight User Search ASINs via SellerSprite] to analyze the market performance of these ASINs on Amazon to see if there is still market potential and whether it is worth trying to advertise, etc.
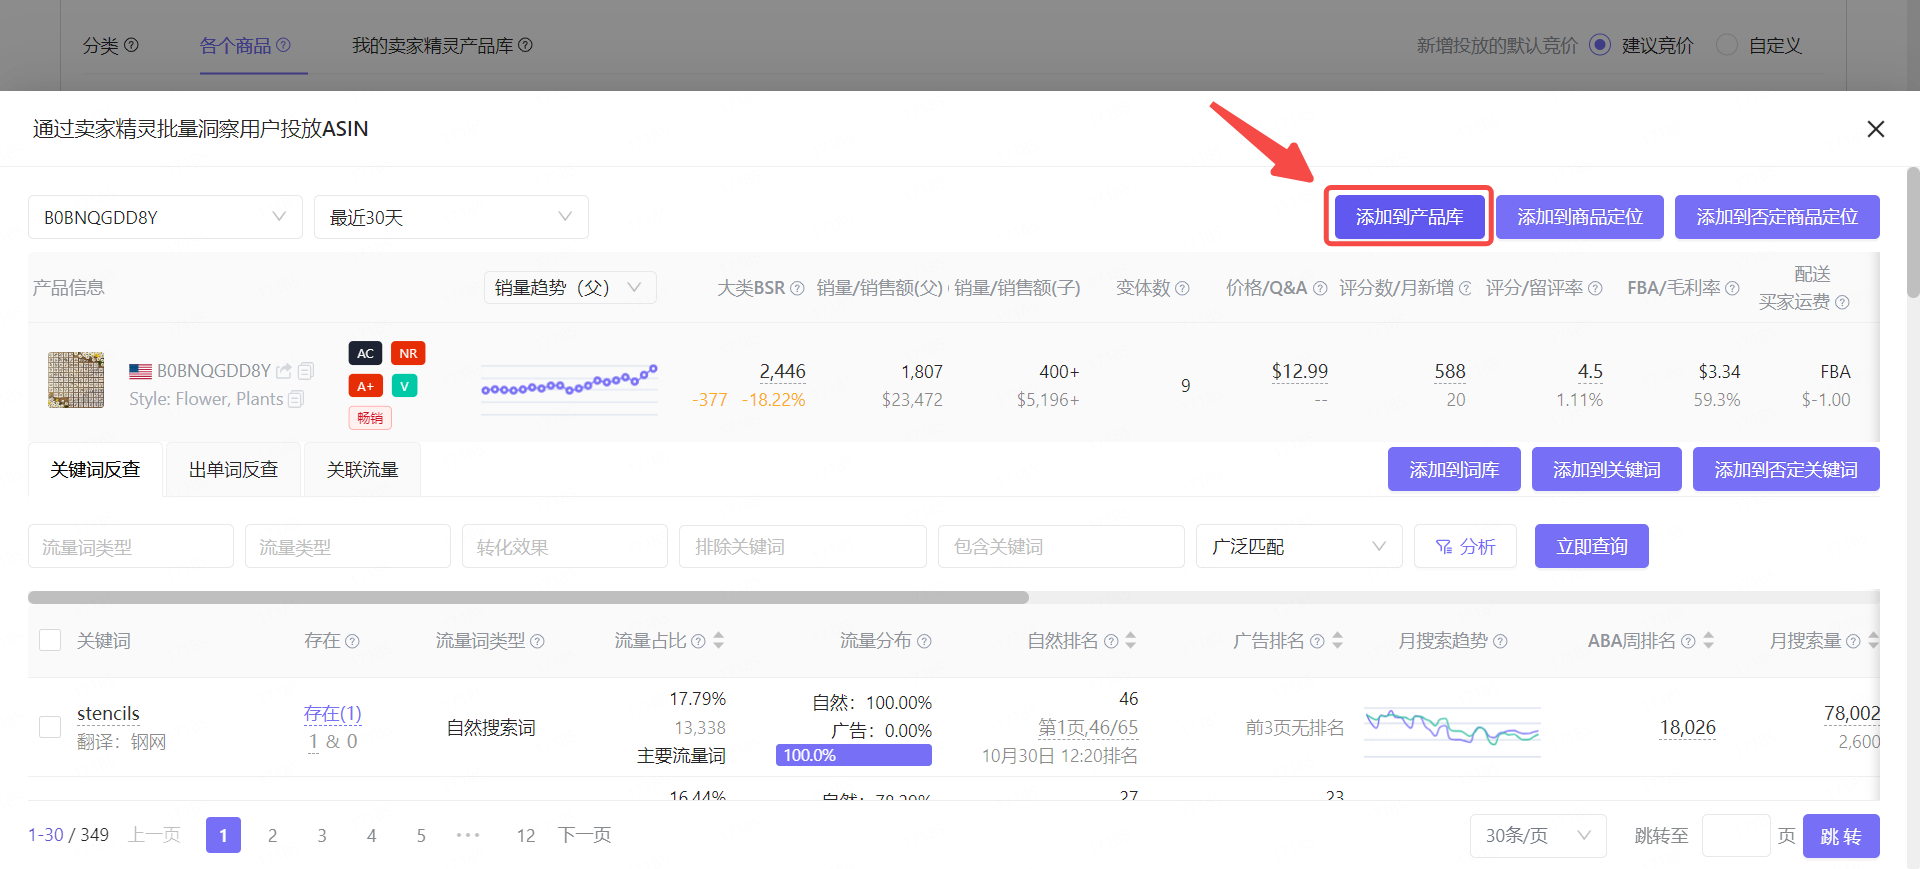
Through SellerSprite Insight, analyze the overall performance of the ASIN, such as: BSR Ranking Trend, Sales Volume, Number of Reviews, Rating, etc., to understand whether the ASIN is worth advertising and can drive traffic for us.
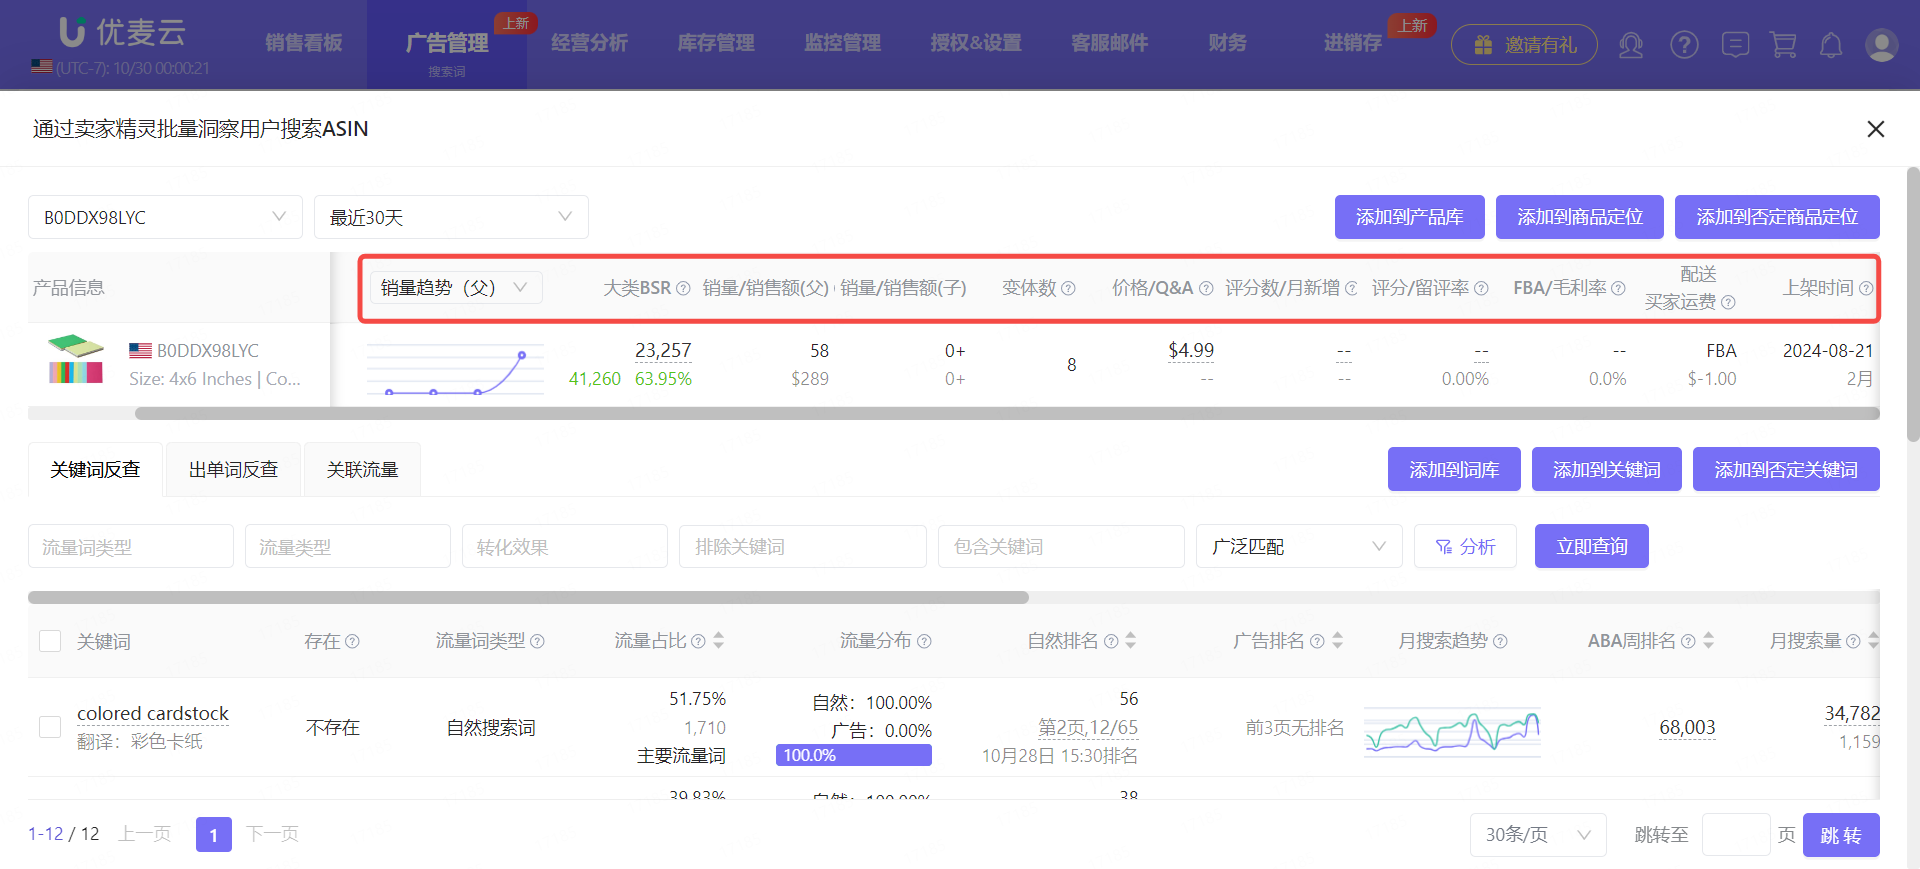
Finally, based on our judgment, click [Add to Product List] to add it to our Product List.
If the performance of the ASIN is noteworthy, we can further check the traffic layout of the product to see where its traffic comes from, which keywords, and which ASINs, and whether they can be used by us.
Finally, based on our judgment, check the corresponding keywords, click [Add to Keyword List], and categorize them.
The subsequent operation steps are the same as directly adding search terms to the Keyword List.
2) Adding "Amazon Suggested Products and Categories"
Amazon Suggested Products are related products recommended by the Amazon system based on the description of our Listing. We can dig out some related products that can be used from them. The more accurate the Listing keyword embedding, the higher the relevance of the recommended products.
When we add new products for advertising, we can find them in Amazon Suggested Products. After finding them, we can also add them to our Keyword List for unified management and utilization. All new product adding operation pages are applicable.
The operation method is as follows:
Go to the "Advertising - Non-Keyword" feature and click [Add Targeting] to enter the page for adding targeting.
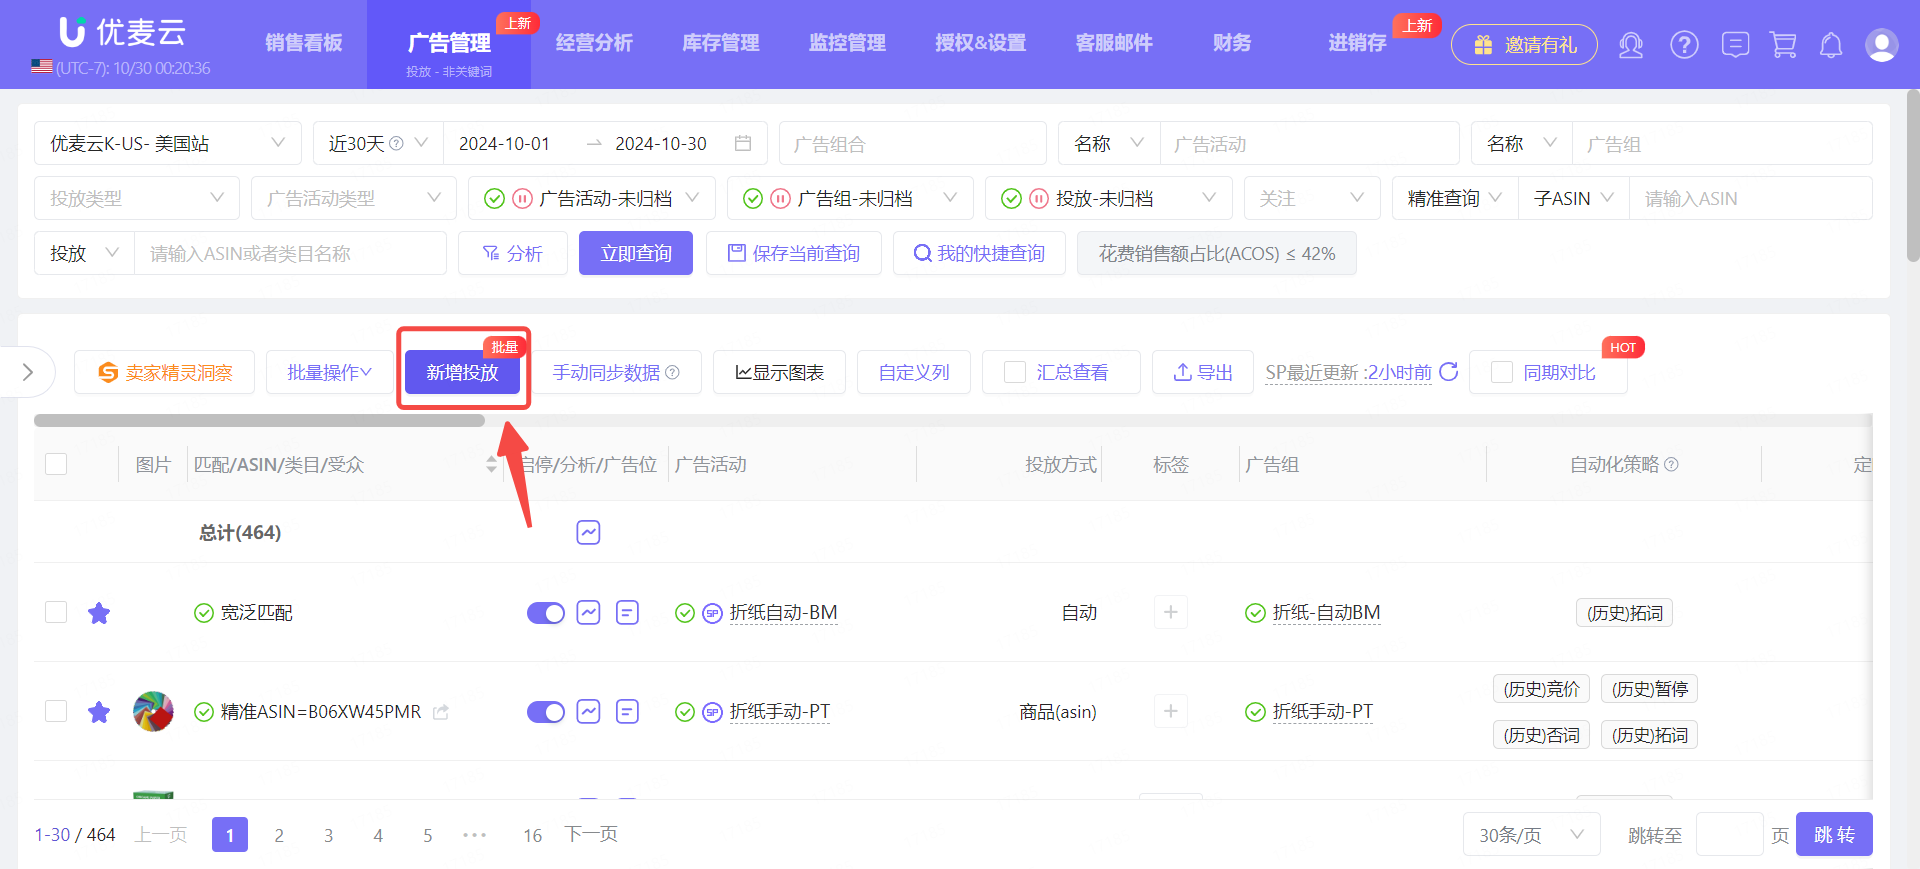
Enter the "Add Targeting" page.
Select [Add keyword targeting under the specified Ad Group], and then select the corresponding Ad Campaign and Ad Group. After selection, the corresponding targeting operation items will be automatically displayed.
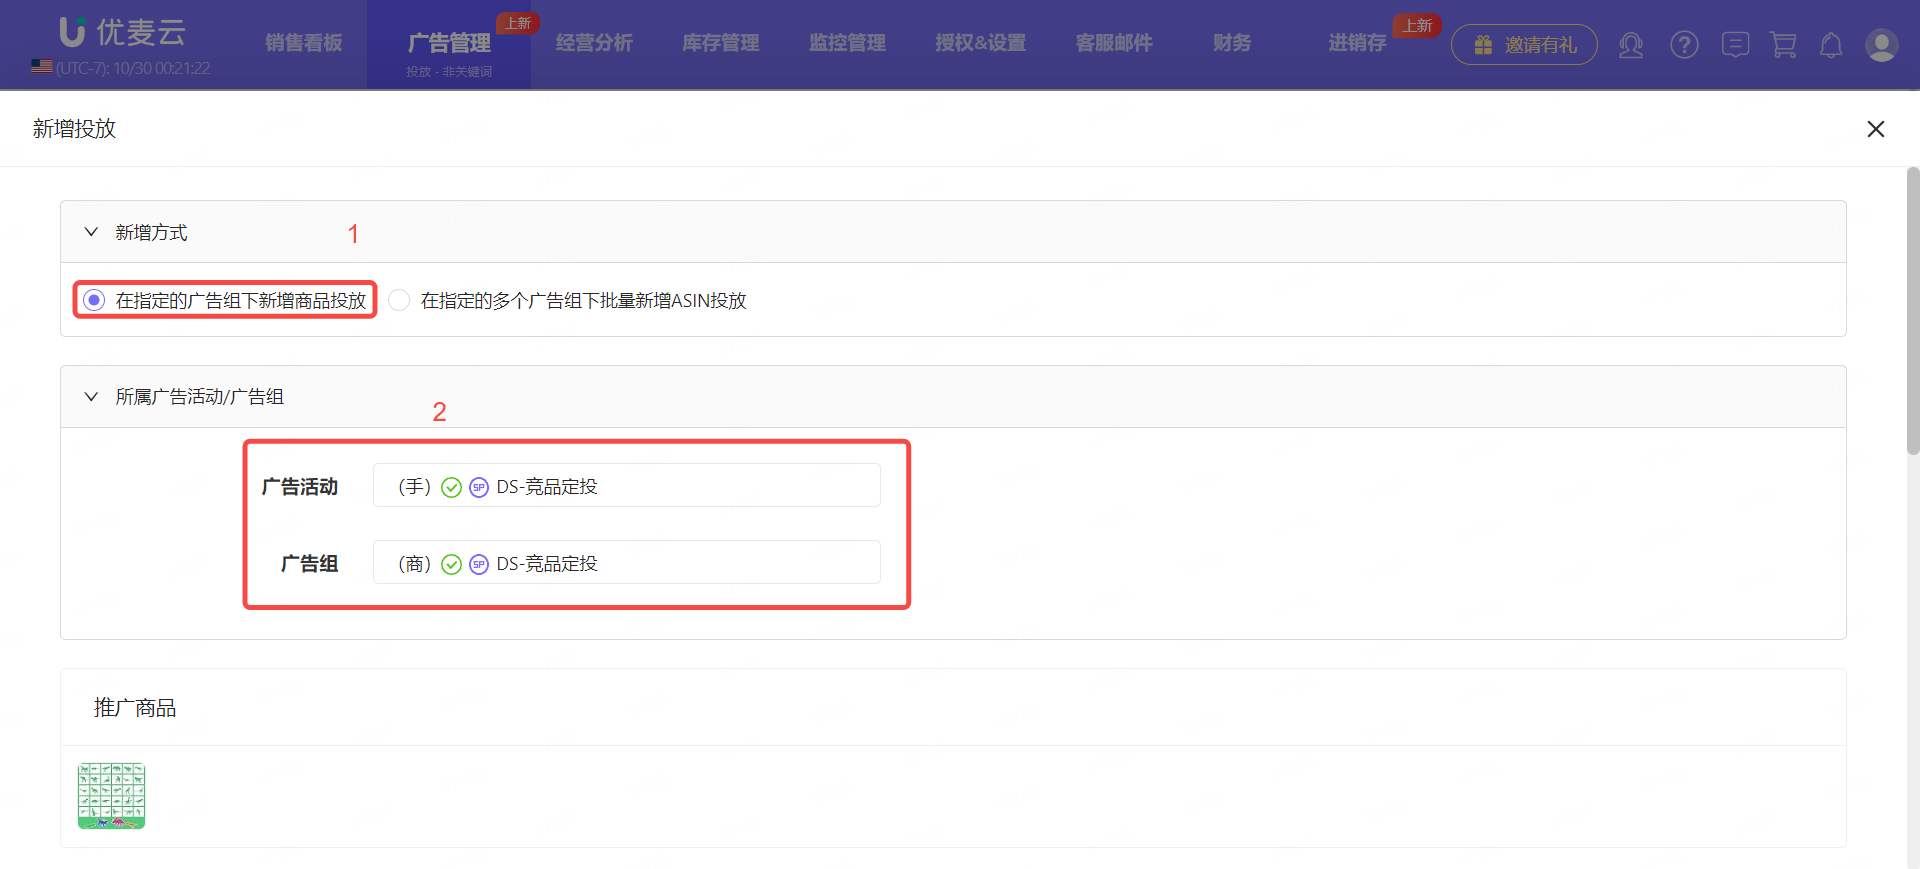
Find the "Product Targeting" setting item and select [Individual products] to see Amazon's suggested products. Then, use the [SellerSprite Insight] feature to analyze the performance of these products and find products suitable for keeping.
Click the SellerSprite icon on the right side of the suggested keyword to enter the SellerSprite Insight data page.
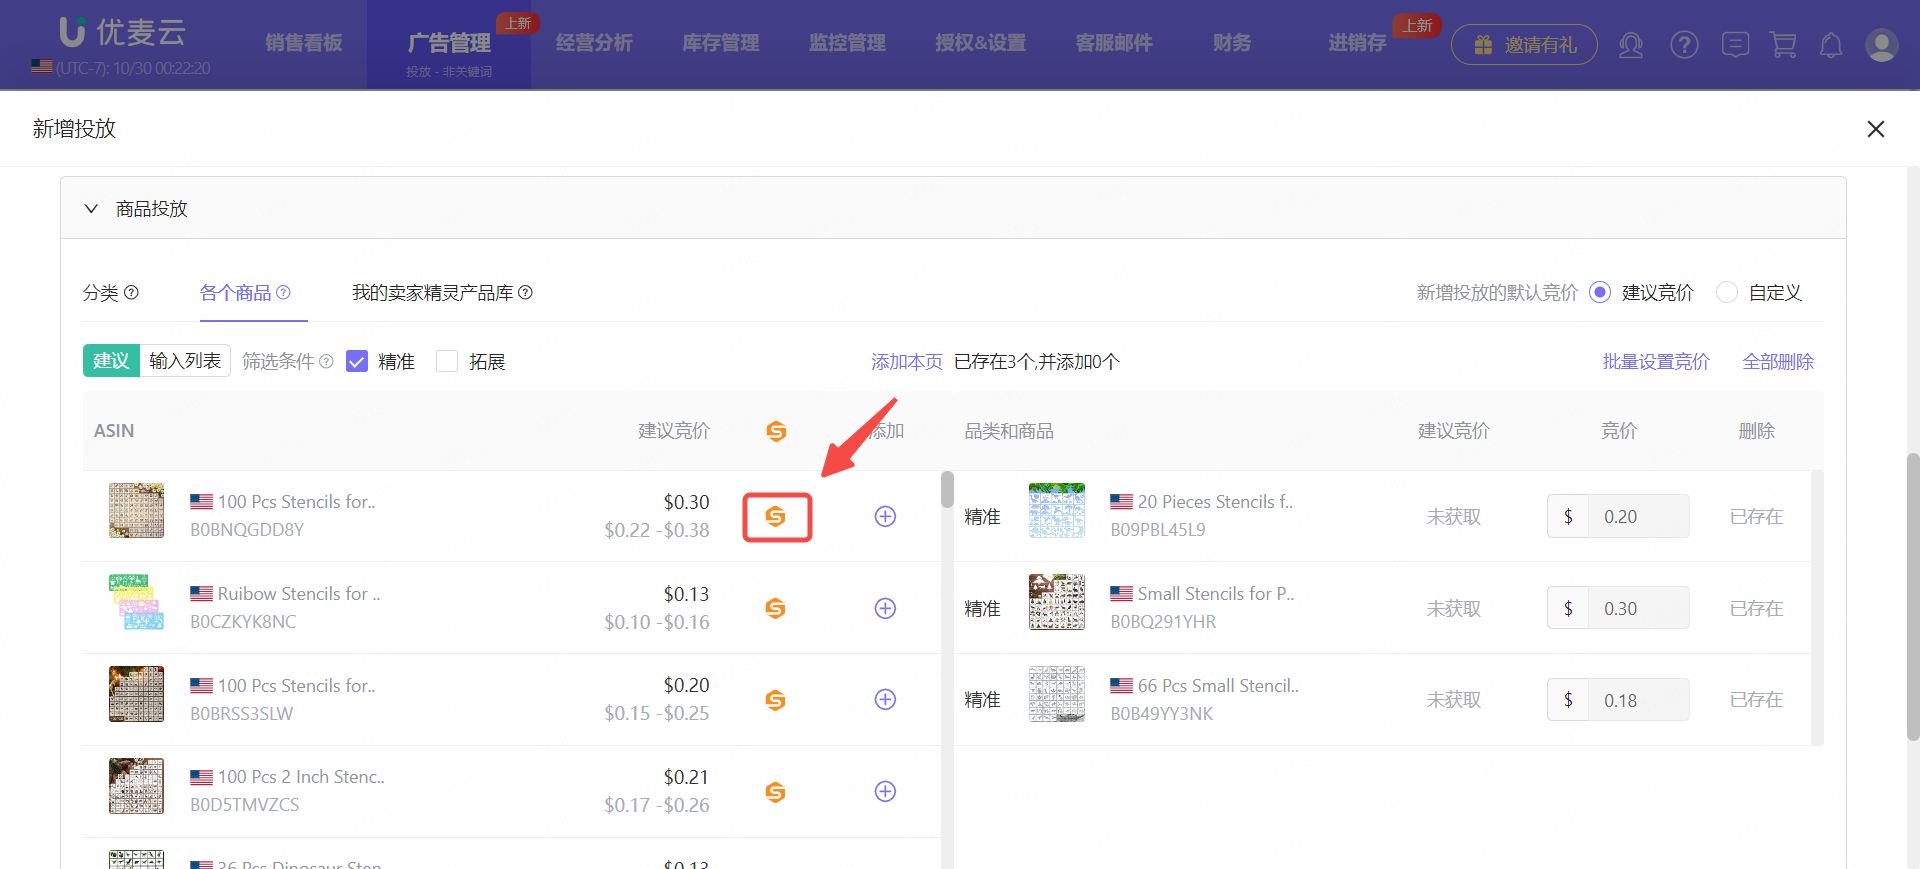
Enter the "Batch Insight User Targeting ASINs via SellerSprite" page.
Analyze the overall performance of the product. After confirming that you want to keep it, click [Add to Product List] to enter the adding operation page.
Enter the "Add Products to Product List" page.
The subsequent adding operations are the same as adding from the "Search Term Report".
3) Manually Adding Products
In addition to adding products through SellerSprite and SellerSpace, when we find usable products through other channels, we can also manually add them to our Product List.
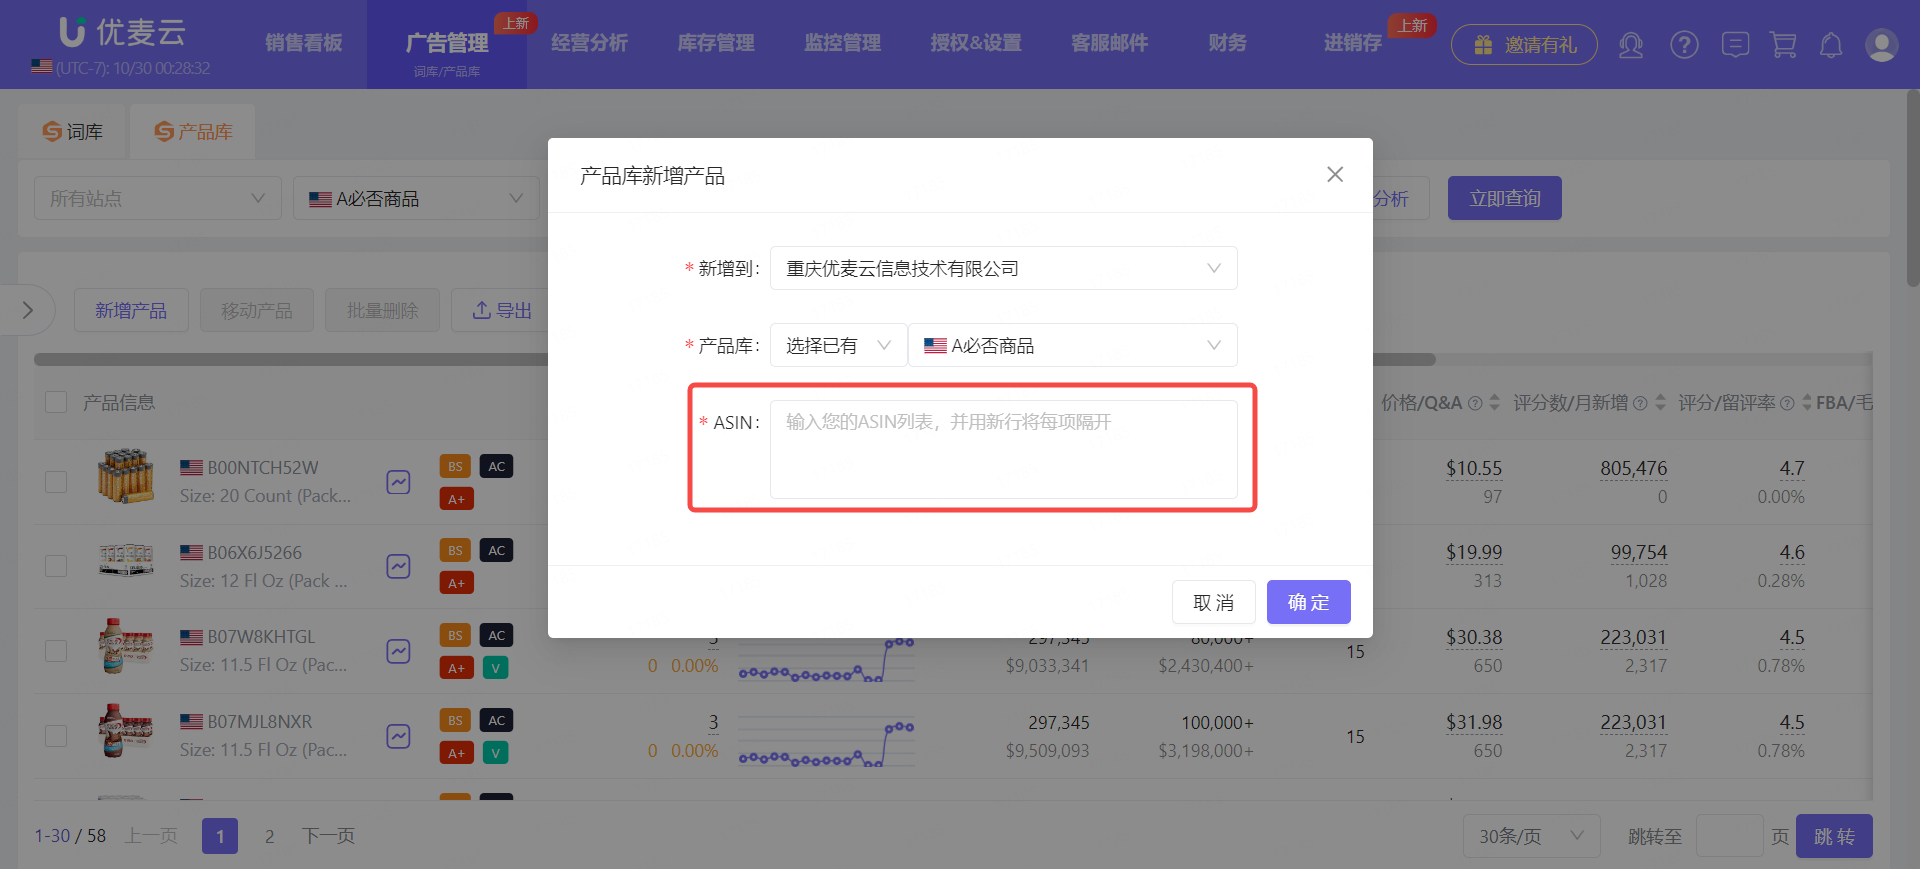
Enter the "Product List" feature page and click [Add Products] to enter the adding page.
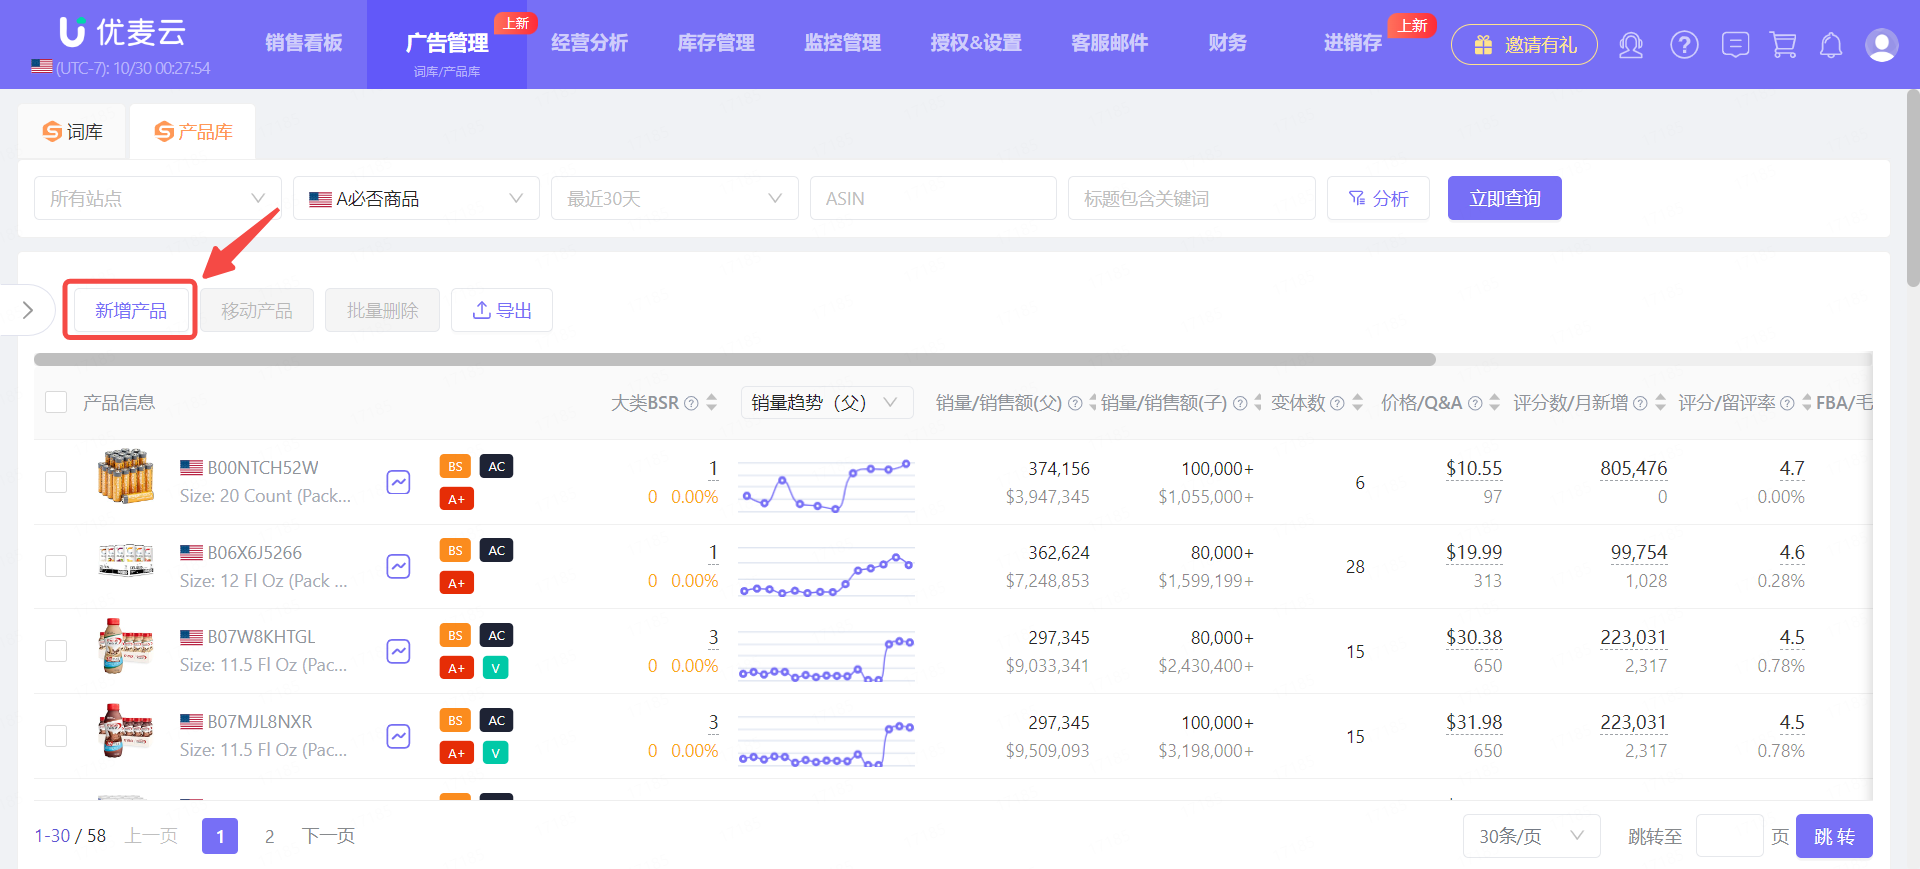
Enter the "Add Products to Product List" page.
The adding operation is basically the same as the previous introduction, except that in the last step, you manually enter the product ASINs, one ASIN per line.
2.2 Managing Product List
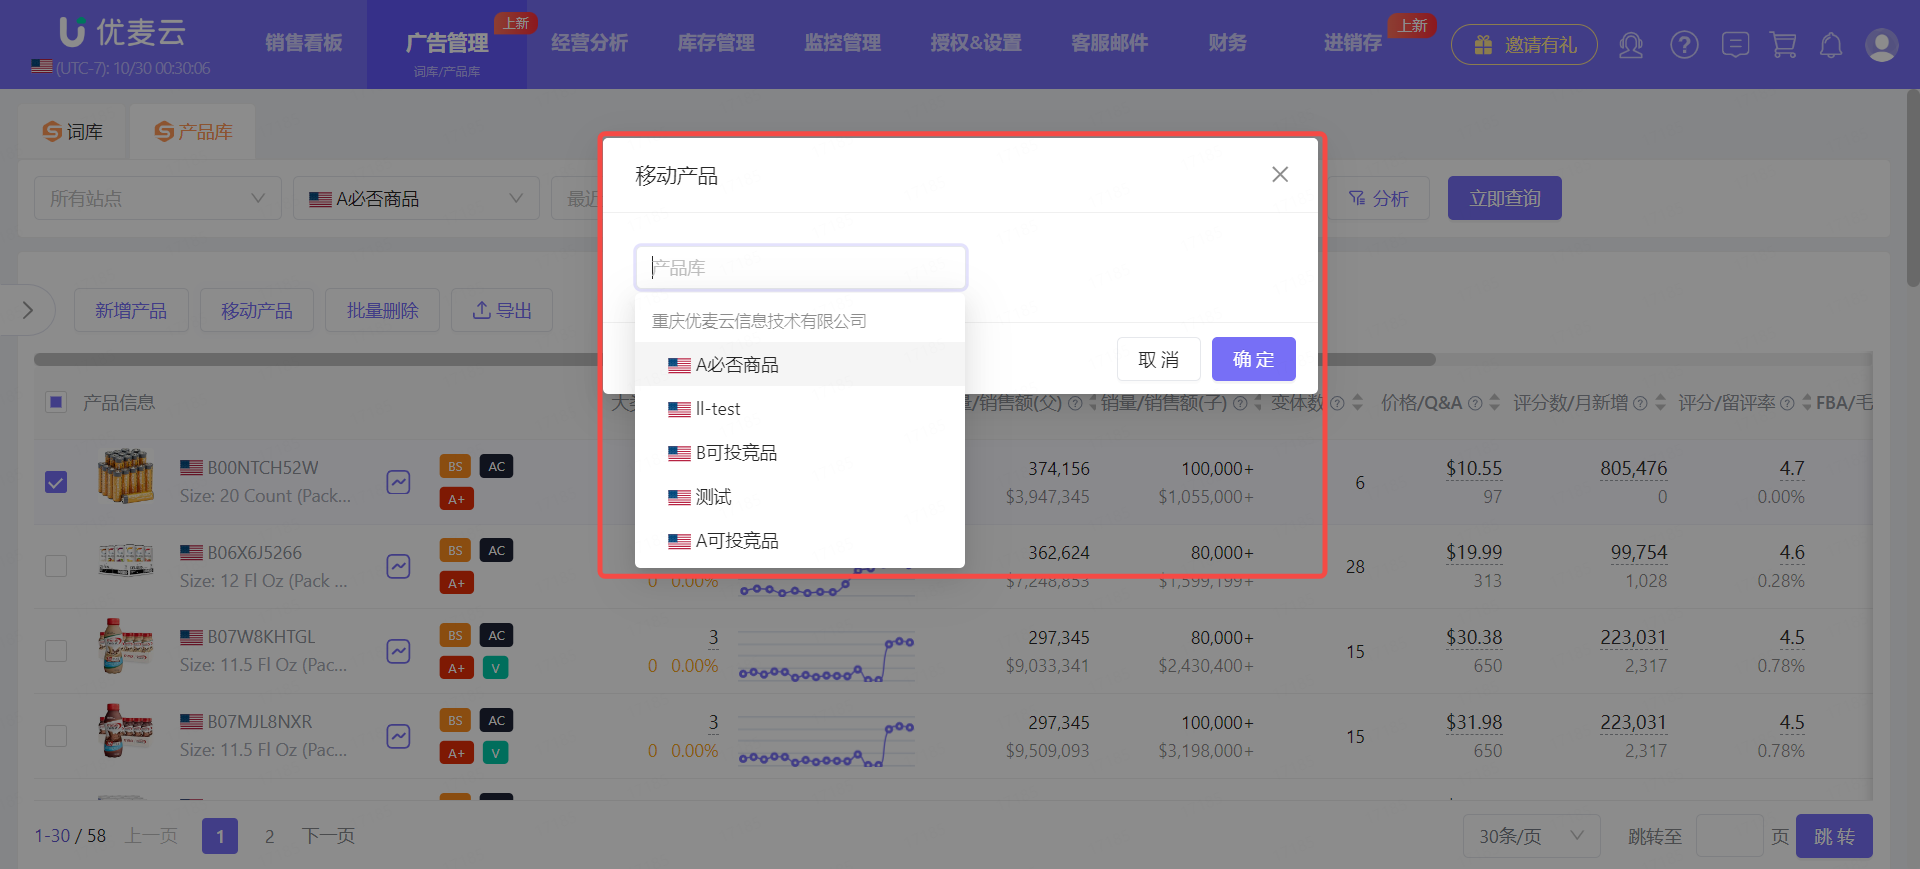
1) Moving Products
If you encounter a situation where you have assigned products to the wrong Product List, or want to re-divide the products, you can choose to move products.
Check the product keywords to be reassigned to the Product List, click [Move Products] to reassign the Product List for the products.
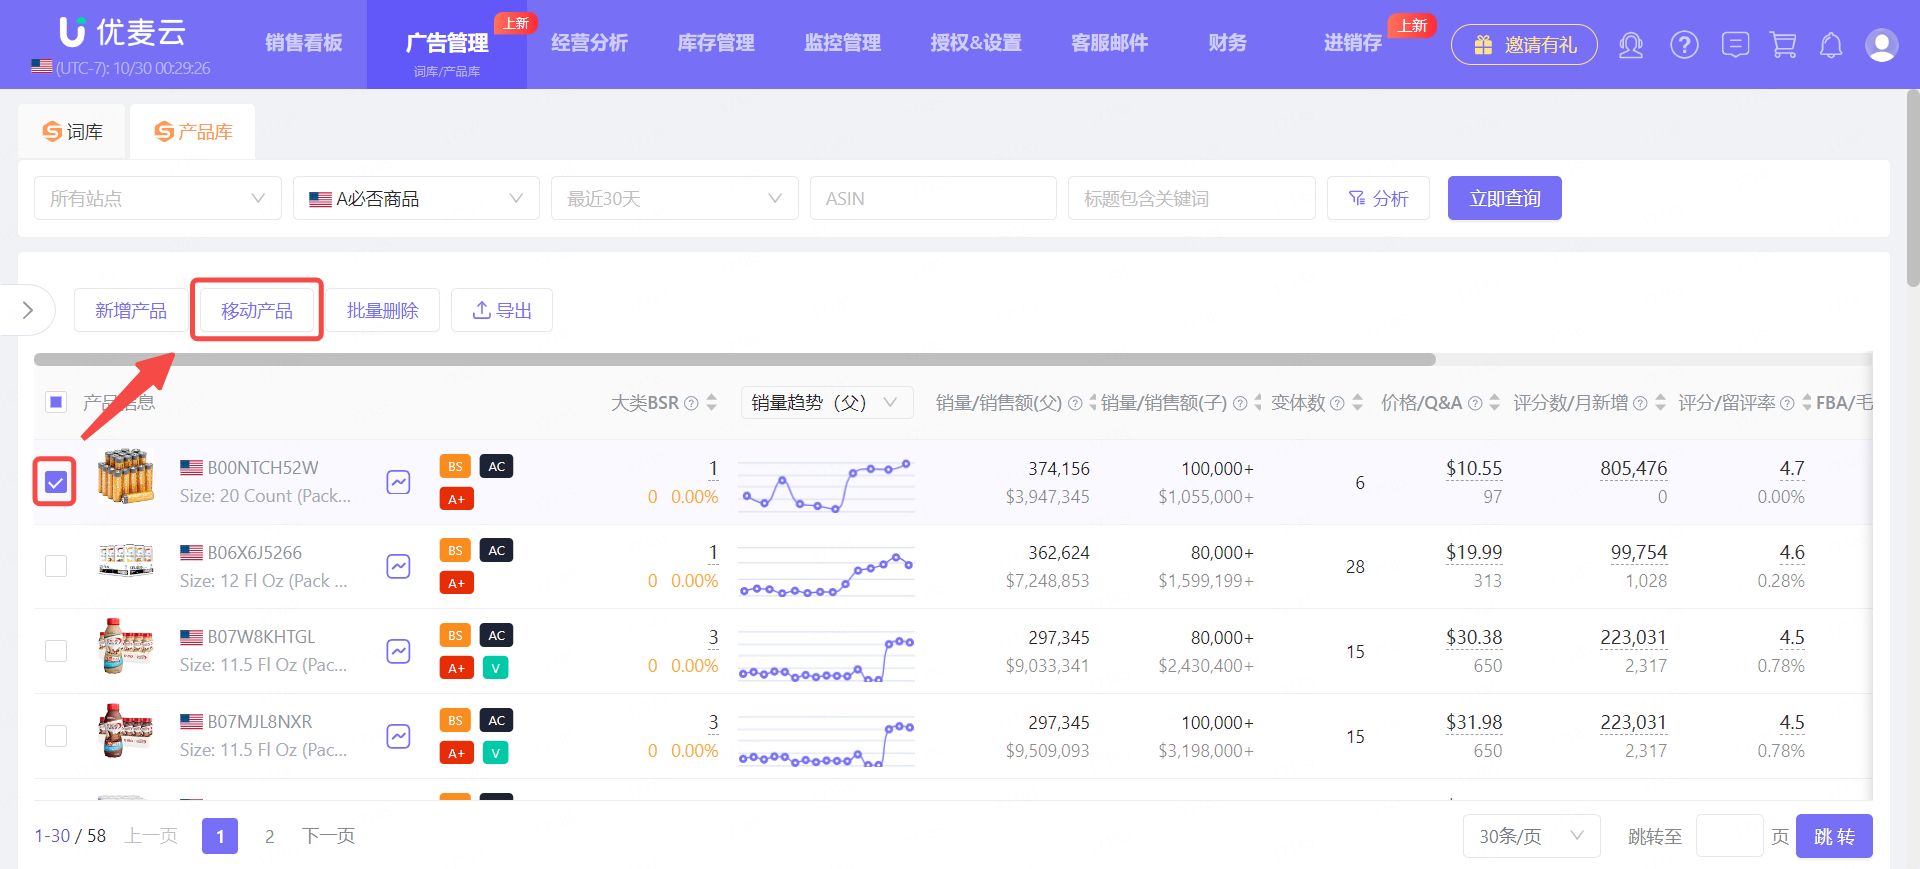
Enter the "Move Products" page.
Click the Product List column, select the target Product List, and finally click [Confirm] to complete the move.
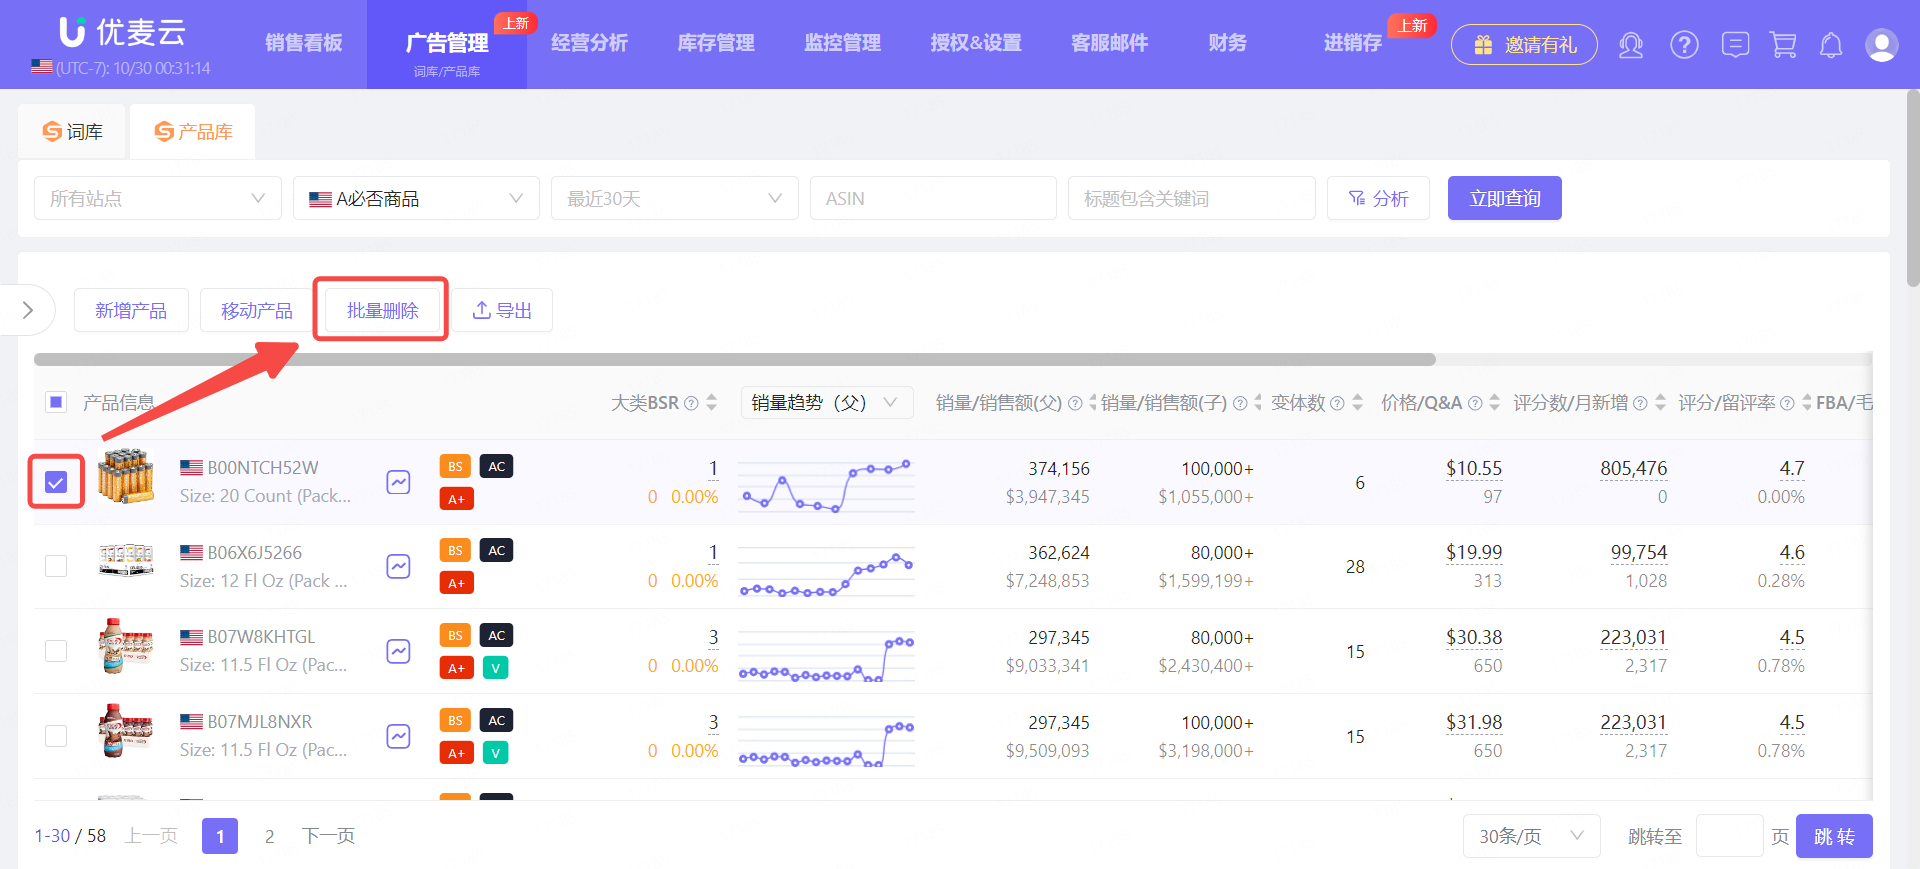
2) Deleting Products
When we no longer need a product, we can choose to remove it.
Check the products to be removed and click [Batch Delete] to delete them with one click.
3) Exporting
The currently selected Product List data supports exporting to an Excel spreadsheet. Each Product List needs to be selected and exported separately.
Select the corresponding Product List, and then click [Export] to export it with one click.